Transcripts
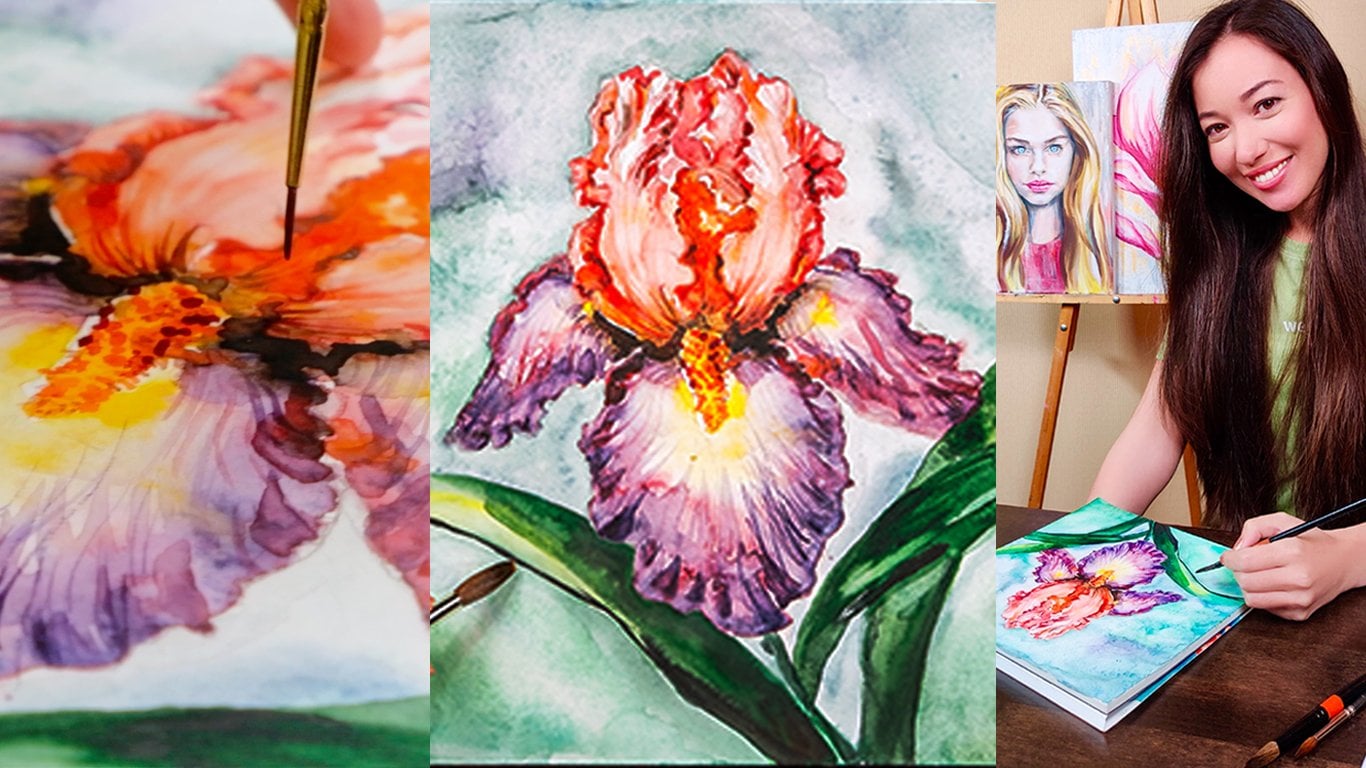
1. Hello & Welcome!: Hello and welcome to my watercolor class for beginners, you don't need any skills to make this floral illustration. And I will show you how easy it is. We will start by laying down supplies. Then we will learn fun wet on wet technique while painting an amazing and unique flower, the bird of paradise. If you are new here, you're very welcome to my channel. Please don't forget to subscribe and have a look at my other watercolor and acrylic classes. So welcome to the magical world of watercolor. Let's begin.
2. Materials You'll Need: I will start our glass with quick supplier and down, I'm using cold press paper. It's on block, which means all pages are glued together. And it's really nice for painting on. I'm using white swan 250 gram. But you can get canceled budget, but good-quality. You will also need a few brushes in different sizes. I'm using professional paints, but depends where you are located. If you're in Europe or US, you can get nice. Winsor and Newton said. And also on students quality watercolors will be good enough. You will need pencil and eraser, a color palette for watercolors. And please don't forget to glasses of clear water and some paper towels for blotting.
3. Pencil Sketch - Bird of Paradise : Let's start our class with simple pencil drawing. First of all, let's find the right location of the flower right in the middle of your paper. So we'll start with the stem on the right side and then we draw modified leaves. Don't press too hard on your pencil. We're just looking for the right place. And then pedals. The orange ones on top and the blue ones, very thin ones on the sides. So once you're happy with the allocation of your flower, now we can start to find the right shape and make all the lines more defined. And also tried to keep the right proportions between different pedals. So the biggest one is that modified leaves, that horizontal one. And then other pedals are slightly smaller. And they have this beautiful round shape and very fem endings. And make sure you, you draw each petal. So afterwards it will be easier for you to work with watercolor. Also, don't press too hard on your pencil. Because I'm doing it just for you to make it more visible on the video. But with watercolor, it will be very difficult to cover all your strokes, pencil strokes, or you should erase it afterwards. Okay, make sure you draw all the details of this beautiful bird of paradise flower. And very carefully the small details of those blue paddles. And as you can see, there is one more leaf and the stem. And here you can make sure that you draw it. And each petal is actually very unique. They are never the same.
4. Painting Stem & Leaves - Wet on Wet: And now we're going to start with watercolors. So first of all, bled so bad, all your pains. So it will be easier to work with them afterwards. Just make some water drops, quite a lot of water on each paint. And now we can add, try wet and wet technique. You just fill up the first stamp with water. Completely. Make sure you go through all the corners. And then let's take some emerald color, green emerald, and just start with it. Also, you can take some green color. Look how beautiful it is. And you just make this simple line right in the middle and you leave the corners. So now you take in, you should take some yellow paint and make the line on the left side. And then also with some lemon paint. Let's make the line on the right side. So this way we're getting this beautiful volume very easily. Then we're working with water. I'm putting quite a lot of water on the continuation of the stamp, but make sure you don't touch the previous stem. So just leave small gap in between of them and hungry. This part is, let's add some paints. First of all, I'm adding some green color. Then I'm adding some yellow, lemon yellow color. And all of that is on the left side. Then I'm taking some green and emerald green and some brown mixing it all together and putting some pain tropes on the left top corner. Taking quite a lot of paint because afterwards, when it's dry, it would not be that intense. And I'm taking some red color or you can actually use some pink color. And you added on the right side. Then you get this beautiful rainbow effect. And then some yellow. And it's very fast and easy now we're covering that modified leaf completely with water, quite a lot of water. Make sure you don't leave any gaps very carefully along the edge. And let's take some beautiful emerald color and added on the bottom side. Then I'm taking some ultramarine blue color and some violet and a touch of black. And I'm adding up some more contrast. Then blue, then a bit of pink. And look how beautifully paint spread all around. And it's mixing itself very nicely. I'm adding some violet color by mixing some pink and blue color. So we're making this beautiful transition. And now I'm adding more of emerald green on the bottom side. And also a small brush. You can fix all the edges. Make sure they're smooth and very accurate. Now, I'm using up some more green color and dragging it all towards the tip of the leaf. Also taking some lemon yellow color. To finish the tip. You can also take brush a bit smaller if you're not comfortable with the one you're using now. And as you see, there's also some red on top. So let's add it to very carefully. Try not to touch your green color. And also take quite a lot of thread. So Toby, feasible. And then n-bits of orange. Look how interesting it books now. And now I'm going to add some yellow in between green and red just to make sure that transition would be nice. But we wouldn't get this very dirty color that we don't want.
5. Painting Flower Petals - Bird of Paradise: Awesome. I'm getting some blue-collar to make those field petals. Getting some ultramarine color. That would be nice. And with the same brush. Or you can, again take smaller brush and you're just filling it up. This time it's really up to you can draw like wet-on-wet or you can just paint on dry. And then you can fix everything with a small brush. Illustration will look much better if you actually make your lines more straight. So every time you can just take some time to fix the lines. And don't worry if your handshakes, with practice it will disappear and your lines will be better and better. The SRE from the first try, you will make nice straight lines. Also, I'm going to remove a bit of color right in the middle to add up some volume this way. And you just wash your brush and you remove the paint. And then you can just help with the tissue to remove extra paints from, from the brush. This is the very easy way to work with watercolors. Then I'm working with the next petal with the same blue color. Just covering it completely with the small brush. Make sure that you go through all the corners, all the tips, and tried to make the lines nice and round with fine ages. So just add up more paint. And now I'm adding a bit of pink. That would be quite nice to have different colors. This way your illustration will look more playful, more fun. So try never to use the same paints everywhere. And with watercolor, it's really nice when you mix different colors, different shades. Make sure you made a beautiful TPS and you have this fine lines. And now I'm covering next petal with water. And we'll add some orange color on your brush. And start with the right side. Also, you can add a bit of red color that will be nice. Then take some orange and just make some lines in the middle. And then I'm taking some yellow color and making lines on the left side. So we're also getting this beautiful transition from yellow to red color. And as you see the beginning of the flower, the root is actually a very light. So I'm going to just remove an extra paint. And I'm going to add a bit of more yellow and some more red color. On the right side. Don't be scared to add up quite a lot of pigment. If it will be intense, it will look very nice. Then let's cover next petal with water. We're going to use the same technique. Just make sure you don't touch your blue panel next to it. But don't worry, even if you will, I will show you how to fix that problem. And we'll cover all of them because they're actually attached. And as you can see, those petals are sort of naturally glued together. So we're covering them all with water very carefully. Don't forget about the tips. And then we're taking some orange color and some yellow mixing together. And go through the left side of the first petal. I'm dragging the paint all the way down. Things some more yellow color and orange mixing together and adding it up. Then we're doing the same thing with the next petal and adding some more yellow color. Okay, So if you touched a bit of blue color on that, the paddle, don't worry, can take another brush and just make remove extra paint and then you can help to remove it to a tissue. Can this problem will be fixed. Then I'm covering the third petal with orange color very carefully and everywhere. Now I'm using orange with yellow. Make sure you leave a bit of gap between the petals. That white gap. Okay? And if your blue color is spreading out, so you just wash your brush and then simply remove that extra paint. And I'm covering it all with orange. Make sure you add more pigment. So then that would not be visible anymore. It's very handy to have a very thin brush. And I'm going to work with edges. And as you see here, on the root of the petal is also quite light, so I'm just adding some more water than dragging the paint down. Make sure you go through all the petals and you add up paint everywhere where it's needed. And yeah, with bigger brush you can work on the next petal. I'm just adding up some more paint. So you see now it looks brighter. And petals start to stand out. Also fixing some lines with a small brush.
6. Final Touches & Background - Bird of Paradise : Then you take the big brush and let's add some more color. I'm taking some red paint and adding it up on the right side of the petal. And that would be beautiful mix of colors as in quite a lot of pigment. And I'm doing the same with the first battle because as you see now, it's dried and it's getting dry, not completely, but still. And some of the feigns already getting very light and the intensity is disappearing. And with the same, same way we are working on the other petals, just adding some red color on the right side of it. And we're leaving the left side untouched. And again, with the corners, I'm working with the smallest brush. I'm going to add some lines, very few and nice of red color. Right in the middle. Can get on the left side. Then I will mix it up a bit. Now I'm going to add a bit, the blue color on the petal in the middle. So we will cover completely that the film mistake that we can also make this pedal more defined. And also I'm going to work a bit more on the pedal on the left. And I'm gonna make it more intense. Also now we can add up some volume by removing an extra paint from the left side of the petals. Just wash your brush with water and then remove the paint. And you can do it on each petal. I'm so removing some paint, helping with tissue to remove color. And I'm washing my brush again. And doing the same with the middle petal and mixing that thread pain that we had already and just helping it to mix nicely and wanted to look more smooth. Adding up some more orange color. And I'm taking a bit of dark color to make tips, modifying. Just a touch. And now I'm working with each panel. You can take your time to work on details as much as you want and feel like. Also with that modified leaf. I'm making that keeps a bit darker. So now it's more defined and you can see it properly. And the same with the leaf in the bottom and with the blue petal as well. Then make sure you mix it. And it blends in very nicely. And now I went to work a bit more on the stamp. And let's read it up. And let's make, let's make just one simple line with very strong and dance green right in the middle. This way we will get that volume that's missing. And you should now it's again like start to stand out and I want to add up even more dark color. So I'm just adding up some more contrast on each petal. Mainly on the right side. And I'm at NAB, even more green color right on the stem. In the middle. You just make this very straight line with a green color. Then you can mix a bit on the sides. So you just blend it a bit. And now we're going to work on the background. And I will show you a very fun and easy technique to make your background TO playful and nice and it's super easy. So let's take some water on your brush, and then let's take some yellow color and less than splash it on your painting just with your brush very easily and tried to make different dots. Some of them will be small, some of them will be big. And if you're not happy with some dots, you can easily remove it in the tissue. And you can also dip your brush into the water, then added on the DOD and then remove it to tissue this way for sure you will remove it. So it's super easy to fix it. So the hallway and just enjoy the process. And also if you have any splashes on your flower, you can always remove it with tissue to and now we're getting some orange color. And I'm also adding some more splashes in different directions right from that center. This time I'm trying to make those a bit smaller. And you see you get this very interesting effect. And I'm adding a bit of water and orange color. Hello, has also splashing it in different directions. So I'm very proud of you and your work. Congratulations, who were the bird of paradise flower illustration. I'm sure you had a lot of fun. And now you have enough skills to continue your watercolor journey with me. And you can join me for the iris watercolor painting. That's a bit more complicated, but it's very beautiful. And I'm sure you will be very happy with your results. Also, don't forget to subscribe here and on Instagram. And please share your artwork with me and other students. And I will be happy to give you feedback and some advices. So, congratulations on your watercolor class. Let's continue our journey together.
 Alexandra Ali, ARTIST, ILLUSTRATOR, ART DIRECTOR