Transcripts
1. Intro: [MUSIC] Do you want
to make short videos of your art for Instagram
Reels and TikTok, but you're not sure
how to get started? Then This class is for you. Hi, I'm Julie. I'm an artist, surface designer and entrepreneur from
Vancouver, Canada. I'm also an online educator, teaching other artists about how they can sell their own art online through my blog and
now here on Skillshare. I love making short
videos of my art and coming up with fun and
creative video ideas. I decided to create
this class to show you some really simple ways that you can make short
videos of your art. No, you won't have
to lip-sync dance, show your face, or even talk. In this class, I'm going to take you through
how to set up and film two simple
videos of your art. Then I will show you how
to edit your videos. I'll also show you all the different places where
you can post your videos. Finally, I'll leave you with some more ideas and
tips to help you on your way to creating more
short videos from your art. All you're going to
need for this class is a piece of your artwork, a few props if you
have them, your phone, and some free apps, I'll show you more about
that in the next lesson. Are you ready?
Let's get started.
2. Project and Orientation: [MUSIC] During today's class, I'm going to be demonstrating
how to film and edit these two short
videos that you can replicate in your own
home or workspace. For your class project, I'd love for you
to share a link to the short video you
created from this class. You can just post a link, or for bonus points, you could share a photo of your filming setup
for us all to see. For today's project, we're
just going to be using the built-in camera
app on our phone. We're also going to be using a free video editing
app called Inshot, which you can get from
the App Store for both Android and iPhone. You will also need a piece of artwork that you want to film along with a blank
piece of paper or canvas of the same size. Optionally, you can also gather some background texture or some props to make
yourself more dynamic. If you've got all
that ready to go, then now we can move on to
the next lesson where we're going to be filming our
videos. I'll see you there.
3. Filming the Videos: [MUSIC] First we need
to make our set, and then I'm going to
take you through filming two super simple videos
of your artwork. For your set you can just have some background and add a couple of props
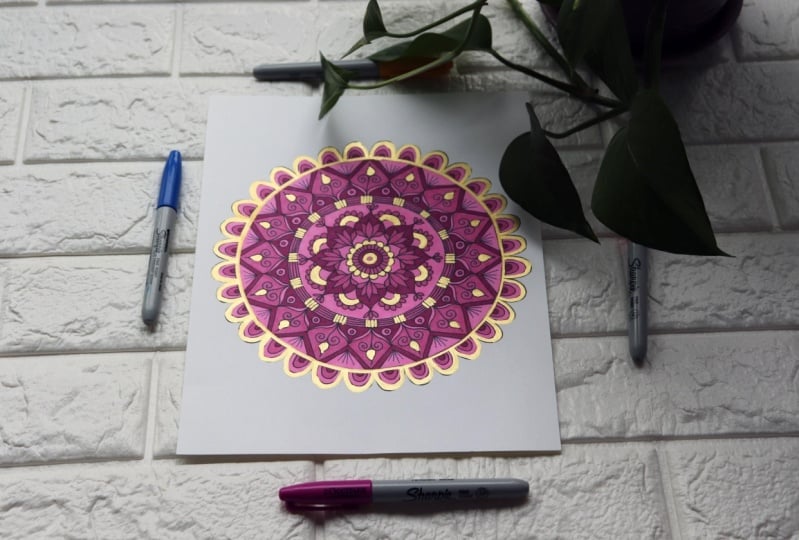
like I'm doing here. I have this faux brick
texture background, which is actually
a wallpaper sheet. You could use a blanket or just a section of the
floor or your desk, try to find a good spot to film that has really
good lighting. In a window like
I have here here really great if you can do that. Or you might need
to move some lights around or move some other things around to get some really
good lighting for your video. Just keep in mind that
this video is going to be filmed in vertical format, so just think about that
while you're setting it up. Make sure to have some space on the top and bottom
of your artwork. To film both of these videos, I'm just going to be using the regular camera
app on my phone. The reason I'm doing that
is mainly because I want to be able to post to
multiple platforms. Let's get started
on the first demo. Just starting with the built-in
camera app on my phone, I'm going to go over to video. I have it on a nine by 16 ratio. We're basically
going to start with our phone right on
top of the artwork, really close up, so it's blurry. Then I'm hitting
record and just really slowly bringing it back up
until it comes into focus. You might have to
practice a couple of times just to it right. Then at the top you can
twist your phone back and forth a little bit and then
hit Record again to stop. That one's done for now, let's move on to the
second video demo. This one's similar
but a bit different. We're going to take that
blank piece of paper that we have and just put it
over top of the artwork. This time we're going to
start filming from the top. I'm going to hit Record, and then I'm bringing
the phone down quickly and then hit
Record again to stop. Then I'm just going to slide that piece of paper
out from underneath the phone and trying to keep the phone in the same position. Now I'm going to hit
Record again and slowly, maybe not as slowly
as last time, but slowly bring it back up to reveal the artwork and
hit Record again to stop. Now you should have three
different clips to work with. In the next lesson, we're
going to edit those clips using the InShot app
that I mentioned. Make sure to go
ahead and download it now if you haven't, and I'll see you in
the next lesson. [MUSIC]
4. Editing the Videos: [MUSIC] Now we're going to edit those video
clips that we filmed in the previous lesson. We're going to use
this InShot app that I mentioned, which is free. You can get it in the App Store for Android and Apple iPhone. I've added that first clip
that we created into the app. I'm just hitting play just to make sure that
it's the right clip. The first thing I'm going
to do actually is go in to that little music icon
and remove the audio. I'm clicking on this clip
and then extract audio, and then click on the audio
section and hit Delete. Now your clips should
have no audio at all. In this app, you can
also edit your video, like change the canvas size
and crop it, or use filters. You can also adjust the
amount of the filter, similar to Instagram,
in that same way. Here you can also change the speed settings so you can make it like a
time-lapse video. You can see here now I've made the clip around 10 seconds. If your clip is a bit long, you might want to just
shorten it so it's between 10- 15 seconds long. Now we'll just watch
our video again and see how it looks
at that speed. I might just slow it down
a little bit and make it closer to 10 seconds actually. Now we're going to hit Save on the top right and
use these settings. Turn at 30 frames per second. Now you got to watch this ad, which I know it's annoying, but it's a free app and they don't put any watermark
on your video. This is how they get paid. You can just ignore
it and then hit the little X on the
top to get rid of it. You just see a little
checkmark where it says it's saved to your gallery. In your images gallery
on your phone, there should just be
an InShot folder. Then you'll see
your video there. Now we can just watch
our edited video. This is our final video and I think it's pretty good.
I'm happy with that. Now let's move on to the second video and we've
got two clips this time. We're going to go back
into our InShot app and we're going to hit Video, create new video and hit New. Then make sure you
select the two clips that we need in the
order that we want them, so from the first video
to the second video. We're just going to hit
play and see how it looks just without any editing. It looks pretty good actually. It came together just
as it is, to be honest. But we're still going to
tweak it a little bit. We're going to get rid
of the audio like we did in our first video. I always try to do that first
just so I don't forget. If you don't do
that, you can have just some really weird audio. Especially if you speed it off, it's going to found
really funny. We're going to add music
in the app anyway. Getting rid of that audio is
the first thing I'm doing. Here I'm just going
to add a filter and [inaudible] it
up a little bit. Pick a filter. We're just going to pick
this bright one here, just brightens it
up a little bit. Then if we click on this little double check mark
that's going to apply to all the clips so
they all look the same. Now you can see both
clips have it applied. We'll just watch the
video through again. Now I don't know if you
can see but there's this tiny little slash thingy
in-between the two clips. I'll bring it closer
here so you can see that little white
slash button thing. We're going to click on
that and then it's going to give you this transition menu. All the basic ones
you can add for free. Otherwise you have to upgrade to the paid version of the app. Let's just look through
some of the transitions. There's a bunch of fun
ones I like to use for my videos swiping
left and right. Or there's some more
like blendy ones. Actually l like that
one quite a lot. I think that's the one I'm
going to use for this video. I found that transition now, let's just watch
it through again. That's looking pretty good. I think I'm happy with it. Now I'm ready to save it again, hit Save use the
same settings there. We just have to watch
that advertisement again and hit the
little X next to it. Then you should see it saved that little green
checkmark again. You can just find it
in the same place in that InShot folder
in your gallery. Let's just watch our
final video again. It looks pretty good. I think it's awesome actually. I'm really happy with it. I hope yours looks the same. Here's the final video again, and I think we're
ready to upload our video to some different
social media channels. I'm going to show you those in the next lesson.
We'll see you there.
5. Posting the Videos: Now we're going to upload
those videos we made to some different
social media platforms. Now I'm not telling you
to post to all of these, just the one or two
that you're already using would work just fine. I just wanted to show
you all the options. I'm going to start
with Instagram Reels and that one's probably
the most popular. We're going to get started
by hitting that little plus sign and posting a real. To upload your video, you're going to
click on that little plus sign in the bottom left and then just
select your video. We'll just watch
it through to make sure it's the correct video. Then you're going
to hit ''Add''. Now from here we're
going to click on that little music icon and we're going to add some
music to our video. You always want to
make sure to add some music to your video. Hit ''Done'' to add your music. Now you can click this
preview button and just watch it through one more
time with the sound. [MUSIC] There's some other
options up here on the top. You can add filters. There's all kinds of
filters you can add. I'm not going to use
one for this video. You can also add
text to your video. Now I'm going to hit ''Next'' and here's where we
upload our video. I'm going to click on "Cover." This is where you can
select the cover image. You can select it
either from the video itself or you can add from
your gallery as well. Select that and hit ''Done.'' Now here you can write
whatever caption, add a location and crop
profile image is good because then you can
adjust it for how it's going to show up on
your Instagram feed. You can play around with
that and then just hit ''Share'' or ''Save Draft'' depending on what
you want to do next. The next one I'm going
to show you is TikTok. You're going to go into
the TikTok app there. From your main feed, you're going to click on
this little plus button. This time you're going to
upload from the bottom right. Just click on that and
select your video. Hit ''Next'' and just preview the video once again to make
sure it's the right clip. You can see some filters and other options here on the right, but we're going to
click on ''Add'' sound. Here's where you
can add your music. You can either add some
favorites that you've saved from other people's videos or just
use the recommended one. You can select your sound
and also adjust the audio. Just turn off the original
audio in case you didn't remove it and watch your video through one more
time and hit ''Next.'' Now here you can
select your cover just like we did on Instagram. Just select part of your video
and you can also add text. If you wanted some
descriptive title to show up on your main feed on TikTok, you can do that here. Here you can add a short
description and a few hashtags. I usually just add 2-4
hashtags on TikTok. There's some other
settings here. I usually just leave
them as they are. Here you can either save it
to draft or post your video. Now we'll move on to the next
one, which is Pinterest. If you have a Pinterest account, I definitely recommend
uploading to Pinterest. Go into the app. From the Pinterest app, we're going to also click on that little plus button
just the same as the others and click
on ''Idea Pin''. An idea pin it's pretty
much just the same as a real or a TikTok video. Click on the bottom
left to upload and select your video
just like we did. You can also add multiple
videos if you want. On the bottom you can add a
few options, text, stickers. I don't really use that
too match on here. I'm not going to add
music this time, so just hit ''Next''. You can edit the
cover just like we did in the other apps. Now you can add a title here, just something short
and descriptive. Then you can add notes where I like to actually
add my website, just a little link there. Pick the board that I'm
going to pin it to, which is going to be my
mandalas for it here. Now here I'm going to
tag related topics. This is where you
can add tags so that Pinterest knows
what your post is about. I'm going to add a few of
those and hit ''Done.'' There's some other options here, I just usually leave it how it is and now it's
ready to publish. I'm going to go ahead and
publish this. It's done. Now you'll see it on
your Pinterest homepage under your idea
pins. There it is. Now we'll move on
to the next one, which is YouTube shorts. On your phone, you got to
go into the YouTube app. You can actually upload shorts from the desktop right now. You're going to hit
that plus button and click on ''Create a Short''. Starting to look
really familiar. You're going to add
from the bottom left. Do your clip and watch it
through and hit ''Add''. Now I'm just going to hit that
checkmark to add the clip. Here again, we
want to add music. Now you can only
add 15 seconds of music on YouTube
shorts right now. My video is under 15 seconds, so that's not going
to matter right now, but just something
to keep in mind. Now we're watching it
through again with the sound just to see how that
looks and hit ''Next.'' Now here again, you
can add your title, but that's actually
all you can do here. I'm going to add a
pretty descriptive title and then this is
really important. You've got to add
a hashtag, shorts. In order for YouTube to
recognize it as a short, you've got to put
that either there or in the description which you can update later once
you're on your desktop. Go ahead and hit ''Upload
Short'' and that'll upload it to your
YouTube channel. Now if you're familiar
with YouTube at all, you can actually go into your backend under
manage videos. That's where you can
actually edit your short. You can actually edit
the description there, go in and actually
edit your title, add a description, add
a custom thumbnail. You could also add tags and
everything else that you normally do in your
YouTube channel. Now we're going to move on to our final social media
platform, which is Facebook. Now, I don't spend a ton of time uploading to Facebook anymore. I just have a page for my art which I post to occasionally. These short videos I just posted as a regular post to my feed. They do have reels on Facebook, but I just like to post it
as a regular post instead, I just feel like more of
my followers are going to see it rather than if
it shows up as a real. So I'm just uploading
it the same way. There are a few filters and text you can add
in the Facebook app. But otherwise, I just
posted like that without any hashtags or anything and that seems to work
well enough for me. I hope this lesson
was helpful for you. Make sure to stick around for the next lesson where
I'm going to leave you with some final thoughts. We'll see you there.
6. Final Thoughts and Tips: [MUSIC] Well, you've almost made it
to the end of this class, but before we go, I wanted to just leave you
with a few final tips, and some ideas to help
you along your way to creating more short
videos of your art. My first tip is to make it as easy on yourself as possible. You can get something
like this phone arm, I have attached to my desk. I just got it from Amazon. You can easily set it up, or just keep it there. That way you can
just quickly film, or setup time lapses of
whatever you're working on. When you are filming, make sure to think about your
lighting, and you're set. If your hands are showing, make sure to do your nails, or at least make your
hands look presentable. I often forget this step, and have chipped nail polish, and other stuff that
doesn't look great. [LAUGHTER] Also, just use
what you have available. You can just gather some
background textures from around your house. Use some of your art supplies, use some plants, just use
what you have in your space. I also recommend
creating in batches. If you've already set up
your set like we did today, you can film multiple
videos using the same set. You should also watch
other people's reels, and gather inspiration
for your own videos. You could also consider putting an art spin on a trending video. In this class, I
took you through creating two short
videos of your art, and then posting them to a variety of social
media platforms. I hope I've made creating, and posting short videos of your art a little
less intimidating, and I hope I've filled
you with confidence, and creative ideas to continue on your
journey with a video. Make sure to post a
link to the video you created today in the
project section. You could also include a
screenshot from your video, or just a still image
of your filming setup. You can follow me here on
Skillshare so you'll get notified every time
I post a new class. I also invite you to join me over on Instagram
@Julieerindesigns, or on any of the other
social media platforms I showed you today. You can also find
out more about me on my website,
Julieerindesigns.com, where you can find lots of info about selling through
social media, to sell your art
online, and much more. Thank you so much for taking
this class with me today. I hope you have a great
rest of your day. Cheers.
 Julie Erin Designs, Artist and Entrepreneur