Transcripts
1. Introduction : Hi, my name is Mary Marine, and I am so excited to
bring this course to you. Are you a beginner or you just looking for an easy
project to make? This course is definitely for you because I'm
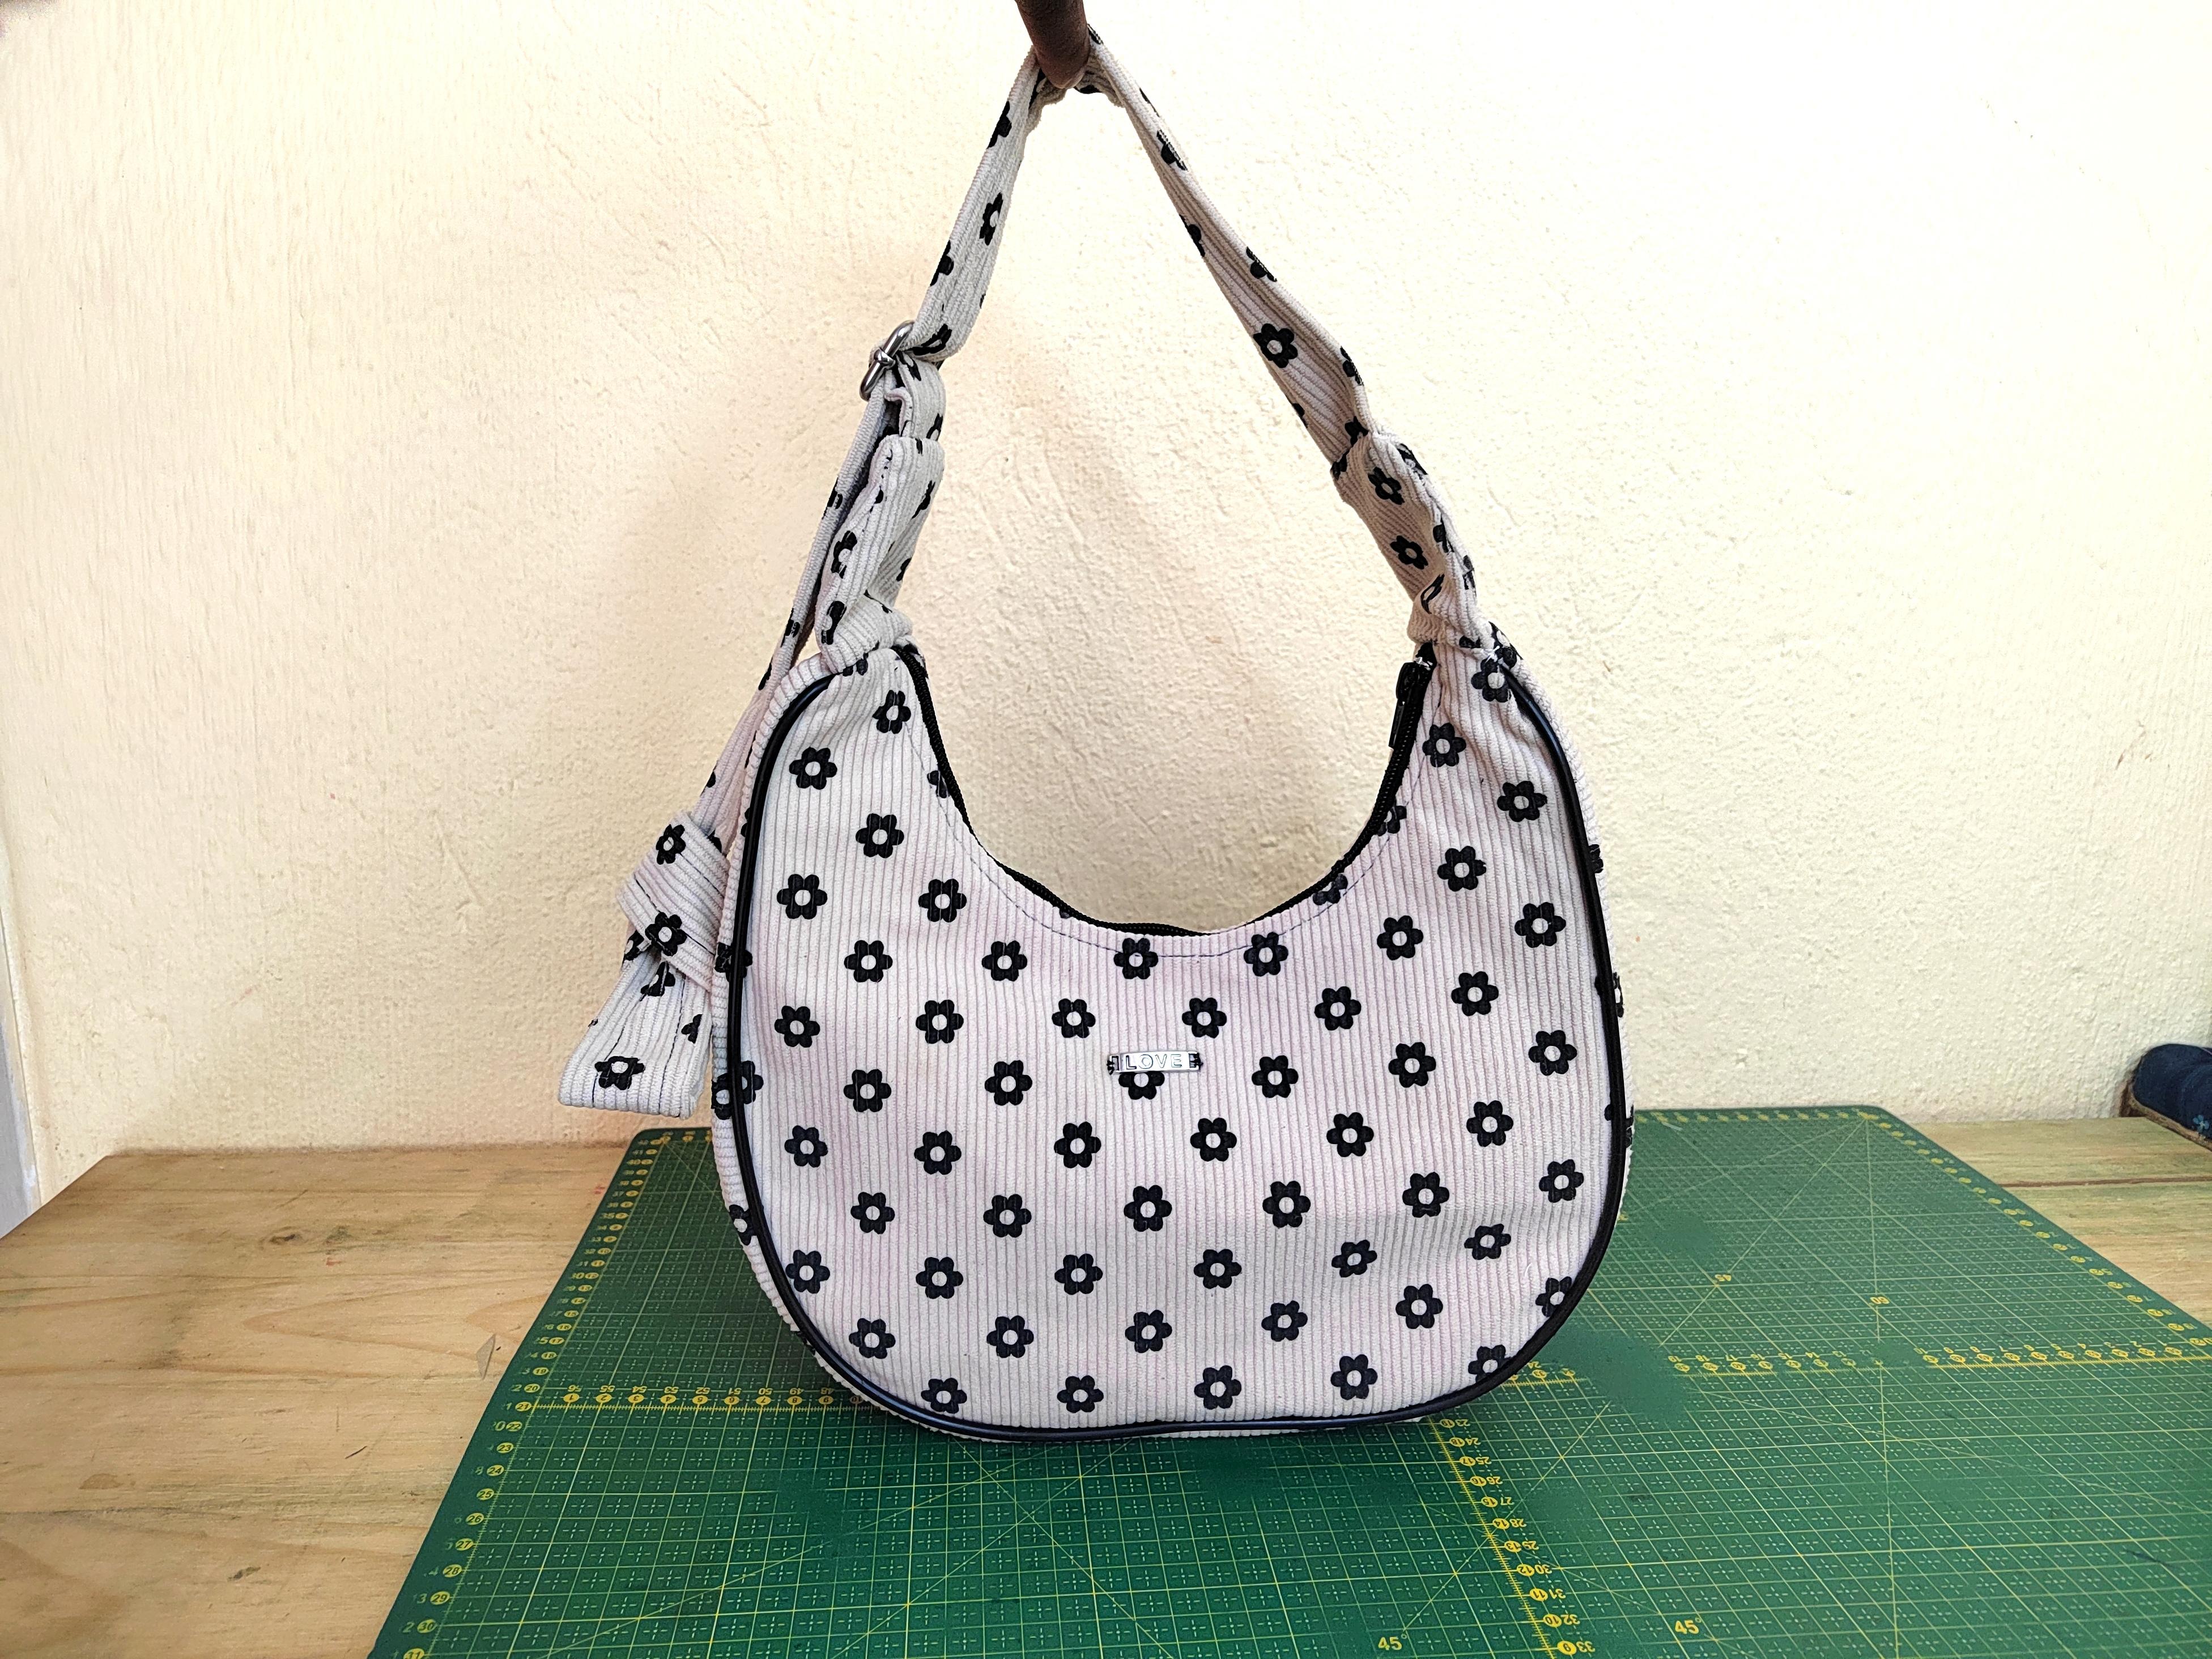
going to share with you how to make this beautiful
handbag that has an adjustable strip and
also an inside pocket. It is so easy you don't even need much because I'm
going to share with you the types of
tools and materials that you're going to need
for this simple project. By the end of this course, you will definitely have
a beautiful handmade bag that is made with
your sense of style. You really want to
see how it is done, so stay tuned, and let's
begin with the first lesson.
2. Bag Pattern Drafting.: Welcome. In this lesson, I am going to share
with you how to actually draft the bag pattern. We're going to start with
the main bag front pattern, which intrudes the bag
and also the side panel. What you're going to need is your pattern paper and also
your ruler and your pencil. So let's get started. So you're going to grab a pattern paper and
you're measuring tape, and you're going to start by making the length of the bag, which is around 23 CM. And then once you've
marked your 23 CM, we're going to
followed by the width, which is around 14
centimeter wide. So now you're marking
your rectangle over here and it's time
to create the shape. So I'm going to start
right on the top. I'm going to mark 9.5 CM. And then we're going to mark
this line across the shape. And then from the top again, you're going to mark 12 CM. In order not to confuse you, I'm going to use my
alphabets, A, B, and C. So from point A, I'm going to mark
12 CM going down, and then mark or extend
this line across. Then from A, I'm going
to go in by two CM. Then next to that point, I'm going to connect
it to the 12 CM mark. Now, once you are
done doing this, you want to mark
here from point A, you mark 2.5 CM again. And then right on that point, you're going to mark 0.5 and then connect this two
point with the slanted line. Now, right here on
the nine CM point, I am going to use
my curved ruler, which is going to touch
the nine CM line, and I'm going to create
a shape like this, which is going to be
for the bag opening. And then for the
base of the bag, I am going to use my
curved ruler and also connect from the 12 CM
all the way to point C. Make sure that you fix
any pointed edges. And just like that, the
bag panel is complete. Take note that I used a folded paper and you want
to cut your pattern on fold. Now it's time to
add seam allowance. I am going to add one
CM seam allowance all around the bag. Now, once the
pattern is complete, this is how it will look. The next thing is to
create the panel. So we need to measure all
around on the first line, carefully measure
around this area. And mine is 34 centimeters. I'm going to take a
new pattern paper and just mark 34 CM. By ten CM, which is going to be a rectangle of around
34 CM by ten CM. Yours at this point might differ based on the
measurement that you find. That is why it's very important for you to actually measure the bag panel prior to
actually making the panel. So once you're done grating
the rectangle like so, from the bottom, mark ten CM. 10.5 CM from the bottom, and then mark the line across the shape and then
right here on top, you're going to mark
two CM on both sides. Now, you want to connect
the 10.5 CM to the 2.5. And you're going to do this on both sides and your
side panel is complete. Now you want to go ahead
and add Sam allowance. I'm going to add 1
centimeter Sam allowance all around the pattern. Now, once you're
done, it's time for you to cut out this panel piece. Prior to cutting your pattern, make sure that you do identify that this piece is going
to be cut on fold. Don't forget to identify your
notches right on the panel. This include also on
the back panel piece. Now moving on to the side
pieces for the strap, I'm going to mark
seven CM by 6.5 CM. So now, right here on top, I'm going to go in by one CM on both sides and then connect this from one CM to
zero right at the bottom. Once you're done, go
ahead and cut it out and trace it again on
a new patent paper. Then add one CM of seam allowance around
the side panel piece. So these are all the panel pieces that you're
going to need. So this one is going
to be cut times four, back and front,
including the lining. And also, you have
your side panel. Make sure that you do
identify the notches, and you want to make
sure also it will fit around the bag prior
to cutting on fabric. And we have our side piece, which are going to be
cut times four, also. Make sure they also
fit on the side. So we are done over here, see you on the next lesson.
3. Material, Pattern Layout And Inside Pocket Zip. : I I've got all my
materials that I need. The first one is the hard facing to give
stability on the bag. As you can see, one side is shiny and the other one
is meted, the other side. And I've got my corduroy
fabric over here. It is non stretch
and also lining, which I'm going to use
stiffening to give it stability. And you will need your
slider for the strap, and you will need to zip. The other one is 13
centimeter long, and another one is 53 CM long. So these are all the materials
that you're actually going to need for your backpack
or for your bag. So to cut out this pattern, I am going to fold
my pattern in half. So because I want to say fabric, I am going to cut the
panel on two pieces, and I add it like one
CM right at the bottom. So as you can see, I'm
cutting out two panel pieces. I'm going to do the same
process also for the lining. As you can see here
at the bottom, I did add one CM because I'm going to
join these two pieces. So to go through all the
pattern pieces that I've cut, this one is the main
fashion fabric that I chose, and this is the lining. I went ahead and I ined a
facing on it or stiffening. And this is for the strip, eight centimeter by
nine centimeter long. And over here, I've got my side panel pieces
for the strap also. One side I've added facing, and the other side, I did
not add any interfacing. Now, for the side panel piece, I cut four of each for the
lining, two for the lining. And I'm going to add
or sew straight stage, so I added same allowance
right at the bottom. And also for the main fabric, I've cut two pieces. And also, I did in interfacing for both the
lining and the main fabric. So we're going to
start by inserting the inside zip for the lining. I've cut out a piece
of fabric over here. I'm just going to use one
panel piece for the lining. And I've cut a piece
of fabric which is around 22 CM by 29 CM long. And I'm going to
place it right side facing over here with
the main fabric, making sure that I leave a space right on top of around two CM. And then I am going to just
pin it down on the lining. So once you're done doing this, I am going to now
create from the lining, I am going to leave a space of around one CM this is one CM. I'm leaving a space
on the lining, which is one CM. And then from here,
I'm just going to mark a straight line. So this straight line shouldn't
pass also the lining. Make sure it doesn't
pass the lining. You should leave a space of
around two centimeter side on both side of the lining. So now we want to create
an opening for the zip. I'm going to create a rectangle
of around one CM wide. So from this now rectangle, go ahead and sew
around the shape. And I'm using a straight
stitch at this point. So now what I'm going
to do is to create a tiny bit of rectangle right at the corners because I am
going to open up the shape. And then mark just
a center line here over here so that the opening
can be straight, also. Grab a scissor and snip right on the center and just cut up
to that small triangle. Make sure when you do this, you don't cut through the seam. And there we go. So you want to turn this lining the
other side like this. You want to turn it in, and the opening for the
zip is created. Now, take your zip
and your pins, put the zip behind this opening, making sure that the zipper
teeth they are facing up, and then just pin the zip down. Now, once you're done
pinning the zip, make sure you sew around it. I have changed my foot to a zipper foot so that I can sew closer to
the zipper teeth. And there we go. The
zip is complete. Now you just want to close it down so that you
can create the pocket. I am going to pin
it, as you can see. I'm going to pin all the way and then make sure you take this to the sewing machine and sew a straight stitch right
around the shape. And when I sew all the way
to close down the pocket. Once you are done,
this is how it looks. See you on the next lesson.
4. Assemble Zip, Pipping And Side Panel. : So to attach the
zip on the opening, I am going to pin it down. But in order for it to sit flat, because this is a cavi area, I am going to create some
snip small snip on the zip, and by doing so, it's going
to allow the zip to sit flat. And when you do attach the zip, make sure that the zipper teeth are facing the right side of the fabric or the zipper
teeth, they're facing down. Now the next thing is
to go and take it to the sewing machine and
sew a straight stitch. I've changed my sewing
foot to a zipper foot. Now, once you are
done doing this, I am going to take
the other main fabric of the bag and place
it to the right side. So what I'm going to do is I'm going to place the
other side of the zip. I'm going to pin it down. It's almost the same process. Once I'm done pinning it down, I'm going to take it
to the sewing machine and then sew a straight stitch. But first, I just
want to open up the zip and then go ahead
and sew a straight stitch. Once you're done, this is how it look to attach the lining, you're going to take the lining, make sure that it's the
right side it's facing and place it in
between like this. Then once you're
done doing this, you want to now sew
around the zip over here and make sure that you do leave one CM right from
the beginning on both sides. So you're going to
start sewing from this one CM mark that
we've just made. Now, when you're
done, I'm just going to create some
notches over here. By doing this, it will
allow the bag not to be a bulky as you turn
it the correct side. So you want to turn the lining in like this and then do
a top straight stitch. And when you do a
top straight stitch, make sure you leave the one CM. You start from the marking of the one CM all the way
to the other side also. And just like that,
you were done attaching your lining
onto your bag. It's time to move on
to the other part. So on this lesson, I went ahead to attach a label as you can
see a metal label. This one is actually optional. To assemble the panel, I'm going to take
all panel pieces, the lining and the
main fabric and sew it right here at the
bottom using one CM. What I like to do is to
press open the seam so that it can be flat for both the lining and
also the main fabric. So I am going to
attach a piping. Again, this stage is optional if you don't
want piping on your back, but I think the piping makes the bag look very
fancy and beautiful. So I am going to a touch piping. So this is a plastic one, and you can also use it
on your domestic machine. So I am going to first change my sewing foot to a zipper foot so that
it will be able to, you know, sew on the piping. And also, as you can see, I used my scissor so
that I can create some notches around so that it can move freely
on the curved area. And this is how it turned out. This is how it looks. I really love the black and
the pink contrast. To attach the side panel, I'm going to take
the main fabric for the side and make
sure that you do identify the center of your main fabric and
also the side panel. So I'm going to match
the notches over here and then attach
them like this. Now, once you're
done a touching, I'm going to sew a straight
stitch all the way to the other side and make
sure again to leave one CM and then start from the one CM point or OCM
marking that you've made, and then sew a straight
stitch around the bag. So once you were done
attaching the panel, this is how the first side look. It is good to turn your back the correct side so
as to see that you did not miss any stitching as you were touching
the side panel. So the next thing is to
attach the other side. So I'm going to make
sure that I fold it in half just to
create a center mark. So I'm marking here a center
point with my pencil, and then I'm going to place this side panel
right sides facing, and I'm going to make sure
that I match the center point. So I'm going to pin
everything down. As you can see at this point, it looks very bit
like a porcupine. But then I'm going to sew a straight stitch all around it, and this is how it looks. So we're done with
the main fabric and attaching the panel, so see you on the next lesson.
5. Sewing Panel Lining.: On the previous lesson, we went ahead now and assembled the main
fabric for the bag. So now we need to go ahead and assemble the
lining for the bag. There's no much difference between the lining
and the main fabric. What we did for the main fabric, we're also going to
do for the lining. But without saying much, let's go ahead and do it. So the last lesson
I showed you how to attach side panel
on the main fabric. Now moving on,
we're going to use the same process by touching
the panel on the lining. So I'm going to first mark
or align the center notches, and then I'm going to
create some small slits over here so that as you're
working on a curved area, so it is easier for us to
actually pin this down, and then you want
to go ahead and sew a straight stitch over here. I went ahead and I changed
my foot to a regular foot. And this is how it looks. So right to attach the base or the side panel
onto the other side, you just want to flip it
like this right sides facing and first match the
notches, the center notch. And then just pin the
rest of the side panel. Now, make sure that you leave an opening enough opening to actually turn your
bag the correct side. And when you do this, when
you attach the lining, also make sure that
your zip is open. So this is how the
opening looks. I am going to turn my bag the correct side.
And there we go. So once you're done doing this, you want to go
ahead now and just check if everything is in place. So at this point, we want to go ahead and attach
the bag handles. In this lesson, we
are going to go ahead now and
assemble the strip. This is a fun part for me
because it means we are reaching towards the end
of finishing our handbag. So let's go ahead and
attach the strips. For the back strip, I'm going to take this small side pieces, and I'm going to take one place another one
right side facing, like so, and then sew
a straight stitch, which is around one CM. And I'm going to do
the same thing on both side panel pieces. And then sew a straight stitch as indicated on your pattern. Now, once you were
done, you want to take now the one piece. I went ahead and I cut it eight centimeter by ten
centimeter piece of fabric, which is going to be
inserted on the slider. So what I'm going to do is
to fold it in half like this and then sew a straight
stitch right on the fold. And then once you were
done, you want to insert it back onto your slider like so. For the handle, I
am going to sew a straight stitch right
on the top, one CM, and also right at the side, I am going to sew
one CM and leave an opening so that we can turn the strap the correct side. I've done all my pattern pieces. I'm going to insert my strip right on one side of
the side panel piece, like so, and then sew a straight stitch to
secure everything. And then I am going to
take also my slider. I'm going to insert it
on one side panel piece and secure all the fabric. Now, to avoid any bulging, you want to just cut
out some excess fabric so that it can look neat. Once you're done
doing this, make sure you turn everything
the correct side. At this point, I
really love to ire in my work so that it looks
nice and professional. So I am going to attach now
the strip onto the bag. What I like to do
is go ahead and take your turn your
bag the wrong side. And then when you turn
your bag the wrong side, you want to insert the
side panel piece right on the side of your bag like this as shown here
on the screen. And then you want to
make sure that you also align the
lining of the bag, including the main
fabric of the bag. So a straight stitch over
here of around one CM. I did cut out some excess
zip that was there, and I'm going to cut
the layer of the lining so that it's not too bulky
right on the side of the bag. So you want to trim off
some excess fabric, and this is how it turned out. Do the same process also onto the other side to
attach the strip. You want to insert it all
the way inside of your bag. And also align your lining and then sew straight
stitch right here, which is one CM. And this is how it looks. I went ahead and I also trimmed
off some excess fabric. Now, the bag is almost complete. I am going to turn it
to the correct side. And this is how it turned out. I am loving the
pink and the white. It is so amazing. So as you can see, this is
how it looks on the side. It's not bulky. That is why it's important to trim off
some excess fabric. So now we want to
just insert the strap on the slider to
finish off the bag. And what I like about this
method of the slider, you can adjust the strap
according to the way you want to hold the bag.
So there it goes. This is how it turned out. So now we want to
finish off the lining. It's either you can
hand stitch this, you can use a blind stitch. So what you can do
is to fold one CM in like this so that it can
hide out any rough edges. You can fold it half
an inch and then sew a straight stitch or
you can hand stitch it. This is the final result
of your hand bag. This bag look lovely, and I'm definitely going
to make more of this bag different colors and look at that pink on the inside
and the inside zip also. It looks so amazing. I cannot wait to see
your finished project, make sure that you send it to me right there on the
finished project section.
6. Conclusion: Congratulations.
You have reached this part of your lesson. And not only that, you now own a beautiful handbag that you can show it off to your
friends and family. I would also like to see
that finished project. So make sure that you
take a picture and post it right on the
project section below. As for me, see you
on the next one.
 Mary Murinyu, Fashion Designer