Transcripts
1. Introduction.: High fashion designer
and welcome. My name is Mary Margo, and I am so excited to bring
this course to you because I'm about to share with you
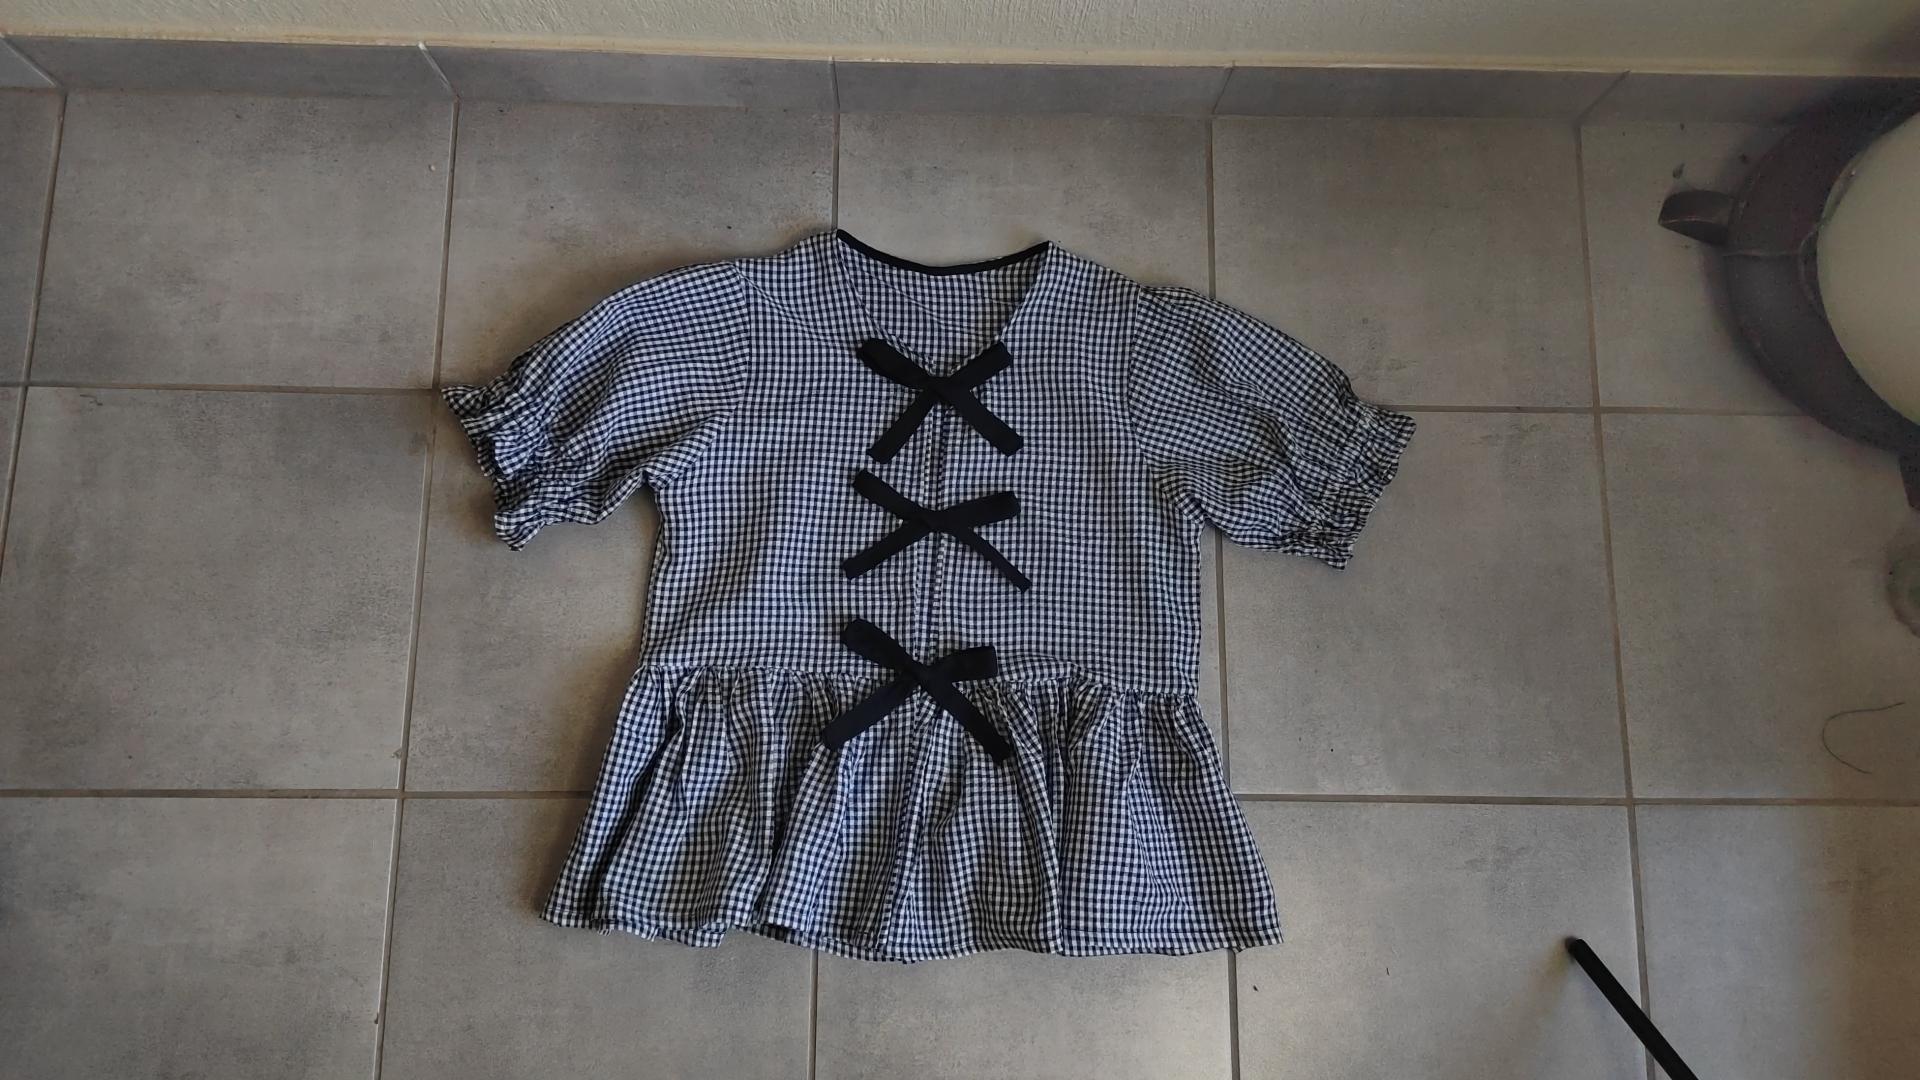
how to make this Gani blouse. I mean, I have
seen it throughout the Internet different
colors and different sizes. And the good thing about
this blouse is you can wear it on an occasional
and a formal day. So in this course, I'm going to share with you how to draft the pattern the type of
materials that I used, and later on, I'm going
to share with you how to construct this whole
guinea blouse together. Of course, by the
end of this lesson, you will definitely have
something as beautiful as this or even more that has your
own sense of style and taste. I cannot wait to begin the first lesson with
you, so see you there.
2. Back,Front and Puff Sleeve Pattern: So in this lesson, you are going to be
required to draft both the back and
the front pattern. So go ahead and grab
your pattern paper, your pencil, and your
ruler, and let's dot. So on this pattern paper, I'm going to mark
the straight line, which we're going to refer
it as the shoulder line. Then proceed and measure
yourself from shoulder to waist, which is under the
rob cage and then implement those measurement
right here on this line. In my case, is actually 16.5 ". You're going to square across
the pattern paper as shown. The next measurement
is going to be your shoulder measurement
divided by two. I'm going to remove
half an inch from that measurement because I want the puff sleeve
to sit nicely. Now, the neck width
is going to be 3.5 and that is a
standard measurement. Then you're going to drop
from the shoulder point by 1 " and connect it like this
to create a shoulder slope. Now for the neck depth, the back one is
going to be 1 " low, then reconnected back to the
neck width of around 3.5 ". The next measurement
you're going to need to measure around your arm hole, and you're going to divide
that measurement into two. Mine is actually 9 ", which is the one I'm going
to be placing it right here. You're going to mic
a straight line across the patent paper, and this line is going
to serve as a chest, and this one is the waistline. Now, you're going to extend this mh line all the way to the chest
line just like this. Now the next measurement is
your bus round circumference. You want to take that
measurement and divide it into four plus 1 " of ease. So the reason why
you're adding 1 " is because this blouse
is a loose one, so that's why I'm adding 1 ". I'm going to extend it all the
way down to the waistline. Now, if you want the waist
part to be a little bit, you know, tapered, you can
go in by half of an inch. Now, going to the neck
line for the front, you can decide how low you want your front
neck line to be. I will go for 4.5, and I'm going to reconnect
it back to the neck width, which is the 3.5 neck width. So just like that, you've created the neck
line for the back, and this one is going
to be for the front. Moving on to creating
the um hole curve, we're going to divide
this line into two, find the center point. Once you've marked
the center point, you want to go in right
here by half of an inch. Now, the front mhle is deeper compared to
the back um hole. Right on the chest line, you want to go out by 1
" in a 45 degree angle. Then you're going to
reconnect the three lines. And just like that,
this one is going to be for the front arm hole. For the back um hole, it's easy. You just want to reconnect this curve line to the
center point right here. And just like that, you have created both of your pattern, and this one's going to
be the back um hole. Now we're going to go ahead
and cut out the pattern, cut from the back um hole, then proceed and cut
on the back neckline. You're going to
go ahead and grab a new pattern paper and trace
out this pattern as is. You're going to trace
out the um hole, the shoulder and also the
front the back neck line. And just like that, you
have the back pattern. Now moving on to the front, I am going to trim off the front and neck line so that we can have the
front pattern only, and also the arm hole, go ahead and trace out
or trim off the armhole. Please do not forget to
create notches where is necessary and also
label your pattern. Now, to create a puff sleeve, you need to grab your
front pattern and carefully measure around the
arm hole just like this. Whatever number you find, make sure that you note it down. And I'm going to mark
a straight line. It's going to be referred
as the shoulder line. So from the edge of
the pattern paper, you're going to mark 3 ". This is going to add for
the puffness of this leave. Then you're going to go ahead now and calculate
your cap's height. You're going to take your
bust round circumference, divide it into 12. Mine is 3.5 and that's the one that
I'm marking over here. Now, take that measurement that you took on the front pattern, the Amho one, and place it in between the shoulder and the
caps height measurement. So if it passes
the line a little bit by half of an
inch, it's okay. And then you're going to mark a line in between these two, and then you're going to find the center point of this line, and you're going to
mark just like this. Now the next thing
what you need to do is to create the sleeve head. So I'm going to mark
it with a curve row. So if you want to know how high this sleeve head
is supposed to be, you can mark half of an inch
higher and then connect it. So right here at the bottom, I'm going to mark the
center line and go down by half of an inch and then reconnect this point
with a curved row. So this half of an
inch is more of a guideline on how deep or
higher it's supposed to be. Then I'm going to extend
my line all the way down now it's time to
decide the sleeve length. Measure from your shoulder to the desired length as
shown here on the diagram. And my length for the
sleeve is going to be 8 ", which actually ends
around the bicep. So I am going to mark this
line across the pattern paper. Because this is a pave sleeve, I'm going to mark out
by 1 " just like this, and then reconnected
back to the sleeve head. Now, I'm going to
mark up here by 1 " and reconnect it
back to the hemline. And then you just want to
blend in all the lines with a three inch mark that you've done on the edge of
the pattern paper, including the sleeve head, you
just want to blend it all. Now, for the sleeve, remember, it has the back side, which
is the straight part, is going to form
for the back side, and the one that caves in is going to be
for the front side. Proceed and cut out
your sleeve pattern. So when you cut the pattern, make sure you cut the
backside of the sleeve. Then you want to proceed now
and create some notches. Now, as we were
drafting the sleeve, I did fold my pattern paper. So make sure that you
also create the notches. This will make it easier
for pattern layout. And this area it's
going to be gathered. You're going to open up your
sleeve just like this and trim off the front side
of your path sleeve. Now, this area it's
going to be gathered, indicate that and
also write on top. So I went ahead and I edit one CM of seam allowance
all around the pattern. And also, I did transfer all the notches
that is required. And also for the front panel, I've edited on the
neckline, shoulder, armhole, side seam,
including the bottom seam. And for the back pattern, it is going to be cut
on fold as should be indicated on your pattern and proceed to add seam allowance, also around the neck
line, shoulder, hole, side seam,
including the hemline. So these are all the pattern pieces that you're
going to need. Now, this part is also optional. I am going to be creating
a elastic casing. So I'm going to fold
my sleeve pattern like this and measure
right here on top, which is going to be 14 ". Now, grab another
pattern paper, fold it. And then I'm going
to mark that 14 " on this red line
that I've marked. And then my elastic casing, it's going to be 2 " wide, which later I'm going to fold it so that it can
fit the elastic. So I'm going to
mark a rectangle of around 14 " by 2 " wide, which is going to be
later cut on a fold. So once you're done, this is how your pattern will turn out. This is how it's going to set. Once you fold it into two, you are going to place it right here on the inside
of your sleeve. So these are all the pattern
pieces you're going to need. See you on the next lesson.
3. Material, Pattern Layout Assemble sleeve on Blouse.: So in this lesson, I'm going to share with
you the types of materials that I used in order to
construct this blouse. So right here, I used
a Scotch material, which is a cotton material. It doesn't have stretch at all. And then I picked a different
type of which is gabardine. I used it to create this ribbon. Now, if you do not want
to overwork yourself, you can buy ready made ribbon in order to attach
it onto your blouse. Now, to finish off the neckline, including right here
on the side panel, you can buy a buyers tape. I made my own buyers tape
from a different fabric, which is gabardine also. So you can also buy
buyers tape separately, and also right here
on the inside, I had to finish it off
with a buyers tape. So that's all the
materials that I have used in order to construct
this blouse. So see you on the next lesson. So to cut out my front panel, I'll need to fold
my fabric in half, and I'm going to take my back
panel pieces and place it right on fold in the front
panel pieces next to it. Same goes with the sleeve. Fold your fabric in half and
cut out your sleeve pattern. For the bottom ruffle panel, you need to take your back piece and your front and
measure around the waist. And once you measure around
the waist just like this, you need to multiply
this number by four. So you're going to
take another piece of fabric and fold it in
half as shown here, because you're going to need a long rectangle panel in
order to create the ruffles. So I'm going to fold it in four layers again,
just like this. At this point, you need
to decide how long you want your ruffle part to be. I'm going to make it 8 ". That includes 1 " for hemming. And once you're done, I've got two rectangle panel pieces. Now, I'm going to take
my front panel pieces, place them right sides facing, and I'm going to take
another one again, right sides facing and sew a half an inch seam allowance
right on the shoulders. Now, for this sleeve,
go ahead and grab your sleeve pattern and
including your elastic casing. On the wrong side of the
fabric, right at the bottom, I've placed the elastic
casing two inch away from the hemming
of the sleeve. So first, you want
to hem the sleeve half an inch and then
another half an inch and sew a straight stitch. Now, once you're done, also, make sure that you saw the elastic casing
for your sleeve. You're going to knead
your sleeve and measure around your bicep
and make sure that the elastic it's not
too tight because we don't want it to
block your blood flow. So make sure that
you measure around your bicep or wherever you
want the sleeve will end, and then cut out the amount of elastic and feed it through
the elastic casing. Now, once you're done like this, you make sure that you
saw the ending then the next thing is to
transfer your notches that you have marked
onto your sleeve. So what I'm going to
do this is how it is. It means I'm going
to need to ruff, create some ruffles or
gathers around this area. And then once you are done
creating some ruffles or gathers around the upper
part of your sleeve, this is how it will turn out. And your sleeve is
complete, just like this. Now we touching the
sleeve onto your blouse, make sure that it is
right size facing. And remember that
you did identify the center notch
should match with the shoulder seam and go
ahead and pin this all around the um hole and then sew a half an
inch seam allowance. Now, once you're done, this
is how it should turn out. Please do not forget
to iron your work so that it will look nice
and professional. The next thing is to
sew the side seam. So I'm going to first
align the um hole seam just like this and then
proceed and sew the sides. So far, this is how
your gut should look. If you want to make any
changes or you want to reduce the whiteness
or even on the sleeve, you can go ahead and do so. So see you on the next lesson.
4. Attaching Riffles And Ribbons On The Blouse.: Now, I'm going to take my
two ruffle panel pieces, and I'm going to place
them right side facing. Right here on the
side, I'm going to sew a half an inch
seam allowance, and then it's going to
form one panel piece. Now, my favorite part
is creating gathers, and I'm going to show you
the easiest way to do so. You're going to set
your machine on the highest tension and then pull the thread
a little bit, not too much to avoid the
breaking of the thread. Now, the gathers are formed. The only thing that I need
to do now is to spread them around so that they can fit on the waistline
of the blouse. Take your gathers bottom
and also your blouse, place them right e
facing like this. And then you want
to proceed and pin the gathers to the blouse and
then sew a straight stitch. Now I have my bows over here, and the strap is going
to be around 26 " long, and I'm going to cut it in half. Now, once I've cut it
in half like this, I'm going to mark or cut
six of these pieces. Now to attach the bow
on your blouse, first, I am going to attach it the
first one around the neck, but make sure that
you leave a space of around 1 " away
from the neckline. And then you're going to
place the second one. So you need to measure
from the neck line to the seam on the waistline and mark the center
point right there. So from that center point, that's where now you're going to attach your second strip. For the third strip
is to attach it on the seam directly where it connects the blouse
and the ruffles also. And then the next
thing, I'm going to take a facing right here, which is around 1.5 " wide, and I'm going to place
it right side facing with the blouse and
pin all the way down. Now, once you reach
the hem line, you need to first hem, have an inch and another half
of an inch on the ruffle, and then take your facing, place it right on top. I'm going to take the facing
and place it right on top and then fold the facing up, not in, but up just like this. And then go ahead
and pin it down. Now, as soon as you're done, you want to take it
to a sewing machine and sew a straight stitch. I've already done or
attached my facing. It is time to attach the bias
tape around the neck line. So what you need to
do this bias tape is actually 1.5 " wide. So I did fold it, and then I'm going to attach
it around the neck line. Now, in order for a neat
finishing on the inside, I'm going to fold
half of an inch on the facing just like this.
I'm going to fold it in. And then I am going to take
the bias tape and place it on top and then pin it down. Now you're going to
do the same thing also onto the other side. You're going to fold the
facing right on the edge by half of an inch and then take the bias and place it right
on top and then pin it down. Once you're done, this is
how it will turn out now. You want to flip it
inside of the blouse, and it will give you
that neat finishing. Now, to finish off the facing, you're going to proceed now and continue folding that
half of an inch inward, then pinning it down all the way to the bottom ham of the blouse. Now, on the bottom, it
might look like this. So you just need to
fold half of an inch on the facing and another
fold and pin it down. This will give it a nice
finishing at the bottom. Now, right on the bottom hem, fold that half of an inch and another half of an inch also
and sew a straight stitch. And on the neck line, there's already a folded seam. You want to just continue
with it that fold seam off the buyers tape and sew a straight stitch
on the neck line. And let me show you how
you can achieve this. So first, I am going to sew on the edge of
the buyer's tape. And then for the neck line, you're going to fold it in and sew right on the edge also. And this is how it will look on the inside, including
the outside. Now, at the bottom, this
is the last part is to fold the hemming
just like this. Now, once you are done, I always advise to press on your work so that it
looks nice and neat. And this is the final
outcome of the blouse. I'm really loving the
bonds or the bows. And for the neck line,
this is how it will look. There's a beautiful
neat finishing that is made with bias tape. And the favorite detail on
this blouse is the sleeve, the beautiful puff sleeve, and, of course, a neat finishing
right here on the hem. So let me show you how this
blouse turned out on me. And this is how it looks. The bows are tied. And also, I'm loving the
length of the blouse. And, of course, like I said, with the sleeve, the
length is amazing. I really enjoyed
making this project, and hopefully you did, too.
5. Conclution.: Congratulations.
You have reached this part of your lesson. And now you own a
beautiful Gani blouse. I cannot wait to wear it myself, and I know I can either
style it in a casual way and also you can wear this
gat on a formal occasion. I cannot wait to see
your final project, so please do not forget to post the picture on a project
section below and describe to us the types
of materials that you have used in order to
complete this blouse. Now, as for me, see
you on the next one.
 Mary Murinyu, Fashion Designer