Transcripts
1. Introduction.: Hi, fashion designer,
and welcome. My name is Mary Marina. Have you ever wished to make a comfortable and a
fashionable shirt? Well, in this beginner course, I am going to guide you
throughout the process from picking the correct fabric and
also drafting the pattern. And what else am I going
to share with you? Well, you're going to
learn the sewing and constructing technique
for your shirt, from hemming and creating the button stand and also
touching the buttons. And one of my favorite is
creating the one piece collar. By the end of this course, you will definitely have your unique shirt that you can add into your wardrobe
and be able to share your creative work to
your friends and family. So I really cannot wait to start the first lesson with
you. So see you there.
2. Body Measurement.: In this lesson, you
are going to be required a taking
body measurement. Now, I always
emphasize that taking accurate measurement result
in a good fit of a gat. Now, if you're a beginner and you're not really
experienced with this, do not worry because
I'm going to guide you in this lesson on
how to achieve that. So go ahead and
grab your notebook, your pen, and measuring tape, and let's begin with the lesson. Now, the first measurement
we're going to take is going to be
your bust measurement. Now, when you take
your bust measurement, you want to make sure
this is very important. You want to make sure
that you measuring tape, it doesn't drop at
the back because this will result in your
garment being oversized. Now, you want your
measuring tape to sit the parallel across
or on your bust. The next measurement is
your hip measurement. You also want your
measurement to sit right on the highest
part of your hip, and it sits also parallel on your hip at the back,
including the side. The next measurement
you're going to take is your shoulder to bust point. Now, from the
shoulder point right here to the apex
or the bus point, this is where the
measurement you should take. The next measurement
is going to be the full length of the blouse. I'm going to mark from the
shoulder to the full length, and mine is going
to be around 25 ". The other measurement
you're going to need is your shoulder
measurement. Just make sure that you place your measuring tape from
one shoulder to the other. The next measurement
is the armhole round. So when you place
this measuring tape, make sure that it
is not too tight around your arm hole
and it's not too loose, but it is comfortable
enough for you to move your hand front and back. The next measurement, you're going to need your
sleeve length. Since the pattern we'll be drafting will require
a short sleeve. You need to measure
from your shoulder to the desired length. I'm going to use
my pinky finger to mark where I want the
shoulder or the length to be. Then I'm going to rotate my measuring tape and
measure around my bicep. Now, in order for this
measurement to be accurate, I'm going to flex
my hand or bend it so that the measuring tape or the measurement
should be accurate. The next measurement will be the waist around
circumference. Now, you need to measure
the highest waist, which is under your rib cage and note the measurement down. So once you have taken all
your body measurement, now it is time to move
on to the next lesson, where you're going to draft the front and the back pattern. Now, see you on the next lesson.
3. Front And Back Pattern. (2): So in this lesson, you are going to be required to draft both the back
and the front pattern, which I have them over here. So as you can see, the
front pattern will be the one that will have
the button stand. And then the back pattern
will be cut on fold. This will be the back pattern. I did join them right
on the shoulders. Now, when we're
drafting the pattern, I'll be adding Es
after I divided my measurement into I will
add ease of around 1.5 ". But it's also optional how loose you want
your shirt to be. You can add around 1 " or
half an inch or maybe 1.5 ". It's totally up to you how loose you
want the shirt to be. So before we waste any time, let me show you how
you can achieve this. You're going to start marking two lines on your pattern paper. So this horizontal line is going to serve as the shoulder line. And then right on the edge
of the pattern paper, you need to leave a
space of around 5 ", which is where we're going to attach or create
a button placket. So what I'm going to do now is just mark this line
as the shoulder line. So you're going to mark the
full end of the blouse, which is 25 in my case. Then you're going to square
across your pattern paper. Then you're going to
mark from shoulder to waist and you're going
to mark that line. This one is also going to call the hemming or the hemline. Then you're going to mark half of your shoulder
measurements. And once you've marked half
of shoulder measurement, you're going to go
down by 1.5 inch. To create the neck width, you need to measure 3 "
wide of your neck width. Then once you're done,
you're going to connect the shoulder slope
with the neck width, and they're going to
form a shoulder slope. Now from that 1.5 inch, you're going to mark half of
your arm hole measurement. And then from that point, I'm going to mark it
across the pats and paper, and this line is going to
serve as the chest line. Then you're going to
also mark going up and that line is going to
serve as the armhole line. For the front to neck depth
is going to be around 3 ", and I'm going to go
ahead and connect it to the three inch
wide neck line. For the horizontal measurement, you're going to
implement quarter of your pass round
circumference plus 1.5 inch, and you're going to
also do the same thing, quarter of your waist
measurement plus 1.5 inch. This is ease, okay. So also on the hip, quarter of your hip circumference
plus 1.5 ". And then you're just
going to connect all the three point from the hip to the waist and
waist to the chest line. And right here on the hip, I'm going to go up
by 1.5 inch also, and I'm just going to reconnect
it back to the hem line. Now, this shirt is going
to be a loose shirt. It's not going to
be a fitted one, so that is why I added 1.5 ". Now, back to the chest line, you need to go out by 1 ". And then right on
the mhole line, find the center point. Once you've marked
this center point, you need to go in to create the front um hole
by half an inch. Then you're going to
connect this half an inch with that 1 " mark. On the chest line. And just like that,
you're going to create an uphill curve. And then, again,
from that half inch, reconnect it back to
the shoulder slope. And then just like
that, this one is going to serve as the front and from here it's going
to serve as the backside. For the button placards, you're going to first mark 1 ", which is going to be
for the button send. And then you're going
to add another 1 ", which is going to
be for the facing to cover up the button send, followed by half of an
inch seam allowance right next to the 1 ". Then you're going to take
a new pattern paper, place your front
pattern on top of it. I'm going to use
my tracing well to trace the hemline,
the side seam. And as for the arm hole, I'm going to trace
the back arm hole, and then the shoulder, including the neck line. So as the front, you're
just going to trace on the front neck line
or front side first, apart from the button stand. Then over here, I'm
highlighting all the lines that I have traced
with my tracing wheel, and this pattern is going to
form as the back pattern. Now, the back pattern
and neck width is 3 ", but the neck depth
is going to be 1 ". Please do not go further than 1 " because we're going
to attach a collar, so go down by 1 ". To add SIM allowance, I went ahead and I added Sim on the front around the neck line, the shoulder, and
also on the arm hole, I followed this
line that goes in. Well, I was adding
SIM allowance. On this side seam also add around half an inch
seam allowance. For the back pattern, I added SIM allowance on the arm hole, the shoulder, the neckline, side seam, including the hem. So this is all the SIM
allowance that I've added. Now, you need to create some notches around
your bats and plucked. So I'm going to fold the
first half an inch and then fold that 1
" just like this, and don't forget to
create some notches. So all of these
are put in pieces, the front and the back.
4. Sleeve And Collar Pattern.: Now to create a sleeve pattern, I'm going to grab a
new pattern paper, fold it up because
we're going to need to draft the back and the
front side of the sleeve. I marked this line, and it's going to
resemble a shoulder line. So grab your front
pattern paper and carefully measure
around the arm hole, and you're going to measure
before the seam right here. And once you have marked
or measured this m hole, mine is 10.5, you mark it down. And once you've done
that, we're going to start by calculating
our caps height. Now you're going
to take your bust measurement divided by 12, and that's how you find
your cap's height. Now, in between these two lines, this is where you're
going to insert your um hole measurement, which was that 10.5. Now, I realize that this
paper is not white enough, hence I'm extending the lines. So I'm going to take
my m hole lines and place it in between
these two lines. Just like this, and then mark a straight line that goes
across the two lines. Now we're going to first mark
the center point of this 10.5 in order to create
the sleeve head. Now, from here, I'm going to mark or find the
center point again of this first half And then also mark up
one or half an inch. And then, again,
on the other half, I'm going to mark
the center point and then mark down
half of an inch. And then just like
that, you have created the front
side of your sleeve, and I'm just going to
connect these two. And then I'm going to
also connect up again, and this is going to
form as the sleeve head. The next thing that
you need to do is to create the length
of your sleeve. Now, from this
part here is going to resemble the front
part of your sleeve. Do make sure that you do
mark that in your pattern. And from this straight
line is going to be or form as back part
of your sleeve pattern. Now, go ahead and measure
your sleeve length. Mine is actually 8 ", and from this eight inch point, I'm going to mark
a straight line across the pattern paper. Once you're done with
it, go ahead and take your bicep measurement
and divide it in two, two, and add also
half an inch for E's. Remember that this
is a loose shirt, and please don't forget
to add seam allowance of around half an inch around
your sleeve pattern. Now, once you're
done, you're going to first cut the back part of your sleeve and then go ahead and transfer
all your notches. This is very important
for pattern layout. Now, once you're done, you're going to
open up your sleeve and trim off the front
part of your sleeve. And just like that, you were done with your sleeve pattern. To create your collar, you need to grab
both your back and the front pattern and carefully measure around
the front neck line. Please do not include the
button stand at this point. So you're going to measure
the neck line right before the seam for both the
back and the front pattern. Once you've measured
both of the neck line, grab a new pattern paper
and measure two lines, the one horizontal
and a vertical line. Now, from this point, I'm going to first implement the back neckline measurement, and then I am going
to go ahead and implement the front
neckline measurement. And then you're going
to decide the width. Now, the width of the we're going to start with
the mandarin collar. So it's going to be around
2.5 centimeter wide, and it's going to
form a rectangle. Once you're done
from this point, you're going to go up by
half an inch seam allowance. And then above this line also, you're going to mark half
an inch seam allowance. And then you're
going to reconnect it back to the center line. And also, you're going to do the same thing on the
other point right here, return it back to
the center line. And then just like that,
we need to go ahead and cancel these lines because we're not going
to make use of them. Now it's time to add the button stand for
the Mandarin collar. You're going to add
measure your button stand on your pattern
and add that amount. So mine was 3 centimeters, so this is the one
that I'm going to add right here as
a button stand. Now, go ahead now and reconnect
it to the top line here. And just like that, you're
done with the mandarin collar. Now, you want to proceed and create the main collar
for your shirt. Right here on the edge, I'm going to mark around 5 centimeters
or around three CM. Three CM is enough. And then from this three
CM mark, right here, I'm going to go up or in, sorry, by around 2 centimeters. Go in by two CM, and then you want to
extend this line. At this point, this is
where you can decide how long you want the pointiness
of your cooler to be. So I made mine around
five centimeter long. Then I went on out a little
bit by around three CM, three or four CM. And then from that four CM mark, I'm going to connect it to
the two CM mark that is connected to the cooler stand. Alright, so once you're done, I'm going to connect this
fossi MMR with the three CM, and I'm going to
use a curve ruler, so you can either use a curve
ruler or a straight line. This part is optional. And just like that, you have created your one piece collar. So I went ahead and I added half an inch seam allowance
all around the pattern, except right on fold. So see you on the next lesson.
5. Materials And Pattern Layout.: So when it comes
to the materials, I went ahead and I picked
one of my favorites, and it's going to be a non
stretch material because our pattern it is for a
non stretch material. So this is the materials
that you're going to need. First, you need to
pick your buttons, buttons of your choice, and this one is the
flower pattern. This one has a flower pattern, and these were other ones. It's a circle. So
I'm still going to decide which one I want
to use for my shirt. And you're going to need
a lightweight stiffening. This is going to be used for the button stand and
also for the collar. As you can see,
it's not so hard, so you just need
something lightweight. And fabric of your choice. I went ahead and I picked
this beautiful cotton fabric. It has beautiful embroidery. I'm not going to use lining on this fabric because I
like the design as it is. So it's beautiful and
it's lightweight, and you're going to need
your universal needle and thread of your choice, which has to match with your shape or the fabric
that you've picked. So let's go ahead and
let me show you how you can lay out your
pattern on your fabric. So you're going to start
with your front pattern. Go ahead and fold
your fabric in half, right side facing and
place your front pattern. And while your
fabric is on fold, you want to place your
back pattern where it is on fold because it's going
to be cut as one piece. For this sleeve, you need, again, two layers of a fabric, right side facing and
take your sleeve and pin it and make sure that you
do mark out your notches. Now for the collar, I went ahead and I cut it
out on a stiffening. I folded the
stiffening because it requires the coller
to be cut on fold. Now, cut it on a stiffening, this is how it looks
once you open it. You're going to fold two fabrics and place the
stiffening and press iron them. Don't iron but press the iron. In this way, it will prevent
the collar from stretching. I went ahead and I cut 1 " of my stiffening and I
placed it on a button stand. Now, you're going to first
add the first half on the button stand and
then fold the 1 " in. And just like that, you are done prepping for your button stand. Now, in the next lesson, we are going to go ahead and I'm going to show you how
to arrange your shirt. So see you on the next lesson.
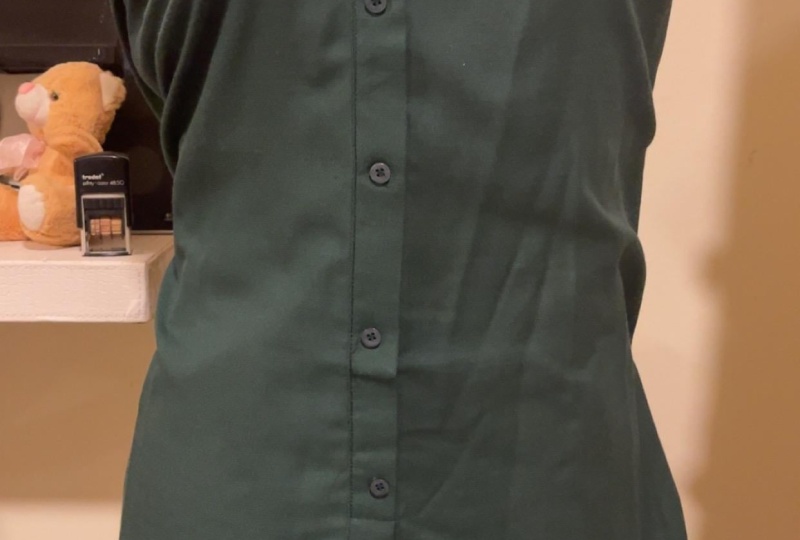
6. Button Stand And Sleeve Attachment.: Now to close down or to
just sew the button stand, I'm going to turn
this the wrong side, just like this and sew a straight stitch right here on the edge of around
half an inch seam. Then I'm just going to snip
the edge a little bit, make sure you don't cut through the seam and then turn
it to the correct side. And you will notice that
right on the bottom, there is going to be a hem, which is around half an inch. This is one method that you can use to create a
hem at the bottom. Then you want to proceed and take it to the
sewing machine and sew a straight sedge right
on the button stand. Now, once you're done
sewing the two front panel, you're going to take
your bike panel. Make sure that it is
right so it's facing, and we're going to
sew half an inch seam right on the shoulders. So there are many method
on attaching a sleeve. So some people might
prefer to actually close the side seam and saw the
shoulders and inset the sleeve, but I like to inset the sleeve before I
close the side seam. And let me show you how
you can achieve that. Now you will notice
that the leave actually it's very important to transfer all your notches. I did transfer the center notch and also
righthe on the side. So usually this center notch, I touch it or align it with the shoulder seam
and right is facing. So let me show you how
I actually do that. I'm going to open
up first the shirt, right he around the armhole and remember that the sleeve has
the back and the front side. So you want to make
sure that it is right side facing
with the shirt, and I'm going to align
the center seam with the shoulder seam and
then pin these two down. And I'm going to proceed
and pin right on the edge. And just like that, your
sleeve will be attached. So I'm going to take this to
the sewing machine and sew a straight stage of around
0.5 seam allowance. So once you're done
attaching your sleeve, this is the outcome. So we're going to
proceed now and close the side seam
of your shirt. So I'm going to first align the um hole or
the under arm seam. Doing this we'll make sure that the side seam is aligned your shirt is
aligned on the side. Now, once you're done attaching the side
seam of your shirt, I would suggest that you try on your shirt and see
that it's the fit that you're going for or
you need to take in a little bit more or you make
it a little bit looser. And once you're happy with that, this is how it should look the side seam with
the sleeves attached. So see you on the next lesson.
7. Attach collar and Buttons.: In the previous lesson, I shared with you how to
actually finish off your shirt, the button stent, and this is
how it looks on the inside. And else you can see, I love the way it sits
on the mannequin. It really sits almost
similar to my body. So this is the perfect
time to actually check if there's any changes that you would like to make
on your shirt. This is before you actually
attach the collar, the collar onto your shirt. Now, in this lesson,
I'm going to show you how to finish
off your collar and also go ahead and attach it on your shirt. So let's proceed. You're going to need to take
your two collar pieces, as you can see, place
them right out facing. And I'm going to
fold half an inch only on one layer of the collar, which is the one that is there actually on the
pattern paper, right? I'm going to only fold the half an inch only on
one layer of the collar. And then take this to
the sewing machine and you want to sew
around the collar, half an inch seam allowance. Now, once you're done,
don't forget to create some small snips
right on the collar. This would make it easy for
the actual collar to fold nicely or fold back nicely
around the neck line. Once you're done, turn the
collar the correct side, and most importantly, make
sure that you iron your work. Now, the next thing is to assemble the collar
onto the shirt. I'm going to first
fold it in half like this and also do the same
thing with the shirt also. Once you have marked the
center point fall on the back, you're going to now
align these two points. This will allow the collar to actually sit evenly
around the neck line. And then take this to
the sewing machine and sew a straight stitch. Now, once we're done,
we want to go ahead and push the rough edges
in between the layers, and I'm going to pin
it down and sew right at the back of the
collar, right? And once it's saw at
the back of the collar, it's going to be
attached on the front. And I did change my sewing
foot to a blind foot, which makes it easier
to actually sew in between the
lines or the seam. And just like that, you
have attached your collar. So the next thing that
I want to do now is to sew around a straight
stitch around the collar, a simple straight stitch. And I went ahead and I changed my foot to a
normal sewing foot. Now, for the hemming, I went ahead and I just ired that half of
an inch that was created when we were arranging or fixing
the button stand. So you're going to go ahead
and sew a straight stitch. And then for the sleeve,
you're going to first fold the first half
an inch and then fold another half an inch and sew a straight stitch
around the sleeve. Now, on my front pattern, I left around 2 " space
between the buttons, and I decided not to add
the one at the bottom. So I'm going to mark the
same thing on my shirt. You can mark 2.5 " space
between each button. So from the collar end, I'm going to mark that 2 ". Now, at this point, it depends how far apart you want
your buttons to be. So once I've marked this, I'm going to go
ahead now and take my buttons and just mark
the width of my buttons. Change your sewing foot to a button foot and then
also change your stitches. Now, for my machine, in order for me to attach
the button, I need to reset. Now, depending on the type of
machine that you're using, you can go ahead and
attach your buttons. I also advise that you
do test your button stand on a piece of fabric prior to sewing
to the actual shirt. This is how it turned out. Now you want to go ahead and create the rest of
the button holes. Open up your button hole, place two pins on each end of the stitch and then
use a sim ripper. This will help not to actually
rip on the actual fabric. And just like that,
you want to do it for the rest of
the button stand. The next thing what
you want to do now is to place the button stand on each side like this and then mark where you
want the button to sit. Now, once you're done,
you want to take your button of your choice
and hand stitch it. At this point, I really
wished I had a button foot. It makes it easier to actually sew the buttons without
hand stitching it. But anyway, you can
still make use of your hands by actually hand
stitching your buttons. So once you are done a
touching the first button, you want to go ahead and attach the button for the rest
of the button stand. I did the same with mine. Then the last thing you need
to do and most importantly, is to press on your work to
get that professional look. And this is the final outcome, and I love the collar. It looks so good. And also, this is how
it looks at the back. And also the front. I'm Loving T shirt is
one of my favorite. I'm definitely going to
make more of this. Two
8. Conclution.: Congratulations.
You have reached this part of your lesson. I definitely enjoyed
making this project, and hopefully you did, too. Now, one thing, if you got discouraged during the process, remember that practice
makes perfect, and each stitch leads you
to your final destination. I really cannot wait to see your finished project
and make sure that you post your finished project on a project section below. As for me, see you
on the next one.
 Mary Murinyu, Fashion Designer