Transcripts
1. 01 Circle Animals Intro: Hello and welcome to this
circle animal course. This is a two part
course and you can do one or the other or
both. It's up to you. The first part is
about learning how to draw any animal you want to
using a circle as a base. It's fairly easy, it's
designed for beginners, jump in and have a go at that. Then the second part,
if you want to do it, is more about
personal development, where I will take you
through a process to figure out your top five values. From there, what we're
going to do is turn our top five values into animals and create
our very own totem pole. Down in the resources
there is a PDF. There's two different PDFs. One is just for the animals
and the other one is just for the values
that's yours to use. You can print it out
and you can use it alongside the course
if you want to. I printed mine out at
Office Works in Australia. I don't know if other countries have stationery stores
like Office Works, but I printed this one
out at Office Works. It actually ended
up being a lot more expensive than I was expecting. What I've done is I've put both parts together
and I've turned it into an actual book that
you can get on Amazon. If you just go to your
Amazon for your country, America would be
Amazon.com Australia is Amazon.com dot and if you
type in my name, Sam Stars. All the books that I have
available are there. And this one is now live. If you wanted to,
you could purchase that to do alongside
this course. And it's the same as the other one that I just showed you, but I actually
think it's better. So you could get that to do alongside this course
if you wanted to. Other than that, just
let's get stuck in and hopefully you will end up with your very own personal
animal totem pole, just like this one of mine. So see you there.
2. 02 Do It Badly: I've been putting off getting
this class recorded and edited for so long,
almost a year. In fact, I don't even know why. It could be a manifestation of my executive dysfunction due
to my neuro division brain. Or perhaps there's an element of perfectionism stopping me. Or it could be all the
recent new changes going on in my life
with moving house and getting a new job and having difficulties in
certain relationships. Regardless of what it is, though, as I sat and
thought about it recently, I realized that even though the underlying personal
development part of this process is all about deep diving into our values so we can use
them to live our best life. I was not following the process. I think it's because it had
never occurred to me before. Now that sometimes
a value can be a concept rather than a mere
adjective such as loyalty, achievement, courage, et cetera. And once that
clicked into place, I realized I've been
disregarding one of my highest values that
dropped in a few years ago. That is more a concept or
a way of coming at life. See, a few years ago now, I came across a story
on Facebook about a university student
whose professor stood at the front
of the class said, anything worth doing
is worth doing badly. As soon as I read that something
shifted in me over time, I've realized that's become one of my highest
values in life, is to do things badly. What that means is if
something is worth doing, if something matters and
it needs to be done, then it's worth doing
less than perfect. Because doing a thing is better than thinking about a thing. For example, if you struggle
to brush your teeth, floss and gargle
mouthwash every day, then just brush your teeth. Don't worry about the rest. If just brushing your teeth is too much gargle or just
brush them quickly for 20 seconds because
brushing your teeth is worth doing to maintain
healthy teeth and gums. If you don't have the spoons to spend 5 minutes a day
caring for your teeth, spend 30 seconds even
if it's a bad job. The same goes for art. If you gain anything
from doing art, then give yourself
permission to do it badly. Art does not have to be a
masterpiece to be of worth. Well, it may be nice to have an aesthetically pleasing
finished product. Art is really about the
process, not the product. That process can
be messy and ugly, bad, atrocious, And that's okay. It is still worth doing. Art is an expression. Art allows us to
express how we feel, what we're seeing, what
we're doing with our lives. That isn't always going
to be perfect or pretty, because life is not
perfect and pretty. The point of this
little lesson before we begin is to invite you and remind myself to give ourselves permission
to do it badly. Because sometimes we
have to do something badly 1,000 times before
we can do it well. And that is just part of
the growth of being human. I'm giving myself permission
to produce this class badly with the hope that even
if it isn't the best class, you will still gain
something from it, even if all you gain is giving yourself permission
to do things badly. Come with me in this
journey of doing, instead of just thinking and let's do stuff
badly together. You never know your bad might
be someone else is amazing, let's not deprive the
world of our bad. Yeah, see you in
the next lesson.
3. 03 Supplies: Okay, you awesome people. I'm going to run through a
list of possible supplies now, but I want to stress, work with what you
have available. You do not need to go
out and buy supplies you've never used before or
have little understanding of. Although you can,
if you are like me and you just want to own
all the different supplies. But I'm going to quickly run
through a list for you now. You literally need nothing
more than a pencil, a pencil sharpener eraser, and a black fine liner
pen of some sort. That's all you really need. Anything else is just a bonus. I also recommend a ballpoint pen for any journaling
or notes that you want to take or if you're
using the PDF workbooks, you can write in those if
you print them out to work in any paper will do
even printer paper. However, I prefer a
heavier weighted paper, something over 80 GSM, but even more than that if you are going to color your images. I probably would not go any
less than around 120 GSM, but that's just my
personal preference. I also hot pressed paper, so it's nice and smooth rather
than cold pressed paper which is more textured. I am using Tulu or Toulouse. I don't know how
to pronounce it. By the paper house, which is a hot press
paper is 200 GSM, which allows it to take
any medium at all. As we're working with circles
as a basis for our animals, having something you can create the same size or even different sized
circles could be a bonus. Of course, you can
simply freestyle your circles as they do
not need to be perfect. However, having a
compass or one of these templates for you to trace around the circle
could be very helpful. Now, I am a little obsessed
with Posca pens right now. As they are a paint pen, They will go on pretty
much any surface and they will go over the
top of other mediums. I find them to have a nice
smooth application and they come in a pretty good
range of colors and sizes. They're good for outlining
and rendering your animals. Copics are also one of
my absolute favorites, depending on which
country you live in, you might call them
Copics or Copics. They are an alcohol, ink. The smell might
bother some people. They blend really
well though and dry quickly and have a
huge range of colors. They also have their own
range of fine liners. Part I love most about Copics is how eco
friendly they are. You buy the Copic once and
simply refill it when it's empty and replace the
nibs if needed. Just. I love everything about them. Soft pastels or chalk pastels
are smooth and powdery. I like them for a softer look. Just be aware they are
quite messy and you will need a damp cloth or
paper towels for your fingers. The powder will
probably go everywhere. Then when you're done, you could probably get some sealer to put over the top of the
paper to keep in place. Oil pastels are another
favorite of mine. Soft pastels have
more muted colors, while oil pastels have
more vibrant colors. Like Posca pens, they go
on very smoothly and you can layer the colors
on top of each other and also blend them
together really well. Water colors are
another medium you could use to add color
to your animals. They come in tubes, in pans, as pencils, as crayons, all are
activated with water. They can be highly
pigmented and vibrant, or soft, and muted
like soft pastels. Lastly, you have pencils and they come in many
different forms, from your average
coloring pencils to water activated coloring pencils to pastel pencils and of course, graphite pencils or
charcoal pencils. Now, I haven't spoken
about acrylic or oil paints here or
other various inks, as I'm not using them
in these lessons, but of course you can use them to render your
animals if you want. There's no right
or wrong way here. There are absolutely
no limitations. Just you do what your
heart wants you to do. Let's get on with it.
4. 04 Circle Animals Meditation: Hello and welcome.
Before we begin, I want to acknowledge
the first peoples of my beautiful
country, Australia. The traditional owners of the U can beer land
I live and work on, and pay my respects to the elders past,
present, and emerging. For this meditation,
we are going to briefly connect in with
our physical body. Take a few moments right now to make any adjustments
you might need. If you feel safe to
close your eyes, it's time now to bring your
attention to your breath. There is no need to change it. Just notice it. Notice the in breath
and the feel of it passing through your nose,
through your sinuses, through your throat,
down into the lungs, filling your lungs, and then
moving out of your body. Notice your outbreath, exiting your lungs
through your throat, back out through the
sinuses and out your nose. Notice how quick or
slow your breathing is. Notice how full
your lungs become. Simply notice you are breathing. You are breathing and you
are alive with the breath. Notice the rise and fall
of your chest or stomach. Notice how your torso feels. Front, back, and sides. Do you have any aches or pains? Is there any discomfort or
are you totally relaxed? What about your arms? Check in with your ar any aches, pains, pins and needles. Do they feel comfortable? The invitation is to move
any part of your body. If you feel the need, reposition your body or do some
slow gentle movements or stretches as you continue
to pay attention to your one of a kind body with
its own beautiful quirks, its own desires,
needs or demands celebrate your divine
body no matter how you are experiencing
it right now. Now, notice your pelvis, your legs, your feet, How are they feeling? Any pain, discomfort,
tightness, tingling. Is your lower body comfortable or is it asking for
some movement too? The invitation,
again, is to move your body in whatever way
it is calling you to. If you want to stand up
and sway or move around, follow your body's guidance
or stay seated or lay lying down and simply give your body some
loving attention. Send your body some gratitude. Even if you are feeling pain, send those spots a
little extra love, gratitude, and attention. You could ask those parts of the body what they need or want, and listen for a response. Now we will move
to the shoulders, the neck, the head. Notice these areas. Are there any aches or pains? Is this area calling
for some movement? If so, give your body
what it is asking for. Now, we're going to come
back to our breath. Notice the inhale
and the exhale, Bring your attention to your
whole body now and send it. Thanks for existing. No matter what state it is in, begin to notice your
surroundings now. The surface of your body, the air around your body, the sounds in the room, the sounds even further away. When you're ready,
open your eyes. If you had them closed,
move your body, especially if you have
remained relaxed through this and move on to
the next lesson.
5. 05 The Workbook: Hey everyone. I just want to take you through
the Circle Animals workbook that is in
the PDF down below. You can use it with this course if you want to.
You don't have to. I had mine printed
out at Office Works, but you could just print it
out on your printer at home. I had it done on 20 GSM paper, which is just the weight, And it's quite a thick paper, but I don't think you
really need thick paper for the workbook and you don't
have to have it in color. You can just print
it out in black and white or you don't have to use
it at all. It's up to you. I had mine bound
and done in color. When you open it up,
there is a note from me, instructions on part one. Then we hit section one, which is all about
practicing heads and ears. Then you have the drawn one and then you have it in a lighter color for
you to trace over. And then there's space for
you to practice it along each line as heaps of different heads for
different animals. You can even guess which
animals there might be. For instance, this
would be a Koala. This one here is a giraffe. Then you get a whole heap of practice pages here,
intersection two. It goes on to practicing
muzzles for your animals. It's the same deal. I
have one drawn out, one for you to trace, and then plenty of room
for you to practice it. Then a page for you to
practice it on as well. Then section three is
about practicing the eyes. The practice pages
if you want to try different designs than
what I've already got. If you think of a
different animal or a different type of eye, then you can use this space to have a go at it and
see what it looks like. Then section four is
practicing the feet. Section five is
practicing tails. Then part two instructions
for part two, and then we go into
section six and this teaches you how to actually
put the animal together. There's the drawing
of the circles, adding the
distinguishing features, and then putting
it all together. Then there's an example of all the different animals right here that you could
potentially draw. Then on this page, again, you've got the circles outlined that you can trace
over and you can practice on. And then a completely blank page for you to give it
a go for yourself. In section seven, I take you
through the two circles, horizontal animals,
then you practice here. And a whole page,
whatever you like. Section eight is
the practice page for single circle animals. Then again, a whole blank
page for you to go. Then section nine is where
we come to the totem pole, which is the project
for this class. You can do the values, there'll be a separate
PDF below for that if you want to do that,
but you don't have to. You can just choose
your favorite animals and turn it into a
little totem pole. Again, I've got my
example here and then the circles for you
to practice from there. Then there's a practice
sheet for you here. Then there's a party
note for you all, me and my dragon, done using the circle method. A little bit of information
about me and then one of my favorite quotes, that's it. Hopefully that's an extra, added bonus for you
and you enjoy it and use it and get
lots of use out of it. I guess now I'll see you
in the next lesson by.
6. 06 Circle Animals How to draw: Okay, let's start looking at how to draw these
circle animals. It is super simple and begins
with a circle or more. You can have just one
circle, two circles. Even some animals have
three or even more. If you're doing a caterpillar, there's a lot of circles
there and you can do the same size circles or different size circles.
It's up to you. These are potentially
the tools that you can use to
make your circles. I have circle templates,
whatever that's called. Is it a protractor? I have
a protractor and a compass. But for my animals, I tend to just use
my circle template. It's quick and it's easy. You don't even have
to use a template. It's quite possible
to sketch out circles in whatever
size you want free hand because these animals do not need to be perfect. They're whimsy,
cool, they're not realistic, It doesn't matter. Just have fun and explore. So we can do either
a one circle animal or like this one over here. Let's do it a bit smaller
on a two circle animal. Or you could even have
a two circle animal going this way side by side. Or you could do a
two circle animal where the body is
bigger than the head. Depending on the animal, maybe the body isn't even
that close to the head. I think we can probably
fit one more over here. Whose body is not
close to the head? Now, if you've had
a look at my work, you already know what
animals these are. Probably I do highly recommend
having the workbook. If you want to, It's a
great place to practice. It's going to show you
all the information I'm about to show you now. And you can follow along with me using the workbook
if you want to. Once you have your
circle guidelines, now you need to think about the features of the animal
that you want to draw. For example, let's do a
cat on this one, right? A cat is known for having triangle ears and
a triangle nose. The mouth comes down
like the letter J. And then you do a backwards
letter J, the cat eyes. You could do the cute
ones if you want to, the round cute ones. Or you could do the more
feline almond shaped ones. I think we're going to stick
with the cute ones today. I, you can also, that triangle is
not quite right. You could also do
some dots here, which is where the whiskers come out and then some whiskers. Of course, the other
thing that makes a cat recognizable
is its wishy tail. Depending on how
detailed you want to go, you can put its front paws in. If you want to give it
some legs, you can. I don't particularly
like the legs, so I'll just do the paws, and then you can do some
more paws here if you want. And give it a back leg, which is like an upside down J. As long as you've got the more pointed ears,
the pointy nose. Some whiskers, people are
going to know that it's a cat. And that's all you really need. Anytime you want
to draw an animal, all you have to do is think
about its obvious features. For instance, an elephant has its big ears and its nose. As long as you've got
these two key features, people are going to
know it's an elephant. Give it some cute eyes. Get a bit of a actually
instead of a mouth, I might give it some
tusks because that is also another key
feature of an elephant. Then their feet are quite
like the solid round, I want to say trunks, but
that's a trunk, right? But you know what I
mean, it's just solid. This is how I usually do my
elephant feet to give small, even though they're
actually feet two. And then an elephant has
a small, tough detail. So maybe you want
to do an animal from your imagination.
And that's okay too. Just think about the
features that it has. Like one of my favorite
animals is a dragon. So I'm going to give a cut
eyes and I'm going to give him a bit of a
muzzle and give him some sharp teeth and ears that come out
of here like that, and maybe a little
horn on either side, and some horns
coming along here. And he can have the
same toes as the cat, but we'll give him some claws. Of course, one of the most recognizable features
of a dragon is its wings. We've got to give it some wings, which is essentially
like a triangle on either side of the body. Just maybe give it
a bit of a curve up and over, up and over. Then if you want to, you
can make it like bat wings and give it a few little
scoops along here. And a dragon tail. I'd like to do a love heart on the end of my dragon tails. Oh, and you can give
him some more spikes for this one. I'm sure you can figure out
what this one is. It has a very long neck and it has two little horns
up on the top of its head. Two little ears.
I tend to give it a muzzle like this with its
nose and a smiley face. And of course the cute, now they have really
long lanky legs. It's up to you how you
want to portray that. Or if you want to portray that, I'm going to make it look like it's sitting down.
Like the elephant. I'm pretty sure they have hoof, pretty sure they have hoofs. Maybe I'm going to give
that little V there. And then I'm just going to give it a nice long arms there. And then of course the
other recognizable feature are there spots now. They're not circular,
almost squish, but not perfectly square. You can do little sizes and bigger sizes and have them half off the side like this, it's going around the face. I'm going to give him a
little circle belly button. I actually might give them
all the circle belly button. Okay, so for this one I was thinking a crocodile normally make the crocodile's
head a bit smaller, but let's go with it anyway. The crocodile is known for
his big snout, sharp teeth. I'm still going
to make him cute, though he also has
a nice long tail. And then he has ridges along his back and a second line of ridges that we will see on
this side and then his feet. I always remember it doesn't
need to look perfect. It doesn't need to look exact. As long as you've got some of the key features, it's okay. Um, and you don't always
have to follow the circles. They're just there to guide you to give you the proportions. You don't have to have them on top of each other like that. You could have the circle
for the head here, and then the body like that. And this one you could
turn into a bird. Usually give a bird
a pointy beak. Maybe toughed its hair a bit, and maybe he's sitting on a log so that you can see
his tail feathers below. Here again, just think about the features of the animal that you're
trying to draw. Point wings. Tail feathers. And it's a bird. Now this one over here
with the head far away, could only be a few things. I was going to say one thing,
but technically a few. This one today though, is going to be a camel. I cannot remember for
the life of me what they're mouth looks
like. They're muzzle. Hmm. Okay, hang on, I hate it. Okay, so you're gonna bring, use that as their like jaw and bring this down
and out like this. Nice big fat nose. Let's give him a bit of a smile. And of course that
keeps the eyes and oh, that kind of looks like a deer, actually, now that I'm doing it. Oh well man. We'll give him some nice
long legs with these hoops. And to detail. And if you want, you could give him a bit
of a tuft up here and we have a deer looking camel. Maybe if we bring the
hump more prominent, put his tail out here. It is what it is.
Now for this one, there's all sorts of
things that this could be. But let's go with dolphin today. For the dolphin, you give them a tail and it's almost
like a tear drop or a leaf. You bring the body down
into the tip where there is a tail and then fan it out. Do a backwards. You come around and
down and you come around and down is like this. Backwards is like that. Follow this motion here. This part like that. Almost like a question
mark, actually. Yeah, just as full. As full as that. Just
make it more elongated. Then follow this
to do its muzzle. Just bring it inside
the seclelittle bit. Give him a smile. Then the eye is pretty much like if you followed
the smile up here, the eye there maybe
flatten this just a bit. Then you give him he backpack. He's little breathing
hole. A fin. The fin is also using
that little backwards S curve as well. That's just some of the
animals that you can draw with this method. Give it a go. I'd love to see your
work in the projects. Yeah, I'd love to see what animals you do
and what you come up with. Please share in the next lesson, we will finish all of these
off, we'll outline them, and then do some coloring in
techniques and you'll be on your way to creating your
animal values totem pole. I'll see you in the next lesson.
7. 07 Circle Animals Outlining: Okay, welcome back. Now it's time to outline these in whatever outlining
pen you prefer. I'm going to use a Posca pen. Just be careful with
Posca pen because it can run when liquid or
water is put on it. When I'm out, I'm putting in any extra details
that need to be added, and I'm not following
every single line. For instance, let's see, can I get close? If you see here the
circle comes around, but we don't want it
to come around first. I'm going to start here
and I'm going to give it some little fur on
the top of its head. Then I'm going to come up
and over with the ear, which is fine, but I'm not going to do this
part the whole way. I'm going to start here and
bring it around and then flick this up and
that gives it an ear, and then I'll do the
same on the other side, up and over the starting here, bring it down and
then flick it up. That wasn't a very good
flick, but that's okay. Then as we're going around, I might just give it a few more, little tuffs of hair to
indicate that it has fur. Now, we'll do the nose, the J, and the backwards. A dots, which is the whisker
holes, then some whiskers. I do these ones really lightly
and I just flick them out. And then I'll do the eyes
and I adjust them as I go. This one was a bit low
and this one wasn't. And so I've made sure
that they line up. Then I'll do the big white
circle and color in the rest. Now you can give it a chin or you can just go
straight into the body. Continuing that fur and I'm going to do the paws. I actually think I
might change it to that and then tail. Do it, sir. And that
is the cat outlined. Now we move on to
the birdie bird. Now, owls generally
have really big eyes. I'm just going to do, I think, two white circles
and that might help make its eyes look
a bit bigger then it's just to indicate
that it goes around. Then for the wings, I'm going to come
down like this, but I'm going to start to add in extra parts there like that to get the
individual tail feathers, the individual wing feathers, Not tail feathers, these
are the tail feathers. Then these are just little bits of tiny little
feathers on the chest. And it's sharp talons, claws, and now the
tail feathers. Now the dragon, I'm not really happy with
its muzzle here, so I'm going to make it even and I'm going to do the
same sort of one as I did on the giraffe instead, give him some big nostrils for all that fire
to come out of. To little tee like a vampire. I actually might give what
I'm gonna do the circle, but I actually might give him. We'll see how it looks. Nah, we'll just color it all in. And now I'll do this part part, and again, with the ears, the same as with the cat. We're not going to bring this the whole way round,
we're just going to do that. I almost forgot the
top of the head. Oh, that's what I
forgot with this one. So at this time I'm
actually going to do, I'm actually going to
do the big claws first. What I was saying I forgot
to do with the dragon is its breast and belly plates that help protect it
from o viceration. I need to put that in and you can, if you want, put
some ripping up, bring its body out like
this and then it's tail. So as you can see, even though I started
with two circles, there's not really much
of the circles left. You can see a hint of it
here and a hint of it here. The two circles are only ever
just for a starting point. Now we'll do the giraffe. I'm going to start with
its muzzle and it's no smile, cute little eyes, but I think you get
the gist of this now. I'm going to just fast forward
through the rest of them. If ever you have
questions though, please do feel free to ask. Reach out to me and
I'll do my best to answer any questions
that you might have. Now it's time to use
an eraser and just rub out all of the
pencil lines that you no longer need before
we go on and add some color to your
circle animals. So I'll see you in
the next video, where we start
adding some color.
8. 08.01 Circle Animals Rendering with different mediums - Part One: Okay, so I'm going to do the elephant in Copics
and I'm going to do blue. I don't know why, but I like
doing my elephants blue. So it is what it is with Copics. Actually with pretty
much anything color, I like to have different
shades of the color. For this, I'm going
to do 213-20-4209 because it's alcohol ink. You need to start with
the lightest value and then add the darker value because you can't put the
light over the top of the dark like you can with
something like acrylic. The first thing I'm going to do is color the whole elephant in with the blue B 21. The thing with Cope two, that's one layer
with the same color. You can actually make it darker by putting
a second layer on. Can you see that then even darker still by
putting on a third layer. Each color has a couple
of levels of darkness. You can keep that in mind if you don't have as
many cops as I do. But that also means that you
have to put it on pretty quickly because otherwise you're going to end up with dark spots where you don't want them. I'm going to go over the
nails because I think I'll keep the nails the
lightest light. Essentially this light color
becomes the high lights, whereas this next color
becomes the midtone, the actual color
of the elephant. Now what I do is I put this on wherever I
don't want the high light, and see how I've left that to make sure there's
a high light there. I tend to keep my
highlights along the top, Sometimes the
outside edges, I am, for the purposes of this
going to imagine the sun is coming from the top
right hand corner. Sometimes with shadows, you get a reflection on what
would be the dark side. Sometimes I'll leave a hint
of highlight there as well. Now, each of these ridges, these lines are like the dip in I'm going to
leave the shadow, the high light in spots
like that along the nose. And I'm going to
leave that and then go over it with the 21. That just helps blend
it all in together. I might just do that
on the top here too. It's just using this. Stops it being such
a stark difference and makes it blend
more seamlessly. So the next color is 24. And I'm using that to
indicate where it's dark. Again, I don't want it to be a really flat line
between the colors. I'm going to use the B 23 and
just blend it down and in so that hopefully it blends
in and it looks gradient rather than linear. Okay. And then the B 29. I'm using it for
the deep shadow, so we're going to keep this one linear because this is the shadow that the
trunk has made. And the top ridge of the ear and the side of the face, the side of the nose, the hand and the arm. The horn, and the foot. And that should do it. Sorry. Looks really blurry.
I'm sorry about that. I'm not sure how to fix it. That should do it, hopefully. Let's give you a
small understanding of how to use copies. This isn't a copy lesson is drawing whimsical animal lesson. Let's go through a
few different mediums to use to render them. Maybe you'll also learn
something new with that too. The next one I'm going
to do is the giraffe. I'm thinking I might
make the giraffe pink and I might use
my Do want ink tents. Okay. What have we got? I don't know how they'll go. I don't think this is like
really corali, scarlet, pink, crimson, carmine
pink, and chilly red. So I'm just going to turn it
over and see how they look. Yeah, see that one
doesn't really fit. That one seems to fit this
one really well actually. And then M, yeah, I don't know,
the light pink isn't as light as
I was hoping might actually get neo color for the lightest one. And this one is like
I did with the topic. I'm going to do the same thing. I'm just going to do the
thing in this light. First, I'm not being
finicky, as you can see. I'm not worrying about
staying in the lines. This is such a small drawing
that it's really hard to stay in the lines
with any type of crayon, like medium. I'm not caring. This is a water pen that
I'm using to activate the pigment and snee it out. So now we'll use the
light pink in the. Rents still feel wet, but that's okay and I'm going to leave the spots actually having it kind of damp
like this is nice. I don't think I need to
really activate the pencil. That's kind of a new discovery. I like it, I think this part was more
dry because it seems like it's harder
to get a pigment on where the paper is more dry. Hm. And I'll just actually might see what
happens if I. Yeah, it's not really gonna do a lot. I don't think it kind of
helps blend a little bit. I guess again, I'm not
being too picky with it. I mean, if I was making
this to give someone, one, I'd make it bigger
than this, and two, I'd spend more time being
more careful with it. But this is just as
a demonstration. And now, the dark, dark, dark on the very
bottom of things. And anywhere that
there's shadow, I might even do that there under the neck here. Cute. So once it's dry, I'd probably go through and add some white highlights with probably a white
posca paint pen.
9. 08.02 Circle Animals Rendering - Part Two: Let's do the crocodile, because there's a lot of
space there in oil pastels. And let's make him
orange. Why not? Now, with oil pastels, you can layer them. You don't have to
start with the light. Well, I normally do. I just love how
smoothly they go on. Again, they aren't designed
for small little artworks. They're much easier to
use than the bigger ones. Interesting that I use orange. It is not a color that I
normally use, as you can see, as this is brand new
and I have not used it before I was out.
I'm terribly sorry. So as you can see, I kind of put the darker orange
up into the light orange. And now I'm going to redo the light and bring it
down into the dark a bit. And that just blends
the two of them together and smooths them out. Now go the next darker, putting this all
along the bottom part and anywhere that you think
it needs to be a bit darker. There we go. I'm just for fun actually, first of go over this a bit
more with the medium tone. Then the last thing
I'll do is the red. We'll do some more
ridges along here too. And he's done, and
that's how easy oil pastels are for the Dolphin. I'm going to do
chalk pastels just because the Dolphin has a fair bit of space and
not that much detail too. Because otherwise chalk
pastels really need to be bigger artworks
for other people. Might be able to do small or
finicky stuff, not so much. I think we're going to do a
gradient for the dolphin. I'm going to start off
with some light, light, light blue because
their underbelly is actually a bit
lighter than the top. And I'm also going to just
have some here as well, maybe do a bit darker. And now I'm going
to do some teal. Well, I guess it's greenish. And then I'm going to, my dirty fingers smudge it
all up, blend it all in. And then for the darkest darts, I'm going to do some purple. As with all of these, if I was going to give it to
someone or sell it, I would lay down my colors
and then I would re go over the black parts again to help bring
them back out again. And I would add my
white highlights. So I think for the owl, we might just do normal pencils. What color shall we do? Okay, so I'm going to use my
derwent color soft and I'm going to actually make its belly met and up into the face, maybe a little bit
on top of the wings. In the ends of the
tail feathers. And then I'm going
to use purple. Be careful when you mix purple and green because it can make brown depending on what meanium you're using and you're
not going to want brown. But with pencils you're usually a bit safe because they won't
mix together super well, like the pastels or
paint watercolor. Then I'm just going
to put what is this Logan Berry underneath and into all of the darks. Sorry. It's to be
hard to Isn't that interesting of all the mediums? The pencil is the
one that I find it harder to talk when I'm using. That didn't turn out as nice looking as I
thought it was going. But again, lessons
in not caring, in just doing it because
you like making art. It's about the process, not the end product unless
you try to earn money for it. And I would like to
help promote doing art for the sake of doing art and not because it's something
to earn money from. Oh, I forgot his peek. Let's do Ginger,
the little talents. I don't have any brown in
this pack. That's fine. I will use Lincoln green. And that is my coloring in
pencil on a small bitty thing. You could do a much better
job if it was bigger. But again, this isn't
about the mediums just. Here to show you how you can do circle animals in
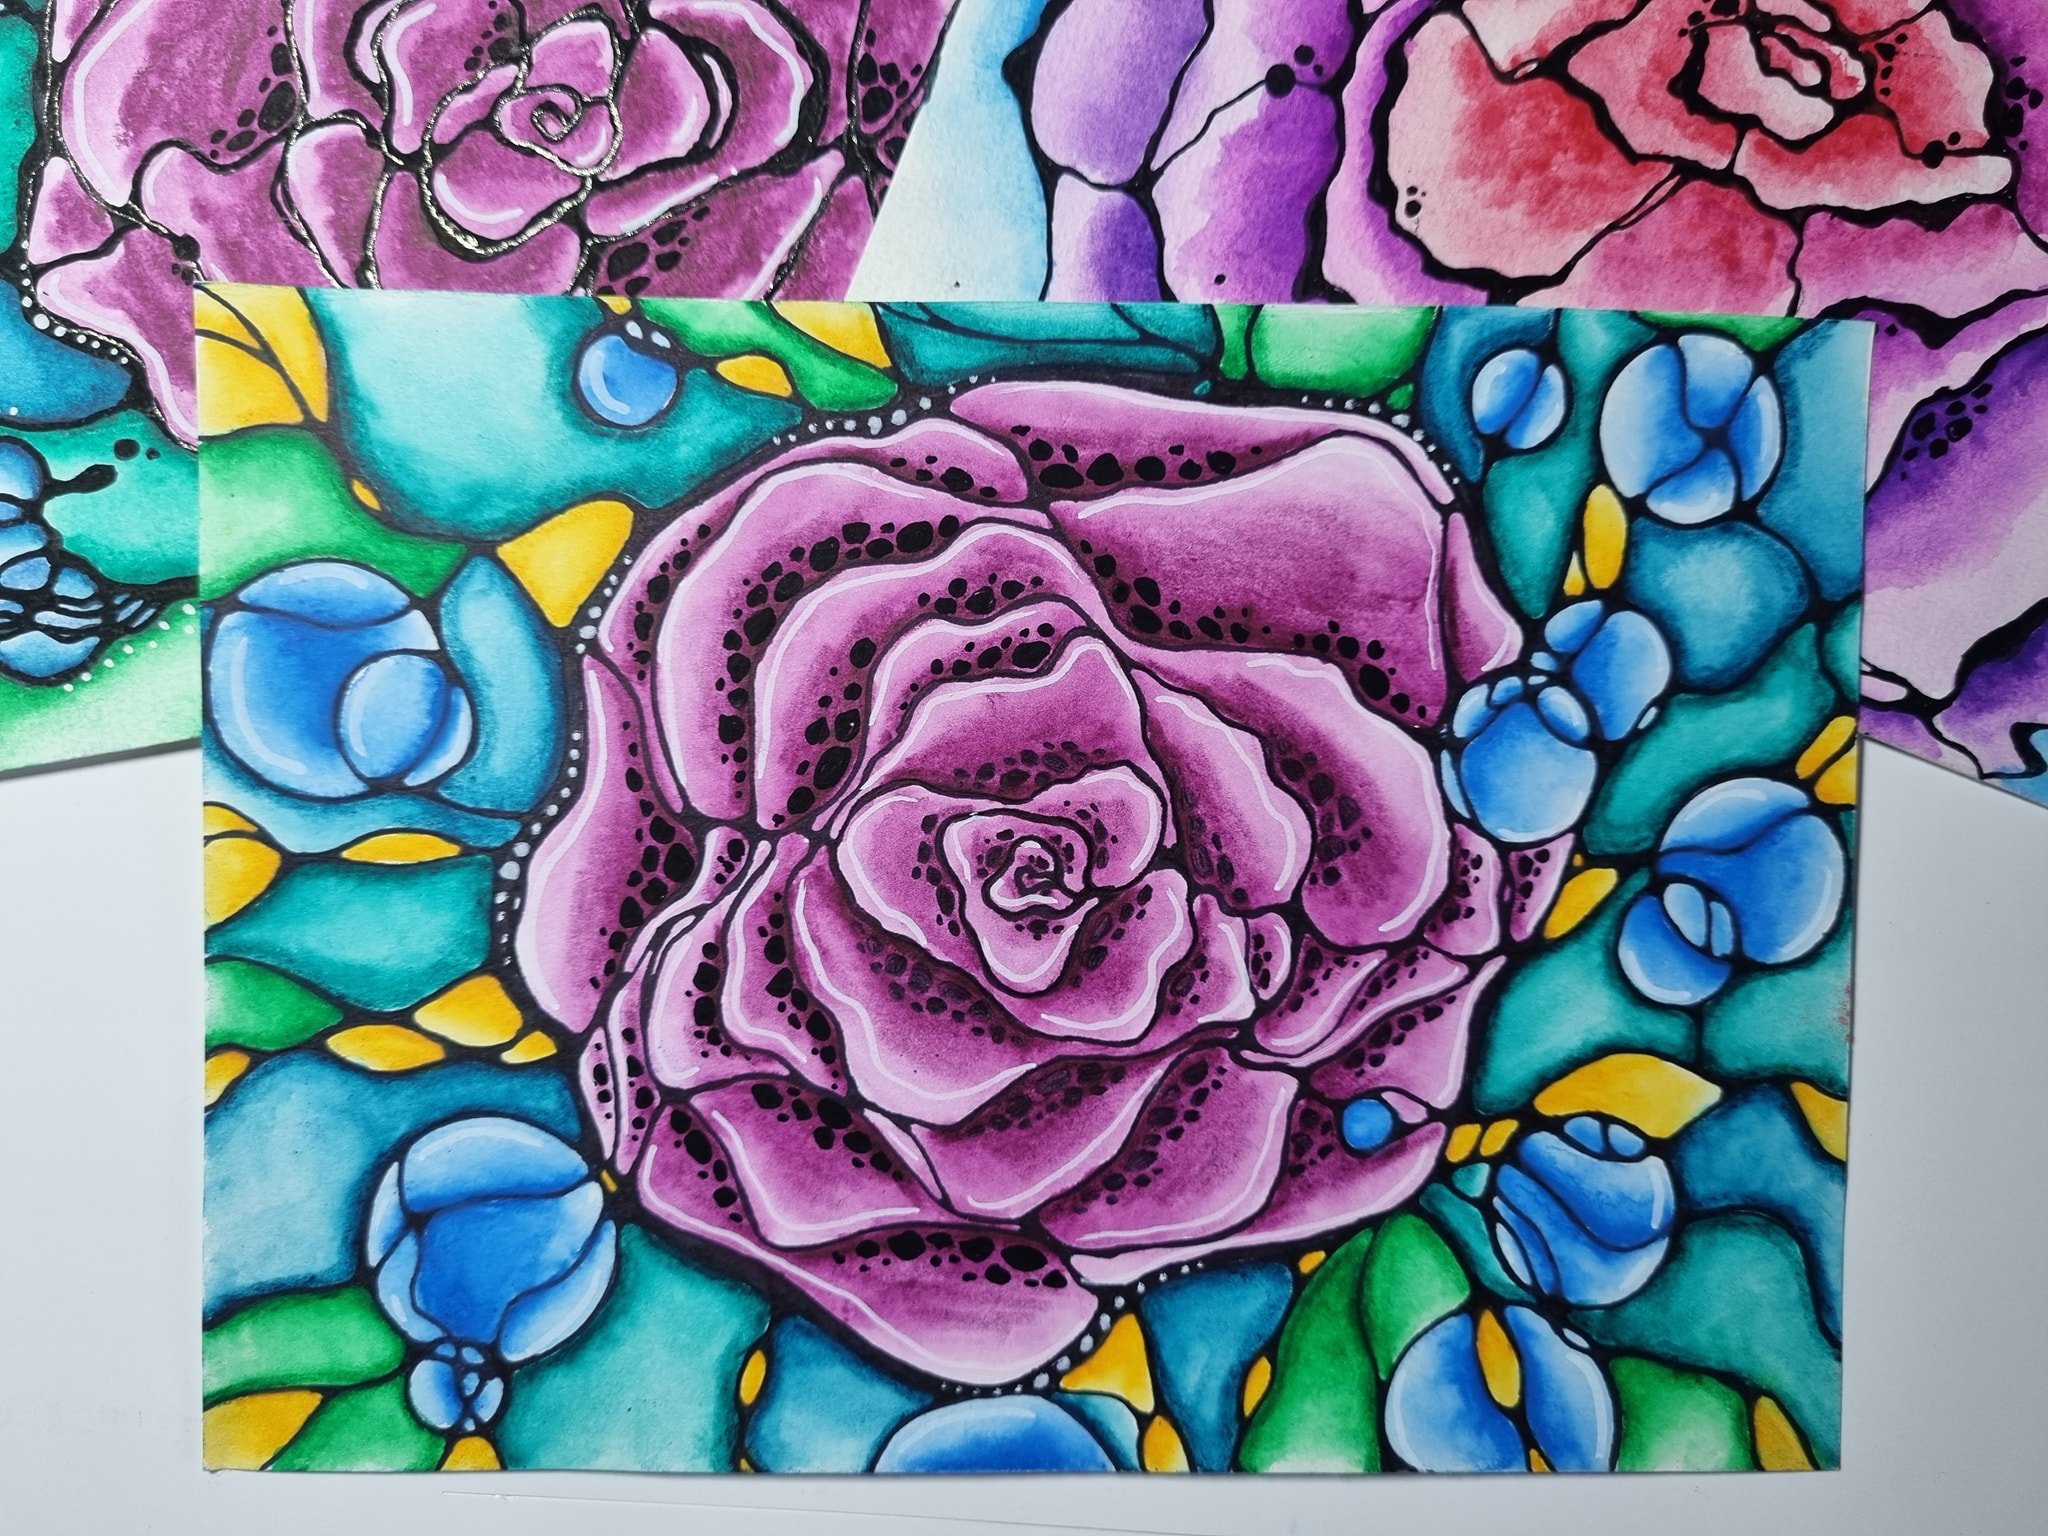
the different ways that you can then render them and add color and details for the dragon. I'm going to do the type of rendering that I am currently obsessed with. It takes forever. I may have to fast
forward through this. It is known as pointsm. I'll be using my
Posca pens for it. I think we're going to go
purple and teal probably again, starting with the lighter one. You just do, of course. The more dots you do together, the darker and more
pigmented it will be. I'll show you when I get to the dark pink because I'll start off doing a lot of dots like this close together. But then I will spread them
out more as they head into the light pink to help with the slow gradient transition
between light and dark. Now with these ones, you can start whether
either dark or light. It's up to you because they
are technically paint. Each color will go over the
color that's underneath it. There's the pink at the light
pink and now the dark pink. And so I start off
with a lot of dots, but now I just add a couple of little dots
to grade down gradiate, is that a word to make it a gradient, You know what I mean? And then I'm going to use this one just to give it a bit of
highlight along the edges here. And I've also been using my Uniball eye
because this has a slightly darker pink hue just to give it
that bitter shadow. Now of course, because these
are Posco pans and pens, they have fine tips. You can be detailed or while
I can be more detailed in the smaller images than what
I can with other mediums, I'll probably fast forward
through the rest of this one ca see at
the other side. So I did that a lot quicker than I normally
would as well. But I just wanted
to get it done as quick as possible so
that you could get an idea of what I like to
do with the pixels. Pixels? No, the pointer ism
I can't seem to get my camera to
focus very well, and it's annoying me. No, it is what it is right now. Anyway, I guess you
get the picture so I can leave it at that
experiment. Have fun play. As you can see,
I've done how many? 12345678 on one piece of paper. And it's all practice.
It's all play. Just have fun experiment. See which mediums
work the best for you and practice. Practice. Practice, because
that's all art is. It's about practicing
art is not a talent, it is a skill and you gain
that skill by doing so. Hopefully, this
encourages you to do. Anyway. I'll see you in
the next lesson. Hi.
10. 09 Your Top Five Values: Welcome to the Getting to Know Yourself portion
of this lesson. If you are here doing
this lesson, way to go. I think knowing yourself is a really important part
of living your best life. One of the most important
things to learn about yourself is what your
highest held values are. Values are what help
us determine what is or is not important to us. This is what then
helps us to make decisions on how
to live our lives, what job to take if
we want to study, travel, sober up, or continue on a path of
instant gratification. Values help us decide if the life we are living
is right for us. Our personal values influence
every aspect of our lives, right down to our relationships
and everyday lives. Part of the importance
of learning our highest values is
because we all give values, different levels of importance. Knowing your most important ones could make the difference between a successful
or failed career, relationship or lifestyle. When you become really
clear on your values, you begin to make
the best decisions for the best outcomes for yourself and can
potentially save yourself a lot of time,
money, and heartbreak. Here is a small list of values just to give
you an example of the process you
can go through to discover what your most
important values are. The list in the
values PDF below in the resources section has a lot more values for
you to get ideas from. And of course, you can
always feel free to add your own to start with, cross out any and all
that, do not resonate. Keep in mind that you might value everything on this
list and that is okay. Crossing something off does
not mean you don't value it. What we're doing
here is trying to find your absolute
most important values. For instance, some people might
choose money over family, especially when we are young and trying to build our lives. We might choose Korea
over relationships. Others might choose
family over money. There's nothing wrong with
either of these choices. They're just different. And show our current priorities. Let's find your most
important priority right now. This time we're going to
cut our list by half. It could get a little
harder now because we are definitely crossing
things off that we value. We are now having to make judgments on what we value more. This is how we get
to the core of who we are and how we want
to be in the world. Now we are going even further. If you have more than ten left, it's time to cut it down
to your top ten values. Always remembering that striking something off the list does
not mean you don't value it. It's just lower on
your value hierarchy. One last push, now let's
cut that list in half. Again, this could feel very
challenging, very difficult. You might have a
lot of resistance. I know, because every
time I do this process, I have resistance yet. Now you have your top five
most important values that you can now measure
your decisions from yours and others
behaviors and actions. And even see where
your boundaries are being crossed or where
your boundaries even are. In the next lesson, we're
going to go on a journey to discover what animals we associate with each
of our values. Then after that, we will create our project
for this course, drawing our own personal
animal totem pole. I'll see you there.
11. 010 Animal Association: Have you ever played
the association game, where one person
says something and the next person says the first
thing that comes to mind. For instance, one
person could say up, and the next would say down. Which could make the
first person say town. Which could make the
next person say cry. Then making the next
person say baby. Which the next person might say mother, so on and so forth. What has this got to do with associating animals
with your values? Well, you could try
that with your values. You might get to an
animal straight away, or it could take a
while to get there. For instance,
loyalty equals dog. For me, straight away,
wisdom equals owl. Now, honesty, that's different. Honesty could take me
to truth, to sleuth, discover, adventure
ship, ocean, whale. Don't question it,
just go with it. Or you could just go with the first animal that
pops into your head, no matter how ridiculous
it might seem. For the purpose of this course, we will say my top five values
are honesty, creativity, intelligence, humor, and
communication without thinking. I will choose for honesty, a horse for creativity, a peacock for intelligence, a dolphin for humor, a chimpanzee for communication,
rainbow lorikeets. I truly have no idea why
those ones came to mind, but I'm just going
to go with it now. Another way you can
decide on an animal would be to look at
the behaviors or personality of an animal and match it with your
values or vice versa. Or you can think about how your values or an
animal make you feel. You could also look
towards symbology and see what others say
an animal represents. You could just go to
Google and type in animal characteristics and
see what people have to say. That may make you think
of one of your values. For instance, let's
look at wolves. Wolves are highly intelligent, playful, devoted to family. Wolves, educate their young, take care of their injured, and live in family groups. If you value community, the wolf might be
a good choice or family could be well
represented by a wolf. Wolves are very social, also could be representative
of friends as a value. Also, there is the lone wolf
that you can think about that could represent the value of individuality or solitude. Clearly, I could talk
about this stuff forever, but I think you get the picture. If you do get stuck though, you are welcome to message me and we can brainstorm
your animals. Or you can write on
the message boards. Or head on over to my
Facebook group and have a chat and see what other people are choosing for their values. Maybe that will, I don't
know, inspire you. In the next lesson, I'll use the animals I chose
earlier and show you how to create your very own totem pole to represent your top five values. See you in the next lesson.
12. 011 Circle Animals Roughing in the totem pole: Okay, welcome to the
animal totem pole lesson where they're going to
draw out totem pole. I would normally do this on a
bigger size piece of paper, but it's going to be easier
for me to just do it on a, like a letter sized paper
or a printer sized paper. But if you're doing
it to display, I would highly recommend doing
it on like twice as big. We call this four and we
call twice as big an three. I would do it on an
three piece of paper. But for the sake
of being able to show you what I'm doing easily, I'm just going to do it on
a small piece of paper. Even though small can be
quite difficult to do, I highly recommend
doing animals bigger. It's a lot easier to do the detail and get
the detail in there, but at the end of the day, you do whatever you need
to do or want to do. To start with, what I'm going
to do is I'm going to find roughly the center of this
piece of paper for me, that's going to be around
the 10.2 centimeters, which is I think around 4.4
" For those who do inches. While you may not see this, I'm going to draw a very
light line down the middle. Now I've already measured
this piece of paper, and it's about 29
a 2 centimeters. If I'm going to do
52 circle animals, I would need my circles
to be roughly 2.9 centimeters wide,
about that wide. However, I'm doing a
peacock for creativity. That's going to actually let
me get a bit closer for you. That's going to actually
be a big circle and a little circle with a neck. I'm going to do a chip, which is going to be
the normal two circles. Then I'm going to do a Dolphin. You can't see what I'm
saying, what I'm writing. Then I'm going to do a dolphin which is just the one circle. And then a rainbow look, which is also just the
normal two circle. Then lastly on the bottom, I'm going to do a horse. This one is actually going to be three circles to
closely side by side. And then one up here. I guess at the end of the day, the universe has allowed me to choose animals that
are going to show you a number of different types and sizes of my two circle animals, which is actually perfect. I'm going to pretend that
I did that on purpose, I didn't, but let's
pretend that I did anyway. At the bottom is going to be the two circles for the horse, but it's roughly be one size. I'm just very lightly
measuring out. Hang on a second. Wrong way. I'm just very lightly measuring out where
I'm going to have it. The horse is going
to be roughly here, then on top of that is
going to be the Lokey. Then on top of that
is going to be the Dolphin, then the chimp. Then on the top I'm
going to do the peacock, because obviously peacock
is my highest value. Okay, so now that, that's
roughly roughed out, I'm going to get
my circle template and I'm going to
put the circles in. Now let me get you closer. Again, with the horse always paying attention to
where this center line is, I'm actually do it this size, I'm going to overlap
these two circles. Can you see that? Yeah. I'm going to overlap
these two circles because it's not really a side by side. That's what I'm trying to say. A horse's body isn't
quite that long, I'm going to overlap the two. Then the head is
going to be smaller. I am not too small. Put the head like here
and that should be okay. And then on the horse's
back, well, hang on, let's, let's just put
the neck down here. We're going to bring the body
over here. Neck down here. And we're going to have
likes leg come out this way and then let's leg come out this way and
then I'll have a tail. He's going to be a bit stumpy, but that's okay in the ear. That's roughly how the
horse is going to sit. Then on his back, we're going to put the rainbow Arrokeet. I'm going to leave some
room for his feet there. Again, making sure
this center line is roughly in the
center of the circle. That'll be its body. And I'm going to make
the head the same size, but I am going to overlap
the circles again, so that's where the
lorikeets going to go. Then on top of that I'm
going to do a dolphin, but I'm going to make this one a bit bigger just because I can do the circle for
the dolphin there. And then on top of
that is the chimp. I'm going to go back to the
same size as the lorikeet. We're going to put
him about here. Again, I'm going to
overlap those circles. And then lastly is the peacock. I'm going to have the peacock standing on the monkey's head. I'm going to give
him that size body, then a smaller head, maybe this size head up here to give him
a nice long neck. Then for the peacock,
I'm also going to, you might have seen
me do it before, just give it this
arch that's going to guide where his feathers go. Okay, so that gives us a rough idea of where we're going to put the animals and now we're going to roughly
sketch them in. I've already roughly
sketched in the horse. Let's just add a bit
more detail here. Give them a cute little eye, a little smile of
mouth, his nose. And a man, if that's what
you call it, in the tail. Um, okay, just gonna rough
these out just a bit more around like this. I'm not super familiar with horses, so please forgive me. If you like horses, then maybe you can learn how
to sketch them properly, but I don't know how
there's his tail. Okay, so hopefully
that's not going to be too much of a
terrible looking horse. So this one is going to
be the Rainbow Lokeet. I actually think
I'm going to have him looking over this way, the same direction as the
horse, interestingly enough. So I'm going to do the
beak out like this. And a big eye. And I'm going to do these,
what do you call them, triangular shapes to indicate the feathers which can be colored in typical
rainbow look colors. Bring his wing out here and of course these parts of the
wings get really long to help them fly. Then we might just put his feet here so he's like
he's riding the horse. You know the wings over here and then all of these
little chest feathers. Okay, now we're onto
the dolphin again. I'll have the dolphin
looking out this way, going to bring his body down first to figure
out how big he is. He's quite bigger than
me, maybe not that big. And then do the tail like the bottles in the backpack on his back, the little hole, his eye will go here and the mouth usually
comes up to meet the eye. And of course he
has a little fin here and then that
is the dolphin. Next we're going to have the
monkey, cute little monkey. With the monkey, I'd like to give him a little bit of a in, so he's got his ears
coming out the side here. I'm going to put his feet here because I remember they have opposable thumbs
on their feet as well. And then I'm going to put his
tail coming out this way, put his arms out
like, hi, are you? Because he is, if
I remember humor, maybe he's like Ta. So I'll put his little
hands out like this and he has a cute little belly. I'll give him a
little love heart belly button just because I can always follow your heart. And then bring this
face around like this. Two big cute eyes and he's nose, big
smile of mouth. Give him a tongue. Maybe
give him some teeth. A little tuft of hair.
That's the monkey. And now the peacock. Okay, I'm going to put his here. I'm just going to do feathers. His, his wings. Wings. That's what
they called feathers. I'll put his wings here. This is the inside part
I'm going to give him. I don't even know
what shape he'd call. There's a thumb tip of the
thumb shape for the head. Give him a couple
of nice big eyes and the beak that comes up like that and then down
with his nose. And then attach the head to the body and give him his
little head feathers. Now for the tail, what I do is I find like
the center point here. I'll bring up tear drop shapes and I'll fan it out behind him, always coming back
to this point. And I like to keep them connected and on the other side. Okay, so that was roughing
out the totem pole. We have a horse on the bottom here and my horse is
signifying honesty. And so I love to have that basis of honesty
for everything. So I like that he's
on the bottom. And on top of that
is communication. Honesty and communication
go really well together. And on top of that,
we have intelligence, which also goes really well with honesty and communication. And then on top of that,
we've got some humor. Because what's life without
a bit of humor, right? And then on the very top,
we've got the creativity. And that is a rough
sketch of our totem pole. If you wanted to, you could make it so that it's
carved out of wood, like totem poles often are. I'm just going to have mine floating because
that's what I like. You do whatever you like. Let's go to the next lesson
where I will outline it all, net it up and make sure all the fine details are
in there. I'll see then.
13. 012 Circle Animals Outlining the totem pole: Okay, Welcome back. I'm just going to be using
a Sharpy gel pen for this. I honestly have no idea if it is water activated by water. But I guess we'll find out
when I color it in, won't we? Yeah, this is just
like a ballpoint pen. It's a gel pen. Any black marker you can use to
outline your animals. And you've seen me do
this in previous lessons. I'm just going too fast
forward this part. And there we have it
all nice and outlined. Hopefully they all look like the animals
they're supposed to be. We've got a little
horse rainbow, large dolphin, monkey, peacock. Now I'm going to rub out
all of the pencil lines, and I will see you
in the next lesson. Where we color in
our totem poles. And then we will be
done. See there.
14. 013 Circle Animals Rendering the Totem Pole: Okay, you awesome humans, Now is the time to color
it in and will be done. I don't always color mine
in the right colors. You can do that if you want, or you can color
them normal colors. It's up to you. They're
not exactly realistic, They're all whimsical
kind of creatures. So there's no point, in my opinion, in
following the rules. I'm not really a rule follower. I will probably do them a
really weird, crazy colors. I am going to be
using my Derwent Inc. Tents, water color pencils, so you will see me color them with the color
first and then I'll go over it again with one of my water pens to
activate the colors. Then afterwards, I will
very likely go back over all of the black lines just to bring the
black out even more. Lastly, I'll probably put in
some white highlights then. That should be it. And I will see you
at the end and watch my conclusion
video because I have some goodies to share with you that you might like to
go and get yourself. Otherwise, I'm gonna
fast forward this and I'll see you
in the conclusion. Thank you so much for coming
along on this journey. I hope you have a really
good time doing it.
15. Circle Animals Conclusion: Congratulations, you
made it way to go. My camera has decided it
doesn't like the Ozzie heat. So you'll have to put up
with one last slide show. This is a circle rendition
of Me and my Dragon. This hopefully shows
you that you can do people with this
technique as well. And I just hope you're
leaving this with the confidence to draw
any animal you want ever, even if you do it badly. Hopefully with a
deeper understanding of who you are and what
matters most to you. Remember, you can get the
Circle Animal Workbook in most Amazon stores worldwide. Just type my name,
Sam stars into the search box and it will be in the list of things
I have published. You will also find these
goodies in that list, coloring in journals that
aren't just coloring in books but journal pages 2 and can take you deeper with each
coloring in page. I also have a number of plain
lined notebooks for those like me love to write all
featuring my artwork. Also, make sure you
visit my website and see the other items you can
purchase with my art on it. While you're there,
make sure you check in the resources section
where you might find the occasional
freebie coloring in page. You can download,
Please feel free to e mail me at the e mail
address on the screen. Now if you have any questions,
constructive feedback, or you just want to connect, you can also find me on
Facebook, Tiktok, and Instagram. I even have a group called the Creative Cauldron on
Facebook where I would love people to share
their creations born from their new art
skills learned from me. Of course, be sure to share your project in the
project section. I love love seeing
your creations. And if you enjoyed
learning from me, make sure you check out my
other skillshare classes. And click the Follow
button so you find out when I
post new courses. Until next time. Do it badly. Until you can do it well thea.
 Samm The Creative Alchemist, Express Yourself!