Transcripts
1. Welcome to Sketching the Basics: Do you have a passion for
creating masterpieces, or are you ready to start
your career in fine art? Hi, my name is Kate, and I'm a professional
Award-winning artist teacher and photographer. And I'm here to let you
in on the secrets of turning your arts into a career. I will show you how
to turn a few shapes into a masterpiece in
three easy stages. If you can hold a pencil and you have the guts to pursue art, then you had the potential
of becoming something great. Now enough with the intro, Let's get sketching supplies you will need include
a sketchbook, drawing pencils and
erasers in a sharpener, these are your core supplies and you will need
them in every stage. Alright, let's get creative.
2. Let's Warm Up: Drawing code is the first
mistake amateur Artists make. Every professional
athlete warms up before a big race and you
should do warming up, gets all that shaky
sketching out gets you focused and ready to
tackle your project. So let's begin with
a challenge to get your hands in mind
ready for this lesson. Here is a random shape. Copy it down onto your paper. Now, I want you to take this shape and create
a character from it. You cannot erase the shape, but you can add to it. If you feel confident in
your skills to proceed, do so, you will have three minutes to
complete your character. If you need further
instructions to help you proceed, listen up. Character design is a challenge. It's testing your creativity. It comes naturally to some, it's a hurdle to overcome. If you have no idea how to
begin, here's some structure. Make your character have
clothing of some kind, or make this into an animal
or fantasy creature. Go with the first
thing that pops into your mind and don't feel rushed. Pause this video if you need time to work on your character. It. That's time. Make sure to snap a
picture and share this in the discussion section so that your art can inspire others. Now that we're warmed
up, let's begin.
3. Learn your Foundations: Sketching is the most important
part of a masterpiece. Everyone can put
pencil to paper, but not everyone could
sketch properly. Let's make sure that you have a leg up on your competition. Most artists quit at the sketching phase
because they aren't using the right movement in their arms. Take a look at this. Try drawing a circle
only using your fingers. It's going to turn out looking a little something like this. Definitely not what you
are going for. Okay. Now I want you to try drawing a circle only using your wrist. Definitely not what
we are going for, more circular, but
really, really shaky. Alright, let's keep
moving up our arm. Next is your elbow. More circular but really
hard to control the pencil. All right, so we know
the fingers don't work and we know the
risk doesn't work. And we know the
elbow doesn't work, which leaves you with one joint on your arm, your shoulder. So go ahead and use your
shoulder joint to draw circle. Just like that. Whenever you see people
draw perfect circles, they're using their
shoulder to draw it. They're also using their
entire arm to draw it. This is called full
range of motion. Your arms should always
be moving whenever you're sketching to
get the best sketches. All right, tip number two, drawing straight lines are extremely tricky for
some people that do. Here's how to master them. First off, you need
to take a ruler and draw a few examples
on your paper. This ruler is called an
architect's ruler or a T-square. Very, very handy if you struggle
drawing straight lines. I'm gonna draw two straight
lines on my paper like this. Now, what I'm going
to do is I'm going to trace each of them five times. Watch how my arm moves. 12345. Dcr charter says much on the guide as possible.
All right, Now repeat it. 12345. All right, Now you're going
to draw straight line right next to it, 12345. This is called muscle memory. Alright, it's very
handy to use and these guides are really helpful. Now every time you want to draw another straight line,
go back to your guide, into your steps, 45 and
then redraw the line yet. This is going to train your brain the movement of
sketching straight lines, just like you were
learning to ride a bike. Let's change it up a bit. Let's say your lines
are angles or diagonal. Go ahead and draw them out. I'm not going to use my
ruler because I find it easier to draw diagonal
lines just with my pencil. I have three diagonal lines like so what I'm going
to do is I'm going to trace each 15 times 12345. Again, 12345. Again, 12345. Now, attempt 12345. Again, 12345. You should have five parallel diagonal lines on your paper. Once you've mastered most, you can move on to
tip number three. Remember, tracing
isn't a bad thing. It's when you claim
that you did it all on your own or plagiarize
someone else's work. That's when it becomes wrong. But tracing is an
excellent tool to learn how to draw
accurately and quickly. So don't be afraid to use it. Now for tip number three, we're gonna work
with a value bar. A value bar refers
to the element of shadows, highlights,
and midtones. The sketches will
include value so the artists can tell where
they want the shading to live. Value bars are a perfect way
to understand value change. Remember shadows gradient into mid tones and then
into highlights. It's a gradual change, not a segmented theory. So let's create a value bar. Value bar begins very hard
in the shadows areas. So you can take your
pencil and you're going to press hard like this. Try to keep all your
strokes even that way your drawing doesn't turn
into a tornado looking thing. Maybe hard to tell because
of how my lights are. But what's going to
happen is that I'm gonna start lightening
up my grip. As I go along the paper, I draw a lighter in, lighter and lighter until
I'm barely touching the paper with my pencil and completely fades off into white. This is called a value bar. Now you can leave it like this and it will
still be accurate, but it doesn't look very good. So what you're gonna do is use
a process called layering. Layering is whenever you stack graphite on top of each other. So I'm going to start off
hard again and repeat, slowly fading it off over
and over and over again. Now graphite can be
a bit tricky because graphite is very
naturally shiny, so you don't want to
press super hard with it. Otherwise, you're gonna
get that graphite shine. You just take your time and
patience and slowly build up those layers until you have a nice solid gradient
called a value bar. Now this can easily be
turned into color as well, but learning it with black and
white is easiest at first. There you go. Alright, now that you understand the basics of sketching,
let's get drawing.
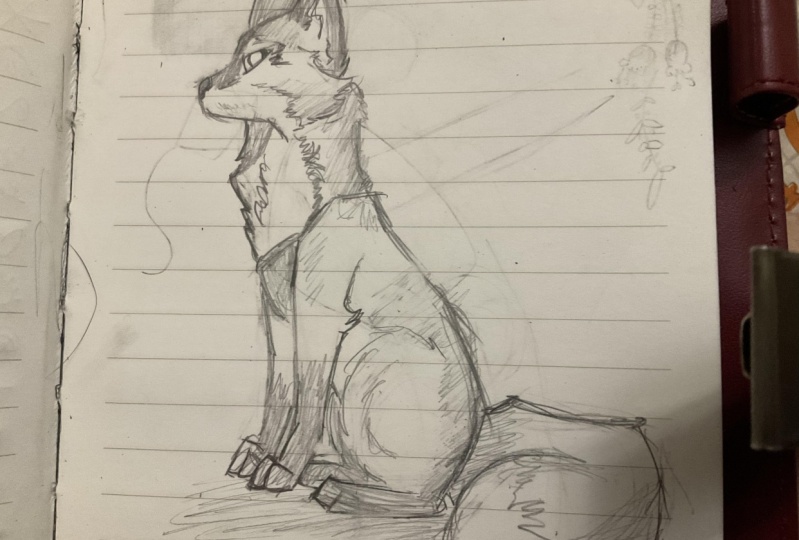
4. Begin your Sketch Construction: Let's talk about construction. This is the first
phase of drawing. Construction is
understanding the build of whatever you want to draw. Here I have a reference. If you are a beginner artist
or a season sketcher, I do recommend working
with a reference, especially if you
are struggling to visualize an image in your head. First, it will simplify
the reference. Simplifying means to break
down into simpler forms. What's the reference
is simplified. I can begin construction. Getting this right is crucial since everything is
built on top of it. Copy down every single step
that I draw on my paper. First, always starting
with the head. Make sure the head is living in the upper-left quadrant
of your paper. This will leave
room for the ears, the muzzle, and the
rest of the body. The head is then connected
to the action line. The action line tells
you what your subject is doing and your action
line will look like this. In this case, your
Fox will be sitting, the action line will angle. So next you need to get in your last
two major structures. This is your ribcage
and your hips, and they are located here. And here. Now, you won't know the exact
locations until we actually sketching the
rest of the character. I can already tell
that my oval is actually a little too
far to the right, so I'm gonna go ahead and
move it over just slightly. Like so. Now everything that builds
off this major structure needs an action line as
well that includes legs, both the fronts and the
backs and the tail. So I'm going to
draw this in next. One leg will live right here. I'll block out where
the foot's going to go. Now, if you look if you'd
already looked like my arm is a little too short, so I'm going to elongate
it just a little bit. We're just going to change
the location of my hips. Rule of thumb, the
work by an art is that whenever you
change one thing, something else is probably
going to change as well. So I changed the
length of the leg, which means that my hips
are going to move down. One thing affects another thing. Now as you can see,
I struggled with the location of hips and
that's perfectly fine. This is the construction phase, so it's okay to mess up and
it's okay to test things. This is the time to do so. You can see that since I changed the hips, it changed
the action line. So I've changed the
action line as well. Now I have a more accurate
looking construction. Now I'm gonna get
in the back legs since the hind legs
are sitting down, which it's kinda like
it's compressed. The axon is going to be
very short, like so. I'm going to make
sure that it does not touch its front pod though. Then I'm gonna draw on the tail. The fox's tail is
big and fluffy, so I'm gonna give
it a big and kind of lengthy line to
represent the tail. In this face, I also like to block in the major
structures of the head. This includes any
huge structures like the muzzle or the ears. You simplify everything down. When you look at the
ears, you need to figure out what shape
you need to use, which in this case
would be triangles. One on the side. On this side, I
might make this one, we'll just a little bit bigger. Dci using straight lines
to block everything out. We'll talk about that
in the next lesson. Then the muzzle
just slightly down. This is what your first
phase should look like. When you have this
completed, you may move on.
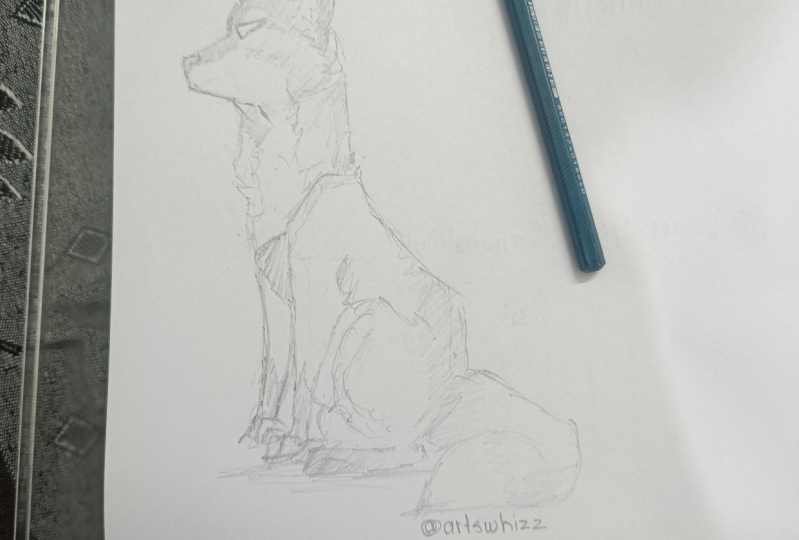
5. Working with Structures: Before we move on, make
sure to check your sketch. This method is called flicking. What you're going to do
is hold your paper up to your screen so that way it's sitting right next
to my drawing. Now, you're going to
look at my drawing, then look at yours, then look at my drawing,
then look at ears, inflict back and forth. This method is called flicking. Whenever you see something
move on your drawing, you know it's incorrect and you need to apply your corrections. Please make sure that you
do this before you move on. Because if something is
wrong in this phase, it's going to be
obvious in the very end now that you've checked
a drawing and that you know that
everything is correct, go ahead and take your eraser and lightly erase
your entire sketch. We don't need this sketch. It's just there to
kind of help us build our character or animal
wherever you want to call it. I'm going to leave
my light enough that way you can still see it. And I'm going to begin
my second phase. This phase is called Structure. Structure and
proportions are really, really important to a drawing. Structure tells you where
everything is located, while proportions tells
you how big some things are versus how small things are and their relationship
to one another. Now we always start with
the head because the head determines the rest of the
proportions of the body. And I usually start
with the ears because that's the biggest kind of form on the main
structure of the head. I'm gonna start with the ears. Now. Watch you're gonna see all my lines are
very, very straight. Now I do this for a reason. Your brain loves to see curves. It's fine. It's curves very
satisfying to look at. And so it's more
likely to overlook mistakes whenever you
use curves to draw. But when you use lines, your brain is more
likely to catch those mistakes and
it's being more picky. So you want to draw with lines first and then you're going
to curve them out later. I angle my head
following the circle. And I just built
everything out into lines. This is also where you can fix the anatomy of your animals. If the muscle was too
long, you can shorten it. I might fix that muscle
in the next phase. I haven't decided if I want
to keep it yet or not. You're gonna see
that I'm gonna make lots of mistakes on the way because I'm testing to see
where I like things to go. You'll also notice that all of my lines don't attach
to one another. I did this on purpose to kind
of just give me the freedom and malleability to
change things instantly. Any point if I'm
moving too quickly, just pause the
video and catch up. I do curve it a little
bit on this side just because it helps
me remember that, hey, there's a big firm kind
of change right over here. Now that's the main structure
of the head itself. Then I'm going to
start structuring the body. Starting
with the shoulder. That's the next major structure. And I'll break this
down into kind of easier forms for you to be
able to see like a triangle. The other is a triangle
living right here. We need to come down
just a little lower. I have an ankle, which is represented by a
rectangular shape. Then the touchpad or
the base of the foot, is represented by triangles
DTA or shrinks down. Alright, you need to be able to recognize these proportions. It's bigger up here and it
shrinks down to smaller, then it widens back out. That's proportions.
Now I'm going to draw on a chest
line right here. And if I look after I
left shoulder in this is a little lower than I would want it. I'm gonna raise it up. Like so. Anatomy doesn't
look quite right. So I'm going to just
go ahead and there we go, correct that. Now since foxes are
symmetrical on both sides, which means the
same on both sides, you can just recopy down the
structures over to here, just make sure that one foot
is shorter than the other. This is called Perspective.
Work on the back. Now. Now since he's sitting down, gravity is pulling
it down towards his hindquarters to
make sure it's a lot of mass down in their bends
around that circle I drew. Don't round out that
hindquarters leg perfectly. They don't turn into
perfect circles. There's a little bit of
corner action going on there. Look that foot kind of bends
into a triangular shape. Chest line, back leg. He kills a little bit crowded, so I might give them
a little more math on his hindquarters. Then I'll block out the tail. I want to remember to actually
block in the eye as well. I Location, kind of been there. Now I can already tell that my foreheads
a little bit off, so I'm going to correct
anything right now. Because basically
what's going to happen in the next phase is I'm just going to draw
right on top of this. I want to make sure everything is correct before I move on. Now, there is my
completed sketch. You're going to repeat
what you did earlier. You're going to use
the booking method. Once your drawing is complete, hold it up to the screen and
flip back and forth just like we did before and see if
you can catch any mistakes. All right, go ahead and complete your flicking method and
then you can move on.
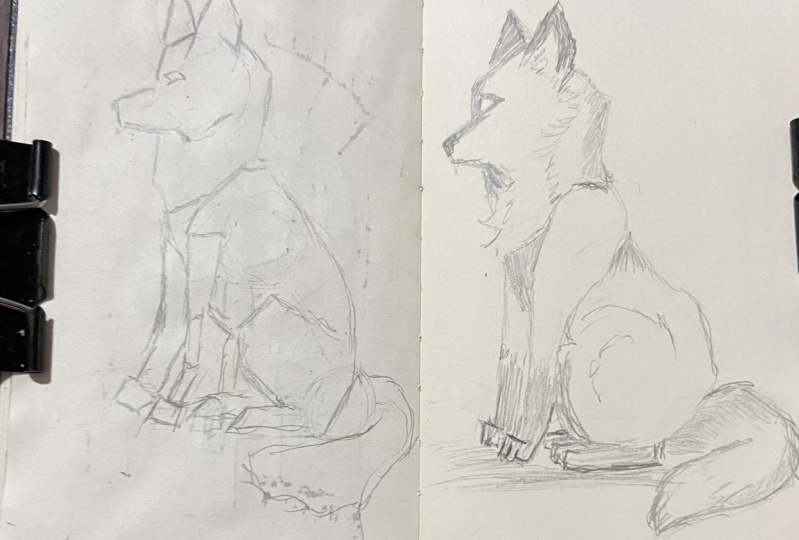
6. Adding in the Details: Now to move onto
detailing instructor, finally, we can move
on to the fun part. One more time. Go ahead and
lightly erase your sketch. I did catch a few
mistakes when I was looking over my sketch
that I'm going to fix now. Now it's really important
to keep your pencil really nice and
sharpen this phase, mostly because Dole
pencils create mistakes. Alright, so now we're
gonna move into drawing the fox itself. Starting with the
ears, of course. We're going to
build out some fern lines and you'll watch that I actually follow those
lines that I just created. But I give them just a
little bit of bend to them. Same thing on the muzzle. I'm just bending
the structure out. You're going to
see that I haven't added in any further lines, really noses or eyes yet. Because what I'm doing is I'm blocking out the structure first because at this
structure is incorrect and you think I
pile on top of it, it's going to be wrong as well. Notice the muzzle was too high, so I'm gonna bring it
up just a little bit. Now I can start
actually detailing in the fox itself right now. I'll teach you a
drill these spring lines in a later lesson. Just go ahead and start
following along with my sketch. Filling in your details. Me for a loop there. But she wanted to think of
it like a triangle shape, not as an oval. This is another common
mistake that you see with amateur artist is that not understanding how the
anatomy of the eye works. So when you look at an
eye from the front view, you're gonna see it as an oval, but you'll see in
the two corners they turn into more
triangular shapes. When you see it from the side, you actually see more
of this triangular shape rather than the circle. So you need to be
able to mimic that in your artwork as well to
create a convincing I don't want to give for
to every single line. And I can see that my neck is a little too long over here. Come back and work on that
here in just a minute. I need to raise that
shoulder up a bit. Now I don't use for on every single line because
we can see this as a fox. And we already know
that foxes are furry, so we already have
that basic knowledge. We don't need to give
every line of fur texture. Just the areas where
a lot of firsts going to be happening
in the joints or any major changes like along the chest line for
texture changes. Lastly is the tail and
actually add fearing lines to any major corner change
because that tail is strictly just a muscle infer. So don't forget to add in
those little for teachers. When I refer to for
changes, it's referring to the color change
of the fruit itself. The thoughts is red,
white, and brown. I want to make sure that I make those places kind of
obvious in there. Now personally, I don't add mouths to my
sketched characters. That's up to you if you
want to add them out, in, go for it. Now this is as far as I'm gonna go with this sketch itself. Once you have all this in, go ahead and move on to
the next video where we'll talk about how to make your
sketch come off the paper in, pop up and look really meet.
7. Take your Sketching to the Next Level: Now sketches on their own can look cool if left like this, but sometimes we want to make things pop and make
them look neat. So let's go ahead and do that. Don't worry, there is no
more erasing after this. What you're gonna
do is you're gonna start shading things in. Remember how I talked about the different
values of the firm. We're gonna work with that now. There's a little
bit of a dark value living kind of up in the ears. So I'm going to
shade those in using the same techniques
that we learned in the beginning
with the value bar. Making sure the faded
off on the edges. Same thing over here. Maybe
a little bit in the ears. Shading that nose
is a little bit. Use a couple of hatching marks. Hatching is referring to
the kind of just like a different little lines to create an overall
texture like this. Number one rule of shadows and shading is that
all shadows connect. This gives it a more
realistic feel to it. I try to attempt to make most of my shaded area
is kinda connect. This isn't a super
realistic fox after all, so I don't have to be super
meticulous about that. Maybe there's a little
shading over here. Along the back side. You might want to
decide where you want your light source to come from. My most, my light
source is coming from the upper kind of laughed area. I'm making sure that I have most of shadows living
on the right side. Remember the shadows
always live on the opposite side of
the light source. So if it's coming from the left, they're gonna live on the right. Also anything that layer's
gets a shadow as well. So any further that's
kind of overlapping one another like in this
area will get shaded. I'll also shade any
major for change colors, which is kind of like
in the pot area. I artist shaded in the ear area, which is where the
other major one is. This back foot also gets
shaded because it's kind of hidden underneath
the main body structure. As you watch me shade,
you'll notice that all my strokes always
go the same direction. Then I use a very light hand and a very angled hand
whenever shading. Now I'm using a to B pencil
in order to shade the solid. And I highly recommend
that you get a drawing pencil set instead of drawing with mechanical pencil or with a normal yellow pencil. Drawing pencils
come with a variety of weights and styles. So it's really handy, especially if you struggle with drawn too hard or
joined to dark. Very, very handy to have. Next up. Can't forget the tail
area. Don't get sloppy. I know it's very easy to get
sloppy in that very end area because you want to be just
done with the sketch itself. You can't let
yourself get sloppy. You have to give your whole heart into it the entire time. Leaks out. Now another tip that you can use in order to
make a sketch pop is using stronger
weighted lines, which means heavier
weighted lines, also known as darker lines. Okay? All right, so you're gonna do is you're gonna
figure out where your shadows are living
minor on the right side. So most of my dark lines are
gonna be on the right side. And what I'm gonna do is
not press super-duper hard, but just a little
bit harder than I did with the normal sketch. It kind of makes some of
these things pop out, make these lines stronger. Now, remember, these
lines are going to draw attention because they're darker than all the other lines. So if you don't like an area, don't darken the lines
up because there's automatically going
to be attention drawn to it because it's darker. So I recommend using these dark lines and areas
that you're very proud of. That way the attention
is drawn more to their rather than the areas
that have mistakes in them. You also use these lines. If something got like kind of blended too much
like in my pot area, you really can't see
the toes anymore, so I kinda darken them
up just a little bit. Or if the lines
aren't clear and you really can't tell
what you're looking at. Kind of like down in here. It's kind of like a latch, a last ditch effort
to really make your sketch pop off the page and make it look like you know
what you're doing. You'll see that my style towards the tail kind
of changes a little bit more sharp appear in a little bit more
messy down here. It's because I'm on
most of the focus to be over in this area. So I let mostly sharp
lines live over here rather than down in the areas where I don't want
more attention drugs to it. Little shadow on the bottom. Just to give it a
sense of depth. I always make my
shadows just a little bit wider than the subject is. There you go. There is a very simple way to make
an effective sketch. Go ahead and finish up
your sketches and feel free to snap a picture
and share it down below.
8. Final thoughts: Sketching is crucial to mastering
the foundations of art. Through this course,
you have learned how to master sketching from the basic building
blocks all the way up to the complicated final
texture details of a sketch. If you want to spice
things up more, you can use colored pencils, pens, or even toned paper to really make your
sketches pop out. Remember, you don't
have to show people your sketchbook get
messy and creative. Sketchbooks are
meant to get ruined, scribbled and creative in. So don't limit yourself
to perfection. Remember to post
your final sketch in the discussion
area down below. That way you can see how other people's
turned out as well. Remember, no two
artists are the same, so never compare
yourself to others. Now get out there
and be creative.
 Doodle Noggin, Get creative.