Transcripts
1. Introduction: Hello and welcome whenever specific color. I'm a graphic designer and illustrator, and today I'm going to teach you how to draw fit. We're going to do this with a very simple step by step process and in different views. I know that fit can seem very scary to draw, but it doesn't have to be. I find them to have very interesting shapes, and once we find them, they will be very easy to do so in this class. We're going to draw our fate in different positions, so you have the basic shapes to draw any feet you want. But before we start, let's just see what you need for disc less and what you'll be doing for discuss. There's two ways you can approach this the traditional or digital, so you can either pick up a pencil or a pen and a piece of paper. Or you can use the drinks doctor of your choice like photo shop creator or Munger. Still you or any other that you might know along with a drawing tablet. First, I'm going to give you some resource is so you can use them in your own practices and exercises that you might want to do. And after that we're going to start drawing. We're going to draw our feet in five different views itself. Side, bottom, front and back. This way you can draw fit in any position you want. As always, we're starting with simple shapes going through the sketch and then cleaning up our lines and some coloring. At the end. You'll have an assignment so you can practice everything you've learned right away. As always, feel free to share your work with us in the project section. I always like to see your works, and I can't wait to see them now. I'm ready to begin. Then let's do this.
2. Resources For Drawing Feet: Hello and welcome. Now, before we start drawing or feet, I just want to give you one resource for you to use to practice your drawing. So I've mentioned this one many times before, and it's one of my favorites. So line off action that come and there's a lot of options. And not only can you practice the whole body the whole figure, you can also practice hands and feet or both at the same time. So become up over here and which is fit, says that's what we're focusing here. And then you can choose if you want. Female models are male, models are both, and then you can choose for how long will each image stay up? Now it all depends what you want to do. If you just want to do some just drawing, then go for three seconds or six year or even two minutes, but at, say, 30 seconds or 60 seconds so you can focus on the main shapes and ignore all the details. But if you want to do some practice and draw the food's perfectly and go over the details and everything go for longer time, like even 10 minutes and then it just need to click here on. Get trying. It will give you some images. As always, you can change the image. And again if you think even that the 10 minutes aren't enough, you have the post foot, and so you can pause on the image and just take the time you want to draw your feet. So this is it for no. And next, we're going to start to drawing our feet, so I'll see you there.
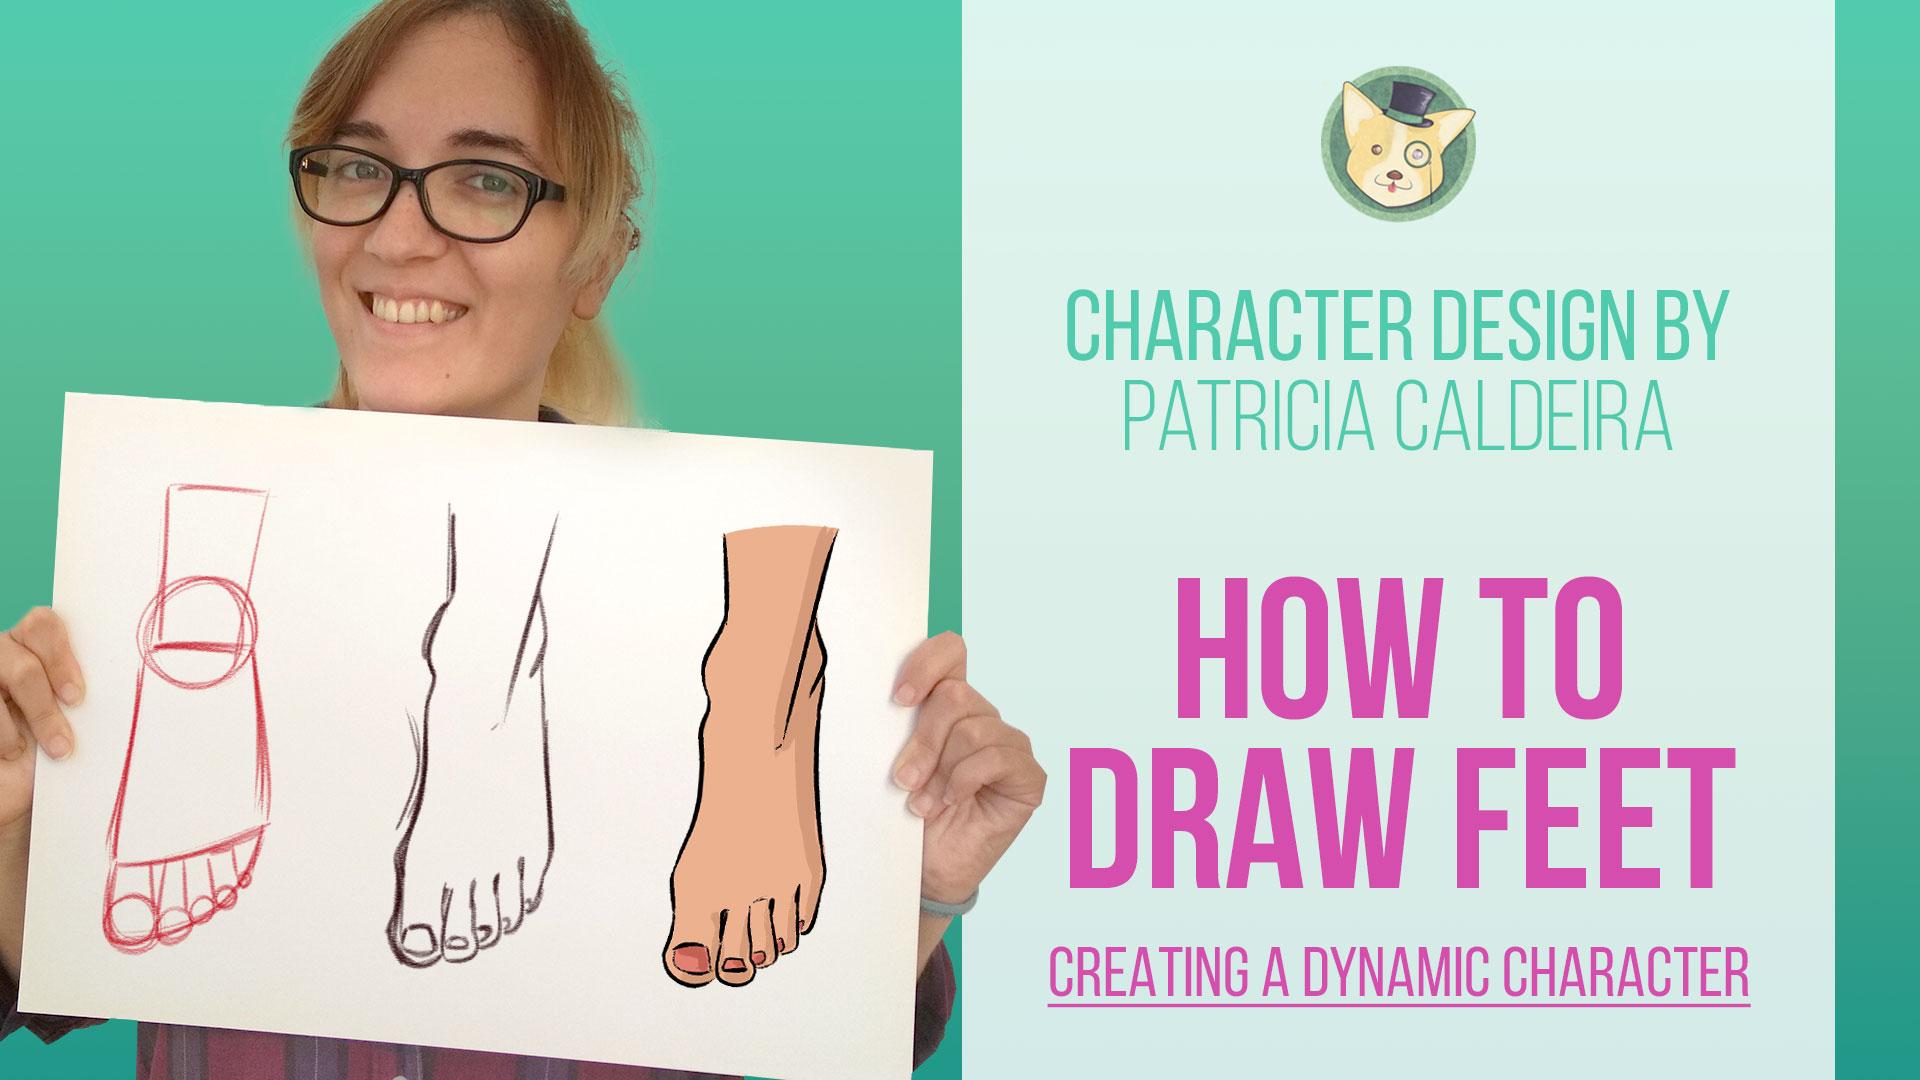
3. The Top View: Hello and welcome back. So now we're going to start our work and the first view we're going to do is a top view. So I have Here are reference image. And now, as always, we're going to start by looking for our shapes. So I'm going to give here a bit of conspiracy, a new layer. And now we're going to look for our shapes here, as always, Very simple, very easy. So first shape is going to be here. This is our main shape for the feet or for the foot. This is a man shaped for the foot, and it's this rectangle rectangle shape. So this is our main shape. Very rich, weird rectangle. And then here on the back, we have a circle and then here, around it, shape for our fingers. Off course, you can dough here also a bit off the leg if you wish them and this is pretty much it's now to make it easier. We can also find our shapes for the fingers so we can go over here and we have our circles for each one another. Here they get smaller and smaller, as you can see. And of course, if you want, you can make some rectangles for each off the fingers. There we go. So now you know where everything is and we have our shapes and we can go to the next step, which is our sketch. So now we're going to have better idea off our foot here and adding some details already. So let's do this a darker tone. I still have my pestle here and now we have here this line here from the leg and now we have are foot here, then goes inside and we have a finger here. There we go, very small. It's very it's pretty much hidden from the rest beneath t other one so and the same goes here part of it is he even And then we have you to another one and now we have. And now this one is also on top. But we can see most off its Here we go. And now it's to the other side. So we have here and it goes out. Remember that one side usually d the inside side are feats are usually very curb. We have this curved over here. Some people have it more sensual ated and other. So it all depends on which food are you drawing are how you want it to be. So there you go. We have our foot here. We have most of it done. Now all we have to add is some fingernails. So let's do this one to and not this one. Start to come over here to the side or fingernails on our feet are very, very weird, but it is also very fun to draw. So there we go. We have here are foot on the top few, and now we just need to draw our final lines. So let's do that very quickly. Now. You might feel like drawing fits is very hard. We tend to draw mostly portrait's or our characters upto the waste, mostly because drawing legs and feet can seem very scary. But I honestly think that drying the fit is very fun and not that hard again. It's all about simplifying it with some shapes. And then, from there we can do anything. Also, I really like all the ships says we can have which fits. I think it's very fun to experiment with that. See, look up different styles and and draw them. Everyone has different feeds. The fingers will look different, even the way they are their sizes, for example, or the styles. They are so different, and it's really fun to do it. So there we go. See, it's not that complicated. Just look for your shapes and then go from there and you'll see that everything will be very easy to draw. Now I'm just going to make this a bit bigger, and then we just need to call her. Are Foot. So here we have it's and now let's add some color and we are done. Harry girl. The nails are a big, darker sometimes three, the more pinkish tone. And now we can very quickly add some shadow. So a darker tone from the skin tone that we have. And now we can more or less follow the shadows that we have on our drawing or on our image . I'm sorry, but keep everything very simple just to raise here this pits and now another darker turn. But for the toenails, these are soul nails. I think I I call them fingernails. What? They are on their toes. So there we go. We have our foods in the top few. So follow me to the next video and we're going to draw our foot in, uh, such you. So I'll see you soon.
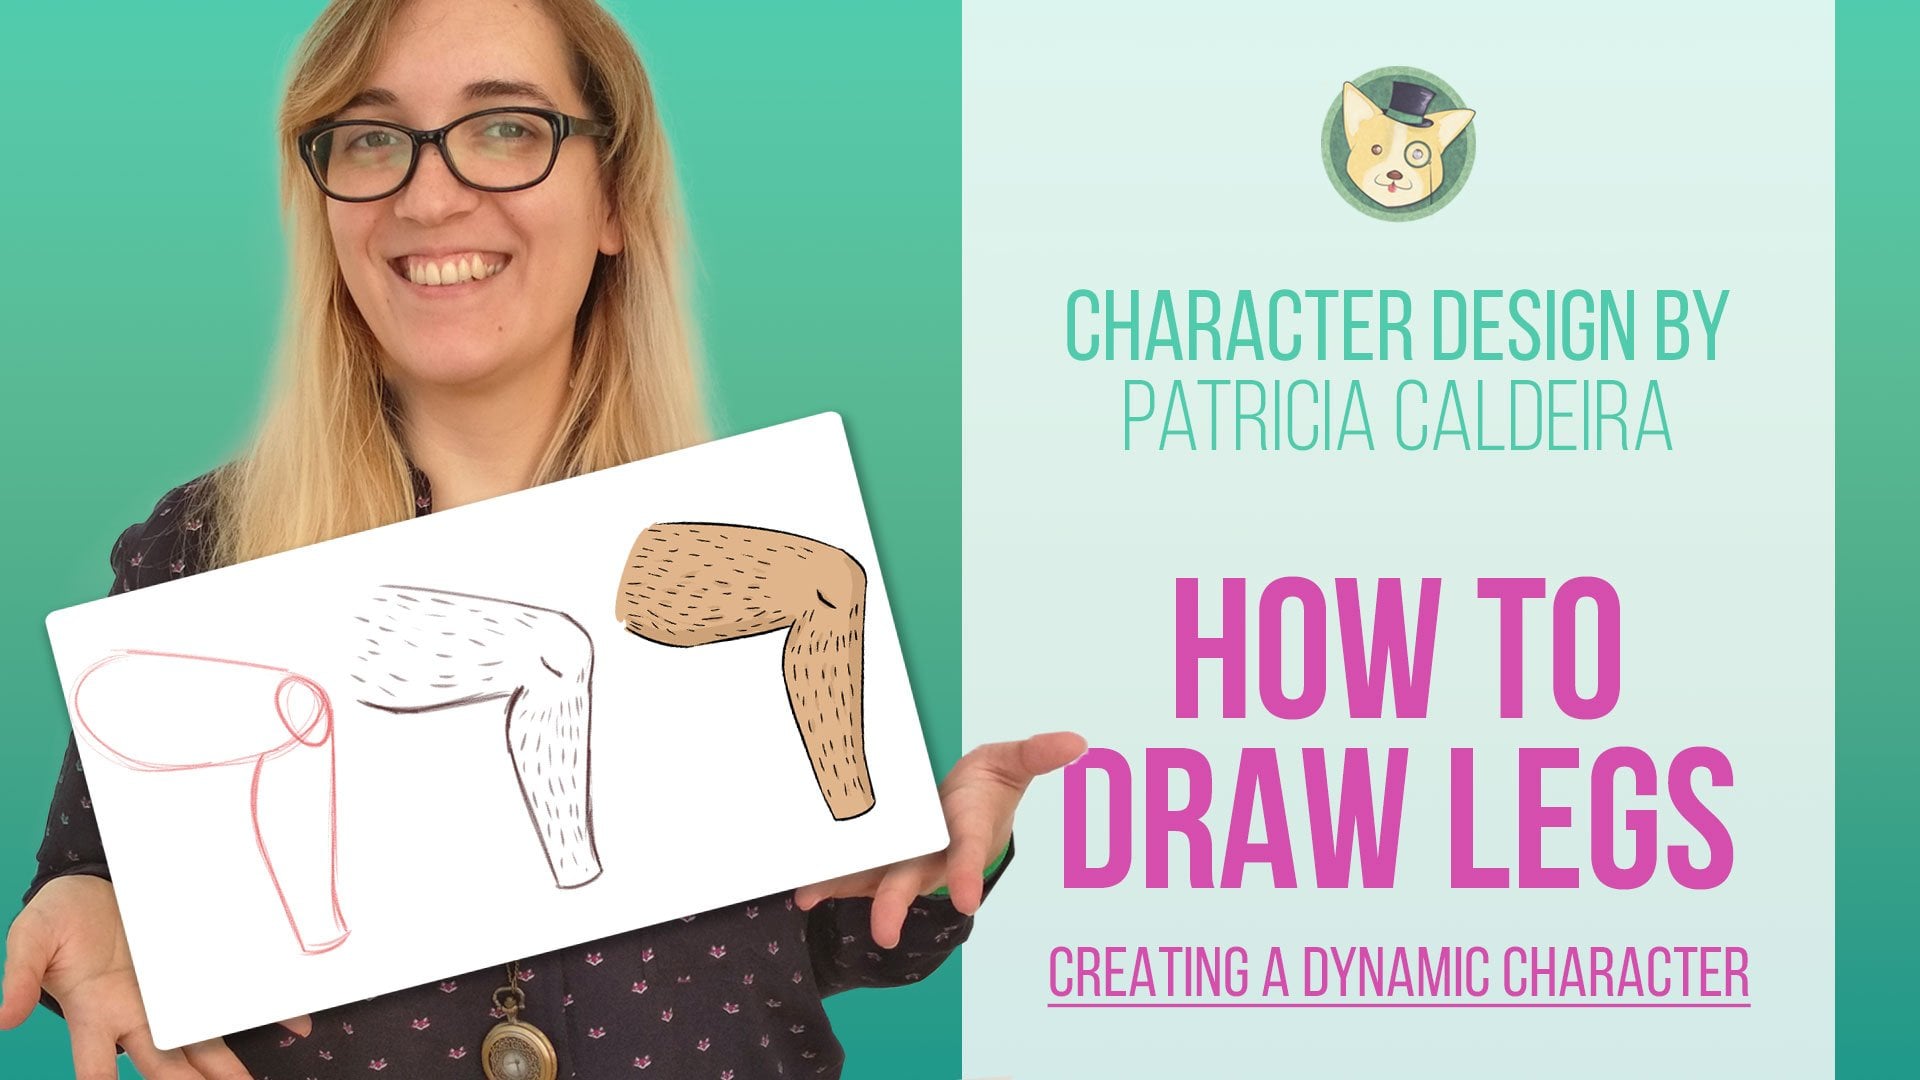
4. Drawing The Side View: hello and welcome Bic. We have nailed one of our fit so far, and we have four more to go. So now it's to turn off the side view. Let's start again some transparency, and we're going to look for our shakes here. So I'm going to pick my usual brush now remember, use which which ever tools that you like and you prefer to use. For example, for me, if I'm going to draw digitally, I prefer to start with this pencil and the special brush and with a reddish color. It's very similar to what I do wear traditional Israel. I start with the red pencil and then I draw on top of it. And here is the same. I start with the red pencil. I look for my shapes or I do my sketch and then on top, out from my final lines. So do this. We'd wherever you feel more comfortable with, if it's a pencil, if it's another kind of rush, it's all up to you. Now let's do this. So I'm going to still do a cure bit off our leg, and we have here a rectangle or almost a square, and now this time we're going to have some triangles. So we have one triangle going here. Well, now we're not going with your angles here. There's two ways to go about it. So we can either just to this shapes here we joined them, and then here we have a triangle. And here we have another one bit Rhonda teens. Or if you prefer, you can also do just this whole shape, shine it and then the triangle. But I'd say that it's easier to go with the tree shapes, at least at the beginning. So you get used to it and to each off the parts that you have on the foot. So there we go. We have here are shapes and now it almost looks like we drew a sandal on top off our food here. So now we're going to draw our sketch. So let's do this another layer. And of course, remember that as you go and as you learn, you can start losing your shapes and go for the sketch right away. So you get you said to the drawings and you practice them, and at some point, you want meteor shapes anymore. So sometimes Ah, good practice to do could exercise for you. To do is to just throw the shapes for a while until you have them memorized and nails on until you understand them. And then you can start losing them and just to the sketch. Now, we are here to sketching out our fits our foot. So we have here this bit off a curve. So let's do that cover bit more century. It'd actually so as you're learning, keep your your reference, Neil by you so you can check it whenever you need. And now here we have again, another bit of a curve and then we have our to. So there you go. So even though you already have your shapes and the overall view off your objects or part off the failure animal, keep your reference image nearby so that you can take a look at it and look for the details because the shapes won't have the details in it. And you want you will need it. So now we have here this line. So as you can see, it goes like this again. Everyone has different feats. So yours, for example, might be very different from this one from the sides, so also tried to draw difference. Try to get different images off fits and draw them because you'll notice that they are very different or can be very different from each other. So take photos of your own feet. Ask for your friends or partners family to take some pictures so you can practice them a lot to have a lot off reference material for you. So there we go. We have here our sketch, and now it's time for our final lines. All right, So, for example, one of the things that I'm not saying here is that this foot is actually very straight as a lot off straits, off straight lines here. And some people have quite a curve over here, and it's not the case here. So, yes, I'd say to experiment weeds with different images with different references. So you have quite a lot off cells going on, and so you learn different styles to apply to your own characters. Oh, good, it's and that we have here or tone, though, and the picked off another finger showing up here and off course here, a line for the ankle. This line you can usually see it very well, so don't forget about it. And this is it. We are ready to color are drawing. And, of course, you can't style eyes a lot. With it, you can do a martial magic style, can do a lot with fits. For example, as you could see, drawing fit on this start can look very weird, but you can also take a different approach with it. You can go with the version magic style and very simple, with less curves than we have here. For example, there's a lot that you can do here, so try to experiment with that as well. So now some shadows and we are mostly done. I'm not going to follow the shadows that we have on it on your on our image. I'm just going to do something else and experimental between it. There we go, not This is a bit softer. Then, before and there we have our foot in the side view. It's very weird, but that's how it is so charming and ex video, and we're going to our next few, so I'll see you there
5. The Hidden Bottom View: Hello and welcome back. We're going for our third view, which is a bottom few, and this is probably one of my favorites to draw. I really like the shapes here, So let's do this as always, our first layer for the shapes, my pencil brush here and now we can start. So we have here a curve, and then it goes down pretty much a straight line. Or if you prefer, you can the debt curve already that we have so here and that on the bottom, we have a circle, as you can see, and then we connect the rest of our shape, which is a straight line. So most of our foot is already done. And now we just need to find here our So So we have that curved shape, just like we did with our first example. And again we can find our toes here. So circle and connected to the autumn and not a circle here. Another one. And then mother circle here. So there we go. We have, you know, shapes. Very simple. We put it to the sides, and then we're going to draw a sketch and figure out our details and all the curves that we have here So we can start here with the big toe. So here we have goes here than inside and then out again. Do you like this, Kirk? Here. Don't worry too much about your lines right now. They don't need to be perfect. You're practicing your doing the sketch. How can finish here or to? Here we go. And now we have the next one also has quite some curves in there. The girl gustan here and now here are next to is a bit on top off this one. This one start to be a bit curved. So by in addition to that to those lines that we have here, for example go And finally the little one. And here we have this line from the foots overlaying on our fingers here. I know again we just go down with the line and we are finished with our sketch. Just going to erase here a bit. There we go. And this is it. I really like this shape and shapes and the curves. I think they are really fun to draw. So now let's have some fun with our final lines. Remember that while drawing. The idea is for you to have fun, so try to relax if you're not having fun, if you're too tense, we will be able to see that in your lines. So try to relax as much as possible and have fun with it. And now we can draw the rest off our foot. Remember to complete lines instead, off going little by little so that your minds are very smooth and continuous. No, we go down here almost the straight line groups, and we connected to the rest aereo. And now we can have here a line or two just toe ads, a bit off details. There you go. We are done and now is always. We can add some color to our drawing, so I'm going to pick up your skin tone. Experiment with your colors as well. Try different skin tones. This time we don't have the nails, so we don't need to worry about the color that it's just the skin tone here and then some shots, and I'm just going to erase the spit here when I went overboard and this is it. We are done with our thirst for you, and once you're done, jump over to the next video and I will see you soon
6. Front View Of The Foot: Hello and welcome back. We are almost done this time. We're going to draw foot, but in a front view. And I know this might look very complicated and very scary to do, because the's feel involves some perspective. But as always, it doesn't have to be complicated. Let's see, how can we deal with this one? So a new layer, my pants Ooh! And first, we're going to start with a rectangle. But here and then from here we make two lines following the ones from our image one here and another one here. And then we connect them a tent. Here we go. And now here we have around shape for our toes off course you can at some another line here to give more off a treaty feel. But we are going to do our our shapes for it. So So I feel that doing that line can make everything a bit more confusing. So I'm going to skip that here if you want. You can also make this lines for the ankle so you know where they are. And finally, our circles for the toes circle here, Another one here, our toes in dispose are going to be all about circles and they will go smaller. The farther you go. So another one here and this is it. We have our shapes now we But just this side we make a new layer as always, and a new caller, our Ben silicon. And now we keep hear our image of reference. So we know where everything is and so we can see all the details. So leg here and an ankle going this way, then the big in and out again and we have one side over foot. Then here the toe. As you can see, the line off or toe goes a bit inside. So let's do that. And remember that since our foot is on the floor, then the bottom part of our toes are going to be done with straight lines. There we go. And now we can continue here with our toes. So we have here this line connecting them both. And then from here we have our next toe so straight to line on the bottom. And then here we have this line and then going down. And don't forget about the tone else. They will also be drawn a bit differently since they are in perspective. So something like this this time and now the next one from here. Also straight line that then goes up hands a small till now, right here and now the next very similar to the one before again small don't know that it gets smaller and smaller. And finally we have our final toll with curved going inside here and then out again. It's toenail is here to the side. It's very weird or small. Toes are very weird. They maybe have They behave very weirdly. And now we have here, going up in the line, going inside the foot here like we see here and then t ankle on the outside we go and then the rest off the lake. So this is it. We have our sketch and now we can do our final lines. So a new layer, our final layer and a pen brush or whichever band you prefer to use and we can draw our final lines. So let's do this. Take your time and now you have your final chance to change whatever you feel needs to be changed. So take also the time to do that. Those final changes that you feel that are needed nails here, another two. I feel that the shapes for the toes are very fun, and there are so many different shapes. Depending on the image you're using are the references you're using. They can be very fun to draw. We can have very weird shapes over on on our feet. So, like I said, even though we tend to be very afraid off drawing feet, I think they can be one off the funnies to draw. So we have here are find the lines, and now we can add some color as always. So a new layer pinking up here, a skin tone experiment with scholars as well. There's lots off towns that you can try, so try their mouths. I'm using the paint bucket here, so it is quicker and I don't bore you with all the coloring and spend God knows how long with it, because you can spend a lot of time with coloring. It all depends on how detailed you want you're trying to be, so if you wish, take your time with this. Try different types of shading. Try different types of coloring or if you don't want to focus on calling right now. You can just skip it or do like and doing so very quickly and simple. So we have our main colors or based colors done, and now we just need to add some shallow. So there we go. It's come up over here. Very simple shadings. Try out different light sources as well, and see how the shades will be. Would behave according to your light source are you can just look up to your reference image and GOP from that. So there we go have our foot in front of you and we're going to the last video, so I'll catch you soon.
7. Drawing The Back View: Hello and welcome back. This is our last video off trying and practice. And this time we're going to draw foot from a back view for me. Personally, I think this one can be more complicated at times. Don't as many shapes as the others. And it is also not as interesting for me. I don't know how it is for you from all that we've done so far. Do tell me which one did you prefer her to practice? This is my least favorite one. My father's is probably from the front or from the bottom. I really like the shapes. I think they are very fun to to do. But let's do this one then. So we want to start with a different shape. This time we have this a round shape right here, followed by another one going up here. So there we go. We have two of our men shapes here and now here we have a shape similar to what we did off from the side view. So almost a triangle shape right here. And this is it. There is nothing much we can adhere off course. You can adhere. Bit off the ankles. I'm going to leave that one out and Addie ankles on our sketch. Show them Basic shapes are done. And now we're going to do our sketch. So a darker tone and you lay you. And now we can start from here. The leg it goes down. We have here bit of an ankle, then inside again, the beat slight curve. And then it comes here and we have the bottom off foot. There's here a tiny, uh Since the foot is a scented on on the sand, the sand is soft, so there will be some extra acres here. And now this sores again. A bit of a curve here, then continue. We go up, go here and then we have here an extra curve going in front off this shape. And finally we have our ankle from the other side and up for a leg. So this is it. But it's simple. And now we can do our final lines. So and new layer on top off both thought is going to grab here, my pan. And now we can draw our final lines. So we go down here again. Now is the time to make final changes as you troll our final lines Now, bottom part, slight curve than up again. And here we have another one. This lines here are basically the same that we did on our first shapes. And then we have a line coming here. So this one here and then another for the ankle on top of it. So this is It's very simple and very easy. I hope these videos helped you lose the fear about drawing fits. For me at least it took me a while toe to go to the fitting. Even the legs Trudeau to draw the whole character. So I know it can seem very terrifying, even more terrifying then the hands sometimes, but it is always a matter off practice. Once you practice it enough, you'll see that everything will be so much easier to drop. So as always, I'm adding here my color. Very simple. This time again, we don't have any does nor toenails. So it just our skin tone and then some shading. So a darker tone Take your time with it. Take as long as you need. There's no time it on you unless that's what you want. But s your learning just take, take your time goes slow with its get used to the shapes and don't worry too much. So here we have it are very simple coloring and we are done with our fits. Then, starting with very simple shapes and going from there I hope you had fun. But before you go jump to the next feed you and there's an assignment waiting for you, so I'll see you next.
8. Assignment - Let's Practice: Welcome back. It's time for our assignments. We are done with all the teaching here and now. It's time trying to put to practice everything you've seen so far. So this is going to be very simple. I'm going to give you some reference images for you to use. Now you just need to choose one off them and throw it just like we did in the quest so far . So use everything that we learn and talked. Start with your base shapes, finding your shapes, then do your sketch. And finally, you can do your final lines and at some coloring, as always, take a song as you needs. There's no need to rush. Take your time and remember posted once you're done, I always like to see your work, and I can't wait for it. Now go do it
9. Conclusion And Thank You!: Hello and welcome back. And congratulations for finishing the class. I hope you had lots of fun with this and that you learned a lot and off course. If you think there's something I can do to make this last better for you, please to let me know. And if you could do leave a review. I always like to see what you think of the class. And this is it for now. If you want to check out my other classes on drying other parts of the human body or even animals do check amounts and hopefully I will see you soon.
 Patricia Caldeira, Illustrator | Digital Artist | Designer