Transcripts
1. Introduction: Hi, I'm Sam. I am both an artist
and an art therapist. In this tutorial, we will
learn how to use art as a mindful practice while
creating this new railroads. You can use this class
simply as an instruction on how to do neuro up and
how to create this road. Or you can also use this
as a tool for mindfulness. This is particularly
good for those who struggled to meditate in
the more traditional way. As an art therapists, there's always a
therapeutic component to everything that I teach
when it comes to art. But you can take
that or leave it. It's up to you. I'm really excited to
teach this kind of art because it requires absolutely
no previous experience. Even if you haven't
picked up or done any kind of art since you
were in primary school. That's okay. This is really easy to do and I'm going to take you
through it step-by-step. It's a passion of
mine to help people understand that
they can do art as long as they pick up some
kind of mark making tool and put aside their inner critic and just make some
marks on paper. Everyone can do. Everyone is creative,
you can do it. So this class is for anyone who wants to explore
their creative side. Whether you've done a
lot of art in the past or you haven't for a very
long time. It doesn't matter. And you can work with
whatever you have available. So if you only have a
ballpoint pens and paper, you can still do this process. If you just have
some cheap crayons, you can still do this process. If you do want to follow
along exactly as I'm doing, I'll be using an
A5 piece of paper. And for anyone who doesn't know what an A5 piece of paper is, that's just a normal piece of printing paper folded in half. I will also be using
a black Posca pen or sharpie to do
the black lines. And then I'll be
using my dough and intense watercolor pencils with my watercolor pen to do the coloring in and
the finishing touches. I'm also using a white posca
pen at the end just to do some little dots
and highlights because that's what I
like to do in my art. It's really up to you what
materials you want to use. So feel free to experiment. I'd invite you to do this badly. Don't put any pressure on yourself to do something
really beautiful, especially not if
it's been a long time since you've done
any kind of art. Just give yourself permission
to do really badly because you don't have to show anyone if you
don't want to. And then you can do
it again and you can practice and
you can practice. And you can keep doing it
because it's fun to do. So. The invitation
is to just not put any pressure on
yourself and just have some fun being present
with the art on the page. I'll start by showing you
what the new graphic line is. And then I will teach you how
to use the new graphic line to create the rows and
how to round the corners. And then I will show you
how I add the ink tents, watercolor pencils to the page and activate them with
my watercolor pen. And then at the very end, I will have a little PDF of general prompts that
you can use if you want to bring that more therapeutic
flavor into your process. And it will just
be a way for you to do some journaling about
the whole process at the end, if you decide that
you want to do that, the end project doesn't need
to be for anyone but you. But at the same time you might get to the
end and realize, hey, that's not so bad. And you could use it to
give someone or create a card or just hang up
somewhere in your own home. So come along for the journey and let's get creatively
mindful together. See you there.
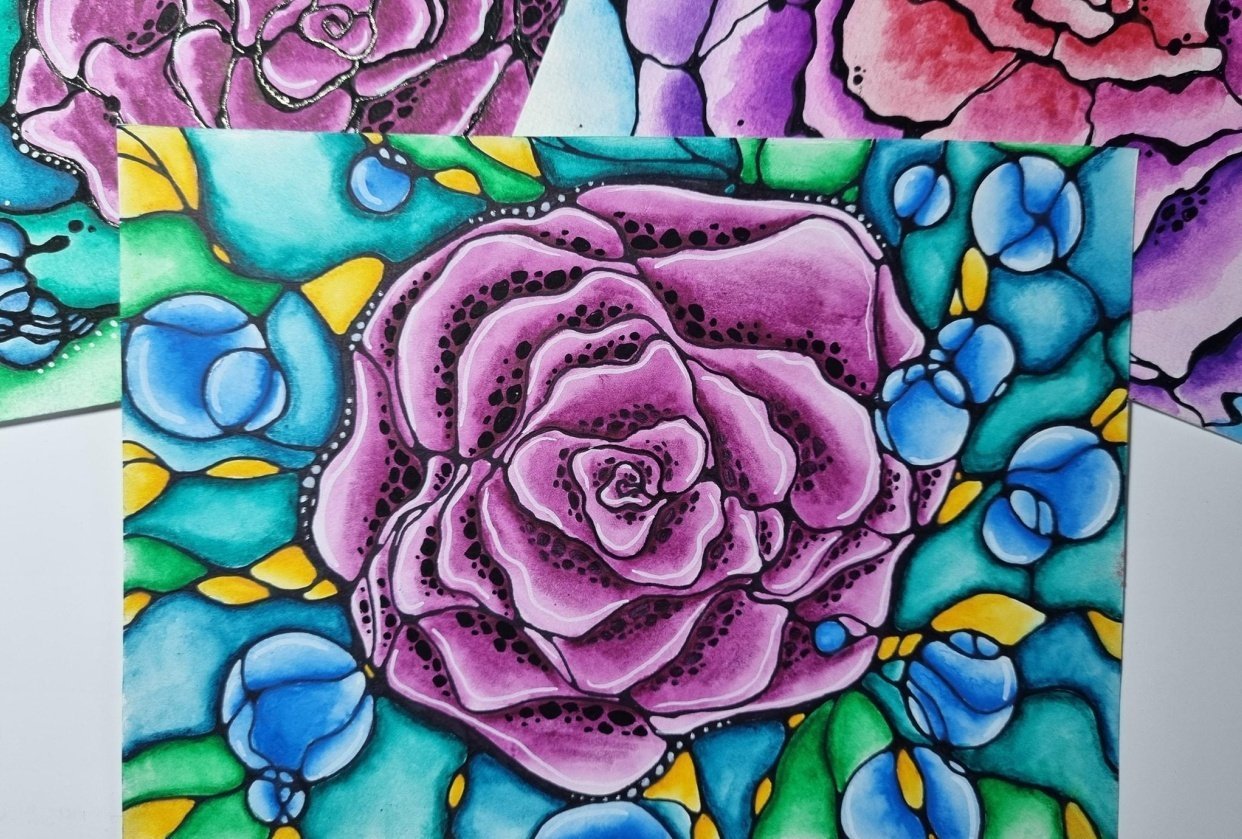
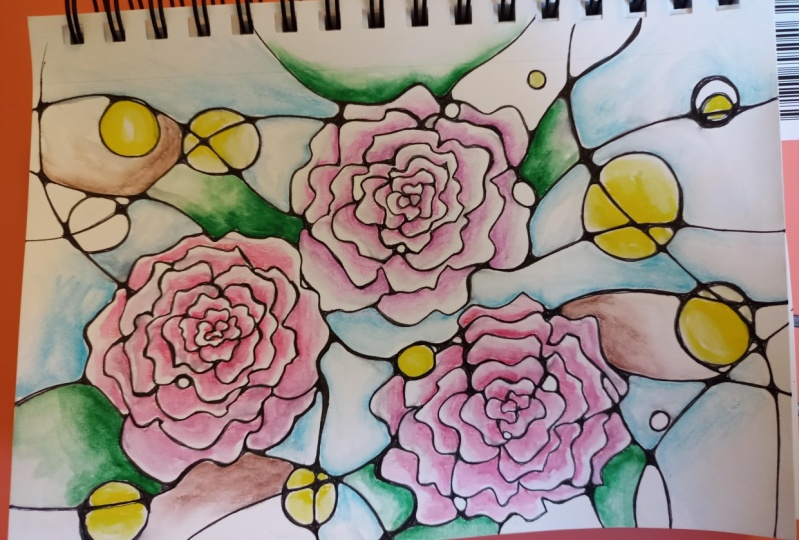
2. How to: Drawing the Neurographic Line: Today I'm going to show you
how to create neuro OT in the form of a rose
like these ones. This is called Neuro OT, and it should not be
mistaken for neural graphic, which has a very
specific process that must be followed and is a process developed and coined by prevailed *** graph in 2014. What we're doing today
is taking some of the elements of Nero graphical and turning it into neuro art. While neuro art doesn't have the therapeutic depths
of new graphical, it is still beneficial as a mindful practice and still contains some of my
most favorite parts of New graphic in
that it's still invite us to play on the page and let our mark making tool meander to the
final destination, imitating life and
how we set a goal, but rarely take a smooth
indirect path to get there, such as, we wanna go from a to b and we think it's
going to go like this. Whereas in reality, it
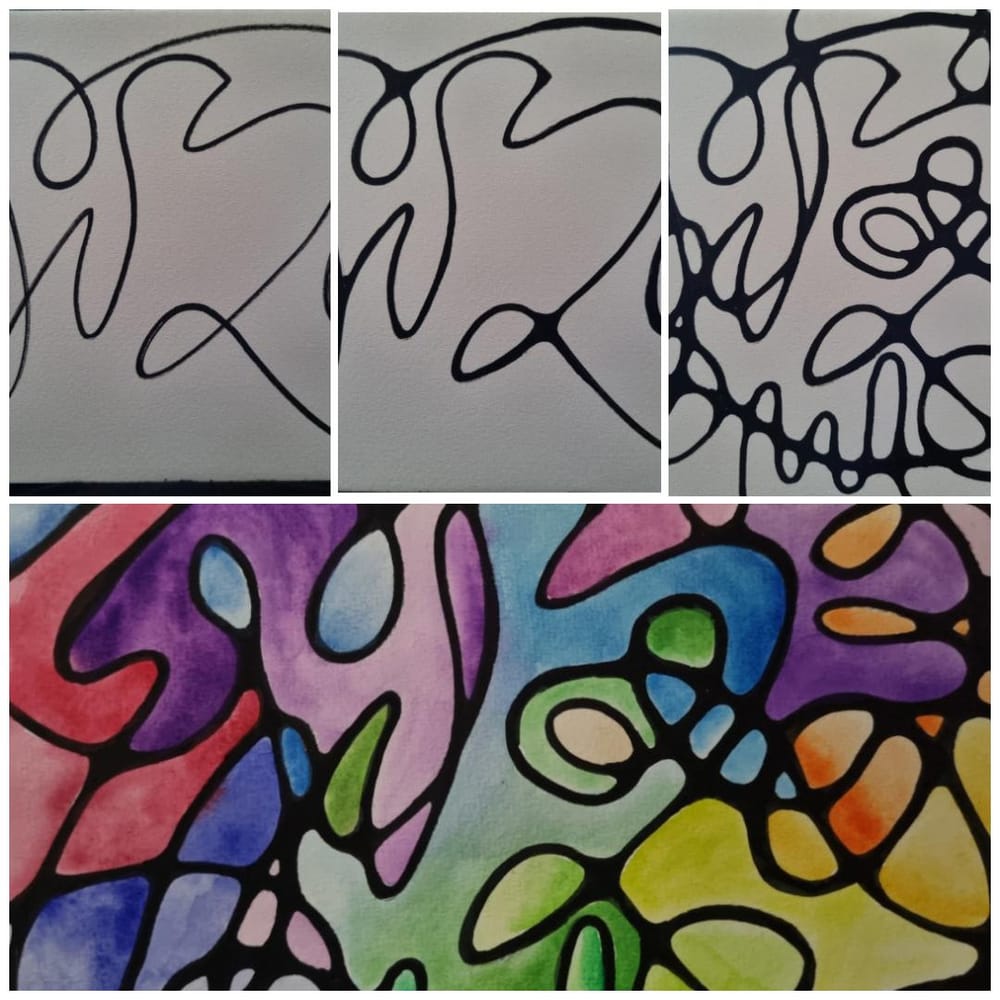
goes more like this. This is the neuro
graphic line where no one section is the same as another section
along the path. And for me, this
near a graphic line becomes reminiscent of the
neural pathways in our brain. The idea here in
neurons is to take the pressure off from having
to be perfect or exact. The wobbly line that
goes off course here is both encouraged
and celebrated. Life is not perfect. And these lines do not
need to be perfect either. When creating your graphic line, we want to get into a state
of flow, state of surrender. Relax into it. Have some fun, and let your
mark a play on the page. Now probably one of the
most important parts of neuro art or new
orographic or is the rounding of the sharp
edges where they connect. This process calls for
presence and mindfulness, allowing us to slip into a
meditative, meditative state. As we find all the sharp
edges and round them out. Remember to breathe. And to just focus on
what you're doing. Every time a thought
pops into your mind. Thank it. And let it go. Let it flow along the
lines, and let it go. And of course, add
lines as you feel too. And make them thicker. Keep them thin. Just round out all the
edges that you come across. By doing this, it said, to help bring about a state
of calmness and safety. In nature when we tend to
find these sharp edges, they indicate danger
because they could be the sharp teeth of an animal or jagged rocks
that could hurt us. And by rounding
out these corners, it helps us bring
this sense of safety, a softness to the
image into our lives. And it helps us
create new pathways. Ease. Rather than having to stop suddenly and go in a
different direction. It allows us to smoothly
transition from one thought, one state into a new state and find a new thought
for a new path. This feels symbolic to me. Us rewiring our neural pathways. Because sometimes you can
get stuck on that one track, that one track of, Oh,
I'm not good enough. Oh, I can't do this. It's so easy to keep
going down that track. And by rounding
out these corners, we can begin to create new thoughts and chase those
thoughts down the line. And start building
new neural pathways. Releasing the old
thought patterns. We can go into this
with the intention of creating more ease, better thoughts,
different habits. We can help encourage our brains to make
different choices. Instead of reaching
for that chocolate. We might go for a walk. And all of a sudden
is tangled mess. Starts to become
smooth. Pattern. Where we can go in whatever
direction we want to go. Make an add. New ways to go. Make an easily change direction. Anytime we want to. Creating a new
picture for our life. If you start to get
lost in doing this, then it's doing the
job as you become present and mindful
in the process. And that's pretty much all
we really need to know. For your graphic on. The only other thing
that I would probably add is that people, and I like to add circles
throughout the image. I just use my little
template here. But you could also just draw
them in yourself freehand. Always remembering to round out any sharp edges
that are created.
3. Grounding Meditation: It's time to make yourself
as comfortable as possible, either sitting up or lying down. Make sure you're warm and all your basic needs are met
to the best of your ability. Not hungry, not thirsty. Bladder is empty. Once you're comfortable. The invitation is to close your eyes and begin to
focus on your breath. Just notice the natural rhythm
as you breathe normally. Pay attention to if your chest and stomach and
moving with each breath. Or perhaps you're breathing
quite shallowly and only your chest is
rising and falling. If you are breathing shallowly. I invite you now to make
sure you are taking nice full breaths right down into the bottom
of your lungs, allowing your stomach to rise
and fall with each breath. Now, try to extend your
in-breath just a little bit. And then extend your out-breath just a little bit
more than that, making your out-breath
longer than your in-breath. Now that you have focused on really filling your lungs with each in-breath and emptying your lungs with each out-breath. We're going to do
some box breathing. This is a simple
breathing technique that will help center
us into our body. And we do this by
breathing in for full. Pausing between the N
and out-breath for fall. Breathing out for fall. Pausing between the outer
and in-breath for four. Then cycling through this again. So let's begin breathing in 234. Hold 23, full, releasing. 23, full holding 234. Now let's do that
a few more times. Breathing. 234, holding 234, releasing 234. Holding 234. Breathing in 234, holding 234, releasing 234. Hold 234, breathing in 234, hold 234. Releasing too. 1234. Holding 234. Now allow your breath to go
back to its normal rhythm. As you begin to pay
attention to your body. Notice any comfort or
discomfort in your body. Notice any sensations or feelings that are
happening in your body. You don't have to do
anything about these things. Or we're doing right now, is being mindful in the present and connecting
to our body. So as you notice in your body, we're going to imagine
a fetus growing down and extending into
the earth below us, like the roots of a tree. Going deeper and deeper through the layers of the
earth, below the crust, past the vast crystal caves, deep into the hot magma until we reach the beating
heart of our planet. As we tap into our planets hot, we allow that deep red love
and warmth to flow back up into our bodies and
begin to circulate up, up, up up into our
feet, up our legs, up throughout torso and arms, up on next to the
top of our heads. And then fall back down to our feet and cycle
through our body in a circular motion up to I
head back down to our feet. Now without body. If the delicious warmth
from our mother earth, we focus on our head
now and imagine it growing and expanding
up, up, up. Through the Earth's atmosphere, continuing up and out
into the solar system, going beyond and out
past the edges of our Milky Way and out into the universe where we tap into
the collective conscious, sometimes known as
the Akashic Records. And as we connect with that
super brain of all-knowing, we draw down the cool
blue energy down, down, down into our body, letting it pour into my head. Going down our neck, down our arms and torso, into our legs, right
down into our feet. Then cycling back up the
body to the top of our head. And then back down again. And backup in a constant circle. As these two energies merge
in the center of our being, we find ourselves connected to the planet and
connected to spirit, centered firmly between the
two as they flow through our body, cycling
together, intertwining, and merging to create a beautiful rich
royal purple color that fills our body with everything we need
in this moment. As the two merge, it is time now to contain that beautiful energy in
our bodies and withdrawer ourselves from first the
collective consciousness in the vastness
beyond our planet. Bring your tendrils
back down, down, down into the Milky Way, down, down, down into
our solar system. Keep bringing yourself back, back, back into
Earth's atmosphere. And finally, bring
all of yourself back into your own body,
your own head. And seal off knowing
you can tap into that goal knowing energy
anytime you want to. Now begin to bring
your tendrils back up, up, up, It's warm, cool. Back up through the
maxima, back up, up, up through the vast
crystal caves, right up through
the Earth's crust and into your own body. Your own feet, sealing off. But knowing you can tap into the Earth's nurturing
energy anytime you want. Notice that energy is from both still swirling around your body. Full of knowledge
and connection. Warmth, love, divinity,
centering you right here, right now in the present
moment, in your body, with your limbs, your brain, your thoughts, your
abilities, your room. When you feel ready, begin to move your body. Wiggle your toes
and your fingers. Begin to roll your
ankles and wrists. Stretch out and move
your legs and arms. Feel your face than torso, and come back into the now, opening your eyes
when you are ready. And moving on to
the next lesson, knowing you are connected
and centered and grounded.
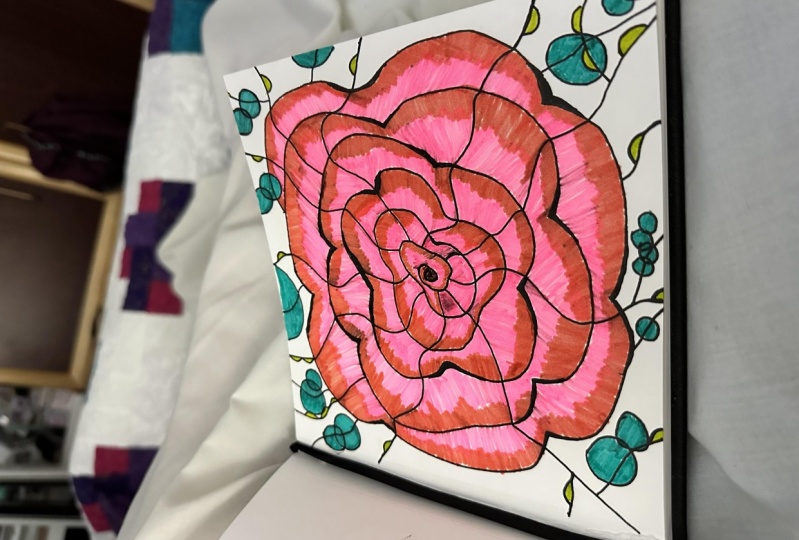
4. How to: Drawing the Rose: So to start with, what
we're going to do is put our marker somewhere in
the middle of our paper. And we're going to
slowly move out by in an ever-growing
spiral outwards. And sometimes you're going to
bring the line quite close. And then other times
we're going to let it go out a little. And what you'll find
is by doing this, it starts to look like
the leaves of a rose. Petals are not leaves. And you just keep doing this until the rise is as big or small as you
would like it to be. To fill most of the page. Now that's done. We're going to make some random lines coming out and try to dissect the petals where
they come together. If you can. Really matter. If you do or not. Maybe bring it all the way
to the edge of the page. As many or as few
lines as you want. The more lines, the more
rounding error you get to do. The rounding out, that
becomes the Mindful Practice. You then just keep adding as many lines as you
want to on the outside. Then of course, once
you start rounding out, you may find you want to add
even more and more lines, so just make it as busy
or as calm as you want, as many lines, as few
lines as you want. And the only other thing
I'm going to do before I start rounding out is just add some circles here and there. Because that's what I like
to have in my design. The beauty of this too is if you have a happy little
accident like this one, you can just turn
it into a novel. Just, I would suggest
that any time you add an element like a
circle into your design, you add it in a second
or third place as well. So don't just make
them one-off events. If you make a happy little
accident somewhere, maybe you go and
do it on purpose somewhere else in the design. And that just helps the
design remain cohesive. Look like it's
supposed to be there. And no one's ever going to
know at the end when you finished that you didn't
intend for it to be there. Now is when you start to take some time to round out
all of those inches and add more as you want to want to or just keep it simple. It's completely up to you. For the rest of this video. I'm just going to fast forward
a little bit of music. You can have it playing in
the background if you like, while you are doing your
rounding out of your wages. Or you can just now and
go on to the next video.
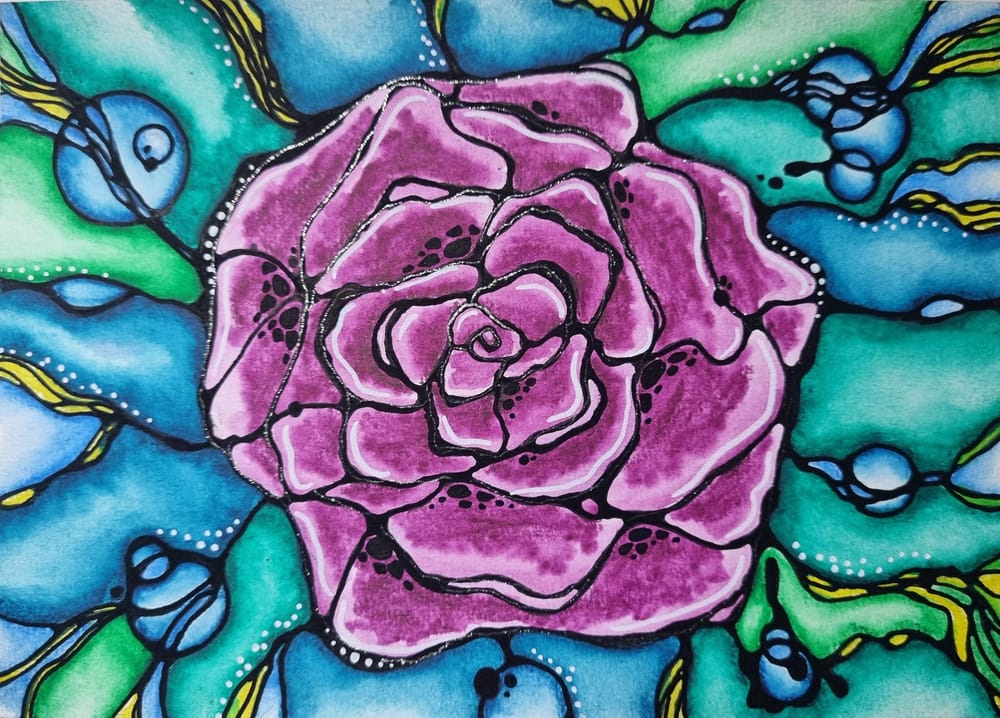
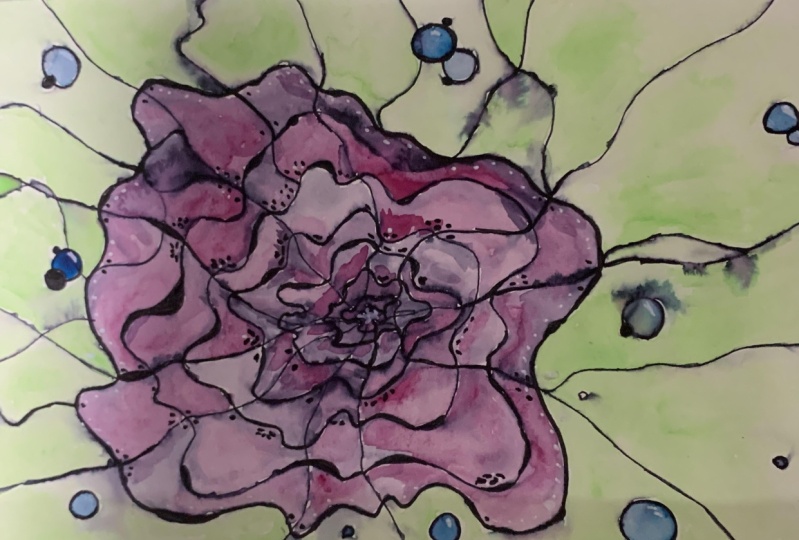
5. How to: Colouring the Rose: So now that we've rounded
out all of the corners, it's time to do
some coloring in. I'm going to be using
like dough and ink tents, pencils that just watercolors
by the dominant brand. They're really highly pigmented so that quite bold
with the colors. I'm going to do colors
is a fissile roads. And then in the background I'm just going to do some blues, greens and a bit of yellow. I like to use my water pins. Things that just these pins
that are filled with water. And I start by laying down good chunk color just on the
inside edge of each petal. Then that way, as I activate the color and bring it outwards, it gets a little bit lighter. In the same way that I did this. Make sure that I have a spare
piece of paper so that I can wipe off the
excess from my pins. So I activate the
pigment of the water. Then I spread it
out to the edges. That gives sort of like an umbrella effect where
it's darker on the inside, then lighter on the
outside of the petal. Activate the pigment middle, and then just spread
it out to the outside. If you get too much
pigment on the brush, make sure you just
won't get off. Always remember
that if you make it a little mistake somewhere, just keep going because
the end product, you probably won't
see the mistake. And even if you do, other people won't know
that it was a mistake. So don't ever let
a mistake make you give up on what you're doing. Just see it through. Even if you never show any one, you still get to learn
from that mistake. And if you make a mistake and you just keep going with it, then the rest of it, it's
not going to matter. So all of a sudden you've got less pressure on
yourself to make it perfect because you've already
made a mistake, right? Don't ever throw out or stop. Always complete them
all the way to the end. Because even if you have a
mistake, it's still practice. The rest of it can
still be practice. So the next time you
can do it differently. But also you may get to the end even with that
mistake and realize, hey, it's still
turned out, okay. Now I'm gonna do all of
the different circle. And this same kind of thing. I'm going to put the dark
pigment on the inside of all different shapes and activate the pigment
on the inside. Then lightly add
more and more water so that it goes to the
outside with a lighter edge. As you can see
when I'm doing it, I'm keeping my tip, the very tip of the brush here, up against the edge
to activate pigment. And then just kinda dragging
it out to the edges. That warning it stops
too much pigment from going to the edge. Brush quite flat on the paper. When I do it. Anytime it feels like I have
just a little bit too much pigment on my brush. Wipe it off from as well. Watercolor tends to do whatever
watercolor wants to do. So you can have all of this
pigment in the middle. And it'll just slowly
fade out to the edge. However it wants to. Just let it do what
it wants to do. While it's still
wet, you can kinda push it around a
little bit anyway. Watercolors pretty
forgiving them not to phase by making this
an ombre effect. If it turns out that
way, That's cool. But if it old ends up a
solid coal, that's okay. Mostly I'm just putting
the yellow in for some contrast just
to help it pop, give a point of difference. Give a little bit of
interest into the drawing. Instead of making
it all one color. But I'm opposed to
just one color. I love a good monotone. But essentially, if I could have people go away with
anything from this, It's a freedom to just play and not care
about the outcome. And not worry about
it being perfect. I'd love for people to just just go and do
art and enjoy it. And if it doesn't turn out
the way you want it to, welcome to being an artist. I think there's very
few people except for maybe the hyper realistic ones, the ones that do the
hyper-realistic work. Whoever have this stuff turn out exactly the way
they were envisioning. For me. Especially this kind of art. It's just about playing and relaxing into it and having
some fun, having no pressure. Maybe using it as a
YE to be mindful. The very nature of Nero art being unpredictable in
where the lines go. And kind of breaking
all the rules. Like it doesn't
have to be perfect. And it's still going
to look beautiful. And there's not any rhyme or reason to where I'm
putting these colors. Just putting them wherever. So of course you could do this
without a water pen tool. You just what your brush. Make sure you've got
a nice clean well of water as well as the one that you want to rinse
your brush out. And if you're going to use just a normal brush
for this kind of work, make sure you've got
two wells of water. One that is completely
clean water that you dip into when you want to
activate the pigment. And then the other one can be for when you want to
clean off your brush. Now that all the
color is being added. Just a few last things that I like to do to finish it all up. One of them is I tend to
go over the black lines again just to help make
them pop out a little more. And sometimes in the
process I add more lines. This is just
something that I do. Because sometimes the
the watercolor goes over the black lines and
dots from a little. Then the other thing
that I like to do is to add these black
dots. I don't know why. It's just a design choice. But I don't know. Just like it. And I also like adding
like little black circles, little dots and also some white highlights on
the edges of the petals. So I'm going to do that now. And phospholipid this, when
it dumps, that will be it. Then the last thing that
will be available will be the general questions
that you can go through your experience
of what this was like. To add that therapeutic
elements to the whole process.
6. Thank you and Goodbye!: You made it. Congratulations. It's not an easy thing to
finish a course, believe me, I know I've signed up for many of them are not actually
gotten to the end of them. If you've made it this far, that's an amazing things. So give yourself a
pat on the back. You now know what the
new graphic line is and how to use it
to create a rose. You have learned how to use watercolor pencils
and watercolor pen. And even though I used the
ink tents do and two pencils, you can use any kind
of watercolor pencil and the watercolor pen
in exactly the same way. And so now you have a
piece of art that you did. If this was your first time. We'll have to start somewhere and what a great place to stop. Now you have the skills to take the euro graphic line and turn it into whatever
your heart desires. All you need to do
is give it a go. And remember, it doesn't
have to be for anyone but, you know, pressure
to be perfect. Because the only
difference between an artist and someone
who isn't an artist is that an artist keeps
practicing over and over again. Please remember to
share your project in the project gallery because I would love, love,
love to see it. If you share it on social media, please feel free to tag me. All constructive
feedback is welcome. So feel free to drop
me an e-mail or message me if you
feel I could do something better and how I'm always trying to get
better at what I do. Any feedback or
suggestions for courses that I can do in the future
are also gratefully received. So let me know if
there's something that you would like me to teach. Now going keep being creative. Is that near a graphic line and see what else you
can come up with. Bye.
 Samm The Creative Alchemist, Express Yourself!