Transcripts
1. Introduction: Have you been watching countless tutorials of how to draw the human anatomy and getting nowhere? Or have you seen too many tutorials where there's a huge gap between steps and you just lose track. I've been there too. So that's why I wanted to simplify every single step in the process so that literally anyone can follow along. Hi, I'm all women art, a cartoonist, illustrator, and the normal around artist. I have over 10 years of experience and an art school Decree under my belt. I have gathered information and skills to teach you how to draw and to make it as easy and as fun as possible. In this class, my focus is on teaching you the basics of drawing the female torso, the core of the body. Even anemia or manga style from simple, easy to understand shapes so that anyone can just pick up a pen and start throwing. And I'm not just teaching you how to draw the torso from a single angle, but teaching you how to understand the structure of the torso so that you can draw it from any angle or in any pose. So just pick up a pencil and a piece of paper and let's get started.
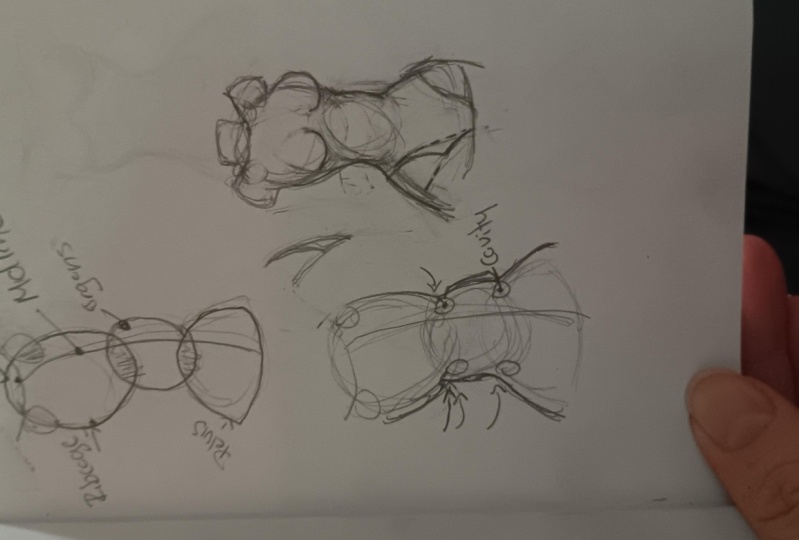
2. Structuring the torso: All right, So welcome to the first real lesson and the meat of this whole class. So drawing the torso, the female torso in an anime or among away. So in this lesson we are going to be going through the basic structure of the female torso and hole where drawing and they're complicated shape, that is the torso from simple, easy to understand shapes. And we're going to be going over every single step of the way so that no one will be left behind. So take a piece of paper and pencil or a digital medium of your choice. So let's start. First, we have to draw an oval shape. Just like this. This shape will represent the ribcage. Sorry, my terrible handwriting. So this shape will represent our ribcage. And again, with this class, we are going to be using simple and easy to understand shapes to trying it complicated things. That's why the ribcage looks like this. And the best thing about this is that when you are ready and wanting to draw their complicated bone and the muscle structures, you can use these simple shapes and simple methods of Troy in the torso to expand upon with all those little details. Because when you're thinking about the ribcage, for example, you will need to know the basic shape and structure of the rib cage before you are adding any of the details or any of the separation of the bones or the rapes in this case. One thing to note about this shape is that it's a little bit tilted to the left, just giving their pulse a little bit of attitude. And it's a little bit taller from top to bottom, down from side-to-side. So that's really easy and important to know. So let's go on to the next step. Next, we have to draw these two circle or a little spear shapes. And these will tease two shapes will represent the shoulders. So these two shapes should be aligned so that their tops are at the same line approximately that the top of the ribcage is as well. And think about these shapes being on the east side of the replicates the left side and the right side because of course the arms are on both sides. And because of that, the angle that we're drawing the torso in this tutorial from this part of the shoulder will be obscured by the ribcage. Because again, thinking about these shapes in three-dimensions, It's really important because we're only we think about the shapes in three-dimensions. We understand that things are obscured by other things when we are trying the torso from different angles or in different positions. So think about these things and you can almost imagine there being a little bit of a bendable stick between their shoulders because so they always remain on the same side of that ribcage. So think about these things when you're drawing the shoulders, but these are simply just little sphere shapes. Now we are drawing something that isn't a bone structure. This over here represents the Oregon's and or the mass between their ribcage and soon to be drawn pelvis or the heaps. So why we are trying this is important because that helps us place that pelvis later on. And placing the pelvis becomes so much easier when we have this shape included here. And the size of this thing is when you are drawing guidelines from the shoulders citing that ribcage goal when narrowing up in the waste. That's approximately the size of that. But the important thing to note is that this shape is supposed to be smaller than the ribcage. So this shape over here represents the Oregon's or the mass between the pelvis and the rib cage and now is the pelvis or they're heaps of the body. So when we think about the width of this shape, it's the same width as the shoulders approximately. So that's an easy way to measure the width of this pelvis. Last day, heaps shape. So if you're thinking that the pelvis doesn't look like this, again, we're just indicating the pelvis or the heaps with this half a sphere be exact because this shape is thinking about this fear. Not a perfect sphere again, but a sphere in three-dimensions and cutting it from half and looking at it from a little bit of a high point. So that's how we got this shape right here, which again is the pelvis slash the hips. So placed a little bit under the Oregon shape and the shapes, these three shapes again, and it should intersect each other a little bit. Let's go over to the next one. This curved line that represents the center. Center. Again, my terrible handwriting. The center or the center line of the body. When you think about the body, there isn't a central line of course, but you can imagine there being one because many of the things in our body are mirrored from the left side, the right side, or the right side to the left side. So this line helps us place everything that has to go on either side of the body. Or in the middle, like the naval fleet goal there. Or when we're controlling the collarbone, the indent would go in the middle, lie here or drawing depressed. They separate on the torso from the midline. So that's just a simple line. And there's another simple line which is this one, which is in fact the color bone. So this line is just going from shoulder to shoulder and it's curved a little bit. And when we are drawing the collarbone, this line will show where to place it. And of course, the Indian would go here. When you're touching your own color bone, you can feel in the middle, there's a little indent right there. Now this is fun because now we're trying the finalized lines or the outlines of the torso. And thing to note about these lines is that they follow all these huge shapes like this line over here going along with the rib cages are all representing the ribcage on this side too. But the thing that makes the body look like, you know what you're doing. And because I'm explaining things to you, you will know why these things are, how they are, and you will know what you are doing. And that is that between the intersection of these shapes, there will be this little cavities between the shapes right here and right here and there. And you can think about those cavity is pulling the outlines Tolbert them so that these little nuanced edges over here or coroners will form. And that that little detail will give you so much more nuance to your drawings. Because if you didn't have that, it would be just a little curved line like this and it wouldn't look so natural. So think about following the lines of this beak shapes that we have drawn, but also thinking about the intersections and little cavities between those lines. Pulling the outlines towards those shapes. So that's that. Let's go word then the next step, this will probably be the most hardest thing in this tutorial, the crotch and their breasts. Let's go where that crotch before we go or where that press and their connection from the legs to the torso. So when we think about this pelvis slash heaps shape over here, when we think about it in three-dimensions and we want to draw some lines on top of the shape. They would go like this, curved lines going like this and this. And then when we pull another line just like that, going from the middle line, which would be here. Just like that and like that. So creating these two lines here and thinking about their midpoint and making another curved line like this, we'll create this interesting little lie in that is not simple, but looks really good. And again, it consists of T22 curved lines just like this on top of the pelvis shape. And then one, a curved line going across them, creating this line, which is the start of the leg. So if we wanted to draw the lakes, they would come like this over here. So that's that. Then going over the breast, the breast are one of the most difficult and the funnest things to draw in a female torso or the female body in general, the easiest way to think about the breast and hold the forum is to think about them as water balloons. Because when you think about the shape of water balloons, and I know this sounds weird. Where does the mass of the water balloon, where does the water go in this shape? It goes to the bottom. The mass goes to the bottom of the water balloon just like this. So the mass is at the bottom of the shape. And then when you think about how the qualities of the shape easy to firm or a soft shape. What is their water balloon like? Of course, it's a soft shape. So thinking about these two things, and thinking about the water balloon forming on top of the rib-cage. This is the side of the ribcage drawn here. And the ribcage again is a firm, heart-shaped so it doesn't bend that much. So if there's a soft shape forming on top of the ribcage where the mass is at the bottom. It will go like this form on top of it and mold on top of the ribcage. And because of this angle, we have a great opportunity to see the underside of the breast a little bit forming on top of the hard and firm rape case. And this part here is the schema connecting the breast and the mass of the breast through the torso. Just like this, which completes the whole idea of this thing. And if we wanted to draw some guidelines here, we can see the water balloons forming on top of the ribcage so fast like this. And again, there are little nuances. For example, when you have the arm pulled a little bit upwards, the breast is connected by a little bit of muscle and skin, their arm. So if the arm is pulled this way, it's the left. That breast will follow the arm a little bit. So that's a little nuance. That's not the most important thing at the start, but just wanted to mention that. And then we have the finalized torso. It may seem like we took a huge step, but if we think about it, we have the outlines that we drew. We have breasts, we have the crotch. And the only really big thing is the neck that we added. And the mic is just a cylinder shape on top of the rib cage. So it's not that hard to draw. Especially when you think about the shape. You can draw a little bit of a line here representing the cylinders top and here too. And again, we collarbone, collarbones, indent is in the middle because the middle line would go across the body just like this. But the thing that we have done is that we just erased this middle part here just to give it more of a natural look. The crotch is one thing too, because we have this a shape for the pelvis earlier on, but the crotch is just like a U shape between the legs and the separation of the legs. So that's that. So those are the basics of drawing the torso, the female torso in simplified terms. I hope you followed along and I hope you learned something. Next time we're going to be drawing that female torso from a straightforward point of view, the site and the back wheel. So stay tuned.
3. Drawing the torso (front, side, back): Okay, so now that we have gone over the basic principles of reconstructing the female torso. Now we're going to be applying all that knowledge into Troy and the torso from front point of view and the side view and the back view. So again, we're going to be using the exact same method that we used in the last tutorial in this one. So you won't be lost. I promised that. So here first we have this basic shapes, having the shoulders, right here, having the collarbone or line right here, having the central line centered because this is the front view in that sphere representing that ribcage, then the organs, and then the heaps or, or the pelvis. So the basic shapes, nothing different about this, other than their shoulders are both almost completely visible because unlike before, we had the other shoulder a little obscured by the ribcage, but this time they're on the both sides of the ribcage, both visible because it's from the front view angle. The other thing that changed is the middle line isn't curved like before, but rather it's straight. And that's just because of the angle that we're looking at the body. We are looking at it from the front view that even the curved line from the front view is going to be looking a little, little bit like a straight line. So that's the basic, basic principle of that. So here we have the thinnest of lines. And why did we jump from the previous thing that this right away is that we went over already how we got all of these things, how we got the collarbone to the collar bone line, how we constructed the outlines of the body by following the basic shapes that we had laid under the outlines and all of that. So in the next step we can see how things like these lines are pulled towards those little cavities between these shapes. And having depress looking like water balloons, like this one. And having all of these lines explained in this picture, where you can only see all the things that we went over last time being applied into this one. So nothing new here. So here's the finished illustration of that female torso from the front view. Again, if we wanted to start drawing the arms, good start. Then from here or the lakes, they would start right over here. So that's done. Next. We will be looking at the body from the site of you. Again, having the basic shapes like the ribcage, like the shoulders and everything like that. But this time because it's the site view, we can only see one shoulder because the other shoulder is not visible because it's obscured by the ribcage completely. Unlike before, we had both of them visible and in the first lesson we had only one completely visible and the other was a little obscure. But this time, because it's the side for you, of course, you can see only one shoulder here. The middle line is not in the middle from our point of view, but from their bodies point of view, when we think about whether bodies, middle or central line is, it resides right here. Because when we're looking at it from the side, the central line will be looked at from the site as well. So that's why the middle line goes across the body down to the bottom here. All of that is pretty simple. Tried to have a little curve. The body just like this, because it makes the body, it look not so steep and little bit more dynamic. When you have a little bit curved like this. And you can start by drawing the central line so that you can place all the items relative to that. Next, we arrive here and again here a few things to note. One of the things, especially is depressed because the breast, you can see the bottom side of the breast because from this side it's laying on top of the ribcage. We can see the bottom off the breast a little bit here. So that's important to know. Again, think about it. A hard surface which is the ribcage and a water balloon on top of the shape. So it won't, of course it will like form and it's a soft shape. So it will form on top of that firm shape underneath, which is the ribcage. Okay. Then here, having all the things explained just like before, these lines pulled towards that cavities between the shapes and everything like that. One thing to note is that when the shoulder is here, here, and here is the brightest, there is a little bit of skin and muscle here that will be pulling the breast towards that. Arm or the shoulder? Just like we went over in the last lesson. If the arm starts moving in one direction, just like this, the breast will move with it. So that's pretty simple to understand, but a little harder to draw, so you need to practice a little bit more. So here's the finished illustration. Again, we went through all these steps from simple shapes and understanding how the constructive finalized outlines on top of those shapes and understanding white O shapes look like they do and we get this result. So that was the side view. Of course, with everything here, you have to practice. I'm just explaining to you every bit of the theory behind everything and constructing of the body. But you still have to practice drawing the body before you can master it. So next we have this and this will be the back view. And why does this look exactly like the first construction of the body from this lesson? It's because it's the exact same, because we look at the body from a straight view angle. It's not a tilted in any way, even though this is the back view, it doesn't matter if it's front or back because they are parallel. Both look the same in construction, only things that are going to change are the things visible and things that are obscured by other things. And of course, from the back view we can see the spine line, we can see the bot, and we can see the shoulder blades. So this construction should be familiar again, having all the elements that we have discussed earlier. So let's move forward. And this might seem like a huge jump because we are not seeing most of the things that we have practiced like draw the press, draw the navel, drawing the core bone, all of that. At this time, we have a lot of new elements, so I'm trying to explain everything so that you can understand everything quite well. So the outlines are pretty much the same, following the shapes as before, but this time differently. We don't have the breast a little bit peaking may be from here. And we don't have to draw their collarbone because it's not visible from the back. The shoulder blades are really simple shapes, so let's move on with that so that we can see from here, they're almost like tilted triangles that you cut the corners out, just like that, leaving just the shape. So this is the basic shape. Of course it can't be this like angular or you have to make it a little bit softer to make it more natural. Or depending on which style you're going for, you can do either way. And remember with same with depressed, the shoulder blades move with the shoulders because you can imagine there being a little thread connecting the shoulders to shoulder blades. It's easy to remember the names because shoulders, shoulder blades, that should be really simple. So when you move the shoulder upwards, the shoulder loop soldier blade will be following the shape a little bit towards the shoulder itself. So that's that, know that. But you can imagine that being when you have the central line, which in this case, because we are looking at their body from the back, is their spine wine. Imagine this spherical shapes that meet in the middle like they're mirrored exactly to eat solar. So looking like this and not throwing the whole shape in BAD indicating some of the shape just like we had in the previous one. We can see that we don't draw the whole circle or the whole all here. Instead we just indicated by drawing these lines separating the butt cheeks and the bottoms can be more droning, just like we have here. So those are the main points. Of course, you have the spine line and you can draw a little bit off the line in this angle because the spine line is a little bit more visible than the central line from the front. So and again, don't draw the spine line like a straight line like this, but instead, break it up a little bit to make it look a little more natural, so it looks better that way. So those are the most important things, of course, when you have the pop six, they are part of the lake. So the lake is a star is starting here. And of course, if the leg is as stretching the bitrate, we'll stretch we did. So they're like not separate parts but connected to each other directly. So and the end result looks like this. So those are the basic principles, how we use the theory that we went over in the last lesson 2, applying from different, drawing their body from deeper diagonals. And I hope I made it easy and clear to you. So I hope I see you in the next lesson where we're going to be going or where even more difficult animals that will take even more practice to learn. Bod will be awesome when you learn them. So see you next time.
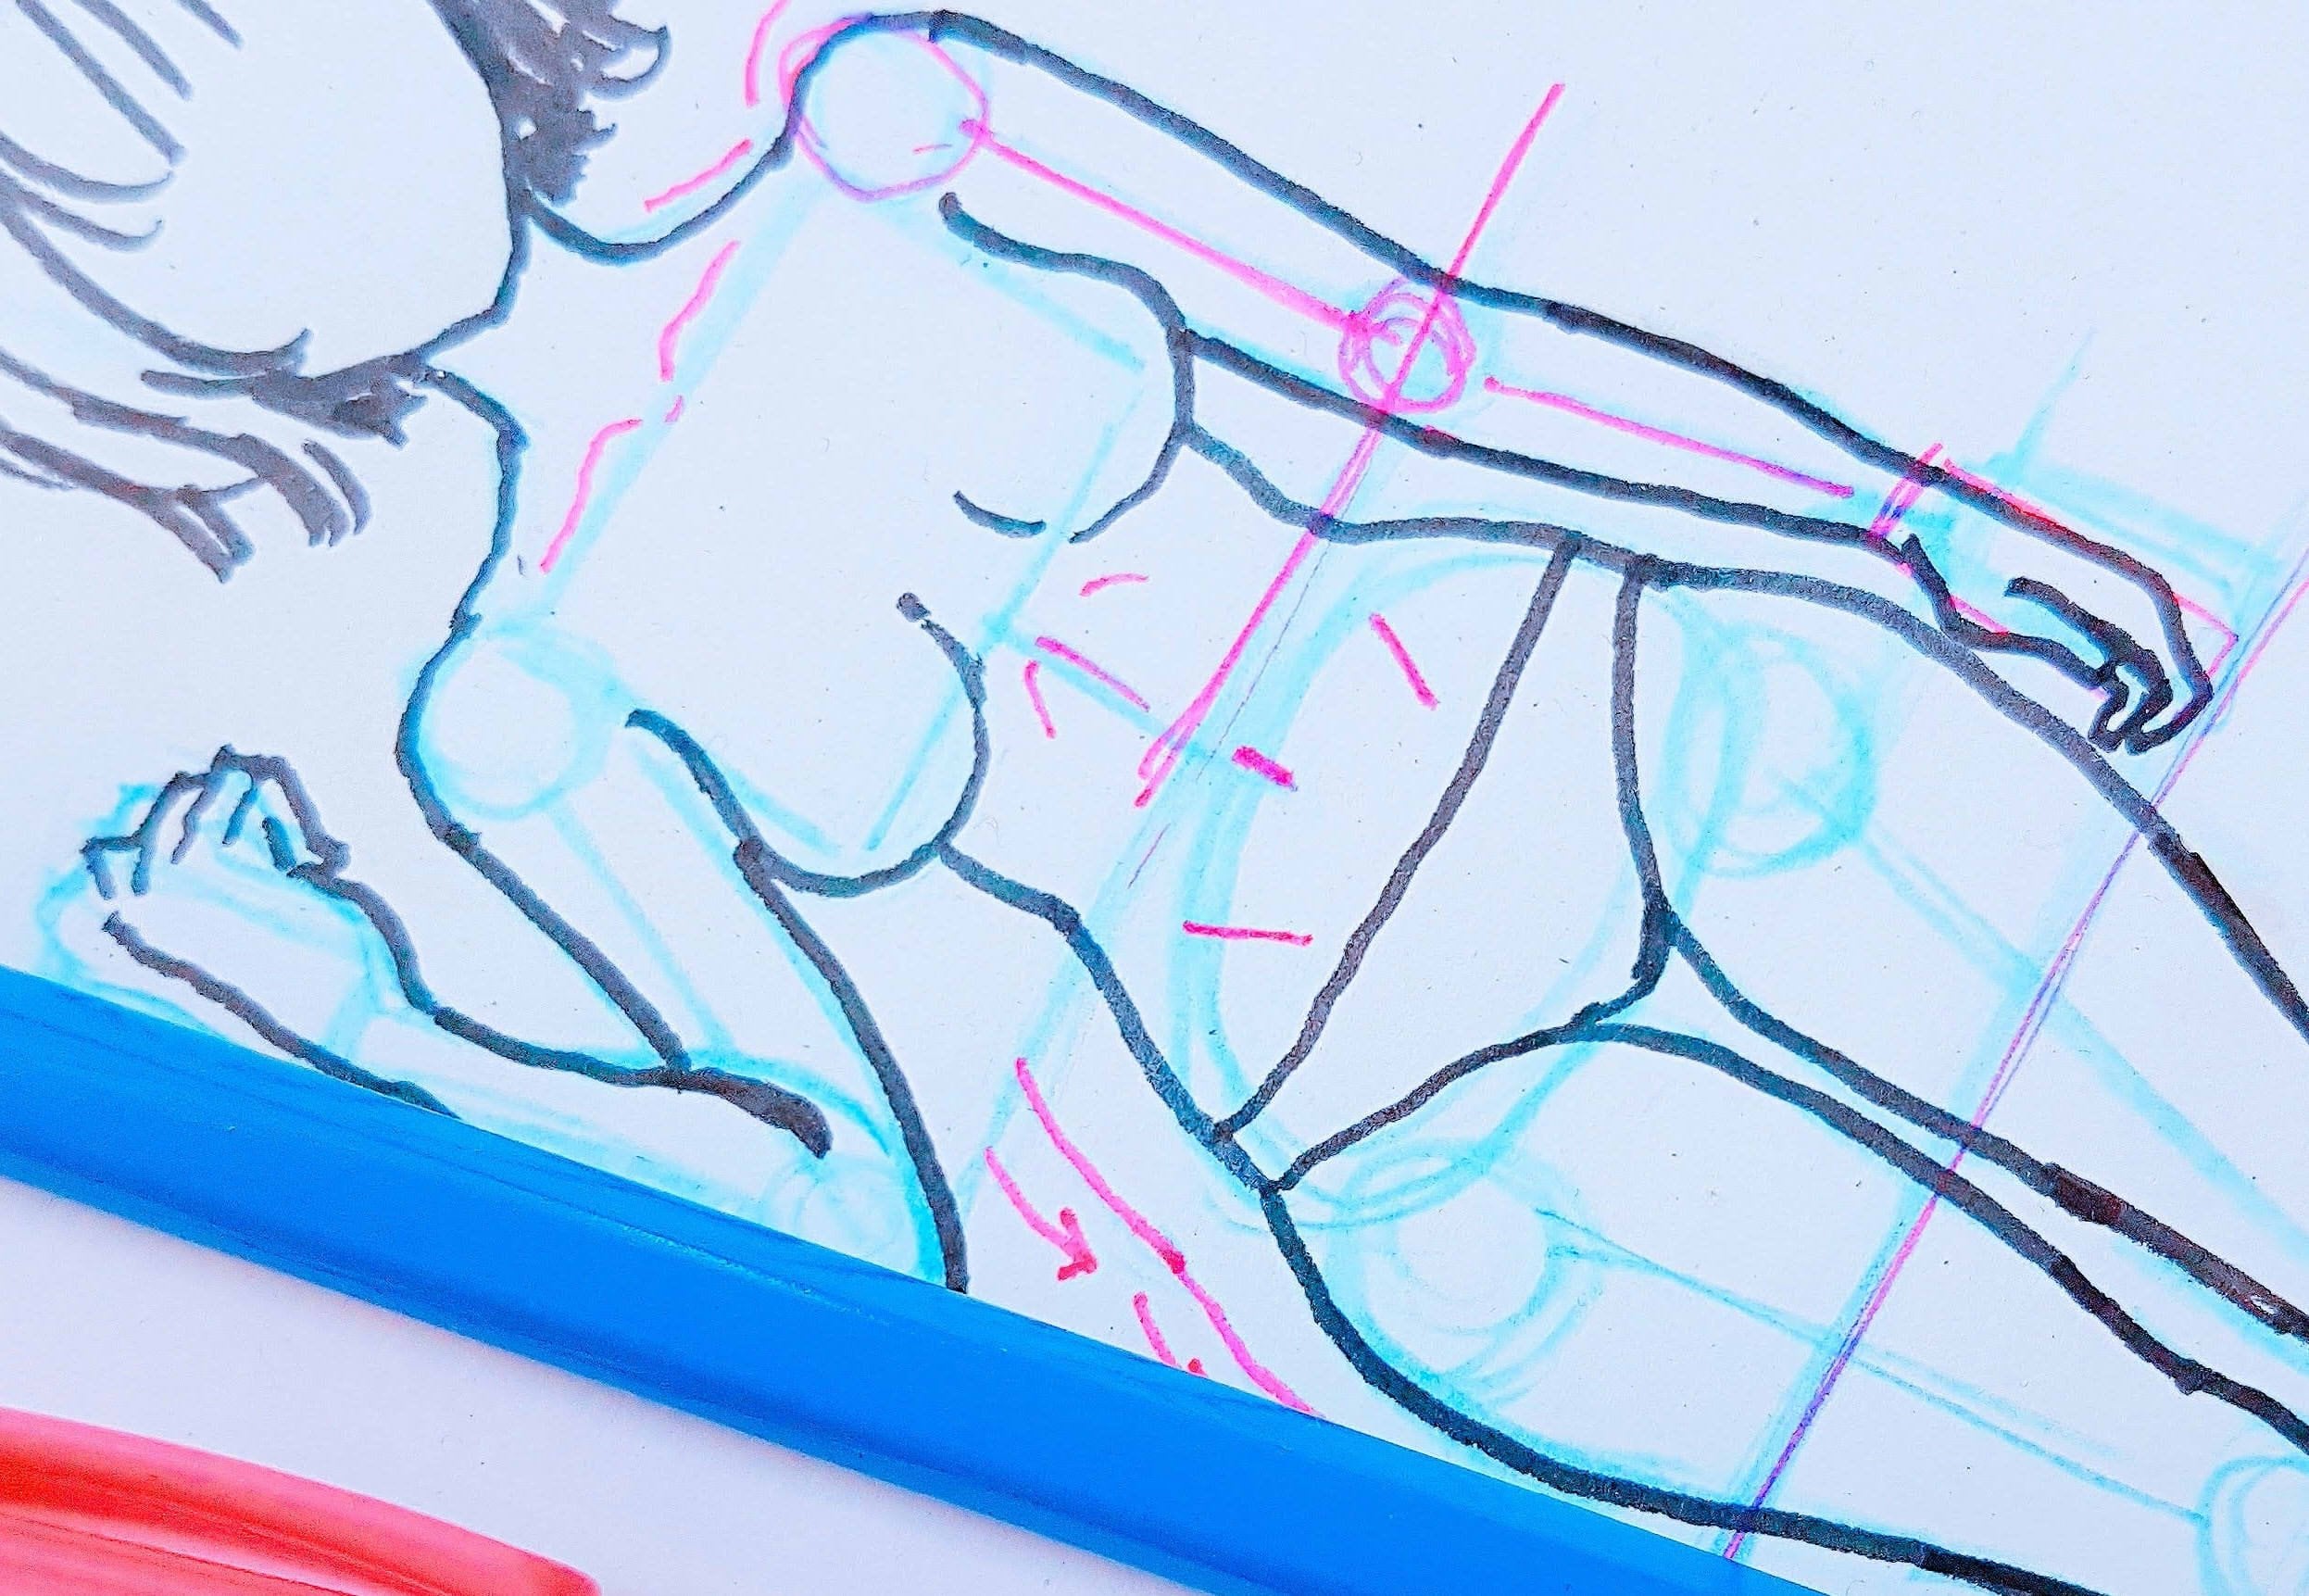
4. Advanced poses and techniques: All right. I hope this is a quick one because I'm just going to be explaining how I apply all the knowledge that we have learned so far into drawing even more challenging posies and challenging angles. I'm going to be going over two different angles on top of that one that we had in the first lesson that I'm going to be drawing in time lapse. And here I'm just wanting to show you how we can use all the simple steps, how we got here into drawing these more challenging posies and more challenging angle. So let's get started. So here we have the torso that we drew in the first one, but actually being drawn in time-lapse this time. So nothing new here, just using the same methods reminding you, we got here and then we're going to be going nowhere. And next post that will be even more challenging. But don't worry, I'm going to be explaining every step of the way so that you can understand it as simply as I hope you can. Okay, so here we have the basic building blocks that we have learned to use so many times already. So we have torso constructed from the ribcage represented by the sphere. And those little spheres as well, free presenting the shoulders. And we have the Oregon's and we have the pelvis and we have the central line. And in this case because it's from the backside, we're going to refer to it as the spine line. So there's nothing new here. We are only using the same things that we have used so far. But notice the spine line because it's a little bit curved because I want to make the pose a little bit more dynamic. So continuing from this, we're going to petroleum the butt cheeks, which we'll learn how to draw them in the last lesson. So again, thinking about the central line and twos ferric shapes dividing from that. And also thinking about them as a mass on top of the leg but also part of the lake and not a separate part. So if the leg stretches, that butt cheek will stretch as well, but otherwise he will stack on top of it. And then we have the shoulders drawn in just like before. Nothing new here. And also that breast, we can see the left breast only poking out a little bit because this is from the backside and the angle is tilted just a little bit so that we can see it. So as you can see, we only use the methods that we have been using so far. For example, using their little cavities between those simple shapes to pull their outlines in. That's what we went over previously as well. And also thinking about the neck as cylinder on top of the ribcage. So even post like thes is really dynamic compared to like guess trade standing pose. But you can construct it with these simple steps. And that's the amazing part about it. Biggest most tutorials teach you only how to draw the body from a few Anglos. I'm teaching you how to draw the body from any angle with this symbol rule. Okay, here's the next one. This time, it's a little bit more complicated, but don't worry. Again, explaining everything. Here we have the ribcage tilted a little bit to the left and the pelvis pointing right tortoise. So this is something interest in big as when you draw the central line, which is really important in placing anything on the body like the navel or they pressed, or their little indent in the core bone. Understanding how it works is like imagining it as a row that is glued on top of these different shapes. And when you bent these shapes in different directions, the rope being the central line, will bend with them. Because of that, we can understand how to draw the breast on the top of the body because we know that that breast can't go over the central line because it has to be on the left side of the body. So this is something that you can make really easily when you understand how it works. The basic structure of the body and bending the rules and bending the body in different directions, especially from the middle where it can be bendable. You can create very interesting poses. And again, using the same methods of that we have used before. Drawing the shoulders in drawing the breasts, in drawing even the neck. That's that for this one. I hope you understood everything or that I was trying to explain to you. Next time we're going to be going over the practice section of this class so that we can use all of that we have learned at practice to actually learn how to draw these things and not just understand, but again, understanding is at least half of the battle. And when you understand things well, first, then you can draw things more easily and without so much trouble. So hope to see you next time. Have fun drawing.
5. Practice (+ draw-along): So this time is going to be a little different because I'm not guiding you through everything in this lesson. This lesson's point is to make you practice drawing the torso, and that's one of the class assignments. My hope is that you practice drawing the female torso and submit one of your class assignment, a drawing of the female torso. You can choose any angle if it feels difficult to use some of the angles or methods that we went over last time. You can totally use to things that we've learned earlier in the first lesson or the second lesson, because those poses still triangles are a little bit easier to draw. But the point is that you draw as much as you can. And I hope to see your submissions in this class. And I'm going to be leaving you with some footage where I'm drawing the female torso as well. So if you feel like you want to draw along, Here's a little video of me drawing the female torso as well because practicing together is important as well. Because of course, I need to practice drawing the things that I am teaching you to draw so that my skills are up to date. So let's get drawing. Hi students. Let's see. Hi. Thanks. Hi. Hi. All right, so that concludes the drawing practice portion of this class. I hope you got some drawing practice done and maybe even the class assignment. I hope it wasn't too much of a struggle, but I know how hard it can be when you are just starting out. But take it easy, don't stress out, but when you get going with drawing, you will get better and better and things aren't going to get a little bit easier. So I'd love to see your submissions of the class assignment. I'd like to see your progress that you have made during this class. So next time we're going to be going over some last thoughts that I have and that's pretty much it. So see you there.
6. Some final thoughts: So here we are. We have finally experience every single lesson in this class that we have. I hope you have learned so many things because these are the things that I really believe are going to be helping you to draw the female torso and many other things. When you consider the steps that we took, we simplified everything into simple shapes so that we could try something even more complicated using those shapes. So that's the basic principle that I want you to learn and take from this whole class. Because when you are trying to draw something new or difficult, you can always break it down to simple shapes. And when you learn that skill, everything else will become so much easier. But of course, even though you can visualize in your head how things can be broken down to simple shapes. That doesn't mean you can draw them innocently, but that's going to be the biggest that you are going to go into, take forward when you're learning how to draw things. But again, I want to emphasize the importance of drawing from reference because, because that's what artists have been doing all this time in history because that really works. The key in looking at reference photos is that you will break the illusions of how you think things look like and replace that knowledge with the knowledge of how things really are in the real-world. And I know this glass was mostly about trying the torso in an animal or among away. But still I want you to keep in mind how important looking at real life references and implementing that into your drawings. Because even the most cartoonish thoughts are based in reality in one way or another. So my word is two, you just keep trying, keep experimenting, keep looking at references. And I know you have the skill to get there. And lastly, this was my first class that I ever made on Skillshare. So I hope this wasn't too bad. Be honest, I was struggling with English so much. I hope you understood what I was trying to say. I know I was repeating some phrases time and time again, but I still hope I could help you in your artistic journey. That's it for me. Please have fun withdrawing and, and I'll see if I'll make more tutorials or classes on Skillshare in the future. If you guys like this enough, I might just go ahead and make another one in some other topic. But yeah, that's it. Bye.
 Omnart