Transcripts
1. Introduction: Drawing your own enemy characters or characters from a popular series that you're like can be incredibly fun and rewarding, but sometimes it can also be difficult. Fortunately, I'm here to teach you all the necessary skills to premier imaginations for life and learn how to draw a portrait of your enemy character. I will break down all the difficult topics in the fun and easy to follow steps so that literally anyone can just pick up a pencil and a piece of paper and start drawing. Hi, All M and art, cartoonist, illustrator and an all around artist. I have over 15 years of drawing experience and an art school Decree under my belt, I have gathered information and skills to teach you how to draw and to make it as easy and as fun as possible. In this class, my focus is on teaching you the fundamentals of drawing aphasic animate slash mung a portrait. I will teach you the basics of drawing a male and a female character portrait with tips that will help you even long after you've finished this class. After this class, you will have all the skills that you need in order to draw your favorite characters from scratch. So get your supplies ready and let's get started.
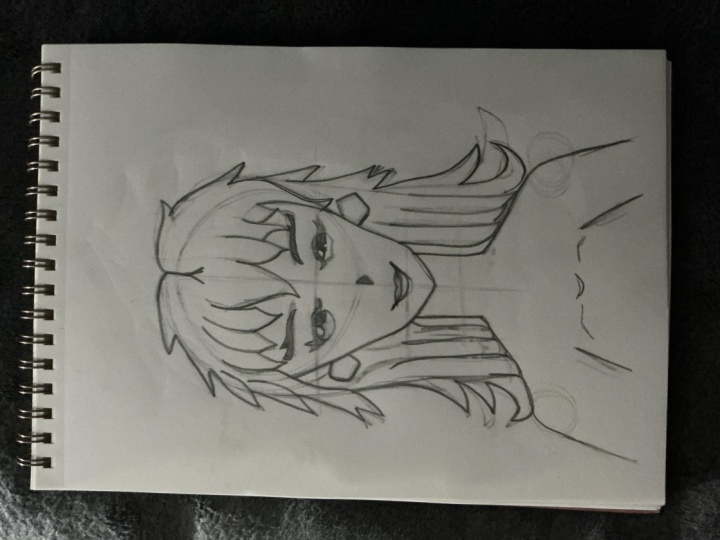
2. Basic structure: Okay, Hi, I'm plugged. You made it to the first actual lesson, melt this class. This time in this lesson we're going to be looking at drawing the basic structure and the basic proportions of the portrait. Drawing or the Boston off the human in manga or anime style. But you can corrupt any kind of pencil and an eraser and a piece of paper or a digital medium, just like I have here. It doesn't matter really what the tools are. Just as long as you can erase things later on if you need to. But let's actually get straight to the 0.1. We have to draw a circle, doesn't have to be a perfect circle just so that it looks something like a circle. As you can see. My circle here isn't perfect either, so you don't have to make it perfect yourself either. Just draw a circle which indicates that the top of the head, and we will be using that to more easily draw different part of the face and the head later on, when you have the basic shape of the circle there, then we're going to be next drawing straight lines, straight just so you can get it. You can use a ruler or an OT. I didn't use a ruler here. But if you feel like it's easier for you, you can do them. But draw a line going vertically across the circle and little bit beyond, like half, half of the circles length. And add that the circle for the line so that the line goes just a little bit over the circle. This will be indicating the middle of the face. But next we're going to be drawing a horizontal line. And this is something that many people don't do when they make tutorials. But I feel like for absolute beginners, It's so much easier to draw this line so that we can draw other lines of the head much, much easier. And you can see that in just a little bit. So draw this. It should be a little above the hanging part of that vertical line, a little bit above the middle point of that. So as you can see, it's nearer to the circle than the bottom of the line. It doesn't matter how long you make this horizontal line, approximately the same width as the circle itself, okay, then we have these lines. It's really easy to continue from here and it will be so easy to draw that basic shape of the head when we have these simple shapes and lines in place. And now we just have to connect a few lines. So starting from the left side of the circle, take the point, the edge of the circle, and then connected to the horizontal line that we just are true. Make it a little bit tilted so that it's not a vertical straight line going down, but a little bit tilted towards the middle. Just connecting these two lines will be indicating the left side of the face. And then after that we're going to be again connecting a few lines, as easy as that. Using this same method connecting the line that we left off to the middle line. And as you can see now, we have the left side of the head completely drawn out, at least a basic shape of it. Again, maybe some people are thinking about what angle should this line B, but it doesn't really matter, because when you draw the line, you can see if you want to change it. And two weeks, which direction you want to do. Making mistakes isn't always bad as long as you have the eraser in hand, you're going to erase the line and try it again and make it look better. And of course, there are many different head shapes in any way among us. So making the line in a slightly different angle doesn't mean that it's wrong, it just makes it look a little bit different. And then when we have the left side of the head, we just do the exact same thing on the right side of the head too. So connecting the lines from the circle to the horizontal line and then from the horizontal line to the center vertical line. And there we go, we have the basic shape of the head already drawn out. As easy as that, as you can see, that horizontal line really helped us the head shape because for me, at least when I was a beginner, it was hard to draw the shape of the cheeks and the shape of the chin because when you don't trust fully your own hand and the lines draws out even these curved lines join them and mirrored to each side will be really difficult for some people, at least it was for me. So this horizontal line makes sure that the both sides of the head will be approximately looking the same but just mirrored. Okay, then we add another horizontal line, this line that goes through the halfway point from the top of the head to the bottom of the head. And this line will help us place the eyes later on and helps us place the ears on the sides of the head too. Now that we have drawn that line, we can continue by drawing this center vertical line and making it a little bit longer. And why didn't we do this earlier was because I wanted to showcase the height of the head and not confuse you with this extended vertical line here. But this will be showing us an indication of where to place different things on their shoulders and the neck and stuff like that. And how long to make this line, it doesn't really matter. It only tells us how much of the body we will be drawing out. So make the line as long as you want. But for me it was here. About the same length as cristae, a circle from side to side, nowhere telling you the neck and the neck. Depending on the character and depending on the art style, you can make it as wide or as narrow as you want. But for me here, I usually draw, when I draw in my style, think about from the left cheek to the central line and the halfway point there for both sites from the right child of the head to the central line, halfway point of that, and draw the next starting from there. That's usually what an enemy. So that's making the character looks like, of course, in different styles. For example, in Dragon Ball, characters have really wide next and some, maybe some series may have narrower and x. And of course, for men character and women character, it depends on that to how much you want to show that female and male aspects of the body. You can change the thought that Nick according to that. Okay. Then drawing the shoulders and the shoulder area as a whole depends on what kind of character, how all the character is, or how young the character is, or if it's a female character or, or a male character. But you can make the shoulders as wide or as narrow as you want. But the basic rule, if you want to make a female character may be a little bit narrower. And if you want to make a male character may be a little bit wider. But of course you can always play with those rules. They are not set in stone. But if you want to get simple guidelines to help you in the beginning, that's the basic rule. Again, as you can see in many parts, when I draw things on both sides of the face and both sides of the body. You can see that I usually draw every single line on both sides simultaneously so that if I draw the shoulder line to the left side, then I draw the same line on the right side before I do anything more on the left side. And that's basically because it's easier to notice mistake if you draw it simultaneously. Because if you draw the left side completely and then start the right side, it's much harder to see where you went wrong if something looks off next, I'm just going to be placing these small circles representing at the shoulders and that these won't be completely visible. But if you were to add some arms starting off from that from the torso, it would need some indication where the shoulder would be and this is where they would be. So if you want to draw any arm is in the picture, these are the places where they start. Again, I want to emphasize that learning how to draw a simple, single specific thing, it's always important to know where to place it in that big picture. For example, if you draw eyes, it's important to know how to draw the eyes on the face. So that if you draw a character with a face, you can place the eyes in the right place and not just know how to draw eyes in a empty vacuum. I'm just placing these few lines here to indicate where the chest would start, but these are not completely necessary if you are just drawing the past, like we're drawing in this tutorial. And here I'm just placing a few curved lines following the forum of the circles here indicating the shoulders. And sorry, I'm saying indicating a lot, but I feel like it's a perfect perfect where to use in these situations when we're just trying to show something without actually drawing the details in. Next, we're going to be drawing the years. I thought I draw the ears here because I don't feel like they should go to the part where we draw the face. So the ears are this simple shape and I know this will be something that you have to get used to drawing. It's not an easy or as usual shape. I'm just using rounded corners to make the shape nozzle look at robotic or geometric been a little bit more natural. Basic shape. You can see here, I'm just using the basic guidelines from that and rounding off the corners. That's how I draw years, especially from this angle. And that's it for the basic structure. I know this was a little bit of a longer one. I hope the next tutorials or the next lessons will be a little bit shorter so that they won't be as big in size as this one. I hope you understood what I was trying to explain each step. I hope you didn't fall off from any point, but if you did too, you can always leave me a comment in this class and I will definitely reply to everyone of them to the best of my ability. This was the basic structure. Next time we're going to be focusing on drawing the details of the face. So see you next time.
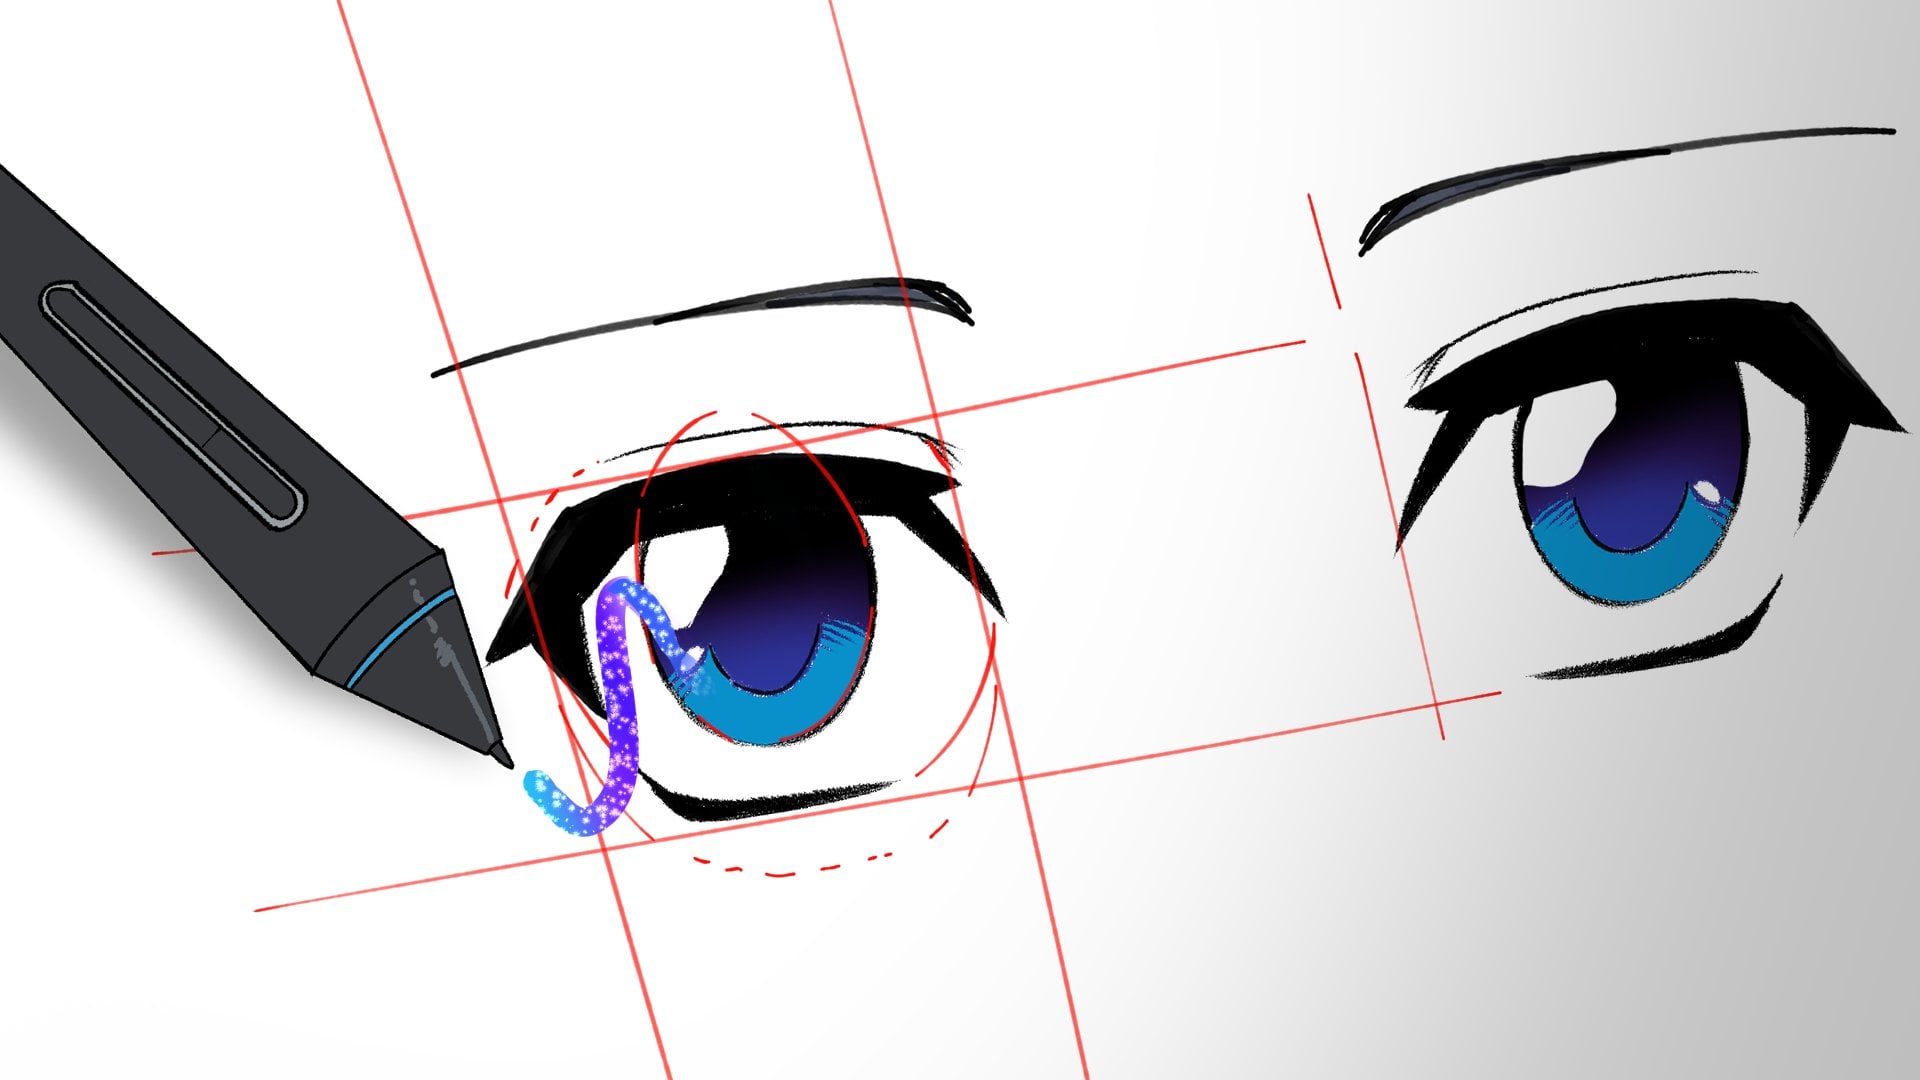
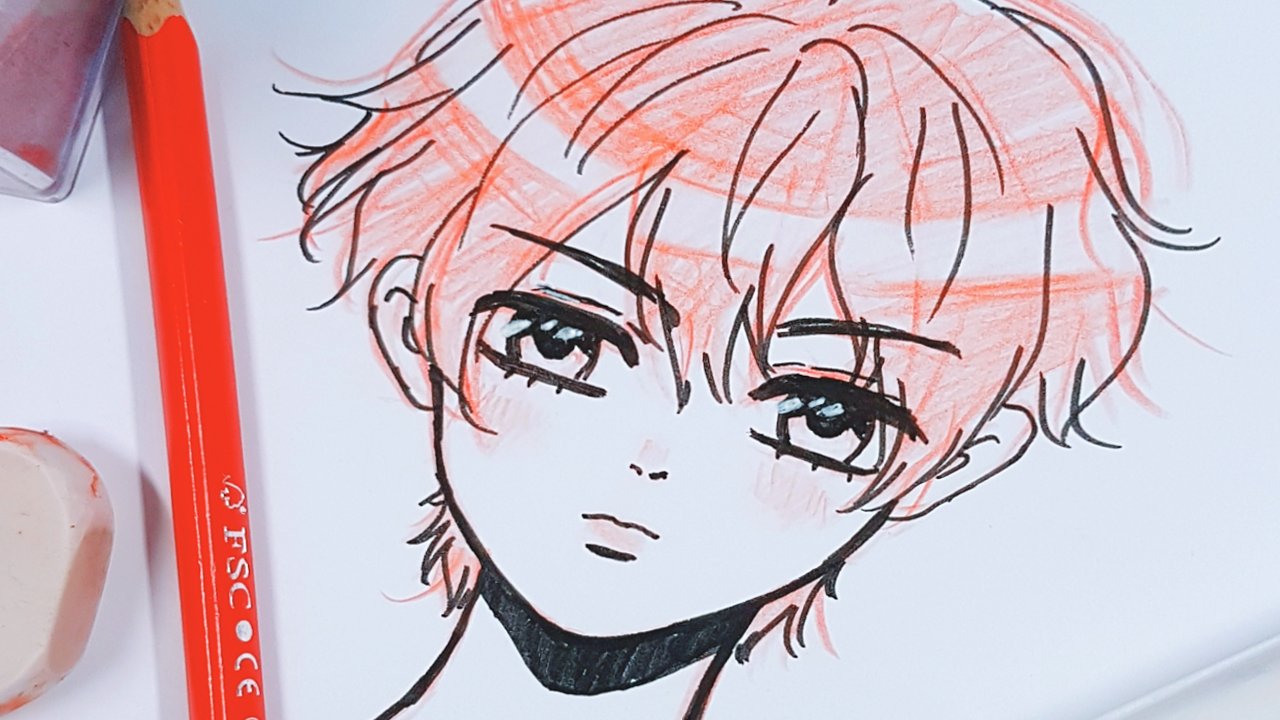
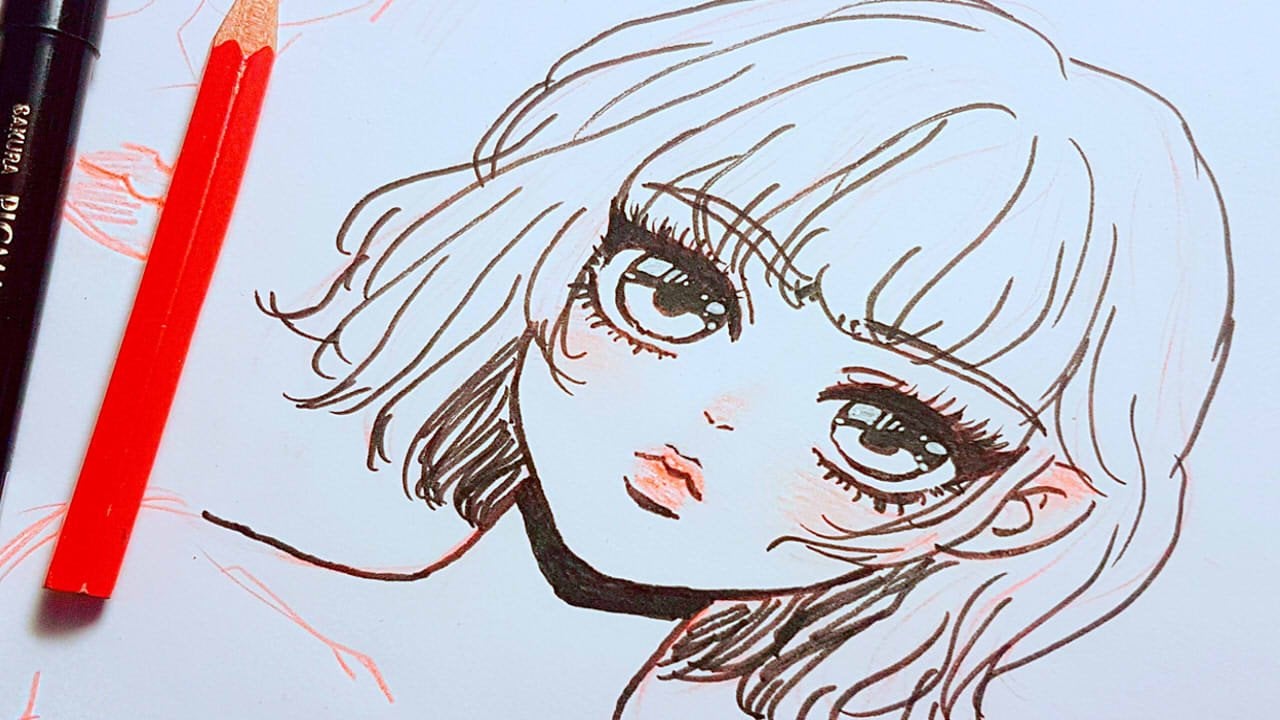
3. Details of the face (eyes, nose & mouth): Okay, Now that we have learned how to draw the basic structure for the Boston view of the anemia character that we have here, the port or we're we have the face, we have the head shape and the neck and the shoulders. Off course not dealt with some guidelines and we will continue from that. So we will be focusing on first drawing the details of the face for the male character, giving you the general tips and guidelines for drawing the face details in general. And then after that, we will be quickly going over how to draw the details soft phase for them female character and it's showing you what the differences between those and sharing some little tips to make it look more feminine. So let's get started. First, we are going to be drawing the nose. The nose can be simplified as a small triangular shape. Of course, there are many ways to draw the anime or slash mung a nose, but this is one of the common ways that it is drawn. Sometimes it's even just a simple single line that is drawn, but I wanted to keep it more shape and this represents the tip of the nose and the shadow that it presents. If you want to learn how to draw the realistic novels and the structure of the nose unsimplified from the realism. You can of course look at real life references and more tutorials that will be breaking down the realistic normal spot here. You can just draw a simple triangular shape to represent the nulls. The placement will be between to two horizontal lines that we have drawn on the face. Of course it has to be above the lower one because the lower one represents that plays where we put cheeks and of course, the nose has to be higher than the cheeks and the jaw. So draw a dotted line. And of course that line that is above it will be the line for the eyes. So of course the nose has to be lower than the eyes. So between that line that represents the cheeks and the line that will represent the line where we draw the eyes. I usually like to Troy a little bit lower and approximately in this drawing and this case with this head shape, I want to draw it near the bottom of the circle that we drew as a guideline earlier on in the last lesson. So approximately there. But of course you can try different things and see how it looks. Now that we have drawn the nose, we will be drawing the mouth. The mouth is somewhat of a simple and at the same time a complicated shape. Because if you are just making the character smile their mouth closed, you can of course droid, just one line. Usually I want to put a little bit more emphasis to the ends of the lines to represent the shadows that when you smile, that will be a few shadows formed to the ends of your mouth because your cheek muscles and the skin on your cheeks we'll be wrapping around the cavity. The mouth will create when it's stretching out. So with this model, I want to put a little bit more thicker line that both ends of the line that represents the mouth. Now that we have drawn, that we are going to be drawing the eyes on, many people start with the eyes, but usually I like to draw the nose first. And when I draw the nose first, then I tend to draw that mouth as well. Because I feel like the normals gives great point of reference where the middle point of the face will be. So the eyes are easier to place even without any guidelines if you placed it knows there. But above the eyes, I already have one class about drawing any ME slash mung I. So if you are interested in that, I wanted to learn my method. You can go there and watch that class about the eyes. But here I'm going to be simplifying the process. So I usually like to draw a simplified shape that represents the whole eye. When you have anemia among the eyes, you usually see the eye is drawn with that iris. And of course, the eyelashes represented by simple lines that are usually not connected. But what I want to understand that it's really so much easier to draw this general shape and then choose the lines that you want to keep him. So draw this with the pencil and then you can erase the rest when you do the lines. And of course, the other three x-dot I use is drawing the same steps for both eyes simultaneously. So I won't be drawing one. I come all the way to completion, then start the other eye because there you can't really see where you made the mistake if that were the mistakes aren't going to happen. So when I draw a one single step at a time for both eyes simultaneously, I can see where the mistake will happen if there will be one. So now I'm just going to be drawing the outlines off the eyes as you can see when I have the general shape of the eye, I don't have to include all of the lines from that general shape. But now I can get it looking more coherent and the structure, it will be more firm. They won't look too wobbly. And I feel like this method has helped me out a lot when I think about the eye or draw the eye in a simple shape first and then. Choose to align to that I'm going to be using, make them darker and then just erase the rest of the lines for the eyes. So that's pretty easy. I will be erasing the eyes a little bit because I felt like I felt like they were a little bit low. So you can of course, every time you draw something, just look at it from afar and you will see if there's something wrong and you can fix it. And that's what learning is. Troy's all at Daoud. And that even me, I'm just going to pretend like here, like I won't be doing any mistakes. So of course we're all making mistakes. But the important thing is that you'll notice your mistakes and you will fix them. So now that I have rice, the I is, I won't be drawing some indications of the eyelids. This is optional to, in my opinion, you don't have to draw this. You can still read the eyes as being eyes we thought based, but these will it give it a little bit more detail and expression to your character? When we have drawn that, I want to draw the eyebrows and the eyebrows can be simplified. Any man among either by just drawing a simple line, because that reads as an IT pro, very well if it's placed on top of the eye is. But here I'm just making this spikier looking shape and then mirroring the same shape on the other side. And depending on the angle of the eyebrows and the distance from the eyes. So you can create different expressions to your character. And now I'm going to be adding a little bit more detail to the eyes themselves. I will be giving the iris pupils and highlights. So first I want to draw this simplified version of a pupil. Any man among, you can usually see that the pupil isn't drawn as a complete circle. Only the underside it will be shown. But that of course depends on the style and what you want to do for your own anemia manga characters. Here I'm just going to be drawing these half circles representing the pupils. And then again, I didn't simultaneously two highlights on both sides of the eyes and then drawing the lines that will be marking the shadow area off the eye, where the eye will be darker at the top and lighter at the bottom. Then I'm just going to be shading the area that will be darker. And that's pretty much, you can add a little bit more lines to make it look a little bit better, but that won't be necessarily all that important. Just making sure that it looks good to me. Okay, we, the female character, the biggest difference is that I do are in the mouth and the eyelashes with the mouth. I usually, when I draw the character smiling, I will leave out a little piece of the line from the middle point of the mouth out of the picture so that I will only draw the lines on the side of the mouth. This is just a personal preference that some artists do to make that character look maybe a little bit more feminine by indicating the mouth only a little bit. The other thing is with the eyelashes. The only biggest thing that I do differently here is that I make the eyelashes a lot thicker, so they won't be as narrow, but a lot thicker than with the male eyelashes. When you do this, this will instantly make the character look more feminine, wanted to or not. But when you want to make a feminine look for a character, you can add a little bit more thickness to that. Eyelashes are the lines that represent the eyelashes and that should do it. And of course I did add some blushes to this character. So having those small little lines there and later on when we are doing some shading, coloring, stuff like that, I will add some airbrushed effect to the blushing cheeks, but that does it for the differences and that does it also for this tutorial, I hope you were able to follow along next time we're going to be drawing the hair for both characters. So stay tuned on the then and we will see each other next time.
4. Drawing the hair: Okay, so now that we have learned how to troll the details of the phase for both female and male characters. This time we're going to be drawing the hair. And similarly, we're going to be having two different hairstyles. Specifically having one male centric hairstyle and female centric hairstyle. Of course, you can put either hairstyle to either gendered character, but ANSYS doing it this way for clarity. Okay, so let's not waste any more time and let's get right into it. First we'll start with that male hairstyle, and later on we will be drawing the female hairstyle by using the same logic and tips and tricks that we learned here first. So first I want to draw this kind of almost helmets looking thing that goes around the character's head. And this represents where they live out loud enough. The hair will be because in any mammal and usually we have to draw the hair having a little bit more volume. It looks more natural and it looks better when the hair is include to the head so tightly. So I usually start by drawing this, this outline for the head, showing that whatever I do later on, we'll follow the basic rule of having this amount of volume. Then I draw this line, this line and the dot at the end. What I want to represent with this line length adults is that I want to show with the adult where the fringe part of the hair will connect and where the hair strands will start falling onto the forehead. And the line just shows you where the other parts of the hair, like, like the backside and the top, will be connecting to the head. So think about this line being on top of the character's head and the hair just for me, according to that line, you're going to of course, but this line on the right or the left side of the face as well, making dead hare divide from that. So you can think about it in terms of it being almost like a vanishing point where the hair strands will always connect to the head. And why I drew the line on top of that vanishing point kinda thing is that of course not every single hair strand will be starting from a single point, but moral, a single line goes across the head all the way to the back. This all will be more clear later on when we start drawing the hair strands, know we started drawing the different hair strands. And one thing to note here is that usually I think in my head about having these beak shapes formed by the hair, representing the hair strands and the hair itself. And when you have beaker shapes, it gives character to your design. But when you have this big shapes that will be forming the hair, that's general guidelines of the hair. Usually I want to deviate from that by drawing some hair strands that's separate from the beak shape, making it a little bit more natural. Again, we're following that same guideline, the vanishing point, if you will, by curbing all of these lines starting from there, especially when we're drawing the fringe part of the hair, will follow the guideline of the vanishing point there. So all the lines that are curving from their star from there. And these different shapes are formed by drawing those beaker shapes. And if you want to have a crate tip for drawing hair, and so that it won't look so chaotic is that when you have these different strands, the smaller strands of hair don't just place them randomly, but make them follow the form of those speakers. Shapes like here, I almost have three different divisions of the hair groups. And with all of those, I have three different deviations with the hair strand that isn't part of the beak shape, but following its forums still, this was really hard for me. Beginning when I was starting I'll drawing hair. It was really difficult to understand how people make it look, make the hair strands looks so good, because whenever I drew them, it looked like a chaotic mess. But if you follow the form of the beaker shapes with all of those trends and divide the fringe part, for example, here into smaller chunks, like we have three chunks here. And then the making more natural by dividing a few hair strands, smaller hair strands from that beak shape. And of course you can add as many lose hair strands as you want. Now that we have drawn the fringe already, we have drawn the fringe, which is crazy because we just started and now we're already done with it. What I did now is I drew another kind of line, guideline to show because the hair, if you're trawl your hair, you can notice that you have different points where the hair parts will divide on the left, on the right side and of course the meal. So, so here I added this line in order to make the backside of the hair. And that divided from a different point so that we can get a little bit more variation to how the hair works here. So what I'm doing here is not just having that beak shape, the beak circle or shape that we drew at the start. As a guideline and then adding these different strands of hair follow this wavy form. And dad, that way we can make the hair not look like a blob, but instead having it look like natural hair with the hair strands that deviate from the beak shapes. And that's the main part. Start drawing hair, withdrawing these beak shapes, beak general shapes, and then add smaller details. And that's almost with everything. When you have a bigger shapes, that gives you design and structure to your drawing. But if you want to make it more natural looking and make it look more interesting to the eye. You can add these different things, different sized deviations from that beak shape. So having those bigger shapes for bigger bunches of hair and then having this hair strands that deviate from the form but still follow the shape of the forum, gives the hair a natural look and makes it look really interesting to the eye. And that's it for the male hair this easily. We got to draw the male hair, and I'm really happy how this turned out. Next, we will be speeding through the female hair, but I will be telling you some differences with drawing the female hair that maybe we didn't cover in the male hair. Again, starting out with this general beaker shape, beginning forming on top of the head with the circle are kind of shape. And then because this hairstyle is longer, it will fall down with gravity and then forming this almost triangular shape in the end, again, having the similar vanishing point kind of guideline there to draw the fringe and draw different parts of the hair. But of course, because the hair is loner here, we have to make sure that the gravity is pulling, pulling some of these longer hair strands down. So I want to draw them first, starting out from the vanishing point guideline and then falling down with gravity to a straight or a lion but curving out at the end. Because I want to do that for this hairstyle, because some hairstyles are more curved than others. And again, one thing to note here that I'm dividing again the fringe part and that from part of the hair into three different segments. This time we have these two longer hair strands that go all the way to the bottom. And then we have the French part itself that falls on the forehead that follows the same guidelines that we used in the male hair by just connecting the hair strands into the vanishing point, kind of a guideline. And again, having different deviations of sizes in the frame Spark is really important to make it look more natural. So having bigger, medium, and smaller sized hair strands makes the design look more interesting and pleasing to the eye. And of course, I had this fringe parts stop at the line where the eyes are glazed. But I didn't draw a straight line for the French part because I wanted to make it look like it has grown a little bit all we're after cutting the hair like that. So just having this general guideline to show where the hair is gonna stop on the forehead and drawing according to that. And what I did here also is that when I had the beak shape at the start with the hair and the bottom of the hair. I started just dividing it into smaller pieces by just drawing these different hair strands. But when we have the general shape, the whole hairstyle and design of it will look really pleasing to the eye because it's forming to a default in shape. But of course, having said all that, we'd still want to make it look natural. And that's why I'm adding this different hair strands. Break the mold, break that break that general shape so that it won't look like a mold that the hair is constructed from so that it will look like natural hair. So just adding this to hair strands again, following the form of the general beak shape, but still deviating from it so that it looks better to the eye. That's basically it. So that's how easy drawing Harry's. Okay, to be honest, I've struggled with Troy inherit two. So it's not always that easy, but with these tips and tricks and these guidelines and T's methods, I truly believe that you will get instantly better at drawing anime hair and any hair, to be honest. Okay, so there's the lesson on hair. I hope you found this helpful. Next time we're going to be adding the rest of the details of the whole character cell that offline self, the shoulders, the neck, adding a little bit of shadow and coloring these characters. So see you next time.
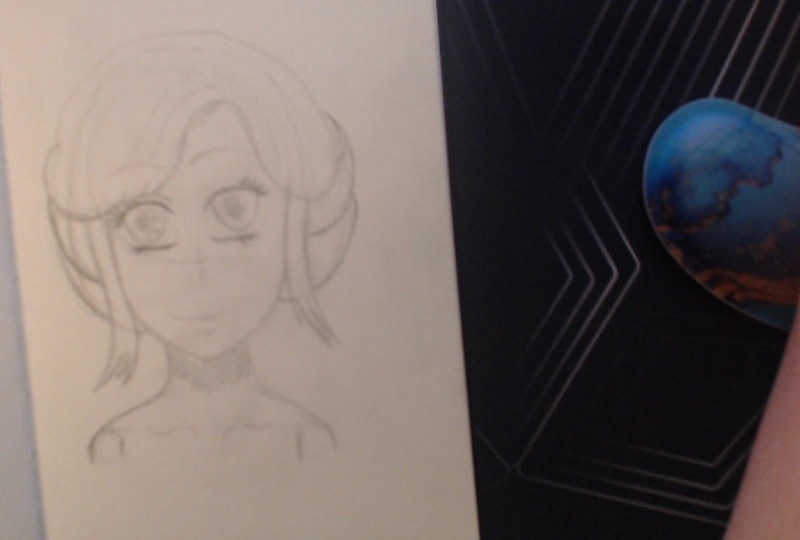
5. Details and simple shading: Okay, Now that we have learned how to draw the details of the face and the hair. Now we are going to be finishing the job by drawing some of the final outlines that we don't have here yet. So we will be filling in the outlines to the head, and the ears, and the shoulders and the neck. So this will be a little bit of a quicker one, but still necessary. The show you what we're still missing. So let's get straight into it. Okay, So here we are going to be filling in the outlines of 10 head itself and the chin and that cheeks. There's nothing really special about this, just following the lines that we have laid out before and just leaving out those obvious guidelines out of the question. I'm drawing the ears and the drawing the chin and the sides of the face and everything like that. One thing to note here is drawing the ear is, I have that here on the side of this little guide that show it to you all the steps even more clearly. But it consists of these different shapes. And this is only of course, the way I draw ears, but this is a solid way to make it look semi realistic but still not super detailed. I usually draw the ear from four different steps. And when you understand the shapes and you start practicing to draw the ears, you will look at more used to it and it will most definitely come more naturally to you. Then I'm filling in outlines of the neck and the shoulders. And again, the same thing here, just filling in the final outlines and leaving out all the guidelines that we don't need. So there's nothing all that difficult about that. Then we're going to be drawing the collarbones. The collar bone is located right at where the horizontal line that we have here in the shoulders. It's located there. We will put the collar bone and that will be our rough guideline, Detroit. And in the collarbone there's this huge kind of shape at the middle. So we will be indicating that U-shaped but not completely drawing it in. So if you connected all these lines of the collarbone, it would make this curved line with the U-shape in the middle. But at least to me, it looks better if we just indicate it by just showing a few lines and not connecting those lines together, then just erase the guidelines that we had before. That way you don't need anymore and we should have a complete drawing for me. I wanted to add some shadow here and there, and of course some coloring that the hair. So I edited this simple shadow underneath the chin and two shadows to the ears because they are much deeper in shape where the light doesn't heed some spots, so they will have some shadows. So that's pretty simple. And then of course I added a little bit color to the eyes. And I call art in that HER2. So nothing all that special about this, just adding some details so that it doesn't look so flat. Then we're going to go for the female side of things. Again, having the same thing here too, but here I'm just narrowing that shoulders a little bit so that we can make it look more feminine. Because as I said before, if you wanted to draw a female character, the shoulders, you can draw them a little bit narrower. So that's what I did here. And then I just fill in that same outlines that we did before with the male character. That there's nothing more to it than that. Again, having the same logic with the color bone and just indicating roughly that breast, that won't be in view in this picture. But if we do that full body, you would see the breasts a little bit more there. But at the same thing here. Again, we haven't drawn all the outlines. Then I'm just going to be adding some shadows. I edit chateaux. Chateaux point underneath the chin, like with the male character and a little bit of shadow behind the hair where the light doesn't heed the hair so much. And then of course, I added some shadow and a chlorine to the eyes, like I did with the male, male version. And one thing that I did differently here was that I added this little blush effect with an air brush tool. And that's something that you can't really do with them so easily with traditional tools, but you can get creative and see how you can indicate the plush of the character or just leave it out completely. And with that, we have finally finished our illustrations. And I think this is quite simple to understand. I hope it is. I tried to make it as simple as I could and I tried to explain every single step of the way so that anyone who, even those who can't really draw anything, could draw this right here. But if you want to go more into maybe the anatomy or the drawing of the eyes. I have tutorials, all classes here on Skillshare of those topics. Next time we're going to be going into the practice section where I'll give you the class assignment and where you will hopefully practiced drawing this kind of boss view portrait of Fannie Mae character. So see you next time.
6. Practice (+ draw-along): Okay, Now that we have learned how to draw the basic structure of the portrait and details on the face and the hair. Now I want you to draw and practice what you have learned so far. And here I'm going to be giving you the class assignment, the class project that you will hopefully be doing that will further on the learning experience and the practice lesson here is, of course, draw a portrait of your character or any character really in an animate or among as tall. And really if I'm totally honest, I don't even try to make it look particularly looking like an animated character. Just draw a character or for your own or any other character from a portrait view that you have learned in this lesson. Because drawing that and getting feedback from that will help you immensely. If you want to share it in the gallery, it would definitely help you because I can comment and I will comment on every single p is. And if you have any questions about drawing things or some things being more difficult than the others and you want some help with those, I will get the best of my ability. Help you draw those things better. Explain things better if I didn't do it in this to her. Oh, so again, if you're familiar with my classes, I will be leaving you with some material. Where are you? Draw the portrait of the characters? And you can draw alone or just do the drawing practice somewhere else. And hopefully you will submit from the class project your own drawing and everyone can comment on it and see what you have drawn. And I can of course help you if you have any difficulties with anything at all. So have a great time practicing. And we'll see in the last lesson of this class. Hi. Hello. Okay. Hello. So right.
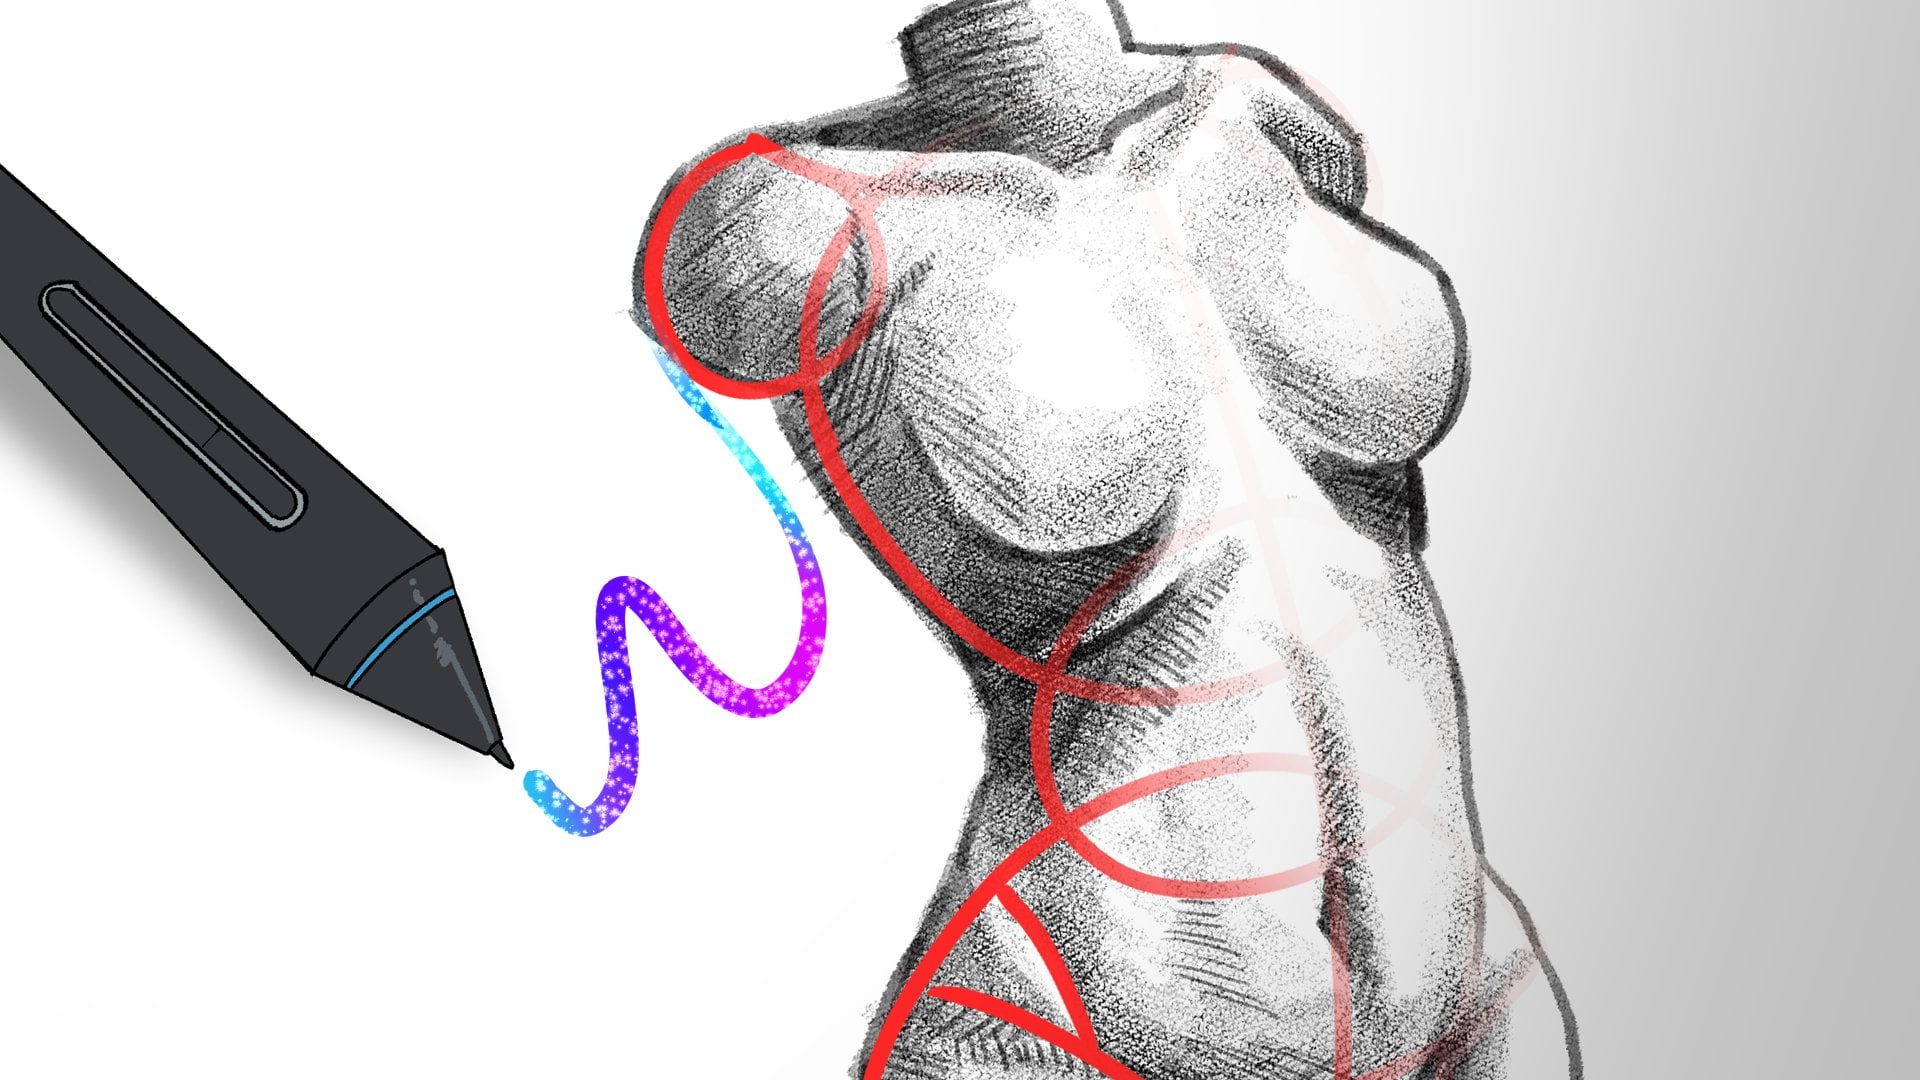
7. Final thoughts: Okay, Now that we have the general idea of how to draw the animated character portrait, here. I wanted to give you some extra tapes and thoughts at the end of the class. The most important thing that I want to tell you here is that now that you have learned how to draw the portrait view or the boss few of the character where we included the hair, the face, and the head itself, the neck and the shoulders. I would heavily suggest you, if you want to draw the whole character to check out my torso drawing class, because I feel like when you combine the knowledge from both of these classes, you will have the top half of the whole character easily drawn out with just two simple classes. And I will be making more classes about drawing characters anyway, characters current source and anatomy in general will surely help you a lot. And finally, give you all the information that you need to draw the whole character itself with the full body view, with the clothing, with the phase, with the hair, everything. And I hope you will be following all of my classes, you know, compress the Follow button here on Skillshare if you want to. So you will be notified about every new class that I will be making at. I hope you will give me feedback and reviews to see how I did here. And my class has helped you in drawing in any way. And of course you can check out my bit comic gold, hear me all to eat on a web tool and you can read the whole thing for free. It's nearing its end. I'm really excited for that. And of course, if you want to see more of my artwork aside from these tutorials, the full artwork finished our work that I do, you can check out my Instagram at OM and art underscore the name or the Handle should be on screen right now. And again, we're ending this course here. I would like to thank you so much for taking this out on participating in this course. It really means a lot to me and I hope you've learned everything you came here to learn, but that's it for this class. I hope to see you in my future ones or the other ones that I already have available. And so see you later. Bye-bye.
 Omnart