Transcripts
1. Introduction: Welcome to how to
draw of gestures and dynamic poses
for comic artists. I'm Mike Van Orden, the creator of this course, and I'm excited to be your
guide on this journey to mastering the art of bringing your comic characters to life. As comic artists were
constantly pushing ourselves to create visually
exciting and engaging art. And one of the key
ways we do that is by using gestures and
dynamic poses. In this course, we're going to explore the ins and
outs of gesture drawing and how it
can help convey emotion and action in your work. Will look at how to use
lines and shapes to represent the movement in
weight of your characters, as well as how to exaggerate certain features
for added impact. We'll also dive
into dynamic poses, which are essential for creating visually interesting
and believable compositions for your comics, you'll learn how to
use balanced tension and foreshortening
to create poses. They're both dynamic
and believable. Throughout this course, you'll have the opportunity to practice your skills through a series of exercises and assignments, culminating into a final
project where you'll create a series of dynamic poses using the
characters of your choice. So if you're ready to
take your comic art to the next level,
Let's get started.
2. Gestures: Definition & Purpose: Gesture drawing. What is it? Why is it important? What's its purpose? And maybe most importantly, how can it help you to grow
and improve as an artist? Gesture drawing is a technique that's used in illustration and animation to capture
the movement and energy of a subject. Involves quickly sketching out the basic shapes and lines
that make up a pose or action, rather than focusing on the details are
accurate proportions. The goal of a gesture
drawing is to convey the overall feeling or intent
of a pose or movement, rather than to focus on
the final drawing itself. In comic art, gesture
drawing can be an incredibly useful
tool for creating dynamic and believable
characters. By capturing the essence
of a pose or movement, you can more effectively convey the emotion in action
in your illustrations. This is particularly important when working with
characters in motion, as it allows you to create believable and engaging
action sequences. Gesture drawing can
also be useful for creating expressive and
emotive characters. By focusing on the lines and
shapes that make up a pose, you can more
effectively communicate the character's
emotions and attitudes. This can help to create more engaging and relatable
characters and your comics. Gesture drawing can be
an essential tool for any comic book artist
that's looking to create dynamic and expressive
characters. By focusing on the
overall feeling in or intent of a pose or movement. You can quickly
create illustrations. They're more engaging
and more believable. How can gesture drawing help you to improve and
grow as an artist? I made a quick list based on my personal experiences
of how it's helped me. And I'm going to pass
that list onto right now. So first, speed and efficiency, gesture drawing is
often done quickly and without worrying about
any details or accuracy. This allows artists to quickly capture the overall feeling or intent of a pose or
movement without getting bogged down
in the details. This can be particularly
useful for comic artist who need to create
multiple illustrations in a short amount of time. Next, it's going to help you
to understand anatomy and movement by focusing on the basic shapes and lines that make up a pose or movement. Gesture drawing can
help artists to better understand the anatomy and
movement of their characters. This can be really useful
for artists who are just starting to learn about
human form and how it moves. Next. Improving composition
by experimenting with different poses
and movements. Gesture drawing can
help artists to create more visually interesting
and dynamic compositions and their illustrations are just
can use gesture drawings to explore different options for their character placement
and camera angles, leading to more engaging and dynamic
illustrations overall. Next, this is my favorite one, I think maybe the
most important one, building a library of references by creating a
library of gesture drawing. And so you can have
instant access to an on-demand catalog of different poses and
movements that you can use for your illustrations. This can be useful
for artists who are working with a lot
of action sequences, as you can refer to your
library at anytime to create believable and
engaging action scenes. Lastly, practice and
experimentation. Gesture drawing allows for
a lot of experimentation. You can play around
with different poses, angles, and movements and see
how they all work together. This can be a great
way for you to practice and improve
your skills while at the same time experimenting with different styles
and techniques.
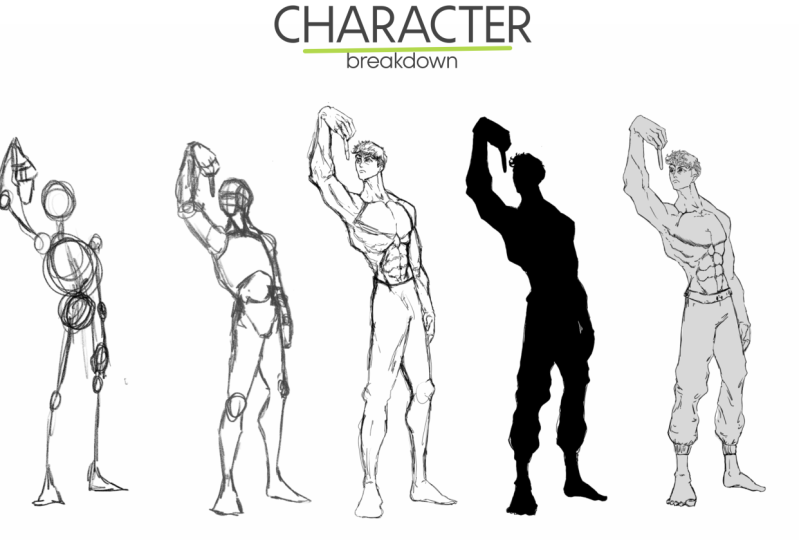
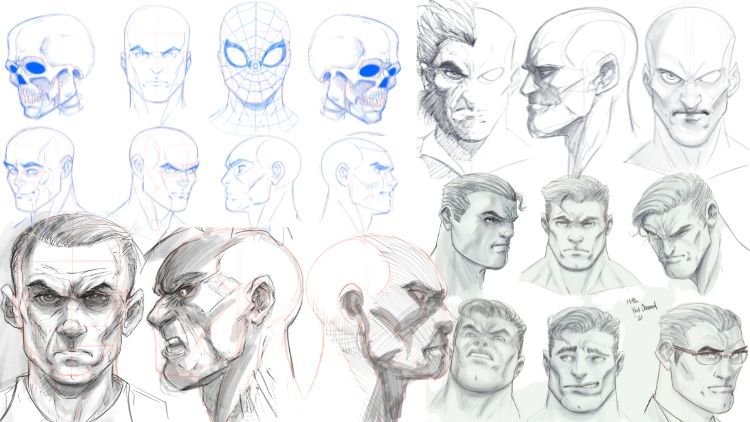
3. Body Types & Silhoettes: Okay, welcome back. In this quick lesson, we're just going to
go over a couple of different types, our body types. So this is by no means
everybody type out there. This is just the
general consensus of body types that
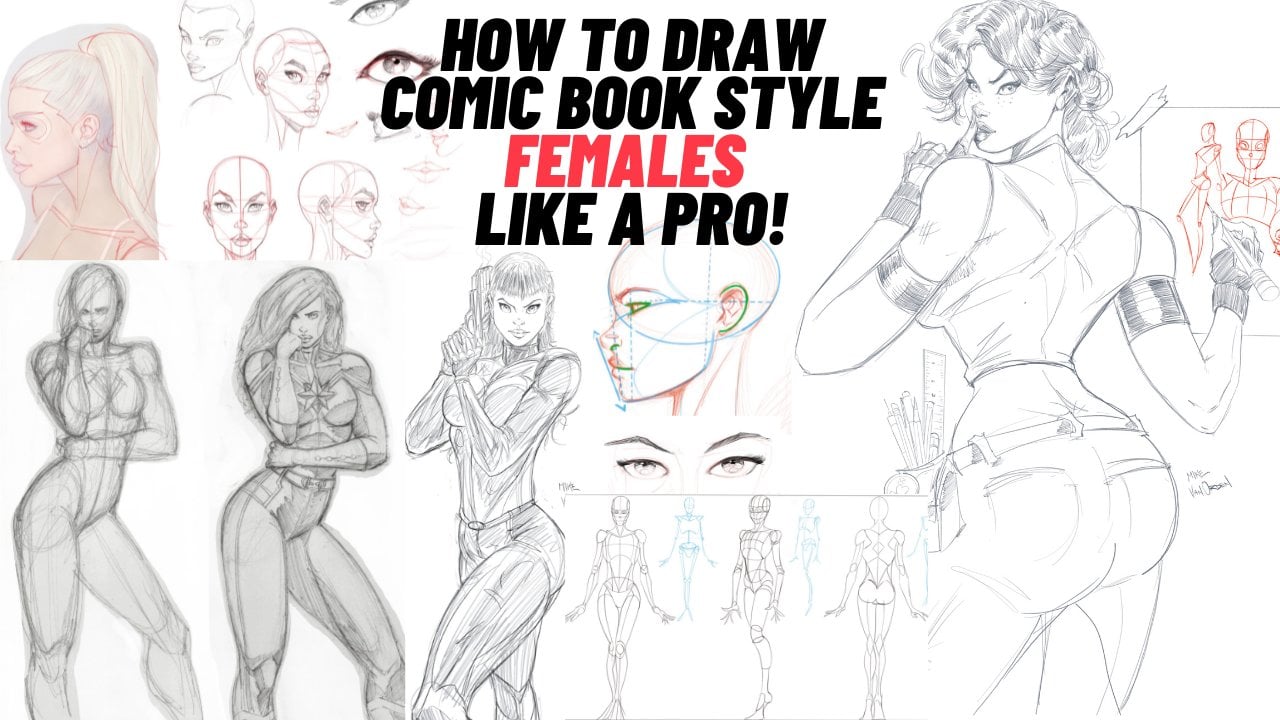
you'll see in comics. And this is mostly male centric, but we can do one
on females as well. I do have a course
on drawing females, but I just whip this
up pretty quickly. What I did, there's a couple of things I wanted to
show you in this. One. I started out with a
general character here, a regular human, right? And then I gradually
increased the musculature and the size and the stature
of the being or figure here. And then even more so developed. Then it jumped over and
drew kind of a really thin, like an ecto morphic fuel. So I don't know if you guys
are familiar with the Endo, ecto morph and
meso morph, right? So the Endo morph and will the ecto morph
is the really thin one. I hope I have that accurately. The one that's really
hard to put on weight and lose his
fat almost instantly. The meso more. And then the endomorphism, I believe the Endo
more is the big one, like this guy over here, right? And usually they're just a big, big dude or do that. And they they're just
easy to put on weight. They walk around their
big-boned or whatever. They are. Considered a believe it's mess
up our Endo morph, right? Then a meso morph. And man, I hope I
have this correct, I'll have to go back
and check myself. So morph is something
like these, these two here, right? Someone who's kinda
guy, natural, athletic build and burns
fat pretty easily, also puts on muscle pretty
easily and stuff like that. Now, there are combinations, Endo morphs and meso morphs. And all of them can be combined and you can create your own
characters from that. But generally, let me
erase all this stuff here. Generally speaking, if you're just thinking about your
comic characters and design, you can think of these
characters like, for instance, this character here, which would be the kind of almost
a regular human, could be enhanced a
little bit more and become a Spider-Man or
smaller character, right? Then this character here
could be like a thor, this could be like
a Captain America, or this could be
a Batman, right? So this guy here could
be a hawk or thing. And then this guy here could be a blob or king pin or whatever. Those are, just all generic
kind of stereotypes. But you get the point of
what I'm trying to say. And then what I did here above, this is kinda just drew in
kind of a simplified anatomy. And I'll give you guys this
as a kind of a template or worksheet to use as
reference by no means. Don't limit yourself to these. I mean, these are
just, you know, you can probably create 100
different types of bodies and then you can get into like aliens and creatures and monsters and
stuff like that, which people have been asking me to create
a course on nasa. I'll probably do something
like that in the near future. But for now, let's
keep it simple. These are body types that I typically use when I'm
drawing and I really, really simplified them
if I were drawing them professionally or for a commission or for any
kind of publication, I would not make them
as cartoony and clean. I would make them look a
bit rough around the edges and just add my
particular style to them. But I think this
cleaner type of look is easier to convey
the lessons and stuff. So yeah, I'll include this
in the templates that should be provided to you through the class so
you can find them. I'll put a link to
everything for you guys. Another thing I wanted
to quickly go over and we're going to have more talks about
this in the future. But since I'm here, silhouettes, like if I were to
remove this here, you have the basic
colors and I can even remove the
under drawing here. So you have a very clean type
of look right from here. If I were doing a class
on shading and lights and finding your lights
and values and stuff. This would be really
fun to do that on. In fact, I might even save
this template just for that case in the future course. But then the thing I want to touch on here is the silhouette. And basically, a silhouette
is when you blacken. Figure out or any object. It could be a coffee mug,
could be a wine glass, could be a clock tower
or building or whatever. The purpose of this is to
kind of check yourself. It's, it's to be able to know what kind of characters you're
trying to portray, eat. And you basically
want to be able to identify a character
through a silhouette and makes sure that the
limbs and the arms and everything are showing the
body language that you want. So yeah, in fact, I will just continue this on. And we're going to
break this up into two. So I'm going to immediately
jump into silhouettes. So here we go. So yeah, so silhouettes
are basically, when you take 22 elements, you take your
sketch, the shapes, and then you take the element
of blacks or darkening and n are shadow so that you can identify your
character quickly. It makes sure that
things are looking good. So for instance, let's say that. Let's just say for the
sake of confusion, that maybe that's not gonna
work because as dark blue, if I wasn't showing
this gap here between the arms and the waste, we would have what's
called a thing. It just jumped right on my head. A tangent. We'd have a tangent. A tangent is when a
certain body part or line crosses
another one parallel. And then it gives
a lot of confusion to the, the audience. So I might touch on that a little bit
here in this course, but if not, it will
be in later courses. But basically, tangents
are big no-nos. So when you're trying to
accomplish with a silhouette, is you're trying to
accomplish that. You have all the
elements that you need in a sketch so that when you get rid
of the silhouette, everything looks fine, right? Or in this case, I like to just kinda reduce the opacity and just
double-check everything, makes sure it looks fine, which in this case, I think it does. But let me give you another
example of silhouettes. So I'm going to jump
into my little gallery here and this one. So this here is a silhouette. And I don't know how familiar are you with
any of these characters, but if you are familiar
with them by any means, you should be able to
identify at least one, if not all three, right? So take a little gander here. I'll give you a couple of
seconds to figure it out. And then I will do the reveal. Alright, so here we go. So let's reveal its loose. Lower this down or shrink this down a little bit so
you can see them all. Okay, And then we're gonna take our silhouette and we're just going to lower the opacity.
Are you ready 321. There you go. Was that who you were
thinking it was? We'll take a look at it again. Now imagine someone
like Mickey Mouse or, or, you know, any character that you're
really familiar with. Spiderman crouching down
or spending his web, Batman and the moon behind them. You want to be able
to use silhouettes. And a big part of that is
body language and gestures. So there we go. Now, I'll come back to this in a later lesson to show you these characters and how
I came up with them. These are really,
really important. There's a lot of body
language in these characters, but for the sake of this
quick little lessons, lesson on silhouettes,
there you have it. I hope that, that gives
you a little bit of understanding on the
purpose of silhouettes. And one of the ways that
you can use them is, let's say that you use, you have a sketch and you
want to just double-check it. Well, you can take that
sketch ticket photo of it, pop it into a tablet like this, or you can trace over it
with another blank page if you don't have a tablet. And then you can just
color it all in black. And just color all
the shapes in. And just kinda step back and
look at and ask yourself, does this show the characters
that I'm trying to draw? It can identify them
just by looking at this. And if so, then you've
done a good job. If it looks muddled and you
can't tell what's what, then you might want to
recompose your sketch. Okay, so that's it for
this quick lesson. And let me know if you have any questions on,
on silhouettes. And I'd be happy to answer
them for you or if you have anything that you want to
show me, send it my way. I'll take a look and
give you some feedback. All right guys, I'll see
you in the next one.
4. Importance of Body Language in Comics: Okay, welcome back. And continuing on
from the last lesson, now we're going to jump in to the importance
of body language. And what I'll do is I'll kinda break
these characters down. So if you remember in the last message or the last message, last lesson, we talked about a little bit
about silhouettes. And one of the reasons
that you could tell who these characters were, hopefully, is because of the body language that
they're using, right? So why? If, if, if you know who
these characters are right, this is a wolverine, why? Or how could you tell? Well, because he's
got his claws up. He's, he's looks very stoic
and he's ready for battle. How could you tell
that this would be dead pool over here, right? Because he's got that kind of look like a stance
doesn't look too serious. It looks kinda funny, especially
when you remove this. Alright, so let's remove
the whole silhouette. You can look and you
can tell like that's a body language
that he would use. Now, the centerpiece
would be Colossus, and he's just a big
giant character made of a metal material. He just looks kind
of intimidating, only big, he's ready for battle. It looks pretty serious,
but it doesn't look angry or aggressive or
anything like that. He looks like just someone
who's very stoic and just doesn't take any nonsense and has very direct, right? That's, that's kind of how
I understand the character. You may understand these
characters a little bit differently than I do, but this is what I base them on. With this one here. He looks like he's ready
to take some action and he's not going to back down. He's like bringing on
all right, hands up. So that's body language for you. Alright? And that's really,
really important in comics because you want, just like if you're
watching a movie, you want people to be able to
identify why I say people. I mean your, your audience, your viewers, your
fans, your friends, who, whoever is
looking at your art, you're communicating to them. The character that
you're drawing. If they've never seen
a character before, you want them to be able to pick up what you're putting
down relatively fast. Okay, so what I'm
gonna do is just get rid of a few things here. And I'm going to trace my steps backwards to kinda show you the gestures of how
I started this out. And I don't know if I
saved a little gestures. Let's see if I did or not. Okay, let's see gesture. Did the finalists get
rid of all these lines? We'll just we'll just have
the gestures and K files. Why do I have these? Why do I have this one? Yeah, there we go. Get rid of that. I must have just used
a arbitrary layer. Okay, so let me go to
all these gestures and try and bring them
out so that we can see. This is how I started all this, how I start almost
all my sketches. Let's see. During this out, that was
very simplified gesture. And then I think I
have another one somewhere here, right here. So we know it's Colossus,
dead pulled gesture. Okay, so there you go. This was the premise. This was what I started
working with, right? When I drew these characters. Now, what I was before, I wanted to dive into
any type of details or anatomy or facial expressions
or anything like that. I really wanted to make sure that I had
their body language put down correctly in such a
way that I would be able to tell that these are the characters that
I'm trying to portray. The reason I do
that is because it gives information back to
my brain when I'm drawing. It keeps me in that zone
of that character, right? If I were just
kinda halfheartedly drawing a character
and I wasn't trying to convey their personality or their body language
or their attitude. Well, there's a big
chance that ending or the final sketch would turn out very botched or lackluster. And I try to avoid
that at all costs. Now as artists, we're humbled
every day and there's some things that we tried to draw and they just
don't work out. And we tend to try
and force them. And it just doesn't go our way. And we have to just learn from those lessons
and then try again. Just don't ever
give up. Then I'm going to go ahead and
show you from here. I'm just going to
lower the opacity on all these a little bit,
keeping them here. But then show you my next step, which was to find the lines
for the characters, right? So we'll start with, let's
start with Deadpool. So that poll, I just drew these lines in,
darken them up a little bit. Fact, we don't need too
much of this gesture here. So I drew those lines
and just tried to, if this was a very quick sketch just for the sake
of this lesson. And then we'll jump
over to Colossus. Now with classes I have, let's see, as lions here. And let's go ahead
and darken them in. Almost remove their gesture. I'm just trying to
keep it there in the background so you can see. I didn't get into any details on crosses his face or
anything like that. Same thing with drawing
this Wolverine sketch here. So I drew the lines. Let's darken them in. And
let's go ahead and lighten up the gesture so we can kind
of see through them there. Then that's kind of how
everything started. I just went from a gesture. Then I worked from that gesture and just started
doing some lines, very, very rough lines. This is just very sketchy. And then from here, let's go back to Deadpool
and we'll do the final. The final is it wasn't even
really a final per se, but it's just this is where I'm ending up with and
I just darken some of the lines that I
wanted to keep that if I were to get rid of the
under drawings at all, it would have enough
information there where it's still know who the
character was, right? Then at the end you can draw it. You're going to add
some gray tones in. And that's a whole
different lesson there. What else did I
That's just the leg. Oh, you know, what I did is I I make this mistake
all the time. So what I can do is just merge this layer and with the dead pool layer,
and I'll do that later. Okay, so then jumping over
two clauses here, same thing, just find the one of
the habits that I'm still trying to get into
is labeling my layers. Because a lot of times
I'll just try and remember Layer one
through 25 or whatever. And I find that I get really confused or I start
drawing on the wrong layer. And I'm not even a
digital artists, I'm more of a
traditional artists. So maybe you digital artists out there don't have this problem. But for me in particular, men, I've just run into that
so many times where it's like you have to get in the habit of just labeling each
one of your layers. So you know, it makes, it makes your job a lot easier. But it also just
prevents a lot of confusion in the future. And it's also great because you can just focus on
one element at a time. So you can have a
layer for backgrounds or layer for our car, layer for a weapon, or a layer for the sky. It doesn't matter. And you can just keep
them all separate, which is pretty awesome. It's something that I'm
still learning myself. Okay, So then there are some
details for our colossus. And then over here
for Wolverine, it's all the same concept. Just helps me of the lines. And then I'll just lighten
this up a little bit. And really we don't even need adjust your shots underneath. I'll just get rid of
them. Whoops. So now we have our lines
and then later on, just to kinda sell it. And you'll hear me
say that a lot. When you're drawing it and
when you're sketching and you're trying to sell
it, quote unquote. That just means an epic. This up back in the day when
I when I used to do sales. And your I don't know, you've probably heard this
before. It's an idiom. It says, sell the
sizzle, not the steak. Well, that's where when you're
adding stuff like this, you're trying to just take
it one little step further to sell it as a
three-dimensional mass. And you can go deeper
and deeper in and add more elements and layers
and stuff like that. But really, the whole purpose of this
lesson here is to kinda show you that body
language and then show you a brief glimpse behind the
scenes to see my process. And then going back
to that silhouette, this is a really great
way to check your work. And I really recommend it to
you because it's better to spot the errors and mistakes ahead of time so that you don't have
to rework too much. And that's the whole,
the whole purpose of this course is to help
you to prevent that. So that before you even start diving into your actual sketch, you should have your
gestures laid out. You should have
everything balanced and, and kinda
proportionally composed so that you don't
run into the mistake of painting yourself into a corner and then
having to come back and rework or even
scrapping it altogether. That always success as artists, we put a lot of work into our, our sketches and a lot of effort and to let that go to waste. It's really just a shame. That's it will end
this one here. On this. I'll share this in
the templates for you all share all the versions. I think I'll do
like the line work. Maybe even the gestures
all separately. And then I'll even drop in the gray tones and the
silhouettes for you. So I'll try and not try it. I will save them
all as a template, probably as a PDF. And then I'll give you a
link to all this stuff too. So you can have this stuff for reference and you
can try your own. Alright, so I hope
that this helps. And if you have any questions, as always, feel free
to reach out to me. And I'll be happy to assist you and keep doing the good work, keep practicing, keep going. I'll see you soon.
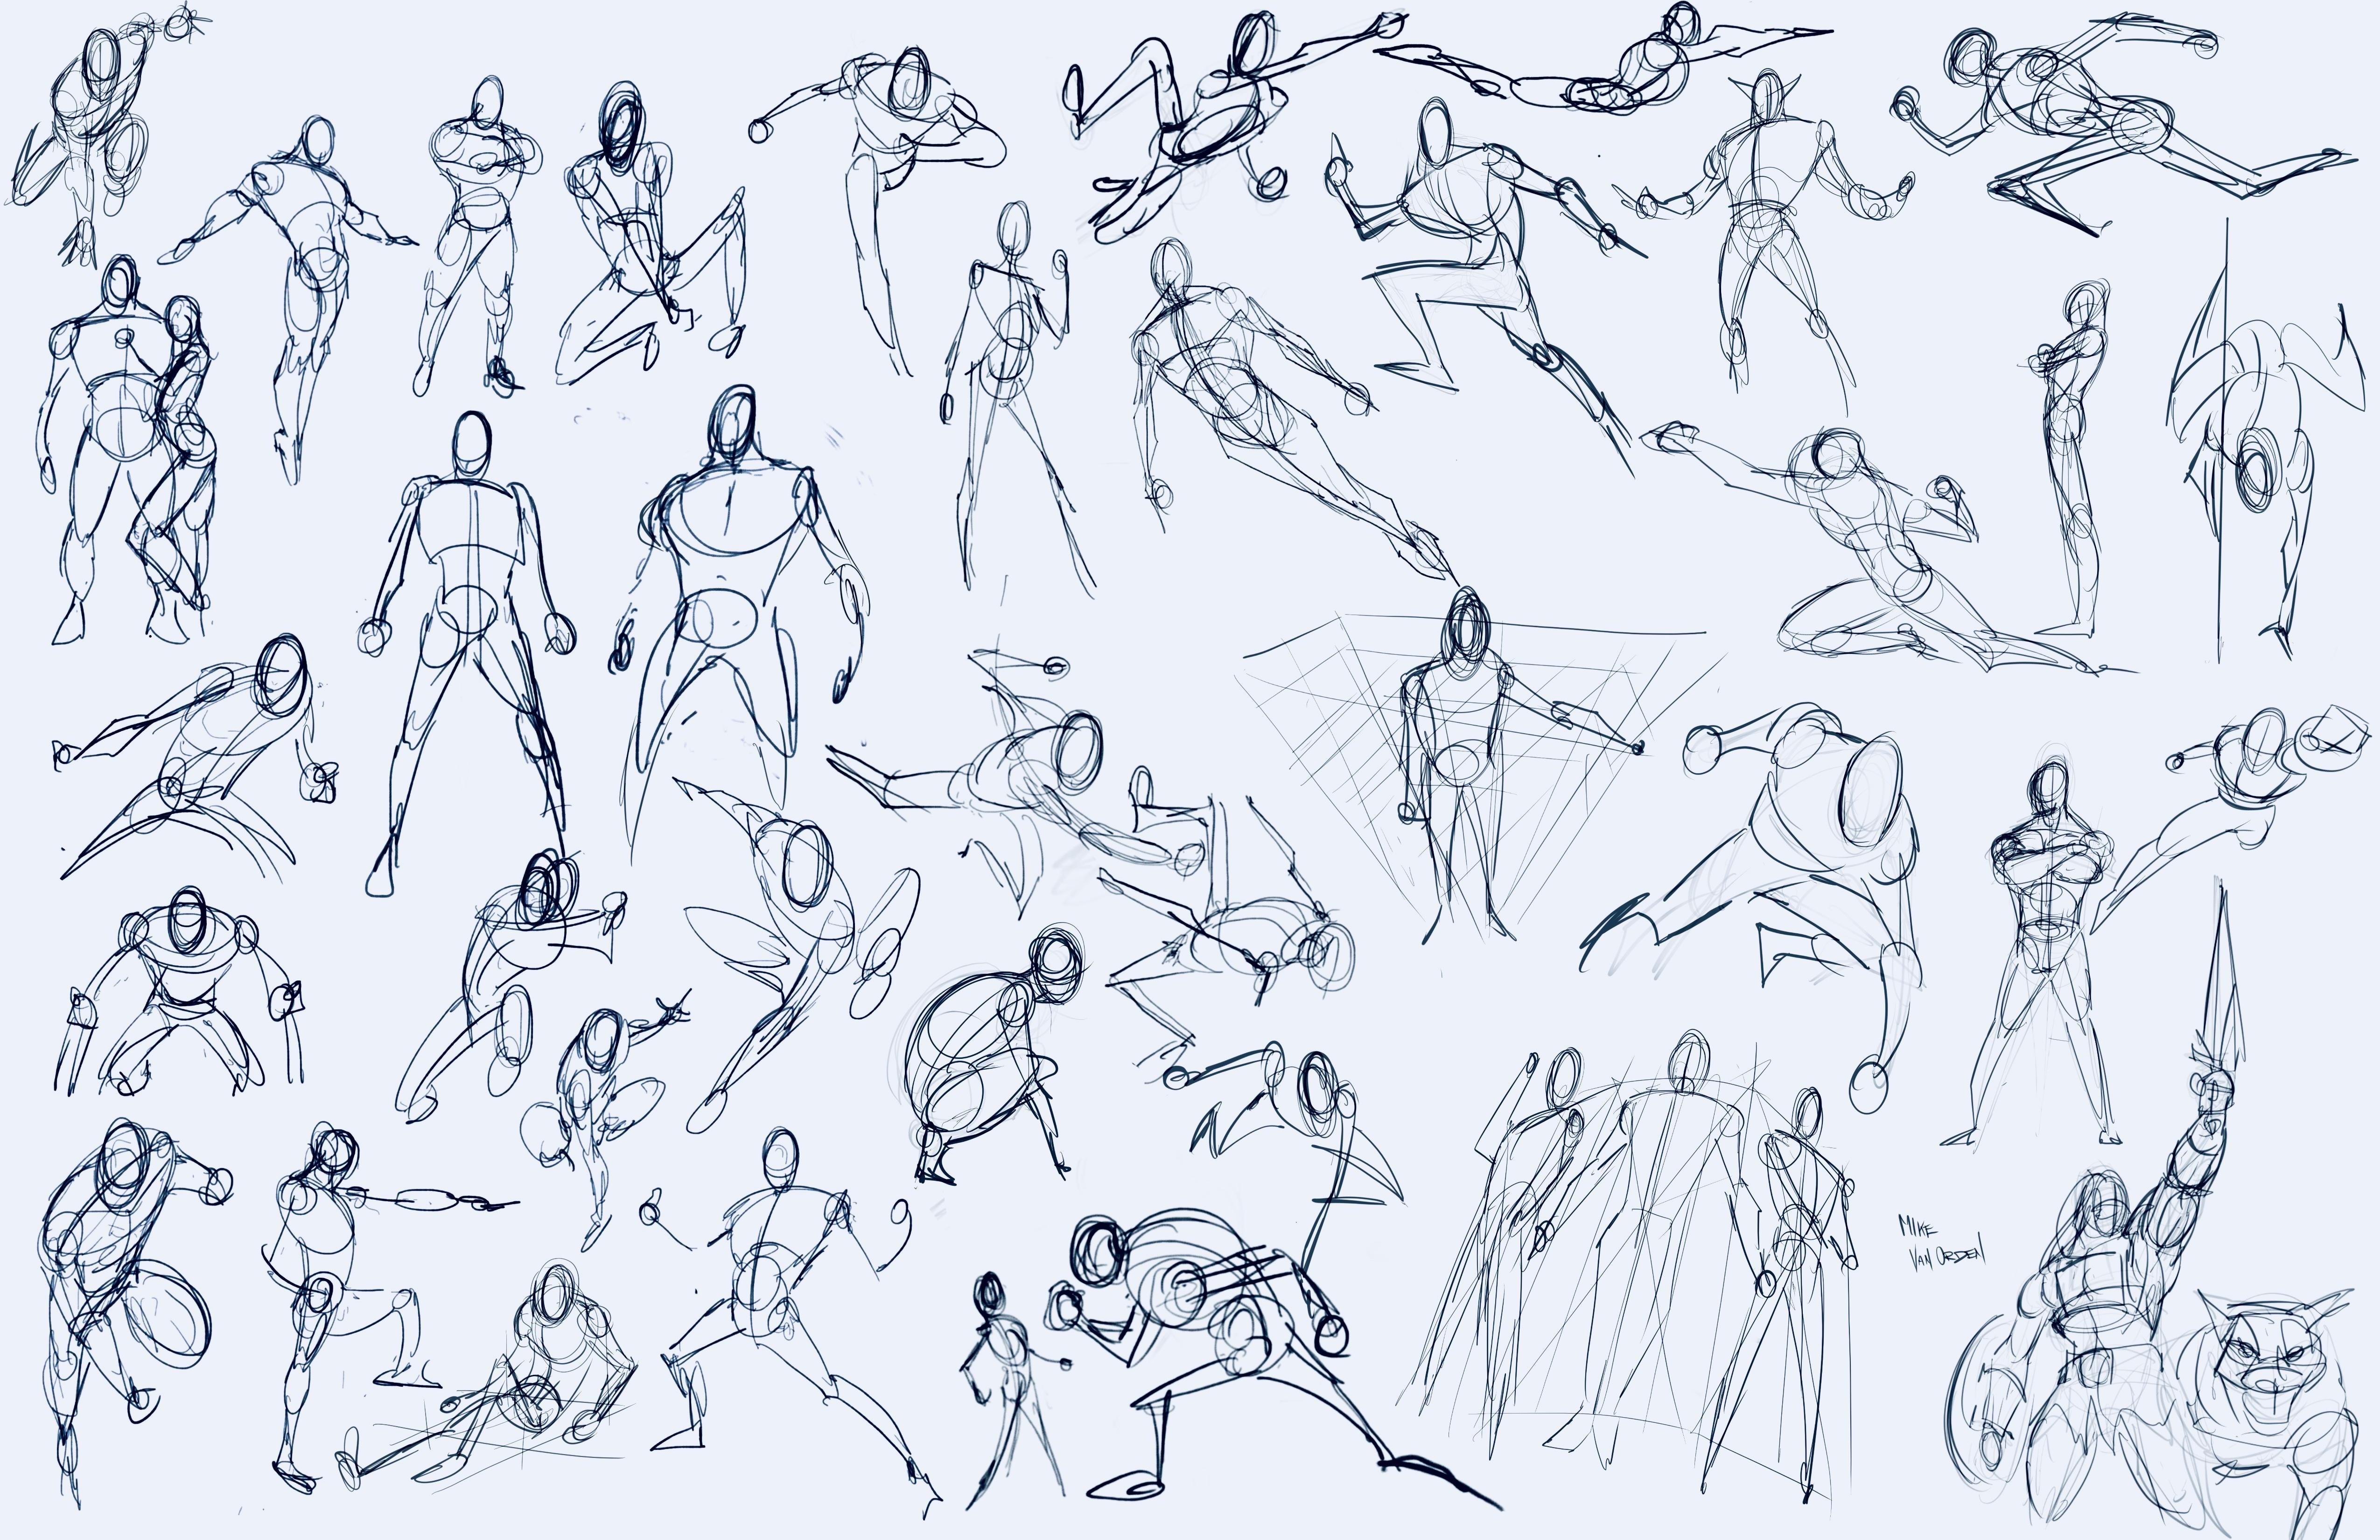
5. Creating Motion & Movement: Alright, well here we go. So in this lesson, we are just going to focus
on something called motion. So we're just gonna go over a
couple of techniques on how to draw the human
figure in motion. And I'm initially, I'm planning to keep
it pretty simplified. I wanted to show you
the concepts and then we'll go a little
bit more into practice. And then in a later lectures, I will dive a little
bit deeper into it and then give you a chance to do some practicing
on your own. So motion, what is motion? Motion is a movement, right? So motion is energy from, if you want to get from
point a to point B. But you have an
obstacle between you. You need to go around
that obstacle, right? So that's called movement. From it's traveling. It's when you raise a
limb like an arm or leg. It's when you bend over
to touch your toes. It's when you turn your head. Any type of movement, whether it'd be subtle or whether it'd be
subtle or obvious. It doesn't really
matter as long It's as long as you can convey that there's some
sort of movement, it's really important that you learn the principles of it. So let's just jump in and let me show you
a couple of examples. One thing that I
learned a lot was okay, Let's just say you have a head. We're drawing a basic
stick figure, right? Actually, we're
drawing a stick on a, standing on the surface. Right? This stick is about, let's just say 78 heads tall. Now. Height here, feet are here. And what we want to do is we want to show
movement to get this, this stick figure,
this stick with a head over to about this area. So how would we do that? How would we show movement? Well, let's just take a line
from the center of here. And let's do a curve to this x. And I'm going to
lower that curve. I think that's a
very strong curves, so I'm just actually going to
draw it through like that. Okay? A way to do this, and this
is just for perception. This is not something that
you're going to have to do routinely or
anything like that. But this is just to send
the message across. And so let's just do
a circle like this. And let's do one here. Let's do another one here. Just jump down to this. Okay? So we've achieved our goal. We've, we've brought this head all the way down to
our target, right? So then let's just
go ahead and connect line to each one of these. So if you've taken
my anatomy course, one of the things I
mentioned is you have the three major masses. And the further you separate
the masses from one another and at three major
message just to kind of recap, are your, your head, which is here, right? Your upper body, your torso, upper chest, which is here. Right. Then your lower
pelvis, which is here. Okay. The further away from
each other they are, the more extended they are, the more you're
conveying movement. And so if we were to
turn this character sideways and just draw, it doesn't have to be perfect. Just for the sake of
showing you some movement. We have a character that's
kinda leaning now, right? And he's kind of Alabama. It's because he's looks
like he's falling. And we're going to get a
little further. Alright. We're going to drop it
down a little further. So we're kinda getting
the same parallel curve. Then we have another one here, which I extended this one a little bit further
than the others. It's just approximate
not to worry about anything being
exact because I'm just showing you that each one of these conveys
some sort of movement. So if we were to
add an arm here, and then a hand here, and then legs, right? Same as if we were
at an arm here. Let's say that we
moved it like this, put another arm back like this. And we moved a leg like this. And then the leg like this. And then I'll even switch to a different color so we
don't get too confused. And then another arm like this, I'll pull it back this time. Arm That's going forward. Then a leg. It's going back. Like this, coming forward. Then we're gonna
keep this moving. It almost looks kinda like
we're animating right. Then this time we're
going to bring this leg forward, this leg dark. And then finally, actually, this is a very long necks, so I'm not really
comfortable with that. I'm going to go
ahead and erase it, bringing up a little
bit closer with it, we'll stick with the red. And we'll go back to the blue. And we will take a closer
look at this in one moment. I'll show you what I
mean by everything. So we have a latest
going like this. So now let's jump onto this one. And we're going to pull this
arm back, full arm forward. You can see that
this one is really, really close to
the ground, right? And I'm going to explain
something in the moment. And I'm going to take
this whole layer. And let's go ahead and
use a different color. Let's just say like a green. Dark green preferably
to make it stand out. So here we go. Point. Let's just call this point a. Whoops. Point a. And we'll call this
point z, right? A to Z. So movement, right? Well, in order to show movement, if we just kept this stick figure upright
and just kinda made him, you know, like this
the whole way. And then just move an arm, leg. It would show movement. Right? I'm just drawing this
for the heck of it. But just to give you a point. But it doesn't show any kind of dynamic or interesting
type of movement. That's what we want
when we're drawing comic books or
storyboards or animation, or any type of commercial art. So we want to show some action. So what I would
do at this point, and just to illustrate
a little bit further, and I am pretty sure that
you grasp what I'm saying. We're gonna go into some actual sketching here
in a few minutes. But for now, I'm just showing you the
principles of movement. So let's just say that this
character here, z, right? That was our ultimate goal. So let's just go ahead and draw a little bit more of
a detailed stick figure. And so when I say
a little bit more, what I'm thinking is, let's draw in a
shoulder and arm. Let's draw on another
shoulder over here. Then let's draw, and since this arm that's closest
to us is swinging back, then that would mean
that there's armed, it's this leg that's closest
to us would be going forward and then delay that's further apart or
further away from us. We'll be going backwards. And I like, when I'm
drawing running characters, instead of clenching your fist, I like to kind of give them kind of pointy hands to make
it a little bit more. No pun intended but aerodynamic. Right? So you can kinda see that we've done the
framework, right? We have a character in motion, which coincidentally happens to be the title of this lesson. Okay, so how did we do that? Well, we just visualized where we wanted our
character to be. We visualize our character
standing up over here. We had in mind that we want our character
to travel to here. So I hope that that makes a
little bit of sense to you. For me, it's the
best representation that I learned personally. And I taught myself this
just by studying things like animation and movement, just watching movies
and things like that. It's just one of those things that you want to have
a pretty good grasp on prior to really try to
dive into your sketches. Because when you're drawing, you have a few things that
you want to keep in mind. You have your anatomy,
you have your technique. You have your gestures,
you have your, let's say finished
details like rendering and adding textures and volume and details and
shadows and all that stuff. Which makes all your
art look pretty. But all of that
stuff is useless. If you don't see useless,
that's a harsh word, but all that stuff
is not serving you as well as it could
if you don't have a pretty firm grasp
on movement and gestures and movement played
together right there on the same playground.
They work together. And that's why when I'm drawing, initially, when I'm
doing my layout, I typically draw gestures. Now, if this were a
real sketch for me, I would probably go a little
crazy and my pencil would be moving like 1
million mi an hour and I'd be shaping things out. And this is a technique
that we'll get into, but this is just kind of a sketchy rendering
technique that allows me to shape and mold things into the
way that I want them. I can lowered his
head down if I want to make it look like. And that's another,
another thing is if you want to
make your character look like they're
really coming out, you are really moving
aero dynamically. So a concept is keep it
lower to the ground, right? So you see how the, his body in general is pretty
low to the surface, right? So if you look at racecars or motorcycle races
or anything like that, when they're taking their curve, are there turn, you can see that the rider will go really, really, really the lean into
it and they'll go really, really close to the ground. The reason for that
is really it's just physics because that
speed, that momentum. It's, you know, if they
were to try and stay upright or they weren't going with that rhythm of the turn, they would just lose control
and they would wipe out. But when you lower, lower the body closer
to the ground, when you're going faster, it creates this illusion of momentum and speed
and movement, right? So just keep that in mind. And I'm trying to give you all the knowledge
I have in my head. So bear with me if I jump
from topic to topic, it's really because I'm trying to share
everything with you. Here's what I would
typically do if I were drawing this character I'm ion. I would probably be using
traditional paper and pencil, but I would try to get
everything as close to the movement and
the portrayal as I, as I wanted to like my gesture and I wouldn't be too focused
on the anatomy just yet. But I would have things placed where I can
tell proportionally. Alright, this works,
this could work. And I might even draw some little speed lines just to kinda tell my
subconscious mind like, Hey, this guy is
moving really fast. You can even throw some flames from the ground
and from his foot. And if this were like a
character like the flash, there might be some lightning
going all over the place. The other thing is
that it's information, you're putting that
into your head. And then what I would do
is I would just lower the opacity or the
equivalent of erasing. And let's just go ahead
and get rid of those. And then from here, I'm not gonna do it right now, but I would just sharpen my pencil and just
start diving into, I would probably zoom
in when I'm using this and just kinda find because I hear and I
won't go into details still. I would just kind of find
out where things fall. And then we come back in later and start working on my musculature or my
anatomy and all that stuff. This is just a process
and it's just, you know, not every process
is going to be your process. You might find a way that
works better for you. And that's perfectly fine. You know, there's no cookie
cutter approach to arch. It is very subjective. And I'm just trying to show
you the foundational stuff, the stuff that you should be keeping in mind while
you're drawing, such as movement and
weight and mass. And how does this stuff, how does gravity
affect certain things, and how's movement work? So I would start
with something like this and I did that
really quickly. And then if I were
really diving into it, I would just keep working and
keep grinding it out until it starts shaping up until the standards that
I want to hold it to. Then I would just keep cleaning
up and drawing it out. I'll create a whole
course on that. And that would be like, that would be a really deep
diving course because we really go into the details and the rendering
and stuff like that. If that's something
that you're interested in, by all means, just send me a
message and tell me, you know, that's something
that you'd like to learn. But for now, that's it. We're going to stop here. So let's just recap
real quick before I do, I'm going to erase this guy here and throw
these guys back on. And let's bring them out. Hello, welcome back. And recap. Now I want this to
be two point where you could tell me
what we did yourself. So you can explain this to me. We started from point a,
we ended up at point Z. Point a is very stiff, upright, boring, not
showing too much movement. And then as you
can see from each one of these and we drew
five different figures. By the time we get down to z, we saw that there's
a lot more movement. I even drop the head
down even lower, which I don't need to have
this detailed part. Okay. I dropped the head
down even lower to kinda just convey more
movement, more intensity. And so keep that in mind
as we go on further. So there you go. We're going to end here. What you could do is
you can replicate this. I really want you to
understand this stuff. My goal in all my courses is to teach you well
enough that you can explain this to
someone else, right? So I want to pass on
this information. That's knowledge I wanted
to demonstrate for you. I want you to be able to take everything
I'm teaching you, and I want you to be
able to regurgitate it, but also to apply it. And I want you to
have the confidence that you can also
teach it yourselves. Okay, I hope that makes sense. And for now, that is it. And thanks for joining and I will see you in the next one.
6. Gestures in Motion: Okay, welcome back. And in the last lesson we
went over some techniques, but mostly the principles
of capturing Mu movement. And this little quick lesson, we're just going to
go into a little bit, a little bit deeper into the techniques and maybe show
you a couple of examples of drawing a more movement
in the human form and which could be equated
or translated as gestures. Let me see here, that was
just a side sketch here. We might even get into
that in a later chapter. So basically, to carry
on from our last lesson, here's what, here's how
I would approach it. If I'm trying to
create gestures, I would think first I would warm up and I would just
draw a curved line, drawn a head, drawing
a body in drawn. There's my three major masses. I would always start out
something like that. Now you could draw
something like this, which is, you know, they call the the pillow or two bean method where
you're kinda drawing a rectangular shape which represents the top and bottom
and put the head here, and then put an arm up here, and then put an arm
back here. Alright. And then put another leg
up this way and then drop it down this leg back here. You can't do that. It's okay. But let's go ahead and shrink this down a little
bit and move them over. And when it comes
to gesture drawing, if you are kind of new at it and it's not something that you really do too often. I really recommend doing this as a regular
form of practice. Before you start driving, diving into a sketch that
you want to finish, just take some scrap paper and just do some silly things like this. Look,
I'll just show you. Draw a upper body, lower body. Draw a line up the middle
Joel ahead up here. And I'm kinda looking
up at them, right? I see. And then just draw try things. Like I'll draw a
leg here, right? And then I'll just
draw this leg. And I'll say, normally it
would probably go here. I'm just going to kick your
way over here right there. And then if that if this
leg was coming forward, that would mean that this arm would be coming forward and this arm would be
going backwards. So we'd also have to
figure out, okay. I want to drop his head down
and give them more movement. Remember we talked about
keeping your head low. Alright? And then pull this arm back. Then take this arm here. And then kinda gives. And then you can even do this. You can take his, his head
and turn it this way. And here we are.
Here's what I'll do. I'll show you what I mean. I'll lower the opacity and I'll redraw it using black, right? So we have, instead is
head facing downward. I'm going to have his hopes. Drawling different layer kinda makes it pop a little bit more. Then what I was saying is just and I'm not trying to get this perfect
because it's a gesture. Right. So his heads facing this way. Right. And then I have a shoulder here. Shoulder here, arm dropping. I'm just keeping it
stick figure for now. Arm pulling back, arm
coming like this. You can even, you know what? Let's do this. Let's make it a little
bit more extreme. Instead of his arm
pulling out here. Let's pull his arm
back this way. And then let's go ahead. And imagine that
his he's kicking. Boom, right? Then this leg is
coming down here. And it just shows some movement. And it may be inaccurate, but, you know, you
can learn from it. So with that said, let's go ahead and
get rid of this. And let's go back
to this other layer and bring the opacity back. And I'm just going to go
ahead and shrink this down, move it over here somewhere. Take this eraser and
get rid of this, and just start doodling a
little bit more with the red. Just to show you some examples. Let's say we wanted a character kind of crouching
down looking at us. So I would just draw
the top head shape. Imagine that the pelvis is pushed back because this
is called foreshortening, which we will get into. But he's bending
towards us, right? So if we're looking
at it from the side. We have the lower pelvis and
then we have the upper hand, we have the head, right? So you have to imagine yet
to see things as they are, as you would want them to be. And I know that sounds very
cryptic and proverbial. Okay, So here we go. So I'm drawing his
arm down here. And then I'm gonna
go ahead and put this leg here and here, and this one there. And then I'm going to
put this leg up here. I mean, there's harm up here. Okay. And so what
can I do with this? Well, if I really, right now it doesn't
look like too much. But if I really wanted to, I could kinda sculpt it and just kinda workout my
limbs in terms of shapes. I can put this arm here, just widen it up a little bit. And we just start kind of developing more of a kind
of a human ask form, right? So we're, we're finding the form and we want to keep it moving. And when I say moving, I mean, like changing the limbs around. Don't keep everything
stationary. You don't want your
art to look stiff. You went to look like these
characters are full of life. And you know, you wanna do this. You don't want to get
stuck on any of these. You want to keep going. And this is, this is
literally how I do it. I take a few of these, I learn and I'll
erase this one here. And I move on. And I kinda, it's kinda like
downloading information into your memory banks. So then let's say I wanted a
character jumping upwards. So let's say, like I would say, okay, well let's try. I put the little
action line going up. I put a torso, upper body here, lower
one here, head here. And then I'm angling
it to kinda show like, okay, we can have
one arm going up. Actually, let's shrink
them down a little bit. Okay. And I'll even turn him
a little bit like that. Okay. And 11 arm up, one arm coming here.
Same thing here. So if this, if this, remember, I think it's called contrapposto
or contrapposto. Forgive me if I'm wrong. But there's a term where whenever you're moving your arms and your legs, like think of it. When you're walking.
Whenever you put your right foot forward, your left arm moves
forward as well, right? And when you and your
right arm goes backwards, so anything that's
on the same side of your body will be
opposing each other. So for instance, since
this arm is stretched, then that would mean
that this leg on this side would be
stretched, right? And then the opposing side would be this leg
would move forward. This arm would move backwards. So I hope that that makes sense. And I can tell you
a few more times. Like even this character here, like I had this silhouette
here for a reason. Because I was going
to show you there's a chapter that I'm
doing on silhouettes. I guess I can explain it. When you're drawing one of the tests that you can
do that make sure that your proportions look good or that your character
pose looks good, is you can block it and all in. You don't have to. I rarely do it. I only do it when I'm really
doing something that's a little iffy or something that I'm really concerned about, but it does help a
lot to make things proportional lysed and also it helps with the composition. So with that said, I will
just remove that layer. And you can see that when I, when I did this one,
see what did I do? Where did I start? Tracing my footsteps
backwards here. Okay, so we have this layout here and now this looks like
the initial layout. And we can even darker then. I will continue to draw on
this layer and kinda recap. So what I did was I
drew his head here, pulled one arm back,
one arm forward. Alright. And then curved his
line of action like this. Pull this leg forward as well, and then pull this leg back. And that was kind
of what I was going for just so you can know. Now we're not going to really touch too much on
this right now because I do have more lectures that go deeper into
this kinda stuff. So let's get out of here. And with cool things about
what we just did is hey, I've just created
a gesture, right? Just by tracing over light
that you can do the same. You can find art in comics
or whatever that you like. You can find a photo
of, let's say, a football player
or soccer player or See fighter or whatever it is. And you can trace over it and just find their action, right. But with comics, what you
want to really realize and remember is that you want
to focus on exaggeration. So comic books are
going to be a lot more exaggerated than real life. Okay, onward and upward. Let's go ahead and
keep this going. So I'm just trying to think
off the top of my head. What's another good pose? Let's think of like Spiderman. Let's say like, How
would Spearman V, I'm just going to
draw a head shoulder. Imagine that his arm is
bent down like this. It doesn't have to be perfect. I can totally move all
this around, right? And pull this arm backwards, imagined that this one is
holding on to some webs. And then since this
arm is forward, I'm going to bring this
leg for oppose it, right? And then since then that would
push this leg back, right? But with Spiderman,
That's kinda funny. He's very different than most
people or most characters because He's got
this weird agility and flexibility and almost
like a contortionist. So you can really go crazy
drawing and someone like Spider-Man or let's
say Night Crawler, or any of those characters
are very limber. But I can have this
imagining that he's swinging over some buildings, right? Maybe a taller
building over here. And I don't care about the
perspective right now. I'm just just iterating my
thought process on all this. Okay? So that's one way
to do it, right? And then let's go ahead
and keep all this. Why not shrink it down? What did I just do?
That was silly of me. Okay. I met two, lasso it and
then shrink it down. That works a little bit. It, alright, let's do smart. And you know, for me, this is actually really, really fun because it gives me a chance to do the things
I wouldn't normally do. Like take the chances that
I wouldn't normally take. Because if you make
a mistake, cares. If you don't, if you
can't figure it out, It's okay, study
it, learn from it. Why would I want to waste valuable sheet of paper and a couple of hours
of my time doing something wrong when I could easily just do a couple
of practice runs and learn and get into
the groove per se and get things
right before I go. So yeah, I would just keep
carrying on like this. And let's see, what's another
pose flying towards you? Let's say, Well, that's
foreshortening and I think I'm gonna do a
chapter on that later. What's another one? How about, you know that you always see
that iconic pose or like Batman or spawn or someone
standing over a building, allege kind of gazing
down over the city. Well, let's do something like
that. How would that look? I'm just imagining that it would be something like actually
let me shrink this down. I always start out
pretty big like that. I'm so used to drawing on paper. And so imagine
something like this. So we have, you
can notice that I pretty much always start with the three major masses first. Now you don't have to, but I like to because
it kind of keeps everything all the checks
and balances in place. So I can imagine that he's
overseeing Gotham City or if it's whoever it is can be Spiderman could be
Batman, could be spawn. But there are kinda looking
down over the city. Or maybe he's watching
inspiring man swing, right? Or maybe it was
watching whoever. And then what I would do is kinda figure out
what's a good pose. So is this arm is going to be closer
to us or further away. Now you could switch it up like I'll do a couple
of different examples. In fact, I'll do another layer and I'll do it where
the arms closest to us. And then that would
make that this leg. Where do you go this way? Then this this leg over
here will go like that. And I would probably not make the back leg so
angled like that. I'd probably make it
a little bit more relaxed depending on the
energy of the sketch. And then. I would just start
playing around with the shapes a little bit and seeing how things
fall together. If I see, if I notice a couple of proportions
that are out of whack. This is a good time to kind
of try and correct them. Now, if his shoulders here and I want him to
be looking over our shoulder maybe at the
camera instead like I had us can do that too. And then put his
hind leg back here. A lot of times what
happens is you would draw like an edge of a building
or a gargoyles or whatever. And it might cover up that foot. There might be a lot
of darkness back here. Because you want to, you
want to keep the focus on your character.
You don't want it. Your eyes wandering
all over the place. Compositionally. You want to keep the audience really engaged with the
character that you're drawing. Now I could take
this other arm on the other side and draw kind of like some outstretched
fingers like that. Okay, so that's
one way to do it. And then I could take his cape. And you can determine, do you want this keep
going forward like that or flying off into the
wind up to you. Then, you know, at this point you start formulating ideas. And you're like, okay, well this kind of works, but what if we didn't
do it like that? What if we did a different way? What if we put this arm
closest to us back? This one? That, and that would bring this R this leg that's
closest to us forward. Another one back. Right? In fact, I think I may have
missed up on the last one. Don't worry, we all
make mistakes. Okay. So then I could
also lowers head. You can you can always move things around to see
how they adjust right? Now I'll show you that because All this stuff is so vitally important to your finished work, I can almost guarantee
that probably the majority of you probably don't start your
arm out like this. You probably just
dive right into your sketch and you think
you have it figured out, or you think you
will figure out, or it will magically turn
out the way you want and then, and then it doesn't, And then you're kinda
bummed out and you might even cave and give up in
the middle of your sketch. And I don't want you
to do that anymore. I want you to learn
techniques and formulas and methods that help you get past those
little sticking points. And so here we go. We have a different
angle, right? And we can try so many
different things with this. So let's say that we have the little edge right there
looking at the profile. If we wanted a cape, again, we can do the same
thing where maybe the cape is going
to go like this. Maybe it's going to come out a little bit
in front of them. Maybe there's gonna
be cape over here. You just play around with it. These are your aesthetics, these are your compositions. And I am working on
a couple of courses. One is on composition
and layouts. And we're gonna get more
into multiple characters and perspective and layout design
and all that stuff too. So bear with me. These courses take some
time, as you can see. Okay? So let's say we took
this one, right? And I would just be like, well, let's go ahead
and lower the opacity. The opacity on the original. And then let's go
ahead and create a new layer and see how
can we handle this. I would probably start out again with the basic
shapes like this. Now, if I were drawing
a real sketch, I probably wouldn't be drawing every single shape
the way I'm doing now, but I'm doing this
so you guys can see, I'm always leave your
self room for error. So I have the basic shapes here. Here's his neck,
here's his head. And we get to decide, you know, what does this
character doing? Why is he here? What's the purpose? Of his existence on this page. Right? You have to be asking yourself these
questions all the time. I know it sounds funny and weird and you're probably
not doing that all the time. You're probably just saying,
what's a cool sketch? What would other people like? What can I get the
most likes on what's, what's popular right
now, and that's all fun. But man, imagine
how much more fun it would be if he
knew all the rules. And you knew how to
break the rules, and then you knew how to
manipulate the rules to work in a coordinates
with your style. Okay, So I'm popping
in some basic limbs and I'm not really working
too much on the anatomy but enough to kind of
get an idea of like, Okay, I could work like this
or I could I could erase this and drop his
head down a little bit, extend his neck. Now, too worried about having everything
proportional yet. Because what I'm doing, this first step is really
just your information step. You're just trying to
lay down information. You can notice like, Oh, this legs too big,
this arms too small, the hands are
mismatched or whatever this you can notice
that stuff later. Or, you know, hey, I could probably
upturn this hand. It would look a little
bit more dynamic. All that stuff. It's something that you'll
figure out along the way as you're drawing and
every sketches different. Alright. So here we go. We're, we're forming
a character, a human figure, right? And I'm just, you could
see that I'm just drawing over and over and over again and kind of sculpting
and molding, not really caring
about my exact lines. So if you're, if
you're the type of artist and I used
to be like this, who just kinda jumps in and tries to get everything
perfect the first time. Don't do that. Make
these mistakes. Whittle and sculpt, and just
keep your pencil moving. Don't have any leave
your ego out of this. And just keep everything moving because you're kind
of machine right now. You're a machine
that's transferring information from your mind
onto paper and two-dimensions. And you're trying to do it is relatively
accurate as you can, as fast as you can to the
best of your ability. But also you're implementing
your own style. And style is a whole
different topic. And I have a course that
I've already started on, finding your style and
capitalize on your own style. I have a lot of
courses in the works, but for now let's
focus on this one. And I would just
take this and lower the opacity and probably get
rid of the under drawing. And then I would just
create another layer. And you can change the
LED color if you want, or you can just
keep it the same. It doesn't really matter
because we're just practicing. But let's say that I wanted to work on the anatomy of this. You can pick any arbitrary
point that you want. I could pick this bicep
and just say, alright, well this bicep would look
pretty cool if it were flexed. And he has this tricep
here and hopefully, you know a little bit about anatomy at this stage
of your art journey. And if you need some
help with anatomy, maybe you've taken my
course on simplified, simplified superhero anatomy. If not, it's okay. You still could take it
or just study some books. I'm also planning on making a more advanced anatomy course
so it won't be simplified, it'd be a little bit
more deep diving. But you know, what I'm doing
here is I'm just kind of finding some lines that
represent the anatomy here. Are the right are they
wrong? I don't know. Let's see. Just taking the information that's inside and putting it down on paper. To the best of my ability
at this given moment. That's all we can do. To the best of your ability. Don't compare yourself
to other artists. Prepare yourself to yourself yesterday or two weeks
ago, or five years ago. And keep watching
your own progress. And here we go. Now I'm just going
to focus on putting his neck in and drawing
the head shape. And this comes a little
bit easier for me. And I still make
mistakes Tuesday. But I've been doing this for
years and years and years. And a lot of this stuff
becomes second nature. And I want that for you as well. I want you to get to the
point where, you know, you just kinda pick
up your pencil and you know, where things go. But at the same time, I don't want you to
overanalyze anything. I used to be a big culprit of
that and it used to really, really slow me down. I would overanalyze my art. And I was stubborn. If I couldn't figure something
out, I wouldn't let it go. I would just keep
drawing, enforcing. And until I realized like, Man, I'm never going
to figure this out. And I've already
spent 6 h on it, and it's just gotten worse. Sometimes you just gotta
learn when to walk away and start over and learn from it and don't repeat the
same mistakes, right? So here we go, just a basic
outline, nothing too serious. This arm here might
be even too small, really, the one
that's further away. So luckily we are using
some technology here. Or I can increase the size. And that's one of
the advantage of drawing on digital tablets. But yeah, these are the
things that you want to catch initially before
you start diving into your finished work. If this were Bamiyan,
I would just kinda draw some elements. Try and capture them
as best as I can. You can even put like
the little symbols here. I think that this chest is actually a little too
small to be honest. I would probably if I were if I weren't
teaching right now, I would probably take some time and change the proportions
on this a lot. But right now it's okay because this is just for the
sake of teaching. So we're not too worried. Just all I'll say is constantly be mindful
of what you're drawing. Okay, just keep, keep yourself aware, keep yourself alert. There's gonna be some moments where you let go and you let your hand takeover
and you just start drawing without really
thinking about it. But you get to a point where
you're starting to wiggle down the details and observe. There is a term called
the observing ego, right? Where you're letting go
of your egoic nature, which is constantly judging. You're getting into the nature of observing with your ego. And all that does
is it gives you the ability to be
aware of when things are going well and when they're not in the way that you're aware is you do a
check on yourself, you're looking at, you're
like, okay, let's check. How does this look?
What would I change? And just off the bat, like the couple of
things I would change, our output, probably make
them a little thicker. And this region give them
a little bit more weight. Yeah. I mean, that's
just one of the things. And you just got to
keep asking yourself, like, how can I make this
a little bit better? What can I do to make this
look a little bit more alive? And these are the questions
of an artist's, right? You're asking yourself because
you're creating something that you're eventually more likely going to share
with the world. And you wanted to just go in
with your best foot forward. So there you have it. Here's a quick way to draw
and render a character. Now, I didn't go
too deep into it. You can keep repeating. This is kind of a rents
wash to repeat cycle. And then you'll get
to the point where eventually you'd be able
to retrace this again. And I say trace, but when
you trace over it with a different lead and
start doing your details, if I really wanted to, I can come in here and just start adding some
hatching and stuff like that. This course, we're not talking about crosshatching or details. I do have a course where I
did talk about a little bit. I did a really cool course
with Ed for a chalk. And that was on
rendering comics. And I go a little
bit into rendering and doing like crosshatching
and stuff like that. But eventually I'll, I'll
do a whole course on it so that you can take your initial sketch like
something like this, and you can take it all the
way through to the end. But yeah, we'll stop here. I hope that this
was helpful for you and we'd have a
lot more to learn. So I don't want
to overwhelm you. This was a long lecture, but I will see you
in the next one. Okay? So that's it. Take care and I'll see
you in the next one.
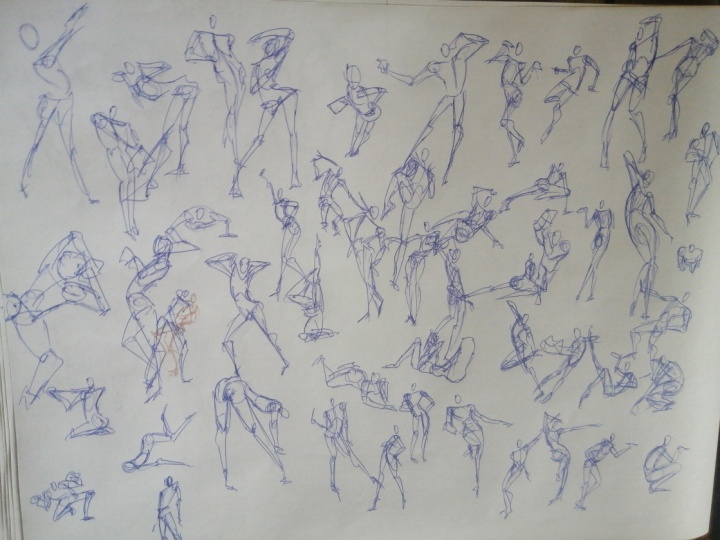
7. The Stick Figure Simplified Gestures: Okay, so now that we've
talked a little bit about the importance of gestures
and dynamic figure drawing. Let's kinda jump into a very basic simplistic
version of the, a simplified gesture,
if you will. And you guys probably started out with
this when you're in school as a little kid. And most people
will tell you, Hey, I can't draw
anything, but I can, I can even draw a stick figure. Well, I'll tell you what. Stick figures are, kinda the
beginning of everything. So I'm just going to
give you a couple of demos and go over the basics of just a
simplified gesture. I'm kinda like this one here. Now. One when we're doing
gesture shots like this, where I guess the main
objective would be to put everything down on your page as fast as
possible, test it out. So if you're doing like
a thumbnail sketch for a future drawing, or if you're laying
out a comic book, or if you're doing character
design and stuff like that, what you wanna do
is you want to take your knowledge of your anatomy, the character that you're
trying to portray. There. You know,
everything about them, their body language, their
behavior, their attitude. You're trying to express that
through your overall art. But the best way to do that is to start out with gestures. Gestures are very impactful
and very powerful. So here we go. For a
simplified gesture. Just start out with a head. It could be an oval head, could be a round head, compete head like this. It doesn't matter, right? You can you can simplify
it as much as you want. From there. Just draw a straight line down. Now this is just
our figure, right? A basic front view. So now measure a gap between the bottom of
the chin and rethink the collarbone would be right. And so hopefully you
have a little bit of a grasp of anatomy. And if you don't, I
do have an anatomy, a very simplified anatomy
course available, and I am working on a more complex advanced
intermediate course. So stay tuned for that. So if this were the collarbone, you can just draw just a
circular shape, a sphere, right? And then underneath that sphere, you can just draw
another smaller sphere. And from here, you can just decide where you
want to put the legs. So you could put like
here, like here. And here you can put
the arms, right? This looks like child's play. And many of you are
probably more advanced than this and you
probably don't even mess with stick figures
all that often. However, I still
use stick figures when I'm drawing. They
really helped me. And I'll, I'll show you how in either this lesson are
the ones to follow. But generally, if I want to draw a stick figure really fast, I would just probably
start out with the upper body workout,
something like this. And if I want to put like a leg here and then maybe
pull this leg, the other leg backwards. And then we're gonna get into
a whole section on twists. But maybe I twist his body
towards us and contort it. Pull this arm back, pull this arm forward. You can see how we can get a
little bit more complex with just a little bit of movement
of the limbs, right? Don't worry about this
because we're getting way deeper into this
in future lessons. But I'm just kinda
showing you why. I think stick figures are very essential when
you're doing gestures. Another way to do it
is just draw a curve. This is how I used to start
out 99% of my sketches. I would just draw
a curve like this, a line like this, kinda follow along
with the curve. And put my one leg here, maybe another leg over here, put an arm, drop down here. And then just imagine that this other arm is
falling over here. And then you can just, you're seeing the form developed and it doesn't
have to be perfect. The whole purpose of
drawing stick figures is to find first-year putting
information down on the page. And then secondly,
you're just trying to find something that works
for what you're going for. So if we were working
on some sort of complex pose or maybe a
multi character pose, It's best to try and try things out first
before you commit. Now, I see a lot of
artists that just kinda dive in and they
don't give it the, the love that you should. And when I say that,
what I mean is, before you start committing
to your final piece. Or even thinking about that, you need to find your gestures, your body language,
your overall blue, blueprint of what you're
trying to achieve prior to going into any
details or even anatomy. Like I don't even draw anatomy
until I start figuring out where my character
is going to be. What angle if I'm using
a kind of perspective, how many characters
are in the scene? Yadda, yadda. So that's really,
really important. Let's go ahead and just
minimize these guys here. Pulling down and
nobody puts baby in the corner, but I do. Okay, So here we go. Another way to look
at stick figures is if you are trying to
accomplish movement, you know, let's say you have someone
running and I think I've given you this example many times and other courses as well. But you know, keep keep your your limbs moving,
opposing each other. Put the head down a little bit. Put a leg forward
and backward, right? And that's just
automatically creating and the illusion of
running or moving. You can even bring
that forward by. Let's say if we wanted
to pull one arm back, put one arm forward here, put one leg forward. And then the other leg back. From here, you'd build on it. So let's say that
I really wanted to turn this one
here into something. Well, I could just, I won't even lower the
opacity. I'll just erase it. I'll pretend like I'm using traditional paper
and pencil here. You could do the same thing. And really it doesn't matter if you're drawing on a tablet or if you're using
traditional paper and pencil like I
typically will use. It's really up to you, but you can do the same
thing as on both. So here we go. So
if I were to want, Let's say I chose this pose of the character
running towards us. Well then what I
would do is just build on that a little bit more. And it really, at this point, I'm not even considering, you know, trying to get
the anatomy correct. I'm just building a building off of what I put down earlier, which is basic information. And then I would
draw through it, keep it sloppy because
I'm going to continue to do this whole process of erasing and redrawing,
erasing and redrawing. So since we have this, his left arm facing us, Ford and his other
arm pull back. What I would do is put this
this leg his his right leg coming towards us. Right. And then his other leg. You wouldn't even
see? Okay. This one. Now you could if you wanted
him to have like a stance or you wanted to bring
this leg back here, you could, and you can actually
draw a foot back here, but it gets a little wonky
when you do stuff like that. I prefer just kinda leaving
things to the imagination. But this is what I would do
and then I would just go another step and kind
of erase this down. Just keep the lines I like
and just work off of them. And then when it comes to
your finished drawing, less is gonna be more. So now, I would probably
sharpen my pencil, which is lowering the
size of my point. And then just kind of focus on whatever
grabs my attention first. So in this case, I'm just going to focus on
the head coming towards us. And no way am I going to finish this sketch because this is a lesson mostly on using how you can use a stick
figure and turn it into a finished
sketch ultimately. But now at this stage,
I would say, okay, well, let's capture our
shapes for the anatomy. We don't have to dive
into the anatomy yet. But, you know, we
know the basics. We know that there's arm. And this is a whole
different lesson, but foreshortening
anything that's further away from the
eye, which is us. The viewer, is going
to appear smaller and anything that's closer to us
is going to appear larger. And this just kinda helps
create the illusion of volume and dimension into Art. So I'm now just trying to find where I think
everything would fall. If you make a mistake,
it's not a big deal. If you decide later like, Oh, you know, I wanted
to change this. I think there's leg
would look better here or this arm would look
better if I raise it up. It's really up to you. Because he's, one of the
points of drawing in general. And learning these types
of poses is you're moving things around to
find out what works best. So I might decide, Hey, I don't like
this arm over here. Alright, I might
decide, you know, maybe it looks better if I have no arms showing and draw
in his hand here, right? These are the types of
things that you're going to have to mess around with and kind of tweak and
experiment with on your own. And this is part of the drawing. This is part of
crafting your skill. And don't be afraid
to try new things. And don't try and copy anyone. You know. Basically, you can copy for the foundational
purposes of learning. But don't try and mimic
any artists, not even me. I have some favorite
artists too. And of course, your
favorite artists, their style and techniques
are going to kind of overlap with your
style and it'll blend in and people might
be able to pinpoint it. But really find yourself your own style by just
experimenting. So there we go. I didn't want to go too deep on this lesson because
it is very general. And really the bottom line is, you know, stick
figures are very easy. You can even do like
the Hangman version. Or you can add a
little bit more. But it all starts with
kind of a stick figure. And the cool thing about body language and movement
and stuff like that is you can just do a little adjustments like
turn his head to the side. Right? You can lift this arm up. So create a radius, right? You don't have to
create a radius. You can just kinda guesstimate where you
think it will go. But I'm just showing you
the hand here. Alright. So there you can erase
this one that you drew in. You just change the whole
dynamic and language of your, your, your original
gesture, right? You could try
something different. The same you know, approximately the same
posture and everything. You could put his head here, crosses arms in. Remember we're not
going into any details. We're just showing the
gesture of the sketch. If you wanted to
draw someone else, and that's a whole
different lesson. But if I wanted to draw someone else
around the same height, I can just go around here but put ahead even
shorter than him. Turn this character towards
him, their way out. I turned the character
towards them was I bowed this line out. So instead of having a
straight line up and down, I bought it towards them. Do the same thing, put an
upper lower a leg here. And then I can even say, Hey, Hey pal, you okay. Why are you crossing your arms? What's, you know,
what's going on? And you can, you can do so much with gesture drawings and
have so much fun. And sometimes I'll even
say almost all the time, when you're doing
gesture drawings, you'll have these little
epiphanies that wouldn't have sparked if you just
jumped into your sketch. I get so many more epiphanies and ideas from my
gesture drawings. Then when I tried to just
jump into a sketch on a blank page and in
trying to just go for it. So I hope that this
kind of gives you a brief understanding
of stick figures. And from here, we're going to move a
little bit forward and a little bit faster paced. And we're going to jump
into a little bit more of, I would say, intermediate to advanced techniques
eventually. And I'll try not to
be too difficult. I want to make it easy
enough for you to grasp. And hey, you might even be way beyond this point
and you're just using this to tighten up your
skills and sharpen the saw, whatever the case may be. I'll try and make this all
relatively easy to follow. So that's it. That's going to conclude
this one on stick figures. Just remember, one
last demo here I'll give to you
is a stick figure. You can, you can figure out
your best way to do it. It could be as easy as drawling. Enlarge this a little bit, is drawing a one piece like this and then
put an arm here and arm here and extend
another leg out here. You could just make up your own. You know, it doesn't There's
no right or wrong way. As long as it's conveying a a figure like image
that you can work with. I didn't particularly like
that one, but you know, a lot of times when I'm drawing, let's say, let's say I'm drawing multiple characters
in the background. So we had like a, you know, this is the background
and we have like a perspective of
point here, right? But we want
characters back here. A lot of times I'll just draw
kind of loops like this. Put it head on loop, loop, loop. And then you can even do
more in the background. Depending on where you place
your your vanishing point, you can go further and further. So if I know this is a whole
different lesson for you, so I'm not gonna
go too deep on it. But yeah, I'll get into
this in a later chapter, so stay tuned for that. But yeah, there's just
so many ways to do it and let me know. Show me what you like to
do and show me your style of your stick figures and how you break down
in your gestures. Because I think that's really, really important and
that's why I've dedicated my time to create this
whole course on it, on this subject
because I think it's something that people overlook. All right guys, I'll
see you in the next one and keep practicing. Okay.
8. Drawing the Twist: You're back. Well guess what? We
have a new lesson here, and this one is on the twist. So what is a twist? I get this question so much. You wouldn't even believe
it. It's, it's very tricky for a lot of people,
artists, aspiring artist, even veteran artists to be able to pull off drawing
a twisting motion. So I'm gonna do my
best in breaking it down as simply and
quickly as I can. I'll show you some demos. I'll show you some I've already done prior to this recording. And then I will
possibly attempt to do some live demos to show you
and put it into practice. So basically the twist. All it is is imagine you're taking a towel and you
are wringing it out. You're twisting one. You have in both hands,
one on top of the other. You're twisting one
hand and one direction. The other in the
other direction. Well, that's kind of how your, your, your body
would move, right? At least your sketch.
You will have, let's see, you'd have one
non right layer here. You'd have one going
in this direction. Let's thicken this
up a little bit. So yeah, so if we had a
straight line, right. This is your feet. This is your head, in
your opinion, right? But let's say that
you wanted to twist. Alright, so how
would you do that? How would you be able to make the body seem as though
it's twist, twist it. So let's go ahead
and I'll show you a few examples there
very quickly done. But they get the point across. So we can move on
to this one here. So let me go ahead
and change the color. Alright, so for this twist, we have an action
line here, right? And then we have pelvis here. Then we have an angle
here for the chest. Okay. So this is the upper
portion, the upper mass. This is the lower-mass
and this is his head. Okay. So how did
we show a twist? Well, let's, let's
break it down. What's the best way to do this? I'm just going to
lower the opacity. Keep it on here. Maybe even lower the opacity
on these kinda show you. Okay, so let's go jump
up to our new layer. And this will be a really quick demo and then
we'll jump into some more. So imagine this is the
backside of the character. Alright? So we have one
leg moving forward, one leg coming back, alright? But the character is swiping or doing something
that's behind them. So they're turning around to
look at an object over here. Okay, so one of the ways
that you do that is, well, let's go back
to our basics. We have our torso, right? Then we have our pelvis. So what I like to do is if you were to imagine
this like a box, the cube, almost, right? Okay. Well what I would do is since it has four
sides, alright? We'll call it this
point, this point. This point, this point. What I would do
is I would attach a string from this
one to the front one, this one to the back one. Went to the front one.
This one to the document. Okay? So what's happening
is you're twisting these. So if this string here, we're to move over here, right? That would mean that this side of that box
would move over here. And then it would
extend over here. And you're just
keeping it simple. Then this one would go front. Because when you go back, this one would go to the back. So let's put it into practice. So we're going to draw, okay, so we have one hip
going this way, right? We want to draw this
point this way. So how do I explain this? I will just try and draw
and talk at the same time. But what I would do is
I would just create the shape of the upper torso. Imagine it connecting
organically, put an arm here. Right. Then I would imagine it has
other arm is down here. You're just seeing the fist, his or her doesn't matter. You can you can change
this to any one you want. And then I would, to sell it a little bit more. I would draw a head here
looking this way, right? So then you can see that this character is twisting
in this direction. So now if we were
to go a little bit further on this, well, again, you'll be doing this
a lot when you're drawing is I will take, see, I will lower the
opacity on these. Might even get rid
of this layer here. Just so we can see it more. So now that I have my
guidelines and my information, if I were to dive into this and go into the details
a little bit more, I would basically, you know
what, let's do it like this. It's sometimes easier for me to, to invert and change the
background to a darker color. Let's say give me
like a dark blue. Okay? So then what
I can do is I can increase the opacity here. And this helps my eye to
focus on the objective. Then what I would do is
come here and draw with a lighter color and make sure
we're on the right layer. Then we go. So if I were to want to sculpt and flesh
this character out, well, what I would do
is remember my anatomy, that we have a shoulder
here, chest here. Now you're not going to
see all that chest because he's turning around
this way, right. Then you're going to see just it's also
kind of an up-shot. So you're just going to
see some of his arm. The lower arm. We can add some fingers. Make it look like he's
shooting some sort of powers out or whatever,
sweating someone away. Then what I would do is make it look a little
bit more dynamic. I would tilt his head. At this point, I'm still
sculpting and molding, so I'm not too worried about
how clean the lines are. Then making sure that
I show this other end, I'll make it a fist. Now you could play around and change the head tilt and straighten
it up a little bit. Whatever works best and
whatever you end up landing on, stick with it. Don't
over-complicate it. And so what's happening
here is I'm just kind of maneuvering everything so it looks like it's
organically twisting around. Now, in real life, is
this a possible position? Maybe, maybe not. It depends on who you're asking. I mean, you might
have a contortionist, but we are exaggerating. This is a comic form. We're not drawing, at least
to me when I draw comics. For me, it's really basic
too much on realism. I base it on fantasy
and mythology. Um, but you want to be able to sell enough
where it's kinda believable. You want to be able
to make it look dynamic and make it look like there's some
action taken place. Then what you can do now
that we have this sketch is we could just invert this. Alright? And then
I can take it back to that other background
which was white. Then we can get rid
of the under drawing. It would be this one. We don't have to keep it
inverted anymore. We have we're back to our
original bluish color. Then I can just lower the
opacity on this, right? And then I can think,
okay, does this work? This is where your problem-solving
abilities come in. And you can see like there's a lot of
things that could work, but there's a lot of things
that look a little bit wonky. So I can do a little bit of
checking and balancing here. So checks and balances
are really important. So I could reverse it
like this and say, okay, well, it's kind of okay, but let's see if we can make
it a little bit better. And one of the things
I would probably do is mess around with
this arm a little bit. So I'm going to shrink it down, see how it looks. One large, I'm going to
tilt it up a little. Math, not feeling it.
You could do that. It doesn't really matter.
That's too small. But I like to do this. A lot of artists like Jim Lee in traditional
artists like myself. A lot of times what
we'll do is we'll take a little sticky note or a little scrap
paper and we'll draw different arms are
heads and we'll put over like imagine this is like a sticky paper or a
scrap sheet of paper. We would draw another arm and then position it and
see what worked. And he just try
different things out. But digitally have the
advantage of being able to cut and move things around
and enlarge them. So it does save you a
little bit of time. There are some advantages
to working digitally. A lot of artists also
draw digitally layouts. They work digitally
and then they go ahead and use a light table, the printout that
digital sketch. And then they'll
use a light table and we'll trace over
with their pencils. So that's something that
you can keep in mind too. So going back to this, I'm just going to flop
it over one more time. And I'm gonna go ahead and
change this head a little bit. Let's see. Since hope so I got the white
on here, the back. Since we have we're not
seeing much of the chest. The chest it's
furthest away from us. I'm just going to try and move this arm a little bit closer, pull this in a little bit
more, and just play around. I don't like any
of this right now. So let's go ahead and reverse. Lot of times you can backtrack. And this is where true
problem-solving comes in, right? So you're, you're trying to, you have the problem now you're trying to
find the solution. Without overthinking. What I'll do now is I'll come
in with like a red color. And I'll try and make
some adjustments that I think might help. See. Might start his neck here. It head back a little bit. Then, since his chest is stressing, we're not going to see
too much musculature or it's not gonna be flexed. Then we have this shoulder here. What we wanna do is we
want to resize things. Now I can see that this
arm is just way too long, which I kinda thought so. But you can, a lot of times you won't even see the
errors until later. Which can be kind
of discouraging because you might spend a lot of time drawing something that
you think is working out, only define that in the end. It was wrong. And you
have to accept that. Take your, your L, learn from it and pick up the pencil and start
all over and look pale. And that's honestly,
it's a gift. The more failures and the more times you
mess up your art, as long as you're
learning from it. It's actually good. Because it doesn't take too
much time to fail. And it doesn't take much
time to learn from it. And then you apply what you learn and
you just keep going. Okay. So I'm still
trying to figure out, okay, how does this arm go? I don't like this under
drawling too much. It's kinda distracting me. So I'm just going to lower
down a little bit more. And let's see what
I can do here. If I was drawing a
stick figure still, I would probably put
his hand re-run here. A generic hand. Overlap it, which gives it a
little foreshortened look. Just kinda play around
until you have a, you come up with a pose. It kinda works for you. That's one way to
do a twist, right? And this was just a
very practical example. So all I did here
was just shorten, foreshortened the
arm a little bit. And foreshortening is
when you just move it towards the camera
a little bit more. So just to give you a quick lesson so you
guys aren't confused. If this was your horizon line, and I hope you know a little bit of the basics of perspective. You have a vanishing
point, right? So from this vanishing points and everything is
directed towards it. So in this case the vanishing point would be his shoulder. Ok. And so from that
vanishing point, you can draw lines going towards that and
then some vertical lines. You can actually make a
cubical shape, right? Ultimately. Then within that, we can do is you can a fist create a couple of
cylinders and work their, work their way back to the arm. Remembering that what's
closer to the arm, which is further away from us, is going to be a bit smaller. And what's closer to the camera, which is closer to us, is gonna be, appear
to be bigger, right? And then you just do
that and you shape it until you get just about
where you want it. And then there you go. This is just very, very quick demo, but we're going to get a
little bit deeper here. So let's go ahead and
get rid of these. And I had some other things on here before I move on. We go. Okay. This was just oh, I think I was just I was playing around with
this earlier and thinking, how can I teach this in a way
that's easy to understand? What I did is I drew some very generic
stick figures or basic gestures of someone
just standing straight up. And then what I tried
to do is within them, I tried to create, actually let me darken
this in a little bit. Try to create a little
bit of a twist. Yeah. Okay. So we'll start let me let me just
kinda talk through it here. So same thing, same concept. We have a teach on a new layer. So we have a character standing straight up right
here in front of us. And then we have a character
that's starting to twist. And what I did was I just
kinda formed this S-shape. Then we have a stronger
twist which would be kinda like we have one
movement going this way. The arm going this way,
leg going this way. And then you have this upper
body is twisting this way. And then this pelvis
is twisting this way. When we get rid of all this, we lower the opacity. And then we just add in a
couple of drawing details. You can see where you can
create from all this, right? And this all just came
from imagination. Just meet, practicing
and playing around. Just kinda thinking of
how can I teach this to my students in a way that's
kind of easy to understand. So this is one method
that came up with is just take the basics
of a character, a basic gesture sketch
like this to the left here and this one here. And just kind of practice
and twisting and turning. Now remember, if we were to
make this three-dimensional, we'd have a couple of
strings attaching it. If we were talking
about the strings, we'd have one connecting here. Alright? Same thing here. These strings, one
would be up front, one be here and there, just twisting and turning, right with the with the with the figure that
you're drawing. I'll give you guys this stuff in templates and stuff so
you can kinda look at it. But I wouldn't go a
little bit deeper on this because this is just
scratching the surface. Let's see what else do
we get rid of all this. Okay? Don't really
need this anymore. Think that it just go back. Okay? So I'm just going to do some live examples of twisting. Okay, This is just
the bare minimum. This is the kind of clean,
quote unquote lines. So I'll give this to you. If you think it would help. I think it might. Okay.
So let's get out of here. Let's go ahead and start
a whole new layer. And what I'm gonna
do is my typical, what I like to do when I'm
practicing is I like to invert and I like to change the background to
a darker color, not always black, kind
of a dark blue will suffice. So that's black. This is a dark blue. And I like to use
a white pencil. And now we have a new
clean slate of paper, clean sheet of paper, clean slate, whatever
you wanna call it. So our objective is
to draw the twist. So let's see. So if I were to imagine
a twisting form, I'm just I'm just spit
balling here for myself to get the to get warmed up. Okay, so here's
what I'm gonna do. I'm going to draw a
basic stick figure. Let's see what's a
good twisting motion. Let's say girl standing up, Let's say like, okay, we have an upper torso
right here. I have a lower. Now. We'd have one
leg somewhere here, maybe one leg this way. And then what I'm
going to try and do is twist this in a way that's almost too close, resembling the last
one I did hold on 1 s. Bear with me. Even
veteran artists and people who draw a time. They wanted to use a
little rainfall eggs. And let's see, I'm
doing this live. Now. I'll probably come back
and re-edit or maybe do another version where I have
something in front of me. But let's see. Trying
to think of, you know, who's really good at
twisting and turning was, and is, marks the best tree did a lot of really good twists. Let's see, I'm
trying to formulate an image in my mind. Okay. Let's say that we have I'm just bear with me if I get quiet. What I'm going to try and do is have twist going this way, twist going this way. And then we'll have the
head going like this, will have the body
going like this. And the day in the life
of an artist from it. Always trying to
figure things out. You don't want to
reinvent the wheel, but you want to learn to be able to draw the wheel
and many different ways. All I'm trying to do here is imagine a character
kinda leaping and emotion where they're either shooting their race or a weapon towards
someone behind them. And it also conveys a
little bit of action. So what I would do here is
I'm just going to erase. For those who are using pencil
and paper, you can just, if you're drawing along, you don't have to watch
and then practice later. I'm just going to erase
this to deployment where I leave just a kinda
residue behind. So I can work from
it. So small size of this Canvas I'm
using is massive. That's the problem. Alright, so here we go. Now we have kind of an
outline of a gesture. And now we can just jump in. And at this point, what you wanna do is you
want to find your anchors. An anchor is a point that
isn't going to move. It's something like, well, we have our head could
be an anchor right? Then we know that this
is the, there's a twist. This would be the characters
right leg, right? And then this other leg
would be coming backwards. Then. Now what we're
trying to do is convey an arm and just show it like this character is
looking behind her. Whoever you wanted to do. I'm drawing a male figure, but you can choose
whatever you want. On the other shoulder over here and draw a flying
cat for all I care. Doc or a panda bear. It doesn't matter. The concepts and the
principles are all the same. Okay, so now I might actually
turn this into a female. I don't know. It kind of reminds me of deal, either Tomb Raider or
which blade type thing. So I'm just trying to capture the elements
that I want to keep. I'm not worried about
the final details. This is just a simple. Kind of a layout.
And the purpose of this stage is to find
out, does this work? Does, is this
something that conveys what you're trying to show? And then what I would do now is reduce it a little bit
and just keep going. Now I'd probably won't finish
this one because obviously, I know your time is
valuable, excuse me. And this isn't really a course
on doing final sketches. But I do want to get enough to where you can kinda
see it coming to life. So here we go. Shoulder here. Now, it's still at this stage. I don't draw too
much of the anatomy. I'm just trying to get
the shapes down. Then. We know that this is
the front of the leg. So we're drawing cylinders. We look kind of like
this right ankle. Then this would connect
to the socket of the hip. Same thing here. This would
be a cylinder going back. This way. There will be a break for the
knee in another cylinder. Then the fluids,
which would probably be the best way to
draw this foot. Almost when I'm drawing a
foot that I know that I'm not putting too much
effort into yet because I don't know
if this is the final. I'll just draw it like an arrow. Then I can shape it out later. Okay, So then we
have this twist. So we want to convey. So remember that if we look
up right at the character, we know that the stomach
is somewhere here, right? So we want that stomach
twisting upwards. But then it's going
into this ribcage. And it's a really, really
tough twist to do. It's almost like I could
do this twist, right? But that doesn't
mean no one can, and that doesn't mean it can't
happen in Congress. Okay. So now we're kind
of getting are, we can see the character
coming together a little bit. And so what I would
probably do at this stage is kinda find the attitude
of the character. And now I think I'm just
gonna go with a female. So to do that, I'm just drawing in some
wispy lines, long wavy lines. I'm not worried
about details yet. Then I will draw. The eyes will fall. And when I'm trying
to do is just line these eyes up at the top. So up here, I'll
draw, draw a couple. I hear no details yet. And since she's
moving backwards, you got to think of some
that hair is going to be flowing this way, right? Going to be flowing
with her movement. And then keeping it
all very general. This is how I this is my process and what I say a lot and I've probably
mentioned it already in this course a few times. Is always keep
your pencil moving because you don't want to stagnate and you'll want
to start overthinking. Because once you get into
that stage of overthinking, you get into the analysis
to paralysis stage where you kind of slip into
your logical mind. And you can't see
it from that point. It's very hard to problem-solve. So when you're doing this, you're a little
bit more creative. You're kind of going
with the flow a little bit and you're thinking, Okay, well how can
I've finished this up? I'm just going to imagine that she's got like she's pulling. Imagine, boom, boom, boom. I'm just making sound
effects in my head. And again, I didn't
think about this sketch. I didn't have any reference. And it's just for
the sake of drawing on the spot and kinda
coming up with a character. Now one way that
I can check this is I could lower the
opacity a little bit. I'm just going to get rid
of the under drawings here. Let's see. You know what? I'm just going to
combine them both. Because I can ultimately
lower the opacity. And then what I'll do is I'm just going to check my work by inverting and then change
back to the white background. And then it gives me a layout. I can look back at. Now at this stage, I would just kinda stand
back and take a, take a closer look. I'm just going to
try and find this color so I can stick with it. Actually. Trying to find the darkest might be written
in this region here. I'll just stick with that works. And so at this stage, I would probably personally took a break and go
get a drink of water, do some stretches, do some push ups,
whatever, keep myself. And that's another thing. When you're an artist,
you don't want to be sedentary for too long. You want to get up
and move around. But that's what I
would probably do. I would just get
up, get some water, give my brain a little rest, and then come back and
take another look at this. And then after I came
back and looked, I would just lower the
opacity or erased it. If I'm doing it on paper,
one of the Continue. And then I would just
think to myself, okay, what can I do to
make this kind of pop? And then I will just start
working on some details. I'll just zoom in on the face. And since I have the information
where I want, the eyes, just come in and start
working on that. Then if I am able to
get lucky enough to capture the life
of the character, right, then I would probably come back in and put
more effort into this. Since this is just a demo. I don't foresee myself
doing too much with this. And I'm just trying to
find the anchor points. And when I say anchor points, what I mean is if you haven't, I, you can basically
tell where the nose is. If you haven't noticed, is if
you know where the nose is, you can you can basically tell where the
mouth before, right? And so on and so forth. And then from this, I can kinda see where either the ear would
fall right on here. The chain would fall
somewhere around there. Then her head. If I'm just trying to
capture the shapes, will not be this big. Now this head looks a
little bit distorted to me. So I would, at this point, I would say that
this is not working. Come back in and erase
it and try it again. This is just part
of being an artist. So if I really wanted
to tighten this up, I would just try and get
my general shapes, right. I tried to get my
head shape in here. And then from there I can
put it in the eye socket. Says my battery is low. On my pencil, I guess. I'll have to there's
just less than soon. But yeah. If you're
still watching this, I'm proud of you because
you're trying to learn. You're serious about learning. But also like, I want
you to see that even though when you look at any kind of social
media platform, everything looks so easy, right? Everything looks like it's so natural for an
artist to draw. But you don't get
to see all the, all of the struggles and all the glitches and the
errors because those are usually omitted or the
cameras sped up so fast that you don't see any
kind of thought process. You just see the outcome. And so when you run into
situations where you're struggling with a piece and you want to give
up or whatever, just remind yourself
that what you're going through, everyone
goes through it. Even the best, the
best of the best. So what I'm trying to do now is just give her some solid form. Kinda find all the hips
would be like this. This would connect to her leg. Might even shorten
this leg a little bit. Then I don't really have to then draw the lower lake overlapping. Now one of the
reasons I overlap is the show depth and show that this leg is indeed in
front of the other leg. Now from here, basically, just keep doing the same
process over and over and over again until I get
where I want it to be. And then once I'm happy, I just at that point, I would just dive right
into the details. So what I'm trying to do is give her a side view of
our hands like this. Then on top, put it in a weapon of whatever
choice you want. And then of course, when you're really drawing things like this, it could be trying
to keep it real. You would want to use some
reference to do that. And then coming up, I think in our next, next lesson or maybe
next two lessons, we are going to start
drawing from reference. And then we're just
going to show you the value of drawing from reference and the
importance of it. But right now, I'm just trying to piece
this one together. And that's really what
it comes down to. You're just constantly piecing things together,
trying things out. Now. I'm just going to give her some hair coming
forward like this. And so I hope you guys are
gaining something from this because this is really just
impromptu teaching here. As if you were here
in my studio with me. This is something that I
would literally be doing when I'm figuring
out my r. Okay? So then what I would
do at this stage is lower the opacity
it one more time. Probably check this out,
see how this looks. Ok. Now I can, I can see like, okay, that's decent enough. Of course, I still need to
work on this foot here, which comes down to
finding different shapes. What else? I have enough
where I can generally say, okay, this could work. Even though she's not even
close to being finished here. I can, I can kinda conceptualize that there is
a way to do this sketch. And what I would do is just
popped in this one again, lower the opacity, then
create another layer. And it's a process like that. So this is the actual process. Then I would just come in with a dark bled like I have here. And from here on out, I would probably just
get a little bit more bold and confident
with my lines. And try and find the things that I would give her
like a belt loop here. Just try to find the things
I want to keep about this. Still kinda keeping it rough, but confidence starts going up when you start seeing
it come together. And I'd probably
shrink down her arm, the shoulder size a little bit. This is the stage
that you want to do that you want to keep before you start diving into your rendering and
all that stuff, you want to get your
proportions right? Like this shoulder over
here is massively big and the arms further
away so you don't want it to doesn't have
to be much smaller, but you don't want
it to look bigger than the arm that's
closer to you. Then I would dive in and
try and capture a little bit more of her
character in the eyes. Getting the eyes down
to a point where you can actually put
some licenses character. It starts making a
difference. Right? Now I have a course that
I'm working on teaching. Now this looks a
little cross-eyed, but I'll probably, I'll
come back and fix it. I have a course that
I'm working on. I've three more
courses coming up. This is just the first
that I think is the most important before you move on
getting your gestures down. But yeah, I have a
whole course on faces. I have a course on
composition and layout, drawing multiple characters and drawing them in perspective. Then what else do I have? I have a lot of
courses in the works. I've done a lot of
recording to just have to sift through them and edit
and all that good stuff. But for now, this one
is very, very valuable. I think it took
me a long time to realize how important
gestures are. And I'm hoping that I
can save you a lot of time and help you grow as an artist by showing
you this upfront. Showing you the
techniques that I use personally. Here's the thing. One day I'm using this
technique and then I might discover a
new way to do it. And I'll come back
and I'll create another video for you
on this same course. And you know what, I know what the problem is. I didn't have my given me the
whole low battery signal. I just plugged it
in, so no worries. Okay. So there we go. There's a little face. So now I can think, okay, She's looks like
she's battle ready. She's in motion. Is it perfect? No, not by any means. Is it something that I'm
happy with this show you because impromptu and I just
came up with it for you. Yeah, I think
that's a good thing because you can see
the creative process. Now, we're going to stop here because I think
this video is running pretty long and I have so
much more to share with you. So yeah, Let's just
end this here. If you have any
questions on this, let me know if I do finish
this sketch or ticket further. I'll just post it in a
group or something like that or share a
template or whatever. But this is just
really, I just wanted you guys to see a little
bit behind the scenes. So you can see like even for me, someone who draws every single
day, for hours, every day. Even I struggle with certain
poses and things like that. So I want to humanize
this for you. So I hopefully I was
able to accomplish that and I will see
you in the next one. Okay. Keep it up, keep
practicing and hang tight. We'll be in the
next video shortly.
9. Step by Step Practice and Application: Okay, welcome back,
and here we go. So as you can see by the little handwritten title
on the top corner here, this is a drawing, a
character step-by-step. So you guys, if
you follow my art, you've probably seen
this sketch already, but I just wanted to show
you the process of it. And it's basically this
is how I started out. So I'm just going to go
step-by-step and remember earlier in the lesson
before saying, Be sure to label
your sketches from, instead of having these numbers
one through blah, blah, blah, label them individually. Well, hey, I didn't do this
and this was a while back, but I've learned since then. But let's just start. Luckily, I started from one layer from the bottom
and work my way up. So it kinda works out. No big deal. Okay? So layer one, we have
the gesture, right? So first step is
draw your gesture. Then secondly, I started to
flesh out the gesture, right? And just try and keep. What I was trying
to accomplish was a little bit movement of
this character walking. Now, looking at this character and this will happen
to you a lot as well. I can see a lot of things
I would make changes on. But overall, I feel like this works enough to
give a solid lesson on this topic of
just kind of going step-by-step and
developing your character from beginning to the end. So then the next layer, I believe, Let's go ahead. Yeah, I just kind of outlined
them a little bit more, but this time dove a little
bit deeper into the anatomy. Not too much, but just enough. Then let's see. Okay. I started outlining a
little bit with a pencil. So if we were to remove this, we would see that's a
little bit cleaner. Right? I'm just going to
keep them all on for the sake of showing you. And then I started
adding some elements to show the character
that was trying to draw. And in this case it's Scorpion, want to Spider-Man, arc
enemies or arch enemies. And so then the
next one would be, I did kind of a quick
gesture of his tail, how I would perceive it. And I wanted to, I wanted to
kind of go in front of him. And then I kind of worked
a little bit more on that. Said tail added some lines and details and I was
just practicing with this and making it look kind of like a thinner type
tail, maybe robotic. And then let's see what
does this line here, okay, these are the stripes on his
costume and maybe we can lose a few of these
under drawings here. Keep that. Oh, we got C. I should have labeled these. So here we go. This
would be what I would consider a clean
sketch where we have all the elements we need
and we can kinda zoom in. I have the face that I
wanted to draw on him, the tail moving forward and I just wanted to keep
some fluidity and some movement into this art on the y that's trying to
get rid of the red here. Okay? And then let's move
on to the next one. Okay, so now I started
trying to find my my shades. So here let me just
give you a demo. I was oops, four here. Okay. I was imagining the light
source from a peer. And I don't know how
familiar you are with light and creating
shadows and stuff like that. But I'll give you an overview and then we'll have
a whole course on this stuff coming up. But if this were a
light bulb, right? And it's shining down above
and behind the character. That would mean,
is that anything that this light touches
won't have shadow on it. Right. So if it touches his top of the shoulder or
the back of his head or anything that's
close to that light. You're gonna do a
couple of things in terms of line weight, which I don t think I demo
on this one too Well. Line weight would be very
thin when it's touching the light and heavier when it's further
away from the light. And there wouldn't be any cast shadow or any kind of shadow where
the light is shining. It's like when you
take a flashlight and you shine it onto something, you're removing the
shadows, right. Top of his tail here. Even here, which, you know, it's, it's really up for grabs. I could have shaded this in. If I wanted to write, it wouldn't have hurt. Okay. But I didn't and that's
that's fine. That was on me. I could have even shaded
more in on his chest. Right? I did. That was just a decision I made. I wasn't putting too
much effort into this butt. You get the point. So let's go ahead
and remove that. Then let's go, Let's keep
climbing up our ladder here. So then I started
adding some details. And that's probably
why I didn't add too much shade because
I wanted to leave some room for some details. And then I put some basic values and shades here just to kinda
contrast the character. And then let's see what's next. Well, this is where I
added a little bit color. Now, just to remind you, I am by no means a digital
artist or colorist. In fact, whenever I do any
kind of a colored work, I'll usually hand
it off to another professional and
collaborate with them. So I do teach myself
occasionally, but it's not my forte. Then. Let's see here. Okay, some elements. I headed some effects where
I was just playing around. So I added some kind of venom, maybe leaking out the
tip of his tail and some blood coming out of his
mouth and stuff like that. But nothing extreme. Just just for me to kind of play around and
have fun with. And that is my character, right? That's my character drawling
from beginning to end. And I hope, I hope
that kinda gives you a little bit of insight and behind the scenes kind of stuff. A couple of things
that you could do if you were doing
something similar to this, in hindsight is
always 2020, right? A couple of things that
I would probably do is I would probably add more
shadows upfront, right? Even darken this area here. And I probably blacken it out. I'd probably even
add some shadows here and darken this
in a little bit more. And just kind of make it
pop a little bit more. And I might even do something
like change the background. If I were, you know, I don't know what color
I'd go maybe with a reddish color
and pop them out. Green or even yellow. I mean, you'd have to
find something that works that complements
what you put down. I wouldn't do any
type of a green, I'll think because that would just kinda
make him blend in. So we do something that
was a complimentary color to whatever it was I was
trying to pull off, right. Whatever character. And that's a whole different ball game. And that's something that
I would even teach at this point because it's
something I'm still learning. But when I trust
me, when I get to the point where I'm
feeling confident enough in color spectrum and teaching how colors
work with one another. I will certainly
make a course in it, but not until I feel like I have a little bit of
a I'm a little bit of authority on that
issue or that topic. Okay. So that's, that's that. So I will, if you want, I can give you a
template on all this. Let's go ahead and bring
that back to white, just make it easier on the eye. And we will remove
this layer here. And if you guys want, I can give you a template
breakdown on how I sketch this. It would be a lot of
different templates. So maybe I can just
make one PDF out of it, just going from one through 13 or 14 or whatever
it turns out to be. And if that's something if I don't give you
enough on this one, let me know if you
want all the layers, I'd be happy to
share them with you. Okay, so that's it. That's a quick gesture to
finish sketch for you. So I hope it helps reach out to me if you have
any questions like always, show me your work. If you've done something
similar to this or if you have any process sketches
that you want me to review, let me know. That's what I'm here for.
I'm not just an instructor, I'm also an art coach or mentor. Have lots of students that
work under me that I'm always, for the past three plus years, I've been watching them
grow and as artists. And I'm just, I'm amazed. I want that for you as well. So keep it up and I will
see you on the next one.
10. Fleshing out the Character : Hey, welcome back. And so what we're
gonna do now is, like I said in the
last, the last video, our last lesson, we are going to just pick random
sketches from this, this page of gestures. Then what I'll do is I'll
remove or I'll move them to a new page and then
we will kind of work. I'll show you how you can
start fleshing out a, a character from gesture to a more developed,
fleshed out. Whoever your drawling, it could be Spiderman like in this case. I believe that I'm just
gonna go with Spiderman. Let's, let's give it a shot. So think I did this right? And then we'll jump here. I'm just going to enlarge it. And what I like to do, as I've mentioned
in other lessons, is I like to invert everything. So I'm just going
to invert this. And I'm just going to
change the background. Let's go with Let's
go to the black. Actually, dark blue is fine. Then what I can do now is I can draw right
on top of this. So let's just go ahead and instead of
reducing the opacity, I will just erase it as
if I were drawing with pencil and paper because I don't know if I'm gonna
do on this actual course, but most of the time I'm drawing and if you
look at my opinion, I'm a pencil or by nature. And I like traditional medium. I like drawing with
pencil on paper. But for the sake of teaching
and things like that, I really do appreciate the, the abilities that digital
sketching has to offer. So let's go ahead
and increase this. Maybe I'll make some videos with some pencil sketching
just so you can see because it is different, like the principles
are the same, but the outcome
usually comes out a little bit different,
differently. Alright, so we're imagining
that this is Spider-Man. So I'll do a couple of things. I will rework this and just kinda find the shapes
and cylinders. I probably went through
this too much on my own. But since you're watching, I'm just trying to kinda
show you my thought process. I'll do it. So I'm imagining that
has upper torsos here connecting with his
lower torso here. Okay. Then this shoulder
this side would have a hole for his
shoulder, right? So then what I would do is
just draw a cylinder here. I like to leave a little space if I'm stretching out the arm, draw another cylinder as if
it were going away from us. And then we can just draw
a shape for our hand, which we can, we can
alter and change later. Then what I would do is
on this other arm here, I would pop the
shoulder out like that just to show that
there is a shoulder. And then I think I raise
this arm up like that. So now with this hand here, I have the option
of putting a thumb, which when I draw my
hand, you'll see I do it. If I'm doing an open hand, I'll do one circle. And then inside I'll draw another circle representing
his thumb, right? And then from here, I'll represent this
will be his fingers. And so I could draw
something like this and you can just draw a
stick figure fingers. You can alter it until
it's about where you want. I don't particularly like this. So I will go ahead and
actually, let's see. I'll leave it like
this and come back and decide if I want
him having a fist. What I want him to be
doing with this hand. Now, this hand here, I think what I'm going for, and to sell it a
little bit more, I might bend his risk down. Like this. It gives it more of an intense. By. Then I can just imagine that that's a web
going through, right? And all this stuff is
subject to be gone later. Like you don't have to keep it. But just for the sake
of conveying and providing information to your
own brain, you'll forget. I like to draw all
this stuff in there. So I'm not really worried
about the anatomy yet. All I'm doing is
putting my shapes and I'm projecting
his foot here. Since it's his right foot, I'm going to have
the curve coming inward then because
we're looking up at it. And then I'm just going
to draw a cylinder here. Alright, and then it has
this little knee area. And then another cylinder here. Same thing here. I'll draw a cylinder popping out
for his other leg, his knee, and then another
cylinder coming back. And then I'll throw this one in. And then this foot, since it's foreshortened, will
appear smaller. And then at this stage, we can start thinking, okay, how are the muscles
is going to work? If I want to add a
lot of musculature, I can, or if I want
to keep it very clean and sleek,
can do that too. So now let's see, where would I go? I think I would zoom in and kind of just pencil and where I think his eyes would be
something like this. Not to worry if I get it right and then I'm going
to raise this shoulder up here and then connect the
shoulder down to his lat. And hopefully you
know these muscles. You don't have to known by name, but you should know them by
nature, like where they go. Then I'm just going to drop this shoulder down here because I think
it's way too high. And actually let me
just do it here. Let me pop this shoulder,
re around here. And I'm just trying to imagine
how things would look. Now this is an
interesting angle. So we're seeing the
bottom of his arm, which would be the
tricep, right. And we're seeing this
muscle over here. We don't even see the bicep. And the bicep is just the the larger
rounder muscle when it's contracted,
but stretched out, elongated right now and extended and we're not
even seeing it because it's actually facing him,
facing the character. Okay, so then now I'm
just kind of working out a few of the solutions and details of how I want the
overall character to look. Now, I'm going to imagine
that he's got that overlapping muscle here and it's going to split
up over here. And then he's going to have, now you probably won't even see these muscles when
all is said and done because he's wearing
a full body costume. But it's good for me to kinda know where things are so I can proportion
everything accurately, as accurately as possible. Now, I'm not gonna
do much from here down because he stretched
out, elongated. We're not going to see too much of his abs because they're
gonna be covered, right? So I'm gonna imagine that if
I were drawing his costume, it comes down to a point, right? He's got that little belt thing. This is the classic version. Then he would come up here and just kinda follow
along his body. Now, I'm still looking
at this left hand. I'm just thinking I'm
just going to make a fist and I'm not getting
into details on it, I'm just kinda shaping it out. As an artist. One of
the things I've learned is to see things and shapes
rather than details. At least initially. And then you can work from them. And then you can
start fine-tuning and adding your details. But initially everything
starts with the shapes. So now we have this, I'm going to work on
this leg here first. Let's see. Since it's going upwards, I'm gonna imagine
his ankles here. Now I'm just going
to finally draw a, well, we call it his shin bone. You won't see the other ankle because it's on the
other side of the foot, but I will draw on a heel. I'll widen this foot
up here a little bit. Then when I'm coming up
to his calf muscles, I'll round it out. And then I will bring
his knee to right about here and just kind
of project it back. Now, since this leg is foreshortened and
it's coming towards us, I'm going to just add
a little bit of shape, bowing out like this, and then bowing
inwards like this. Now I'm going to kind of protect it towards the slot of his. If this were an action figure, like I'm putting the leg
inside of that open slot. But then what I'm gonna
do is kinda give him a shape here to show
his glute muscle behind that you're
not going to see much of but just kinda cells
at a little bit more. And then I'll drop down to this other leg and
I have this thing. And if you've taken my anatomy class and I'll mention
that as often. Is that from right. Here where the hip bone
connects to the upper ribcage, I usually draw a line towards the knee representing this
whole overlap of a muscle. Alright. Like if I were
doing it from here, I would just overlap like this. So you wouldn't even see
much of his top of muscles, but you would see more
of his hamstrings, which are the muscles
behind the leg. And then same thing. I'm imagining his leg
going into a slot. And then you're seeing a
little bit his hips here. Then to sell it to myself, what I'll do is I'll take a line straight down the
middle of this leg, which I'll erase later. But it kinda gives me, it's almost like an
action line so I can see, okay, this leg is
being towards us. We've got this kneecap here. Now you're not going
to see much tension in the muscle or you're not
gonna see much contraction, I should say, because this
leg is stretched out. So you don't have to worry
about too much of the details, but coming back in towards
his lower leg here has Shin. I'm going to draw this in. I'm gonna put his foot
right about here. The heel curve this in. We're not going to
see too much of it. Then what I'm gonna do is imagine that this is
the top of his boots. And allow this will be
hidden by this leg. So you're not going to see much of that lower layer because it's pushed up against
his upper lake. Right. And then if you wanted to, on the outside of this up
his right leg facing us. You could add a little bit
more dimension like that. What I tried to remember
is that a lot of times like one muscle will be
higher than the other. So the inside of his leg here would be lower than
this outside calf, right. And these are just
little nuances to remember when you're drawing. Really just, I just advise you to study the heck
out of anatomy. And it doesn't have
to be perfect. Don't be a stickler for trying to get every
single muscle perfect, make it believable, at least, or at least consistent, right? Okay, So then what I'll do here is I'm just going to develop the ribcage
a little bit more. I'm going to pop this
chest muscle out off the body a little bit to show it like he has
some trust muscle, even though It's stretched back, it's not gonna be
flexed to kinda like the bicep or anything
else where the leg, it's not gonna be
bulky or anything. You might not even
see too much of a shoulder because
of this angle. Right? So I'm imagining
his neck is here. And now you can try different
angles of his head. You could, and it's
perfectly fine. You can turn his head
to any way you want. You can even put his head
over here if you wanted to write or over here, or you can have them
looking this way. But I think for the
sake of this one, my initial my initial
instinct was to put it here. So I'm just following
through with that. Now. I can always
change that later. Okay. So I've got
the ribcage in. I've got the anatomy and enough to where
I can work with it. This is basically how I would
just put a sketch together. Then you can come in and
zoom in here and just like, alright, I got this
spider thing here. You just put the information that you want to
get too detailed. Okay, so now at this stage, I could just kind of, um, well, I could just reverse the invert inverted layer here and then go back to the background and
change that to white. And then we have kind of
a more traditional look. Something that we can work with. I can decide, hey, do I wanted to make this body longer or do I want to
make any adjustments? And you can always do that. I probably won't get into a really finished sketch because that's not what
this course is about. I'm just trying to show
you how you can take your small gestures and turn them into a
formidable character. So let's see. What I'll do now is
I'll just jump to this layer and I
will go ahead and overlap the the under drawing hair with a
little bit of line work. This is just for the sake of
demonstration. Let's see. So I would just capture some
of the muscles that I like. Not too much. A lot of
times when I'm drawing, I always remind myself
that less is more. I don't want to draw
every single muscle. I just want to allude to the fact that there
are muscles here, that this is a
powerful character. And you leave a lot of room
to the imagination that way. And I just think it's
more appealing overall, because if you draw
every single muscle and I used to do that when I was younger because I was
like flexing like, Hey, I know this muscle, I know where this goes and but you're doing
yourself a disservice. You're also doing your audience a disservice because
you're taking away from that fun of using the imagination and building
and putting things together. And it kinda just looks crazy at the end, at
least for me it did. I mean, if you have a way to pull off where it looks good, go for it. I'm all for that. It's something that you're just doing because you think
you're supposed to do it. I say less is more and
just allude to things. Unless you're drawing
some like crazed out character that's
like, what's his name? Bain from Batman or something where there's
reduced the size of this head banging or
Batman from Batman, where he's like pumping in those toxins into his
blood and he's got, he's all vascular and you might draw a little bit more of the muscles
in that case. So there are exceptions. As you've probably heard like, I like I like to know the rules before you break them because if you're breaking
them intentionally, then it shows if you're breaking them because you're just, you know, you don't
know any better. That also shows okay, I'm not gonna spend too
much more time on this. I think you get the gist
of what I'm doing here. All I'm trying to do at this
point is find the delight, the lines that I would
like to keep it if I were to take this
sketch further. By no means are these
my final lines? I would love to do
a course just from, just drawing from
beginning to end, from conception to the
actual finished piece. But the problem with that
is it takes a while. Sometimes even me, I'm a pretty
quick sketcher or artist. But even with me, sometimes a really decent sketch could take several hours. Because you're
problem-solving, you're doing so much at the same
time while you're drawing. Then when you're talking and drawing at the same
time, it's pretty tough. What I could probably
do is time-lapse. And if someone's interested
in that, let me know. I was teaching courses back
in 2020, live courses. And I would do live
demonstrations there. And that was cool. Okay. I'm just going to pop
into this arm here. Again, just trying to
find the shapes at work. Not getting too much
into these details. And maybe even this, this arm might
even be shaded in. For the most part,
I might just end up because it's pushed back. That gives the illusion that
it's further away from us. That and could also
make it smaller. Go up to this arm, this hand up here. So we got his wrist bending. When I'm drawing hands. I like to draw a hexagon here. Or is it a hexagon, or is a no. It's a pentagon,
five by five points. And then draw the
thumb sticking out. And then if I'm really going
to dive into this sketch, I would come back and it's
treating all this stuff out. The little spider envelope here. And then you can come
back and alter this. Then put his eyes and let's say because I changed
the shape of his head, you can even keep his eyes the same size. It
doesn't really matter. And I think that's
about all I'll do now if I really wanted
to go crazy on this. Since this is kind of
still an under drawing, I would just start his webbing, just kind of a guideline for it. This and then just
work my way around. This is very lightly done because I don't want to
get married to anything. Yeah, I don't want to commit to my art just yet
until I feel 100%. I want to move forward. I would just kinda keep
everything very generic. Meaning that I'm not getting
into the webbing details, just kinda placing them
where I think they would go. Pop this fruit in here. And then let's say
what would happen if I were to drop this
under drawing? It looks fine. Now. I would
keep going. Honestly. Workout a lot more lines
and just start adding in my lights and shadows and textures and values
and all that good stuff. But for the sake of showing you, this is just one and I'll
do a couple more examples. So stay tuned and show if you've done this
and if you follow it along, or if you want to go
ahead and try and then show me what
you come up with and show me where
you're struggling with. This is a really good
way to kinda see what you're sticking
points are and where you're having problems. And we'll try and get
through them, okay? Alright guys. Well, I'll
see you in the next one. Thanks for joining and
I'll talk to you soon.
11. Gestures in Real Time: Okay, Let's talk about
gestures a little bit more. So when you're, when you're thinking in
terms of movement, emotion, expression,
all those good things. You're thinking in
terms of gestures. So the gesture is the
it's the underlining or the blueprint of your EarSketch before you even begin
fleshing it out. It's something that's
really, really important. And if we take a look at
a couple of things here, the thing that you're trying
to capture when you're, when you're doing gestures, is you're trying to
capture the mood, the movement, the emotion, the expression, the stance. And then some cases
you can even, you can even identify
certain characters by just a simple gesture, right? Like, like this one here. Actually let me go ahead and open up a new layer because I don't want to
draw on top of this. Okay? So like this one for instance, let's pick something better. Let's go with a, an ink pen. So this obviously, I
would say that that's, I don't want to
say too obviously, but it looks like
Spiderman to me, right? Let's see if there's anymore. You might spot some before I do. Oh, was that I would
say probably Wolverine. This could be Superman. This could be Spider-Man again. This could be sub
Mariner or human torch. So you get a lot of this
when you're sketching. This was kind of
like my quick human. And I really proud of
this one to be honest. This could be Spiderman
crouching down. But you get the gist
of what I'm saying. Here's another one that
could be Wolverine got the claws out, those
little indication. So when you are
sketching gestures, you want to make
sure that, you know, you give yourself enough
information while you're sketching them so that
you create that energy, that momentum that, you know, that kind of drives the
rest of the sketch. That's really the
basics of a gesture. If you're just taking a glance. This one here could be
Spiderman as well, right? Spinning, web,
jumping, whatever. But realistically, you
can take a gesture of almost anyone in any
kind of gesture, or this could be
Spiderman as well. You can take any gesture and you can formulate it into
almost any character. But certain characters have their own distinct movements and agility and things like that. So I like to keep that
in mind when I'm drawing because it's a,
it's a good habit. It's good practice to kind of draw things in such a
way that they resemble the, the character that
you're drawing. Gestures in such a way that they resemble the character that
you're trying to portray. This could be the flash, right? I'm just trying to
identify a few. Now, when I was drawing this, this could be a flash as well. I wasn't really thinking of
any particular character. I was just drawing
general iconic poses, ones that you see
repeated a lot. Um, you know, get the, someone throwing a punch here. Again, this one could be a superhero landing or even throwing a punch
at this guy here, earth is bouncer
crossing my arms. This kinda connects to that. Just a side view. Got the foreshortened leap with the bigger
fist coming at us. I got this one here where he's kind of a flying Superman punch. You got the body
language here of the larger character crouching over the smaller character. And the smaller characters
can have bending. They're both kind of bending
in the same direction. This character here was kind
of knocked on his feet. We don't know if he's
taken harassed or if he was knocked out. We don't know. But it's a gesture. This one here, it looks like someone who's kind of leading. Telling you maybe an army
with to do this one just, this could be something like Captain America or Batman
or something like that. He's got that kind of a build. Another Spider-Man here. So you see, you get
the gist of it. Let's see if there's anymore. You can tell. This
is the he cliche. Male, female. Portrayal that you see in
a lot of the '90s comics. I always liked it. I think it was Jim Lee used to do this one a lot where
he would just draw like a very masculine
strong character and then have a feminine
looking character next to them. And it would be either Jacobi,
superman, Wonder Woman. It could be, could be
Cyclops with Jean Grey. It didn't matter. But that
was kind of like a standard. Let's see, what else do we have? But these are
generally like you got this one here where he's
kinda ready for action. Another one where it's almost
like a Spider-Man ask. You got this one where it's
like I got the centerpiece, which is the main character. And you've got the two could
be guards next to them. You got to just be creative and imaginative when you're
doing your gestures. And I really think
that every sketch that you draw Here's just a, could be any female character. But I think that any, any character that you're
attempting to draw, don't just dive into the cylinders and the
shapes and the anatomy. And, you know, unless
you're just like an expert, always start out with a
underlining gesture gesture or a scribbling of a pose, which would be a gesture. I do that first, it's
just good practice. It's going to get
you into the flow. It's going to help you warm up. And yeah, so that's just kind of an
overlook on some gestures. Now, we're still going to
continue on with this, but in this little lesson
here is just a short one, just so you can understand why we draw gestures
in the first place. So on the next one, what we'll do is I will go
ahead and pick a gesture, or maybe two or three. And I will formulate
them into a pose, right? Um, so I'll just randomly pick a couple and then put them on a blank sheet and
we'll go from there. So what I would like
you to do is just kind of start practicing
your gestural sketches. Now, I can show you different
approaches on that. And I will in a later lecture, but on this one, just for today, just do
the best that you can. Get your sketch pad
out or your tablet, whatever you're
comfortable drawing on, and go ahead and do a couple. When I say a couple of
1020304000 sketches, if you have time, but really somewhere 10-25 would be great. Just different gestures
in different poses. And it can be as simple as let's go ahead
and close this out, and let's go ahead and
go to this layer here. Just to give you an idea, you can just draw a, let me change my pencil here. You can draw this one. Sorry. Draw a head. A body. Getchar. Gets are three major masses
which if you've taken my course on simplified
superhero anatomy, you would know like the
three major masses are the ones that are
connected to each other. So you got the upper chest, torso connects talent to the pelvis, and
you've got the head. So those are your
three major masses and then your limbs and
everything connect to them. But let's just say that you drew something
like this right? Now. You have so many
different options on what you can do from here. So you could basically imagine, okay, let's have an arm
going back this way. So this would be like the
center, center point, the center line of the looking
downward at the top mass. And this would be one shoulder, this would be one
shoulder from here, would connect to the neck,
connects to the head. Right. And this
could be the back, connects to the
pelvis area, right. Then from here, we
can have an arm extending out like this
and pull fist here. Then from here, you
have another arm. And we can decide, you know, what do we
wanna do with that? Do we want to hear
something interesting? When you're in this stage? You can move things
around organically. So if you wanted
to raise his arm up and kinda put it up here, you can imagine this is the shoulder because
your shoulder does raise up and down, right? So that shoulder does move. And so if you want
to push it forward, you can if you want to
pull it back, you can. You can try a couple
of different methods. So like, let's say
we try and arm here. Alright? Or let's say that we decided, well, I wanted to. Normally this well,
that one probably doesn't look as good because
it looks a little awkward. So I'll go ahead
and delete that. But this is a good way
to test your work. Your kid. Pull
this arm way back. Alright. Don't like that either. I'm just going to stick
with the one that I drew the first time. Now, we can decide with this lower body here,
what do we wanna do? Like here? Extend another leg back. And then, you know, you just you just
mess around like that until you get something. Now you can lower his head and don't worry about
getting it perfect. I might sketches are never perfect and they'll
never be perfect. But you can always
learn something. So then I'll just
open another layer after I've reduced the opacity. Then what I'll do here is just all kinda refund
it a little bit. I'll say, okay, well here's the energy is flowing like this. We're looking at the top, looking down into character. It's got this leg that's
popping out here. And this is where you just kinda practice drawing a
little bit further. All right. We're like, okay, well, he's got this shoulder
here that pops out. It got this arm that comes here. And then we have this on anyway. I'm just going to bring
it back a little further. And then for his head, I'm just going to
right around there. And then there you go. You have a gestural sketch. Now, when you shrink it down, Let's say that we
shrink it down where this other layer here
don't need anymore. Now we have this sketch of a gesture that looks
like he's in motion, looks like he's about to throw a punch. You could
do a few things. You can say, okay, well, do I want to failure so
that way or this way? And you can also
lighten this up. Add another layer. Or if you're drawing
with pencil and paper, you can erase the lines, keep them kinda light behind and go ahead and
start redrawing. So that's the equivalent. And so then what I would
do is this layer here. And if I were trying to draw
some sort of character, I would, I would think
in terms of okay, he's looking this way. Alright. We're looking at
them from above. So we want to make
sure we capture that. So we know that his shoulder
is going to be here and another shoulder is going
to be here. They are. There's this way. And again, I'm not trying to get the anatomy perfect yet or ever, but just trying to capture
the movement and the emotion. So if you see what I did here, I do kind of an S S curve. And then I imagined that this
leg is extended backwards. This would be a calf. Not worry about
the feet just yet. Now this leg I
would want it to be extended for me it really long. So what I'm gonna
do is just shorten it. And then just imagine. Okay, So since you can actually make this foreleg the one, the one
that's closest to us. So you can make that one
going forward or vice versa. Because both arms are kind
of equally facing. Front. Can pull this one back and
just do a basic shape. Don't, don't worry about
getting everything perfect yet. What we're trying to do is just capture the essence
of this character. Would I know what this
character is if we can really make them into whoever we want. We're focused on here
is the movement, the movement and the action. Now, with that said, you know, as we're getting
closer and closer to finding out who
we were drawing, we can take it step-by-step and it just gets a little
cleaner and cleaner. And then I'll switch legs here. I'll go to the gray.
Jumped to this layer. In this layer, what I'll
do is I'll go ahead and reduce this opacity where
you can almost not see it. And then I'll think to myself, okay, well, how could this be? Well, it could be a number of
people, could be Spiderman, could be, could be
Night Crawler, hopes. It could be rain. And it could be Batman. So really, when you're
drawing a gesture, when I say you can make it into almost anyone, I'm not lying. You could. But it's I think it's always best to have someone
in mind while you're drawing, unless you're just doing
gestural practice. But like, let's say I
wanted to make this, let's go back to our Wolverine. And what I would do is I would just focus
on a couple of shapes. Now I'm not going to
worry too much about the anatomy or any details. I'm just going to
imagine his head shape, size, not even really his shape. I'm going to connect
now. I'm going to thicken up his neck. Alright, and I'm
going to give them a little bit more mass
because Wolverine, at least a comic book version, is more of a stout, shorter character,
but wide, right? And so you're just constantly, constantly creating
these little shapes and until you get it just
about where you want it. So from this shoulder here, I would pull this arm back. And don't worry if
you're not getting this. Where we're doing a couple
of different things here. We're talking about anatomy, we're talking about poses. We're talking about gestures. It's a lot, right? Don't overwhelm yourself. Just go at the pace
that you're comfortable with and do what I always say to just practice, practice, practice, practice. So what I did was I made
this leg closest to us, the one that's
extended backwards. Now, again, I'm not getting too carried away at the
shapes or the details. I'm pulling this other leg for a couple of things that you can do to really sell this is you're adding the boots, these little wings or
come off the boots, you have the famous Wolverine. I guess they're called wings. I don't know what
you would call them. Give him his claws. And all you're trying to do
is you're trying to sell the cell the sketch. You're selling the
sizzle, not the steak. I don't know if you've ever
heard that expression before. But as you can see, we're not too intricate
at this point. We're just really getting
into some light details. And it takes a lot of this, it takes a lot of
this repetition, drawing, finding shapes,
adding different layers. And then you start, Okay? You tell yourself, alright,
well let's find the anatomy. So what I'll do for the anatomy is I'll
get a little sloppy. Like what I mean
by sloppy is I'll move my pencil a
little bit fast. Because while I'll do is
I'll lighten this up. I'll sketch in my anatomy to the best of my ability
at this moment. Keep in mind that I'm
going to keep this energy flowing and all this stuff
that we're seeing right here, it's subject to change, but what is not going to change as the
energy of this sketch? Okay, so what I'm
doing is pulling him, putting them together,
putting his muscles together, imagining that has dealt
would go somewhere around here, shorts, leg. And then really doing this
over and over and over again. And the reason for this
is because I'm learning, as I'm sketching, I'm learning, you know, what to do
and what not to do. Where do I want this face to be? Which direction is it looking? And once we get to a
stage similar to this, what I can do is I can
lower the opacity. I know one more time. And look, we're getting
closer and closer. You see? Now it just
comes down to refinement. So now we have all the
information there. And we just want to come in and start working on the
actual, actual sketching. So at this point what I would
do is I would find tune it, come in here and just kinda find a couple of
different shapes. And we're doing this
really, really fast. But honestly this is my
approach to when I'm drawing, I just feel it out like this. I take my knowledge of anatomy and I just
put things together. As I'm sketching. Then you start rendering more and more details
as you go on. But you're not really focused
on the details. Just yet. It really just focused on
getting your proportions, your anatomy, your energy flow. Just try and get all that. It starts coming together. Like Okay, well,
that looks good. Works for me. And just keep going. You got to decide. Okay.
Well, which direction do I want his head tilted? Like Do we want him
facing someone over here? Alright, so if that's the case, That's the focal point. You have to imagine that. So let's imagine that he's
facing a villain here, right? Let's just say this is
some horrendous monster, could be, the hall, could be saber-tooth,
whoever is coming at them. So what we have to do
is we have to find the angle that we want to use. Taking our knowledge of what we've learned in all of our courses that
we've taken, our anatomy. And we had to construct
everything together. And if we start finding
that were struggling, it's okay, just take a breather. There'll be deal. What you want to really focus on is
just doing the work and then, you know, perfecting it later. Don't worry about it.
Like I said earlier, you'll never have it. Perfect. But you'll have it. And
when I say perfect it, I don't mean literally
become perfect. What I mean is you'll
have a process. And that process is something
that is going to serve you. And the process is
what's repeatable. Its form is something
that you can formulate. So you want to keep that process very formulaic in
very practical. So if you look at his
head while I'm trying to do is you're not seeing
too much of his eye. You're seeing kinda like this would be his
jaw line coming down and this would be
the back of his head. So if we were to
draw a circle here, this would indicate the
sphere behind his head. And then we could take from here add on his wings and then go on the other
side, do the same thing. This is really as daunting
as it might seem. It's really fun and
it's very cathartic. It's something that once
you get the swing of it, you're like, oh man, this, you just become a little
bit better and better and better to the point where
it's not intimidating. It's more like you're
excited to try. And you want to learn and
you want to get better. You're going to see other
artists that are just mind-blowing and you're
gonna tell yourself, hey, if they can do
it, I can do it too. You got really believed that the only way to
build confidence. The only way to build
anything is by doing it. So you can read all
the books you want, you can watch all the
courses you want. And I think that they
are very beneficial. But ultimately, you're going to have to come in and you're gonna have
to do some work. So there we go. We have a
wolverine kind of gesture. Now, this is something that we could move
around if we wanted to. We could totally we can
totally reposition his arms. We can move his head. You know, there's a lot of
things you can do with this. Like I said, the key
is non-attachment. You don't want to get
attached to anything. This is just sketch. And honestly, I spent
more time on this than I would normally
because it's just a gesture. And normally what I would do is I would do a
really quick gesture. And then I would dive
in on my main shapes. And then from the shapes, I would start working
on the anatomy and looking for the
muscles that are flexed. Some muscles, they're gonna be contracted and some are not
going to be contracted. So you want to pay
attention to that, then you would start
thinking about it. Where's the light
source coming from? Where the shadows
are going to be? How can I make this look
more three-dimensional? So these are all
parts of the process. So hang in there. What we'll do on the next one, like I said earlier
is we'll come back and we'll go to
this original one, will pick one or two
or three of these, and we'll take it a
little bit further. Okay. So thanks for watching. Go ahead and do the
homework that I asked you to do, which
is just practice. Look, here's the,
here's the deal, is you are only going to
get better by practicing. Now. What you practise is
what's most important. So when you hear the term
practise, practise, practise, it might sound kind of boring or repetitive
or not that again, but it's not just practice. It's taking the information, the knowledge, and
then applying it. So a practice really equates
to combining knowledge with application
repeatedly until you have a better understanding. And then even when you
start to understand that, repeat it even more so
that it becomes ingrained. And then ultimately
what you want is it to become second nature.
Why do you want that? Because when you start
drawing or anything else, you're going to slip
into flow and autopilot, just like when you're driving
a car or riding a bicycle, or playing a video game,
or watching a movie. You're going to zone
out consciously. And you're just going to allow things to
flow through you. You got to learn to trust that. But first you have
to program it. So practice is programming. Okay? So there you go. That's some inside
knowledge from me and I hope it really helps and
I'll see you in the next one. Okay. Keep it going. Don't skip this. Make sure you practice. Pick out a few
different gestures. Challenge yourself,
send them to me, show me what you've come
up with and if you find that you're struggling with
gestures, let me know. Tell me what you're
struggling with and send it to me and maybe I can rework it for you and
show you how it's done, or at least how I would do it. Alright, hang in there, I'll
see you in the next one.
 Mike Van Orden, Imagine Learn Create