Transcripts
1. Intro: Hello guys and welcome to my class on how to
draw full body poses. In this class, he will learn
how to study references, how to break them down
into easy shapes. And you will learn basic
proportions and its line of action compared to
the previous classes. In this one, you can
actually download for free the brushes that
I'm using the most. And you can find them in the
resources section below. The line art brush
that I'm using has been especially requested
by a lot of you. You can watch this tutorial
and draw along with me. Or you can watch it first, understand what
I'm doing and then applied for yourself
whichever way you choose, I definitely recommend you
try it yourself so that you will actually experience
what I'm showing you. The more you try
doing it on your own, the better you will
get every day. Now for your assignment, I would like you to draw
one of the poses that I provide in the resources
section or find one that you like
more and submit your drawing and your reference
in the project section. It's as easy as that. I would also appreciate if you follow me on Skillshare is I'm posting monthly
extensive tutorials on digital art and procreate. If you don't want to
miss out on anything, click the follow button. I would also like to be more
active with my followers and show you more progress shots
of the next tutorials. Discuss with you what the next one will
be about and so on. Right now, I'm only doing
that on my Instagram. And if you'd like to follow me, this is my handle. And we'll see you guys
on the first lesson. Don't forget to bring snacks and let's get goes the end, draw.
2. Shapes and Line of Action: Hello guys and welcome
to the first part of the health draw full
body female characters. The first thing that I will recommend anyone
who wants to draw full body characters
is to exercise as much as possible withdrawing
from figure references. And preferably if you are a beginner tried to
start with Mogul step, aren't wearing bulky
clothes so that you can actually see all the joints
and septal lines of the body. Let's take a first set of references and tried to
break down what we see because drawing for
the first time of Chrome references
can be intimidating. Let's start with the
reference on the right. As I said, if you
are a beginner, you might be tempted to draw
the clothes that the model is worrying and your
anatomy might be off, but the number to list, let me show you what I see
when I pick a reference. Let me find a decent color
to use overdue picture. All right, so the posing
itself is nothing difficult, especially since the hands
are hidden behind her back. And that saves a lot of the
trouble of drawing hands. But really now we also
need to practice that. So the secrets of drawing
phos is fastest to train your eyes and finds the shapes that are
making up the body. That easier to shapes
you can find the bitter if you break down the body and
simple shapes tried to respect the post
as much as possible. For instance, we will
take into consideration the tilt of the head and the
straight shoulders line. For the chest. I will try to make something
that looks like breastplate. But in my own work I usually use an upside down
triangle or a trapeze. I'm right now
trying to also show you a more detailed
version of the way I work. All the joints are regularly marked simply with
circles which should then connect with simple lines like a stigma that has joints. One thing to take note of, but we will also talk about this in the proportions
listening later. But this is the perfect
visual example. The elbows over here are supposed to be on the same
line as the belly button. So if you are ever
unsure how long to make the arms measure the distance between the shoulder
and the belly button. And that's the same
link that you should have from the shoulder
to the elbow. And then from the
elbow to the wrist. You will see it exemplified
in the first poses well, which is in the Lesson 4. For the hips, we will use this shape that looks
like underwear. But again, you can use any other shape that is
more comfortable with you. I'm assuming this shape
will help beginners understand where the legs
will start from as well. Again, we will mark
the needs with two circles before we
actually draw the leg. Finally, you simply need
to connect all the shapes. For the feet. Tried to use
some simple shapes as well. That wraps up the first bows. It isn't that difficult, was it? Now let's go to a slightly
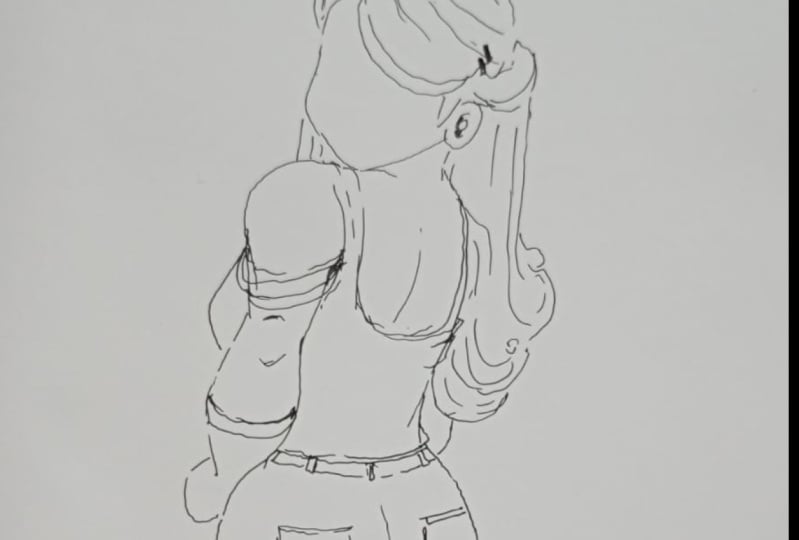
more difficult one. This one is more difficult because it is not
facing the viewer entirely and it has a
very evident to gesture. So let's try to
break down dispose. And to do that, we will start
with the line of action. The line of action is the longest cursive line
that cure pose creates. This pose has a slight curve
as if the girl is leaning her upper body back and
extending her leg forward. As an artist, your job is not to get every muscle perfectly, but to communicate
to this gesture, this line of action, which is why you need
to be able to tell what the line of action is
before you start drawing. Moving on in this kind of both, It's important to
understand what is in front and what
is in the back. For instance, on
the shoulders line, her left shoulder
is in the front. Then the chest is in the mid ground and her
right shoulder is behind, so it won't be entirely visible. Similarly, we have her
left elbow and forearm. Given her lift arms position, it will be useful to think that the forearm is the
object in the front, while the upper arm is behind, somewhere behind her belt
is her belly button. So remember what I
said earlier that if she had her arms hanging
around her body, the elbows would be
on the same line as the belly button
now for the hip. So just like with the chest as a part of the hip
will be hidden. So it's important to
capture this relation. Draw it with easy shapes, just like I'm showing you here. For drawing the legs. It comes with experience to get all the curves right since
the Mondelez wearing clothes. So once again, I
recommend you look for models with thin
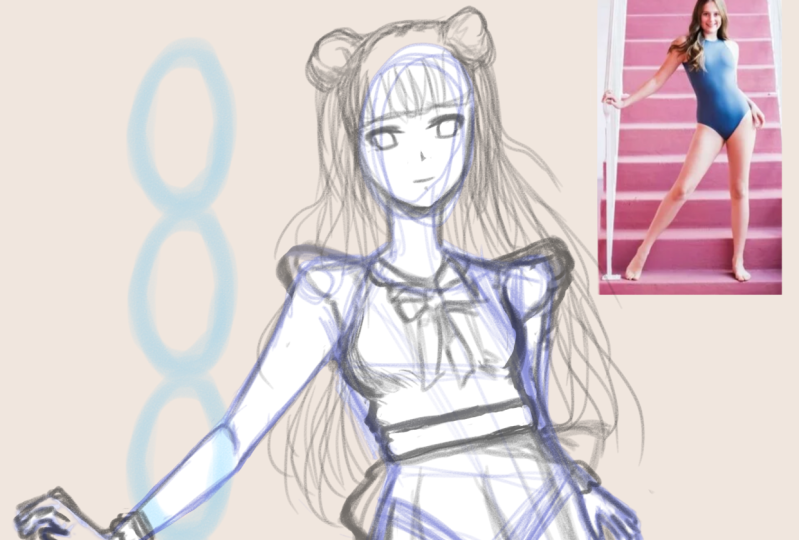
clothing or none at all. This is a great example
of a model with thin clothing that can help you understand the shapes better. This reference is from
an account that both regular poses on both
Instagram and divine third, and it's called a dork com. I will also link their
profiles in the about section of this class
because they will be really useful for your studying. Start by finding the
line of action of the pose and then start
identifying the shapes. This is a pretty simple pose, but to the position of the hands might have some people scared. But it's not deal because
we are doing this together. We quickly than the
fight the shapes and basic proportions
for the upper body. We need to take care
of the hands now and then most of the drawing
gives us get this done. Don't worry, because we will
dive deep into disposal later on where we
will draw it fully. After we finish this pose, we have another free
dynamic poses that we will break down in shapes
and line of actions. When drawing calls, it might be a nice trick for your hand to draw the exterior lines
from top to bottom, and then the interior
from bottom to top. It usually helps me to
get that nice form of the muscle if my hand is relaxed when drawing
these lines. So these are the sketches
that we made in order to understand how the poses
are supposed to be drawn. As you can see, they are much
easier to understand now. And because we follow
the line of action, they don't feel stiff at all. Of course they are
not refined and you shouldn't use this marks
to create a new drawing. Instead, if you really want
to challenge yourself, you will put this
breakdown away, open a new canvas and weak
your reference next to you. You will draw everything
again on the black canvas. Again, no worries as we will do this step late
there together. Now for our second
set of references, I chose more dynamic poses
for us to break down. So let's jump right into it. We will of course, start with the line
of action which goes from her tills to her head. I would be tempted to save that. Her hand contributes
to the line of action, but it goes straight up, whereas the rest of her
pose is slightly curved. One thing that I
want to point out over here is that indisposed her left hand is
intersecting her other arm, which creates a tangent. In illustrations,
you will typically try to avoid this
accidental tangents. And you should try to
make your shapes leave the eye of the viewer in
a specific direction. Tangents aren't
really doing that. They are simply
cutting the movement. To be more specific. Tangents are any two lines that's thought to each other in a way that creates a
spatial ambiguity. Most of the times, if
you are not careful, they tend to ruin a good
composition as it is doing here. Now let's move to another
adorn car reference for the worksheet
seems to be an archer. Let's find the line
of action first. You might be tempted
to say it's the arms, but it's infected body. Also, this is a very good way of practicing the
proportions of the arms, as you will see light there, one way will completely
draw this bows. We have some foreshortening
of the left leg right here, where we will need
to make it look like the cough is still attached
to the rest of the body. But let's not worry
about that right now because we will
draw it later. The rest of the pose is quite easy after you break it down. So let's jump into
the final one. I love this pose because
it's so flowing, so dynamic. And it also has some really
nice places where you need to place a part of the
body in front of the rest. So let's dive in. The line of action is
obvious in this one. So let's start by drawing
the chest and the hips. The hips are at the eye
level in this picture, so we will look at the
upper body from below. This is important to remember when detailing
this illustration. Be careful when
drawing the waste as it has a small twist and it needs to be obvious that it goes on a plane that
is behind the hips. So this is a bolted with
the references so far, remember to always choose
the references with the live clothing so that you
can actually see the Bose. Always identify the
line of action to avoid stiff drawings and then break down your pose into 3D shapes, then nothing will
stand in your way. In the next lesson, we will discuss some basic
proportions that you need to keep in mind
whenever you are drawing.
3. Proportions: Welcome back to my class. In this lesson we
discussed about proportions when drawing
the female body. Has it ever happened to you
to draw too long torsos or arms that are too long
or links that are too long. And the whole drawing
looked weird. It happened to me a lot, especially when I was drawing. Traditionally, I was drawing
from only one position and the angle was showing
off my eye bold proportions. So make sure to always check
out the things that you will see in this lesson so you don't have to restart
your drawing. You can check them
multiple times while you are drawing
so that you don't need to correct a
lot of things when you're illustration
is almost done. So you might have heard
about this technique before, but it's still quite
a common way of measuring how long
a body should be. Generally, a female
body can be measured as six or 6.5 heads, or even seven heads if that
person is really thought. Having this in mind, here is the fastest
sketch I made. The character that
measures 6.5 heads. So the distance
between the chin and the breasts should be the
dimension of one head. Then the belly button will be in the middle of the first head, and the hips line
will start between the third, fourth head. Don't forget that
the elbows will be on the same line as
the bellybutton, as mentioned in the
previous lesson. The hands should end at
around half of the dice. This proportions are not
difficult to keep track of, and they will also be
in the class handouts. I will see you in the next
lesson where we will actually start to discuss about
recreating some poses. You can draw along
in those lessons or a watch and then
try it for yourself. Either way, take a break
and I will see you soon.
4. Archer Pose Drawing Process: Hey guys and welcome back. For our first those, we are going to draw the
arrow girl in market fail and stylize it
for an illustration. We won't cover anything
in this class, but if you want to
learn how to color, you can watch one of the
other classes that I have on Skillshare is I teach my coloring method
in every single one. We already made the breakdown
of dispose earlier. So before we jump into sketch, I just wanted to
know that I am now testing out my new brushes. Let's get garage a liner brush. And to run their brushes, you can download them for free in the resources
section of this class, I encourage you to use them
as you draw along with me. Now let's get started
with a sketch. I'm sorry, it's not very visible on the recording for
the first few lines, but it should be more visible in a moment for the arm. So I wanted to exemplify
how you can make use of your digital tools in order to make sure you
get the proportions. Just write, dropped
the two circles connected by a stick
that represents the upper arm and draw it next to the body
so we can see that the elbow will end on the same
line as the belly button. Then use your lasso tool and select this measure,
this segment, and then rotated in the position that you'll need to
10 after death while still having gets select that copy and paste
the segment on annuli are and as the forearm, copy and paste it
two more times, n demote them in position
for the second arm, and then merge the
segments together. You now have the skill
at them for your arms. As far the rest of the sketch, after you have to post
laid down on the canvas, tried to find all the
curves and small parts. Really pay attention to
your reference and try to understand why you are
drawing what you are drawing. Hi. Okay. Okay. Okay. When you are done
with your sketch, I encourage you to use
the liner brush from my package and pulling around with the
pressure sensitivity. This is the brush that I use in all of my drawings
for the line art. And it makes the process
really enjoyable. If you like this brush set, let me know in the reviews and I will try to make
more in the future. Try to draw along
with me or draw your own poses and submit your work in the
project section, you can watch all
the classes that you want on drawing and art. But if you don't
put in the work, you won't really
see much progress and be accountable for
your progress and submit, even want to sketch, people, feel really good
to have it done. I will let you watch
the rest of the video and I will check back
in at the end for a short summary and
the next formation of the composition and building dams to get more value
out of this lesson. Okay? Okay. Happened. Hello. When? Okay guys, so our
stylized Bose's done. We added some hair and we can accentuate the
motion of this pose. Now, let me show you how
this illustration reads. As we established
in the beginning, the line of action is that of
the body which we captured. Well in our illustration. Then we added the
hair we chew leaves the eye upwards towards
the character space. And this composition is completed by the
characters left arm, which also leads back
to the center point. Any drawing or illustration
needs to have focused flying. And you as an artist, needs to help your viewer look
into the right direction. Using a post for this is
the best way that you can leave the island growing
care versus your main focus. That's it for this lesson, I will see you in the next one.
5. Standing Pose Drawing Process: Hi guys and welcome back. Let me just blow out
my reference for our second pose and then
we can dive right in. For this pose, I will use a fast approach where I'm using triangles to
shape the body, opposed to a more complex shapes that I showed you
in the beginning. I'm using this simple
shapes because I have some experience in drawing
the body afterwards. If you feel more comfortable
with using this fast method, I won't try to stop you. But if you feel like it's simplifying your posts too much, go back to the second
lesson where I show you which shapes you should use. In my sketch. I'm trying to
first get to the post, right? Then I will go back
to every part of the sketch and make sure that
I'm capturing the curves, the muscles, the
joints, and so on. Okay. Also try finding a
website that gives you multiple poses and that you
can set a timer for each one. I used to do for the
second sketches, at least ten of them in
a row, no break renting. That basically means five
minutes of your day. And it doesn't
matter if they look bad or if you have a
few incomplete ones. You will get used with
the timer and you will try to capture the
essential in your drawings. It really helps you a lot. Hi. And so on. Okay. Hello. Left and right. Space and time. Okay. So in your sketches, Dani, you can check your
proportions by making the heads and on a new layer. And then if something is
too long or too short, you can always use
the liquify tool in Procreate Florian Photoshop
to alter the proportions. That's why you have
digital tools, so don't be afraid to use them. In Clip Studio Paint. You can use the mesh
transformation, but since it's
essentially a warp tool, you won't be able to have so much control over
your transformation. And why. Now I will get started on the line art and will lead to see the rest
of the process. I will see you on
the next lesson. We'll write our final pose. All right? A. Okay. Sorry. Okay. Yeah.
6. Dancer Pose Drawing Process: Hey guys and welcome
back to our final bonus. This time I chose a dancer and I really love this S-like pose. So I wanted to try
it out for you. As always, start with the
line of action to establish the fluidity that you'll
need to follow when drawing. Then I start sketching
the chest and the hips. And I slightly correct
the midsection wind, which the Liquify tool. Okay. Then it's on to the
drawing of the legs. But then, then C might
be to Ellen Gates, the legacy no drawing because they seem really long
in this picture. But you still need to respect the proportions that we
talked about earlier. So I'm trying to be
very careful with the legs and did not
make them too long. The same thing
applies for the arms. Don't make them too long. Suppose I showed
you a trick for how to make sure that you
get them just right. Once you make sure the limbs
are at the right length, the rest of the pose is
not really difficult, but I would love to see
how you all tack live. I added some long flowy
hair towards the end in order to further
enhance the readability of the post and the overall composition and will lead to watch
this one to the end. And I will check back
in with the assignment. Happy drawing. Okay. And why? Okay. Okay. Right. Hi. Okay. The impact dreams. Okay.
7. Project: Congratulations on
finalizing this class on how to draw full body poses. Now you shouldn't know
my whole process, what brushes I use, how to study a reference, help break it down into simple steps and then
draw it for yourself. You now also have the brushes that I use the most
in my art flow, so nothing will stop you. Now for your assignment, I would like you
to choose one of the references in this class, which you can also find in the Resources section and
start studying the reference. Try sketching it and stylize it, then submit it in the project
section of this class. I would love to help you
out and point out what you did great and what you
can work on some more. If you found this class
useful in many ways, I would also really
appreciate it if you follow me on Skillshare as I am hosting monthly
sensitive tutorials on digital art and procreate. If you don't want
to miss anything, click the follow button. I would also really
appreciate that you took one minute of your time
and leave a review. Tell me why do you think about this class of bulk my brush set and what you would
expect in the future. Thank you so much
for participating. I appreciate you and your time, and I will see you on the
next tutorial. Bye guys.
 Lara Militaru, Digital Illustrator & Coach