Transcripts
1. Class Introduction : What's up, everybody.
This is Yi. Welcome to another
step by step tutorial. And today, I'm going to
teach you how to draw eyes. We'll do that by using simple geometrical
shapes like an oval, a parallelogram,
and a trapezoid. So without further ado,
let's go down to business.
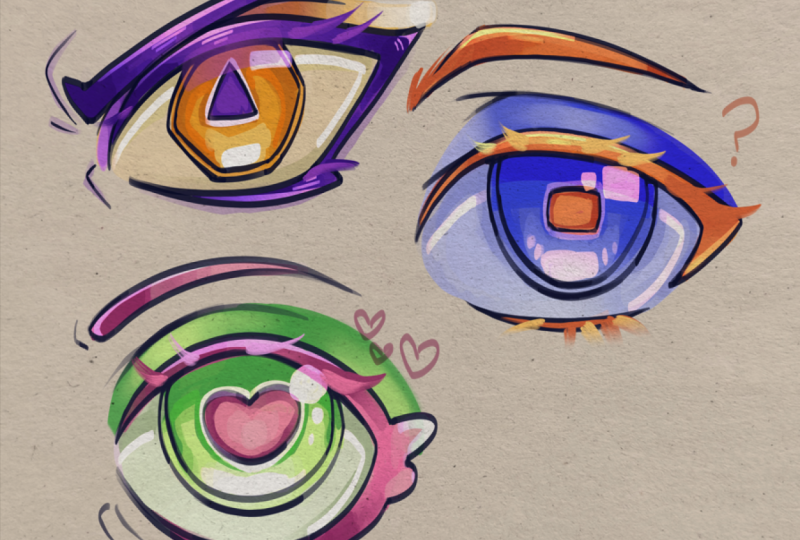
2. How to draw different anime eyes: Okay, so today, I'm going
to teach you how to draw three different types of
eyes by using shapes. We are going to use
a parallelogram, a circle, and a hexagon. So I'm going to start
with a parallelogram. Then I'm going to draw
one curve right there. The second curve will be
all the way to this edge, one more curve at the bottom, and to close it, we'll draw
this curve right there. Awesome. So now we got the
overall shape of the eye, and now we can start
add all the details. So first, I'm going to
start with the eyelashes, and I'm simply going to do it
by give it some thickness. I'll do the same for the bottom and we'll get rid of all
the unnecessary lines. Next, I'm just going
to draw the Iris. I'll give it some thickness, and I'll add the
pupil at the center. Now we are going to
draw the eyebrow. So I'm going to
draw a long curve all the way to this edge. As you can see, I'm covering
the eyelashes a bit. We'll draw a diagonal
line right there, and then we'll give some
thickness to the eyebrow, and as you can see, it gets
thinner towards the edge. Next, we are going to draw the upper eyelid simply
by drawing two curves. And if you want, you can add some wrinkles right next to the eyebrow. And there you go. We got our first eye. Of course, if you want
to draw the left eye, just reverse the parallelogram
and do exactly the same. Okay, so now we are going to
move to the second shape, which is an hexagon. As you can see, this
hexagon is a bit wide. Not all the sides needs
to be exactly the same. You can also draw it
thinner or longer. So again, just like before, I'm going to start by drawing
the shape of the eye. So we'll start with two curves, one up and then one all
the way to this point. One line at the bottom, and one more curve here. Next, we're going to give some thickness to the eyelashes. And we can give
it some character just by drawing two spikes, for example, to
indicate the eyelashes. However, you can
also do the same but drawing the
eyelashes pointing out. So really just feel free
and do some experiments. Next, I'm going to draw
the upper eyelid, again, by using two curves and we'll draw the eyebrow
different from before. We'll draw two curves and
give it some thickness. And as you can see,
the edges are thinner. Next, we'll draw our
iris really big. Again, place the
pupil at the center, and as you can see, you can draw the pupil slightly
thinner and taller. Again, just like before,
just play with it. Awesome, and now we are moving to the less
shape for today, which will be a circle. As you can see, it doesn't
have to be a perfect circle. This time, as opposed
to the other eyes, the tip of the iris
will be at the center. I'm gonna draw a big iris. Then we'll draw the upper
eyelid by drawing three curves, and I'm going to give him a nice thick eyebrow just like mine. And we'll add some
wrinkles, again, simply by drawing two curves and some more wrinkles below the eye and the big fat pupil. We'll give some
thickness to the iris. And I'm just going to
add some lines here, just like Dragon Ball Z,
just for the fun of it. And we are done with
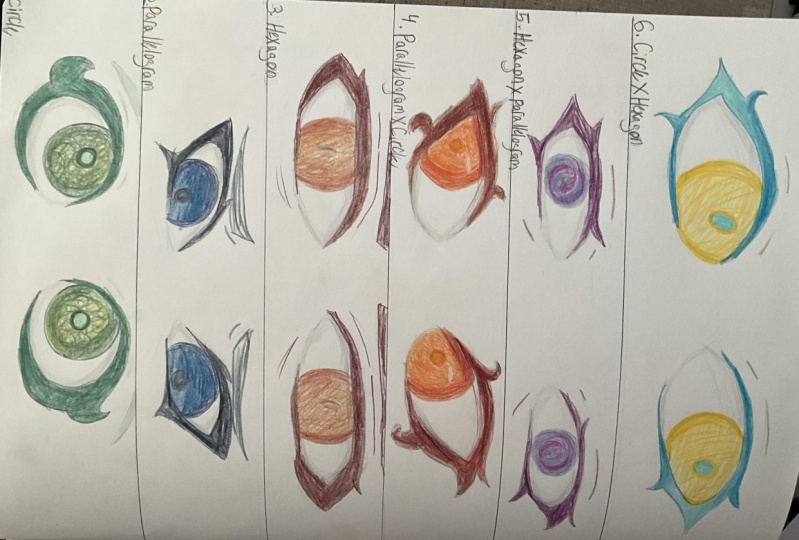
the sketching part. So got three different types of eyes by using three
different shapes. Just like I said before, you can play with it however you like, you can use other shapes. You can extend some of
the shapes like drawing a very wide rectangle or
a very narrow circle. You can even mix some shapes together to create
a very unique eye. But now we're going to move
to the inking process, and then I'm going
to demonstrate how I color the eyes
with copic markers. But first, for the
inking process, I'm going to use 0.3 black pen. However, you can use
your regular 0.1, or you can just use a
black color pencil. What's important in
the inking process is you want to have your NHM which means your
natural hand movement and you'll do that by
rotating the page, get a film grip on the pen, and just go all over the lines. Once you practice more inking, you'll get better at that
just like every other thing. Personally, the inking process
is my least favorite part, but I'll try to do it as
much accurate as I can. Awesome. So once we are done, I'm going to use the
charcoal eraser, the notorious charcoal eraser and go to get rid
of all the lead. Make sure to clean it very
well because you don't want to smear the lead later on when
you use the Copic markers. So now I'm going to
use the Copic markers. Just like I said before, if
you don't have copic markers, you can use color pencils. You can use a regular HB two
pencil and do some shading. I'm going to use Copic markers. Those are alcohol based markers, which means they can
blend very well. I'm going to use green
tones for the iris. First, I'm going
to fill this area by using circle strokes. Next, I'm going to
use a darker tone. Next, I'm going to
use a darker tone, and I'll create
this kind of shape. I forgot to mention, but if you look on your top
left of the screen, you can see the exact number
of copic I'll be using. Then I'm going to use
an even darker tone. Then an even darker
tone than that, I'll mark a nice curve. And now I'm just going
to go by the feel of it and do some blending. So I'll use some of the
brighter tones again, and I'll blend the colors. As you can see, I want to get a nice highlight
below the pupil. And now I'm going to use the dark stone to create a
nice shade from the eyelashes. And again, we'll
do some blending. Now, sometimes you can
overdo the blending and sometimes it depends on
the paper you are using. A thicker paper can
absorb more layers, which means it can withstand
more of the blending. Okay, so once we are
done with the iris, I'm going to add some shade by using a very bright purple gray, and we'll color it on the side. And then I'll use a slightly darker tone just
to create a nice gradient. Now, I can also blend the colors by using the colorless
blender number zero, which what you basically do
is absorb some of the ink. That way, I can create a smooth transition
between the colors. Now you can also use
the colorless blender to create some highlights, for example, just like that, which kind of gives it a
watercolors style of effect. Next, I'm gona colour,
the eyebrows are using two tones of orange and brown. And again, we'll blend the colors to create
a smooth transition. Awesome. And to finish up, I'm just going to
use my black marker and fill all the blank areas. And the reason I left the black color last is to
achieve a cleaner environment. If I used the black color first, it will be most likely that I'll smear it with the other tones, and that could possibly
ruin the drawing. Now, one more tip if the area you are trying
to color is too thin, you can just use your inking pens instead
of the copic marker, just like I'm doing right now. And Tip number two, you can also use a white pen
to create the highlights. I'm not going to use
it for this eye, but I will show it to you
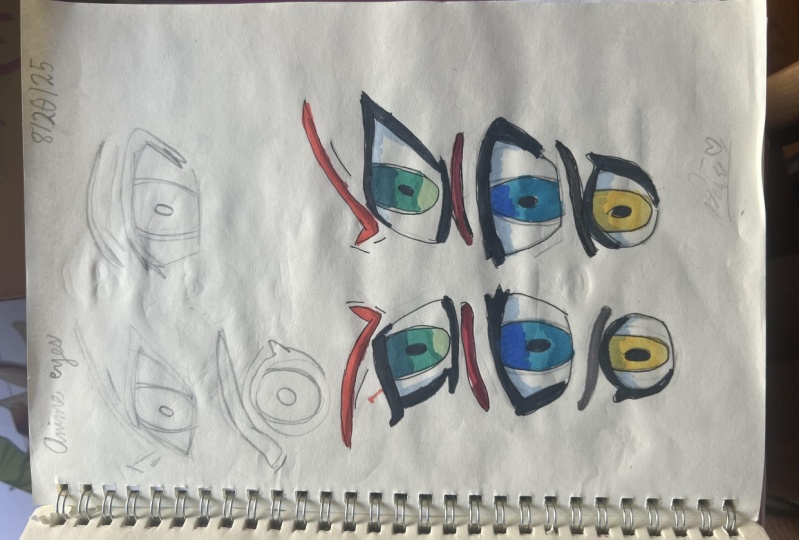
on the left eye I'll color. Okay, so now I'm going to
color the rest of the eyes. So just like before, I'll
start by erasing all the lead, I'm going to pick the
colors I want to use. I'm going to start by
coloring the brighter tones, and gradually I'll move
up to the darker tone. Once I did that, I'm going
to do some blending. And I'll do that until I'm
satisfied with the look. I'll try to get a nice
gradient and I'll add more layers to get more
saturation if necessary. And lastly, I'm going to
use the black marker and the inking pens to color the
eyelashes and the pupil. Just like in the inking process, what you want to do is rotate
the page while you color. It's just much more
comfortable that way. M M For this eye, I used some brown tones for the eyebrow and
some yellow brown, goldish tones for the iris. Awesome. So now, all that's
left is the third eye. So I'm gonna let
the time lapse to the talking and we'll
continue once I'm done. Okay. And we are almost done. Everybody. So now,
like I said before, I'm going to use the white
pen to create the highlight, and that's just in
case you want to get a really white, glowing highlight. We're just going to create
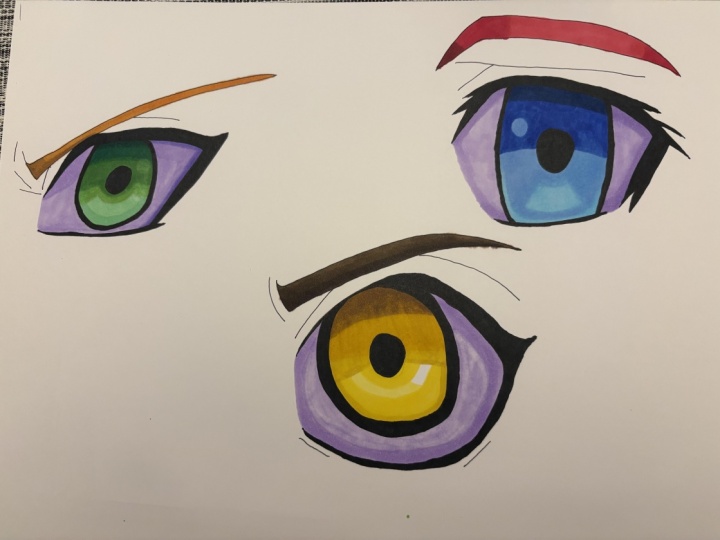
a nice circle right there. A. D. Everybody. So this is
how you draw eyes. As you can see,
for this tutorial, we used three different
types of shapes. We use the parallelogram, the hexagon, and the circle.
That's it for today. Thanks a lot for watching. Keep being awesome, and I'll see you on the next video. Peace.
 Yair Sasson, Artist