Transcripts
1. Class Intro & Tools: What's up, everybody?
This is Yael. Welcome to another
step by step tutorial. And today, I'm going
to teach you how to draw the principal
science Vajira. In this tutorial, we'll draw his royal superset Blue form, and after that, we'll add
an incredible, as well. If you'll check the
description box, you can see all the materials I'm using for this tutorial. And by the end of this class, I want to see how you did. So make sure to submit
your drawing, as well. So without further ado,
let's go down to business.
2. Sketching & Inking : What's up, everybody? This is, and today we are going to draw gila beyond supercane blue. We are going to start by
drawing a perfect square. Each side is 4 centimeters, but you can draw it in
any size you want to. Just make sure to use
a suitable paper size. So first, we are going to start by drawing the
shape of his face. Then we are going to draw his massive forehead by
indicating the hairline. Looks like the letter M. We'll move on to draw
the wrinkles between the eyes and we'll draw the
eyebrow just like that, all the way parallel
to the side burn. As you can see, it gets
thicker towards the edge, and I'm going to add some
random lines right there. Now to create the eye, just use three
lines and make sure to draw the bottom
line with an arc. I'm going to indicate is
bump above the eyebrow and then simply add the
pupil and the iris. And to finish up, we'll
just add the cheek marks. And we'll do the same
process for the left side. If you want, I'll recommend
you to use a ruler so you can keep the right
proportions of the eyes. Next, I'm going to indicate
the dents on his forehead. And we'll add some
veins just like that. Awesome, to draw the
nose, follow these steps. As you can see, it looks
like the shape of a rhombus. Next, we'll draw the mouth really close to the
nose with a very, very tiny gap, and we
indicate is bottom lip. Awesome, now we can draw the ears so you can
follow these steps. Again, if you want, you can use a roller to keep the right
proportion of the ears. Next, I'm going to
add the details. And of course, I'm going to do the same process
for the left side. Important note, it
doesn't have to look exactly the same as long
as it looks proportionate. Awesome. Once we
are done with that, we can focus on the hair. But first, I'm going
to start by drawing the neck just by
using two curves. Then I'll draw four spikes
of hair on each side. Next, we'll use this guideline to help us keep the
right proportions, and all we have to do now is
add the rest of the spikes. As you can tell, in
this form is spikes go a bit higher and looks
a bit more point. Once we are done
with that, I'm going to add a lot of random lines, but make sure to draw them with the direction of the spike. Awesome. So once we
are done with that, we can focus on the torso. Okay, so in the last episode
of Dragon Boat Super 126, Vajira lost his clothes,
he lost his armor. So I'm going to draw
him in that state. I'm going to start by
drawing his massive traps. Then I'm going to add
his neck muscles. We'll continue by drawing
two arcs to create his upper chest and then
draw his lower chest. Next, I'm going to draw two circles to indicate
the shoulders. I'm going to refine
the chest by adding the nipples and some lines
to make it look pretty. Next, I'm going to use
these two guidelines to create the shape of the arm. Now I'm going to refine
it by adding the bicep. The tricep. I'm going to indicate
the shoulder muscles, and we'll do the same
for the left side. Awesome. Next, I'm going to
draw his back muscles and add some ads. Awesome. Now I'm going to refine it by adding some veins right
next to the biceps. I almost forgot about the
trichiaG ahead and add that and we'll add some
bruises simply by drawing random
lines side to side. Awesome. We are pretty
much done with sketching. Now I'm going to
use my inking pens. I'm going to start with 0.1, and I'll use that for the
torso for the upper body. For the hair, I'm
going to use 0.05. That's a bit thinner. And for the face,
meaning the eyes, the nose, the lips,
I'm going to use 0.03. A phenol line helps me
with the tiny details. Now, if you're having some difficulties with
the inking pen, what I'll recommend
is to take a paper, draw a lot of random
lines, scramble lines, and then just take the ink pen, try to go all over them,
practice, practice, practice. Once you do that, you'll
gain more confidence. You'll be more precise. Then when you get to
the actual drawing, your hand won't be so shaky
because you got used to it. Okay. And once we
are done with that, I'm going to take the
notorious charcoal eraser, and I'm going to clean
out of this paper. And by cleaning, I mean, I'm going to remove
all the lead. The reason I'm using
the charcoal eraser is it cleans very well and
it doesn't ruin the page. Now, if you are left with
some stubborn lines, you can use the
exquisite eraser stick. So I'm just going
to use the tip. That way, I can be more precise. Okay, so once it's clean, we can now use the Copic markers
3. Coloring & Background Effects: So for those who don't know, copic macros are
alcohol based markers, which means they can
blend very well. If you'll check your
top left of the screen, you can see the exact number
of copic I'll be using. Okay, I did the job for you.
You don't have to pick. Okay, so I'm going to
start with the skin tones, and as you can tell, I'm coloring in the
direction of the shape. I'm going to leave
some tiny blank areas just to create a nice glow. Then we'll use the second
tone for the shaded areas. Next, I'm going to blend the colors using the
brighter tone again. And finally, I'm going
to add a darker shade or those deepest areas
that get more shade. Okay, and we'll do the same
for the tricep and the bicep. Awesome. Once we
are done with that, we can focus on the chest. Again, I'm going to
color from side to side in the direction
of the shape. Then I'm going to
use the darker tone for the shaded areas. Now, I want to give
the chest more volume. I'm going to use the
bite stone again and just add more layers
in these areas. And we'll finish up again
with the darker tone. And I'm going to do
the same process for the rest of the areas. Again, sometimes
you might see me add some more layers to
get more saturation. Sometimes you see me blend it more so we can have
a smooth transition. Basically, what we want to
achieve is a uniform look, meaning one area will be colored in the same
quality as the other area. We don't want to reach
one area that is colored very well and another area
that is colored poorly. Okay, and the quick note, again, what I said before about
the smooth transition, you can also use the
colorless blender for that. Awesome. So once we
are done with a torso, we can focus on the face. So if you've been watching
Dragon Ball Super, you'll know that there's several animators that
work on the series. Therefore, some of them color the characters in
a different style. As you probably know, I
prefer the oldest style, for example, UE Takahashi. It's much more detail than add
that awesome effect to it, and that's how I like
to color as well. So first, we are going to start again with
the brightest tone, and we are going to
fill this entire area. Next, we're going
to use the me tone. Now, because the light will come from both
sides because of his, the mid part of his
face will be darker, but we are going to leave
some highlight areas on the bumps above his eyes, the cheeks, the nose, and the bottom lip. Next, we're going to blend
the colors a bit and using the colorless blender again to create a smooth transition. Then we'll use the darkest
tone for the darkest areas And to finish up, we'll
do some blending. Awesome. Now we can
tell the eyebrows, I'm going to use
Bo two for that. As you can tell, I went
over the lines a bit. Now, there is a
great way to fix it. All you have to do is take
the colorless blender and soak the ink to the
nib. And it's fixed. Awesome. So now I'm going
to give more shade to the eyebrows simply by
adding some layers. Next, I'm going to color
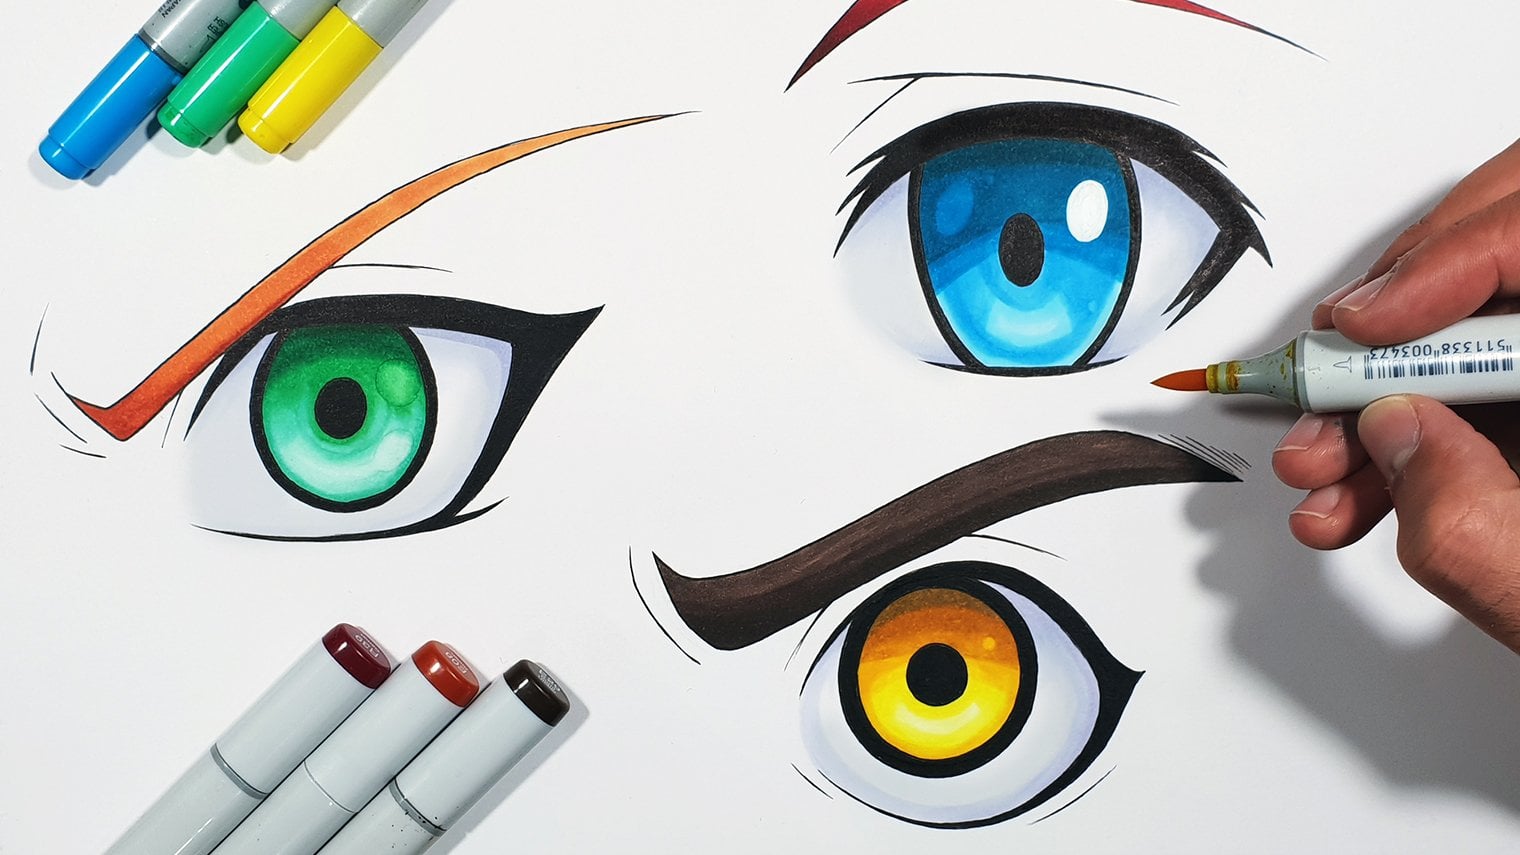
the eyes and I'm going to leave a blank area to
create a nice highlight. We'll add some shadow and blend it again using
the colorless blender. Awesome. So now we can
focus on his glorious hair. So as you know, in this state, his hair is a bit darker. I'm going to start with
the bright stone BO two, and I'm gonna leave
some blank areas again to create the highlights. Next, we'll use the
mid tone, B 26. And again, if you want, you can cover more areas with the shade. I prefer a bit brighter
because of the A. Now there's a different
method to color as well. You can start with the mitne and then use the bright tone. Okay, so I'm going to go
with the second method, and I'm going to colour
the rest of the spikes. Once we are done with that, I'm going to use
darker tone B 39, and I'm going to add
some more shade. And to finish up,
I'm just going to use the colorless blender again. Awesome. So what I want to
do next is add an amazing. I'm not going to go over
the steps in detail because I don't want this
tutorial to be too long. But basically, what I'm going
to do is pick five colors. I'll gradually add each one. I'm going to blend the colors, add more layers to
create more saturation, and then I'll do some more blending with the
colorless blender. And if I need to, I'll do it
again and again until I'm satisfied and reach a nice
harmony with the colors. Then I'm going to add all
the tiny details like some dots of two keys,
some white dots. And to finish up, I'm going to color the
background with the black color. That way, the ra
really sticks out. Okay, so I'm going to let you enjoy the rest
of the process, and I'll say my final remarks
at the end of the video. A And we are done, everybody. This is how you draw Ve
chia beyond supersenblue. I hope you guys and girls enjoyed this tutorial
keeping awesome, and I'll see you on
the next video. Peace.
 Yair Sasson, Artist