Transcripts
1. Class Intro: What's up, everybody. Welcome to another step by step tutorial. How do you like my grabbing
skills. But never mind that. Today, I'm going to
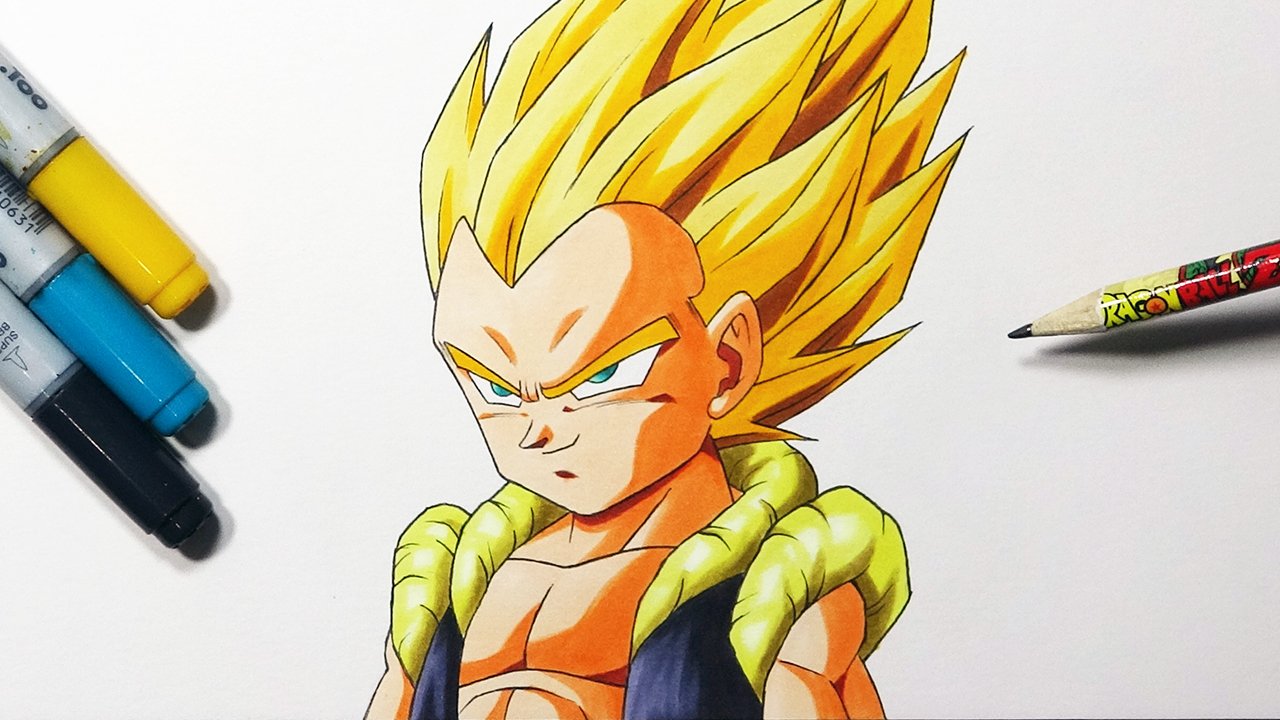
teach you how to draw magine Vajira from dragon boozy. This time, we're going to use colored pencils
for the coloring. This is going to
be a frontal pose, and once you finish the cress, make sure to take a
picture and upload it so I can see it and maybe
give you some feedback. So without further ado,
let's go down to business.
2. How to draw and color Vegeta with colored pencils: Okay, so back with another
tutorial, this time, we are going to
draw margin Vagira from dragon ball
C. As you can see, I started by drawing
a perfect square. Each side is 4 centimeters, but you can draw it in
any size you want to. Just make sure to use
a suitable paper side. So without further
ado, let's get to it. We're going to start by
drawing Vagita's face. This is going to
be a frontal pose, and we'll do that by
using five lines. Following up with the
sideburns and his hairline, join his massive forehead. Next, from the center
of the square, we are going to draw the
wrinkles between his eyes. We'll do that by
using four lines. And then with a
very tiny margin, you're going to draw
the eyebrow and the eyebrow will connect to
the side burn just like that. We're going to do the same
process for the left side. Then to create the eye, we'll use three lines. It will be two diagonals
and the curve. And as you can see, I'm adding
more thickness to the eye, just like in the anime. Also, next, we'll add some
bumps above the eyes. And then the famous check marks. We'll do that by drawing two
diagonals and three curves. Next, we'll place the
nose at the center. We'll use five lines for that. We'll add some wrinkles. Then we're going to
give him a very cocky, confident smile, evil
smile with a very, very tiny gap from the nose. We'll indicate his chin and
we'll refine the jaw bit, going to make it a bit wider. So next we're going
to draw the veins. We'll draw two veins,
one on each side. Next, we'll add the pupils. Don't worry, I didn't
forgot about them. And then we can draw the ears. We'll do that by
using four lines, starting with the shape, and then adding the ditals inside. And if you want, you
can use a roller cross two lines from the top and
from the bottom of the ear. That way you can get the same proportions
to the left ear. Also, next, we're going to draw the neck following up
with the trap muscles. And then we'll draw
the color of his key. As you can see, I'm marking
the center of the chest, and then from that
point, we'll draw the neck muscles, chest muscles. H And we'll add some
creases to the side. Now, initially,
this was supposed to be only a face tutorial, but later on, I decided
to add the torso, so don't worry, it
will come up later on. But that being said, we are going to continue
by drawing Vigeas hair. First, we are going
to start by drawing the shape of the hair by
using this guideline, kind of looks like a flame. And then we're going to
add the spikes of hair using that guideline to maintain the right symmetry
and proportions. To create the spikes, I'm
using two to five lines. If you guys remember this is the super sit two stage
of vagia In that form, the spikes go up a bit
and they look more sharp. Next, we're going to
refine his hair by adding some lines in the
direction of the shape, adding two to three
lines on each spike. Mm hmm. Mm hmm. I'm going to do some
adjustments to the spike. And, of course, don't forget
to add is Adam's apple. Awesome. Now we are going to add the famous Magin symbol
right on the forehead, draw a spike letter M. Now, as you can see, I started the inking process,
but don't do that. Wait until we continue
to draw the torso. So as you can see, first, I want to get a rough
shape of the torso. Next, we're going to refine the gee by adding
some more creases. Oh Next, we'll draw two circles to
indicate the shoulder muscles, and then we'll refine
it by adding the bicep, then refining the
shoulder muscles we got to the interior, the medial, and the rear. Following up with the tricep. We're going to do the same
process for the right side. And then we'll add some more veins to the
shoulders as well. Also, next, we'll do some
adjustments to the gee. And now we can start
the inking process. So for that, please grab your black color pencil or
you can use a black pen. Just make sure to
sharpen the pencil, hold it closer to the tip, and, of course, rotate the page, you can have your
natural hand movement. That way, it's much easier
to go all over the lines. And just to make things
more interesting, I decided to colour the margin
symbol with the red color. If you guys remember
in the anime, when Babadi tried
to control Vagila, the margin symbol turned red. Awesome. And now we can
start the coloring process. So this time we are going
to use color pencils, prisma color pencils
to be more exact. But if you don't
have prisma colors, you can use copic markers. And if you don't
have copic markers, you can use your HB two pencils and just
do some shading just like I explained in the black and white joint
tutorials on my channel. That being said, as
you guys can see, I started with the blue color, marking the shaded area. You want to do is hold the
pencil closer to the tip. That way you can
apply more pressure and then forget more
lead on the paper, thus getting more
color on the paper. And, of course, make
sure to color in the direction of the shape in the direction of the creases. That way, the drawing
won't appear flat. And if you don't want
to smear the lead, make sure to use a paper
underneath your hand. Once we are done with
a darker tone of blue, we'll use a brighter
tone of blue and color the remaining blank areas with the same method coloring in
the direction of the shape, adding more and more layers to get rid of all those white dots. Also, next, we'll move
on to the skin tones. For that, we are going
to use three tones, starting with the darkest tone, a warm brown tone. And as you can see,
the main light sauce for this drawing comes
from the left side, which means that
the right side will appear darker because
it gets less light. Now, I'm not using too much of the darkest tone for
the skin, minimal use. And then we can move
on to the Mton. As you can see, I'm marking all the shaded areas and only after I'm filling up
all those blank areas. Now, what's special about
the prisma colors is they are very soft unlike
normal color pencils, which means you can really
spread that lead more easily. But again, you don't have
to use prisma colours. You can use fabricate color
pencils, whatever you got. Awesome. And now we are going to move on to
the bright stone, doing the same process, filling up all the remaining
blank areas. Awesome. We're going to do some adjustments with
the darkest tone. Just want to make those
veins pop up a bit. And then we're going to colour the eyes using a
blue green tone. And once we are done with
that, we can color the hair. So for that, we're going to
use three tones as well. It's going to be dark brown, then a golden tone, and then a bright yellow tone. As you can see, I'm starting
with the darkest tone, doing the same as
before coloring in the direction of the
shape with a minimal use. Next, we're going to use
the golden yellow, first, marking all the shaded areas and only after filling them up. That includes the eyebrows. And after that, fill the blank areas with
the brightest to. Awesome. So we are basically done with the overall drawing. But if you want to get a
bit of a rougher look, we can add some blood
and some bruises. So for that, we're going to
use the red colour pencil, just adding some lines
right next to each other, spreading them all over
his body and the face. Next, we'll grab the black colored pencil,
adding some dirt. And I'm gonna add some
more blood right there. And we are c. Everybody. This is how you draw margin Vagra
from Dragon Ball Z. Please. Let me know how you
did in the comment section. Keeping some as always, you'll see on the next video. Pit. H.
 Yair Sasson, Artist