Transcripts
1. Class Intro: Mm hmm. Wata everybody,
my name is Zaire. I'm a professional artist
for more than ten years specializing in traditional
art as well as digital art. In this tutorial, I'm
going to teach you how to draw your favorite
character with three steps. First, we got the
sketching process in which we learn how to draw the face and body using geometrical shapes
and guidelines. In the second part, I'll teach you how to
ink your drawing. And finally, in the first stage, we are going to
color the drawing using copic matters
or color pencils. So without further ado, pick up your pencils and
let's get down to business.
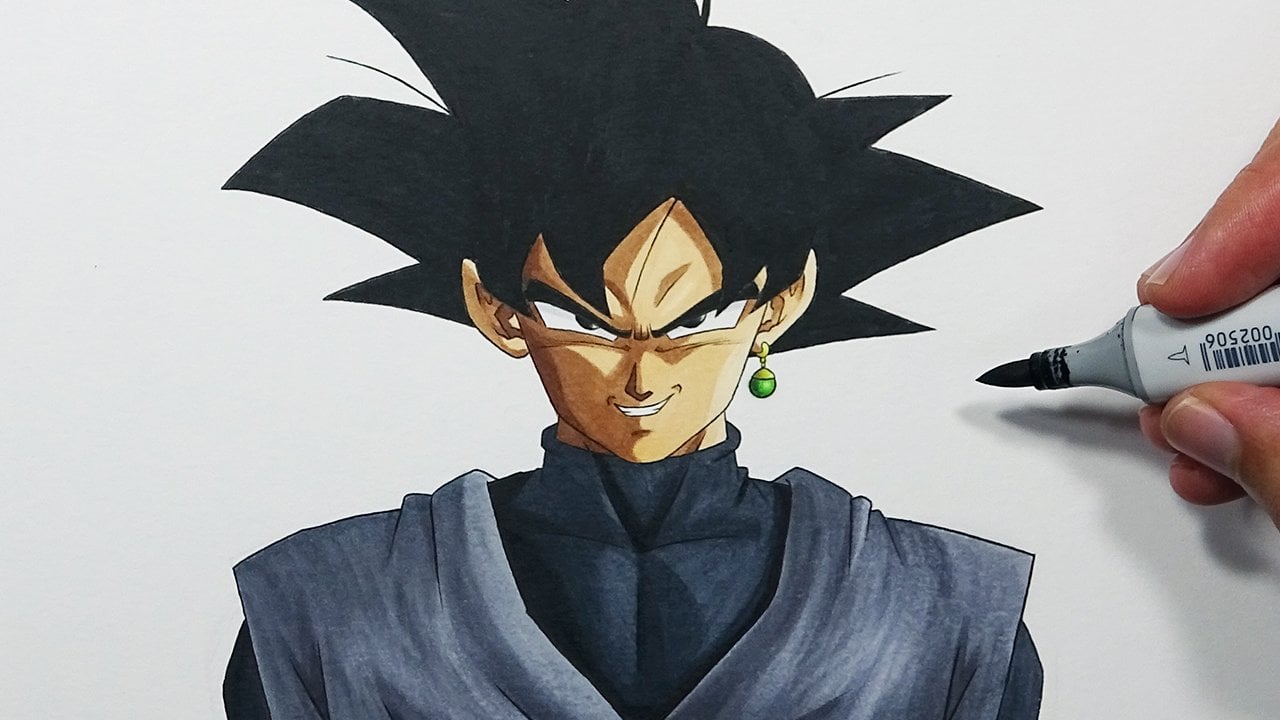
2. Sketching, Inking and Coloring Merged Zamazu : Okay, so today, we
are going to draw fused Samsu from
dragon bow Super. If you'll check the
description box, you can see all the materials I'm using for this tutorial. As you can see, I drew
a perfect square. Each side is 4 centimeters, but you can draw it in
any size you want to. Just make sure to use
a suitable paper size. This is going to
be a frontal pose. We're going to start by
drawing the shape of the face simply by
drawing five lines. Next, we'll draw the
wriinkles between the eyes, and then we'll draw his eyebrow, and as you can see, it gets
thinner towards the edge. We'll add the bump
above the eye, and to draw his eye, we'll use four lines. It will be four
curved diagonals. We'll place the iris and the pupil at the
center but slightly to the left and then we'll
draw his cheek marks, again, with some curves. Also next we'll
draw the left eye, and as you know,
the left eye will be much bigger because
of the mutation. In this case, it doesn't
have an eyebrow. I'm still using four lines. As you can see, it's three times bigger than the other eye eye. This time, the iris and
the pupil will be much smaller. Add the cheek marks. Next, we'll add some
more wrinkles here. And to draw the nose,
we'll use eight lines. Do it by following these steps. Next, we'll give him a
crazy looking smile, as you can see the gap between the mouth and the
nose is really small, and the mouth almost
reaches the cheek marks. We'll give him some sharp teeth. Add some wrinkles. And the next we'll
add some veins. Awesome. Now we'll draw his melting skin
from the mutation. Just draw some leaking, gooey, ugly, disgusting,
whatever it is. And next, we'll draw the ears. So the ears kind of look
the same as Picolos ear, only a bit smaller. We'll start with the shape
of the ear, of course, and only then we'll
add the details. We'll do the same for the
left side, and if you want, you can use a ruler to
maintain the right proportion. Next, I'm going to add some
thickness to the eyes. And now we'll draw
the potara earrings. So first, we'll start
with the metal parts, adding two more pieces that
connected to one another. And then, of course, the jewel and we'll do the same
process for the left side. Awesome. So now we can
focus on the hair. So first, I'm going to start by drawing two locks of
hair from the front. The left one will be noticeably bigger than the white one. As you can see, it covers
his eye and the ear. And next, we'll add some
details for the locks of hair just by drawing
some random lines in the direction of the hair. We're gonna do some adjustments
to the melting areas, and now we can draw
the rest of the hair. So we'll do that by drawing
two spikes on each side. As you can see, I'm using
three lines for each spike. Next, we're going to
use this guideline to help me keep the
right proportions, and now we're just going to
add the rest of the spikes. And I almost forgot about the
spike that goes down a bit. So just add it right there. And the next thing to
do is just like before, adding some random lines
in the direction of the h. Awesome. So now we can
focus on the torso. First, we'll start by drawing two curves to indicate the neck. Next, we'll draw
his shirt color. And the color bones. And now I'm just gonna draw
the shape of the torso, as you can see, it
looks like a trapeze. And once I got the
overall shape, I can add all the details. So we'll refine his shirt. Add all the creases. M, and next we'll draw his arm. We'll start with
the shoulder and then draw the tricep
and the bicep. Next, we'll draw the
button on the shirt. We'll draw the
rest of the color. And then we'll draw his massive
disgusting mutation arm. As you can see, I'm
starting with the shoulder, then drawing the bicep and the tricep will make
it a bit bigger. And then we'll add all those
melting disgusting parts. Awesome. So we are done
with the sketching part, and now we can move on
to the inking process. So what you want to do is
take some inking pens. Preferably the size of the
tip you'll use will be 0.1, but you can use 0.2 as well. What we are going to do is hold the pen closer to the
tip with a firm grip, and we'll just go
all over the lines by pushing lines
or pulling lines. Of course, we'll do that with
our natural hand movement, and you can rotate
the page in doing so because you want to be as
comfortable as you can. Now, for the facial features, I'm going to use 0.05. That's a slightly thinner tip, and I'll do that just
because I want to be more precise and more accurate
on the facial features. Awesome. So once we are done, we're going to take the
notorious Charcoal eraser and just get rid
of all the lead. As you can see, I forgot
to record that part, but just imagine me cleaning
and erasing and of course, make sure to clean it very
well because we don't want to smell the lead once
we use the markers. We are going to
use copic markers. Those are alcohol based markers, which means we can blend
the colors very well. If you check your top
left of the screen, you can see the exact number
of copy I'll be using. However, if you don't
have copic markers, you can use colored
pencils or just use your HB and B pencils
and do some shading. For starters, we'll
focus on the shirt. As you can see, I'm coloring in the direction of the shape. I'll do that by pushing
lines or pulling lines and basically
cover this entire area. Next, I'm going to use a me tone that will be a darker tone, and I'll do that for
the shaded areas. Now, for this drawing,
the main light source will come from the right side, which means that the
left side will appear darker because it
gets less light. Next step will be blending and we'll do that by using
the brightest tone again. As you can see, I'm just adding one more layer to
mix the colors. Now I'm going to
use the mid tone again to add more contrast. And next, we'll use an even darker tone that
will be our darkest tone, C seven, and we'll
add more shade And then we'll do
some more blending. This time, we'll use the me tone to blend the darkest tone. And after that, we use the brighter tone to blend the mine, just like
we did before. Next, we'll use a black tone for the shirt underneath
because it's darker. And then we'll use a dark
gray and a brighter gray. As you can tell, this
time, I started from the darkest and then
went to the brightest. So you can basically experiment and see what
works for you best. Next, we'll colour those
red stripes on the shirt. Again, we'll start with
the brightest tone. After that, we'll
use the mid tone. And then finally
the darkest tone. And of course, just like before, we'll do some blending. We'll use the mi tone to blend the darkest tone and the brightest tone to
blend the me tone. Next, I'm going to do some
adjustments to the shirt because I see I got some
blank areas right there, and we'll blend the
colors just like that. For the button, we'll
use some yellow colors. As you can see, I'm coloring in circles in the
direction of the shape, starting with the brightest, then the metne and
then the darkest tone, creating a nice gradient. Awesome next will be coloring this
disgusting looking arm. We'll do that by using
some purple tones. First, I'm going to start by marking all the
highlighted areas, all those gooey things that
sticks out a bit more, which means they
will get more light. Then we'll use the meton
covering this entire area. Next, we'll do some blending with the brightest stone again. And then we'll use
the darkest stone to add some shade and
we'll do that right below those guy gray things and on the far left of the arm. And you guess that's right
the next step will be blending And now it's just a matter of adjustments, adding some more shade, doing some more blending
until it looks smooth. As you can see, I'm using the bright purple to
blend it with the shirt, coloring on top
of the gray area. Awesome. So we are done with the torso and we can
focus on the face. We start by coloring
the right eye. As you can see, I'm leaving a blank area at the far right, creating a nice highlight. And just like before,
we blend the colors. For the left eye, we use the same purple tones
we used for the arm, and for the sclera, we'll use some yellow,
green mustard tones. Create in some nice
shade and blend it all. Next, we'll color the eyebrow
with the same bright gray, and now we'll focus
on the right side. So for that we'll use
some green tones. Again, starting with
the brightest tone, coloring in the direction of
the shape that's important. Just put in one layer. Next, we'll use the
midtone, adding some shade. After that, we'll use
an even darker tone, adding some more shade. And then we'll use
the darkest tone for the most shaded areas. And you guess that we are going
to blend out of his face. For the mouth, we'll use
two colors, two red colors, dark red, and we'll use a
gray tone to add more shade. Next, we'll use a bright gray to add some shade for the teeth. And now we'll use the same
colours we used for the arm, but this time for the face, just like before I'm
going to start by marking all the
highlighted areas, then adding shade
with the mi tone. After that, I'm going to
use the darkest tone for the most shaded areas right
below those obnoxious stuff. And, of course, we
do some blending. And to finish up,
I'm going to use the bright green to blend the mid area just like that. Also, next, we'll
color the earrings. We'll use three tones for that, starting with the brighter one, then using the mid tone, blending and using
the darkest tone. We'll do the same process
for the earrings. And if you want to get
a brighter highlight, you can use the colorless
bender and basically soak some of the ink
out of the paper, and that creates a nice effect. Awesome. Next, we can
focus on the hair. So I'm going to demonstrate how to color one spike of hair. We'll do that by using
three gray tones. As you can see, I'm
starting with S one coloring in the
direction of the shape, and I'm going to leave some
blank areas at the far right. Next, I'm going to
use the mid tone. Then I'll add the darkest
tone with a minimum use, not too much, and after that, we'll do some blending
with the brighter tone. Awesome. So this is
the result we want to get and we'll do the same
for the rest of the hair. Of course, if you want,
you can rotate the page and color it with the
most comfort as you can. I'm not doing it because
I want you to see exactly what I do.
That makes sense. We'll add a bit
more contrast here. And now I'm going to shout. So please load the
volume just a bit. He. Everybody. This is how you
draw fused amasu. Congratulations. If
you made it this far. I hope you guys and girls
enjoyed this tutorial. Let me know how you did
in the comment section. Thanks a lot for watching. Keep being awesome as always. And I'll see you on
the next video. Hey.
 Yair Sasson, Artist