Transcripts
1. Introduction and Supplies You Will Need: Hi, friends. How are you? I hope you're having
a great day today. I'd like to share
this lesson with you. This is a drawing and
watercolor painting, popsicle lesson that was
designed, especially for kids. You do not need any drawing
or painting experience at all to be successful
with this project. I will teach you step by
step all of the steps that you need to take to
create this cool project. I'd like to go over
the supplies and the materials that you will
need for this project. The first thing
that you'll need is a piece of watercolor paper. You will need some
watercolor paints. You will need a paintbrush. I use a paintbrush
about this size, but if you have a different
size paint brush, go ahead and use that. You will need some clean
water in a bowl or a cup. You will need some crayons
or some oil pastels. I like to use oil pastels
because they offer a thicker, darker line, but that's okay. If you don't have oil pastels, just go ahead and use crayons, and you will need a paper towel just in case you have
a spill or a cleanup. So go ahead and gather those
supplies and materials, and I'll see you back
here in just a minute.
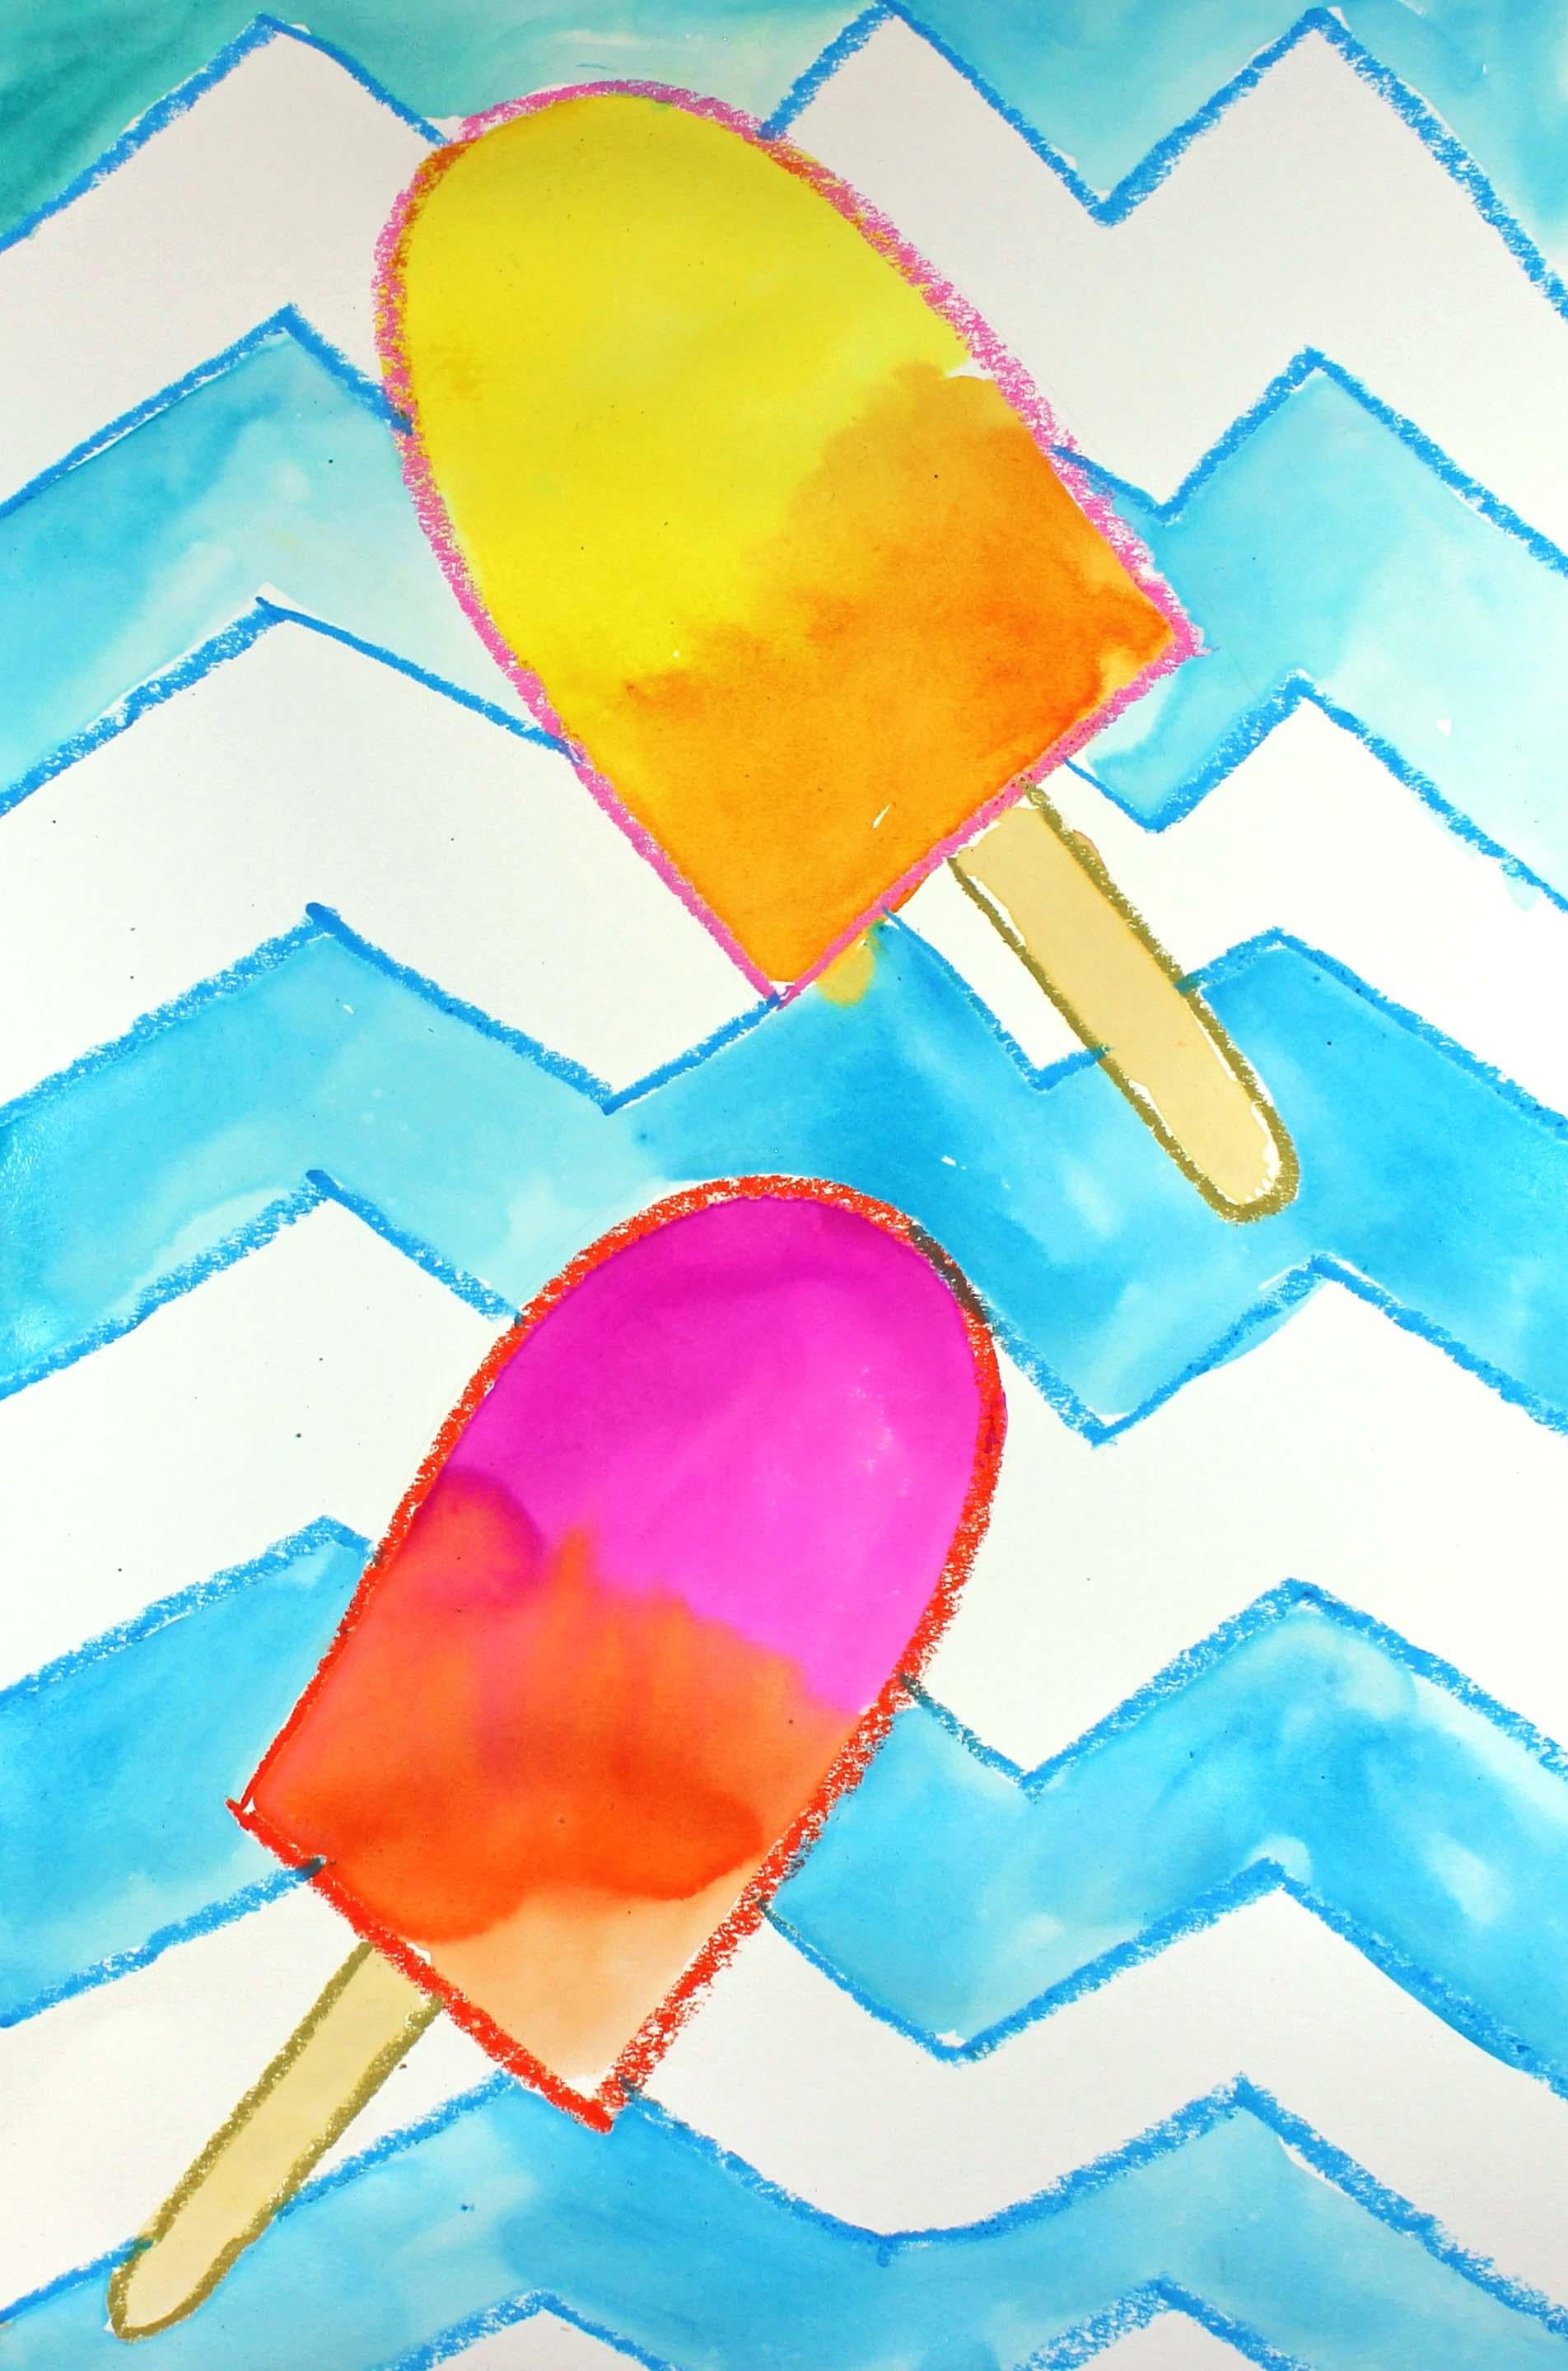
2. Step 1: Draw a Popsicle Design: In this first step, we are
going to draw our design. So go ahead and choose
a color that you'd like to use for one
of your popsicles. I think I'm going to
choose this color orange. I like it because it's bright and it reminds
me of the summer. So what we're going
to do is we are going to create two popsicles. The first popsicle I'm going
to make going this way, and then the second popsicle I'm going to make
going this way. I want them to be really
big on my piece of paper. Small popsicles are
so cute, aren't they? But we want to be able to see these popsicles from
across the room. So I'm going to make my
first popsicle right here, and I'm going to make it pretty
big on my piece of paper, but I'm not taking up
my whole entire space. Okay? Let me show
you what I mean. I'm going to start by making
a really long upside down U. So I'm going to start here, and then I'm going to go up and then I'm going to come down. Do you see how that's
an upside down? That is my first
part of my popsicle. Now I'm going to close it up
at the bottom, like this. All right. Now I'm
going to put that down, and I'm going to choose
a different color. I think I'm going to
choose this color pink. I like orange and pink together, and I'm going to make
another popsicle right here up in this space. So I'm going to make
the same shape as this, so I'm going to start
about right here. I'm going to cop up with
my long upside down, and then I'm going
to close it up. Alright. So now I have my two upside down s,
and I close them up. Those are going to
be my popsicles. Now I'm going to choose
a color for my sticks, and I think the closest color would maybe be about
this color right here. It's almost like a
goldish tannish color. You can choose whatever
color you want, though. I'm just choosing this one. I'm going to make a stick so
that when I eat my popsicle, I can hold on to
it with my stick. So I'm making a stick
here and a stick here. And if you can
see, my sticks are just straight lines coming
down and then going back up. Almost like a super tall and
skinny letter U. Alright, I'm not going to color
these in because I'm going to be painting
them at another time. Now, if you'd like
to put any type of design inside of your popsicles, you can go ahead and
do that, as well. I'm going to have mine be
a little bit more plain, but I will add a couple of different colors inside
my popsicles. All right? For the background,
we're going to make what's called
a Chevron design, and that's basically
just lines that go up and down up and down in a
zig zag all the way across. We're not going to make our zig zag lines too close together. Let me show you what I mean. So I'm going to use
my blue oil pastel. If you don't have
this color blue, that's okay. Choose
a different color. I'm just going to start
going slowly carefully, and I'm going to make a zigzag line going all the
way across my piece of paper. Now I'm going to move down a couple of inches or
a few centimeters, and I'm going to make
another zigzag line, and it's going to kind of be parallel with this
first zigzag line. So I don't want to put my oil pastel or my
crayon onto my popsicle. So I'm just going
to make the motions of where I would put it if I was going to go down like
this and up like this. Do you see how I
did that? And what I'm going to do is
I'm just going to go all the way across and
down my piece of paper, maybe down here like this. And if yours is not perfectly
lined up, that's okay. As you can see, mine aren't
perfectly lined up, either. I'm just doing the
best that I can. Alrighty friends, I'm finished
with my Chevron design. And like I said,
if you don't get your lines exactly right,
don't worry about it. That's the part of
the fun of painting. It doesn't have to be perfect. Okay, so at this point, what I'm going to do is I
am going to start painting. So in the next video, we
are going to be applying paint to our drawing.
3. Step 2: Paint the Design: In this step, we
are going to apply some watercolor paint to
our popsicle drawing. So what we're going to
do first to prepare our watercolor paints
is we are going to drop a drop or two of water inside each of
our pans of paint. And what that will do is it will get our paints ready
for us to use. It will dissolve the
paint just a little bit so that they're nice and soft
and ready for us to use. So let's talk a little bit about the colors that we're going
to be using for our project. You can use whatever
colors you use. Keep in mind, if you choose to use colors like, let's say, orange and yellow
for the popsicles, then you'll want to maybe choose different colors
for the background. And the reason why is we really want those popsicles
to stand out, right? Because we want them to be
nice and bright for summer. For this particular project, I would suggest sticking
with the bright colors. So I am going to start by
painting my popsicles, and I think for this one, I'm going to start
with a bright pink, and I'm going to try to stay inside the lines for this one. And then maybe when I
go about halfway down, then I will add a
little bit of orange, and I'm going to maybe blend
them together a little bit. Just like this. You
can paint yours, like I said before any
way that you'd like. For this one up here, I think I'm going to maybe
paint yellow at the top. I want to make sure that
I get a lot of yellow on there because I want it
to be really, really bright. Remember, if you want your
colors to be bright and vivid, you'll need to use more paint. If you want your colors
to be more soft, then you will use more water. So I'm going to use some orange down here and I'm going to touch them with each other
because I want them to blend together a little
bit there in the middle. Alright, for my sticks, I am going to stick to that realistic color of
a real popsicle stick. I'm going to use a
little bit of brown, just a tiny bit of brown
with a lot of water. And that way, my popsicle
stick will look like that tannish color that I see in a lot of
popsicle sticks. Okay, I'm really happy
with this so far. Alright, what I'm
going to do now is I am going to speed up this video, and I'm going to
paint my background, and I'm going to choose to paint my background, two
different colors. I'm going to choose to paint my background a
blue and a green. So you can watch me do that, and I will speed up the
video, like I said before, so it won't take me long at all, and then you can get
started on your project. Alright, friends, I'm
back, and guess what? I changed my mind on something, and I want to share
that with you. I was thinking that I was
going to use blue and then green for this other part
of my Chevron design. But then I changed my mind. I decided that I like how it
looks with just the blue. So I'm going to stop there, and I want you to know
that if you ever change your mind when you are creating art it's your
right to just stop. Stop what you're doing, if you feel like it looks great, which I think that
mine does look great. So I just want to stop
right there and encourage you to keep going if
you want to keep going, but also stop if you feel like it's the right
time to stop painting. Okay, a couple more things. As you can see right here, my popsicle started the yellow started going
into the blue. I'm going to keep that area there because I like
the way that it looks. However, there's a little
puddle right here. I'm not sure if you can see it, but there's a little bit
of an orange puddle, and I want to bring that up. So I'm going to use
my paper towel, and I'm just going
to touch lightly, and I soaked up that
little tiny puddle. I don't do that all of the time, but sometimes if I
have a puddle that I just want to maybe
soak up a little bit, I just touch it gently
with my paper towel, and it soaks up
very, very easily. I have another puddle here, so I soaked that up
and I have one here. So that's another
option that you can do with your paper
towel if you'd like to. Alright, friends, I hope that
you enjoyed this project. I will see you next time. I
 Em Winn, Teacher, Art Instructor, Artist