Transcripts
1. Intro: Hi, Welcome back to
another Skillshare. My name is Holly soap
plus I'm an artist, author and illustrator, and
I loved drawing animals. This Skillshare is part of
the series or the same, creating cold observation
to illustration. And in today's session, we are going to be
drawing horses. I'm going to talk you
through how to draw horse, which I know can feel monumentally
challenging at times, but they say horses
and bicycles, most difficult things to draw. I'm going to talk
you through how horses put together and how best to take on that challenge
of drawing them. We're then going to be a bit
playful with those drawings and start to develop a
feeling of character, which we're then
going to take forward to our last lesson, which is to create a
finished illustration of a horse that we've developed from our original
observational drawings. I really hope you're going
to enjoy this session. If I'm drawing observations, that illustration is something
that appeals to you, you can check out
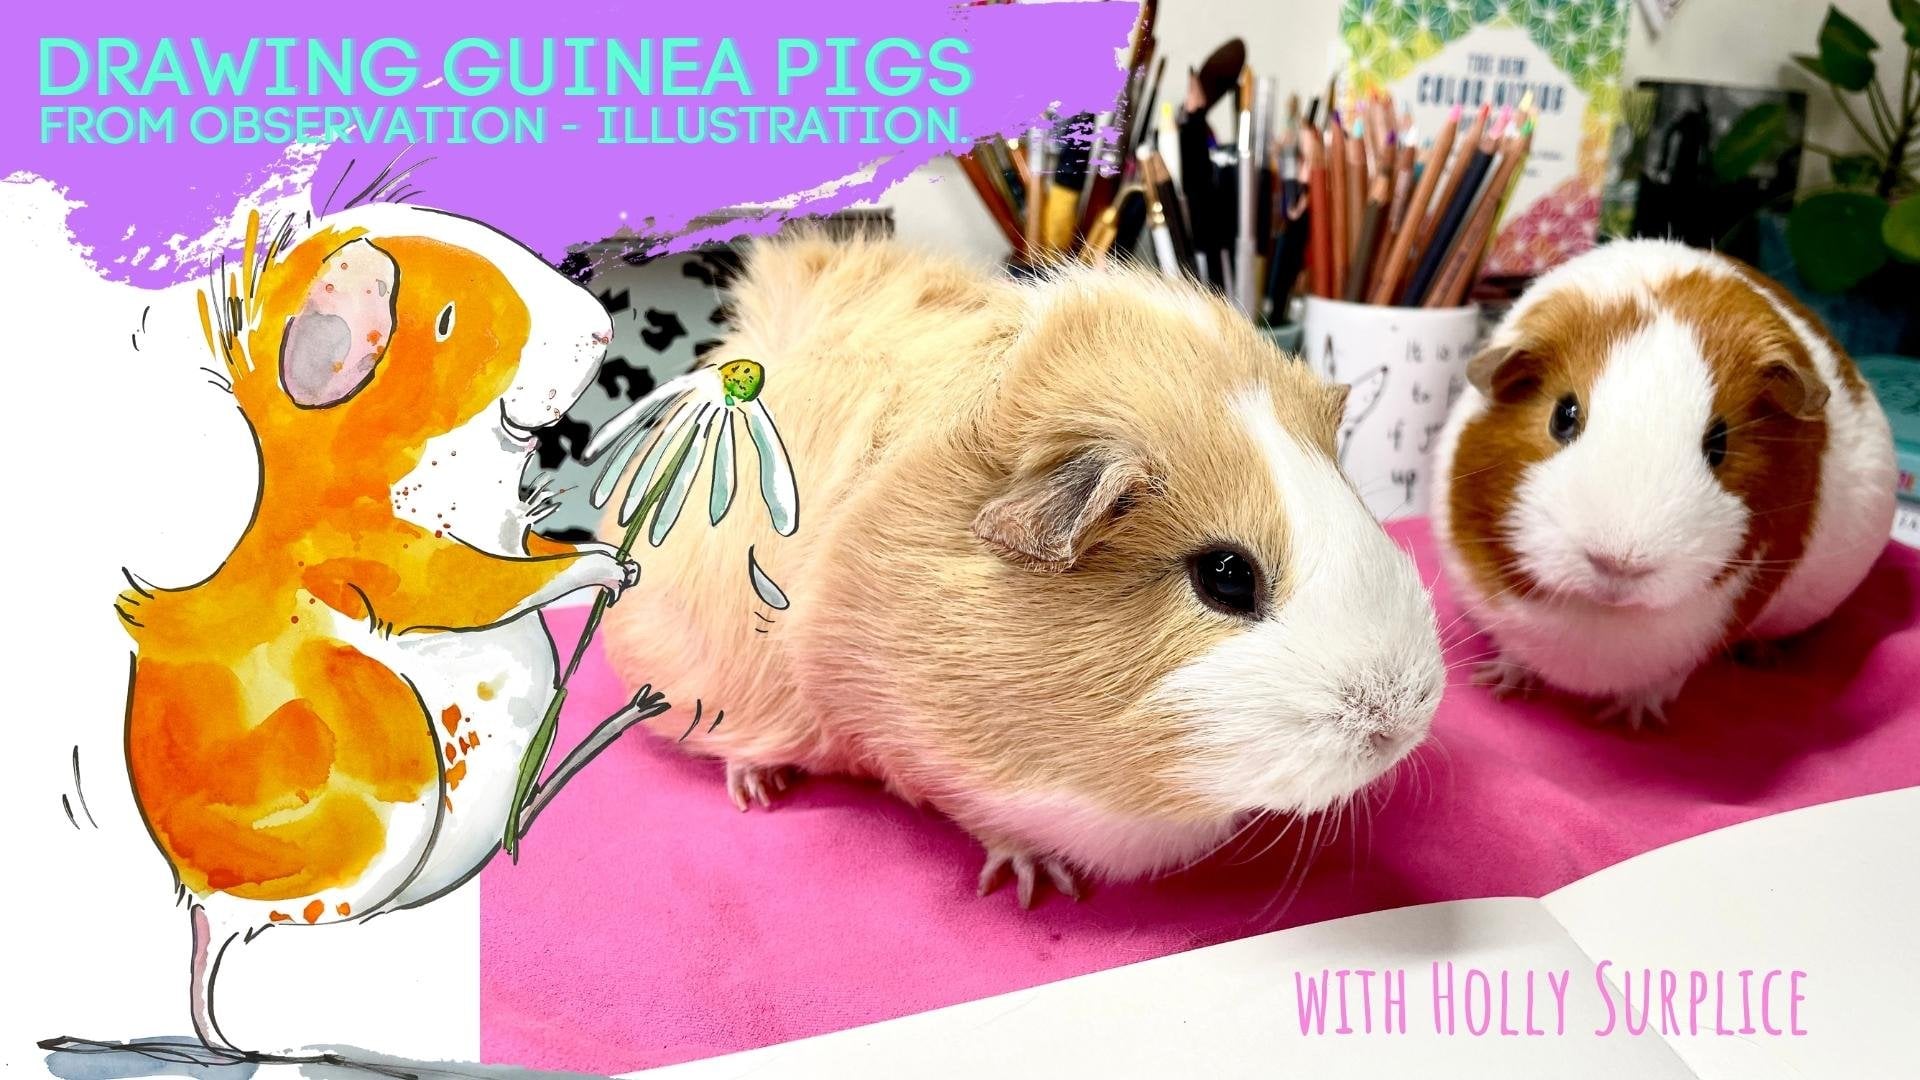
my other Skillshare of how to draw a Guinea pig
observation to illustration. Crack on. Let's get on to the exercise.
2. What tools: Okay, so for this first stage, you simply need
paper and pencil. You can actually draw
with whatever you like. The actual act of drawing
is what's important. It doesn't really matter
what you're using. But for this first challenge, are going to use a
paper and pencil. I'll put a list in the contents of what things you might need
it for this whole course. But right now, grab your
pencil and your paper, and let's get drawing. There'll be an image up
in the top corner that I'm going to be
drawing from and that you can use as well
to draw along with. I'll also provide the
full size image in the resources section to see you can have that at a
bigger scale as well. Let's get drawing.
3. Let's draw some horses!: Okay, so we've got a
picture of a horse. And we're going to just start by having a really
basic lit at night. You probably get bored
of me saying this. But if you're new to drawing
or even if you're not, if you're new to drawing
a certain subjects, the best I'm going to do
is look for the shapes. So I'm being really basic here. Circled bomb, kind
of a slightly longer square on the body. And then horses, they've got you can see
there's an angle, there's a line that comes
across the shoulders. It's more like a
triangle that's there. The neck again is like a triangle that kinda
comes forward like this. And then we've got
another circle here, the cheek, the cheekbone
is really big, but it gives a
really great place to get a good focal point for your drawing when
you're looking at the face. So nice, big, cheaper and
it's bigger than you think. And then go raise straight
face and it kinda comes down. But the undid your
lower mandible starts to taper end and it doesn't
come to a total point there. There might be sort
of squared off. Essentially. You're kind of coming down
not quite a triangle. And then they've got crap
boxy square at the end here. Now, at this point, I can see that I've not
made his chest deep enough, so it's nice and easy. We can just extend that. So we've got this triangle here. Tommy. You can start to, You can start to add
depth and flavor, I guess, to your drawing
as you go along. Here, let's look at those legs, the legs that everybody kind of gets really
worried about it. So we've got this triangle. If you think about
things like joints, they've got the elbow here. And then if you look at him, There's a nice kind of
triangular shape at the top of his leg
and it kinda goes up. So there you go. That's nice. Easy point of reference. And again, the leg tapers down, it doesn't go parallel
to each other. There's a slight tapering. Their knee from this angle is a bit like a
sideways diamond. From the fronts. Their knee is well, I tend to do it as a oval, but essentially it's like that when you're
looking straight on. And that's because they
have their knees made up of these bones, 366 bonds at the front and that kinda come
together like that. And then there's a
spirit the back. So you can see these
bones they meet, they're there and then this is a slight kicking out there. Not much. I find it helps to kind of understand a little bit about how things
are put together. So we come straight down
and nice big bones here. There's huge bones here. And then two disjoint here. This is the fetlock joint. And again, find it easiest to think of it
as a bit of a circle. But again, it's got a spur bone here that there's
different bones in here, but there's one that kicks out. So you can see on him, he has had his legs trimmed. If he was in his natural state, he would have very hairy legs. We wouldn't have to bother
with all this detail. But here he is putting in
this other joint here, and then it's coming forward. If you try and think of balance. If we just went straight
down, he'd like topple. The waste of them goes comes forward and
then it's cushioned. Didn't see this. Again, the foot angles
forward and different horses, different shaped feet,
but that tends to, you know, the basic rules apply. It's narrower, shallower
rather at the back. And then de France so that
you've got this angle. In this chest coming forward
and you turn this angle, you are not really
seeing a huge amount. You're really just seeing a
little bit of the other fits. So we can just pop
that in there. And as we're drawing, we can kinda go on
and we're going to tackle those back legs. Makes sure maybe he's bottom
needs to be a bit bigger. It's okay to not get things
right the first time. Don't get frustrated with
yourself or give up on a drawing because
you are not making the right lines. First-time. It doesn't matter. You don't need to
be rubbing things. I mean, I've made all
sorts mistakes already, but I just keep just
keep going. Okay. So we are back to
this area here, stifle and you can see it's
got this little curve there. And he's a boy, so we've got that there. Now. Their bottom. So when we start to
do this hind leg, it helps to start to shape
the bottom a little bit. So he's got the best
peachy bomb ever. But even though it's peachy, it still has angles rather
than being a true circle. So if we're looking all the
time at my reference image, and I can see that
we need to pull in this angle here and here. If you're ever not
sure of an angle, don't be afraid to just use
your pencil a bit like a cliched held at arm's
length and hold up at your, your drawing, sorry, at
your reference image. And then take that day into your drawing to
check your angles is a really useful and great, reliable way of testing. You're testing your angles. Okay? So he's standing on
a slight angle here, but ultimately you want his
his knee his his front knee. I'm going to check with my check with the top of this knee here. Needs to be in line with
the front of his hock here. So that's about right. And again, we're tapering down. I know he's on a
slight angle here, so with this leg, so we've
got an extra challenge. Essentially, a horse's back
leg goes then it goes out. In this area here is called the hawk because i
and then it goes straight, comes down, and then you've
got all the happening here. Slightly disproportionate. You get the idea. So here's this
twisted around a bit. So we're just going to be
dealing with that by again, just looking at the
shapes that we see. So I'm seeing this triangular, triangular shape
facing the front. And then I suppose it's like a rectangle there and
then it's coming forward. And then we've got this circle here and coming here. So it's going to look
a little bit wonky at the moment because you're
mapping it up, mapping it in. And you can see his
hawk with lingo. Horse's tail is
infinitely useful. I'm blocking any mistakes you make because I made
that too much sticky eyes. So I can just use
the dot-product, this tail as if by
magic, it's gone. Okay. We've got his other leg coming
forward and then straight down again and then it's
kicking out for the foot. Because he is a lovely
piebald horses, what you call when they
are black and white, we can go back in and we can start thinking nearby where
his coloring zone is. That if you want, you can sketch that in being super duper rough. But we can at this stage, we can kind of go around so
we can start to add a bit of definition to our drawings. Now, rather than just being
tempted to draw a line around everything with
the same density. Try and hover. We think about the type of
line that you're using and the weight
of that line. I always really advocate
holding your pencil further up. You are drawing with your
arm rather than your wrist. And that way you can get, you can get more
freedom of movement. And you can turn your pencil
as you're drawing it. Which I always really
like an, actually, I really like even
though I'm going rains, I really enjoy creating lines that almost create a
map of the animal. And I do that using line that I use
different weights with. I press and I turn my pencil. And that's just another
little technique that you can use to
help at definition. And it just stops
you create using the same kinds of
pressure and weight, an outline for everything. Because when we do that, then we end up with something.
4. Heads & tails: Okay, With a horse
is faces quite useful to know little bit about what's happening
under the skin. I've popped up this
picture of Skipper just to break it down a little bit more simply because he's looking straight ahead, which
is very helpful. Most basically, we can think of the horses heads face, sorry. Like this. You break it, break it down very basically into this
cross-section here. Their prey animals, their eyes are on the
side of the face. Here. And here. Very much
comes up to a point. Well, not quite a point
that comes up to this area here is called the pole
and it's between the ears. Okay, So let's go
very point to use. Let's just put those there. You've got your
eyes on the sides. Then. You've got to think about the skull and the muscles encasing and protecting the eye. So you come, you coming out and then that
kinda comes over. You do see he's
got his eyelashes, which as I said in
the first lesson, you have to think about eyes is this sticker on the
side of the face. But they come to
this widest point. Really broad. But everything else
kind of goes in. Much. Skipper doesn't have
a very big main, but we can use things
like that to help. Then from the eyes,
they have this, you're seeing the the front side of the cheek bone
or this big bit, this big sigh cheekbone. We're not drawing this area. So it comes in and it
does start to angle. You're ultimately
your, your, your, your guiding yourself dying
to this point matches. This should be a
bit lower. And so you're seeing the signs
of these cheekbones? My horses faces,
they come forward. So this this area here, this area is like flats
and this slopes down. That helps you. I think you can see that I bet in
this picture of Skipper, but it's helpful
to know that this, this, or this area
flat, flat, flat, flat. So imagine you're stroking it. Flat, flat, flat, flat, flat. And then your hands
would go down here because that's slopey. And then face comes
out and their nostrils are lovely and fleshy
and they will flare out. And also, depending on what the mood the horse is
in and what type horse. Again, this is another
thing that is individual, but the nostrils flare out. And again, you've got the nostrils but then
you've got to encase them. And then it comes Diane just managing to
fit you on Skipper. And they have this
gorgeous lips. You can see here on a Harley has left is
quite chunky and he's actually got lovely
mustache because of the type of horse is skipper. Not so much, but you can see it's got that lovely,
lovely shape. And skip has got
beautiful markings. I always encourage you to use
markings to your benefit. Hover. However, we play around, maybe Google some horses in
different faces and look at all the different shapes
and patterns and colors. Endless, endless variety, which was what makes
them really fun. Characters to use. The ears. Again change, but essentially
banana shape there. They have a little
weird belong there. It comes in and then
it flares lives. But then you need this part to attach it
to the body, the head. Okay. So then there's the opposite. They're sisters, not twin. Going out. And they're always
dark on the inside. The fill of hair, horse's ears, the fill of hair
to protect them, but they go all the way
and that's all dark. See some of his main coming out. Okay. So basic face-on. Let's have a look
at Harley again. So let's have a look
at this next drawing is in slightly
three-quarters view. So I'm just going to
start with I'm just going to do part of
his neck like that. So I'm going to mark in his
ears and I'm just being quiet lights because as we know, things can be changed
later already. I can tell her ears. Not quite right, but he's
got very chunky main. So we can, we can put that in. And again, I'm just
looking at the shapes. So his kind of
angle of his face, that flat surface at the
front is coming down. Their eyes are going
across like this. Everything is on a bit of a curve and you can see
that with his nose band. Okay, so we can get started. We can look at his eye here. And then you can see it's
a little sticky out, eyebrows, eyebrows,
eyelashes, Holly. And then his other I
come in here and again, you've got this flat and then
it comes forward and you've got then the circle of the
actual eyeball is there. I mean, if it helps,
you can put in your circle to help you. But that's essentially
how to get there. I straight across, angled down, circle for the eyeball. Then you can soften the
bottom of that circle. As you like. I'm going to use his markings. That's a little bit of help. Just because I
enjoy drawing them. In his main ear is terribly I'm going to be much bigger. There. I'm now he's got a collar on so you can
put that in if you want. You can use that to help
you with your drawing. But just make sure you
are looking at I mean, usually it's more
helpful to put on last, be honest, but you
can also use it to help you with
mapping out your horse. It's quite hard to see, but his jaw line
is cheek, sorry. It's coming in here. We can see that this part this
part is here on his face. Do you remember me saying
face goes in like that. But you can actually see
really helpfully the shadow on his seed flat area. Flats. And go. Flashy stuff down here. Straw. Come in. Here. You're seeing his Smiley
mouth is really on the side. Now. I keep going from one
ear to the other. And this is my way of balancing because
sometimes if you were to go all the way
round, all the way, right? And then you go back. You can actually find
yourself having gone a bit wobbly in the middle, but it's kind of
almost too late by that point to to make
things kinda match up. So I just find a
naturally go from back, I go back and forth
in my drawings. So here we go. And I can see. This nose nostril needs
to come over a bit more. If you need to go in
with an eraser, you can. At my advice to you
is please just don't, don't become a slave
to try and get things perfect because it takes
all the finite verb. Just need to take
on a frame of mind. Oh, wow, That's okay. It doesn't matter. It's actually, I think
really nice when you see the lines that go into
making up the drawing, not just the finished,
the final lines. I just think it's a nice way to show expression and the
journey of the drawing. There we go. His throat. Again, as I was saying, you can see this shape here. Then you've got
that thing there. And he's got his very humane
and names coming forward. And there is holidays
face on an angle. I can just go in and
tidy up various things. I can put it on the
hair color if I want. And that's going
to help emphasize the shape that we're seeing. Now, I've got one more. Okay. The next image
that I got for you is these are a couple
of new forests ponies. And I'm just wanting
to show you that it doesn't matter what shape or
size your horse or pony is. They have got the say the same thing happening
with their face shape. These same rules apply. Flat area at the front. Just proportionately
things change. You still got these fleshy. They're almost like trumpets on colon trumpet,
trumpet nostrils. Here. You've got the same
things happening, eyes on the sides. And I love this one. It's good, It's great name. I love the profit when
horses have got these. Wild. Unruly means eyelashes you can see sticking out properly. Here. Ponies ears, much shorter
in proportion to a horse. So depending on that one
in the background here, so quite long, his or
her cheeks come out, they're quite a curve to them. That's a characteristic
of this particular pony. And so we can get that. But we can see that these
shapes coming in and let's just use those observe, see shapes. The shape, the nostrils. Again. This is face on. The nostrils are
slightly different. This is a case of draw what
you see, not what you think. You know. You could draw one
nostril and then go, Okay, I'll draw the same on
the other side, but flip it. But it's not because this
is slightly on an angle. It's really rather charming. The nose is pointing
away and we're seeing, you can see the lunder lip
here, which is really sweet. You can just pop that in and
then make that much darker. You can add on some little hairs that he's got a
little star there. You can make marks. Give an indication of that without feeling the need to have to color in
the whole thing. It's not necessary, especially when you're doing
observational drawing. You could put a note
saying blackface. White star, star. That's what this
is called a star. And then this little pink
here, that's called the snip. Snip. To remind you, if you want to go further, you can see from this angle, or D, c is coming,
I legs coming. That's enough freely. This little cheeky number
and the backgrounds. His ear. I enjoyed
starting here. Here, I'm just I'm showing you how I might go buy if I was drawing with I getting so
hung up on the shapes. Because I promise you, the more you practice, the more your brain will automatically make
sense of the shapes. You don't need to
draw the shapes out. So much. Knife fines. I take my pencil for
a bit of a spin. I turn it around. I'm looking and I still
explored the shapes. I still look at these shapes
and planes on the face. In more of a space organic
and less rigid way of fluids like little
nose is wrinkling. And by doing that, I'm just, I'm really,
I'm looking at, I'm looking at, I'm looking at the reference the whole time. That by taking my
pencil for a walk and exploring my way
across the face. It's enjoyable. It brings awareness to your subjects and
you start to notice things that perhaps you might
not necessarily always do. Now, there's one thing
I love about drawing, especially drawing animals,
is you can look at something. But then when you
draw it, you see it. You really see the details
and stuff that you just wouldn't have noticed
when you were simply looking as a onlooker. But as the
observational artists, you really notice things. She can, right? Little wrinkles here. Or some kind of see a bit
better maybe in this one. With the jaw. So the cheekbones
here, your eye there. This, their teeth. They've got their teeth come
like this at the front. So missing here and
here, like are there. But they have molars. It go right up here on the top. So the top mandible,
this is all, this is all teeth and housing
that you can actually see. Look, you can see his
front teeth. Here. I crudely draw them in. So these are his
grazing teeth and the hail trump the grass. Then that goes back
to the back there, whereas it's ground up. So again, I just find that a nice thing to know so that you know,
when you're drawing, that you are making space for the dentistry helps to make
sense of them, I hope anyway. Okay, we're getting a really
good feeling of the horse. There is one last thing I think is always, always
worthwhile drawing. That is a peachy bottom. The high-end view of a horse is. It's always it's
always a good one. I'm not sure. I'm going to bring on a
different piece of paper here. And Holly has a
particularly good bottom. But essentially if you're
drawing a horse from the back, again, let's have
look at the shape. He's kind of rounded. We're gonna go into
the detail in a bit. We're just looking
at basic shape. Basically. It's this,
this kind of rounded, square, helpfully, with
this gorgeous big tail. So we're now actually troubled
too much by the legs, but his legs are coming down and then just put a marker here for where his
feet are landing. And then the legs are
coming back towards. Back towards, and we're gonna
go in with some detail. Got some hawk, sorry,
fetlock, they're here. That means there's concern
about and we you can see the top of his base of his neck. And you can actually see if
we look tiny little ear. To take this into more detail. Or horses bottom is
again, very variable. Sometimes they sloping like that depends how much exercise if had and what kind of exercise. Just like people. And this is all muscle. This is, this is just
muscle and Peachy goodness. So we can really
have fun with that. And we can also, for him, fun with color,
not really helps. The sides of these legs. It's all going to
taper backwards. And you've got curves of these muscles here that
go back towards the hawk, which is here, let me call
it C because of the tail. But you can see the
side of the leg curving and then we've got that fetlock
that range join us here. From this angle. You've got the foot facing away, which becomes a little
bit more challenging. But if we just look at
it and break it down, you've got the back of
the foot right here. Then it's just, it's
still that triangle. It's just going that
way and forward. If in doubt you can use your pencil to look
at your ankles. And then this one
here is, I mean, it's a little bit
lower down and you can really see they're kind
of almost a heart shape, the base, but then you've also got his fetlock
joint will be there. You can only just see his hoof. So you don't even need to
particularly worry about, it. Just helps all. Their feet are always going
to look a little bit strange, but I'm drawing this even
though we can't see it. The legs come out
really narrow here. She I'm just going
to draw the legs as if the tail is not there. And then we'll add
detail on top. And the hawk points
and towards you. Then it curves. And then essentially you've
got this big muscle here. This is just power,
power, power, huge bones in here, supporting all this way. And then the other side as well, this is all muscle and then
it's coming down and then, but then straight down and
really connect when looking. But hardly lesson, he's got
this gorgeous big tail. So let's just shove that on top. Now we know what's
going on underneath. We can add on the fun bits. And there we go. There's more white on there. Then there's this little ear. If you want to put a ground
line and you can do that. I find something like that. It's important sufficient. We're gonna go and have a little bit of a play with different materials
and different ways of developing character and understanding our
horse a little bit more so that we can develop it into a
finished illustration. So hop on over to
the next lesson. Let's get started.
5. Play time!: Okay, Now it's time to start getting a
little bit playful. I want you to have a look
at what you've got a range. If you don't have lots of
art materials, it's fine. You can use coffee, you can use anything at all. In this instance,
I'm going to use, I've got some ink,
I've got Nance, big brush and various
other things. And I'll talk you through
what I'm using as I do it. Essentially, we're just good
to get a bit playful and think about different
ways that we can represents or our host. Okay, So I'm gonna start
by just using water here. I'm just going to draw and encourage the
different areas. And I'm just going to, in a very basic way
create an inky horse. One thing that's a little bit more
random because I'm doing it this way first. So I'm, I'm having to kind of map my host
site a little bit, but some of it
mapping in my head. So this area here, and it might go a bit wrong, but it might go a bit right, and that's the bit. So you could use ink, you could use
coffee, watercolors. Anything at all, t, right? Bina and red wine. Doesn't really matter
what you use as your ink. Just something,
fluids and liquids. So I actually really like that. Even without any line. Six, it looks like I
can tell it's a horse. And I love that. Inc. They are as created its own little I am just going to put
that a little bit. His nostrils. Okay. I might, I might just leave that. Now. You can draw with your ink. You can just go straight on
with a pipette and draw. Just remember this. Papers and gray when I do this, I'm just going to
do a small drawing. We could go straight
on with ink. You could find a stick
and dip it in the ink. Or a feather is very, very good access to a horse. Why not make a brush out
of their tail trimmings? Scalp the whole thing, but I'm little tail trim. And what's fun is we can start to play around
with different colors. And this is the point. This is the opportunity
to be a bit playful. I'm starts experiments
before we do anything else. Because these sort of things come in handy
when we're starting to think by creating
illustrated character. Like adding this purple. Maybe, maybe I'd like to
do crazy purple horse. And actually the way the
brush has gone rains, the I liked that reminds me
of like a Toronto horse. And maybe that's something I want to explore
with my character. So everything you do, is it valid and
important and useful? So don't shy away from, from trying something and
thinking, Oh wow, that's, you know, that's a bit weird, weird, weird with your drawing. I highly encourage
weirdness at all times. So I got, I've got this and I'm thinking I'd quite
like to get some ink. I'm quite sure how
this is going to work, experimenting with you. So I've swapped up for pitcher. Let's just using
some black ink here. Quite sure how it's
going to work, whether it's going to work, what it's gonna do. But that's the fun. This is the bit where
the magic happens because you don't know
what's going to happen. And it's exciting. And let's just see. Okay. That increments the side. Edge. Brush and fun. Yeah. Yeah. This is starting to
happen something. And this is kinda
like playing to his hearing is just going
to borrow that thing. You can do that. It's important to note that the art police will
not come rains. And tell you off if you are doing things that are
little bit different, a little bit, you know,
getting ink everywhere. I mean, I wouldn't recommend
getting income a cockpit but then met well, if it's scratchy, lines are held together
by some smooth lines. Like he's been through
like a Bramble dish. I hope you're getting the idea that anything goes at this stage that you are playing
with your art materials. Seeing, seeing what
happens as you like those scratchy marks. Trying to get a bit more. Just borrow some of that. Maybe scrub That's nice to never underestimate the value of scratching through
in campaigns. Also, really lovely
things happening. Then you can draw
on top as well. I just got a little bit lost, but that's okay.
I like this one. Combine your materials
and see what's, what things go together. I challenge you to really have a play and figure out what, what, what works together, what makes you happy when
you're making the drawings? Because that's what
it's all about. It's much more
important to enjoy the process and the
finished products. Honestly, just use
this time to be playful and do all the things. I thought I might try. I've got this piece of paper, but I did see me just
color experiments. And what I thought, I might try. Let's have a look. Let's
let's try it and see. I'm I'm just I'm just going to look
and might not work, so Let's try it. I don't know. I don't know
what's going to happen. Here. We're all on this
journey together. But it's really nice to make use of materials like bits of artwork that you've
maybe not used, decided to not do
anything further with. I want to say I wasn't imagining
I was going to cost more light from this,
but it's happening. It's happening. People. Harley, you are
gonna be very jazzy. It's not looking much
like a horse yet. It may never look like a horse. But basically, I am the areas that
I've cut his patch. This is the black areas. I find myself collaging
without glue. That's okay. We're just going to sit
down there. Just do that. Then. Let's take a bit more off. Okay. Here we go. Strong top. And then this face, It's like he's gone
back in time and he's, he's selling a
psychedelic experience. And I'm completely there for, maybe my character is going to be some wall of a
rainbow horse who knows. I've stuffed up and I'm just
going to tear off his ear. Tear off his ear and
bring it forward. Because I can do that. Here we go. Actually, what I could do is cut this all. Do something a little
bit scraggly with late. I might shoot. I'm having so much fun. I hope you are managing
to find something that's giving you as
much pleasure as well. I'm having, I think that's
a little patch here. And maybe just put some little marks or
woodshed, so ugly. I'm gonna go back
and get some good. Okay. Yeah, that is my colorful. Hardly needs to stick down. That was so much fun. Okay, so this is really
interesting how this is drying. It's like waves in
water and waste. This is where it's really
lovely with ink and anything wet is if you just let it be, let it do its own thing. And lots of happy accidents
can, can come about. Something that is very nice
to draw with a scar speedily. Especially when you've
got something like this. You can just use a pencil or you could just use
it for the hairy, but it's a great way to
recycle stuff like this. A bad You or someone you know, has got a dead mascara
that they will happily donate to
your creative course. Just going to ask them but
look how it's kinda fun, exciting lines that
we make that choice. Got plenty of them. They are brilliant. They useful an underused tools. In my opinion, we seem to associate finger-painting
with childish, the childish way of working, but I often love remarks
that you get there, you get a texture
that is often really, really useful for using in things like my dogs noses and just paint in a
little bit of texture. Right? There we go. I've got page filled
with just creative play. And the really
wonderful thing about this is that even though
you've just like, you've been laughing about
it with sticking things on and you might not
think that you've been doing anything
particularly useful. Let me tell you that your brain through this whole
process has been continuing to absorb like
a sponge information about how a horse is put together and how to
represent them on the page. So it is oh, valuable and all really useful in moving forward
to the next stage. I hope you've been
having fun to do as much playing as you like. I encourage you to do that. And then once you've done that, let's hop on over to the next lesson and we're
going to start thinking about developing our observational drawings
into illustration. I'll see you there.
6. Developing Character: I brought my sketch book or for the character
development stage of this is just a
personal preference. You can do it on
this piece of paper. Probably easiest to work
with a pencil at this stage. But again, It's entirely up to you draw with whatever you
feel comfortable with. When we're going from
observations, illustration, when we're starting to think about turning something
into a character, essentially you're
wanting to start thinking about exaggerating
those features. When I'm starting, I'm kind of loosely starting by drawing. This is the face on. I've gone in with the shapes, but I've kept a really
simplified them. I tend to make my animals
quite juicy look. None of them look like
they missed a meal. So my shapes tend to
be quite rounded. At this stage, all I'm
doing is redrawing. Essentially what I've done, but I kind of softening it. Looking at simplifying
the shapes, including the eyes, my
eyes tend to just remain. Those shapes. I like to keep eyelashes. Maybe it's rain starts to
become a bit like that. So I'm still very much
force is not gone to. Nothing too exciting stuff. And yet now he does have this shape from this
face with that. I think I'd like to play with. And I quite like the
fact that it already goes off to the edge and
then this is all pink. Okay, I could
develop this again. So what we're going to do is
we're just going to keep on, just keep from it,
just keep drawing. We can redo this face eyes. We can simplify it down again. Maybe the main is becoming
more exaggerated. Maybe the nose, for me is weird. Thing it small. Like the curves. Maybe the nose comes
into like a very tall. Again, I'm just saturating ears to look at hormones. Also. Yes. I'm thinking that needs to come back if we completely simplified the ears, the nose, because the nostrils
become super simplified. This is your opportunity
to like a skull there. To discover the illustration
style that you want. This is your opportunity to figure out what you like
and what you don't like it when it's got more
shaped like this. Let's keep going. Let's keep on simplifying. So I'm growing, I really basic, maybe bringing the eyes of it to the front of my eyes tend
to be alike, the shape. But you could do something where you've got
space around the eye. You could have dots, circles you have
the more realistic as you can sometimes you can just really quickly
get to fill out. Nope. Nope. Not for me. I'm still I'm still find my horse. Yeah. It might be that. I will find it in
another drawing. I'm going to do one
more like this. Like it when the
eyes are further. Maybe. This feels a bit nicer. I'm not worrying about color. And then just tonight, I'm just I like this one. Then I'm going to start
thinking more to the side. So we can start with our
basic shape of our horse, the neck, ears, and then
take it from there. So maybe like this
big main session, the sides and the top is, I would make it be I do like the shape. Who keep paying. I do love a side profile because it can get more opportunity to playing around with
things like names. Quite like him. He kinda matches that profile. What would I do to
match this guy? There is simplified ears. That main and face. Simplified like this. Let's see Is other
ear scratches, small, nose. Just try not to over there. Then maybe he's just put
like a really little knife. Might not need to
have any mice at all. Sometimes characterised,
don't have that nice. Or would happen if rather
than having a blaze, he's got a patch like like Harley main like that would be a
little bit heavier. If you doing dark, just just leave some
space around the eye. I'm still has its
written to brief. You go back in bigger I this time. Maybe as main comes forward
like that, That's cute. He's got some kind of Beardy Like Holly had. Maybe it's just a simple
most simple shape. Her in the face. Like her
kind of more tongue to horse. Maybes a spotty Apple looser. Maybe. Here's me just starting
to think about things. Maybe he's mocking making up as I go along here, can you tell us they have the hand
mark, their person? This is where this
is kinda the point for me where stories develop and then start to think about the character starts
to develop that. And by doing these things, I'm starting to sort of thing. Well, what has happened
with this for sports? You know? What's the story? Why is it? Where's this person and why
is it have these markings? What do they want to
the markings mean? And stuff like that. Just starts to develop and
we think about the money, but really like this one. Let's see what we
look like on-site. For going for this
sort of thing. I'm thinking, wow, we need to, we need to keep
those nice shapes. Again. I'm just
keeping it light. But essentially if we're
really simplifying it, you could have your horse
a bit like a jelly bean. Make sure you've
got enough space. And I like, I'm going to have
mine main coming forward. Cheeky little ears. Ears, face. Shape is that I want, so I'm going to let that influence what's happening with the rest of the body. Keep them nice and curvy. Lie there. I haven't decided yet
what his face path name. Neck is going to be like. The nice round bottom because that's the way I do it. Tail coming forward like
that, comes backwards rather. Now, I'm using on my understanding
of a horse that we've, we've looked at and
we've observed. And I'm just simplifying. Now. I mean, we could do the
legs as simple as that. I'm going to keep it as simple. Like a circle. If he's got I do want them
to have proper horse legs. You could simplify your legs all the way down to
just pointing up. And it's whatever works for you and whatever works for the character that
you're developing. You might find that. You might find that you want to have your leg
site really super, super simple because
that's going to help you to animate your, your horse throughout your, if you're creating a story. By animator, don't mean
make a picture film. Mean like an actual film on
meaning through illustration. Having animated Illustration. Little hairy on the
backs of this locks. The further away leg. Make sure the grind line of it as a little
bit further back. That'll be your
debits. Big tail. And see it's partly
through his legs. But we can start to now go back and refine those details. We want them to be my intervals. So but I'm going to maybe do so. So maybe they had like a looser, maybe he's gonna be a spotting. You can, as I said
before, you can hover. We look at the
different types of horses and get some
influenced by that. I want him to have, I cannot show. That's cute. Maybe he's just
really spotty course. And then we'd get some color on. Maybe he gets drawn
onward, it's blue chalk. Maybe they do a
circle lines this I don't know what. Marketing. I think I will go
and do a little bit. A look. I could do pretty much anything, even if it's just
as simple as that. Bans on his leg. Little more paint. I like it. I'm starting to feel like
character is coming to gather. Useful to sort of
think what maybe he'd looked like from behind. Get a peachy bottom in there. And again, THE bomb, but then the legs together and playwrights game
as we remember, gets, give that tail
a bit of movement. You can really get away with
my parents, my products, really get away with not having to say very much
at all about the fees. With a back view. Especially if you've got a
horse that you've developed with a lovely big tail. That is, all I just need to
do is show the grind line. And you could make the tail even bigger and
cover the whole lot. But I'm gonna give them lovely, peachy,
almost heart-shaped. And maybe I'm going
to try and have them so his head is turning. So you'd see a little bit of
the top and then come down. Remembers further away. Looking around and pick my pencil is going a bit blunt. Much coloring in. I just try and try and think of him turning his
face to the side, but I'm able to use reference
this and just read that. And it's further away. Yeah. What the bottom. I am enjoying his very
much night and I'm really looking forward to seeing what it looks like in
the finished illustration. You've all gotten on. I really
hope you enjoying your, enjoying developing
your character. You can spend as long
as you like on this, there's no there's no right or wrong or anything like that. It takes as long as it takes. Sometimes you can be doing going on with this sort of thing
for a long, long time. Or just had a cheeky
little thought. Maybe this little pony, little TOM to horse in my
circle around some spots. Maybe even create some
part of his war paint. This is quite an
exciting and that's coming from that collage I
did with all the colors. Okay, this is gonna be fun. I think the next stage. The next stage, we're going to create a finished illustration. We're going to figure
out how our character, we wanted to draw our
character and its final state. So hop on over to
the next lesson. We shall see there.
7. Let's Illustrate Line with Dip-Pen & Ink: Okay, so we're
going to get going with creating some final
illustrated artwork. In my hands are the tools
that I'm going to be using. I'm going to demonstrate drawing using a dip pen but also
quick version with a, with an ordinary water fast. This is a Tombow pen and there it's called
a brush like nib. And if I'm in a rush, this is what I use
because it dry. It's almost instantly dry. And you've not got the
drying time of this. However, when I'm making
finished artwork for a book, this is what I use. Net with a flexible nib. I like to have a good
bit of splay there. The ink that I use is this. It's matte, which means that
it's not shiny when you are taking photographs or having a scanned and reproduced. It's waterproof Indian ink. When it dries. I can
paint over the top of it. And the color I'm going to use, I'm going to use these
eco line watercolor inks. You can use just, I mean, you can use anything at all, but if you don't have ink, so you can easily use standard
watercolors or water, or just ordinary pencils. Colored pencils. You need a
pencil and an eraser as well. I'm going to be drawing
onto some hot press. Watercolor paper. Hot pressed means super smooth, means there's no two in the
watercolor paper at all. That's the way I like. And again, it's total
personal preference. Some people like it
when there's the, the, the tooth and the green
in the watercolor paper. My preferences for it
to be really smooth. So that's what I'm
going to be using. I am going to be referencing my little horses
and I'm going to, I feel like I've, I've really
got this character here. It's come from this shape. I started with that, then went to the shape
and then I decided, or what happens if
we make patches. And then I started drawing
markings on him and thinking that or maybe he's like
a painted Toronto horse. And then what would happen if we start to
bring in some colors? So I'm excited to translate him into
finished illustration. Let's do it. Let's
do it, everyone. My. Now, if you are planning
on using lots and lots of water with your illustration, you will probably be advised to stick your paper down and
that will stop it warping. Another alternative is to use a gummed block of paper.
They're brilliant. I love them. For this purpose. I'm going here. You could draw straight. If you feel confident, you can draw a straight
ahead straight on with your, with your ink. Most people, you probably going
to want to lightly sketch out your horse in pencil first and then the
pencil can be raised. Quite chunky. And this, of course, this is the point to not worry about
if you get things wrong because we're still
at the pencil stage. So this is why we do it. When I'm doing my final
artwork for my books. The way I did is
I have my rough. Then I use a light box
rather than drawing pencil. And the reason for that is the printer firing
up in the background. The reason for that is that the less raising and robbing
you can do on a, on paper, the better. Every time you do something
like that on the paper, it disrupts surface of the paper and causes it to rough
up a little bit. So if you can find alternative ways where
you don't have to do that, then all the better chunky hair here to come forward. Really important to get
the eye placement right. So just take your
time and figure out because you can you can re
position at this stage. Here. Forward. I've made his legs a little
bit short time. Would work for his other leg. Yeah. I'm just making him a bit in his body a bit
thicker altogether. I think he needed that. Better. There we go. I can
feel him though. Yeah. Okay. So I've got him here.
8. Let's Illustrate with Pen & Watercolour: Okay, let's go ahead and try
to draw with the Tombow pen. Now, my way I like to do my illustrations is I'd
love to have a pen line, but there is no hard
and fast rules. You might create illustrations where you want just
a pencil line. For a charcoal line. Maybe there's no line at all. It's entirely your
coal because this is your space and your,
your illustration. I'm going to go straight
on with drawing, any, drawing, any
pencil lines first. Try and keep those lines
a little bit cheeky. This is what's good with this. And you can see that I can
go up and then push down. And you get this nice
feeling of variation. I, you know, I take my time, I measure and assess what's
going on. As I'm drawing. It's going to have
this little beard I do like that feature. Like this little,
little worried. He's got his nose at first. Can't see the obvious
place for the eye. It helps put the
nose and then you should really be doing. Because looking at
my other picture and seeing how many are where
my spot placements are. If I was illustrating a book, this is what I'd have to do. I always have to match. I mean, no millimeter. Perfect. But I would have to I would have to match up the spots on my
character so that it was universally matching. The other little thing I might
get that peachy Bellman. I am because I want there
to be a real emphasis on the roundness and the
peach genus of the bottom. I've made my marks quite heavy. And that's going
to give space for the marks I use on the face
to be a little lighter, which will help describe
it being further away. I'm just glancing up all the time at the sketches
that I've done. I'm not doing
anything magical by being able to draw straight
on the paper with the pen. I'm just, I'm just copying awards what I have done earlier, but I'm simplifying it. By c. I'm going straight
in with my line, so there's no sketchiness. That's the only
difference really. Different sizes and shapes
really help with surrealism, which sounds like a really funny thing when you're drawing. Like her clearly
realistic character, but stuff like that. It's a balance is
instead of having things that are real or not, real and things that are not. Okay. Let's get some color happening. I'm going to use a
finer brush than usual because they've got
these spots and things. So I I can't really didn't
make my mind up by the color. But I've decided on this one. I might make them do
different color varieties, is going to have these patches. I was toying with having
them kind of a yellow, a slightly palomino color,
or orangey chestnut. But then I've decided because
I want to add color with the paint painted
markings on him. I decided that having a
friendly neutral color for his real spot was
was a good thing. And as you can see that that
Tombow pen is not bled at whole little speckling, right? That you give them. It's got a pink nose. I'm going to let that dry a
little bit and move over. Now. Let's, let's try. Let's try and see
what it looks like if we do a different color spots. These are water color inks. They will bleed if you touch
them again with water. Once they're, even
once they're dry. You can always make
him very fluffy. Cute, cute. I like to have to add a little bit of tone tonal shading
to my drawings. Sometimes I'll use a brush pen, and other times I'll use a Payne's gray
that's watered down. This is just a warm light gray. You see is it's very pale. And that's because I'm rushing. Reactivating. This would have been
more sense for me to do this before
doing the spatters. So if I was creating my final art work or doing practice run
for my final artwork, I would make a mental
note to myself while they do the spatters loss. Every day is a school day. For the hair. Some little shadow
under that nostrils. Here. Darker.
Shadow of the feet. Really quite what I
need to be careful. I'm undecided right
this second as to where I whether I want to paint Hong the painted markings or if I want to let this dry
and draw them with pencil. I think what I'm going to do is I'm going to let this dry. Come back or a pencil. Oh.
9. Colouring with Watercolour Ink: So the ink has dried
and we should be safe safe to erase
the pencil marks. I mean, I recommend not like
heavily palm rolling away. I'm usually quite light, especially around
areas where I can see the ink is
little bit heavier. As I say, it is just the worse thing when
you've done a drawing you like. And you capture a mark at
this stage is removed. He's ready to paint. You can see or simon about that ink with its matte finish. It's not shiny, which
is really nice. I'm ready to go. So the other drawings
that I've done which aren't quite finished
and aren't quite dry. I've decided I'm going
to paint this next one. I'm going to use this
unlike the blue light. I mean, I like both of them, but I think this is going
to be this gonna be sweet. So I'm going to go with that. You just see this. You've messed right. Cracking on. I'm going to start
with I'm going straight in with just
using the pipette to drop in this tiny bit of
pink color on the nose. Sometimes I like to just
use the prepared to just, I suppose I'm being
a little bit lazy, but it saves kind of dirtiness. Paintbrush. I don't need to and sometimes it
just I just like the instantaneous delivery of a good amount of color and ink. I've done the same
here by dropping on some ink onto the patch. And then I'm just
using my paintbrush to spread that around I because the ink is already fully liquid, I don't need to
dilute it with water. I could do if I'm wanting obviously to dilute
down the color. But in this instance, I'm just using the
pure ink itself. It's why I really like
using these inks. You guys are great delivery
of color intensity. But as with all watercolors, when it dries, you need to expect that
it will dry lighter. But I do find that
with the inks. The difference is
a little bit less than using, say,
pan watercolors. It's entirely up to you though, how you want to, or what, what coloring
materials you want to use to add color to
your illustration. I'm using a wet medium here. I'm using ink. You could use acrylic paint or gouache if you
wanted it to be wet, you could use colored
pencils or pens. There's really no rules, no regulations at all. It's a by what you've
got available to you, but also what you enjoy. So have a look around, try different things and
just have fun with it. Just speeding up
through this process. Sometimes I use the
ink prepare to just dot on some extra spots. So not all the spots are
encased in this black outline. I kinda like that. I'm mixing it up probably
about making sure that the ink is I'm wanting to have the
dark areas in the tail, but because I don't want it to just look
like it's shadow. I'm making sure that the ink
is nice and intense. There. These pens that I'm
using for finer details, I absolutely love their eco line brush pens
and they're actually the exact same ink that I've been using
that's in the bottle. You can match your
colors if you want to. But the brush pen
itself delivers really gorgeous amount of ink. I just really, really like
these pens and also you can recharge them by using
ink from the bottle. Which means you're not throwing away extra plastic from
the pens, which I love. I use them a lot in the finer details of,
of, um, illustration. They're just really handy. I'm just using a bit
of tissue to mop up the pink on the nose was
looking a little bit intense, so I've just lifted it a
little bit with the tissue. What you can also do
even if this is dry, I'm just clean your brush and it's just got water on it and lift some of the
color off that way. That work also
works brilliantly. It's time to draw on these painted decorations
on our horse. And then the end, I decided
to just use the puppets. And the puppets on
these inks are quiet. They've called it
can be quite sharp. So I can feel quite
confident about being able to get
fine enough lines. And it just, I mean, it's just fun,
that is fun to do. And I'd find myself kind of
overthinking it a little bit and just decided
to go for it. And I'm really glad I did. Some of the ink on
around the eye patch, as you will see, it leads just a little bit
into into the blue. And that's the sort of
thing that just happens. That again and I'll say it
again and again and again. Do not panic when things
like that happen. There is always a
fixed around, um, as long as you keep
your head and don't just through your artwork in the band or
anything like that. You'll just see right there. I let my line come in contact with the edge
of the blue line, which still with wet. And so immediately the purple
ink kind of sucks into that blue space and it
made it a bit too purple. So I just went in
with my tissue. I soaked it up. And then I've got then I go back in with
a bit more blue later, I take some really lovely warm, pale gray ink and work in the areas of
shadow that I want. I always like to do this. I just feel like it, it brings that kind
of level of finish to the artwork that
I'm looking for. So I just work my way around. I'm kind of looking at
the picture as a whole, trying to make sure it feels balanced and using
the shadow to help find that balance to this no particular
source of light with us. So I'm just working around and putting it onto the
neck under the chin. Helping his great help to find some of the
little bits of Maine and making a few marks
which help deliver that extra feeling of fur
and hairiness to this horse. I felt like he should have a little bit there and
the tip of his bag. But there we have it is
looking pretty good. And I feel like I'm
almost finished. There's just one more
thing that I feel like I need to do on this
piece to finish them up. Can you guess what it is? That's right. Some
ink splatters. I've just dipped
my paintbrush into the blue ink and I'm kinda
of karate chopping it rather than flicking it
so that the ink drops directly below the brush
rather than spraying away. And that keeps, keeps it
a bit more contained. If you're particularly worried, you'd need to place
some protective paper. Lastly, don't forget
to sign your art work. You've done a brilliant job and you should be
really proud of it. I'm really looking forward
to seeing what you've done.
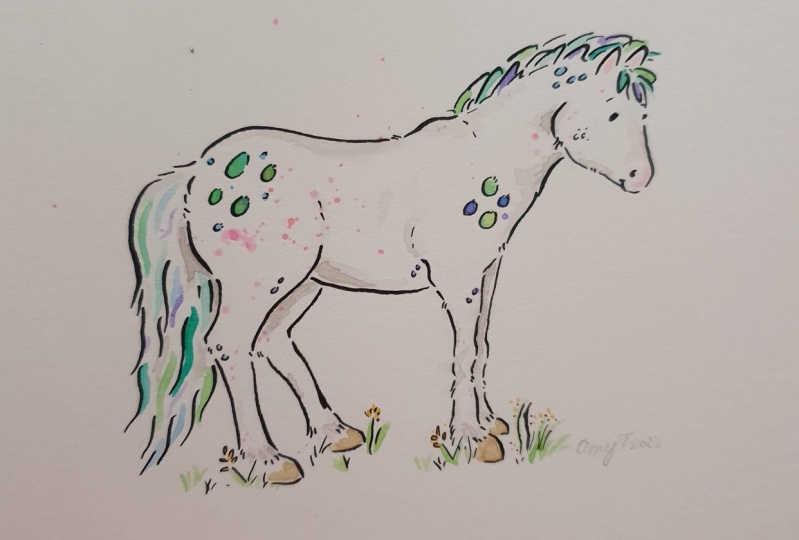
10. Thank you!: So there we have observations,
illustration with horses. I really hope you've
had a great time. I've loved it. I'm surrounded by horses, which makes me very happy. I really enjoyed that process of taking those drawings and developing them
into illustration. I really hope that you have to, if you've enjoyed
it and you want to try something else with me, check out my profile
page and you can see what other Skillshare's
I have available. Until then, please feel free to share what you've
been drawing. I'd love to see them. And until next time, take care and happy drawing.
 Holly Surplice, Artist, Illustrator & Author