Transcripts
1. Introduction: Hey there, welcome to my macro, my key chain course. I'm Andy from IT, letters. And you can usually
find me making calligraphy or fine art
pieces with flowers. But every so often I enjoy
bringing up my craft, decide to, to change
things up a little. This time, I decided
to share some of this crafting knowledge
with you. In this class. We'll cover the basics
of what macro MA is, how it works, why it's such
a fun and rewarding crafts. And best of all, you'll
end the course having major very own key chains
with your own two hands. Looking forward to
it, I know I am. See you in the class
2. What is Macramé?: So what is macro? Macro MA is a type of
textile art that involves knotting cords or strings to create various
patterns and designs. It's a very versatile craft that can be used to make
all sorts of things, from wall hangings
to plant hangers to jewelry and of
course key chains. One of the great
things about macro MA, is that it doesn't
require a lot of expensive or
specialized equipment. It's accessible to
just about anyone. It is based on a few basic
nuts that once you learn them, you can create endless
variations and designs. So it's a craft that
never gets boring. And of course, there's something
really satisfying about creating something beautiful and useful with your own two hands. So let's check out
what we will be creating in this class today.
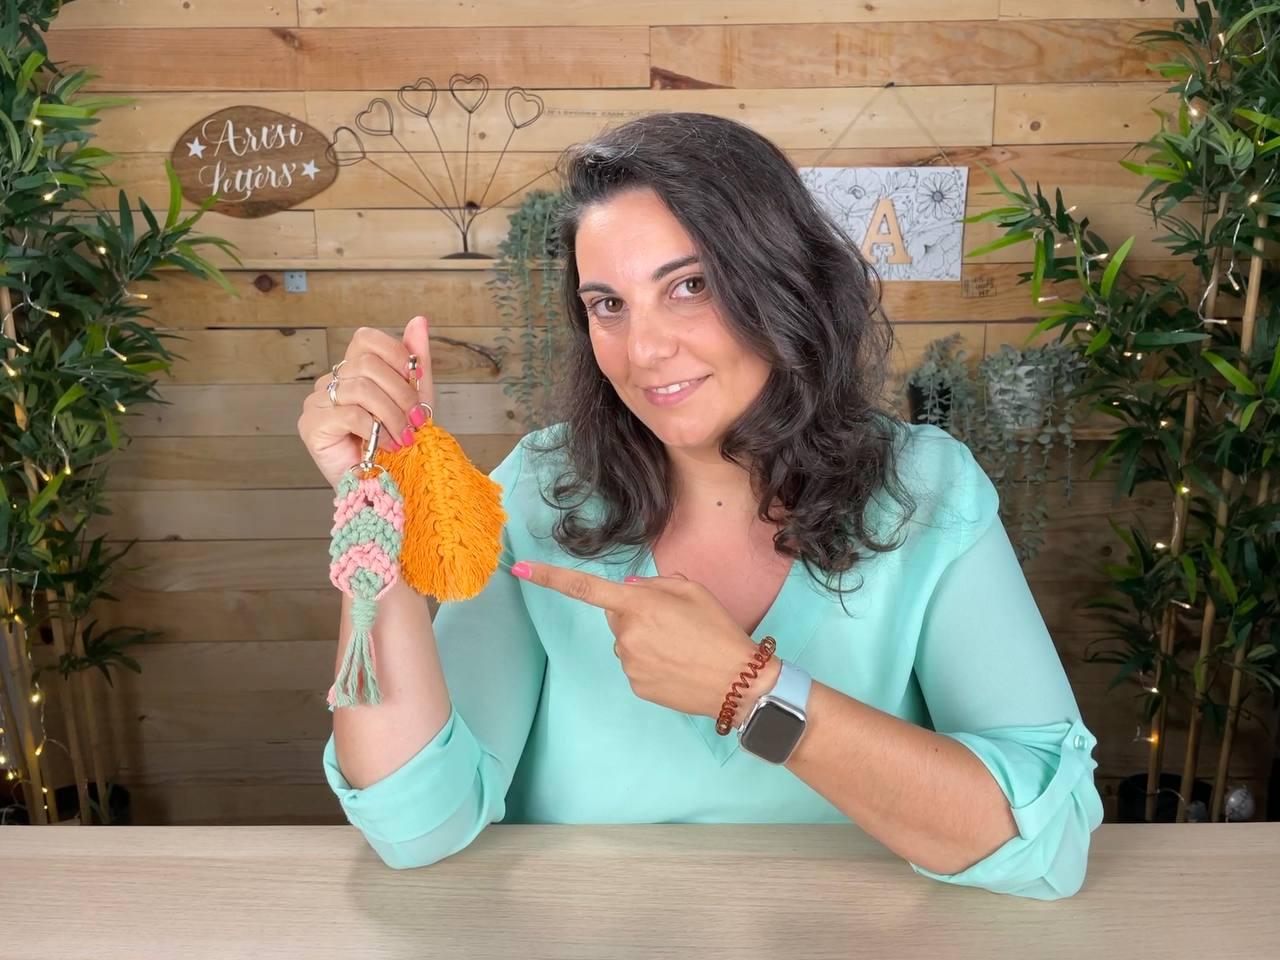
3. What You'll Take Home with You: In this lesson, we'll talk about the key chain projects will
be making in this course. We will make two
different key chains. One using the head nod to create a beautiful feather-like
beau ** styled key chain. And another using
the double half stitch nuts and finish it with a gathering not to create this beautiful and functional
mermaid tail accessory. With these two small projects, you will learn the
basic nuts and be better equipped to start
creating other macro, micro pieces with
different patterns of your own creativity. So let's look at the materials
and let's get started.
4. Materials: Now that we know
what we're making, it's time to talk about the materials will need
to make it happen. We'll cover everything from
the type of chord you'll need to the tools you'll use
to create your key chain. Macro may projects typically
use core is made of natural materials such as
cotton because they are strong, durable, but also
soft and flexible, making it easy to work with. They also come in a range
of colors and thicknesses, allowing for greater
versatility in project design. A four millimeter courts
thickness is usually great for smaller macro MA
projects like he chains. For the first key chain, you will need four
metres of court. And for the second key chain, you will need 5 m of chord, or 2 m of one color and
3 m of another color. I'll be using pink and green, with green being my main color. You will also need a lobster
key ring -1.5 mm wide, a ruler, scissors, and a calm. Let's get started.
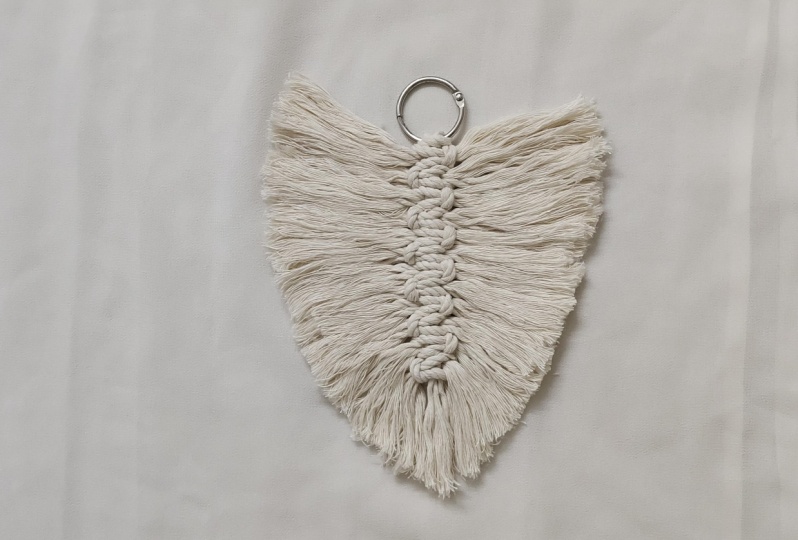
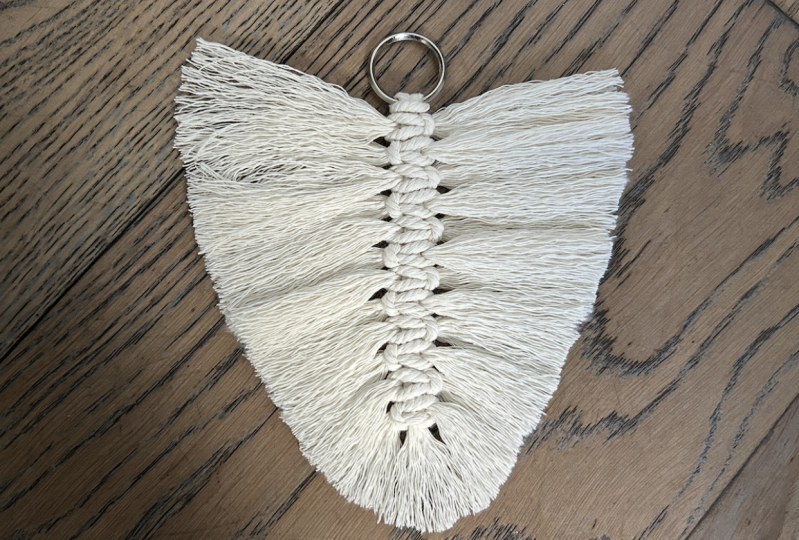
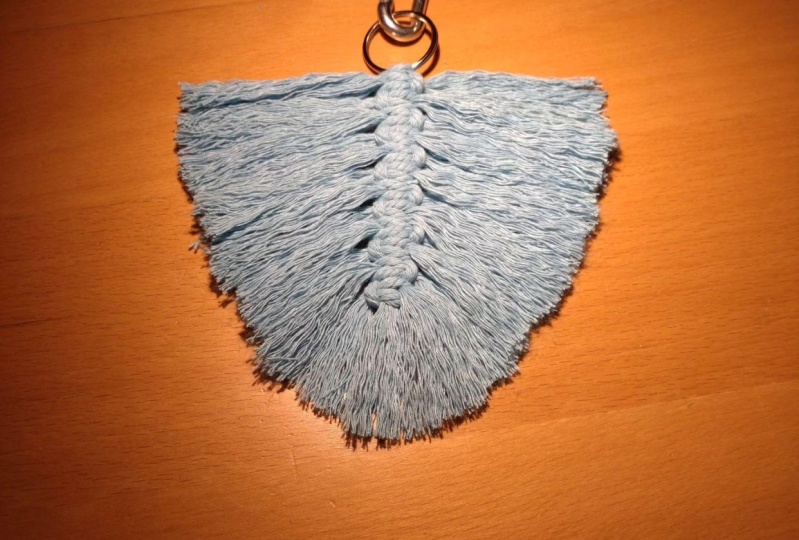
5. Feather Keychain: This is where the
fun really begins. In this lesson, we'll
dive into the process of creating our bot hostile
feather-like key ring. To do so, let's start
by cutting our formula, our 4 m of chord into
the following measures. So it's 30 cm once, then eight pieces of 16 cm, eight pieces of 14 cm. And finally, another
eight pieces of 12 cm. It's fine if they're not all the same width
because in the end, we will cut it to the
size that we want. Pick your 30 cm long thread. Do folded in half. And it creates a loop. Now we're going to put the loop through the key
chain front-to-back. And then we're going
to pass through the ends of the string. Like so. Okay. Having
something to hold on, your key chain will help
you do the entire project. So this is something that
is important for you, but if you don't have it, it's fine either way. Now, let's start picking our 16th centimeter long
threads two at a time. The first thing we're going
to do is divide it into half. Push it, or pull it
underneath our spinal cord. Let's call it that way, like so. And then pick a second one, pass the loop underneath the other one over the cord
and then the ends through it. And then you pull trying to keep it on the middle on each. And then you pull
all the way up. This is basically your
not for this key chain. Let's do it again. Another
two strings of 16 cm long. This time we're going to put the chain starting
on the other side. So this one will go underneath
the cord towards the left. And the second one
folded in half. We'll go through the loop over the central corridor
spinal cord and then between hold the
ends through it and then pull it all together
and push it to the top. Okay. So let's repeat this. Folded in half and their
needs from the other side for the second one-and-a-half
underneath and then goes through the loop
over the cord and then bring the ends through its pool. As you can see now, I
did a mistake because these ones look the same and
this one looks different. So we'll need to do it
the other way round. So let's undo the knots. And we will start with
the loop on this side. The second loop goes under, over and then the ends
through this loop. And then we pull,
see the difference. Now there be opposites
of one another, and that's how the
patterns should go. Okay, pulling all the
way to the front. And let's continue. This is our final pair of
16 millimeter, 16 cm long. So this time it will go, it will start on this side. And there the loop, the spine, pull the legs or the
ends in-between. And now it's correct. So let's repeat this
process for the 14 meter, the 14 cm long, or it will start on the side. Second one So we've done all of the 16 and all of the
14 long strings. And now we move on to the final set of strings which
are 12 centimetres long. I would not usually
be using this cloth, but if I did, you would be hearing
a lot of my nails touching touching the table
and all those things. So it's not that nice. Okay? And now the last one, and as you can see, our key chain is
already taking shape. Now what do we need to do? We will need to check if the strings are
more or less the same size. Because what we want
to do is for this to have the look of a
feather or a leaf. So now I'm going to get
my scissors and I'm going to cut more or less like this. And then more or less like
this. Let's see how it goes. As you can see, we've got a
little issue with which is these ones are a lot shorter
than the ones afterwards. So I'm going to have to take that
into consideration for the cutting of these. Let's push this aside. Now let's do the same
thing for the other side. So this is the shortest one. Hello. It is honestly harder
to get all of these the same length than actually doing the
rest of the knots. But now, let's start doing another part which
is coming our code. So get your calm Let's start undoing
these courts. This is much like
combing your hair. If you have long hair. That is basically the idea here is to undo all the way
the courts are intertwined. Be careful not to do what, what, what I almost did, which is not to let it fall. Now let's come to
the other side. Okay, so now that it's
a lot comes over, lot easier to be
able to cut this in a more correct shape. I will probably need a
better scissors for this. But nevertheless,
as you can see, it's a lot easier to cut. And this is how it looks. Our final key, our
final key chain. Now let's move on to
the second key chain with a different kind of
nuts. I'll see you there.
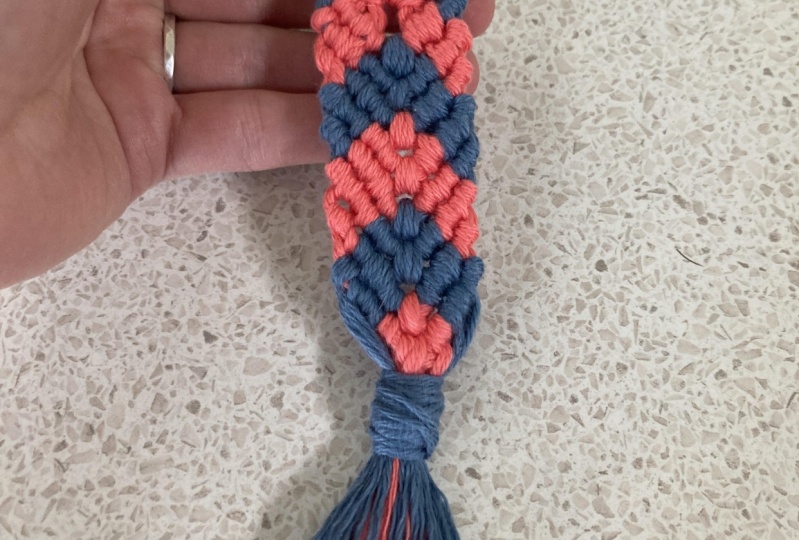
6. Mermaid Tail Keychain: Now that you've had
some experience doing some basic notes, Let's move on to a more, a more complex pattern. This pattern will be based
on a double half hitch knot, which is a fundamental
naught in macro made. And it's often used to create diagonal lines or zig-zag
patterns in your work. So let's start by cutting four pieces of one
or 90 cm wide. I'm chord. In this case, I've cut
to pieces and green and two pieces and pink because I want to make it a
pattern with two colors. And one final piece, we're 50 cm long, green, which will serve
for me to finish it off. So this part will
be on the side. Okay, So now let's start with
our green folded in half, and let's start the same
way we did the last time. So the loop goes from front
to back through the ring, and then through the ends
go through the loop itself. Now we're going to put
two of the pink ones. Same way, folded in
half through the loop. And then the ends
through the loop itself. And then another pink one. Same process through the loop. And then back again. And finally the other green one, back through the loop. And then pull the
ends through it. So your keychain, your key chain should
look roughly like this. Then what we're
going to do is we're going to start our
double half hitch. Not to do so. You will pick the chord or the string that's
furthest on the left. We will put it diagonally, and then we'll pick
up the second most, the second string
most on the left, go above this diagonal
strip and then under it. And through the loop and
pull all the way up. Then we do it a second time
with the same strings. So over, under and through the loop and
pull it all the way up. It's important to
keep this diagonal because this is what is
going to make our pattern. Okay? So 2 kt on this one, we put it on the side, and then we start
with the next one. So over there and
through the loop. One more time. Over, under and
through the loop. So never forget to do two times. And each string, again
with the pink over, under and through the hoop. Over, under and
through the hoop. Okay, so now we've done
halfway on to our left side. Let's repeat the
exact same process, but now on the right side. So we'll put the green one to the side and then pick the
furthest one on the right, make the same diagonal. And let's start doing the same thing with the
next one on the right. So over, under and
through the loop. Again, over there. And through the loop. Always keeping in
mind that diagonal. These first diagonals
are the ones that are most important
because the rest will always keep on following
the first diagonal. Okay? So now the first
pink one over under, through the loop. Again, over under And now the second penguin, over under, over, under theorem. Okay? So now we are left
with similar points. And these two, these two, we want to join them together. To do so, we're going
to choose one of the sides to always be
the one that goes over. So we're going to
choose one over the sides to always
be the one that goes over, under and through. And this will be important
throughout the entire pattern. And a second time
over, under through. So I chose the right
side to always go over. But you can do it
with the left one. Okay? So now let's start
everything again. The first one goes
in and diagonal. The first one in the left
than the right one goes over under through first time. And then over under it's
through a second time. Again, over under, through and then
again over under. It's true. Okay. And at last the green
one over, under, through, then again over under cerebrum. Now. Okay, so now let's repeat
this for the other side. So the first green
one goes forward. And then we start
doing all around over, under, over under, through. Then again over one more time, over under, through. Finally, we love green one over, under, over, under. And then through. Again. I chose the right side. So right goes over
under and then again over there.
And then through. We're already starting to
see a really nice pattern. And now I'm going to do
this a few more rows, maybe another six rows, and we'll see how it ends. Okay, let's go As you can see, the
pattern looks the same if you turn it
one way or the other. And I've made six rows because
I'm already getting well, not having enough of the
court to do another one. So I'm going to finish off
my key chain where it is. So the part that you want to
do now is you're going to hold on to all your
chords, like so. Then you're going to pick up the other chord that
you've middle of 50 cm. You're going to put one
end towards upwards. Make a loop at the end, hold it with your thumb and
then go around several times. Holding it tightly. Then you will go with the
other hand through the loop. And then you're going to
pull your first tail. Like so. Then you want to adjust it. Now you want to
adjust as best as you can see on both
sides how it looks. And if you're happy about
it, you can cut it. So if you're happy about it, you can cut the top
and the bottom. Okay, So this is our
final key chain. As you can see, it
looks very nice. And if you want to finalize
it a little bit more, you can still come this part so that it
finishes off like this one. So join me in the
Final Thoughts video where we will look at the
final end finished results. See you there.
7. Final Thoughts: Congratulations, you've made
it to the end of the course. You will now have a couple of beautiful key chains
that you will have made with your
own two hands. Which one do you like best? These make awesome
gifts and make it really easy to find
your keys in your bag. Don't forget to post
your projects in the project gallery
and leave a review. I would love to hear your
feedback on the class. I hope you had as much fun
as I had. Have a great day.
 Andie Lopes, Calligraphy & Line drawings