Transcripts
1. Introduction: Have you ever found
yourself in an art slump? You want to create but just can't think
of what to create? You try to create something, but nothing really works into
anything worth continuing. Hi, I'm Elizabeth and
welcome to my class, How to work through
an art slump. I'm a professionally trained
artist and art educator, as well as a published
author, Illustrator. In 2020, I began
teaching for Skillshare, Developing classes that explore art techniques and art making approaches that are filled
with fun, experimentation. Normally I'm filled
with creative ideas. I love picking up an art medium
and just running with it. Sometimes though,
I find myself in a place where I want to create. I want to play with art
materials and experiment. But for some reason I just can't get excited about
the things I try. I end up feeling even more
discouraged and long, all the more for when
art making came easy. What do I do when
I'm in an art slump? In this class, we're going
to learn techniques and strategies to reignite
our creative energies. We'll experiment and play through those
unsuccessful art moments. And most important of all, we'll just keep creating. Because when we find
ourself in an art slump, the worst thing we can
do is nothing at all. It may seem like a good idea to walk away from
your art table, and I'm sure you have plenty of other things that you can do
with your time while you're waiting for creativity and
artistic motivation to return. But for me, not making
art is not a good thing. I need to consistently create something,
because otherwise, I find myself in an even worse
place than an art slump. So let's learn how to
overcome our art slumps together and get
back to the joys of art making waiting for
us on the other side. This class is intended for
creatives of all levels because at some point in
your artistic journey, you are going to
face an art slump. And these strategies and
techniques will guarantee that you can navigate that calmly for as long
as it may take. And get back to the fun
of creating art again, by the end of this class,
you'll have a variety of ways that you can create
through an art slump. Strategies to keep
you coming back to the art table when that place isn't one that
currently brings you joy. And one day find that
because we kept on creating, we returned to our
art happy place. I hope you'll join me in class.
2. Class Project: Thanks for joining me
for our class project. We are going to work through
several different exercises and art approaches
that aim at keeping us creating in a low
stakes way as we work our way through our art slump
to get to the other side. These are four different
approaches that can be used in
combination separately, any way you choose, but they can also be used outside of an art. They are wonderful, warm and inspiration boosts that I think you're really
going to enjoy. Let's send it over to the
next lesson to take a look at what art supplies you
might want to have on hand for class there.
3. Materials: Now let's talk about
what art supplies you might want to have
on hand for class. Really truly, the
sky is the limit. And the great thing about
this is you can work with whatever art supplies
you already have on hand. But if you needed a
reason to get out to an art supply store or make
a place an order online, who am I to discourage you from adding to your art supply? What I do recommend though, is that you have a mix of
dry media and wet media, so that you have some variation as well as whatever surfaces you're going to need to work
with those types of media. So let's check that
out in more detail. You're going to want to
have drawing paper or watercolor mixed media
paper of some sort because we are
going to be working with drying materials as well as wet materials
for some painting. Canson mixed media
paper is a paper that I often use because as
a mixed media artist, I'm never really sure
when I begin a piece what materials are going to end up being
incorporated into it. So mixed media is
a good way to go. A lot of our exercises
that we're going to do are going to weave through
a variety of art media. So a mixed media paper
is a great choice, but drawing paper
will also work well. You might want to have
on hand some different markers. Sharpies are wonderful. Fine liners are great. You can even incorporate
ballpoint pens, colored pencils,
graphite pencils, water soluble pencils,
watercolor pencils, charcoal pencils, soft pestel, charcoal sticks, water color. I've got pan sets. I've also got some
palettes where I put my tube paint into some
watercolor brushes. We're going to need something to activate our water colors. I love to use a spray bottle. I'm also going to
want to have a cup of water on hand as
well as a cloth, and then I also like
to incorporate ink. You can also use India ink. If really the sky is the limit. I do want to make
sure that I have a ruler as well as glue. I've got some glue sticks. I've got some liquid white glue. And then I'm going to want
to have some tape on hand. I really love washi tape, but painter's tape
will work as well. You could also use acrylic
paint if you wanted to guash what materials you incorporate into the
exercises that we're going to do are going to depend on what materials you have on hand. The ultimate focus is you're going to need a
surface to create on, so some sort of paper. You're going to want to
have some drying materials and some painting materials so that you can play with dry material and wet material
and weaving those together. And we're going to be
doing some collage, so you can tear that or you
can cut that with scissors. So basically we're drawing, we're painting, we're
collaging, we're mixed medying. We're going to be doing a
ton of stuff and having a really good time as we
work through our art slumps. Take some time to gather up your art supplies and I'll meet you in the next lesson where we will begin working through
our art slum. See you there.
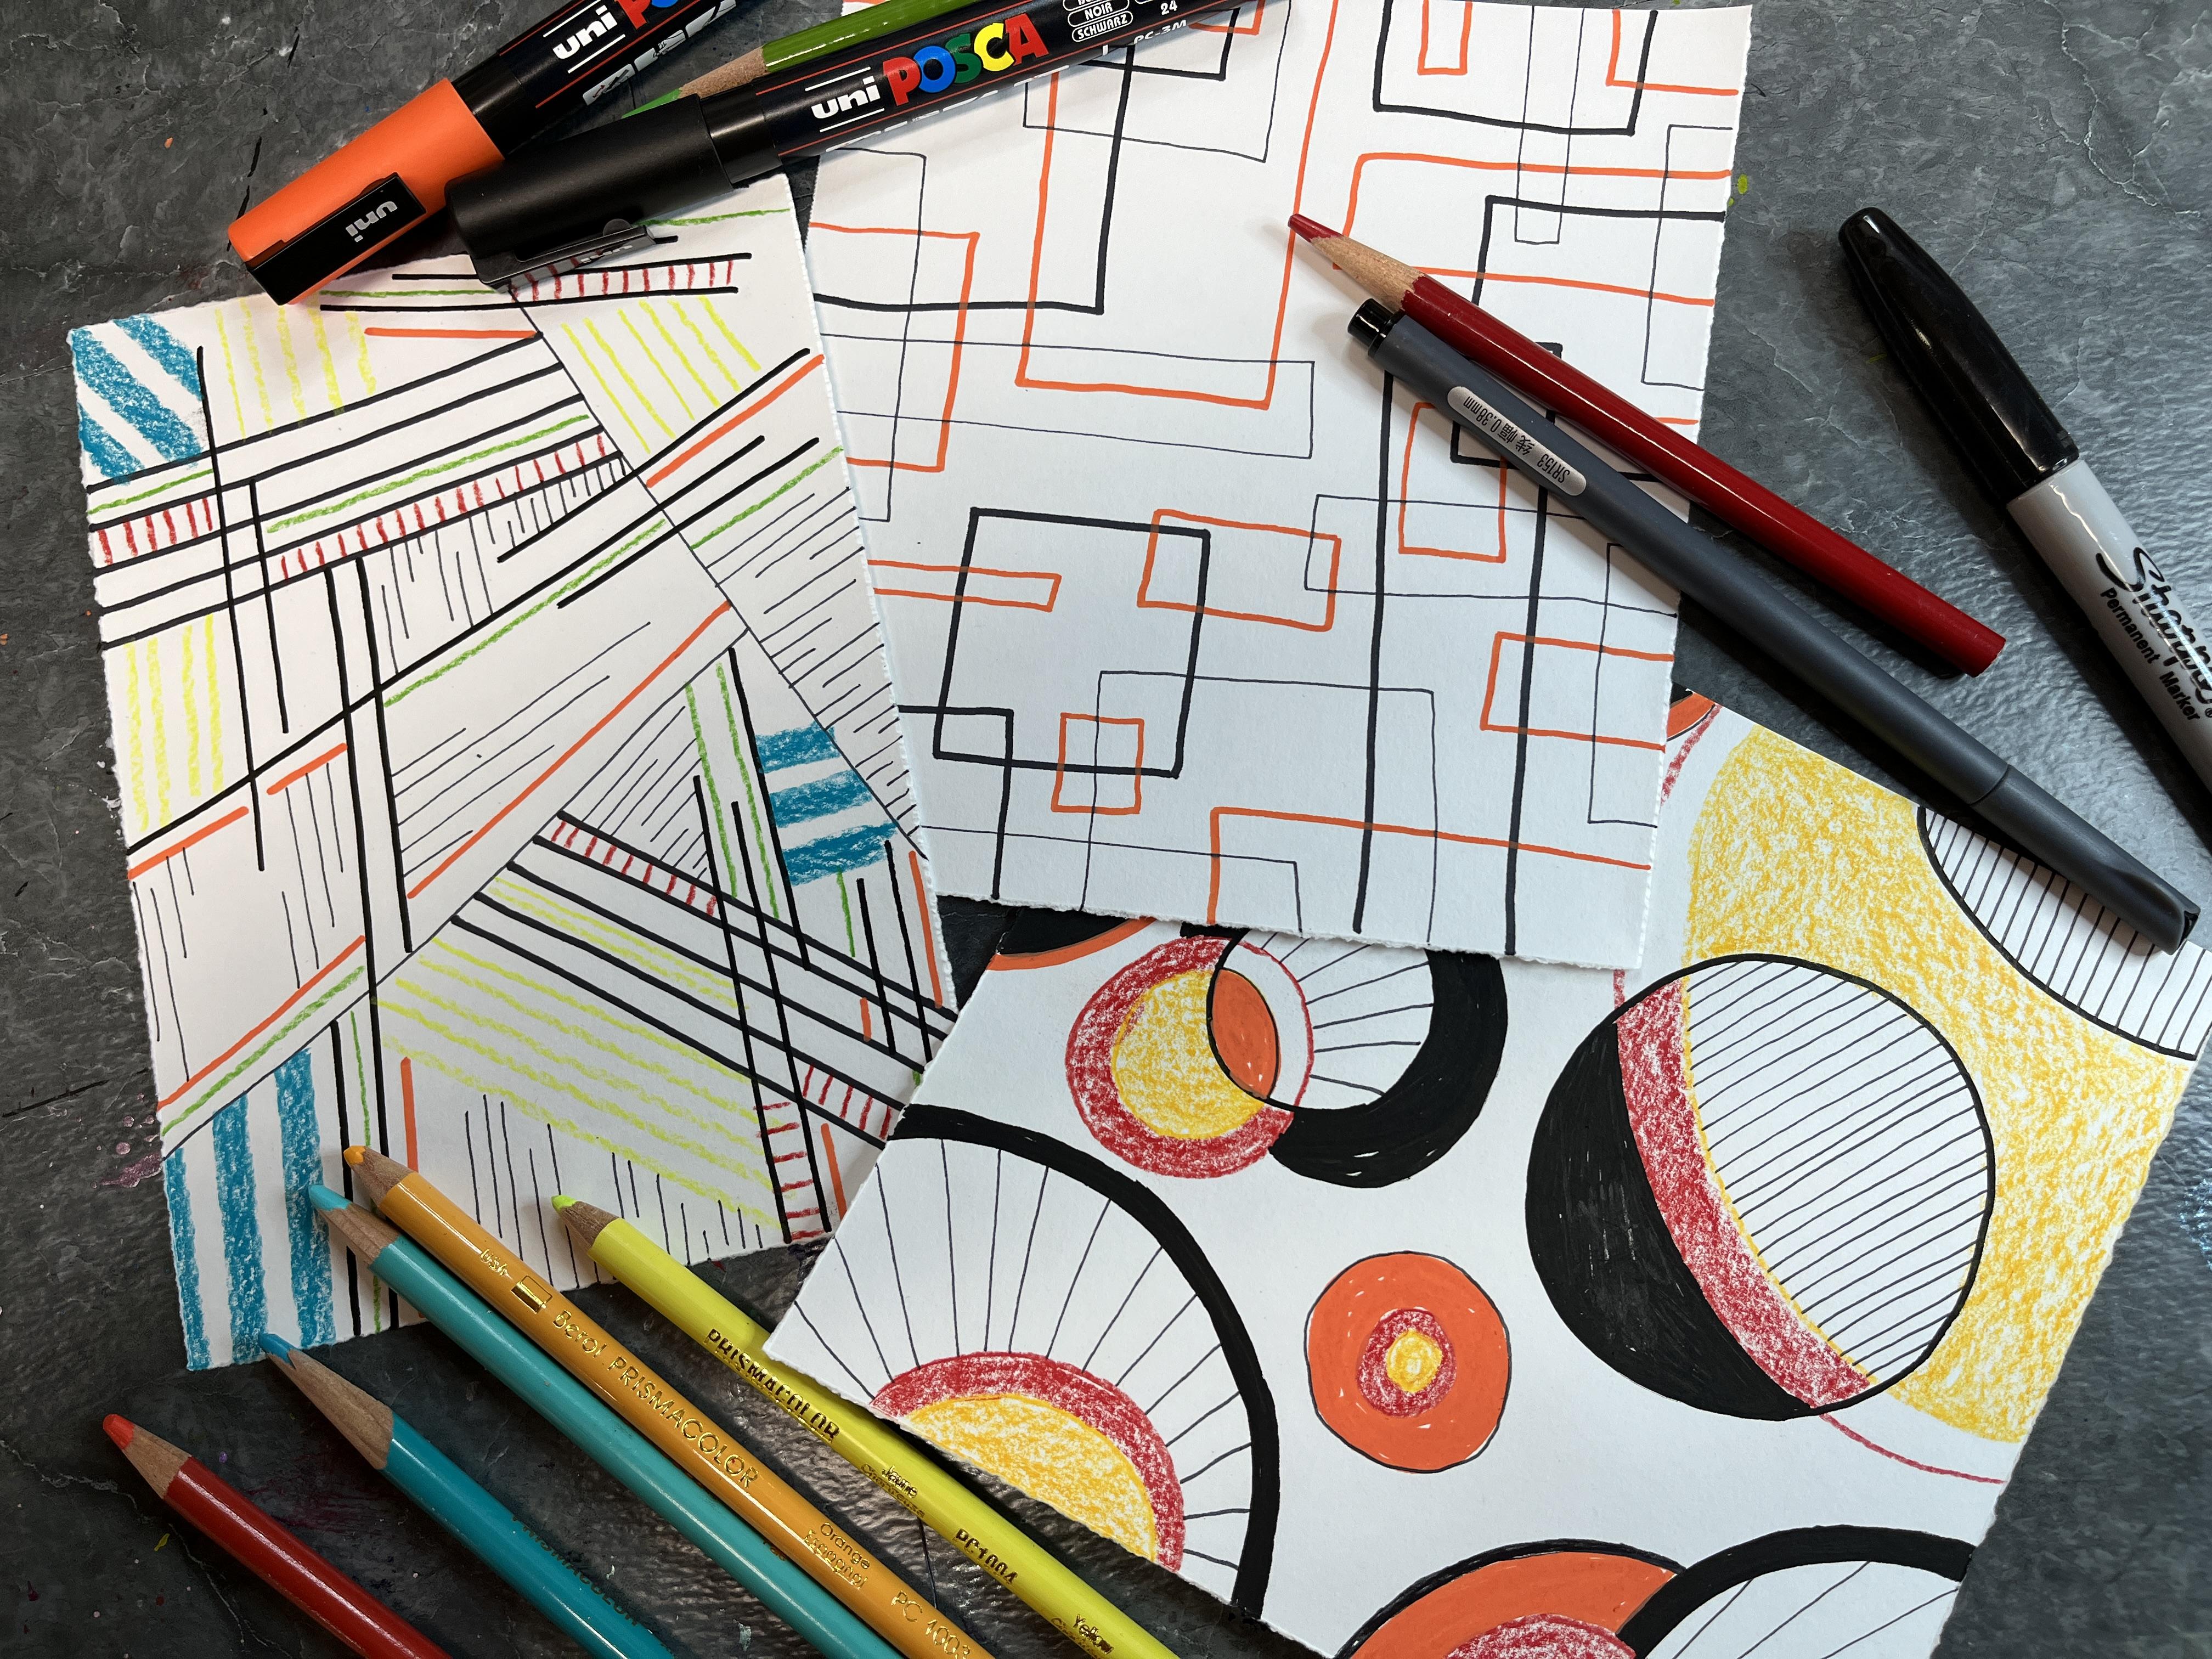
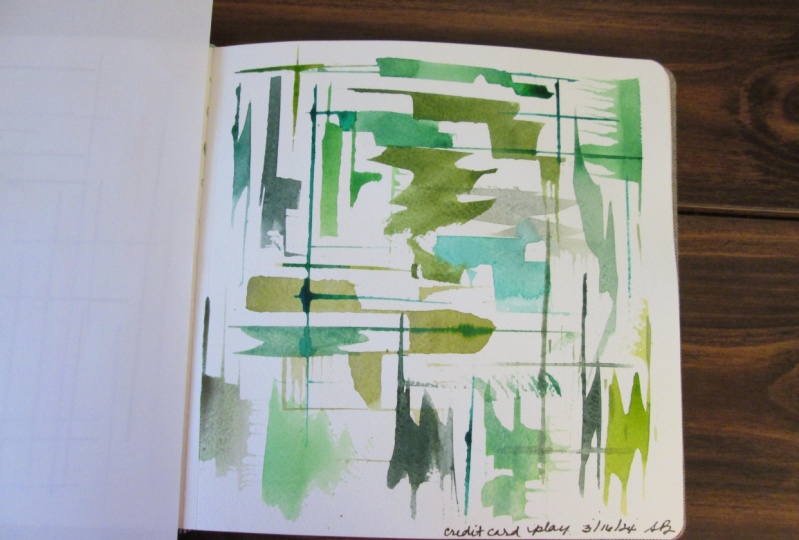
4. Exercise 1 Limitations: Welcome back. Often when
we're in an art slump, we are easily overwhelmed
by having too many options. In this exercise, we are going
to play with limitations. There are many ways to use limitations to
inspire creativity. This doesn't have to just be an exercise that you pull
out during an art slump. This can be an exercise
that you use at any point in time in
your creative journey. It's a really fun one. I've put together a list
of limitation ideas that you can find on the projects and resources section of class. I hope you'll turn to them as inspiration and guidance
the next time you aren't sure what to
create and maybe even when you're experiencing
your next arts tation. And we're going to work through three different
limitation exercises in this lesson to see
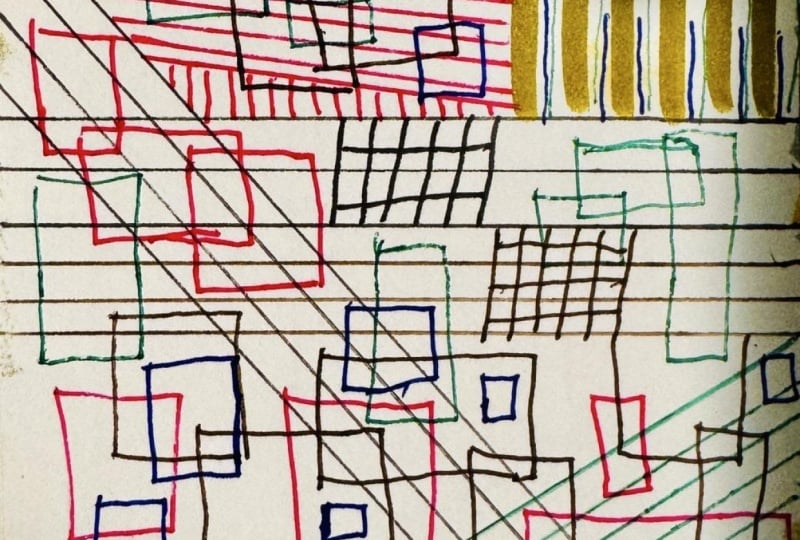
what comes out of that. Our first limitation
is that we're only going to be able
to create lines. If you think about
line and you think of all the different kinds
of line that there are, there's all sorts of lines. Straight lines. We
have horizontal lines, and we have vertical lines. We have angled lines, we have wavy lines, zigzag lines, dotted lines, dashed lines, broken lines. So you can decide how limiting you want
to be in this one. You might end up creating
something that is very surprising and very different from what you normally create. And that is a wonderful way to strip away the expected and really create something that is a new aspect of
you as an artist. We're going to only
work with lines, but I'm going to let
myself have a little fun. I have a variety
of different pens here of different widths. I also grab some colors
that make me happy. So I'm going to create
a picture that is just randomly composed of
different kinds of lines, and we're going to see
what comes out of it. And I encourage you to
either do this along with me or watch and then circle
back and do it on your own. Afterward. I tend to be a little bit more
loose and organic, so I'm going to start by being very angular and geometric. And I'm going to change my pen frequently so that I get
some nice variety in here. I do very much like
parallel lines. I also like repetition
that makes me happy. And the ultimate goal
is to create through our art slump and get back
to our art happy place. Even though I'm encouraging you to go out of
your comfort zone, I'm also encouraging
you to play with the very simple things in art
making that bring you joy. Because ultimately we want to get back to that
joy in creating. But it is bringing me happiness. That's huge, because
that was not happening the other day when I realized I was
in an art slump. Let's see, let's add
some color in here. Okay, if it's a little wonky, we're not making an artwork, we're just playing with art. I'm just going to
keep continuing to add more line details. Changing up the color
of the color pencil I'm working with as well as the thickness of the
lines I'm creating. An easy way to do
this is to just put in a bunch of lines and then between two lines
fill it in and then you've magically got a
thicker line in your artwork, which is really fabulous. Line weight is a really good
way to add some variety will still sticking to the
same limitation of line. The same goes for line color, line thickness through
different pen thicknesses, as well as line length
and types of line. Of course, the next limitation that I want to play
around with is shape. I'm going to be doing
this whole piece just using the idea of
squares and rectangles. It's super loose as far as whether it's a square,
whether it's rectangle. But I'm just roughly creating that type of angular
shape with my Sharpie. And now I'm going back
in with my fine liner. Playing with the idea
of overlap length with changing
anything I can about it so that I still
maintain the limitation. But I'm also still creating an interesting composition and having a ton of
different variety. Because that way I'm really
pushing how far I can take this limitation and
having a lot of fun with it. Because who doesn't love to just draw the same thing over
and over and over again? Then I decided I want
to add some color. So I got it to Pasca
paint pen and I'm just doing the same thing
I was doing before, but now I'm doing it with
the Pasca paint pen, continuing to overlap. Play with size, scale, position. Continually turning the
paper so that I find new areas where I can pop
in some additional stuff. And then I want to do the
same limitation of shape. But now I want to
explore circles. There's so many different
ways to play with circles. I'm starting out with just colored pencils and
getting those in, switching over to Posca, because that gives
me a different look with the different media. As well as that bold pop of black line for
my circles there, going back and forth
between media as I see a need in the
image that's evolving. And then also doing the same
thing where I thickened up the lines from
the line limitation, but now I'm doing it
by thickening up. The outlined edges
of my circles. Not being afraid to play around with filling
in certain spaces. Not worrying about being terribly accurate or
neat or measured. Just having fun with
different ideas and concepts within the limitation
that I've set for myself. The cool thing about overlapping shapes is that you create other smaller shapes and it
helps segment your paper. It's a really nice way to take the overwhelming idea of
a blank page and quickly conquer that by breaking
that up and creating new interesting shapes and sections and pieces
to play with. Then I decided to go back
in with some micron pen, and I wanted to expand it a bit. The limitation is
our starting point, but that doesn't ever mean that we're stuck with
that limitation. I decided to go in
with some line work, playing with some radial quality as well as some parallel
lines in there. Just to add another
interesting detail with the thinner line work versus
the thicker line work. And creating some really
nice repetitive pattern and texture in a
different field. In some parts compared to
the open sections versus the solid color sections
versus the line sections. And playing with different kinds of line that I can put into those sections to keep pushing myself and adding
more visual interest. Then as I discover new ways
to work back into this piece, I'm using those ideas and inspirations to further
push the ideas. I'm thickening up the outer
edges of some of my circles. I'm filling them in with
my posca, paint black. Just pushing the boundaries
of color and value and line, weight and circle quality until I feel that
the piece is done. Because really it's all
evolving in a very organic way. I don't really have a goal in mind other than to
keep creating and to work with my limitation as the inspiration
and jumping off point as I discover new
interesting things along the way. I'm playing with continuing that with other
media, other colors. Just continuing to add to the piece until it
feels resolved. Doing the same thing
with an orange pasta to, I ended up going with a
warm color scheme and that high contrast black and white.
That wasn't intentional. I just started grabbing
colors that called to me and sounded like they wanted
to have some art fun today. Now that one's done
a couple more. Oh, I did decide to add in
a couple thin Pascal pasta, some thin fine liner edges, just to add some
more line variety, but also to have some
more darker pops. That one's done. Now I want
to do another limitation. I'm going to use
very minimal color. I'm only going to
use various oranges that I have in different media, as well as black and then
the white of the paper. And then I wanted
to limit myself to only the kinds of lines I
could create using a ruler. In the other line one, I let the lines be wonky. I let it just go on
there as it wanted to. This one I'm really
creating some crisp, clean, intentional lines. But each line is leading to the next line as I figure out where else to
make the marks. Turning the paper constantly, adding in different stuff. Now I put the ruler aside, and I'm using those
initial lines as guide marks to help me create some crispi lines
as I go in with a light orange pasta to make some dashed lines
of varying lengths. Just to continually break
up the space mirror, the same loose grid idea, and just letting the
piece evolve bit by bit. Then it felt like it needed
a little something more. So I decided to
add some gradients in there with colored pencil. Still following my
limited orange, black and white color scheme. And turning the page
and just adding gradients anywhere feels right. There's really no
rhyme or reason to it. There's no rule I'm
following other than looking for interesting
sections that have a defined rectangular
shape and then starting bold and fading it out quickly with
the colored pencil. Then I had another
fine liner orange that was a little bolder than
the light orange I'm going in and mirroring the
original dash lines just to double those up. But also still have a little
bit of contrast and variety between the types
of oranges that I'm using with those
same fine liners. And then I got up
my orange Posca pen and got the ruler back out to continue the work that I was doing
with my Sharpie. But now I'm doing it with
the orange Posca pen. I'm adding some
boulder orange lines right over the top
of everything. Very much playing with
layers and overlap and repetition and random yet controlled aspects
of the limitation. For this one, that's very much about jumping
back and forth for me regardless of whether I'm
doing a limitation or not. Same idea as the
light orange pencil. Now I'm going in with
my more standard middle of the road orange
pencil and just finding new areas to pop in some gradients
with that media. Repeating a technique, changing up the
material a little bit, but still trying to
work to have some fun, keep to the limitation, but explore new ways that I can add more into this
piece to continue to add visual interest and
get me inspired and excited about art making
and just keep creating. And then I decided to go in
with some black fine liner. So I'm using the spaces that are available to put in
some longer lines, but playing with line variety. And then I really wanted
some more texture like repeated lines is a really
wonderful way to do that. So I started putting in some
varying length sections of fine line or black
line so I could have some areas that had a
little bit more going on. So it wasn't just so
spaced out and calm. It kind of gives a little
bit of vibration almost feeling in those sections and adds a little bit
more visual interest. And all of these are
things that I can continue to explore
in my art making. They're giving me lots
of great ideas for future projects as I get through my art slump and
get back into art making. In our next Ilson,
we are going to explore another way to create
through our art slump, relying on the fun of
randomness. See soon.
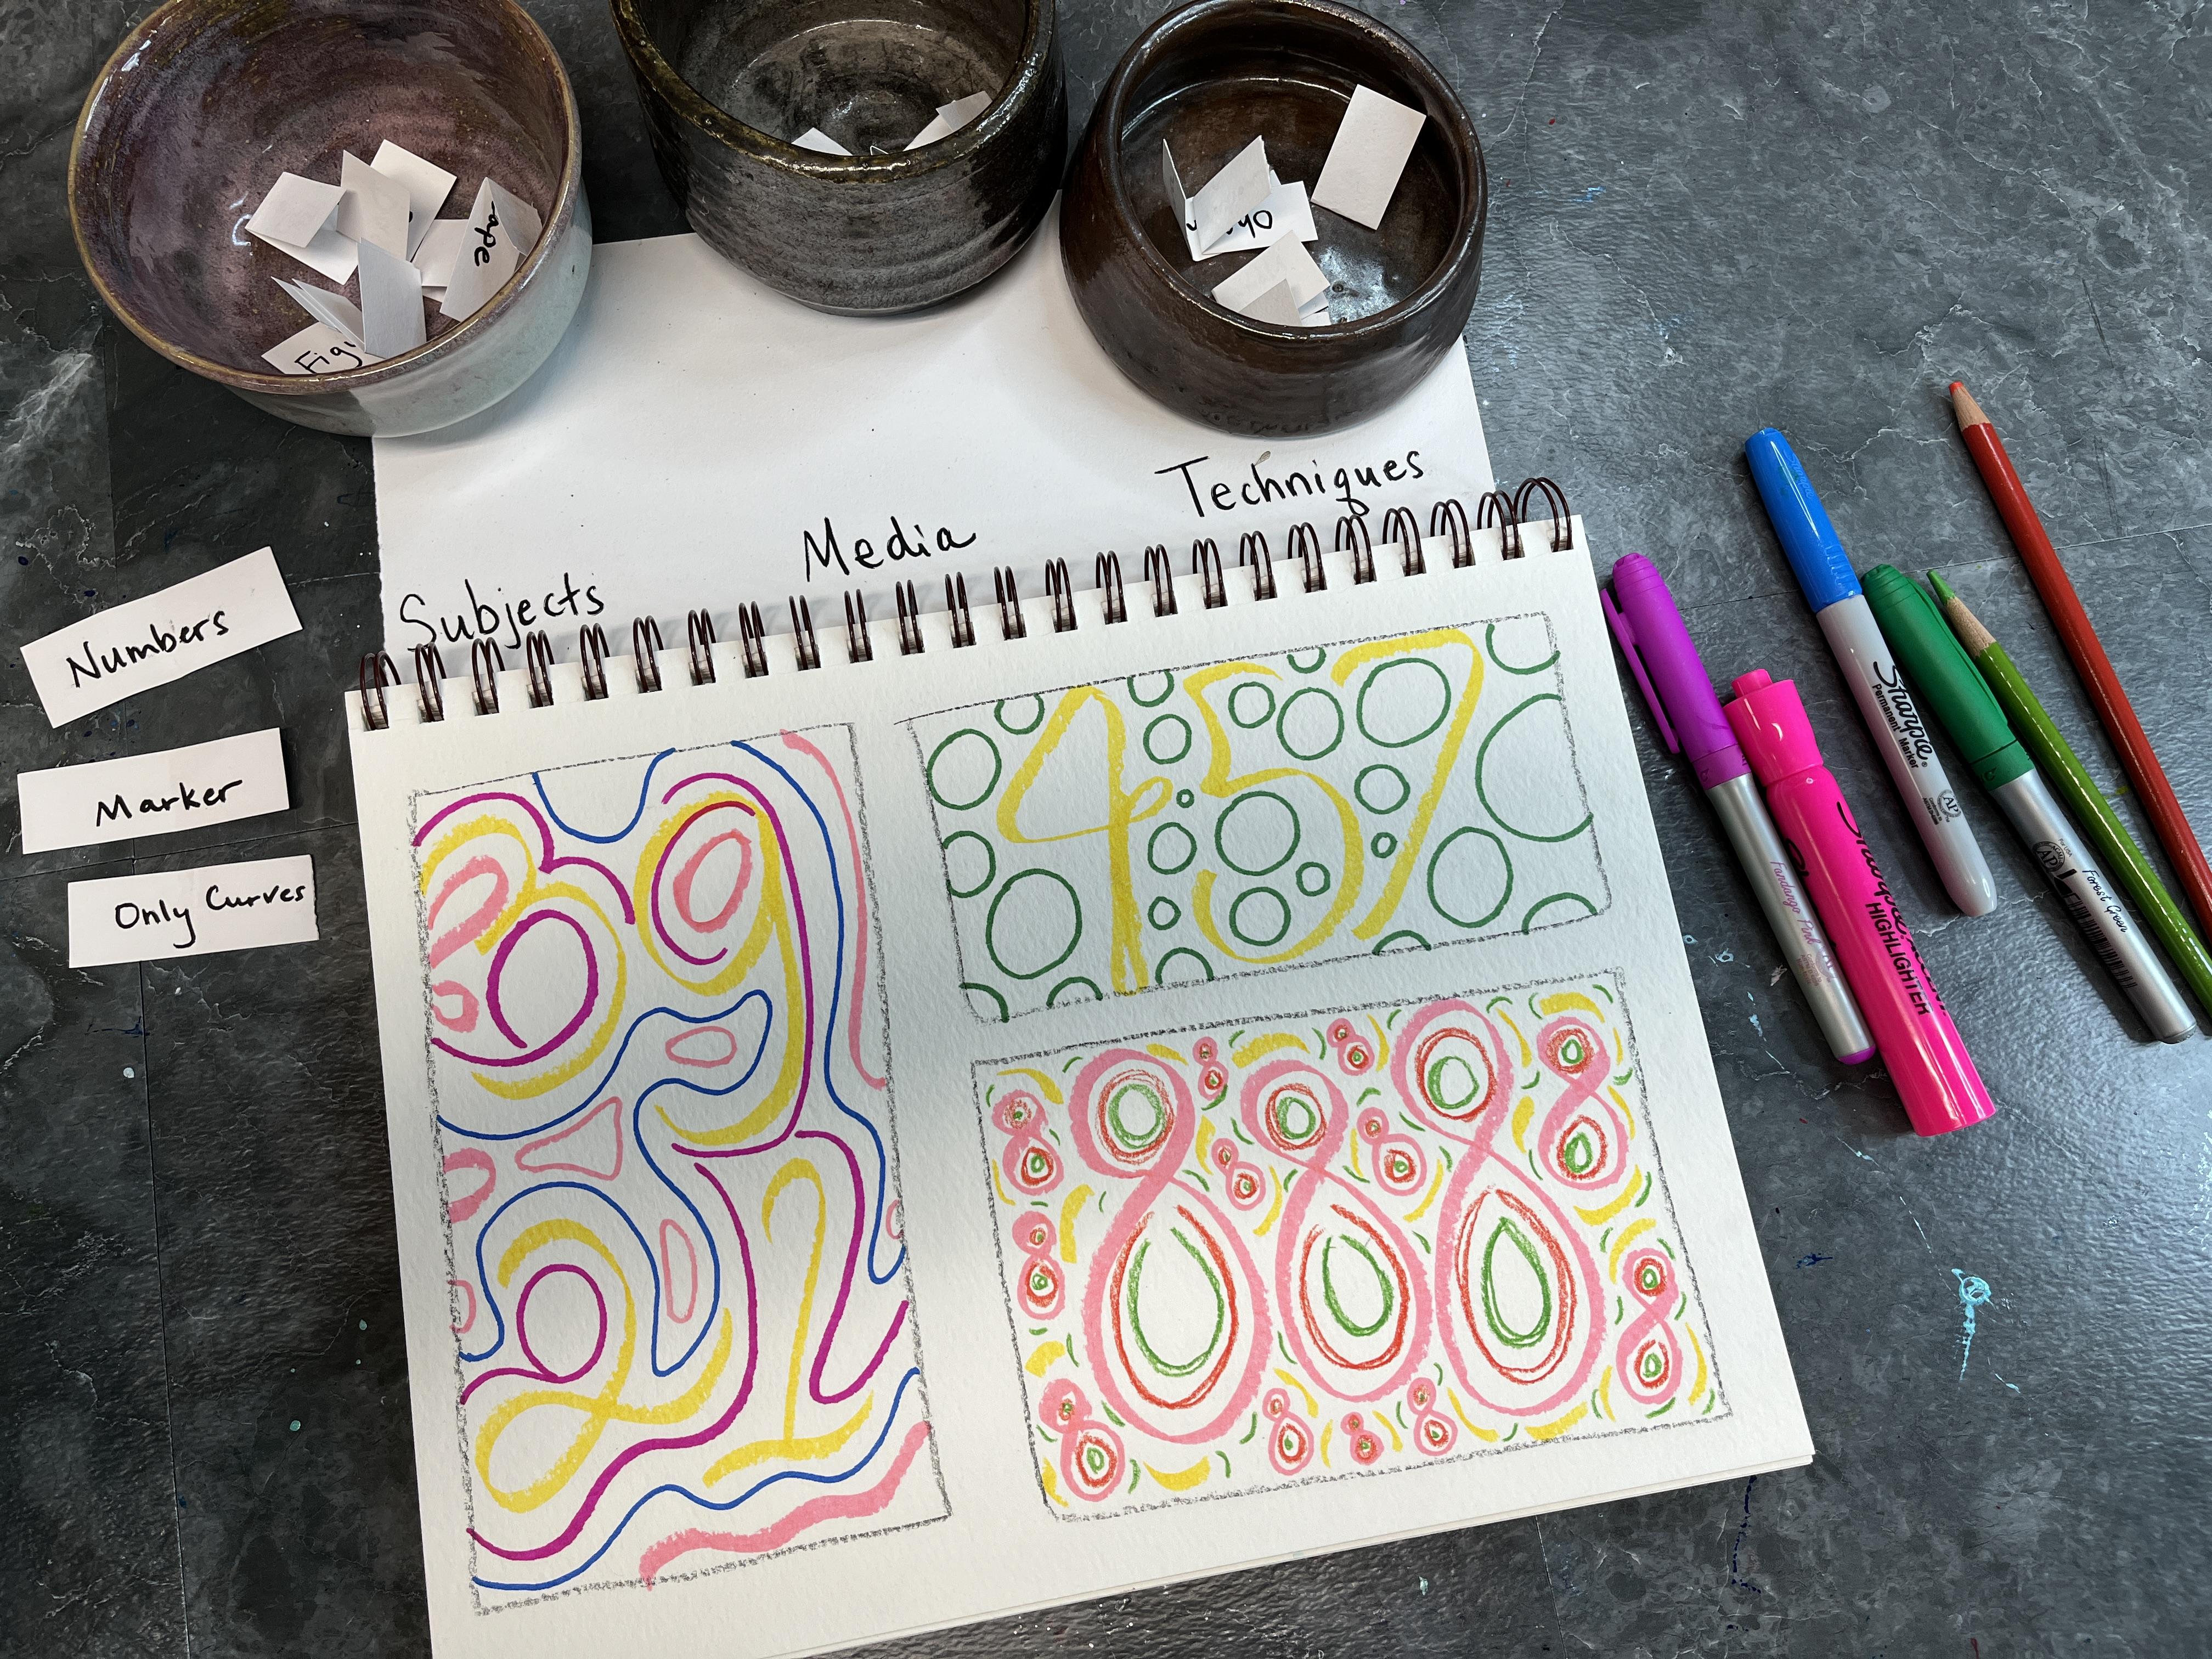
5. Exercise 2 Randomness: In our last lesson, you've got
to choose your limitation. Now we're having some control, but we're also really
relying on randomness to spark our creative
practice and get us going. We're going to have some fun incorporating randomness
into our art making. The first step is to write
down on a sheet of paper a list of art materials,
techniques, subject matters. It could be limitations if that was something
you really enjoyed. But I've also provided
a list for you that you can use and
add to that is on the projects and
resources section of what you're going to want to do is you're going to
want to cut those up into slips of paper
and fold them, and then put them
into category bowls. So you're going to
have a category bowl for subject matter, a category bowl for art media, and a category bowl
for art techniques. And you can add as many other
categories as you want to, but have at least those three. And then we are going to
draw one from each bowl. And then using at least
those three slips of paper, whatever they say, we
are going to create something for as little or as long a
time as you would like. This is a really fun way
to use art prompts in a low stakes way and
to get you doing some unusual things that
probably wouldn't naturally come out in your own
art making practice because you can
personalize this, you can include things that you really enjoy working with. Also put some surprise
ones in there, some ones that maybe aren't your strong suit or
your comfort zone. And really challenge yourself as you draw the
different slips of paper and come up with new ways to create using those
random concepts. I've written out my list of different materials,
subject matters, concepts, art techniques, what
have you that I want to pull from cutting
those up into slips. And then I'm going to pull
those up and get them organized into my three
categories of subject, art, media, and concept
or technique piles. Give them a good mix and you're
ready for the next step. Then I just grabbed a
sketchbook that I have on hand. This is watercolor paper. You could use any kind
of paper you want to, but I don't know what's
coming out of these bowls. I decided to go for a paper
that was a little thicker, and I haven't worked at the
sketchbook for a while. It was a good
opportunity to do that. Let's pick out some random slips of paper and get to creating. You can work along with me and use whatever I
draw out or you're more than welcome to set up your own bowls and do
this at another time. After you've watched the video. See, we have oh, architecture, not something I often
do water color for, a technique that I need to incorporate two neutral colors. Also something I
don't normally do. Okay, I'm going to put these off to the side and I'm going to grab my water colors
and get started. All right? I've got
a couple of brushes. I've got a tray of water
colors that I had used in a class years ago that has some more neutral
colors on there. I've got a container of water. Hey, I'm going to grab a
couple other art materials in more neutral tones. So I'm going to grab some
colored pencils. Some browns. I've got some, three
different browns, grays, grayish
browns, warm browns. I also happen to have
some brush signed pens, so we're going to try
those out too now. The whatever you pull out of the bowls is just a
jumping off point. You can add anything else
you want to to this. It's supposed to
get you inspired in creating and give
you something to start with and kind of get your creative juices flowing and kind of help you get back in the rhythm of creating
a more joyful place than from a place of being
stuck in an art salon. I'm excited. I'm
a little nervous, but I'm super excited. You can also use reference
images, so if you, if you're doing architecture along with me and you
wanted to look up some images on unsplash or in your own photography or anywhere else that you like to get
your image sources from. That is totally great. I'm just going to go from my imagination and
see what happens. Drawing from my imagination is something that
I'm continually working on and trying
to become better at. I'm just going to start mapping
in some vertical lines. I'm going to see where
we go from there. Let's keep it rough. Some values I do want to get to water color since that's an important
part of this. The other fun thing about
doing this is that it's a chance to play
with colors that I don't normally
mix up and probably wouldn't have created if I was just left in my own devices. I like that it's already getting me away from what I tend to
gravitate towards. Right. I think I want
to go back in some more of these brush pens and you can be done with
this at any point in time. There's really truly no rules other than incorporate
whatever you draw out of your cups or containers into the piece I like to scratch
into the wet areas. Definitely would not have
made this on my own, which is pretty cool because normally when we
think of an art slum, we think of being stuck to
come up with something that isn't your normal stuff is
exciting, very exciting. Oh, I totally
forgot I was using, let's see, I forgot to use
the color pencils I get out. It's going to also reactivate some of the other
stuff we have down. I like this a lot completely
out of my comfort zone. Nothing I ever would
have come up with just super cool pop in
line detail a little bit. I love a great ser ball line. Awesome. I love
this. Oh my gosh. I'm going to go ahead
and write on here. What led to this? My fine liner. We had
architecture which led me to create more geometric,
alluding to buildings. We had neutral colors
and water color. One done. Now you can do as
many of these as you want to. I'm going to explore
another one. So I'm just going to and
flip this and not worry about the fact that it's
probably still a little wet. You can put the pieces you
drew back into the mix or you can leave them out so that you
keep drawing more options. I'm going to go ahead and take those out and I'm going to go ahead and put away my
neutral colored pencils. I can use neutrals.
Again, I'm not limited, but I know that I'm not going to specifically draw neutrals
a second time around. This is also a really
nice thing to do as a warm up if you just need to get into the groove of creating
before you get back to a project or start a project that you're
excited about. All right, what do we
have here? Line, love it, colored pencil, no color. Wow. All right then
we're going to be, because if we got
colored pencil, we know we're going
to be using black. We've got line colored pencil, no color, black and white. Now, we could also use gray to, I suppose we could use gray. This one I'm going to do
a couple of small ones. So what I'm going to do is
draw in a thumbnail box. I'm going to draw in a
couple of thumb boxes. It doesn't have to
be a whole page. That's the other fun
thing about this. It can be super small
line, no color. All right? This is going
to start breaking this up. All right? Line colored
pencil, no color. Now let's go again. It
doesn't have to be. It can be as simple or as complicated as
you want it to be. There's another one
line colored pencil, no color. Let's do one more. You know what? I'm
really enjoying this. I want to do another one focusing on thumbnail
size pictures. Let's see another
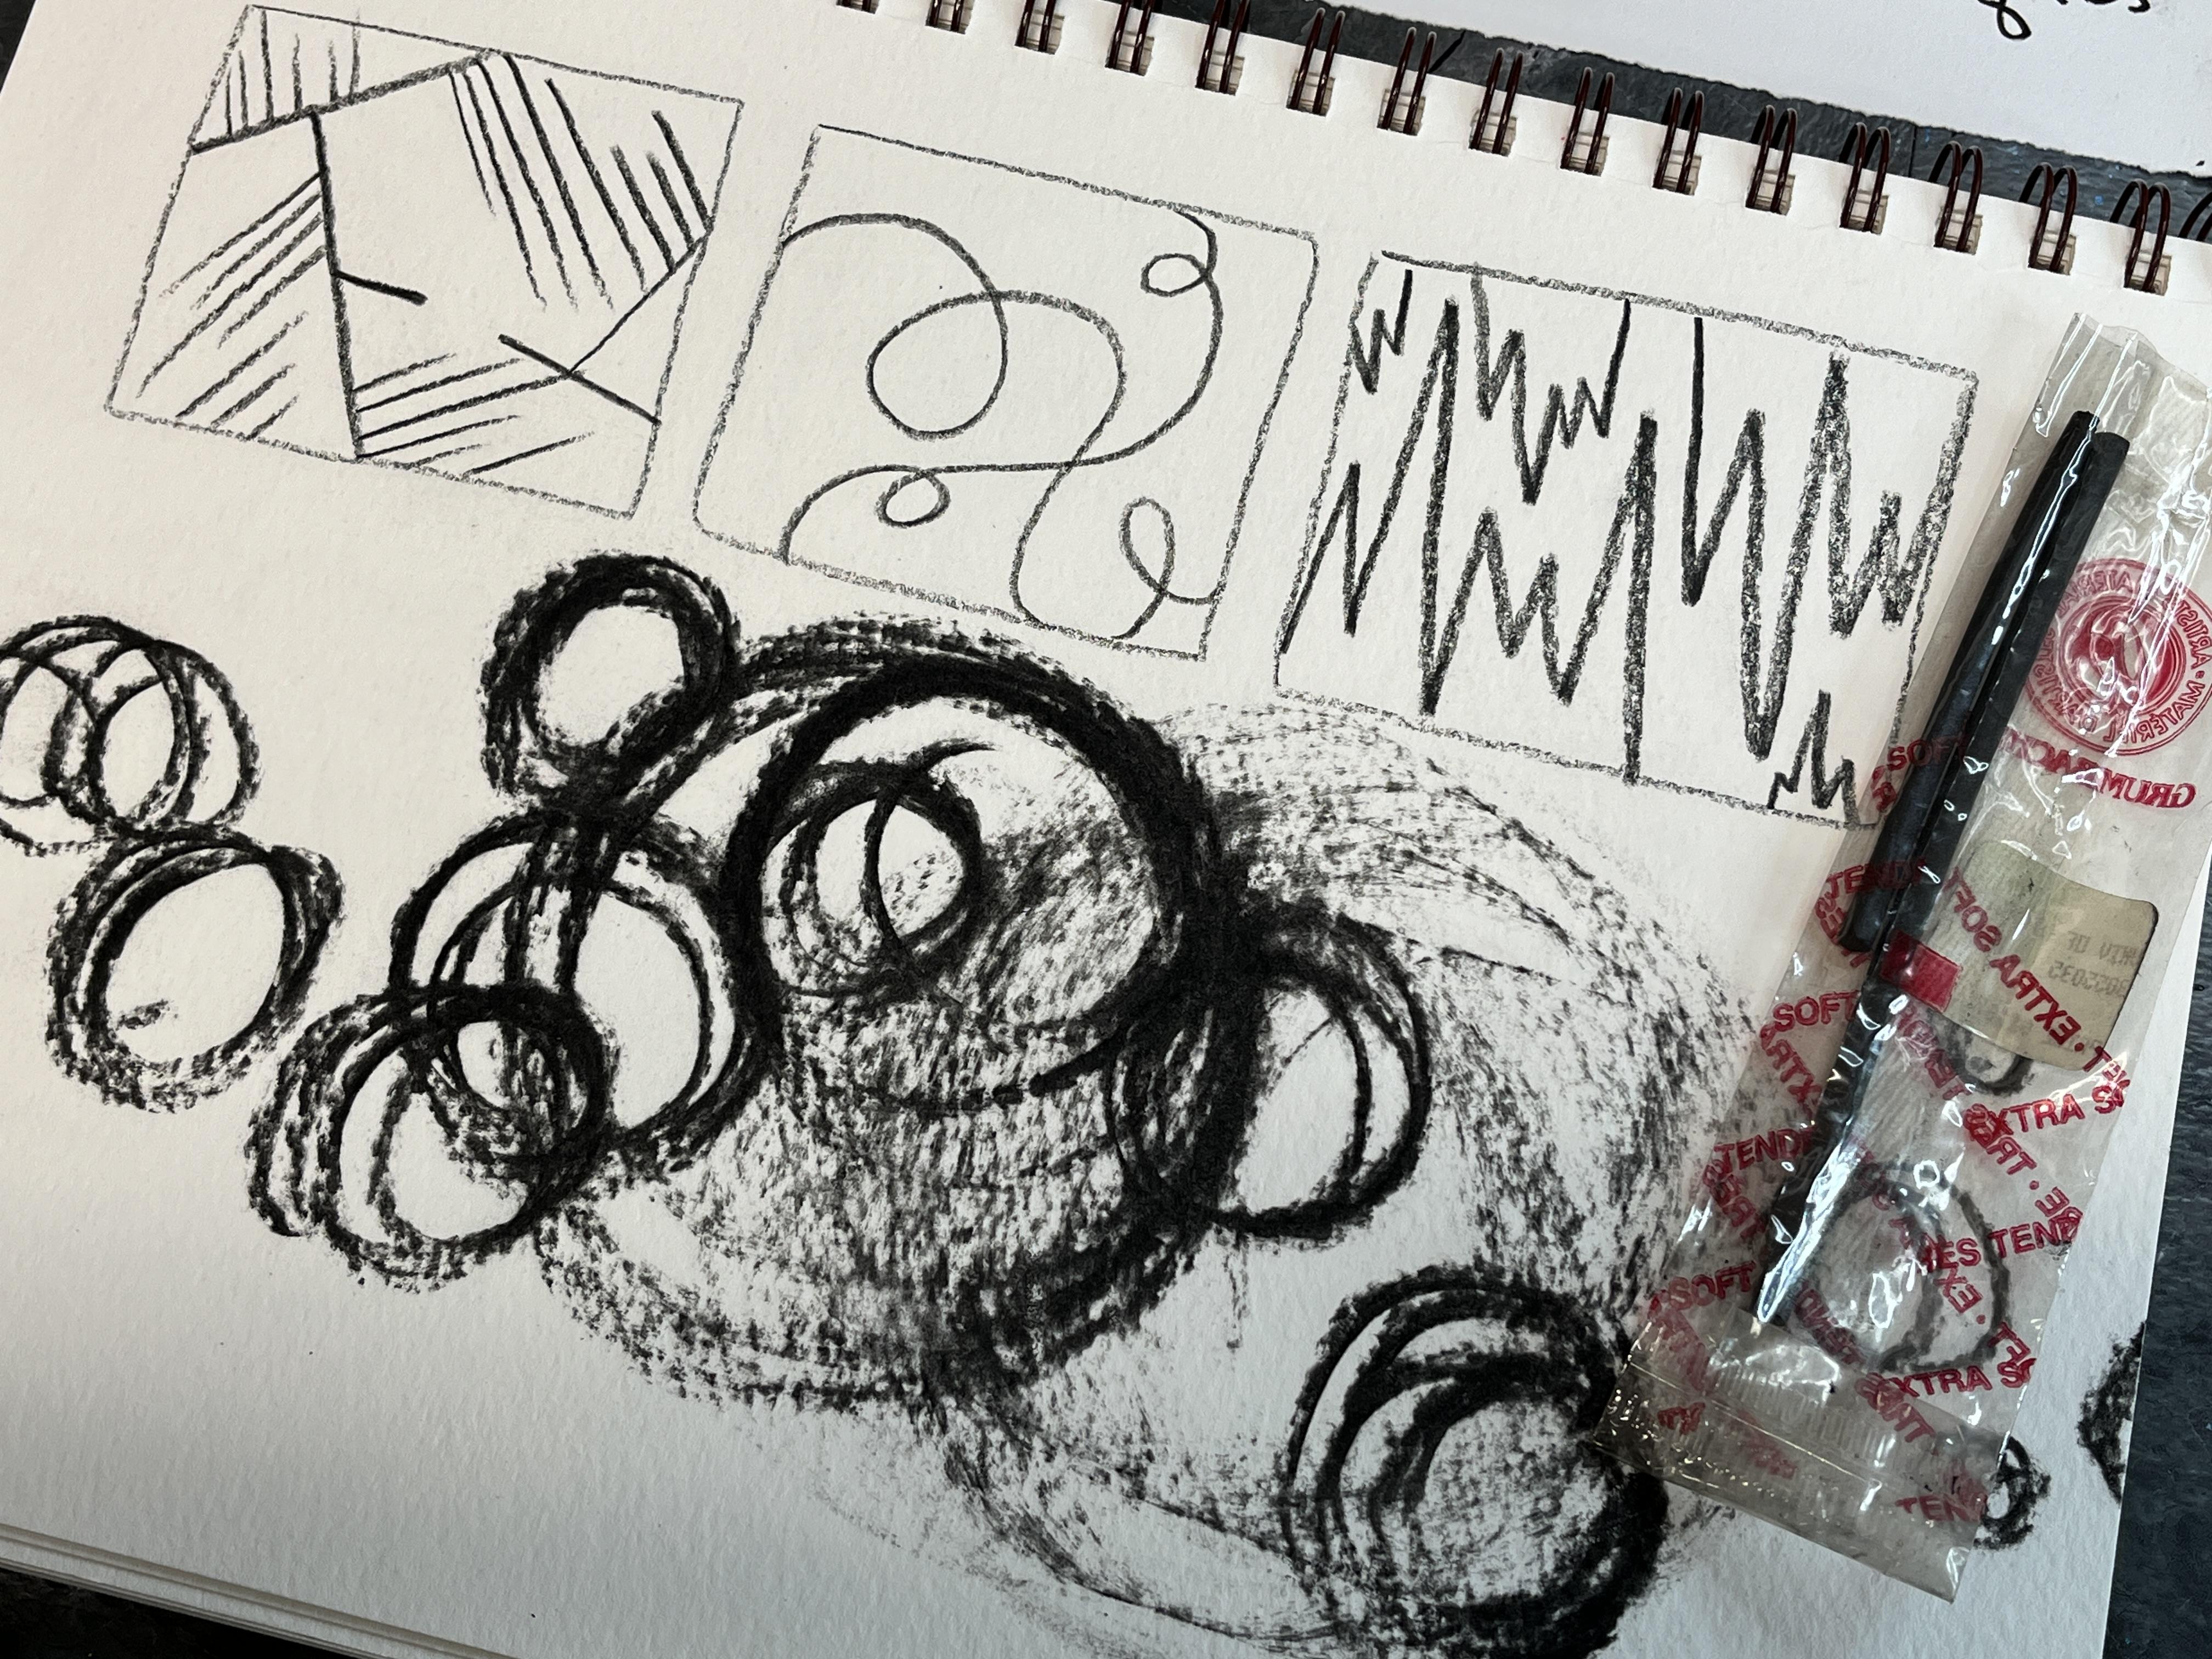
subject circle. We have a theme, charcoal. This one, eyes close, circle charcoal, eyes close. This one is going
to get really fun. I haven't used vine charcoal
in a very long time. I'm going to go ahead and
just break some of this off and work with that. You're just going
to have to trust me that I'm going to close my eyes. But I promise you
eyes will be closed. I'm going to focus on circular
motions with charcoal. But now the fun thing
about something like charcoal or soft Pt is that even unwrapped
cons the pointy end, but you can also use
it flat. Let's see. All right, I'm going
to take a breath. Find my paper with one hand. I've got the charcoal
in my other hand, and my eyes are closed. For just a little while, I'm going to start making some circular
shapes on my paper, not worrying about
if it goes over the other stuff I
have going on there. I'm going to try doing it on
the side, find charcoals, a little trickier to do This
charcoal is pretty messy. That's okay. I feel like it's
a good day if you've gotten some art on you fun. I really love that it's playful, it's got different values to it. There's some really
nice line quality, some lovely texture, because I'm working on
my watercolor paper, play around with this. And it's just meant to be
fun and playful and to get you creating through very
simple prompts and direction. Some of these could be great
to work back into ideas, to explore further when you have more time or energy or
whatever is going on. In our next lesson, we're going to continue working
with randomness, but now we're going to
be using it in terms of collage and a relaxing
nature of repetition. Let's head over to the
next lesson. See soon.
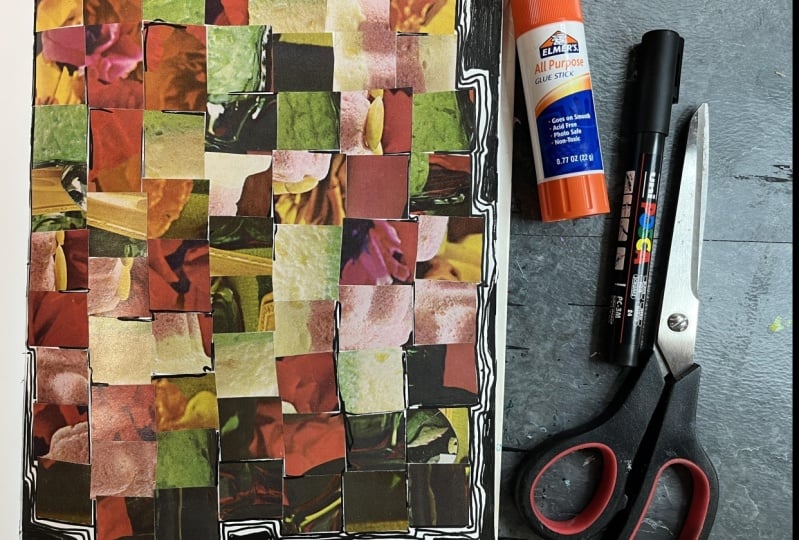
6. Exercise 3 Repetitive Collage: Now let's explore art making through some low stakes collage. This one's really fun
for this exercise. We're going to be working
with the idea of collage, but very basic shapes, so you can do a
square or rectangle. The idea is to not
do it perfect, just get the size that
you want to start with. And then cut out a bunch of decorative papers or collage
materials in that size. And then we're just going to
randomly start gluing them down and it's going to be very meditative and very
fun and relaxed. And we're just going to let go of everything and just
have a really fun time. So I've already cut up some, but I want to make a few more. So I'm going to go ahead
and grab one as a template. And then I'm just
going to put it on top of some of my
decorative paper. I love creating decorative
paper with watercolor inks, acrylic, and it works great
in an exercise like this. This is a wonderful
use of scraps or just anything you've had lying around that
makes you happy. So we're going to go ahead
and just get a couple more of these cut before we dive
into the next part. And it's totally fine. If they're imperfect,
we're using our original shape as a rough template to
create the rest of them. And you can create as many
of these as you want. I like to have a lot of
variety in my collage work, so I'm just going
to cut out a couple from each paper that I'm using. You can also decide if you don't want to do squares
or rectangles, you could do circles, you could do organic shapes. The idea is we're also going to play with repetition
and pattern, so we want to make
sure that they're all the same size shape, whatever shape you want to use. Doing a square rectangle means that I can quickly
cut these out and not spend a ton of time
on that portion of the exercise so that I
can get to the collaging. But I do have a couple other fun papers that I've been laying around that I wanted to
incorporate into this one. Normally, I would cut off
the borders where I had taped it when I
did the painting, but I'm going to leave those and let those be
part of the clash. We really want to focus
on the process for this one and maybe something cool will come out
of it. Who knows? But I know that I'm going
to have a lot of fun calmly gluing these down and I'm going to try to glue them
with a glue stick. You might find that
that is a little bit too mellow of a glue for the papers that you're
using. It's hard to say. I might need to get out some of my liquid white
glue and a paint, brush and paint on
some of the glue. Also, that part will be a
little bit of an experiment, but if you're working with
pretty thin paper for your repetitive shapes
or magazine images, you'll definitely be
able to glue it down. No problem with
just a glue stick. Now, I'm going to be working
in a sketchbook that I made. This is an old cookbook. I gutted it. And then I
used a bookmaking technique to sew back in
signatures of pages. I love doing this to old books that I find at a thrift store. I'm just grabbing a nice page and I'm just going to
start building this up. I am going to grab a scrap sheet of paper
though, to glue on. Then I'm just going to
randomly start grabbing them and putting on glue and
sticking them down. You can decide if you want
to go that way or this way. Feeling vertical. Today,
everything is going to go in a vertical orientation and they're just going to go
right next to each other. I can already see that things definitely got
a little askew here. Oh, well, that's okay. I was going for an evenness. It's funny that the first one I pull out is much bigger
than all the rest. That'll add to the fun of it. I do want them all to touch and I do want them
all to line up, But I can work over and I can
work down at the same time. I just don't want to have any
white space between them. Another thing that helps when you're gluing
thicker papers down, if you're doing it
in a sketch book, you can close the page and
give it a little squash and a little burnish to
help the glue stick. Or you can put a piece of
scrap paper over it too. If all you have on
hand is a glue stick, I would definitely stick with thinner papers so that you don't have to battle
getting those to stick down. Actually, I'm going to
get out some liquid glue and go back and forth
between the two. So I'm just going to
go ahead and make a puddle of my liquid glue. Then for the thicker papers, I can just grab the paper, grab some glue painted on
there, and then stick it down. If it gets really gluey, you might want to
have a Df dry cloth on hand because
then you can clean off your gluey fingers. I'm going to correct
this a little bit and glue over that. And it'll give it a cool
offset feeling too. When we're all done gluing it, we can close it up and put
a heavy buck on top of it, and that'll help it stay down. Now the process is
what's important, so we don't need to worry about the fact that it's
not sticking very well. But I do want it stuck
until the very end. I am going to keep battling
it to get it to stick more. Some of these are so big, why
are they so big? Who knows? The other thing you could
do is you could play with the overlap shingle it. You would see on rough,
rough shingling, you could have one here
and then you could have and offset it down. That
would be pretty fun. Remember, the goal is to keep creating through our art slump, but also to get some
new inspiration. Try out some new ideas. Go to places that we don't normally go creatively
or artistically. If you have an idea, as you're working through any
of our exercises, follow it, Don't stop yourself. Or if you want to stay
true to the exercise, you can always write it down
and then circle back to it. Just make a note of it so
that you don't forget it. It's always such
a bummer when you forget a really great
creative idea that you have. I'm just going to trim this
so I can fill it up there. I really like this paper. All right? I'm just
going to keep going. I'm going to go ahead and
speed up the video and I will be back once I've glued down everything and filled
the whole page. Hello. All right. So I have filled my whole
sketchbook page with rectangles from various
decorative papers that I have collected and
created over time. There are different
color schemes, things are kind of crazy. But I can tell you that I really enjoyed the calm
process of just cut, cut, cut, cut, cut, and then glue paste, glue paste, glue, paste. I'm going to let this dry and then I might work back into it. I'm not sure who knows, but I know that it's
a really fun page in my sketchbook and it's getting me one step closer to working
through my art. Slum collaging can
be so relaxing. I hope that you've enjoyed that. And then it just kind of became sort of a calming, meditative, easy to create artistic
thing exercise as we continue working
through our art slump. In our next lesson,
we're going to explore the benefits of an art
challenge or focusing on a single subject or a
single artistic skill or technique to continue creating through our art
slump. See you there.
7. Exercise 4 Challenges: Another way to
approach an art slump is through an art challenge. Check out the list
of art prompts and challenges over on the projects
and resources section. This approach to
creating through an art slump can
really provide you an opportunity to
do a deep dive in an area of creating that you've
been wanting to improve. To get you continuing to
create and maintaining a creative habit even when you're not feeling
very creative or inspired. That may be doing a
daily art prompt. And we're going to also work through a little one together. I want to take us through two different art prompts just to get us creating in a really
super fast, quick way. The first one we're
going to do is doors. You're just going to draw as many doors as you can think of. Super quick drawings. Don't really worry
about how they look, just get whatever ideas
for a door pop into your head out on the paper quickly using any drawing
material that you like. You could even paint
this if you wanted to, but drawing would
be the fastest. I'm just playing with
different shapes. Playing with the idea of
doors having windows, doors having door knobs, the framework around the
door, Different shapes. Like I said, just having
some fun creating some different ideas without any plan for this
to go any farther, other than to get me
drawing in a fun way with a idea that is super approachable and easy
to draw depending on how complicated you want
to get with your Or designs. I'm just doing this with
the Posca paint marker, but like I said, any media would work, just drawing whatever ideas come to mind quickly
on the page. Playing with the space around the doors to give different
feelings to the doors. Now let's do another one. This
one I'm going to do hats. There's tons of different
hats in the world. Tons of different hats
for different jobs, different times in history. This is another
really fun one where you just start playing
with design and shape and line to create different feelings and
different types of pants. Another super easy
prompt you can do. There's tons you
can find on line. But these were just
two that came to mind. And I said, okay, I want
to do an art prompt. I just want to do
something quick. I don't want to commit
a lot of time to this, but I want to get myself
drawing so I can stay fluid and creative and consistent
in my art making habit. In a low stakes way, I love doing art prompts. It's just such a fun way to
get me regularly creating. I love participating in October. In October, I've done self
December in December. So you can have a
lot of fun with this and just keep yourself
creating on a daily basis. Another thing that
I really like to do is I like to turn to others when I'm in a creative
slump or an art slump, and use their guidance
in place of my own. These are just some of
the books that I have in my art studio that
I love to turn to when I'm especially feeling uninspired or just
lost artistically. Some of them are
practice oriented, like Omar wins. Go with
the flow painting. Omar's book takes you through
different processes and exercises as you work on very specific subjects
with watercolor, with a loose application,
which is great. This is a really fabulous
book by Carla Sondheim. It's a mixed media
workshop based book for drawing and painting
imaginary animals. I really love
intuitive art making. Dean Nimmer has a wonderful book called Art from Intuition. I love it because it's got
some really fabulous exercises for drawing and painting that just kind of helped shake
up my creative practice and get me thinking about art
and art making in a new way. The Sketchbook Challenge by Sue Blye has wonderful
techniques and prompts for achieving
different creative goals with the focus of a
sketch book in mind. And the nice thing
about sketchbook is that it tends to
be pretty private. It's a little bit
more low stakes because we're not
working on an artwork, we're just working
into our sketch book. Which is kind of
a safe place for us to create and
grow and explore and experiment without the
worry that it's going to be something big like creating an artwork which can
sometimes seem overwhelming. This book is really fabulous. This is abstract painting
with Vicky Perry. It is some really great
techniques to kind of get into abstract artwork
through painting as a lens. The great thing about
books like Vicki's are that because it's abstract, what we come out
with isn't trying to make something look
like something else. So abstract is a very safe
place to play when you're not sure what to do or you're feeling a little lost or
you're kind of stuck. And then there's other great
books like Jay Rotors. This is 100 Days of Lettering
Challenges like this. This one is a complete guide to different ways to letter so you can grow in your
lettering abilities. You can follow his guidance
as you work through each of the prompts and
exercises and techniques. And then you're also
gaining a skill that you can continue to apply to your
parade of practice, which is really what
all of these are about. But turning to the
guidance of others, whether it be through a book that you can get
from the library or one that you have in your collection that
classes online, This is another way to
approach art making through the art slump and giving you a little bit more
guidance and direction. Than just sitting
at your art table staring at your supplies,
going, what do I do? I'll include a huge
list of these and more on the projects and
resources section of class. To for this one, I found a really fun project using Esso and collage
paper in acrylic paint. I decided that I would create
this in my sketch book. The first step you do is
you just put Esso down on the paper and you move it around to create
different textures. You're supposed to let it dry, but I just really
wanted to keep creating and didn't want to
wait for that Drs. I decided to use the Esso as an adhesion so that it would
hold down my collage paper. I'm following the idea of the floral in the
book that I'm using, but I wanted just keep
playing and let it evolve. The project in the book is a very loose guide just
to give me some basis to go off of the Justo is my adhesion to put down
my collage materials. I'm not worrying about the fact that it's going over some of my magazine pages
because I don't mind if they get lost
in the process of this. They're just like a
sketch almost to give me some shapes to work with for when I attach the acrylic paint, building up some
basic flower shapes, and then I'm adding
some more gesso. And here's where I
got a little crazy. I didn't really
fully intend for it to cover up the magazine
images as much as it did, but I wanted them to
stick down really well, and I decided I would
just roll with it. Then I had the idea
that if I put down some magazine paper and
burnished over the top, I could pull up some
of the gesso and create some additional
texture on top of the page. This one, I did let
it dry after that, before I went in with
the acrylic paint. Then actually I'm just using some leftover acrylic
paint that was still wet on my palette from a previous
painting that I had done. I'm using that plus
then I added in some red green and orange
for the flower sections. I'm just building
up a rough sky with the acrylic going in and roughing in the stems
with the green. And just continually going back in and refining the
shapes that I'm creating. But also playing with
continually adding texture with the breast
strokes and the application of the acrylic paint and letting the colors do a lot of
mixing on the page. It's super rough,
super expressionistic. Just going for a fun mixed
media art experience in my sketchbook without any concerns for
how it turns out, other than letting
each step push the next one as I
continually build it up. Now if you did
something like this, you could let it dry
and then go back into it with paint
pens or markers. I might go back and
do that another time, but for this art session, I only had enough time to get through the acrylic process. And that was great
because I wanted to have a fun art making session doing something that
is out of my norm. I don't normally do
a lot of florals. I haven't been getting out
my acrylics very much. So this was a fun
way to get into some different media
that I love and enjoy, but don't naturally turn to. Flowers are fun and
pretty and colorful. So it just gave me something
interesting to play with. And then I am playing
a little bit with value in the background
because I really do want to continually
define the sections of the flowers so
that they stand out. But I love how this turned out. This was a really fun
session in the art studio, Coming to my table in
a way that I don't normally show up and really playing and growing
as an artist by doing something that
isn't my usual. So I'm really excited
about this one. It's definitely an
art process and I am going to revisit
in the future. For this one, I really
wanted to play with some of the exercises in
Carla Sondheim's book, and this one is called,
it's based on scribbles. So you grab a pen and you
just make random scribbles, and then you're looking for
images in those scribbles. And you can add
more marks to it. You can add different
media to it. You can do whatever
you want to it. I made three wacky
scribbles my sketchbook, and then I started
turning the page to figure out what images
I saw in there. This funny character
came out of this one, ended up turning my
sketchbook upside down, and all of a sudden there
was a nose that led to this. And then adding in
some fun hair details, keeping it really
stylized and cartoony, and just having a lot of fun
building out this character, using the scribbles
as the foundation. Then I wanted to keep going. This one, I saw a poodle. I don't know, There was
something about it. There were feet, there was a
little buffont hair to it. I had a lot of fun
adding in some details, adding in the back legs, the further back legs, and
then some ears and eyes, and nose and stuff to
make that into a doodle. And then this other one, I wasn't really sure
where to go with it, but it felt like a
figure of some sort. It had a whimsy to
it because it didn't really have normal shapes to, it became a clown in the end, a very loose whimsical
figurative clown. Some funny punching bag
fists. I don't know. I added a cute little hat to him in a little face
and started putting in a collar and buttons and
just defining his jumpsuit. Then I wanted to keep the next step of this
super loose and fun. I just decided to grab a
couple of colored pencils. Play with texture, play
with a loose application. Just put some pops
of color in there to help further define my
scribble creatures. I played around with some
different blues in my poodle, keeping the fluffy hair
quality as best I could. Playing around with
a little bit of light colored pencil
application versus boulder, but really just having
fun working back into my scribble creatures and bringing them more to life. This is a great exercise. I've done this before
with my own kiddos. I've done this with my students, different stages of teaching. Just a nice, easy way to create in a very low stakes
manner and have some fun. It brings you back to
when you were a child and you look up at the sky and you try to see images
in the clouds. It's the same idea, we're seeing images in our
scribbles or our doodles. And how fun is that
with the figure? I'm just adding in some
more color and just having a lot of fun putting in defining it further
through color so that it has a little bit even more life and
vibrancy to it. So I just proceeded
to do that with all the rest of my
scribble creatures. And then sometimes to
get out of an art slump, you need to take it back to
the basics and just work on some very technical minded art where it's very much exercises. It's very much about learning a certain technique or a skill, or a way to apply a media or to try a new media or one that
you're maybe a little. I've had this book that
on Marwin created for quite some time and I have not had the chance
to go back into it. My art slump provided the perfect time for me to
get out my watercolors, flip open to a page
and just start working through some exercises
that she put together. This book takes you through many of the different subjects that you might have seen her do. She goes in so much detail about the technicality
of the water color. The great thing is I can go
back to the book for this, but I can also just do the
exercises and the pages and the small little paintings as quick little art sessions
to further loosen up, open up, get more creative
and have some fun making art. Now that we've
explored some ways to work through an art slump and come to understand the need
for continuing to create, let's turn over into
our final lesson to wrap up the class.
See you there.
8. Final Thoughts: You're now prepared to tackle an art slump head on and
to continue to create despite those negative feelings discouraging you from picking
up a pen or a paint prush. Thank you so much for
taking this class and learning importance of
not letting an art slump stop you from sitting down at your art table and continuing
your creative practice. I hope that whenever
an art slump hits you, or you just need some
creative inspiration, or you want to do a fun exercise that you return to the
activities that we have discovered in this class as a fun way to be playful
and experimental. Challenge yourself,
and most importantly, to ensure that you keep creating through those art slumps
whenever they may hit. I'd love to see your
art slump creations. If you feel comfortable sharing, please hand it over
to the projects and resources section of class and post it to the
student gallery. The wonderful thing about the student gallery
in classes like this is that we're all coming at this from a similar situation. We're all experiencing
a negative impact on our creative journey and we're working
through it together. I'm here to support you. I'm in this too, and I hate
being in an art slump. More than anything, I hate
being in an art slump alone. So having a community of creatives who are
also experiencing something similar or just need some extra art inspiration
or whatever it may be. Having the student gallery
is a really nice place because we can get
inspired by each other. Either sharing the
stories of what we're experiencing in our art slumps and how we're feeling as
we work through them. Sharing what we create as we work through the
different exercises. It's just that's a really wonderful
community we have here. Be sure to check
out the posts from other classmates and
comment and connect, because connection is one of the most important things that can come out of one's
creative journey. And getting to take
classes online and meet people from
all over the world who are also growing as creatives and working
through it day by day. One pencil pen line at a time. You can also update your student project at
any point in time. So feel free to continue
to add to your post, to put up new images as you continually return through
these exercises time. And again, if you update the cover image for
your student project, it will give me a
new notification. So I'll know that you've been in there and you've been
sharing some more work so we can continue to
connect as creatives and fellow art sloppers
are greatly appreciated. If you left a review, student feedback is
so important to me. I'm a very reflective teacher
and a reflective artist. And hearing how students experience the class and
what they found helpful, things that could
be improved ideas. They have to expand on a class
topic, whatever it may be. It's all so appreciated
and so helpful. And I know that as a student, I love the feature of offering reviews because it
gives me a chance to reflect back on my
experience in a class and share any insights that I
might have for others who are considering checking
out the class in the future. If you happen to share
your artwork on Instagram, I would love it if you take me so that I can check it out. And you can also continue to explore art and art making and
artistic journeys with me. Over on Youtube, My channel
is Elizabeth Welfare, and I post regularly
different demonstrations and techniques and share whatever is happening in the land of art. If you check it out, be sure
to click Subscribe so we can continue connecting
beyond Skillshare. And if you want to
stay up to date on my new of Skillshare classes, be sure to click the
Follow button below. And I'll see you next time.
 Elisabeth Wellfare, Artist, Art Educator