Transcripts
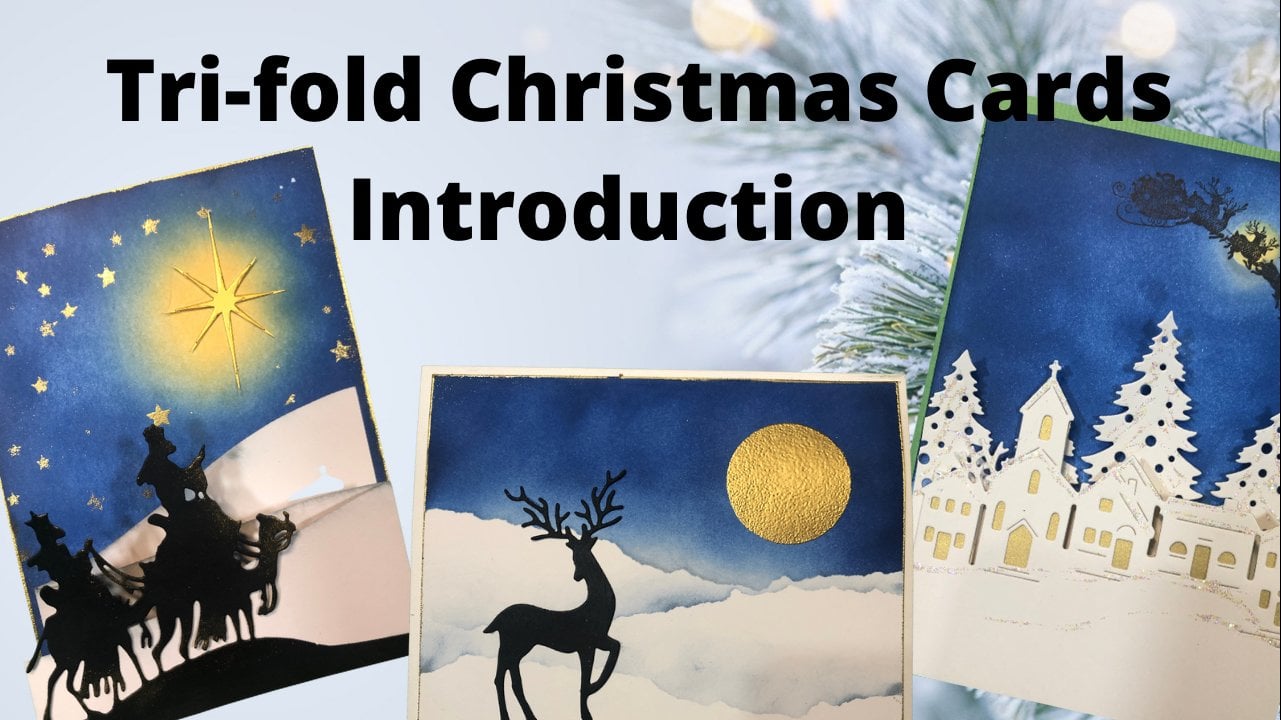
1. Luminary Christmas Card Class Introduction: During the holidays, so many of us sam cars to our family, friends, and loved ones. But when it be cool if those cards could also be used for Christmas to Corner. Hi, I'm Sheryl. And in this class I'm going to show you a way to turn your cards into Christmas decor. Luminary cards. Each one of the cards created in this class has a section that is just velum. So when we go and put a battery operated to light in it, it starts to go. Now I only have the TEA late in the center one right now, simply to show you the difference between the two, as well as the fact that all of our local stores are sold out of battery operated tea lights. So once you put the card over the t light, the velum piece starts to glow. So it's a great way to have interactive cards that also double as holiday to court. In the class, I'll be showing you a unique way of using your dyes to create these luminary cards. The class also comes with a supplier list. I will list each one of the cards with pictures as well as all the supplies that are used to make those cards. And link those supplies to where you can find them if you don't have a local source. One thing to note, these are only created to go over battery operated tea lights. They are not intended to go over tea lights with an open flame simply because fire and paper don't mix. And it's a sure way to have a really bad night sort of fire and meet your local fire department. So let's start creating.
2. Card Prep: Creating the Blue Background: All right, so the very first step to our cards is to create the blue background that we have on all three of them. And we're going to do all of them at once. What I'm doing it with some spray stings and some oxide sprays. So make sure for your oxide sprays that you mix them up to get the pigment blended in before you start to spray. And there's a couple of ways you could do this. You could spray it read on the card stock. For this particular cart. I am not doing it that way. I'm going to spray it on the mat because I want to add a little bit of perfect prose, just add a little bit of shimmer to the sky. So a couple of sprays of each color on your mat. So the oxides are going to be a little bit more of a chalky, opaque finish, whereas the spray stands are going to be a little bit more translucent. So I like to have a mix of both. If you have a preference, you could use either or you don't have to use a mix of both. And then for the perfect pearls, I'm just going to sprinkle them over, give it to the side and then we're going to spray this to activate. Those, are those perfect pearls. Here we go. So the very first step, and if you get some offspring onto your card stock, that's totally fine because we are going to cover it, read up. First step, we're going to press it down and smash it around. I just want to try as much as possible to cover the whole background. And then I'm using my heat tool to dry it. Now. You could use an embossing gun to dry it. The only thing is, is the heat is a lot more intense and a lot more directed. So you would have to work a little bit farther away from the paper. The heat tool is perfect for drawing things because it, it isn't too intense. And you'll find, you'll have a little bit, your card stock is going to curve a little bit, but that's totally fine. Once we get glued onto the card, you're not going to see it. You also want to make sure that you are using mixed media card stock or whatever, watercolor card stock, something that can handle water. If you use regular card stock, it doesn't react in the same way. You're going to get bubbling and blistering, blistering and your card stock and your inks are not going to look the same. So you definitely have to choose something that is meant to be used with water techniques. For the card stock, I'm using Islam, distress white heavy stock. But like I said, if you have watercolor paper, you can absolutely use that as well. So I'm trying to get this mostly drawing. It doesn't need to be a 100 percent dry, but I want it mostly dry. Let's say about 80, 90 percent dry. If it's too wet, when you go to it, we're going to tap it back in the colors. When you go to do that, you're just going to get a big puddle again. So I went along the edges here, but I'm still going to go in and tap it. And you'll see little bits of that perfect pearls throughout. If you have some white spots, don't worry about it too much. I'll show you how we will get rid of them when we are done art piece here. Hardest part of this background is waiting for the heat tool to dry at all. Especially when you have really wet spots. If you have a spot that's super, super wet and you really don't like it. You take a paper towel and watch it up or suck out some of that moisture. So it'll definitely make it work a little bit quicker. You could even do an ink ink blended background for these cards as well. I just thought this would be a little bit more of an interesting background to do. And you could also just use plain blue card stock. But once again, I like the variation that background's like these give. And it makes the project book a little bit more interesting to me. Still have a few big wet spots, but we're going to tap this in here for leisure time. And I typically do it about three times. If you find that the rate there, there's not really any texture there. So I'm just going to quickly tap that in there again, just get a little bit of texture in that paint there. And again, if you've got something that's too dark for you and you can just use a paper towel and soak it up. But I don't mind it for what we're doing. You might have an easier time trying it completely if you're lifting your paper up so the heat can go through. Sometimes when you have it sitting on a surface, it tends to curl up a little bit more. You see how I had a big line of that and I just twist or a slanted my paper so that it would roll down the paper a little bit. That's going to thin the paper, the paint out and make it easier to dry. And it's also giving this section a little bit more texture. All right, I think I like the way it looks. There's still some white spots. I'm going to let them air dry while I clean this up. And I will see you in the next video and I'll show you what we're gonna do to prep them for our cards.
3. Cutting & Prepping the Blue Background: All right, so we are all completely dry. So the very first step to preparing this for our cards is our card. Or a card size is four and a quarter by 5.5. So I want these pieces to be four inches by five and a quarter. So this, this piece of paper is 8.5 by 11. So I'm going to cut it down to 8.5 by 10.5. And then I'm going to cut it into quarters. And you'll end up with four pieces. You only actually need three of them to do these cards, but then you can choose exactly which ones are going to be best for what you're doing. All right, there we go, and let's put the trimer away. So these are the cards that we are doing. So I'm going to pick which ones I would like for which I'm going to do this one here, but I'm gonna leave that there because that's going to be covered by the town. And then I'm going to do that one there. So you'll see there are some white spots on each one of them and some of them are going to be like this one here is going to be covered by the town. But any of the ones that are not covered, this is how you hide that. Just get some ink and just blend a little bit of ink on there. This is tumble glass was the same color as one of the sprays that I use, but see how that makes that not quite so opaque. There's some white dots in there too that you can cover if you want. I'm just going to leave it because I kinda like the way it turned out there. I'm just going to cover this anyways, even though it's going to be covered by the town. And you could do as much or as little as you want. You could use one of the darker colors if you want, but if you use one of the darker colors, I would suggest lighter hand at first and then get a little bit heavier handed just because if you get it too dark then you might you might be able to see that you were inking it, right? So we want to be a little bit more subtle. And basically I'm just taking that starkness out of the White. So I think we've got that done. Now, the other thing that we need to do to prep these for the cards is I am going to want to temporarily stick this piece onto my card back wall. I die cut this because I want it to be in a precise position and I want it to not move. So the way I'm gonna do that is I'm gonna put some temporary adhesive on just part of the background. And on this one I'm going to do it on the outside. Tumble multi, if you use it as a glue and put two pieces of paper together, it's an amazing glue. Nothing's going to come apart and nothing's going to fall apart. The only way to get it apart is to rip it apart. But if you put it on a piece of paper and let it dry clear, it becomes like a post-it note. So I'm gonna do that for all of these and then let them dry. So when you put the glue out, it's got a white look to it. You want to make sure that it's translucent before you use it on your carts. Now, you could also use something like this, which is the temporary adhesive mind just happens to be really, really also it's not quite as temporary as it should. If by chance you have something sticking out, something. That's totally fine because we're going to be gluing these things back together anyways. So anything that rips is going to be hidden. But this is just a way to hold things in place while we're doing the dicots that we need to do within the carts. So I'm going to have to wait for this to completely dry before we can move on. And I'll see you when that happens.
4. Wisemen Card: Luminary Star: All right, my adhesive has derived till it's translucent and you can see it got a little bit darker. So we're going to tuck those aside for when we are working on those cards. And we're going to work on this one here. So the first thing I'm gonna do is I'm going to do my dicots for the wise man. And I've got my rate here. Let's get the machine. So I'm going to position my die as far or as high as I want it to be on a piece of card stock here. And then I'm going to die cut it. There we go. And I didn't quite reach all the way to the end of a piece of paper, my paper with slightly longer but that's okay. So I just rip that off. We're going to be cutting it shorter to fit the blue piece of paper anyways, so we just want to have that prompt. And now you need to take all of these bits and pieces out of your dye. Before we do the next one, we're going to cut a white piece just from the bottom, just to do the bottom here because I felt that would look better and white then unblock if you like the black, leave it at the black. This tool here is a spell binders 21. It's super, super easy to get all those little bits off very quickly. And normally I do this over a garbage can. But there you go. Now all those black bits are out of there and we're ready to die cut the next color. So I'm placing just the bottom. I don't need the entire thing. I'm just concentrating on this part here because that's the part that I want to keep for the card. Or we go pull that out there and then you're gonna take all the white bits out. We don't need this diet anymore, but that way it's going to be nice and clean for the next time we use it. And what I'm gonna do with this piece here, because I'm going to cut the bottom of all those figures off because we're just using it for the hill here. And then just below the count because they're so all of this can go in the garbage. And there we go. So this is going to be glued on to that piece right there. I'm just going to use my glue to do that so that can dry while we're getting the rest of it ready. And you don't have to worry about this being the same size as the black. Because whatever is short on the black is going to be hidden if by chance. So this is where I tore it at the end. If by chance you've got that showing just snip it off there. What are we going to put that aside? And now I want to die cut my star. Now the thing with the star is I want to die cut both my card base as well as the blue mat, which is why we put the temporary adhesive on there. So I'm going to position my blue piece where I want it, center it as best as possible. And we have the temporary, temporary adhesive on there and put the star died down. Now these are thin die, so it won't actually cut through both pieces of paper. But it will leave a big enough indent on the card base that I'll be able to position my die in that exact same spot. So we will run that through there. So you can see the end, end of it. I could probably rip it and try to get that story out of there, but it would make her really it would look really bad on the inside of the card. So I'm taking him my tape off and this is just a diatomic, it's temporary tape. It's perfect for holding a dye in place. Oops, you don't wanna do that. So now that I did that, I'm going to do the same thing that I did for if there was white on the bottom of the card there, I'm going to ink that to hide that. Alright, I'll take this tape off and my glue seems to be super sticky today even though I waited for it to dry. It's funny, I've used this blue for this hundreds of times. And for some reason today it doesn't want to work. I'm going to take the blue over here. And then I'm going to line that store up. And it's super easy to line up the second time because you've already got the grooves in there from the first cut. My tape just to hold it in place while a turn it upside down. And now I've got the adhesive on here to hold it in place. There we go. Now our star is completely die cut. The adhesive from the blue piece transferred onto the red. So now it's sticking to my machine. You want to make sure that none of that stays on there for the next die cut. All right, so now we've got our red piece out of there. Let's get rid of the machine. Put my die to the side, and we can assemble our card. So I'm going to take my here it is underneath for it but my die. So I've got some double-sided tape here that I'm going to put on. The top. He's here, in the bottom here. And then on my slides. And I probably didn't really need that much adhesive, but because the card stock has worked a little bit when we did our distress background. I just want to make sure that it's going to stick down really, really well. So I've got a little piece of gold velum. We're going to put that in the window here. Take that back into my tape off. All right. So I'm not covering all of the adhesive on the top and the side because I want to be able to use some of that for gluing it onto the front of the card. So this is where I was saying if you happen to rip some of your card with the adhesive, the temporary adhesive to line it up. It doesn't matter because we're going to put it right down there anyways. Before I do that though, I am going to use this mat so it doesn't stick. I'm just going to ink that white part there. And what happened there is there is a little bit or there was too much pressure on my machine on that piece of tape. So it just stuck really, really well. And I was trying to rush while I was taking it off. So by inking it the same way as we did, the front end kinda hides it in our background. So if that happens to you don't worry about it. There's a way to fix it. I mean, I have that extra background piece because our background made for so I could have just cut another one. But it's always nice to know a way to fix a mistake as well. The mat, right? And now we will put this onto the front of the card. And this is why we, we're really careful when we positioned at the first time. Because if we position it nice and evenly within our front of our card, we will have it positioned lovely with the star on the inside. You can lift it up to the light just to check and make sure that it's completely there.
5. Wisemen Card: Assembly: But it's completely there. And now I'm going to add my wise men. Now, I am leaving this piece here, the full length of the card. If you want to cut it and only have it within the blue piece, you can do that. You would just need to attach that before attaching it to the card base so that you can position it and trim anything that needs to be trimmed off if necessary. And then putting my piece on there. And I love this adhesive for putting dicots on cars because if you happen to have any seep through, it dries completely matte so you can't see where that adhesive watts. So it's quite handy for that. All right, You can leave your card like this. But I thought a little bit of sticklers and some gel pen would just enhance those dicots a little bit, make them pop. And you can do this however you want. I just wanted to have a little bit of extra I mean, they're Wiseman after. All right. I wanted to do that one in red stiff goals. And I'm just going by what I did on my sample card. You don't necessarily have to do it exactly the same ones. I can one more here. And then this one here is a nice pen because it just has a touch, a sparkle to it. But it's clear and the sparkle is got a bit of a gold tone to it, so it coordinates perfectly with the rest of our accents here. Alright, so now I'm going to add some red stuff goes on his crown. Little bit on the reins for the camel. And I just kinda figured there Wiseman, they should have a little bit of bling on them. It seems to close up here. This guy just did just colored demand a little bit on the blanket, on the saddle there. And I think that's all I put on my sample. And then a little bit on the bottom piece there, just to add a touch of sparkle there. Alright, we're going to let those dry and this card is completely done. We'll see you in the next video.
6. Santa Card: Luminary Prep: Alright, now we're ready to do this one here. So we've got our blue piece here that has our adhesive on it. And what we're going to do is we have a little town die here. We're going to place it on the blue piece. We're going to mark out where our windows are going to be. And then we're going to use an exacto knife to cut that part out so that our luminary on the inside will shine through it. And then we're going to punch out the moon part there. So before I do this, I am going to placed my dicot on my blue and trim off this side here so that I know exactly how long it needs to be. And then I don't cut out the parts for the windows at the very end because otherwise we're going to go too close to the edge here. So I'm putting my dicot rate on there. And then I'm going to use a pencil and mark out the edges for my windows. And you don't have to mark out all of them. I'm only marking out every so often because I'm going to take a metal edge ruler to die cut a straight part here. And then I'm just going to die cut, not dicot. I'm going to use my exact dough knife to cut out extra pieces on the top. There. I've got my ruler here. Now where did my pencil marks go? You're going to be a little bit challenging to see on the blue because it is darker. And you wanna make sure that you have a metal edged ruler. Because if you don't have a metal ruler, you're going to start to gouge inside your ruler there. And if you find it easier, you can always learned. You can always just do it by hand. Or you can mark more of your window so that you see more of your marks there. Down there, down there. And pull that out. And I typically will check as I'm going to make sure that I have it right or how I have what I want to see, right? So now I'm going to cut out a little bit here, a little bit here, a little bit here and there. So that those windows have a little bit of a light through them as well. And the red is easier to cut out because we're going to use what we cut here as a pattern and we're just going to trace it. I seem to have gotten my pearls right where I want to cut excess out so my pencil mark isn't actually showing up too well On top of that because it's right on top of silver. But that's okay. We can do it like this. And make sure that you're cutting on top of the mat. You don't want to cut into your table or into board. Keep putting my ticket on Rome. And now I can see that. And I do it with a pencil just so that if I happen to get too much of my pencil onto the dicot, I can erase it. And we go. All right, Now lift this up. There we go. Now. We are going to center this onto the front of our card. The moon is super easy. We can punch that with a circle punch, and that punch will go the way, all the way through both layers easily. And now we're gonna take our pencil. We're going to draw this piece here. So like I said, this one's a lot easier to cut out because you can see exactly where those pencil lines are. And you could use your still metal edge ruler for these long lines here as well. Pull that out and then just these extra little bits.
7. Santa Card: Assembly: All right, We are ready to add our dicots and then our little accents. So the dicots, just to make them really pop. I always like to use little different accents like metallic pens are sticklers or whatever, especially with Christmas cards, just because it's always nice when they have a little bit of extra sparkle. Here we go. I'm just lining it up to the bottom of the card there. If by chance you have it not lined up perfectly, you can just slide it up a little bit. And then my Santa insulae. And I have these ones all pre-cut because he saw me cut the first video or the first card. And this is done exactly the same way. So when it comes to all those fine details on the horns of the deer, I don't really worry too much about them. I know some people like to have every single thing glued down. I don't usually worry too much about it. Alright, so that is glued on. I'm going to add a little bit of gold accents to the d or colors. And you can do as much or as little as you want here. I like to make them pop, but I typically typically colored this particular dicot because it's one of my favorites the same way every single time. And I'm using a gold pen here, but you could always use like liquid pearls to Pearl dimensional. It's like articles but it's paralyzed. And it would have a little bit of extra dimension to it, but you'd have to wait for that to dry. So there I like to make their antlers little bit. Berkeley. If you felt more comfortable, you can always do this coloring ahead of time. But it's really quite easy to do it well, it's on the card as well. All right. I like to put a nail daughter red circles on reindeers are rangers on Rudolph's nose there. And then I'm just gonna put a little bit of red on Santa's hat on the sample. I put it on his body as well. And then after I did that, I thought it was a little bit too much. You choose which one you like and which one you'd prefer. No right or wrong. It's just personal preference. And then I'm just going to add a little bit of opalescence to close just at the top of the roofs. Kinda like snow sparkling in the moonlight. And once again, as much or as little as you want, I typically just do a line around the edges because I kinda think less is more. I know some people prefer it to be heavier. And then we've got, well, we will let that completely dry. But card number two is done. We'll see you in the next one.
8. LCC5a Lantern Card Luminary Prep: All right, so now we're onto our last card. And one thing I realized, I forgot to mention the other two. You may have seen it when I was gluing the front panel to the front of the card, you want to make sure that you are doing your cards so that the fold is on top. And it's a kind of attempts. So when you put your battery operated light in there, you don't have light coming out at the top of the card. You might have a little bit coming from the inside of the card. But for these particular ones is fast. If you have a tent card and you can put your battery operated, he laid underneath there so it will show through the velum. So this is the dye that I'm going to be using for this particular car list assembled the way here. Because I liked how it had a lot of open space, so it's going to be perfect to put velum in there so the light would shine through all of that velum. So the very first step for this card is to cut out the lantern shape on the card base. Now, this particular dye has a lot of different layers that you layer up. So there's actually three different pieces for the lantern, but I'm choosing the one that doesn't have that handle because I don't necessarily want the light to be shining through there. I only want it to be shining through this open part here. So just like with the other ones, the very first step, and I'm choosing to put the light latest or the light part from matt here kind of by where the lantern would be. It's one of those things. You might have a light part on your piece or you might not, it's not vital that you do. But if you just so happen to have one, it's kinda nice to line it up with it. So now I'm going to take my die down. And for this guy, I can tape on the part that is going to be taken out of the card. So if by chance my tape sticks a little bit too much from the pressure of going through the machine. I'm not going to wreck my card front or need to fix it like I had to fix that one and with the ink. So there we go. Now it's taped in place. We're going to rush right through the machine. Let's get this frame here. And it doesn't need to be run both ways like that. I only did that because the way my machine is sitting right now, it would hit the stand for the camera. So this already fell off because it was stuck to one of the pieces of the piece fell out there. So I'm going to take that off. And I didn't have to be careful with taking the tape off there because that piece was going to be tossed in the garbage anyways. All right, so now taken the front panel off the front of the card and once again, if some of it rips, that's totally fine because we are going to be sticking these pieces together again when we put our hearts together. And I was wondering yesterday why even though the tumble multi is a temporary if you said when when you don't put two pieces together, why it was ripping for this? I've never done it. Like I've always done it for masking, but I've never done it where I've gone and run it through the machine. So I believe it's the pressure of the machine making it stick together like that. But still, I mean, it's easy enough to get up. It's just I was kinda curious why. All of a sudden it was behaving like that. So now I'm going to lie my die line, my die rate up with where the indent from the first run through was. And it's really easy to do. You just kinda wiggle it back and forth and it sits right in the indent there. Grab my machine again from run it through once more. So there we go. We are there. And that adhesive wants to stick to my plate, which I don't want to need. Alright, so I will tidy that up later. I don't necessarily need that. This little piece here that the dye cuts out is important for the plant pieces, but for this, it's not important. I'm going to take, and it's not important to on here either. My dicots are going to cover all of that up, so we don't need to have that on the base piece here. I'm going to put some tape in here, put my Belen and place. And as I was mentioning before, it's really easy to pull up the backing from the tape with just your nail. But if by chance you have a difficult time with it because I know some people do. I've taught many, many classes and some people just have no problem with it. And some people need to use tweezers. You want to choose a tweezer that has a really nice fine point to it that can slip rate underneath there and that makes it easy to do. All right. Velum covering that opening. And then let's glue are fun. Front panel on. And one other tricks too is if you take your tape and you rub it down, make sure it has really good contact with your card stock. You'll have an easier time getting the backing up as well because the backing oppression or I don't know what the word for it. Sticking to the tape. It's easy to there's stronger adhesive with the tape on the card stock is basically what I'm trying to say. All right, So we have our luminary backing done right here. I will see you in the next video and we will put our dicots onto the card front.
9. LCC5b Lantern Card Assembly: All right, Now we're ready to put our dicots on to our cart front. So the very first step, and I've got all my pieces pre-cut. This particular die, like I said, has a lot of different pieces and they layer together, which makes a really beautiful result. But it does take a few minutes to do your die cutting. So rather than you watch me die cut things, I figured I would have it. I'll pretend. I'm gonna do my candle first. So there's a little wax piece that goes on top of the candle based. And the nice thing about these dyes is there's a little indent rate on the bottom piece, so it shows you exactly where the upper pieces lei, which makes it super, super easy. For tiny pieces like this, it's quite handy to have a piece of Twitter. I have a tweezers, so you can hold it that way. Your fingertip is not covering a whole bunch of covering a bunch of the die where you want to place the adhesive. And if you happen to not place it correctly, you can use your tweezers or your fingers to move that around. We go. So I'm going to leave the candle like this. You could, if you want, put some glossy accents on that candle wax or even the flame or whatever. It gives it a nice contrast of texture. But just for time, I decided not to do it here because if you did it on here, you would need to wait for it to completely dry. And sometimes it takes a few hours for it to dry depending on how thick you get it before you could put it on put the other pieces on top of the front, on top of it. Otherwise you're going to mess up your glossy accents. But if you happen to be doing a lot of these cards or similar cars or whatever, it's really easy to dicot a bunch. Do the glossy accents for a bunch, end, have them drying while you're doing other pieces. All right, so our candle is on there, we're ready to do our lantern. So because these dyes have several different layers to them, typically you're gonna choose different shades of the same color card stock. So you'll see on the one that I'm gluing together, I'm going from dark to light on the lantern. On my sample, I went from light to dark. So my latest piece was in the back and then I have darker pieces coming in the front. And it's gonna be kinda like a puzzle because we already have that Lantern cut out of there. We're just piecing are puzzles together, layering things on top. And again, because it has that indent showing you exactly where the pieces go, you don't have to guess what they're supposed to go. I can see this flipping up right there. So I may have to go back later and add some adhesive to it, but I'm going to wait for it to dry first. The thing with vellum and especially dicots that you're gluing right onto vellum. It doesn't like liquid adhesive. It doesn't look like liquids of any kind. So sticklers, Glossy Accents, adhesive. They tend if you use it too much or too heavy with it, They tend to make your velum buckle. So when I'm gluing something to my velum, I tried to be as minimal as possible when it comes to adhesive. Last piece for the lantern. Here we go. And the cars dot colors I used where a little bit different between the two cards simply because I'm using scraps. That's the great thing about dicots, especially ones that piece together like this. Is there a perfect way to use up some scraps? So this one is dark or light to dark from back to front and this one is dark too late. So you just see the difference between the two there. I kinda thought this looked a little bit planes, so I die cut some greener me from this set here. I love all the different variations for holiday greens that it has. So it's nice and easy to pick your favorites. So I've got them pre-cut. I'm just going to put the greens down. And once again, I don't make sure there's adhesive over everything, especially when it comes to greenery or natural things. I kinda think some of those pieces flipping up makes it look a little bit more natural because it's not completely flat. And sometimes you have to hold your peace down for a second while the glue dries. So the last step, I've got these barriers here, but I think it would look a little bit odd to have berries with red stems. So here's what I do. I take my dicot and I take a Copic marker because I'm going to add some gloss or some articles to the front. Sometimes when I'm doing various, I'll do glossy accents, so I have shiny red berries. But for this one I wanted a little bit of sparkle. And I'm taking a brown Copic and I'm just coloring those stamps. There's a few leaves in there that I'm coloring. You wouldn't want to color them green because green and red make brown anyways, so I'm just coloring them brown. There are so few in there that I don't think it really matters. And then you can color this one to you. But I happen to know that it's a little bit too long, so I'll be cutting or ripping that part off anyways. You can cut it if you want. But to me, when you rip it, you don't necessarily know it was for something that's not fine. It's not going to matter. So once again, I'm putting glue on my dicot. Just putting it where I want it to be on the card here while that's drying Kristof and I'll put the lid back on my glue. And then like I said, if you wanted, you could put some velocity accents here. If you put glossy accents on your candle, then I would suggest not because it's the same texture than the sticklers will look better. But if you hadn't done that and you left it flat, you could put glossy accents on here. I'm going to put a little bit of the red glitter just because I've put some other red glitter on the other cards in this set. And super easy to just put it on the barriers. And then you need to leave it to dry. So there we go. And then once it's dry, it will decrease in like it won't be quite as puffy and will flatten a little bit. And then you'll have some sparkle and your varies. So there we are. Our third card is done.
10. LCC6 Thank YOU: Thank you so much for joining me for this class. I hope you enjoyed learning a unique way to use your dyes and also to create Christmas cards that also can be doubled as Christmas decor. I hope to see in the next class. If you have any questions at all, please let me know. I'm happy to help.
 Artsy. Island Girl, Teacher