Transcripts
1. Intuitive Storybook Introduction: Hello and welcome. My name is Karen Don, and in today's class, I am going to teach
you how to make an intuitive
storybook. Man hour. You don't have to
be a storyteller. And you really don't even
have to feel like you're intuitive or even artistic. I want to step you
through all of the things that are going to help you to create an intuitive storybook. Now what do I mean by
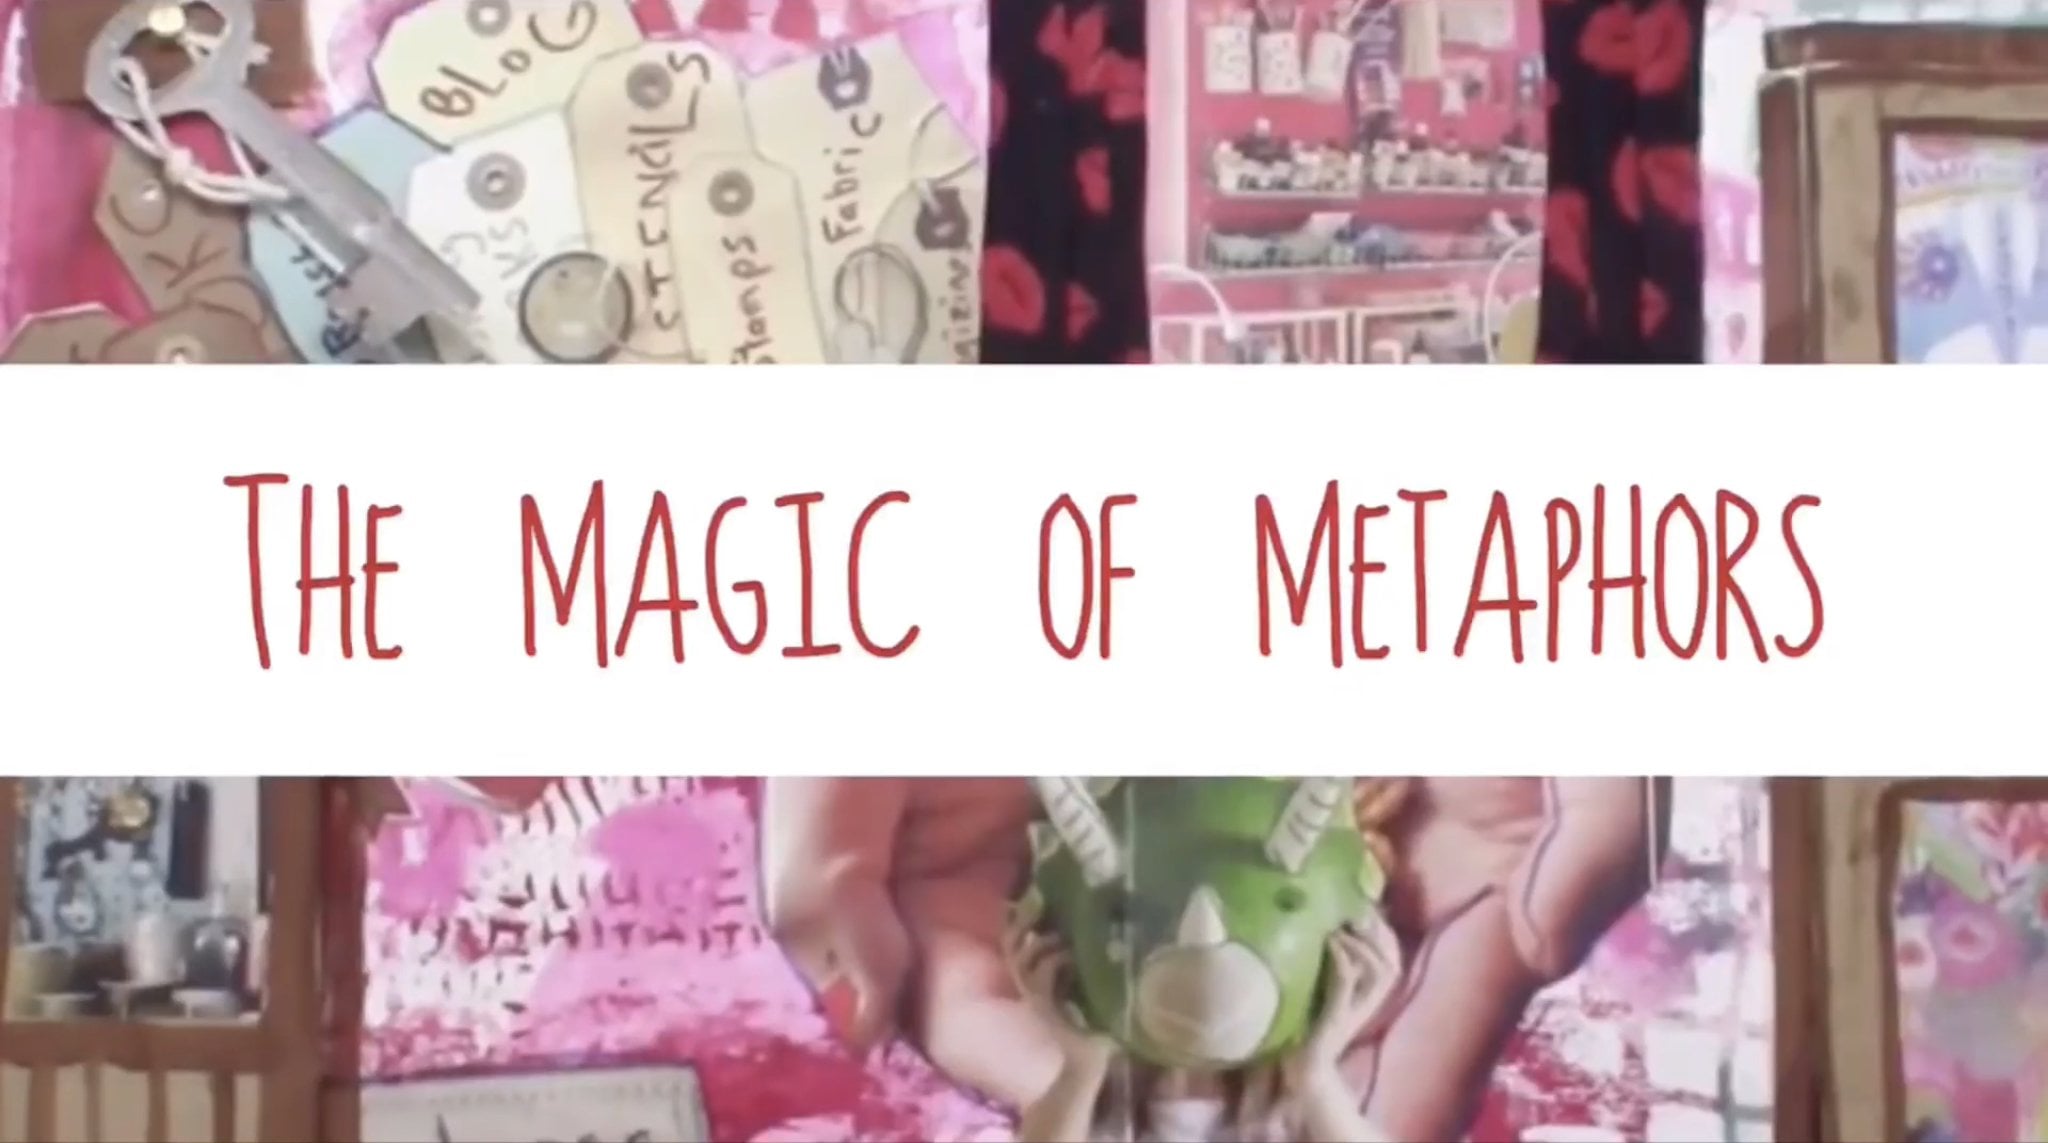
intuitive storybook? This is an intuitive storybook. It is a story that
I put together in using a method that I'm going to show
you in this class. And it's going to show you how to make all of these
wonderful pages out of a magazine and then put it together so that it
reads like a story. Now this particular
book that I made, I created using the, this is a new art
journaling magazine, the strawberry moon. And I use this magazine
exclusively to create this book. But you don't have to have this magazine or any
particular magazine at all. Although some
magazines are going to be definitely something you're
going to want to gather. In the next video, I am going to introduce
you to some of the supplies that you're
going to need for this class. And then we're
gonna get started. And I'm going to show you
this really fabulous process that is going to really free you up to experience something that maybe you didn't know
you had inside of you. So let's get started.
2. Supplies to Gather: Now I am going to show you a wide variety of supplies
that you will want to gather. Now, you don't need every single one of
these supplies, okay? But you are going to
need a few key supplies, so I'm going to
start with those. The first thing that
you're going to want is some magazines. And I really recommend
that you pick a variety of magazines if that is available
to you or you can. Like I did when I
created my first book, I use one magazine for it. Here are just some
ideas of a variety. This is a National Geographic
Good housekeeping, uh, Somerset studio. And a real simple. The second thing that
you're going to need as an absolute must is
some sort of paper. Now you could use card stock. You could use mixed media paper. You can use a, this is a watercolor paper, but it's a kid's
watercolor paper. And it's very similar
to the mixed media. It's not as heavy as
watercolor paper is. Or of course, you can
pick watercolor paper. The next thing that you're
going to want to gather as a absolute must supply is
some sort of adhesive. Now a glue stick is certainly
going to work just fine. If you have just some
Elmer's glue that works too. Or you can get all fancy with an artistic supply
which is matte medium, and this is my
absolute favorite. The other thing that
you're going to want to gather is some sort of tools for binding your book. For this lesson, I
am going to be using a tool that can be an all this is actually a bead Bremer is
just something that's pokey. And it's going to allow
me to poke holes into the paper so that I can do
a simple binding on it. To bind it, I will
be using some, this is some hemp cord. This could be button thread, this could be embroidery thread, this could be yarn. This can be string. This can be just about
anything that you have on hand that you can thread into a needle and put through the holes that
you poke in the paper. As another optional tool, you might want to grab a stylus. And I think that this has only really going to be relevant if your paper is heavy-duty
like a watercolor paper, you're going to want
to score that edge. And I will show you how
to do that in the videos. So there you have it. Those are the basic supplies
that you are going to need in order to get started, at least on this. Okay. So I say get started because this may what those supplies may be
just enough for you. You may be like, Oh, I
don't need anything more, but you might want
some extra things. It all depends on how involved you want to
get in this process, how far you want to take it, and what kind of resources that you
have available to you. So let's look at some
optional supply here. You'll see some
optional supplies that I have that
I will be using. And I say these are optional
because do you not going to absolutely need these in order
to create your story book? But if you really wanted
to take it a step further, you're going to love having
more supplies and these can really be anything
that you have on hand. These are just what
I have on hand. So one of the things
that I love to work with with my collage, which is what we're going to be working with in this class, is, I love to work
with stencils. And of course, if you're
working with decimals, you're going to want to
have some sort of paints. My favorite paints for art journaling is these
Matte paints. They're just inexpensive
Kraft paints. But what's unique about these is that they
have a matte finish. Now, most of these ones are not going to say they
have a matte finish. Okay. If it doesn't say
it's a matte finish, it's going to be a matte finish. If it says gloss, it's not going to be matte. And you don't want to work
with glossy paints in your art journal
because your pages are going to stick together. Besides paints with
working with stencils, you are going to want some. Tool to put the
paint down for this, my tool of choice is a
simple cosmetic sponge. Now these sponges can
be the round ones or they can be those triangular
ones that you can get. The other tool that I love
to work with is washi tape. And I have quite the
collection of washi tape. This is a fascinating
medium to work with. If you've never worked
with washi tape before, I highly recommend
just picking up a few. You don't have to
go crazy with this, but you can generally get a little packs of
three or four of them. And they, they really are a fabulous tool to work
with in your journals. The other tool that I
have here is stamps. And I have a wide variety of
stamps that I've just kinda pulled out for this activity. I love working with stamps that are coming non-disruptive, that basically allow
me to put down patterns really similar
to using stencils. And of course,
working with these, you're going to want
some sort of ink to use your stencils with your stamps with and even
some lettering stamps. Those can be really
handy to know if you're working with the clean stamps, you're probably going to want to have one of these little, they're just like
these acrylic blocks. And they allow you to
take your your stamps and put them on so that you can put your
ink on and then stamp. I will be going
through all of this in the following videos. The other way to use these, if you don't have one of these, is to just dab it on there
and dab it on your page. So you don't have to have
these acrylic blocks, but they can come in real handy. Some other supplies that you
might want to gather if you, if they are available to you are some ephemera or some scraps. These are just leftover scraps that I've collected from
doing art journaling pages, and I can keep them in
this little drawer. I have several of these
drawers on my desk. And these scraps are things that didn't make it
into a project before, but I didn't want
to throw them away. Some of these are actually papers that
came from products. So the other ones that I
have here and these are new, I just got these because they were having
a Halloween sale. And it was like 70% off for the ideology, Tim
Holtz products. And these were just the papers that came in the packaging, so I save those. But a couple of
these if you don't have a lot of femora and things, these can be a great way to get a quick collection of things. And you'll find in the ideology, you'll find all kinds of
little goodies, photos. Just all kinds of really wonderful yummy
stuff to play with. So I have that one. And then I have these are the paper from the
paper doll collection. They're just photos of people. What was what's
really cool about these is they're all cut out. And I really liked that
because of course, you know, I can
cut these myself, but that's a lot of work. So that just made a
nice little shortcut. So I'm pretty sure
that this wraps it up. And like I said, this is this is still
optional, okay. But you might want to have
some paint brushes on hand. I like to have a nice variety of paint brushes with
all different kinds of sizes and stuff. So I have my little cup of
paintbrushes and of course, I have some water
to rinse the mouth. Okay. So that does
it for the supplies. Are you ready to get started? I guess Sure. Let's do this.
3. Binding Your Storybook: The first thing that we're
going to do is we are going to bind some paper. And I'm just gonna do a
really simple binding on it. Okay, It's two holes. It's several pieces of
paper folded in half, punch some holes in there, and put some string in there. And there you go. You have a little
book to get started. And that is the first,
very first step. So let's get started. Okay, so for this one, I'm gonna go ahead and
I'm going to use up my kid's watercolor paper. I actually really love
working with this paper. It's inexpensive and it's, it's not heavy duty like
a watercolor paper. But in Handel's wet
mediums really well. So I have three sheets here. The first thing I'm
going to decide is, do I want to create a
book that's that big? I pulled them in half. That's gonna be like
that big, right? Or do I want to cut this down
and make it even smaller? Like I can cut these
in half and then fold this in half and then
have it, have it that size. But for the purposes
of doing this video, I'm going to work a little
bit larger because I think it'll be easier for you
to see what I'm doing. So the first thing
I'm gonna do is I'm going to fold this in half. Now as promised, I wanted to show you how to use a stylus. Because if you've got some heavy-duty
watercolor paper and you have any troubles at
all folding it in half. It can be really handy to score and a stylus works
really well for that. But you could also use the
backs of a pair of scissors. Oh, look at that. I didn't even mentioned
that you can have another optional supply would be scissors and yes,
they truly are. Okay. So for scoring this, you're going to want at
the very least a ruler. Now if you have one of those cutting mats that
Scott measurements on it, that can really come
in handy as well. But if you don't
have a cutting mat, take your ruler. Place it down. Find this center mark. These are my, my
paper is 12 " wide or long and mark it at the
top and at the bottom. So you have two marks and
then take your ruler. And you'll have to do this
for each individual sheet. You're just going
to take your stylus and you're going to score, which just means pressing into the paper and creating
a score line. What that is going to
allow you to do is to fold the paper evenly and perfectly. Of course, if you're
working with even, just even card stock, you can easily fold it in half. And then my favorite
way to make sure that I get an even as I
match up the corners. And then I put my finger
in the middle here and I push out to the edges. And then having a pair of
scissors to press into it. That can come in real handy. Now if you're using
the scoring method, you may not have to do that. But I'm just showing you
some optional stuff. Now, if you don't really
care about it being perfect, then by all means just fold
it in half and that's fine, that is good enough. Just paper. It's just a little book. Okay, so now that I have all my pages that I want
to use for my book, I'm going to put
them all together. And when you put them
all together like this, this is called a signature. And then I'm gonna take
my little pokey tool. Then this can be anything
that will poke a hole. I'm going to poke
two holes into this. Okay? And I'm just going to
eyeball it because it's not really necessary to
measure anything. And I'm going to push
it to the outside. Just be really careful that you aren't pushing it
into your finger. Don't put your finger back
here and then push into it. You can go ahead and do that and then move your finger aside
and push that through. With my holes in there. I'm gonna go ahead and I'm
going to get out a thread that's twice the
height of my book. And I'm going to take a needle. The needle that will accommodate your thread or cord will work. I'm going to start
on the outside. And I'm going to
put that through. Gonna go over to the
other hole, back out. Now I can remove my needle and even this up a little bit. And now I can tie
a knot or a bot. And there you go. Now you have a book,
tickets started with.
4. Setting an Intention: With your pages bound together. The next step is to set
some sort of intention for the story that you would
like to see come out, okay? Now, I'm not asking you to
decide on the story, okay? This is just simply
an intention. And intention is something that might be something
you want to learn. Something that you
want to experience, something that you
want to explore. And having an intention before you get started picking
magazine images, which will be our next step, is all about setting
something in your mind, okay, and when we start
picking images, we're going to do this on
a very subconscious level. Okay? We're not going to be, I'm really going to
encourage you to not Think about it, okay? I want you to feel into it. So having an intention
before you pick images can help connect you with
those feelings. Okay? Now, in order to
set an intention, it could just be simply closing
your eyes for a minute. Maybe take a deep
breath, blow it out, and just feel into what wants
to come up for you today. If nothing comes up, you could simply set the
intention to be open to a story that wants
to be presented to you. A story that may help you
in some way and just be open to that and have that
being delivered to you. Or you may choose, or you may have come
up with something. And when I want a little bit more clarity
around this intention, and this is great. This is a great
opportunity to take, take out a journal
or just a piece of paper and a pencil
and start writing. This is often something that you'll find helps
bring you clarity around your intention
and what it's really kinda coming
up capping you to get much more clear on it. And then again, you
may have come up with something very specific. And that's great too. Okay. So I'm going to assume that at this point
you're done writing, you've come up with
your intention, okay? Now, the next step
that I want you to do, actually, I'm going to start
this process over again. Okay? Now that you have your intention and maybe you've gotten
some clarity around it. The next thing that I'm
going to ask you to do is to set that aside. I don't want you to go into this next step with those intentions in
your conscious mind. Just set them aside, okay? This is what is allowing it to come
from your subconscious. You've set your intention. Now you're going to trust. Trust that whatever comes
up next is just right. Okay. So in this part, I'm going to be using
my magazines, Okay? And I have several of them
here and I'm going to, since I have them all out, I'm gonna go ahead and
use some all or at least use them until I don't feel that I need anything
to find anything more. And this is a process
that I will give you some little clues
and hints as I go along picking out my
images and how I do this. All right.
5. Gathering Images: Okay, so for this process, I have set aside my intention. It's there. I mean, I'm not neglecting
it or anything like that, but I don't want to approach my magazines with my intention, top of the mind. Okay. I am trusting that whatever needs to happen
next will happen. Now when you're picking
images with your intention, kind of off to the side. What you're gonna do
is you're going to fairly quickly go
through the magazine. Whatever images feel
like they're they might, they might feel a
little brighter. They might stand
out a little more. They might make you curious. Whatever feelings come up, pay attention to those
feelings and allow images to come up. Now when I pick out
magazine images, images, I just tear up the whole page and
I set them aside. This keeps me moving. Please don't don't spend time cutting things out or tearing
things out right now. Just go through the magazines. Tearing out images, carrying out pages that have images or words that feel like they're
really I don't know, I can't really describe it. You'll just have to
kind of feel into this. So I'm gonna put out a little
bit of music and you can play along with me
or you can stop the video and do
this on your own. Once you have your pages
torn out of your magazines, then you're ready to start refining some of the
imagery on them. And by that, I mean, I recommended that you tear
up whole pages at once. And now, you know, that was a fairly quick process. And now you're going to add a little bit more
consciousness to this. And so you can go through your pages that you
select it out and you're going to maybe tear
out or cut out some of the words and images that
are standing out for you. We're still working on
an intuitive level, but we're being a little
bit more conscious about what we're
picking on these pages. For this process. I know I said scissors
are optional. Having something that if you're going to be
cutting out words, having some scissors can come
in really handy with this. Although I really
encourage you for the images to tear them out. There's something that is very freeing about just
tearing things out. We're not worried about
being perfect about it. And we're just, we're just
curious about the images. Now, the reason I say scissors
are better for cutting out words is because your pages are going to
tend to tear very easily in one direction and not
in the other direction. So like I have this
magazine here. When I tried to
tear it this way, you notice that
little jagged edge. See how jagged that is. That means that the
grain of the paper is, this is tearing it
against the grain. So if I wanted to get
this word out of here, these words, I can
tear down to it. You can get a pretty
decent straight chair by just doing that. But once I get down to that, I should find that it will tear pretty easily going
in one direction. So you don't have
to have scissors. Next. I really liked the rough cut. The rough cut, the roof tear of things when you do it like that. Now I'm getting
very specific about which part of the image
that I wanted to collect. So I thought this
was interesting. But it was just this part of it that was coming out from me. Always look on the backside. Sometimes you'll pick
the page because it's that was what was
coming up for you. But before you tear into it
or cut into it, the back, sometimes things come up on the backside that you didn't
really intend to pick. But they ended up having
a significant meaning. I always forget to do that. Look on the back,
What's on the back. Sometimes it can be
tempting to want to save the entire image. But I really want
you to get more specific about what
you're going to collect. But that doesn't mean you can't use the rest of the image. It's just that maybe you're
going to use them separately. So I really liked
this whole image, but I'm not going to cut the whole thing
out in one piece. Generally save all
of these scraps. I might cut them down. Because I know that
this is just garbage. Some of the words that you find might give you some clues as to the topic or
title of the story. The curious about
what's coming up. And just because you
picked out all of these pages and you're tearing
out all of the images, doesn't mean that you
have to use them all. So they want you to have
as many as possible. And you might want to keep separate piles for your
words, your images. Now, these are all from the
Somerset studio magazine. And I tend to really love
working with these images, but I don't want to overdo it. So I think this is gonna be
the last one that I pick. And then I'm going to
set all of those side. Then move on to the
other magazines. You'll notice that I'm
passing by some images. So I have some of these
pages that just they just no longer felt something just
wasn't coming up for me. So I just set those aside. Now, these pages, I can go ahead and I can leave them
on my desk top. I can set them aside, but don't discard them just
yet because you may want to come back to this
because like you said, some of those pages
are kinda, you know, it's like, okay, No, not really feeling it. They may come back up. They may become more relevant as I start to put
together my story book.
6. Let the Story Begin: Okay, so now you have all of your images collected
and torn out, or at least most of them. And you've satisfied
maybe some of the pages that you might come back
to later, but maybe not. And now we're ready to start putting together our storybook. Alright, let's get started. This is the fun part. This is where you can
really get to let go and put things together in a way that doesn't require
you to really think about it or you're not
trying to create a story. The whole point of this is
to do something intuitively. You have some images
and you have your book. And now you're going
to start picking images and gluing them down. I recommend that you take your images and you spread
them around like this. Now I'm on my cover page. Now I may decide that nope, I don't want to work on
the cover page just yet. Or I may see an
image and go, oh, yeah, that is for
the cover page. Whatever comes up,
allow that to happen. And then grab your
glue and start going. Now I can tell you the faster
you engage in this process, the more likely it is that you are going to be
working intuitively. The more you slow down, the more you start
to think about it. And the less intuitive this process is going to
become thinking about it is also going to
get in the way of the magic that is going
to happen when you simply allow and trust that whatever's coming
up is meant to come up. It's a message for you. So what I like to do is
I'd like to go through these pages and just
start gluing things down. You don't have to
work in a linear way. You could go to
this book randomly. I want you to feel into
what wants to happen. I want you to do this in a
way that feels right for you. Or maybe even feels a
little uncomfortable. Sometimes. When we do things that
are uncomfortable, we get different things
that can come up for us. All about tuning into
those feelings and those feelings don't always
have to be positive. Now, one of the things that you may have noticed
about what I did was I only put
down the images, at least to start. This was not a conscious choice. It just felt just, it's just what felt right. And I also put 11
of these images on the edge of the paper because
I want to trim that off. So now I'm gonna go through
this and I have my, I have my words. And I'm going to start
gluing down these words. Again. I'm really, I'm, I'm doing my best to not think about this. I'm feeling into this. I love to start overlapping
things that again, you just need a view into
what wants to happen. And most of all, trust that whatever you do, just without needing
to be perfect. Now you don't have to use all of the images or words
that you picked out. But it can be really
interesting what happens? When you do. You'll notice I'm coming, going back and forth
through this and absolutely no right or
wrong way to do this. Not pills could pronounce. So at this point, your storybook may be complete. It's completely up to
you in how it feels. If it feels like, Wow, this is, there's, there's
a whole story here. I can feel it. This is enough. You may decide that your
storybook is complete. Now reading your story book, that is an interpretation. The images, and that's kind of an optional step at this point. You may choose to sleep on this. Or you may decide, no, I want to keep going. I want to do some
writing around this, or I want to do some
painting around this, or I want to grab some of my my optional supplies and do a little bit
more with this. I trust that you will feel into what is wanting to happen next. And you will go with that
at this point in my story. But I feel that I think
I need some more images, but I might be overthinking it. I also would like to
work with some paints, add some color to it, and maybe even some of
my other tools and such. So for me, being creative and
being an artistic person, just leaving it like this
is not going to be enough, but for you, this may be enough. Trust the trust, your next step.
7. Adding Color and Paint: For this next part
of this class, I am going to just allow you to watch me continue to
play with my book. And I'm just going to put on some music
in the background. Hopefully speed things
up as I go along. You might get some ideas, it might inspire you
to do some things. Um, but like I said, everything after this
point is optional. Okay. It's just my way of inquiring more into the story that's
presenting itself in my book. And when I work with
paints and other tools, it gives it more depth and it allows things to become
more conscious. For me. This is just part
of my own process. It may be part of yours as well, or you may decide that you want to go in another direction. But I hope that you'll watch it and enjoy it and get
some, maybe some ideas. Okay. I'm going to introduce you to an
optional resource that if you work in this way
that I'm working with paint, it really can come in handy. Now you can take a hairdryer
or heat tool and you can dry your paint in order
to work on the next page. Or you can take a
piece of wax paper. When you put wax paper
down between the pages, it's going to allow
that paint to dry, but it won't stick to. It. Allows you to keep working
throughout your book. So what I generally
have is I'll have several of these sheets handy so that I can put them down in-between the pages
when I'm ready to turn the page and
work on another one. And I generally reuse
this wax paper. So I'll have several scraps
and you can reuse them and reuse them and reuse
them until while you can't reuse them anymore. But it can really
come in handy when it comes to working in this way without
disrupting your flow. Another thing you might be, you might be noticing, as I'm going through this and adding paints is I'm
actually picking colors of paint that are
already on the images. It's just one of the ways that I love to work with
paints and images. Instead of me having
to pick a color, I pick a color that's
already there. This can also help
your images kind of blend in and belong on the
page a little bit more. But it is just a way
that I, I enjoy working. So now the next thing
that I'm going to do is I'm going to remove
all the wax paper. And I'm going to let my book dry out because it's
pretty wet this point. But the wax paper has
sopped up some of the excess paint and that will also help it
to dry a little faster. So the next time unit do is I'm going to set
it out like this. And I'm going to let it dry. Now, I'm using this
inexpensive craft paint. This is going to
dry really fast, probably in the next 20 min. This will be ready to
continue on playing with it.
8. Mixed-Media Playtime: After letting it dry, I've come back and I'm going to do a little
bit more work in it. Now, I brought out some of my other supplies
that are optional, but they can really help
you to dive a little bit deeper into things
and keep going. I have my washy tape. I brought back out
my unused images, magazine pages that I
didn't use originally. And I have some stamps out. Now. I'm just kinda leave these on my table so that they
are available to me. And I'm going to continue to
work intuitively on this. Reaching for whatever
supplies feel like they want to come
out and be on the page.
9. Sharing my Story: Let me go through this
and just show you what's coming up for me for now. Now, this can be something
that evolves over time. I may sleep on it and
more may come up for me. But my intention when I first started this
was very loose. I have been going through some health issues that
are very uncomfortable. Primarily, my feet
get really hot and my fingers go numb and
weird stuff like that. And I'm I'm used to going
through a lot of pain. But this other thing
that I'm going through with temperature and tolerances and my
body reacting to it. I was just really
curious to know more about what's
going on with that. What is the story behind this? And there's some, there's a lot of really interesting
things that came up for me. And none of this was
done on purpose. So I love how it just
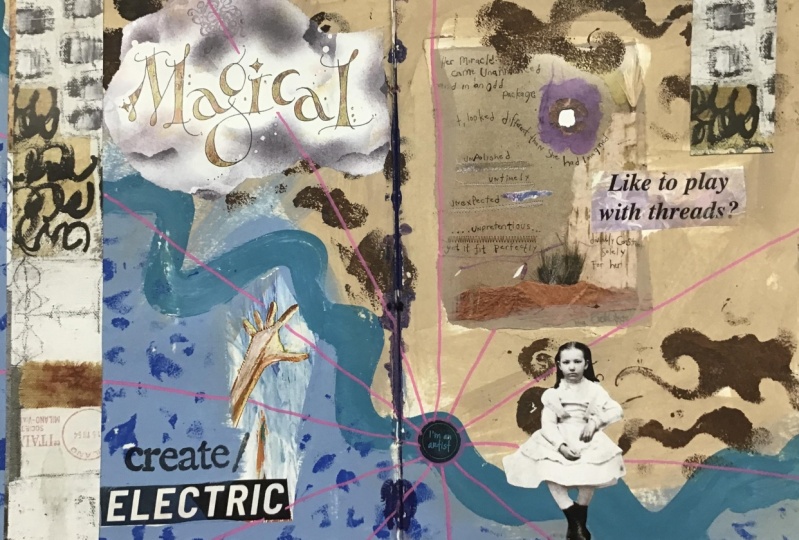
is coming out for me. On the front cover. I loved that. It says
the choice is yours. And Red Hot Mama. We have I put I made her feet read because
my feet turned red hot. I mean, they literally turn
red when they get hot. And yet here she is. She's got a red hot feet and
she's relaxing on a beach. And there's these
cool ocean waves in contrast to the hot sun. So I know that if I just look at this little
portion right here, There's quite the
story just in that. And then we go over here
and we have this woman, which may be me, looking down on a bird that
looks like it's just died, ads in her hand. So there's there's to me that makes me think
of letting go, letting go of maybe some sorrow, letting go of some pain. And then I did these stamps on this page too,
which were plants. And that makes me
think of growth. That there can be some growth
that comes out of this. So that is just all
from this one page. And that right there could be, could tell the whole story. But if I go, continue to go into the book, and I'm not going to go through
this page by page because this is a story that is
quite personal to me. And it may take me a
while to digest it. I may choose to do some
journal writing on the side or maybe
even some journal writing right in here. As I dive into what all
of these things mean. Especially like this page, I'm, I'm very partial to
things that are magical. And I love how this
little stamp right here, I know you can't read
it, but it says, I, I'm an artist. And these radiating lines
coming out from it. This little girl sitting here, maybe reminding me of the child in me likes to
play with threads. Lots of interesting, interesting
images going on here. I like this change
lives for the better, The moment that
changed everything. And this very
prominent word, dream. And then there's
this little thread that connects everything. And again, we have another
little girl, little older. So I'm very curious to know
what's going on with this. There's these cards over here. Sometimes they say
that you just have to deal with the cards
you've been dealt. This has a lot of really
interesting images on it. There's a little
gambling wheel here. They've got a gal over here. It's kind of like
in the shadows. And the words that
are stamped on her dress or dare and scape. And that's interesting when I, when I read those
words, Dare and escape, that makes me think of
this, this gentleman here. He's being very daring
and it's almost like he's escaping
from something. And it's connected
to this dream, dreaming of flight on
this very magical tree, which makes me, reminds
me of a wishing tree. I don't know why. Something
I can explore more. And here's my, here's my feet, my happy, my Happy Feet. See I'm renaming my
heartbeat to Happy Feet. And it's telling me the
message is telling me that I'm altering my
perception, altering my mind. It can remain a wishful thinker. Or you can take some
positive action. And just the words on here, wild and free and strong
wheel to overcome pain. And look at these colorful
toenails and and this postcard that's there's a
message in there to again, no. I mean, what is this the
message that's coming out? This is the last page
in the book too. It's like a message has
been delivered to me. Very interesting. Then on the back of the book, which I wouldn't say, I would say that this is
the last page of the story. So traditionally, if you
look at the back of a book, the back of a book might have a description of
what's in the book. And this is the only
page that's kinda dark. And it has the
darkest day on here. And I even put this
little stamp on here this has created for there's this little magical cat on there with the hand silhouette. So lots, lots and lots
of things to consider. I think that there is definite
healing in here for me. And if I can follow
this clues, you know, kind of tease out the
story that's coming out. I think that I'm
going to find this as this is a very
healing story for me.
10. Trust Your Creative Process: I loved how my story
book came out. Very, very, very powerful stuff. I don't want you to walk
away thinking, Oh, wow, that's just so deep, Karen, and how am I how am I
going to get there? Don't worry about that. Don't worry about that. Okay. Practices, steps, setting the intention,
letting it go. Finding images, intuitively, placing them in your
book, and be curious. And most off above all else. Trust, trust is so important. Trust, okay? I hope you will share
what you create and I look forward to
seeing it till next time. Bye bye.
 Karen Dawn, Creative Soul Journeys