Transcripts
1. Introduction to Finding Your Strengths: Hello and welcome. My name is Karen Dawn and today I am going to show you a creative way to explore your strengths. In this video, you will learn an intuitive way to explore the strengths that you have and some of your talents. Without necessarily having to think about it. You will learn how to work in a intuitive, layered way that is going to help you to bring things forth into your consciousness that you might not have recognized in the past. This can be a very insightful activity. And if you give it the time that it needs, you're going to get so much out of this.
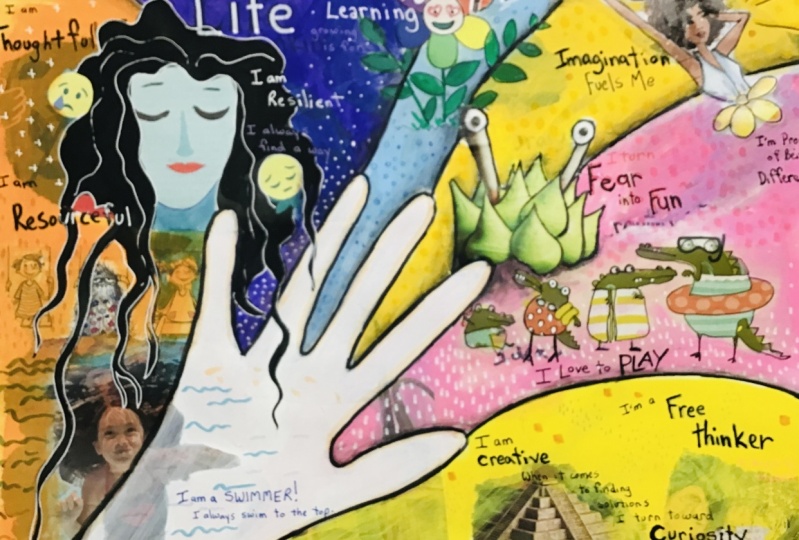
2. Designing Your Hand Map: To get started, you'll want a piece of paper and a pencil. Any kind of pencil will work. I just happen to have a mechanical pencil, but if you've just got a regular old number two pencil, that will work too. I do recommend that you do this first part using a pencil, however, because once you trace your hand, you're going to find that it's a lot more bumpy than you thought it was. And you can smooth it out by doing it in pencil first and then doing it with a pen. So put your hand on a piece of paper and trace your hand. Okay. Now, I know you can't really see this on camera because pencil never really shows up. But trust me, I have a very bumpy, Bumpy hand here. So what I'm gonna do next is I'm gonna take my permanent pen and I'm going to retrace it, but I'm going to smooth out all of those bumps. The next thing that you're going to want to do is make some sections. And you can do that by creating lines that come out from your fingertips. They can be straight lines. They could be curvy lines, or they could even come out from, you could make your spaces coming out from in-between the fingers. The idea here is to create some space has on the page that are related to the fingers and thumb on your hands. So you're just creating spaces and we're going to be working within those spaces. Now that we have our little hand map all set to go, now it's a matter of filling it in. So I have decided to make my hand map about my, my talents and my strengths. So I'm going to actually write that down up here. And apparently spelling is not one of my strengths, so I will not be including that in my hand went up. So, so now that I have this is Carl, I think of this as my intention. My intention is to explore my talents and my strengths on this hand map. And since this is my hand, these talents and strengths are, I'm going to relate them to things that I can do with my hand. But it doesn't have to be limited to that. So I'm starting off with this idea of it's going to be related to things that I can do with my hands, but that doesn't mean I have to stay within that. I may choose to go in other directions. So you can do this part either with your pen or your pencil. You may choose to just kinda pencil things in. I'm going to do it with my pen just so you all can see what I'm doing here. So I am going to do this part in like a brainstorming session. So I'm just going to simply write down the first things that come to my mind and put them in the different areas. And really not put a whole lot of thought into where should it go here? Should he go there? I'm not going to worry about any of that. This, this is all part of that intuitive exploration. So I'm going to take a deep breath. Take another deep breath, and one more. And I begin. All right, so now that I've got my brainstorm done on my hand map, now I'm ready to add some drawings or add some color or add some imagery to this. This is the part in the process where you can really take this in just about any direction. So what I'm going to do is I'm going to start off really simple with this and just show you how simple it can be and how you can add more and more layers if you want. Or it can just be as simple as where you start. So I think the simplest thing that you can do with this is to color these areas in. One of the simplest ways to color it is with watercolor. I absolutely love using watercolor. And this is the reason I used a permanent marker. Now if you just so happen to use something that was non-permanent, sometimes that can intuitively work out. So allow whatever's going to happen next to happen. Try not to judge it. It can't do this wrong. It's all good. And that is as simple as it can be. Doesn't have to be any more complicated than this. You could say, I'm done with it. At this point. You've identified your talents and strengths. But as always, I am going to take it out to mothers that further.
3. Now We Collage: For this next part, I'm going to add a layer of images. So while this is drying, I'm going to set it aside. I'm going to go through some magazines and I just have a variety of magazines here. And I am going to look through them and I'm going to pick out images, but I'm not going to try to think about the type of the images. I'm not gonna go through these and look for them. Go, Okay, this is what I'm looking for. This is what I'm looking for it That's not what I'm gonna do. I have my int shin set already. Now, I'm going to allow my intuitive at brain to select images. Another trick to this is to go through the magazines fairly quickly. Not thinking about it. You don't have time to think about it. You're just going through it. And when I find an image that I want to use, I'm going to tear out the whole page. Now at some of the things that might come to you as you're doing this and just let it happen. You might find words that you want to use. And they don't all have to be images, but just go with whatever is wanting to come up with my edges, with my pages selected. Now I'm going to go through them and tear the images out that I want to use. Now, you could use scissors for this, but I really recommend that you just tear. Okay, so there are some things where it counts the words. I do like to cut them out. So you can always break here. Gray hair rules. Okay. Okay. So you noticed I wasn't very precious about when I toured these out. I really just kinda ripped into it and allowed what ever it was going to happen, happen. So still, I'm not putting any real thought into it at this point. That's going to come next. So at this point, my paper is almost dry neck completely. I'm going to go ahead and sop up some of these petals with a paper towel. Because I don't want any big puddles on there now because I'm gonna get ready to glue some of my images down to good my images down. I am going to use my Elmer's glue and a cosmetic sponge. Now this could be any sponge at all. It could even be a paintbrush. I'm, I just happen to be like, wow, I think I'm going to use this bunch today. But you could also just use a glue stick. Glue sticks are great, especially with these thinner magazine images because the pages don't tend to get all wrinkled up, but I'm not concerned with wrinkling it all today. That is just not why I'm here. So my mixed part is to get these images down. Now I realize that these images, you can see they're going to cover up those words. That's okay. It's all about just adding these layers. And I am not going to, again, I'm not going to put a lot of thought into where these are going to go. I'm really just leaning into my intuitive, creative voice. But I am going to start off not just by gluing things down, but maybe just setting things around, kind of auditioning them on the page. Maybe further refining some of the images and seeing how they might just fit onto the page. And I don't have to use all of the images that I picked out. But I do want to try to use as many as possible because there is a reason why these images came up for me. And I may not know that what that reason is just yet, but that is what I am going to explore. Now a lot of times when I'm working with imagery, I put the words on last. And that's because I want these to end up being on top. But I'm just still just kind of playing around and seeing where things might go and refining what's happening. It looks like I have these are all just scraps, like some tossed out now. And I don't know, this feels really big, but you'd never know it might might be the last thing I put on there. So I'm gonna go ahead and set my words off to the side. And I'm going to start gluing things down. Like you said, I'm going to play around with this, with this bunch here. Just putting my Elmer's glue down. Could be any white school blue of course, doesn't have to be hours. I'm already really liking this technique. One of the things that it did was it allowed me to put my glue down and then thin it out, make a super thin layer of it. And what happened is my my magazine pages didn't wrinkle up, which is almost unheard of with magazine images. So I might have just created a whole new tag, make fun of. And again, I'm trying not to be too precious about how these get glued down. Exactly where they get glued down. I could, I can obviously change the position from where I originally five edition them, but I'll only do it, do that if I feel like it wants to be put in a different place. Okay. I had a very interesting impasse on this hand map. I've cut out this thing that says rethink how to do it. I'm really feeling that it wants to go up here. And this is over the top of the name of this map, which is my talent and strength hand map. And usually when something like this happens, it means that there's something more coming up that I need to explore. Wow, rethink how to do life. Oh my gosh. Now I could have kept that down here. I obviously I definitely could have, but I was like, It goes up there. I don't even know if I want to use that. And I didn't know if I want to use this. I just I there is something happening here. Okay. I'm gonna take my spine and I'm going to put it in water because science, I don't let this dry out. I can reuse it and reuse it and reuse, reuse it. So this kind of sound it in my water for now. However I
4. Now We Paint: Now this is where some of that, that deeper insights and where you can invite in brain to try to make some sense of what's happening here. I mean, at this point I've set an intention to explore my talents and strengths in a hand map. I brainstormed and some of those words are still peeking through. I'm taking note of that. I think that is important and where they show up, I think is important too. Where they show up in relationship to the images that I picked up? No, you gotta keep in mind that when I pick these images, I didn't consciously pick them. And I didn't consciously place them anywhere on this hand map to make any sort of logical sense. But I get tried to make some sort of meaning out of it now. So I'm taking my time on this. Everything is kinda dried so I don't have any wet spots. And one of the things that I really, really, really feel drawn to doing is bringing back out my hand. So I can't see the entire drawing underneath there, but I think I can probably get pretty close to recreating it. It may start looking a little funky, but that's okay. Now I think what I wanted to do next is find a way to bring this hand out even more. So for this, I'm going to take some paint, can then take some inexpensive craft paint. And I want to, I want to apply the paint in a way that it it doesn't I don't want to apply a thick layer. Put it that way. I don't want to cover up everything. I want these images to shine through. And sometimes when you're working with craft paint like this, it'll go on like really super opaque, so it covers everything. So you might want to have some water on hand, because if you just water that paint down, it'll go on much more transparent. It's always a good idea to have, you know, a little thing of water around whenever you're doing creative stuff. It's infinite possibilities. Now the next part of this process, I wanted to say at this point, this could absolutely be done. You get to say, Oh yeah, this is it, I get it. And just let these images kind of go into your subconscious and allow them to kind of dance around and play in your mind. Your mind. We'll keep working on this to find meaning if that is an intention that you have set, and it definitely is my intention to find the deeper meaning in these, in this map. What is it? What is it I have done here? How do my strengths and my talents relate to the fact that I changed the title of my map to rethink how to do life. And how these images helped me to do that. Somehow. Things here are trying to tell you something that is a message in here. And it is your job to kind of tease that message out and find it in the layers that you're putting down. So what are the next things that I'm going to do? And this is one of my favorite techniques for kind of letting things sink in and being able to go deeper with this. Is adding layers of paints. And it just in the simple act of painting, you can start to explore and tease out some of those deeper messages that might be presenting themselves on your page. And I love taking what I've already got here and picking out inexpensive Kraft paints that already match the colors. So I'm just, that's for all I'm doing right now is I'm just picking out paints that have the same colors that I already have down. And I'm going to be using these colors to help blend in the background. But the images. And it's just a, it's just a creative technique that I've used a lot and doesn't require a whole lot of thought or even talent to do this part. Here is simply just taking paint and overlapping from images to background. Some kind of overlapping the background of this image into the background of the page. And what that's going to do is it's going to make this image, which is a lady had a blend in more with the page, so she will appear to belong there. She's being integrated into the page. And that is why I picked colors that were already on my page, primarily with the background. But there's no hard rules with this. So you can just go with whatever is coming up. And one of the things you'll notice is that yellow does not want to cover over the black very well. And at this point, I'm not going to worry about it. There is a little trick that you can do where you can take a white paint and put that down first because that tends to be more opaque. And then you can put your yellow on top of it. And I may choose to do that later, but right now, i'm I'm not going to worry about that. I am simply just exploring and letting my mind, giving my mind some time to take this in. I'm also spending some time while I'm doing this painting part, noticing what the images are, and being curious about what they might have to tell me. With that part done. I'm going to step away from this for a little bit. I kind of really let it, let it sink him. At this point. You could call this done. This is definitely done at this point. You don't have to do anything more with it. But what I find is is that if I come back to it in a little while, maybe a half hour, maybe a day. I will be able to get more out of it. And if there's something that happens in the brain when you step away from it and you don't try to actively solve a problem or to solve the mystery, or to find the answer. And you, basically it's like you're giving your brain, you're giving your brain some time to take things in. And it's a very important part of my own process in visual journaling that I do quite often. And I may get, I may be inspired in an hour to come back to this and work on it some more. I may be like, Nope, I'm I'm not coming back to it and there may come a point where I don't come back to it at all. It's like, Oh, maybe I'm done with that. And to be okay with that, I didn't have to do anything more. Part of this process is trusting yourself, trusting that you are getting something deeper from this experience. And you don't have to understand it. On a conscious level. It can be there and still be relevant in your subconscious. So give yourself that time. I think it's one of the most important times that you can give yourself.
5. Refining and Deepening: So I walked away for awhile and now I'm back. And I decided at that I wanted to keep working with the imagery on this and keep bringing things out and maybe pushing some things back. And one of the things that I wanted to show you was how you can use white paint to cover up dark areas so that you can get yellow paint on top. Because as you saw when I did this right here, I put the yellow paint on there but it doesn't it can't cover black because yellow is always transparent, so you need to put white down first. Now not all white paint is made equal. So you might find that your white paint is not as opaque as this. You may need to put down a couple of layers of it. And there are some transparent white paints out there. Obviously, that won't work. I am just working with inexpensive craft paint. And while I am covering up the black areas here, I'm also going to bring this white out into where the pink paint is here. Now because I have to cover that up, but because it'll do a better job of blending. So after this has dried, I will put the pink back over the top and the yellow back over the top. And it'll just make it blend in a little bit more. If I don't have a hard line of white. Oops. I covered some, didn't. Well, it was supposed to cover. This is why it's good to have paper towels on hand. So I'm going to just take a paint brush with a little bit of water on it. Using that water-like It's sit down the eraser. This little plants got these little googly eyes coming out of it. I'd really like to play around with more of that. I think is you, if you can work with the images that you pick out and bring out elements, maybe enhance them. You can not only explore things more creatively doing this, but you're going to start to make these images your own. And when you start to make EM image your own, you start to give it a piece of your voice. So it's not just about being artistic, it's about giving these images your own, your own impression, your own take on them. And it really depends on how far you want to take this work. I've done some collages like this, where by the time I'm done, you can't do everything. I've kind of remarked with my own with my own hand. And it will look like the whole thing as I did it. But in reality, I M just enhancing the images that were already there. Now this image over here did pretty good when I covered up that. So I don't think I'm going to have to do a whole lot on that one. Okay. Now if long as this is dry, I should be able to go back over it with my white or yellow. That wasn't that wasn't the yellow I was using. Using more one that had an orange tone up here. Let's try this again. That's the stuff. When you're working on things like this can be really handy to leave that the paints out that you started to work with. Because you never know when you're going to go back and add some more of that color. And if you are like me and you have a lot of different paints, it can be really handy to just keep them out until you're completely done. Reds are another one, including pink, that can be very transparent. So that's why I use this on this as well, putting the weight on the back side of this. Okay. So just kinda shows you how you can play around with the white to cover up areas and then bring them back out. Now keep in mind that as I'm working on this at this stage, I'm still just kind of letting things sink in. I haven't necessarily chosen or am looking for any meaning just yet. But I can tell you that at some point when you're doing this work, things will start to come up. And when they do, make note of that, it can be a very powerful experience that can come up in a very almost like sneak up on you. So be very diligent about listening for that. Meaning it's one of the reasons why. And you'll see this often in my videos. Why? Where you don't see me finish something? It's because I can't be on camera and do that deeper work. At least I haven't found a way to be on camera and do the deeper work. So this is actually, I'm just working on this later in the day, the same day that I started it. And what will end up happening is I will let this dry overnight and then I will probably take my pens to it and really start working on it. And of course that's only if I if I feel called to keep working on it at some point, I might just go, nope, I've done this is good. I got what I needed from this. And i'm I can I can move on. Be willing to come to that point to let it go. But if you want to keep playing with it, by all means keep playing. I just love this part. Okay, So basically, right now, I'm just going to use up these paints that I put out. And sometimes that's, that's a technique using up your paint that you put out. It's adding more layers, more depth. If only for the purpose of just using the paint. Thank you. Wanted to cover up some of this water. There's a girl swimming in water here. I want to leave the girl, but I want to make it blend more into the hand. So I'm going to white out that, that blue. So hopefully I can get it to blend in a little bit more. I know when I first put down this hand, I started painting inside of it. I wasn't too keen on covering everything up and I'm feeling like it's okay. I can go ahead and cover up what's in the background and really bring this hand forward. I'm just going with what what I'm feeling. So i'm, I'm not trying to think about is this artistically whatever, you know, not even getting go there. But I do want her one more paint. Go put put that blue right back in there and then I think I'm good. I'm covering up a little bit more than I want to, but I know that I can always bring those. I can always bring things back up. So I covered up like these petals of this flower. And there's actually part of the petal that's missing up here, but that's all stuff that I can play around with when I'm getting in there and doing some of my pen work. One more thing I want to bring out, and that's her here. I don't think I want to use that though. Actually use some black paint. Put way too much down. Don't need that much black. But maybe I, maybe I need black someplace else to just kind of bringing out this image of her hair a little bit more because I got kinda the the original image got torn off. Plus I can make it a little bit more like my own. Don't have to go. That was kind of a click Add computer drawn graphic. There's at heart there. I want to leave that they're bringing her hair down. See now, drawing into it, taking what's already there and expanding on it. Knew that looks really cool. I'm going to even bring her hair over the top of the hand. That really did something. Well. Such a simple thing. And it really, there's really something here with this hand and this image of this woman. She's just very quiet. Even the color of her face means something. And it's got these kinda the sad little flowers around her and her hair's kind of going around. There's this little monster in here. And it's going down even further. And there's this girl and she's under the water and she's looking up like she's trying to come up for air. It's really a story coming out. In this. I'm starting to see how these other images will also start to make a story as I continue to work on them. Okay, one final touch. My hand is a little too white. And this paints just go a little bit more of a pinkish hue to it. Still pretty light, but that's okay. So one of the things that I will do when I do some of my line work in the morning when I'm kinda meditating on this, which is something I really love that that meditation time is I will bring back out some of these lines, like the outline on the hand because this is all really getting pushed back with the paint. But I can bring all of that forward. So think about that, you know, that these things, I'm working in layers. The first layer that I put down, I penciled in. A drawing of my hand. Right? And then I went over it with my marker. And then I put on another layer of images. Oh, I did the paint, so I did the water color in the background. But then I did the magazine images, right. Which covered up my hand. Remember. And then I brought it forward with my pen. I drew it again on top. So it's like the third time I've outlined, I've done my hand on here. Then I started to paint it in. And even that I didn't layers, the first layer that I did really didn't barely covered things up as very, very translucent. And now I've just added more and more layers and really brought that out. So now, after my paint is all dry and I will want to wait until my paint is pretty dry in the morning. I can go back over it and do some pen work. And I can bring out things like this right here is actually some sort of like frosting. But I think I'm going to make this a little plant monster because there's something about this little playful plant Monster. There's also these little alligator monsters and I'd love to redraw those and really bring them out. I and II and the kinda artists that I love to, I love lines. So outlining things. And I was somewhere I read in a personality type that, that is actually they've, they've typed that there are people that just love to outline things. And when I look at this, it's like, oh all my, all my nice crisp black lines are all messed up. So I really want to bring those forward and it's really going to change the way that this feels for me. Of course, that's just me because I'm an outliner. I outline everything. And so that's kind of one of the things that I will, I will do is I spend some time my morning contemplated meditative time. I may even bring back some of these words that are still peeking through and making them more prominent or maybe not, maybe I draw over them. I can, I can do a lot of different things to cover things up and to transform things. Just working with, with pens. I have some brush pens and some paint pens and some other fine tip pens that I can do quite a bit with this. I hope you are working on yours and please don't feel like you have to take it as far as I am doing it. If this is as far as you get and this feels done, then it is done.
6. Finding the Wisdom Within: I took some time in the morning and kind of play around with what was going on in this spread. And one of the things that I love to start with is making these little marks on the page. And you know, they're, they're kinda like decorations, but there are also a form of kinda contemplating and meditating on what is going on here because I approached this with the intention of, okay, what are my strengths? And I ended up making a nice big title for my page as well. And I really, I really got back to my original intention of what I wanted to get from doing this piece of art. And I also brought out some of the words that were in the background. So imagination was one that was in the background that I had painted over. And I added to that. So just adding that imagination of Peel fuels mean knowing that that is one of my strengths that I know that I can draw on imagination to kinda fill me up again. And then I did things like wondering, well, what does this image about? You know, what does she want to tell me? And I came up with a lot of different things. And one of the things that I ended up writing down was, I'm proud of being different, you know, and this is something that I have I've been proud of being different. It seems like most of my life. But it's only been recent that I've realized that this isn't something that is like you might consider to be normal. You know, most people want to fit in. We have a need to fit in. And I was taught by my father to be proud of being different because I was different and that wasn't going to change. And then I went in and asked her, well, what does this little plant monster want to tell me? And I wrote, I turn fear into fun. And these little alligators down here, I love to play. Other things I've just kinda brought forward was free thinker was just in the background. So I brought that forward and I did a lot of this. You'll see it throughout the page where I brought these words forward, these strings forward that I had done in my original brainstorm. But I added, I am. So I wrote, I'm a free thinker. I am creative. This, this image right here, which I ended up completely covering up merely made me curious. So I wrote down the word curiosity. And when it comes to finding solutions, I turned towards curiosity. I am willing to change. I'm resourceful. I'm thoughtful. So these, these words, resourceful, thoughtful, resilient were all words that were in the background learning. And then I just kinda added that firming I am to them. This image down here of the girls swimming underwater made me really curious. And what I came what came up for me was, I am a swimmer. I always swim to the top. And I love life. This image right here. Even though she knows, she seems kind of blue and sad. And these are reflected by these little drawings that were also on the original magazine images that really prompted this IM resilient. I always find a way. And I am always learning. Growing is fun. Now I realize that I have a lot more strengths then came out on this page. And then when you do this, you don't have to find every little thing. But that whatever wants to come forward in that moment, come forward for you. And as you're doing your little meditative marks. And that's what I really consider these little meditative marks. What happens is as I'm going through and I'm making these marks, something will come up and I'll write it down. Making more marks. And something will come up and I'll write it down. Listening for those messages during meditation is what I really love about this. And I do use art as a form of dices my meditation, this is how I choose to meditate. And it does involve that, that deeper sense of listening. So when you're finishing up your piece of art and listen, see what comes up, and write it down. So you can remember. Finding your strengths is one of the most powerful things that you can do. And you don't just, this isn't an activity that you do just once I've done this many times, something always comes up that I didn't expect that was new for me. I hope you've enjoyed this lesson and I look forward to seeing what you create with it. Please share. I would love to see. Okay, bye.
7. Bonus - Finishing Techniques: So before I get into this, I want you to know that at a certain point when you're working on your page, pages, your artwork, things are going to look flat or plane. And this is where those techniques, the techniques that I'm going to share with you really come in handy. One of the things that I do is I do a lot of outlining. And you can see that here where I have outlined the hand, I've used bold penned for that meaning. And by using different sizes of pens, you can emphasize and de-emphasize things. So I use a bold pen for the things that I really want to have stand out and come forward. And I use a finer tip pen for some of the details that might be considered to be in the background. And I can use even finer and finer, finer tip pens to put little details in there that you don't want to stand out. So definitely, I use at least three different widths of pens when I do my outlining. The outlining for me really helps define things. It helps bring things out. It helps give things a better definition. The second technique that I'm going to share with you is how I've taken the backgrounds, just like this pink background, which was very flat before I took a marker to it and started just kind of making these marks in the background. Now, they're not very obvious because I am using a pen that's very close to the color of the paint in the background. I'm not I don't want it to stand out. I want what I'm going to put down to blend in. But what it does is it gives it texture. You can also see that I did a similar thing over here in the area of the yellows where I added yellow marker actually was. This one's a little more orange than the one I originally used, but I use a pen that was very close to it and I just gave it that texture. Texture is, I think really can make a spread. Another thing that I've done, uh, to bring things out is used white pens. And I have a little bit of a variety of pens that I use. I have a really fat acrylic paint pen. And then I have a much finer tipped paint pen. I also have a couple of different of these Jelly Roll gel pens, and this one is a 10. These are, I think the fattest that you can get in the gel pens. And I used them to put down like this writing right here is done with the really fat, what would be considered a fat gel pen. But there's also, this is kind of like the regular, normal size, which is an 8 AM. I'll use this for me making little finer details. I also have this pit pen and this is a it's not a brush tip. I wish it were. I have I have a hard time finding these in the brush tips. But what I can do with this, these are the paint pens and a gel pens are pens that are going to sit on the surface. And so by that, what I mean is when I put down this pen, it's out there, okay. You can really, really see it. And then this pen is, it's more transparent. Okay, so if I put this on like this, what it's not going to stand out like these. But I can take this and just kinda rabbit with my finger. And I'm adding a little bit of a shading. And I can go back. It looks like I covered up my my black line, so I will go back over that. And that just adds like this little highlight. Okay, Which brings me to the next thing that I wanted to show you, which was adding shadows. And there's a lot of different things that you can do this with. I actually used, you can see the dark shadow. So I actually used a black brush pen. And this particular one is not very dark, so it's not a heavy black. It is permanent, however. So before it dries, I go over it with a water brush and this could just be a wet brush and move it out. So I create a little shadow. And shadows like that. You can see I've added, I've added this around the hand and on each one of these lines. So I've added a shadow and it's not very obvious, it doesn't stand out, but it makes a big difference. All of a sudden it's like my, my drawing here, my artwork here is not flat anymore. The texture between the texture and that it really makes a big difference. Some of the other things that you can use to add texture to the background or just some interest is gel pens or any type of fine tip pens. Now these are o sixes. So these are a lot finer than the regular pens. And I loved to add little repeating backgrounds, little details like this. And this kinda serves as a dual purpose. It not only add some texture to the background, just like when I was adding the pens over here. It's also a way that kind of meditate and take things in. So I often use pens, pen marks on my pages as a way to just kinda let things kind of sink in. And as a benefited added result, I end up with a much more interesting artistic looking spread. And I know I get asked this a lot. You know, how, how did you make that look good? Because, you know, I always do. I do all of this off camera because I am doing it in a meditative time. So That's why I'm popping on here and just sharing with you some of the details that I do that really help make my, my pages in my artwork look a little bit more already. Okay, I hope that gives you some ideas. Take that in, take your time with it, and try these things out. Okay, Thanks for watching.
 Karen Dawn, Creative Soul Journeys