Transcripts
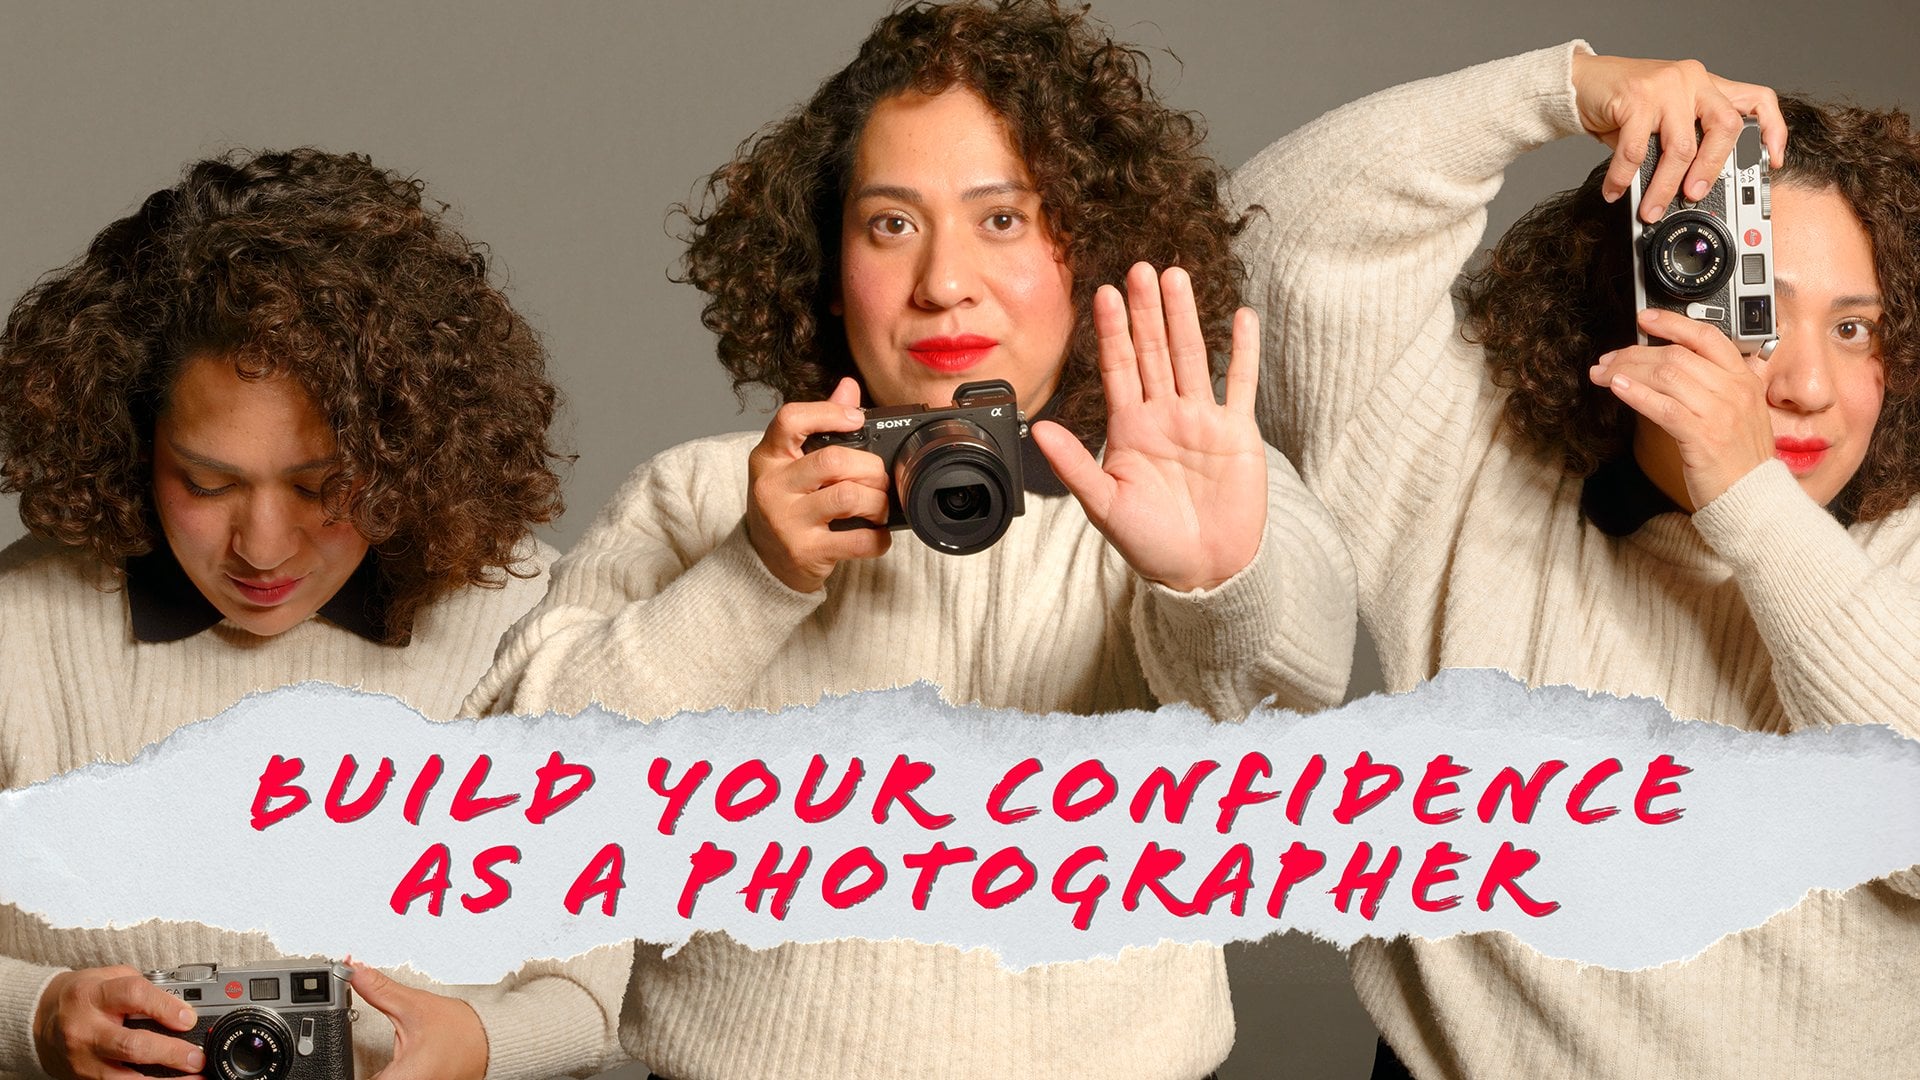
1. Introduction: When I grab the camera and take a shot, I'm thinking about creating a memory a moment. It can be of something that I see on the street or something I'm creating indistinct. My name is Celia Cruz and I'm a portrait Jan documentary photographer from x. Unlike experimenting with different ways of percent in our board. And the cyanotype technique is one of my favorites because it is very satisfying. You can see in minutes while you are doing. And he's also eco-friendly. So you don't have to worry about touch in any dangerous chemicals when using this technique. In this class, I'm going to teach you how to create a portrayed using the cyanotype technique. You are going to learn everything I know about cyan. I'm going to guide you through the entire process from mixing the solution, do juicing the paper, creating the digital negative, how to wash it and how to present. To create your first project, you just need the cyanotype kit with brushes, watercolor paper, and all frame and binder clips. Basic knowledge of Photoshop, transfer paper and a printer. A place to wash your print and the sunlight. This class is for any skill level. So if you are just starting out in photography or having doing it for a number of years. This class is perfect for you, um, to use your creativity and create beautiful portraits. If you don't know where to start. What about taking a photo of your family or your friends, your pet, or yourself? Share with us your portraits and final cyanotype prints in the gallery below. I'm very excited to start this class and see all of your projects. So let's get started.
2. The Project: I'm glad you decided to start your project creating a portrait using the cyanotype technique. I chose to create a portrayed as the project for this class. Because portraits are very meaningful to us in general. They reminds us of someone, a moment, something that brings a smile to your face most of the time. So why don't we create portraits of people or animals that we care about? For example, I have five dogs and I'm always chasing them with the main camera, so I have plenty of images of them. And I have cyanotype board trades around my home of them. So above or my beds there, I don't no longer have because they've passed away and they always bring a smile to my face. And he's not only because I see them in, in the picture, but also because how the cyanotype, I don't know, enhances the portrait itself. It just makes me smile. So I want you to choose something for your project that will do that, something that will create a beautiful moment in your mind every time you see it. Remember that your final prints will be perfect to use as a decoration around your space or you can give them suppressing to someone. Maybe you take a picture of your brother or sister or someone that you care for and give them this dispersant. If you are ready to start with the project, just keep in mind that the file that you are going to use is something that has a good quality. It can be a picture that you do with your cell phone or digital camera. Just a portrait of, of good-quality that when you print it, it has, it will have a good definition. If you have any questions about the process, about how to proceed with the technique or if they image that you chose is the correct one. Let me know. I'm available with a contact so you can write to me and I will read your questions and keep an eye on how you are developing your projects. I want you to have fun, so that's my main objective, cell cup phone with the way the project has started creating something that means something to you. So you can continue creating cyanotype portraits long after you finish this course.
3. The Cyanotype Process: Before we start the making prints and cyanotype, I want to tell you a bit about the origins and background in the history of the cyanotype process. The cyanotype process was discovered in 1842 by John Herschel in England. And these was three years after the discovery of photography. So Herschel was a person very interested in arts and sciences. And he wanted to create a photographic technique that was very unique because he wanted to have purines that were different from the ones that dao board created. The prince from towel boat, where in these brown values and Herschel wanted something with their reached peak met in a unique color. He could distinguish his own work through rehearsal, worked with previously with flour big mans, and I started working with a chemical called potassium cyanide. And with the help of an electro chem is called doctor S mapped. They work together to see what he could do with this chemical in conjunction with others. Soon after Dr. S ME handed see your Herschel do chemicals. The first was the red potassium for Messiah at night with a new one chemical as core ferric memorial site rate, which has a light sensitive properties. And these was very interested for interesting for her child. So he experimented with a, with a two chemicals and then created a sensitizer solution which could be applied to paper and then exposed to the sun to the UV ray lights. And when you expose these paper, what you could see was this beautiful Persian blue color in India brings, and that's how we come to have cyanotype prints. But when we think about cyanotype, it's important to recognize one of the main artists that work extensively with this technique. Her name was Anna Atkins. And it's speculated that rehearsal was fermenter because he was a friend of Ana's father. So we presume that she learned that technique directly from him. Ana published a lot of books with botanical subject matter. And she created Prince of algae, ferns, feathers. So her work is very much recognize nowadays with these beautiful blueprints. Nowadays, the technique, the process of cyanotype is widely use because of the simplicity of the process. The process is something that once you learn how to do it, you can do it many times. It's almost a failsafe or you can create something very good every time you create a new breed, a new composition. Also, you don't have to worry about the chin dangerous chemicals. These process is eco-friendly, said that's one of the advantages. Would cyanotype is you can create anything you want really. Here, you're going to learn the basics of creating something. But keep in mind that you have to use your imagination to continue working with the technique and explore all the things that you can do. I'm going to leave you with several examples of all there are this.org width cyanotype. So you can get an idea of all the beautiful things that you can create.
4. SettingUp Workspace: It's important that you prepare your space and all the materials. So you don't have to be running from one side to another because you forgot something and then you kind of lose the moment of creativity. So for example, here I am in my studio and this space, it's very well the, the I have lots of sunlight coming from the windows and the front door. But the work with cyanotype. So we need a space that eats away from the sun because we, because we're working with our sensitizer, we need some, some place that we are going to mix the solution and then go the paper where the sunlight doesn't affect the solution. So I recommend you use a place that it's away from the sun and a place that you can see very well. What do you are doing? I have a dark, dark room and I usually work there with the cyanotype is because all my material is over there. But you don't have to have dark room to work with your cyanotype. Just prepares space that you can lay out everything, the papers, the solution, the brushes. So you feel ready to begin one thing. And then when you are waiting for the papers to dry, you can continue with creating your digital negative and Brinton it. So in just, I don't know, maybe an hour you can start with the exposure of your papers and then just to wash it, I'm going to show you all the things that I use and what I have here in the working space. So you get an idea of all the things that you need to have. At one moment. I'm going to put everything early, layout everything on my working table. And here it's very sunny. So what I'm going to do is just close the door, draw the court is so I don't have direct sunlight. Just start working. I assume you already have your cyanotype Keith, and all the materials that you need. But if you don't remember to check all the resources I leave in the description so you can check them out if you have any, any questions. So here are most of the things that you need to get. You re the star with your approach here. Well, at this moment I have the door open because I need sunlight to record this. But i if you have a space that it's open and have lots of sunlight coming in from the outside. Just close the door, close your curtains and you will be. Okay, to start working. So for example, let me tell you here I have all the materials that I need to start the bridge and have the solutions, the solution a and solution B to create a sensitizer disorder very large containers, but this is because I make my own solution. I don't have available here in Mexico or places where they can while they sail, kids or smaller sizes. So I thought it was best idea for me just to order the chemicals, prepare them myself. So I prefer about 500 milliliters of solution, so I can use them plenty on for a long time because separated these, each solution can last you for many projects, but also about two years, sometimes even more, this will remain good to work with so bad you check with the specific brand that you are buying. How long does the solution is? Star is keep efficient to create a sensitizer. Okay, So I also have a disarray changes. Judo have to have a syringes, but just something to bore the precise amount of solution into your cup. Because you need to be precise in this breasts, you need exact amount of the same. The second numbers of milliliters or onsets of the, of each solution. So you have on a stables sensitizer. So I use syringes because these bottles are quite large and deep. And these have like just the graduation like any other syringe. I have my spawn. Roche's, a thin one and why they're one. But you just can have like one that you like. You don't need to do. And I also have a branch, this one, he has synthetic hair. So you can choose any kind of brush that you like and that's available to you. I also have the paper I will show you later what kind of papers specifically, but I have the paper already got the size that I will be working. And well, here are some samples of that I already made of cyanotype. I also have a notebook. A notebook is important because even if you have a really good memory, sometimes it's best to have something to keep you to keep notes because while later you will forget in one month or two, if you go back to creating a cyanotype, where it's important to take notes of what conditions apply. Do you use the time? How much solution did you miss that mix and such? I also have a frame, an old friend that I no longer use it, That's the Chimborazo and glass and binder clips. I have two of them, two ones that are large. I have the transfer paper for inject brief, which is the one I have. And also these bags that are quite useful to restore your printed digital negatives. Because what, you never know if you want to make more Prince of the of the Brita negative that you already have available. Okay. So let's see what an apart you will have a tray with water to wash your prints and a place to refresh that water because we have to wash the paper really well so we can rinse out all the chemicals. So just have already the place where you have all your tray on water available. I will show you now how it displays loops with a close doors and you get an idea of the amount of sun that you can work with. So I'm beating the Doric, but you see that they can be and light diminished quite a lot. So this kind of ambiance, it's, it's good because I'm not really close to the window and I can start working if you prefer to do it in a place that it's darker than this. Go ahead. Next, I'm going to show you are what kind of paper sidewalk width. And you'll see that it's a very interesting part because you obtain different results from the type of papers, attitudes to work.
5. Choosing Paper: Okay, now about the papers here, I have some examples of different papers that I use. I like to try different papers because you never know if you're going to like the result of how defined offering is going to look. So while I just experiment with them, what I recommend is that you use paper that has got to be neat and is also acid free because since we are dealing with chemistry, while the kind of paper that did use also reflects on the final result of your cyanotype. I think give you choose watercolor paper. There will be a good option because these are cotton base and they come in different kinds of textures and weights. So you can see which kind of paper you like the best. But we do only have one type of paper. Are just practice with that. And then as you move along, you can choose another type of paper to work with. For example. And papers that are heavy are really good because you can have them wash and be in the water for quite a long time and they don't air way you are handling them. So that's also important because if you have a paper that it's very thin, ways of water when you were watching it, you have to be very careful not to tear your projects so you don't want to be to happen that to the projects that you are creating. But you can use seen papers or less heavy papers to practice. For example, this one is cold press, 90 pounds or 200 grams. And this one is kind of theme as you see. It's paper that's very importantly. You can, you can twist it and you can see it also sounds kids very thin. And this one, it's, it's not a bad paper, but the final result, it can relieve a lot of warping in your paper, in your project on the x21, that effect, I wouldn't recommend something like, like deep these, that it's very easy. Here it's an example of how the final print looks. As you see, the paper is very work. And you can see that it's been quite, quite some time in, submerged in water while we watched it. Here I have another one that it's heavier than the last one. This one is a 98 pounds or is 160 grams. And it's also a theme, but it's not as, as, as thin as the other one. So this one has a little bit more of consistency. Actually. I never try these paper before, but to create the brains for this project. I tried it and I liked it. This one is final primi using that vapor. I like that a1 is theme, but it's not that thing. So I had fun working with, with this paper. Here you have another one which is 140 pounds or 300 grams. And this one is has some texture. The other ones were very soft texture, almost no texture or hole. And these ones you can see in the paper that has some ripples. And it's also, keep in mind that if you want your paper to be very smooth, all of you, if you want some kind of texture to have it idea. And this one, as you're saying, it sounds heavy and it really is, it's kind of paper that has resistancy. So these 300 grams will stand water really, really well. And let me show you an example with that, with that paper. This, so you see, this one is remained with the same characteristics of the paper. Of course, you see a difference in the paper we got to spin. Watch throughly. But the, the final product, it's very resistant. The you, you don't have tears in your project. This one also is 300 grams or 140 pounds. And this paper, It's also cotton watercolor. This one has more texture than the other word. And as you see these papers, they also have difference in color. This one, for example, is very wide and the other ones are at kind of Beadle agenda wish. So just check what you have available if you want something that it's on the wider side or something that is on the generous side. Just dry it. It just, it doesn't affect a lot on your final cyanotype, but it can give a different look. Keep in mind that the size that you will be working with your paper has to be a size that feeds on your, on your frame of mind here is from an old portrayed that I no longer use. So I have paper sizes that feet riding to my frame. If you have a smaller sizes, you can put do prince at the same time. Said I save the part of the papers, then we are moving to the do the mixing of the solution.
6. MixingSolution CoatingPaper: As I talked before in the introduction about the process of cyanotype, we have two chemicals dissolved in water, and each one takes his part in creating the sensitizer. First we have the solution where you dissolve the potassium Ferro cyanide and the Indio, they're the ferric ammonia. So each one separately, they don't do nothing for it, the cyano table, but once you mix them, you have about an hour to work with the solution. So I always recommend to mix a small batch because just a few milliliters go along way. So you don't need to mix a lot of quantity unless you are going to war with a very large or paper or fabric. But for example, arches use this arrange and take about when I'm doing lots of prints, 10 milliliters of each. But otherwise I will take five milliliter, milliliters of each one. So if you run out of the sensitizer, don't worry, you can make more, but it's always best to use a small amount of each one. And then if you need to, just mix a little bit more, once you have your solution a and B ready. Jails use a cop a plastic cup to mix them. Don't use metal. And just for each, each solution in there and give it a mix. So now the solution is ready and it's time. We go to the paper. You can use foam brush any size you like, or hair brush. This one's has kind of fine bristles. You can use something with another kind of texture. And then when you go to your paper, you have to let it dry. So what I recommend is that once you coated your paper, let it dry. Flat on a drawer somewhere where you don't have humidity because humidity all also affects the paper. It can turn a little bit bluish if you have a lot of humidity around you, but it usually keeps quite well. Joe's away from the light and in a place that is dry. Okay. So I'm going to show you I counted these papers. Why I think two weeks ago, something like that. Okay. And this is what I tell you when the humidity can effect a little bit, how your paper looks when it's freshly coated the solution on the paper, It's a jello heat has a yellow hue, but later it turns a lead beat bluish. This is okay. This paper is perfectly okay to work with. So don't worry, if your paper turns a different corner after it has drag. Also, remember that you can create any shape you want with your, with your brush. And that's also an important part of creating a cyanotype. Be creative with how you are going to present your image. Remember that the image is only going to appear where you have the sensitizer. For example, I love making round images. So I specifically use these in the center. But you can also leave like a small frame around your paper if you like, or you can call it complete. Okay, so let's do one paper, Let's go out one. So what are you going to do with it? So you have your sensitizer, your solution. So you don't have to have your brushes extremely like a dripping in the solutions you need to very literal of the, of the solution. So just uses a small amount, press it on the COP. Okay. So as you see, this doesn't drip. Just use unsteady hand to create the brushing motion. If you ran out of the solution from that one, just sell your brush again and give it another go. You can use two layers, three layers stops, but very few of the dissolution. So do it in one way and then spread it to the other way. Because you want to, I have that paper very well impregnated in with a solution. Okay? So this is one example of how you code your paper. And as you see here, the hue is very yellow. If you compare it to what is dry and because here you have I have quite humid environment and internal little bit bluish when I let it dry, but it's okay. In an hour this wheel will be completely ready for you to start working. So while you wait for the paper to dry, you can continue working on your digital negative and printed and be ready to the same morning to work with all your project. And damages practice way different shapes on your paper and sizes. You can take, for example, this already is half of one paper. Just folding it with your hands and just run it with my nail. And you can easily there the paper and create another, another print. Okay, Let's do another one. This time. I'm going to try to be more a steady with my brushing. Okay. One there and another here. I'm trying to keep it balanced. And then the other way. And the other way. If you have two different kinds of brushes available, use both of them and see what kind of results do you have. Because, for example, the foam brush, it really leaves you and an a steady line. While the brush with the bristles, it can leave another kind of texture in the paper, like here or here. You can see the strokes of the, of the hair. That's all a cell phone to try because the way you brush and apply the goatee, the solution to the paper, it also gives another layer of interest of do your, do your image for example here you can also see the strokes from the, from the hair brush. And it's kind of an interesting effect. And here I use the phone brush by r. Then I don't know what I did exactly with my hand, but it created like another circle line here, which I really like. The beauty of this process is that you can play with the paper, how you create the, the, the cotinine, the paper, the brushes. So you will always have a different result. Also, if you apply more layers, I mean three layers instead of two layers or one layer of coating to the paper. The intensity of the final print also varies. So keep in mind, remember to take notes of the things that you like or how you did something. So you remember, after all the steps that do you follow, do have this final print. Any questions? Don't forget to contact me. And I went to see what you were doing. I'm really very, very interested in seeing your final projects.
7. MakingDigitalNegative: You are halfway through your project. So now we are going to create a digital narrative from the file that you have chosen as your portrait. In this file, I'm going to use Photoshop as the software, but if you have any other software that can do all the process in the same way as Photoshop does. Please use that. Your knowledge has to be very basic because we are not going to do alike extreme things with the digital file. So I'm going to show you my screen is set by step of all the things that i've, I did do have my own digital narrative, found a file that I chose. I'm going to give you two examples so you can see how to work with different kinds of images. Also remember to have ready your printer and transfer paper according to the specification, specifications of the, of the ram. So once you finish with adjusting your file, then you can proceed with printing. Here we have the digital file of my dog, penny. She's the only one that wanted to model that day. The main reason I chose this image is that I can see clearly the main subject at the front and the background is a little bit blurry. There is a good contrast between the front and the back. The subject looks good in terms of shadow and light. Even when her clothes are the same color of the cushion layer, there is enough difference between the shadows to separate them. You choose an image that also transmit something to you. Apart from having a good quality. We want a black and white image in negative to put in contact with the cyanotype. As a negative you get from a film camera. First opening your selected file as a usual, duplicate the layer and go to Filter order. High-pass. This is step is to increase the sharpness of the pixels. We want an extra sharpness. So when we print the negative, the image doesn't look too soft. We want defined borders. I'd recommend you use a radius of 10 no more because you want your sharpness to look natural. Here you see how it changes with higher numbers. Then go to layers, overlay, CDD, Francine sharpness. Go to Adjustments, Black and white. If you want, click Presets and use high contrast. This is optional. You have to use your judgment if this improves your image or not. Now and go to Layer, new Adjustment Layer, Invert. This has a negative version of your photo. We want a negative image that has a range of grays values. So the cyanotype has mentioned and is not flat. Use curves to correct your image. Adjusts light and shadows to have a contrast and separation between elements. For the next step, we need a new layer that contains all the previous layers. You can do it by pressing the combination shift Option Command E. There you have a layer with all the previous layers. This is called a stamp visible. Now we have to flip the image or recent alum. So when it comes in contact with the paper, it reveals a correct side of the photo. Go to Image, Image Rotation, Flip Canvas Horizontally. And that's it. This is your digital negative. Save it as usual, and printed accordingly to the instructions of the brand. This is another example. It's a self portrayed idea while ago, the process is the same. Open your file, duplicate the layer, go to Filter order. High-pass. Check, well, radius works for your image. Then layer overlay, CDD friends in sharpness, in adjustments, click black and white in press sets. High contrast, red filter. Use your judgment if your image needs. These are not move to layer, new adjustment layer, Invert. Now you have a negative image of the original. Click on Curves and adjust your values to improve contrast. In the first example, we created a layer containing all the previous layers. If you don't want to do this is not absolutely necessary. Just skip it and flip the image horizontally. Save your file and print the negative. When you are ready. With all your printed narratives, get your coated papers and frame to start assembling the cyanotype.
8. AssemblingExposing: Your Digital Negative is ready. You have already printed it and you are very close to completing your portrayed in cyanogenic. So get everything ready, have everything on hand so you don't forget one thing or another. This process is very fast, so I recommend that you have, are ready to space. Our you're going to assembly everything and also the space where you are going to expose your cyanotype also have a dimer. Because while you need to be very precise about the minutes that you are going to leave your cyanotype in the sun. I'm going to guide you through my own example of how I expose my negatives and give you some more dibs while I show you what I did with my own prints. Cyano types are a type of contact print and we need to create a sandwich with the coated paper and a transparency. Plays one coated paper or two, if you like. If their feet like mine. Hood, each negative on top. Remember to put it with the shiny side up. Take your time to place your negative where you want your image to fit. Continue with the glass or acrylic. And now take your binder clips. Make sure you place your clips where there is no paper. Because if you place your clips where you have the paper and it has coating, you will leave a mark of the clip in there and you don't want that. Now you're ready and take your cyanotype outside. Here, I'm exposing my print for a vowel 3.5 minutes. The sun is very bright and I consider, I don't need more time. I recommend us start with 3.5 minutes. And and if this guy is kind of cloudy or it's later in the afternoon when the sun is not that strong, you can expose it or up to five or six minutes. Just consider how your sunlight looks like, how your sky is, that they consider that the direction of the sun, time of day, and season also fade. How long you will expose your cyanotype. Remember, this technique is very much trial and error, and it's just about experimentation. Take notes so you can compare your different results. As soon as you place your cyanotype, indirect sunlight, you start to see how it changes in color from yellow to blue to silver. Working with cyanotype is all about experimentation. Even when you control the exposure time and the papers you use, you will have a unique print every time. Set your timer to the minutes you will expose just to be on the safe side, even if your final brain doesn't look great, there are things that you can do to make it better. Once they're timer rings, bring your cyanotype inside away from the light and cover it. If you rule has a lot of light, just blaze a paper on top of it just to make sure it doesn't continue with the exposure. Then take it to where you will be washing your cyanotype. This is how my cyanotype look after exposing them. Here, I knew my dark room. I have the light on. This doesn't affect the print and the door or burn a little bit so I can get more indirect light from the window. So now let's proceed with the washing.
9. DevelopingWashing: At this moment, you have already expose your cyanotype to disarm. So it's time to bring it inside and start the process of developing and washing your cyanotype. Go to the place where you have your water and Trey available. I'm going to show you through my own process what I did and all the tips I have for this part of the technique. In the past video, I'll show you how to expose the genotypes. Luke, have your tray ready to develop your cyanotype. This part is one of my favorites because as the water rinses the chemicals, they start to show the washer cyano types. I recommend you have your tray with plenty of water and let the papers so OK, so the solution dissolves and you don't waste that much water. I like moving the print from one side to another and flip it. Honestly, I think is just that I get w4 from weight into this bar to move fast. If you use one to leave your brain there without moving it, it's fine. When you see that the image appears completely refresh your water. The resume part takes about 10 minutes. You need to make sure your preen doesn't look yellow. My prints have a subtle blue color. They are not a very deep, every prince looks different. I may 334 in samples of these two images the same day and all of them look different. This is how the process goes. Once your print is fully wash, is time to add a bit of magic. Well, it's just hydrogen peroxide, the kind of used to clean wounds. This will help with the oxidizing process. The blue becomes darker. So what you have to do is pour splash of peroxide in your tray. I use the cap of the bottle as my measure. And see how the blue of your print intensifies. If you don't have a hydrogen peroxide, don't worry, your brain will naturally oxidize after a day or two. But it's always fun. See you need happening right away. Give it a quick rinse and your print will be ready in no time. But wait, there's another tip in case you feel your print is dark and doesn't look that great. This happens sometimes you don't know the final result of your, of your cyanotype print. And when it's dry, you see that you don't have a lot of definition. With all the details. We can fix this with another bath the next day. To increase the tonal range of your print, you are going to use any of these three items, borax, ammonia, or sodium carbonate or soda ash. What these do is I did bleach the cyanotype, but be careful, don't use these combined. Choose only one. Also, remember to have these displays when you are working with these chemicals very well ventilated. When do you need to do is soak your print in water, they're your printer, it's already dry. So cooling water, take it out before you put it back in your tray. In your tray, if you're going to use borax or sodium carbonate, use one teaspoon or two. I now liter of water. Give it a mix and put your print back for two to three seconds. Keep an eye on your print because the bleaching process is very fast. So keep an eye on it. Is if you see that your print doesn't have the desired result from the bleaching repeated again. Once you are satisfied with the bleaching process, ruins your print again for another 10 minutes. If you use household ammonia for five milliliters in a 100 milliliters of water. And watch carefully how your print bleaches when you see the desired results, reads for another 10 minutes. Once your print is dry, it's ready. You have successfully completed your first pore through the US in the cyanotype technique. Now, how neoprene to dry? You can also let it dry flat. The main thing is you don't drive too fast. Like outside in the direct sunlight, you will damage your print. So just let it dry naturally. And then you will see your final print. In the next video, I will show you how the prince look at the end.
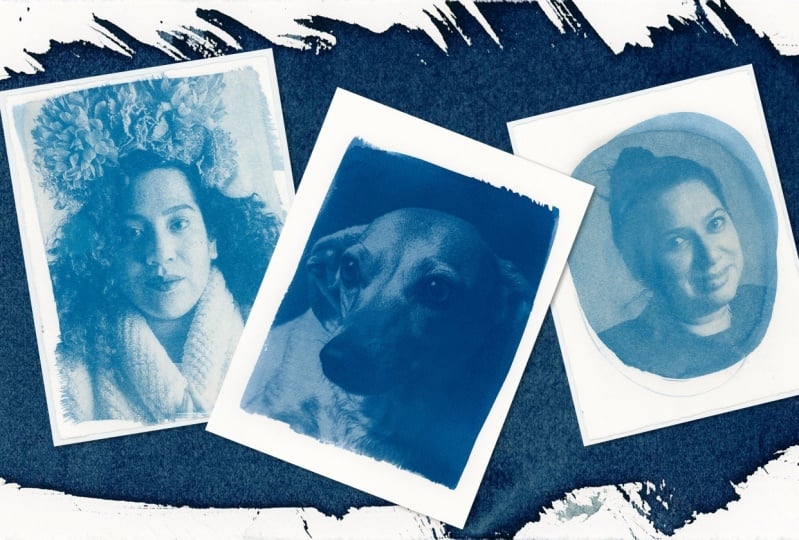
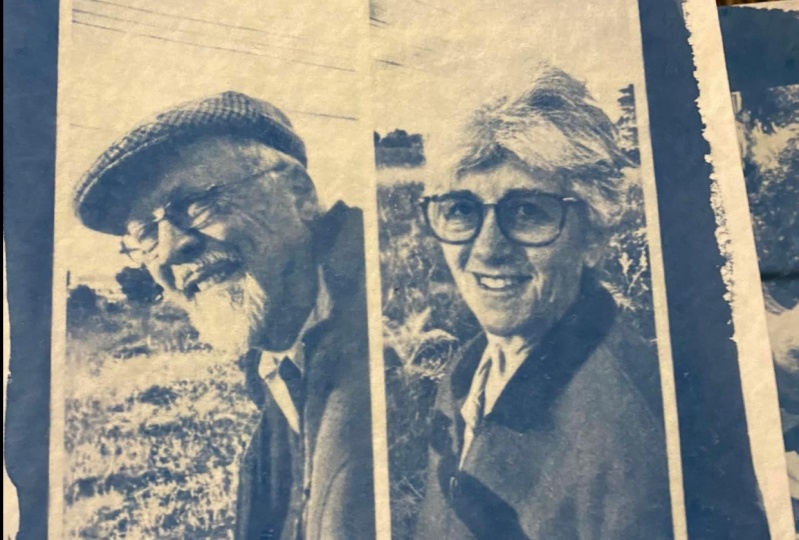
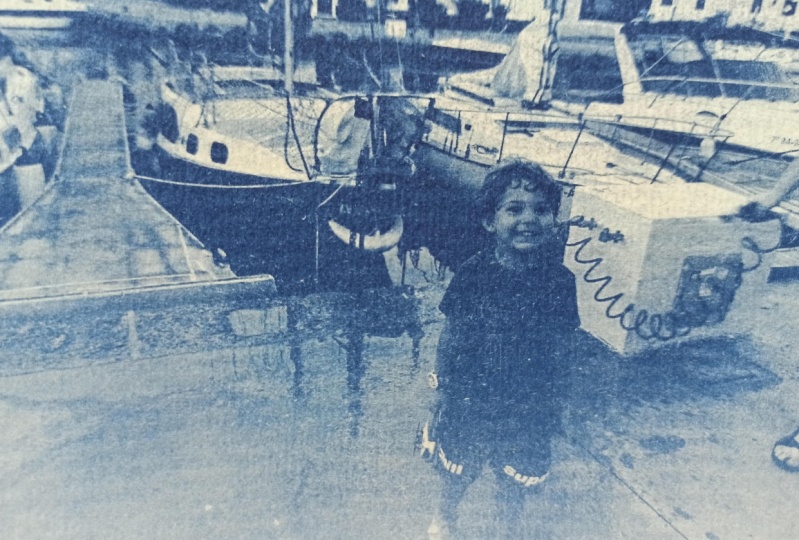
10. The Final Print: Your prints are dry it at this moment. So it's time for you to think where you're going to do with your final prints. I hope you enjoyed this process a lot, as much as I enjoyed making them. These, this class is just the beginning for what you can do with your cyano types. I hope you also get to practice a lot with your portraits or any other thing that you want to do with your cyanotype technique. I here, I'm going to show you some of the prints that I already have that I prepare for this class. Size said before, these processes, much about experimentation. So don't worry if your first sprint doesn't come, come out the way you want it, you have to keep trying again with your same digital native and the song how, how much time you're going to be exposing your negative. And just have fun with the process. Don't really worry much about the final result. But mostly I want you to learn how this technique works so you'll feel more confident the next time you try to make another print in cyanotype. I say show you while this is my lovely Penny. And I made like lots of trial of her, her portrayed with the from vapors of because every time I get a different result, it also depends on, on the day, sometimes it's sunny, sometimes a cloud gets in the way. But these Ds process, it's just about that. Trying what you can do and see what results you come up with. I also tried with self portrayed. Actually I did do Prince of these one. But the first one, the paper was kind of thing and I tore the print from one side is so it doesn't look really nice, man now. But I just keep the night, just keep them in a folder and I write down what I did wrong or what I did different from the ones that I like. So just to remember to take notes of your final prints, but above all, I'm very satisfied with the results because it's not only that I get to experiment again with, with a process of cyanotype. But I get to also disconnect from everything else and just be present in this moment and get all my energy focus on creating something while this is a portrait of my sister. So I think I'm going to frame these and give them to my parents. What do you think while maybe you have brothers or sisters, someone in your family that would appreciate having a gift of a portrayed. So just imagine what you want to go. What do you want to do with your prints? For example, I have this one lovely if all of my dog blue. Well, he passed away a few years ago. But I have this does sprint in my living room and it just makes me smile every time I see my little boy over there. And here, there's another print from penny from the ones that I just showed you. And this one is the one that I like the most. So I put her in a very jello frame, which really enhances the blue of the print. Just also consider if you already have other frames or places that you see that A-prime who'll be really great in that place. Just your paper, the shape you need. So you can really take advantage of their curating your spaces according to the to the sizes of frame or what do you want to place in that particular space? And don't forget to always store your negatives. Because well, you never know if you want to have a new print of that cyanotype in particular, maybe not now, but maybe you revisit your technique in a few weeks or maybe a month. And you can take out your narratives and have another go. As I said, Just have fun with the process. Remember that you can do a lot of things with your brain's not only put them in frames, but you can also make a print that it's like the size of an envelope of our greeting card. You can give them as gifts on Christmas maybe or any other see soon that you want to celebrate a birthday. That will be a very lovely gift to give, to do some warm. Also are, for example, I have these, these clips. They're very cute and also they are blue. So I was really lucky to have these ones. So sometimes what I do is I just have these pretty clips and just hang from there. I don't need a frame. So just use something practical that you have in your home and see what you can do with those things. And your prince, remember that these cyanotype technique is not only. To create portraits, you can do a lot of things with other kinds of objects. I hope I am able to percent you later another class with another type of things that you can do with your cyanotype. And don't forget, pleased to share with us your projects. I really want to see whether you are doing with the cyanotype technique with this class. Because it's very interesting for me to see what other people are making, what their creativity is going. Because I also get inspired by the works of others. And of course, it's very satisfying to me to see someone taking my class and working with the technique and given the time to produce something that's beautiful and meaningful. In previous videos, I will show you some other artists. They'll work with cyano types and then the kind of things they do with that technique. Remember that your cyanotype, can we intervene? If you want? You can paint them with watercolors, wash, color pencils. You can write something with a beautiful pay any of you like. Well, if you're really good at writing something, you can do. A lot of things. Just use your imagination, a bit of creativity, look for what other people are doing with the techniques also. So you also get inspired a little bit more. Finally, I wanted thank you for taking this class. This is very important for me because while I invested a lot of time creating this class, and it gives me a reason to keep going, to keep teaching. The little that I know about photography is not only this than I do, but I also enjoy a lot of other parts of photography and also about creating. I love painting. I'm recently re, re-acquire the taste for working with watercolors and wash and some other things. So it's just about the feeling of creating. It's very rewarding. So don't, don't forget to treat yourself to a class to do something for you and appreciate the time you give to creating something with your hands, with your mind, and with the creativity that I know you have. This is for the class. Thank you for your time and for sharing your portraits with me and with the community. Don't forget to follow me if you want to. This is my Instagram and my website. You can follow me there. And I hope to see you soon in another class.
 Cecilia Cruz Sandoval, Photographer / Content Creator