Transcripts
1. Intro: Hi. Hi and welcome to this new skill share class. My name is Brenda Baker. I'm an artist and teacher
based in the Netherlands. I started to use
Procreate in 2018 and already told over 32,000
students my appropriate classes. I have over 20 fun appropriate
class for you to explore. In this class, I will be teaching you my way
of illustrating acute imaginary underwater scene using Procreate on the iPad. But you are most
welcome to draw with any other medium you
want to use instead. We will be diving deep in and create the whole
illustration step by step, starting at the
beginning with creating a sketch all the way to
the finished project. We will create a gorgeous
and colorful background, adding rugs and the most
cute animals you like, all that in a lovely
underwater environment between a diversity of plants and where the sun mysteriously
shines through. So if you are just as
excited about this as I am, then let's come in and
let's get started.
2. Getting the downloads and explaining the brush set: So the first thing we want to do is to get all the
downloads into your iPad. So you must go to your
browser for this, open the class, and if you go
to projects and researches, scroll down so you can
see every download of it, I'll be starting with
the appropriate Canvas, tap on it, download it. Then here it is download
now, tap on it again, and it will be visible so you can import it
into the gallery, and you can find it in the upper left corner
of your gallery. So I'm going back to the class. I'm going to get the swatches
by tapping on it, download. Again, tap on this
one and on this one, and it will be visible
right here. Import it. And if you go to
your swatch palette, you can find it all
the way at the bottom, directly set it to set as
default and switch to my disk. That for me is very
easy to work with, but do as you like. And at last part, we have to get the brush
set I prepared for you. It's a large one this time with all my illustration
brushes in it. Again, do the same thing. I will get visible here. And you will see all the brushes you've just imported at the
top of your brush library. So let's dive in a little
bit further to this one. This is my canvas. The canvas
is not very difficult. You have a top texture
and the bottom texture, and you draw everything
in between here. So you can create
new layers here. And you will see that as we go. And for the brushes, I will
run you through very quickly. Is my illustration pencil, and I will be using it
with different sizes. I've create sizes here, perfectly fit for this
ten by ten inch canvas. And I refer to them in
class like size one, two, three, four, from the
bottom up, I'm counting. So most of the time I sketch
with a very small size, but when I fill in the colors, I'll use it at a bigger size. So that will be very easy, and it will fasten your artwork. Uh, here, I have a
playful texture brush, and you can use it as stamps, but you can also
lightly smudge with it, and it darkens as
you go over it. And this is an illustrated texture brush I like very much. It's got a lot of strokes
in there as we go. I normally use it a lot finer, but you will see me use
it in a big size as well. Uh, here I have a
lot of brushes, and you can easily use
them by creating strings. You see the first one is
always a little bit crooked. So I start outside of the canvas and I can
move it to my liking. And these are all
working a little bit of the same, just
slightly different. So you can create a variety
of plants very easily. Also, you can see a
lot of these brushes, and these were made with my
illustrated pencil as a base, and then I created
some different leaves. So you can play with
it very easily. And if you zoom in, you will see the
pencil texture as well as it has some pencil gaps in it
because I like that. You can also see that in
here when you zoom in, and that's why I
like them so much. But you have to draw
very slowly in the way. They will make a lot of fun. And here, this has
a double drop, both side, and this has
scratchy leaves, both side. You can see them
switching side to side along the way
you're drawing. Those are very fun, I think. Also, I've got some
foolage brushes. I made some flower brushes, and these are fun with colors. You can see they have a
slightly different color in it. And I did the same. And also, I've drawn this by hand with a pencil kind of look. So you can see those
little marks in there. And I did the same for
the foolage leaves. And when I make them
bigger and zoom in, you can see also the
textures in those. We'll be using these
in class very little, but I would like for you
to have them as well. I also created two
fun bubble brushes. These are more meant to be
like air drops in the water. And these are, yeah, well, more for the color
and slightly fun. And well, you can play them. It's a little bit
between water bubbles, water drops, and Felix brushes. So you can use them
to your liking. I created more brushes
for you, some plants. So I'll be using green for that because that
would be easy visible. So I created some stemps from flowers as well with the textures in
it, as you can see. I created this one out
of a watercolor brush. So these are fun as well to use. This is also a fun one. It's already colored in with a little bit of an outline
in there, so that's fun. And I have another one, and you can use them
to your own liking. And here you can see a lot of texture in this brush as well. The next one are
funky doodle plants. They are fun and
easy dropping in. So they switch from side to side just every now and then to
get them more randomly. And I will show you in class
how I draw this by hand. So if you're not willing
to look for the brushing, you have, Oh, I've just
one plant of that. You can easily
draw them by hand. It's very easy. Also, as with
this funky doodle plant. I also show in class how you can create a plant like
this while drawing. And here are the soft brush
and the bouquet lights, and these are from
Procreate itself. So that's a quick
overview of the brushes. So I think now we're ready to dive in and let's
start creating.
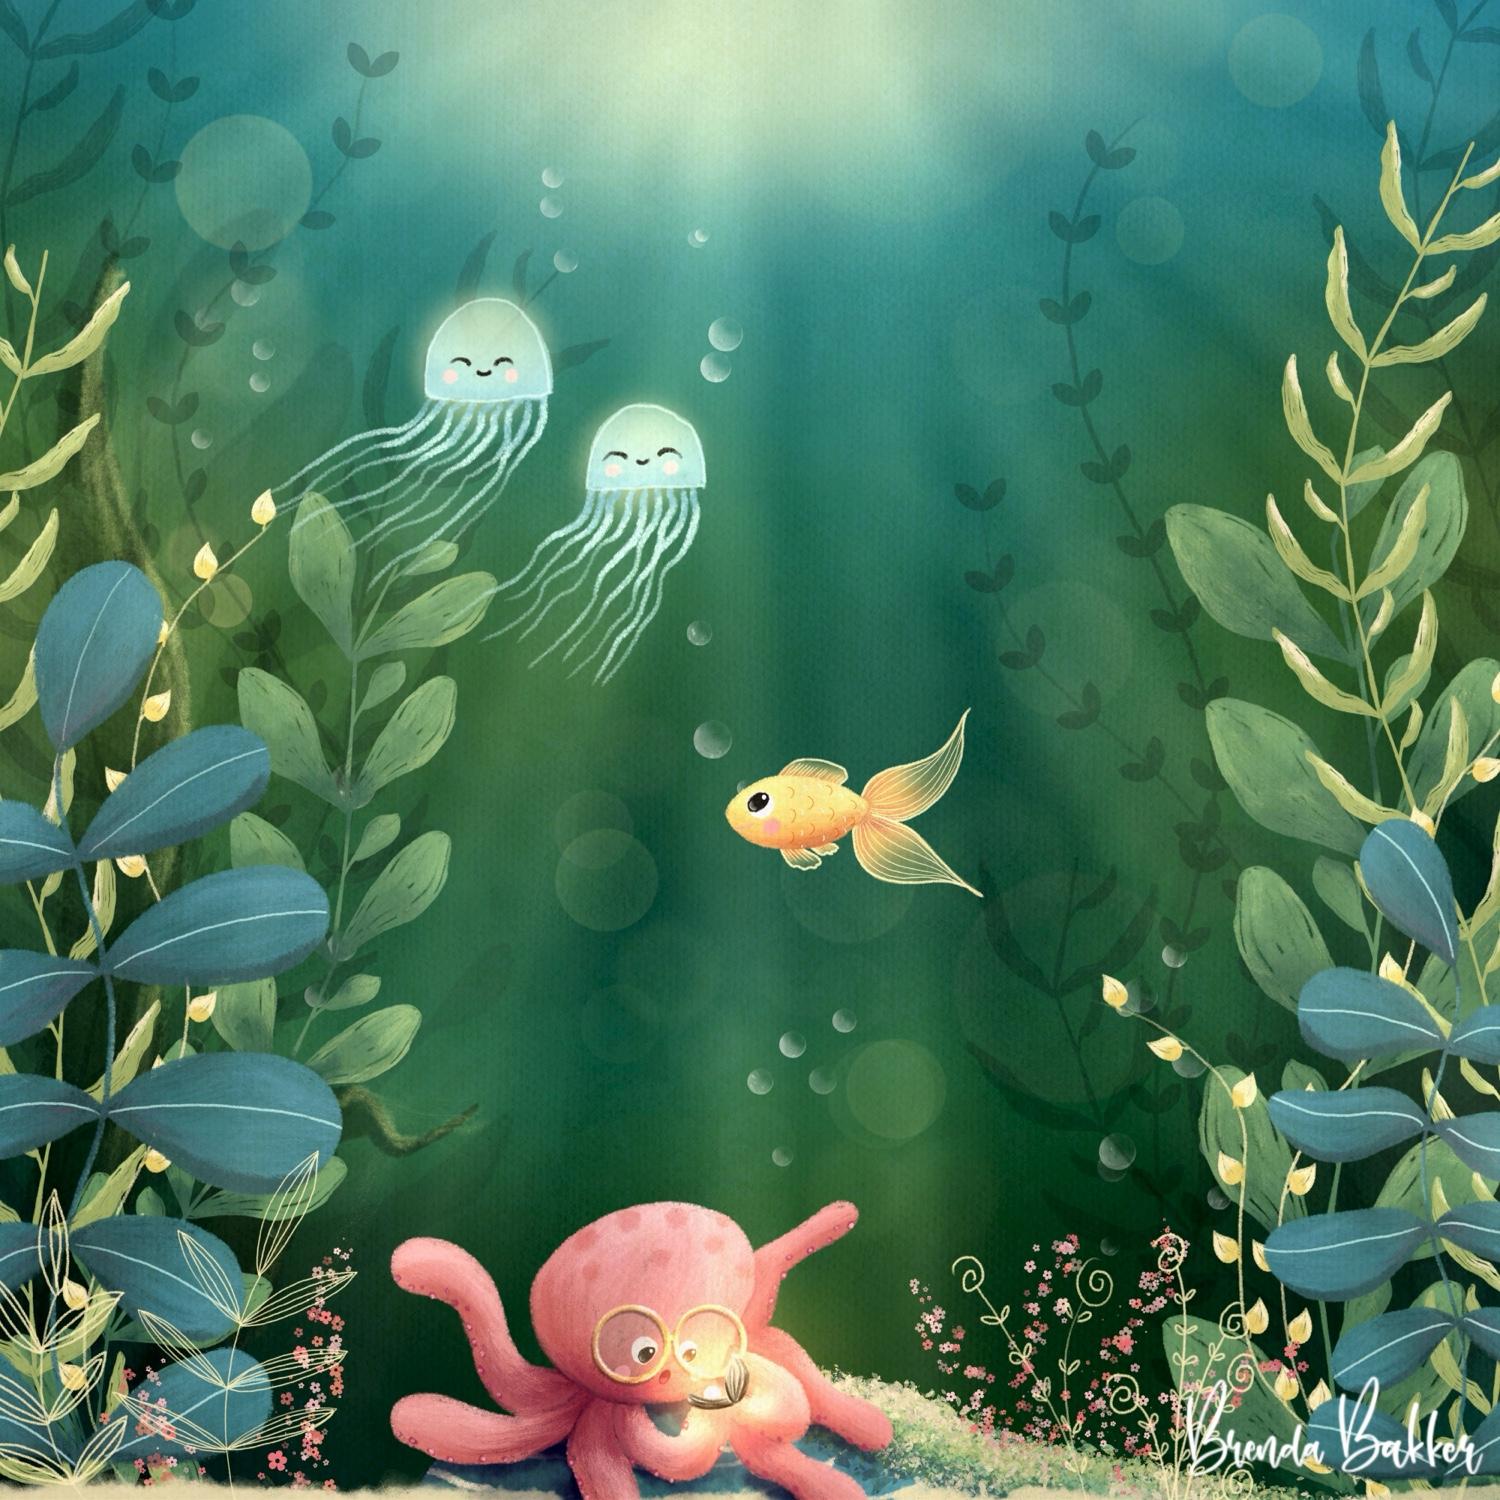
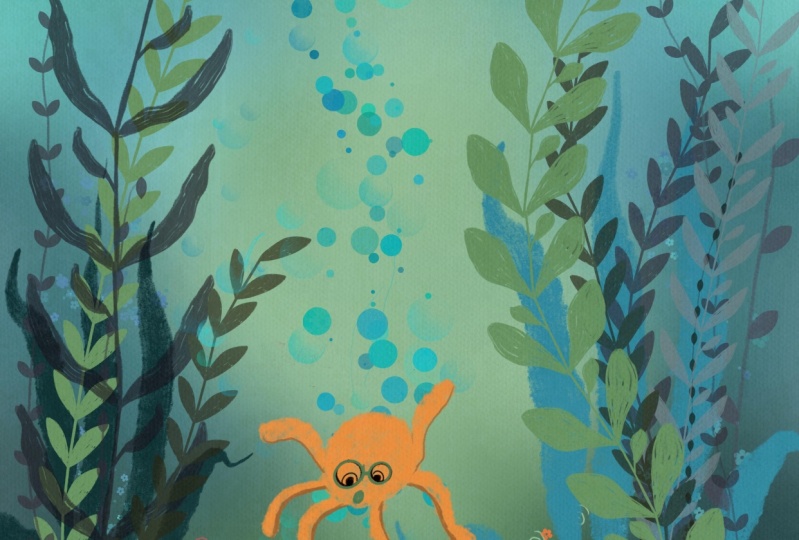
3. Creating the Sketch: I so the first thing we want to do is create a
sketch. So let's start. I know a little bit of
what I'm going to create. So I'll start out with a rock in the middle somewhere
at the sea bottom. It's just a little
bit of a blob. It's just a raw sketch, and we don't have to stick
to that sketch later on, but it's just for our ideas. So I also want to
create some plants. So a little bit of
large ones over here. And we're going to create
a lot of depth with them. So a large one here, let's create something like this here just a little
bit of wobbly lines. Don't make it too flat. They have to have some
movement in them. So that's important to me. And we can draw one plant in front of the other,
so that's okay. I'm also going to create
some lovely plants out here, just some little other leaves. And this is just a raw sketch. So don't get too
sturdy on that one. And maybe we can draw
something around here which has lovely
leaves like this. And, you know, yeah,
it's underwater, but we can make our own imaginary underwater
world from it. So as long as these lines are a little bit wobbly and
a little bit fun to look at, it's just a rough sketch. So create those leaves in
any wave or shape you like. And maybe some plants
in the background somewhere and here in
the background also. But we can come to that later on because we can use
some stems for that. But the one in the front must be clearly visible.
So that's important. I want to create some
fun jellyfish here. These are floating by maybe two. ******* from this way
in and they are funny. So I give them funny, sweet eyes and make
them a little bit like Kawai shape or something like
that to make it more fun. They're instantly happy
faces. So that would be fun. Maybe a fish in here that's coming from
the opposite side. Lovely lovely long tail. And maybe that fish is
looking up to those jellyfish up there,
saying, hello. So maybe for the fun part, I want to create
an octopus here, a little octo maybe I do it on a new layer so I can play a little bit with that. Also for sketching,
I can use new layers because when I don't like
it, well, that's okay. An octopus has eight legs, so we're going to draw it. I want to have the octopus
looking at some pearls. So like, Oh, wow. Look what I found in the sea. So that's what I'm going
to create two arms this way and it's going to
have found some pearls. So and then we can
change six other legs. So well, maybe coming from here. Then we can add some
volume to the legs. And the more thickness
you add to the legs, the more fluffier and the more happier it's going to seem. So that's why I'm creating
lovely white shapes of arms. Legs, arms. Everything
is fine for this one. So she's also very happy
looking at the pearls, so I must face her downwards. Like so give her a face. You instantly see she's looking
downwards by doing this, so let's make it not
too much visible. It's just a sketch. Okay, so
I can draw some yes in here. This one a little bit smaller because it's coming
from the other side. And here are the pearls, so she looking into the pearls. And she's like,
surprisingly, Oh, my gosh. I think
that's wonderful. And, yeah, I give my characters. A lot of my characters,
I give glasses like me, so I mostly draw myself. So if you see a
cute little doll, she has white hair
and glasses also. I don't know how to
connect the glasses, so I just keep the
glasses on here. So maybe I'm going to make
them a little bit bigger. Maybe more obvious.
That's much more fun. So I at these classes. I think that's more fun cute. She also has cute
cheeks, pinkish ones. So I think now our
little sketch is ready. I'm going to erase some stuff because I don't think I
don't need them anymore. So she's wobbly. That's okay. I'm going to
draw everything I cannot see. So I just have the sketch ready with the
lines I don't need. One, two, three, four, five, six, seven,
eight. That's okay. I'm going back to the
layer below that, and I'm going to see what
blend I want in the front, and I want this lovely
shape in the front, so I'm going to erase this one from the back
because it's larger, and I think it will
be still visible if it's all the way in the back. And also, this is still sketch, so I can play with
that along the way, it's just for my visibility. And I'm not going to hold through the sketch because
we have stamps for that. And we're doing that
on different layers, though, that's okay for now. Just for now, I think this is
a fun sketch we can create. And I'm going to create
this to one layer, put it on multiply, and in this case, it's
already on multiply. And then we change the
opacity to slightly visible. So again, this is still my sketch. It's
not my final work. Maybe I decide to do
the fish on bigger or the jellyfish smaller
or another side. So let's go from here. This picture only
exists in my mind. So if you're drawing to, you're perfectly fine with
changing your subject. First, I want to
create the background. I'm going to leave this
illustration on top, so it's always visible for me.
4. Creating the Background: So now our sketch is ready. It's not like we have to
stick to this plan because this plan only exists
in our own minds. Every viewer didn't know what your sketch originally
was until you show them. And now you can see my process, but you can also see, maybe I changed something
along the way. I don't know yet. Let's try. First of all, I'm going to start with creating
the background. And for the background, we can use some colors. I've made a color
palette for you. And here you can
see these colors we can use for the background. And think of the background
as if you're underneath the water and you can look slightly upwards
and far away above, there's the sea level, and you can see some sun
shining through, but there are also plants
everywhere around and so we can see lovely shades
coming through the plants. So there are blue colors. There are green colors.
There are darker colors. And usually, when you're looking up towards the sun
shining through the sea, it's lighter above and a
little bit darker below. So that's what we're
going to create. I mostly create the
backgrounds for these scenes first
because then you can visualize the colors you create for your subjects
in your painting. So let's start out. I've created this
block of nine colors, and those are the colors we
can use for our background. For that, it's very weird, yes, we have a ugly face. We go to the BB
playful texture brush and create a large shape for it, maybe the fourth
stripe, size four. First I'm going to
the bottom texture. We leave that at the bottom, and we create the colors here, so I'm going to use the first color of this block that is
the darkest one here, and we go and create this
in the corners here. Don't overthink it. Just
tap and dap and blob. You can hear me do that
because these are stamps, it's mimicking the colors. That's very
interesting to do so. So in the upper corners, you can use a little
bit of blues. Those are the only ones I
want you to create so far. And then we can fill it in
with whatever color you like. I'm liking to use
the greens a lot. So don't overthink the
use of the colors. And just tap and dap, make sure everything has blocked out the
white in the end. That's okay if you want
to create something, but make sure the white
is no longer visible. I use that one,
right? Well, that's okay. It's okay with me. If it's okay with you,
it's okay with me as well. Might be this color
again here as well. And maybe some blues
at the top again. So now you can see there
is no more white visible. What we're going
to do now is blend all these colors,
but be careful. Don't blend them too much. I want them to be a little bit more visible like the sun is shining through the
leaves and the shadow. So you have light and
darker spots and you can still see some
stains of the colors, but not completely fluid. So we go into the
magic wad brush, go to Goshen blur and slide
it as far as you like. I can slide it all the way, but then all the
colors has faded. I think this is stunning, but it's not exactly what I want. I want them a little bit blobby. I'm looking at the of my
space in front of me. So I think that will
be okay for now. So I'm at 64%, but it's up to you
what you like. Maybe you like it more more
of the colors visible. But yeah, I think 64%
for me will do it. 61, 64. That's okay. We have some shadows in here, and we can play a little bit
with the colors we like. So maybe I'm going to duplicate this one just to keep it safe, and I can play with that one. So I'm going to put this
one off and going to play. Maybe I want them a
little bit more dull. So maybe I put the saturation a little bit downwards. No, it's
not what I want. Maybe a little bit bluish green, green is for me, a
little bit more green. So I think that will be lovely, maybe a little bit darker. No, I think that's okay. So a little bit desaturation, 1% will do it for me. And notice I have
a different color. I see perfectly here than
when I see it on the screen, so it changes the
color for you as well. So create this one
to your own liking. If you're satisfied with
that, congratulations. You have your first
layer finished. Let's get on to the next one.
5. Drawing the Rock: So now I'm going
over to the octopus, the octopus that's
sitting on a rock. So I'm going to create
the rock first. I'm going to create a new layer, and I take the middle
color of these blues. For this one, I'm going
to put off the background because I want to
color it in with the illustrated pencil brush. And sometimes when your
color is dark enough, you can't see through if
you colored everything. So that's why I take the
colors off at this moment, and I'm going to create
this little rock, and I'm going to fill
it in with a color. I'm not going to use
color drops because I like it. I will
zoom in for you. When you have a little
bit of see through from the textures because
I want to have it as an illustrated something. So yeah, I'm going
to color it in, but not everything as
smooth as possible. I don't want to see any white, so don't leave the
gaps too open, but like this, this is fun if you can see a little
bit through here. I will put the
background on again, just for this first
layer so you can see it. And you can see you hardly can't tell sometimes when
your colors are darker, if you can see it
visibly enough. So I'm going to tap for a new layer and I will put
it on the clipping mask. And you can see now it's clipped down here with
this little arrow. And if you don't know
what a clipping mask is, everything I will draw on this layer directly above
this when it's clipped, you can't see anything else. So for instance, if
I take this orange, I can only draw visibly
on the layer below. So that's very easy
and very convenient. The rest is still there, and I can move it if I want. So you can see it will become easy to use and play with it. So it's easy, and you
always draw within the lines when you use a
clipping mask above this. Now, I'm going to
create some shadows. So I've been using
this middle color, so I can use this dark
color for the shadows. Now I will be using that with the illustrated texture brush, and I create some
stripes above here. You can also see
it's hardly visible. For me, it's harder than I see on screen, so
you are safe now. And for the lighter part, I can use some
stripe here as well. I can choose to blend
them with the same brush. By holding it here,
you can see it changes and it takes the
same brush with you. So when I'm on the smudge brush, I have the same brush
here, that's convenient, and I'll go and blend
in just by listening. Tapping and dabbing. So maybe this is just where the sunlight is coming from above a little bit, but the octopus creates
a little shadow, and we're going to
create that afterwards. But so far, I'm fine with this. I'm going to create a new
layer above this, as well. So also with the clipping mask, I will go to this
bright yellow one. And I'm going back to
the Illustrating pencil. Size three, and I'm going
to create thicker, thinner, push, lift, push, lift, push, lift, push, lift. I'm going to create
some stripes like this. So push, lift, push outside
the lines, lift, push, lift. Maybe also one here. So it's visible
through its pause. I think the rock is
ready at this time. So I group them
immediately together. And flip it in, and I will call it the rock. I don't always do that, but for the sake of this tutorial, I would like to try
and keep up with it. So it's easy when I go to create more shadows or
more details to the rock, I can easily go
back to this one.
6. Drawing the Octopus part 1: A So now I'm going over
to draw the octopus. She is sitting on
top of the rock, so I create a new layer on
top of the rock as well. I'm going to draw with my illustrating pencil
because it's opaque one, and I can play with it. And for the colors,
I'll be using a pinkish kind of red
pinkish kind of color. I think this would
be suitable for her. And let's see what it does. I have my size at size
three for the outline, and I'm going to create
some blobby shape. It's not perfect, but I
think it will be fun. So yeah, here I go. I'm going to create
her face first. Now I'm going to color that in. I'll make a bigger size so
I can speed up my tempo. And again, not a color drop
because I want to have that illustrated pencil
look shining through. Then her legs will be coming
from behind the head, so I'm going to create a
layer underneath her head, and I'm going to draw her legs. So on this one and let's get them all
together from behind, so that's okay with me. Free ones from here.
Color them in. And yes, I could separate
these all on different layers, but I'm too lazy for that, and it's not always needed. You just have to be more
careful when drawing later on, but if you want, you can use
different layers as well. Just make sure you colour
them all the way in. Maybe bump up the size a
little bit for the speed. You see, I'm going to create new lines and new
shape, and that's okay. I don't stick to my
sketch for this one because maybe now she
would get any fluffier, so that's fun as well. This one is coming
from behind her. And I have one coming from here. And I have one coming
from here as well. You see, I go outside the lines with my
illustration, but that's fine. Just making it more yeah, interesting to me, so it's
not a complete picture. So that's fine. So we have
created six legs here. This one should be a little bit thicker to the other ones. And now we have the two legs coming from beneath her head, but it's coming
towards her face, and it's not in her face, but it's above this leg. So I'm going to create a
new layer behind her face, but above these legs. So I'm going to create
new ones from here. And if it's hardly visible
for me where I'm going, I can always turn this off and create a new one from here. So it's easier visible for me. And then I can put
them back on again. So, yes, it's
hardly visible now, but you will see what we're
going to create in a moment. We're going to create some
shadows and some highlights. So I'm going to starting
at the bottom, always, and going to the
last part of her, create a new layer and
create a clipping mask. You remember, we only
can draw on this layer. So if we create a
shadow from this leg, which is on this layer, we create a shadow
here, this one automatically will pop up. So we're going to choose a slightly darker
color than this one, going a little bit downwards. It's a little bit darker,
but I'm also moving it to the right because I want to
have more saturation as well. I can use either this
one or this one, and I think I want to have
it playful texture again, so I'm sticking to this one. And I'm going to
create a little bit of darkness at the
bottom of her legs. And you see, I'm lifting it. You can hear it. I'm
lifting it every time. So I get new stripes and
new how do you say it? If I go on and on, it will not pick up new pixels. So I'm using this one to
go over and over again. And here you can see this one is coming from behind her arms, so I can go over this arm, but it's not visible because
this one is on top of it. I call it arms, but
it's still her legs, so sorry for that. And also, she has a
little bit shadow to where this arm is above it. And I can always go
back to these layers. So that's no harm
done if you're not exactly going from the
right spot immediately. Her head is also going
to give some shadow. It's a little bit
visible already. And then I create a new layer on top of this and
also clipping mask. And I'll take the
original color, and I go a little
bit lighter from there to create a little
more fun and depth. And you see, when I lift
it every time again, you can see these
little pencil stripes. So that is what gives it a little bit more
character to my liking, so And maybe I can take these colors in here and maybe I'll sort them a little
bit later for you. I want to remove this one
because it's lighter, and I can go even
darker than this one. So maybe a little bit
darker and a little bit more towards purple to create another let me
check it another layer of intense darkness maybe on
the shadowed layer again. Yes, a little bit where everything is a
little bit darker. And I have to see it when I
turn off the sketch layer. Then it's way more
fun to look at. You can still see this
is a little bit dull. This is a little bit
dull, but this is coming more to life already,
so that's much fun. Maybe now I see there is
a little bit of openness, but maybe that is where
the pearl is coming from. I can always color that in
later when it disturbs me. Let's get on. These are back balls, the first
layer of balls. Let's group them by
sliding them together, group them, so we clean them up. I'm going to rename them by, uh, well, shall we call
them, Background legs? Just to give it a name. And we're going to do
the same to this one. And with a new layer on top, put it to clipping mask, and let's take the
same colors again. So this is the color we used, and here we go and create the shadows coming from
underneath her head. So I'm drawing them inward and underneath his and maybe some underneath where
she's holding the pearls. Good as I can see this also has got to be
a little bit darker because these are from behind. So I'm going to
make it very dark. This is from this leg here, so I can create a little
bit more darkness there. So that's when I go all the way in and out again
of these layers. And I can make some
changes whenever I want. So you do too. So you're just picking my
brain and see how I work here. So I go back to that one again, flip this in and go
back to this one, create A here some
more darkness. More darkness where
the pearls will be the will create more shadow. There will also be
some highlights, so I can create a
new layer on top of that with a lighter color
and also a clipping mask. Don't forget that, and you'll easily see it when
you go the wrong way. See, I draw with the shapes of the legs a
little bit, so that's fun. And I think these are ready. So I will call these her
hands for this group. So it's for me, that's where she's holding something hens. For now, that's okay. And I can always go back
to those layers. So let's get on with a head. Also for this one, a new
layer, a clipping mask. And let's start
with a dark color. Maybe a little bit bigger. And you see I moving with
the shape of our head. I can go to the
highlighted part, and I will go back
and forth with this. So that's okay. Take
the lighter part. And sometimes I move the lighter all the way over the
darker part again. So that's fun. Maybe even a little
bit lighter on top of that again because there will be more light and a little bit darker
from the bottom up. Maybe a little bit darker again. I can play with a little bit of darkness for this as well. And her background
legs to her liking. We can smudge that a little bit. And as long as we move it towards the point it's directing to,
we can play with it. That's the fun part of this
brush as a blender, as well. So you can pop those colors and blend them to
where you like. So as well as her arms. I'll be using this as well. So it's coming more to life
already. So let's check it. When the sketch is off, I often do this because
then I can see more shapes, and I can even go in and
define a little further, maybe with some purple, dark blue, and maybe with
the illustrating pencil. So I can Oh, I have to go to the right. You see here I was
drawing on the arms, so it wasn't visible. So when I go here, I can pop in some extra details
on the legs as well. This one is way in. But
also with this brush, it's a fine blender brush, so You can play
with this, as well. I just so you can give it some slighter bit
of more accent, so I'm going to create this
on this layer as well. Just see where it's coming from. And blend it? Forwards
and backwards. We can blend however we like. And it's just by giving it. Don't go all the way
smoothing back and forth. Stripe it out because that's where the textures come from. And sometimes they mustn't
be very visible just adding some hint of shadow
or tones of stripes. That would be enough sometimes. So I think this will be too hard. Maybe soften it up a little bit. Then I go to her arms, and then I go do this, as well. Blend them in. You can see. I'm I'm I go back and let
us see what you do. So I'm going to blend
this a little bit inward, and then I take it
with me and then I'm going to pull it back again. Look, that's visible for you. And maybe I'm bringing
in too much detail, but, yeah, I want you
to learn as well. And now I go back to the head. Let's get rid of these layers. Fix that. And let's
see that we can bring a little bit more shadow in here with the darker
colors as well. Mm. Blending from outside in, blending from inside out. Yeah, let's keep it striped
and with a lot of textures. So don't smoothen it too much. I think this looks gorgeous. Is it an octopus? I don't think so, but that's
okay with me.
7. Drawing the Octopus part 2: I can also see now I need
some shadow below her. So I go back to the
rock layer and I open it and I go creating a new clipping mask
on top of everything. And maybe I can use this
darker purplish one, maybe a little bit more bluish. And I'm going to create
a little bit shadow underneath this
what I'll be using. It's either this way. These
two brushes are fine. If you use this brush,
just use stamping. I'm not on a clipping mask. You can see that and I
can change it easily, and then you can
see what it does. I immediately gets rid of everything that's
outside of the box. So I can also play with this one as I blender brush by
going back and forth. As long as it's a
little bit darker, hear it tabbing and
dabbing on my screen, not smudging, but
tab and dabbing. And then I can place it
while I'm doing this, so I push it back, bring it towards me,
pushing it back. It's just playing with these. So you can see it
happening in front of you. There's no right or wrong. Just make sure your paws aren't hovering
above the surface, so I think there should be a little bit
rock up here, as well. I can easily fix this because
I'm having a clipping mask. If I push this backward, I can create more
rock behind her. So I'm going to my
magic wand liquefy. And I pushing up the rock
as well a little bit. So I see the clipping mask
wasn't very part of it. Oh, it must be the shadow that
would be on top of there. So I can create a little bit of shadow because it's
all the way here. So it will be dark anyway. But now, you see,
it's not floating from somewhere or
anything like that. So I think this is
fun to look at. Let's get more details on the octopus again.
Let's give her a face. And for a phase, I will go to
a new layer on top of that. Will I be creating
a clipping mask? I can do so. But maybe I will
for the eyes. That's okay. For the eyes, that will be okay. For the glasses, I don't maybe because the glasses are
going outside of her face. So let's keep that in mind. So I'm going to
create the eyes now. I'm having a like
one, very small size. Sorry, this one, the
very small size. And let's get on with the illustration again so I can see what I was looking at. I start with her pupils. And give her a spark in
her eye at the same time. And when I give her
a highlight here, I want to give a small la moon like shape half
circle on this side, and I will blend that
at the same time. So I'm going to stick this
very softly up and down. And when you zoom out, it's it's making her
eyes look glossy and give it a
watery glare in it. So is it glare? Glare glimmer. Shimmer, glimmer? I
don't know. I'm sorry. My English isn't that good, but I hope you understand. So now we have
pupils of her eyes. I want the white of her eyes, but those are behind her pupils. So I create a new layer, and you see when I create a new layer in between
the clipping mask, it automatically has
a clipping mask. I go to the white, maybe
one size bigger size two, and I can create a
little shape outside. Oh. I know I want a little bit
of white visible here. Yeah, maybe that's
funny to do so. Yeah, I think that's funny. Also on the same layer, I would draw her
mouth. What color? I think maybe like some of the purplish darkest color here. I'll get it in here as well. I have not decided yet
if I want to make her smile or surprised or
something like that. So maybe for now, she will be surprised,
maybe she's smiling and happy
with it later on. Maybe I can draw a little bit
of light in her open mouth. So it instantly gives her
more depth, so that's fun. And I want her to have
some lovely rosy cheeks, but what color
should I do for her? Maybe some lighter color. I don't know yet, so I created a new layer so I
can play with that. Maybe here. Maybe I get them some more pinkish. Let me see. I can play with these saturation a little bit maybe darker. No, that's not funny. This
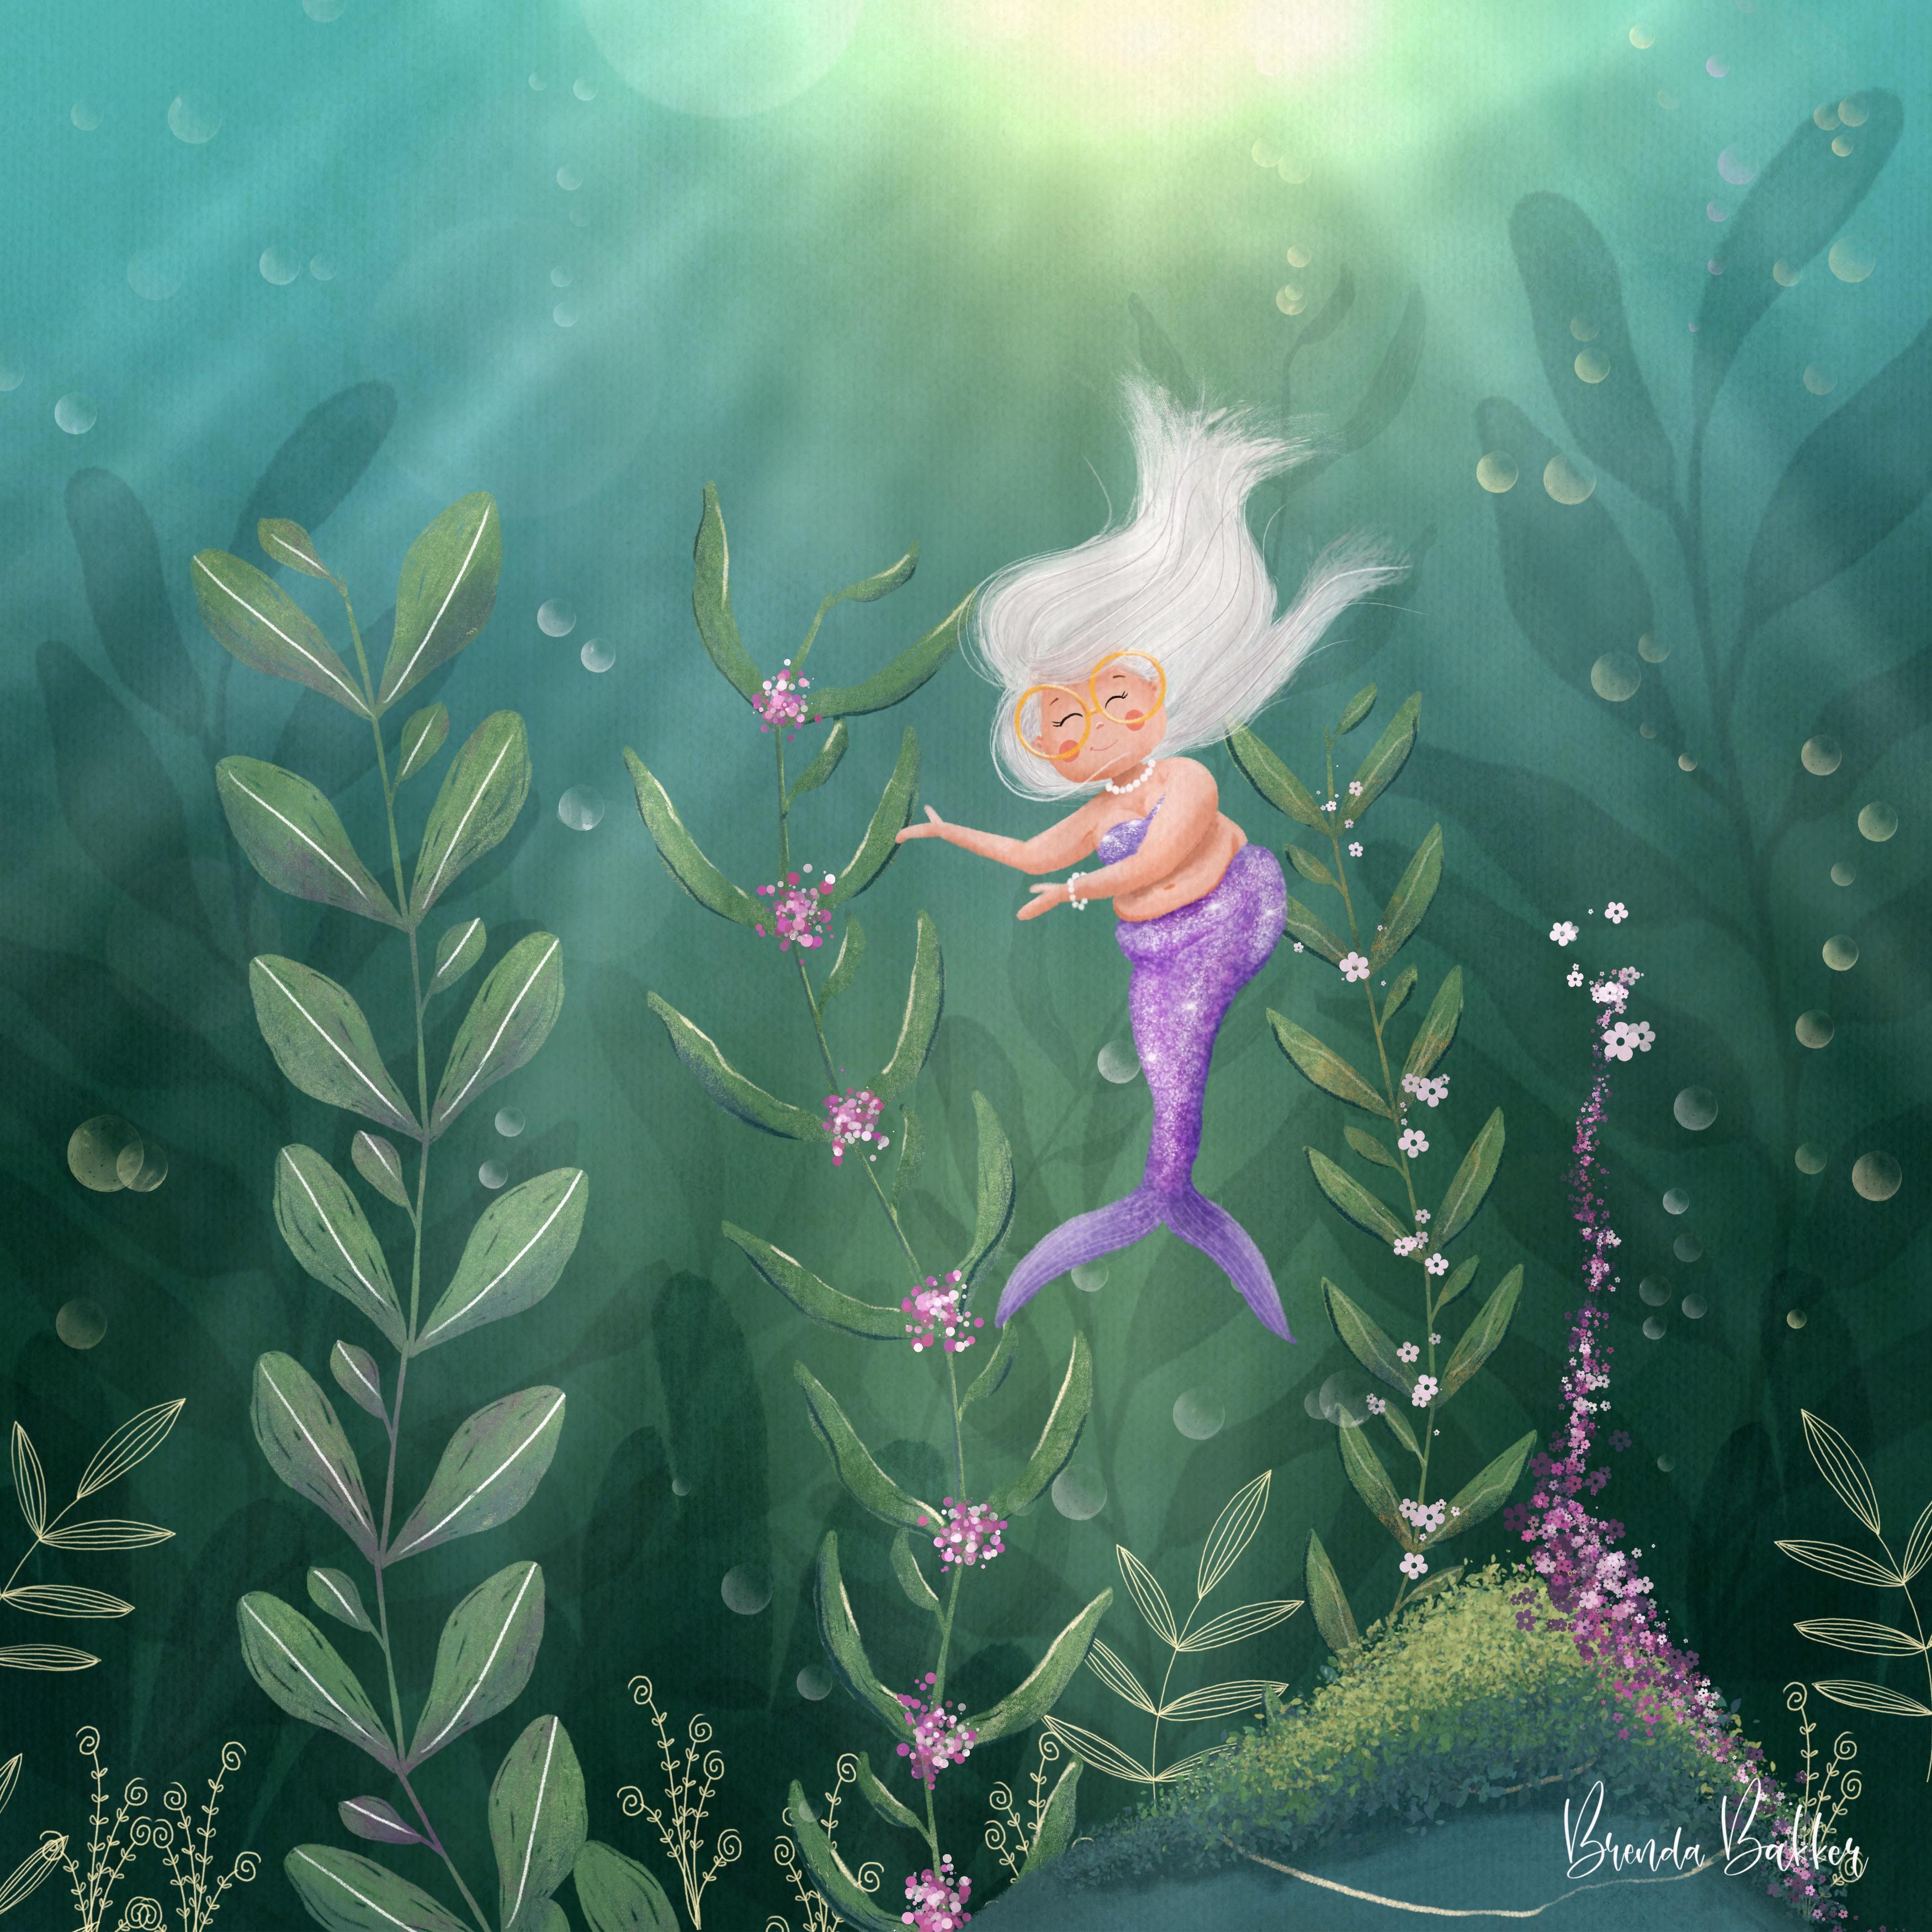
will be lovely, I think. Yeah, this will be cute. And on top of that, we can create glasses. Now, for me, I used to
wear black glasses. The frame of my
glasses were black. Now I have some rose gold, so now everything I draw has rose golden
glasses, as well. So let's see if we
can create that. It's a little bit of golden and yellow and rose in between. So let's first go to a new
layer, create a circle. Hold it, and then tap. Then you have a perfect circle. I want to move it a little bit, so create a little bit bigger. Move it a little bit
to the side here. I'm going to create
another one bi duplicate, so I have the same circle. I'm going to create
it here as well. And maybe I want to get this
one because it's a little bit more to the background
a little smaller, maybe a little bit to this way. Maybe a little bit upwards also. I think it's I think
it's funny when the glasses are a little
bit outside the head. I like that a lot.
Making this one a little bit bigger again. So I can always
change that later, so I will create a bridge
between those two. And I'm going now, I'm going to do blend these
together by punching them. Go back, punching them together, and now I'm going to use the
alpha lock because, yeah, I want to play with this with the rose and the pink
and something like that. So let's create a little bit. Pink shimmer. Maybe I'll turn them
to black anyway, because there is a lot of
pinkish going on in here. But yeah, we can
always play with that. Maybe some orange colors
just to your liking, right? We can play with a lot of
colors within here and always end up with a lighter
one at the outside. Just go over it a little bit, so you can see all
colors in here, but make sure the outside lines and there where it catches the light are
a little bit lighter. And also a fun thing to
do is create another one, like so, duplicate,
swipe to the left, duplicate, and change
this into black. Fill layer. So you have
the background that is, I will put off the illustration. Now you can see you have more defined because this
is an open texture, but you can also move it
a little bit downwards. So there will be a shadow of the glasses. I
want to say brill. In the Netherlands,
we call it Bill, but it's glasses in English and maybe turn down
the opacity a little bit. And also I want it on multiply. So it blends in with
everything behind it. So this is what you can
play with to give it more defined structure
of the glasses. So I think this will be fun. If you want to have it
more like real glasses, you can see a little
bit darkness on here. So maybe we can play
with that as well. And for that, we must
color within the glasses, but I don't want to have
it on the same layer. So what am I going to
do with an easy step? For now, I'm going to
take these classes. Take this as a reference. So everything I draw on another
layer will refer to that. So I can easily give it
a color drop within now. And the easy part is, it's on a It's on another layer, but it's still using these
lines as a reference. Immediately, now taking this off because if you forget that and you want to color
drop something else, it will be referring
to this, as well. And if you don't put
them off immediately, you have to search for Where
is my reference layer? Why is it wrong? So I will explain that you
have to do it right away. And now I can play a little bit with your
opacity and you can see now it is more of glasses
because it's just not a color, so just a little bit different. You can also make it darker. So, for instance, if you want to use a brownish color because, yeah, why not wear sunglasses
underneath the water? You can change that a little
bit. Maybe this is fun, too. Maybe I'll leave it
like this. I don't know yet. I can play with it. I have enough layers, and if
I don't have enough layers, well, that will be fun. I think she needs some, how do you call it?
We say Such Nap. Sucking some things where
she can stick everything on it underneath her paws. Will I do it on the same layer? I think I can get away with doing it on
top of everything. So let's get if let's get to see if it
will work out fine. It's just creating as I go now
here, so that will be fun. Maybe a little bit
darker as well. So we take the darker part. Just some fun dots
at the bottom side. Just here and there, we don't
have to use much of these. Just a hint. That's the fun part with imaginary creatures, and to give it a
slighter look as well, we zoom in and create
maybe a lighter.in there. That's fun. Maybe
this is too light. Maybe I go a little
bit back in here, but not too much.
It's light enough. Just a little bit of
visibility in there. And because it's on
a different layer, I can always play. M. I think she's cute now. This is fun. And now I
have to create a shell. Shell will be a little
bit beige, yellow. I can create a little bit. Like, so on a new layer
on top of her hands on top of everything
of the octopus, I'm going to create a new layer, and I have to get my
illustration back again. And this is why I have
to draw everything. Again, like so, create a
little bit of darkness, maybe a little bit more brownish for the shadow part of this one. Maybe some stripes. I can play with this. Get rid of my illustration
because it's annoying me. It's just a hint.
It doesn't have to be perfect all the way. Maybe I'm giving it a little
bit more of a shell shape. Smaller size. It doesn't
have to be precise. It's just a hint.
I'll be darker again. Okay, and now the fun
part, the pearl gets in. And I want to create a very whitish yellow
one, bright color. And I'm going to draw this behind the oyster because
it's coming from inside, and I want to draw a huge one. So now I don't have to be careful too much about this one. And I'm going to play a little
bit with lightning on it, so I'm going to go wider. On top. I'm also
going to play again. I duplicate it, and I'm going
to play with another tool, which is called bloom. And you can see now we
have a sliding bar. You can see it's a little
bit glowing even more. And I'm going to another layer below that, creating
a new layer. Put that layer on Ed. Go to the bright orange
with the soft brush, and I'm going to
create a little glare. So it immediately gives some light to this
illustration already. So I think our octopus and her bright pearls are
ready at this moment. And let's crop the
whole octopus. Everything has to do
with your octopus, even with the hands,
background legs, and group these again as well. So we now have the
whole octopus group. Here. Maybe I want the shadow
placed in this as well, because when I want to get
rid of the octopus and I want to um I want to draw
something else on it, I have to change the
shadows as well. So I'm moving that all
also in this group. So I will call this
the octopus. October. I can say this one
is finished now. See, now the shadow
is also gone, and I can create
something else if I want. I have to remove this
because now it's no longer clipped to the rock. Oh, sorry. For that one, so I have to
erase that one manually. Here we go. And put
these layers together. If you don't have as
much layers as I have, you can always if you're satisfied with your
octopus, at this moment, you can always pinch
every layer together or just these groups
within the groups, you can put them together, but I have enough layers, so that's fine for me. Let's get on to
the next chapter.
8. Drawing the first plants by hand: Let's go back to the
plants in the background. So you hear me say the
plants in the background. So we go back to the background and create a new
layer above that. I will again, choose
this middle one, and here we have fun
brushes I created for you. We are going to draw
one plant together because I want you to
hand draw as well, and then we go and make some changes with
some other plants, but I want you to draw
them as well yourself. So I'm going to
create a new layer. Yes, I already have a new layer, and let's get back to the
Illustrating pencil size three, and let's create this
one here at the front. And it's just a simple
stroke and you see, I'm not perfectly
going over my sketch, so that's fine and create
round leaves for that. Play with these as well. And now you can color them in. So bump up the size a little
bit, stay within the lines. Maybe this is too
big. Don't making such a mess or fuss about
it, so that's okay. I just want them to be illustrated so they don't
have to be perfect. And I want that great
pencil texture there. Swapped to the eraser brush. I wanted a brush to draw with. And also, if you're having a hard time to keep it visible, just put off the
background so you can look if you have
too much open gap. A little bit, I don't mind. That's because it's
handraw and that's okay, but too much isn't okay. So maybe this is the
best way to draw. Color them in quickly, and you can see I'm not doing everything precise,
but that's okay. Just keep it loose and like an illustration for
children's book or something. And if you're
finished with that, we can tick on and giving turning on the
background again. So now for this one, I want to create a
new layer on top. So that's how easy this is. I can do this with
a brush as well, and we're going to
do that later on. So creating a clipping
mask for this one, using the darker colors, and I will be using this brush again because I
like the strokes of this one. And I'm going to blend
from inward out and you see immediately it gives a lot of texture because of
the stripes of this one. And we can create with a
lot of different colors. You can use any color you like. You can also use the greens. You can use some red or some
pinkish in these colors. It's all to your
own imagination. But you hear me
tapping and dabbing. So I create new strokes. If I going back and forth, I don't get the texture. I want that fun. I want to scratch them off like a lucifer stroke or hair strokes just because then
it will be even. And if you're
having a hard time, just follow the strokes and
turn your page a little bit. And maybe some darker color to the lower parts of
the leaves as well. Then I'll be jumping in with some lighter parts from
the outside, inwards. And you can see I'm going over these as well, slightly softer. So they mix and blend colors and they layer
also the colors. So a little bit on this side because they are
a little bit off the page. And maybe I'll be getting more even of a darker, purplish. This, maybe this one, a little bit will be fun. Let me see if I can like that. A little bit as well? Oh,
yes, I think it's wonderful. And it's also good for getting those colors a little bit back and forward in
the illustration. So use those colors a little bit everywhere so they
can blend in as well. Yes, maybe soften it a little bit with the
same brush as well, going back and forward
with these colors. Also, keeping those
pencil strokes alive, maybe here's too much of the
purplish, pinkish color. So here you have one plant
already drawn for yourself, maybe a little bit on the
stems as well here and there, just where the leaves come
together and a little bit below the leaves because
there will be some shadow, but not forgetting when it's too dark, it
won't be visible. So then you take a
little bit of light within the pencil
a little bit here. So it's visible again. Maybe blend it a little
bit to soften it. Just give it a little bit
more life and fun within it. So maybe like this one, again, sometimes also fun to create a little
shadow light to give the leave some thickness
at the bottom side. Again, it's all to
your own imagination. You can draw them
anyway you like. I mostly do this also
with eucalyptus plant, but they are not on the water, so that's why I'm keeping
in blue and not green. Otherwise, it will be too
much of a eucalyptus. Maybe here it's again it's
fading against the background, so maybe I'm taking a
little bit darker here. So it will be visible. Maybe it's too hard now, so I'm going to blend
it a little bit again. I think this one looks
wonderful as it is. So I'm not going to do a
lot of things to this one. So now we hand drawn one and we can make it easy
with using our stamps. Again, we're going to
draw behind the octopus. This one is you can group it, but if you don't have a
group, you can layer it. You can also easily simply
duplicate this one. When I do one, let me see. Flip it. Move it. I have two, but it
obviously mirror image now, so you can play with the
size, make it smaller. So you have instantly filled
up your page already. And if you see I think
this is not bothering me, but if you think
it's too bothering, you can also play with your liquefy and then
play a little bit with the leaves to make it less of a copy of the
other part to run. I think it's cute here,
so I leave it there. I think it's fun.
Also, the colors are coming together like this. Maybe I will change the background later.
I don't know yet. But I just want to show
you some other stuff. I can pinch these two together
so I can save layers.
9. Creating more plants by using stamps and specialty brushes: I want to make some lovely
plants in the background. So I create a new
layer below that, but on top of the background. And I'm going to the dark one
of this, maybe even darker. I don't know yet. And I'm going to use some
steps for that. So I've created a lot of fun. I like this one a lot. So I can create a new one, move it a little bit
downwards, make it bigger. Put it a little bit
out of the scene. And now it's too much here. So I want to create
a multiplied layer. It's darker, but now I can
play with the opacity to make it much further away
in the background. And you can see light
coming through. So that's an easy way to
use stamps like these. And you can create another
one with this one. This is small, make
it bigger, too big. Just play with it as you like. So this will be also
in the background. Maybe I will do this on
a new layer so I can play with the opacity later on or move something else or create other
colors with it. But you make it bigger. So here, just keep
a hint of these. Let me see what I'm doing because otherwise
I can't see it. Make it a little bit here. We can now already see there
seeing come into life. And that's what I like
with these plant stems. So we're going to use even more. I'm going more towards
the foreground. We also have brushes here. And these will do exactly
the same as this, but maybe now a green one. So let's get it here. How big is it? I want to be on top
of the background. Or these will be
in the foreground. Yeah, I want to be on top
of the shadow plants. You see? These are
the shadow pants. Maybe I can group them, make these shadow plants. So I know these are
in the background, and these are in the foreground, so I'm going between them, and I'm going to
create a fun brush. So maybe here somewhere too. Maybe a smaller one. It's coming from here. And these have a
stick to the end, so I can erase
that a little bit. So it ends with the leaf. And you can see, I gave these stem some
pencil scratches as well. So they will be easily
like a pencil look, but you can also see it's coming into more
depth right now. I'm going to play with
some colors on this one. And let me see. I can
use this one for that. That's okay. Maybe I can. Oh, this is a little
bit too light. And I have to go on a
clipping mask for this one, create a new clipping mask
above that, tap on it. Maybe I will play with
these colors as well. I've been using this
color. I'm going slightly lighter and blend
in some colors. You can see it's very easily, very quick fix for this one. And again, if you're
having trouble seeing it, get rid of your background, so you can see every leaf. Also, the little ones
we mustn't forget. And yes, deers are behind the plant on the
foreground, but that's okay. Using a darker green, even darker than this one, maybe a little bit more bluish. So we can play with
these colors as well. But sometimes you have to check back on how you are
with your background. So that's very important. Dap and dap every
here and there. We'll be using that
same colors with this one as well on this side, so giving the top
color some highlights, the top of the leaves
some highlights. And some darkness to
the bottom parts. Don't make it too
hard on yourself. Just play with the colors, then. Give them some playful stuff. Check it with the
background again. Yes. But I think these aren't popping up
like I want them to. So I'm going to blend
these a little bit, maybe with the same brush. By holding it, it will
have the same brush so I can play a little bit
with blending the leaves. And I think they could pop up a little bit
more with lightning, so I create another layer on top with a clipping
mask as well. Choosing a lighter color, maybe I get some
outlines for that one. Will it be using I don't know. Let me see. For me, it's also playing
with these colors like maybe a little bit
lighter, even more. Yeah, for me, this
lighter green works, but it all depends on
your background color. And that's why we
have duplicated one, and we can play with it again in the end if you want to
make things more visible. It's more important you give your leaves a little
bit more defined outlines. So make sure they are visible. And if they are not visible, you can always also create
more darkness behind it, so they will pop out more. But first of all, let me see we can play with this as well. Maybe if we pop a little
bit more dark behind it, like, for instance, this darker one
and creates well, with this one in the back they can come from anywhere. It's just to our
own imagination. Make it and multiply and lose
the opacity a little bit. Like so. And you know, the ones that are darker and
more saturated by color, there are more to
the foreground and the ones that fade away
are into the background. So that's fun to know. So we go to the
shadow plants again, maybe create a darker
green one here. Maybe we can check on let
me see this one as well. You see it's between days. We can play with
that one, as well. Obzits maybe a
little bit bigger. So you can play with these
as long as you like. And You can play with it yourself a little bit, so you don't always have
to follow what's there. So you can create
to your own liking. That's fine. I want to
add some fun parts. Maybe I want to play
with the background. Mm let me see what I've now. Maybe I want a
little bit darkness here at the background. So I'm going to this
part above this one, create a new layer, maybe with a soft brush on this bluish one. Maybe just a little dash, creating some bluish
darkness again. Maybe put it on overlay or
multiply to blend more in. I think that would be nice, yes. I also want to have it in the foreground some
lovely doodle plants. You can easily draw
them yourself. I will do the yellow one, not on the overlay layer. It will be in the foreground, so I have to be
all the way here. It makes it more fun and smooth. So I've got some stems here. That would be fun. Maybe a little bit higher,
so like these. And you can easily
draw these yourselves. I will do them for you.
Like on a small size, you can draw some strings
easily, very easily. So these are fun to
create yourselves, but I also has step for these. So You can create
to your liking, and these are made
just like this one, and create one,
two, three, four. Just leave the pencil on
stage one, two, three, four. One, two, three, four. So you can play along and
create your own doodle plans. And yeah, I just created
the stemp for it, so it's very quick illustrated. And it easily pops
up and give it so much more fun and brightness
to your illustration. I also have this one, like, on top of the rock, like we made some leaves. So I want to keep the rock
a little bit visible, but also want to
show you the leaves. I've created some
illustrated fooliage and it's also when you see it
with a lot of texture, I drew it with my pencil and then created a
brush out of it. And let's create some
fun leaves from here. So it's a little bit like so. And then we can
take some greenery. Like it's growing at the bottom. You always start with
the darker one first and then build up to lighter colors. And even lighter on top. So that's instant fun. And we can create a new
layer on top of that, and we can easily
fix it with flowers. So let's go back to this one, maybe a little bit more color. You can create that as well. So like, there are
some flowers in there. I wouldn't work as an eraser
brush, maybe smaller. So these are more like flowers
here. A little lighter. And I don't know why,
but there can be flowers underneath
the surface, right? It's our imaginary
friendly zone, so I think that would
be fun as well, and maybe some from here again. And the lighter color. It will bring in some
color and some funness, and, yeah, I like that. So I want to give it some
friends at the at the top, like we did those jellyfish.
10. Drawing cute Jellyfish: And then now I want to
go to the jellyfish. You can see out there. They are very light and see through. So I'm starting
with a blue color, and I will check if my
illustrating pencil will work. I will do it with
number two here. And let's create a little
bit on a new layer. I have to be on a new
layer behind the octopus, yeah. On a new layer. I'm going to create a little
bit of this jellyfish here. I'm going to create
here another one. So not exactly the same
size, but that's okay. And I want to color them in. So I'm making a
little slide a pier. It just easily half circles,
little bit elongated. Like a mushroom kind
of childish mushroom. You see, again, I don't use my color drop here because,
yeah, I don't like that. I want to be hand drawn
with a lot of character. So that's what I'm doing here. And from there on, I will do a new layer on top of this one, and I'll be doing
that with a reason. I'm going to a little bit
lighter version of this one, so a little bit lighter. I'm going to do the
outline of this, but a little smaller,
maybe with this one. Yeah. I'm going back
to the layer below, and I'm going to
the blue one again. Maybe a little bit bigger now. Do I want the bigger size? Size three? Yes, I
want size three. And I push further and loosen the strings when I
go outside, so push, lift lift, push, lift, lift, just like we did with
rock, push, lift, lift, push, lift, lift. Lift Push, lift,
lift, push, lift, lift, push, lift, push, lift, lift, push, lift, lift. I say that to myself in my
head because otherwise, I keep forgetting
that, so push, lift, lift, push, lift, lift, lift, push, lift, lift, push,
lift, lift, lift. Yeah. So I'm going to a layer above this,
create a new layer. Go to put this on
the clipping mask. I will take a darker
color from this one, and I will be giving
it some color again. Just below the
jellyfish, a little bit. So it will give it
some kind of shadow. And I will do this with
the fish itself, as well. Maybe a little bit more bigger. Et's get rid of
the illustration. Let me see what we've got here. I think they look cute. But jellyfish are normally
a little bit see through, so we can play along with that. And for that, we're going
back to this layer. I'm going to erase, but I'm going to erase with
a soft brush very slightly, very small, maybe change the opacity so I can kind of erase a lot at the same time. So I'm going to slightly, maybe a little bit bigger. Wait, wait, wait. Am
I on the right brush? Yes. I want bigger. I did the wrong one. Bigger. The fun part is when you have the jellyfish in
front of a plant, you can get to see through
the plant as well. And that's why we needed to
outline on another layer. Maybe it's too hard now. I can always change the
opacity a little bit, so I think this
would suit him fine. So there are a little
bit see through, and I can blend these
colors a little bit. So I go back to the
layer for this blending. What's brush am I on? I want to go to my
illustrating pencil because it's small and
I put it up inside, so I can blend it very softly. Almost no touching. Very softly. I can blend this a little bit, so you can still see
the color changes. You can still see the see
throughness of the jellyfish, and now it's time to give them their Kawai looking like faces. So on top of that, I will create with maybe
a black one, yeah. Let's get the
illustration on again. Oh, there kiss. This
is so much fun. This accidentally happened, so it's push a harder
one and lift it. So let me see. I have to write pencil for this. Push and lift. But that's thinking,
Oh, yeah, maybe. Yeah, maybe a little bit
smaller. Take it one side. So push and lift it a
little bit towards the end, so push and lift
and push and lift. So it's a friendly
face, so that's fun. And this is the mouth
will be Big all the way. So push and lift, push and lift, and
for the mouth. It's bigger all the way. And I think this one
is too soft here. Just to out every
once in a while. So yeah, they'll be friendly. Give it some cheeks, oh, that can be done on
the same layer with this pinkish guy,
maybe soft ones. Cute. Get rid of my illustration
to see how it looks. Oh, I think these are
cute, cute, cute. Cute. Yeah. I'm
satisfied through now. And maybe we had a fish
somewhere, a colorful fish. Yes, I want that one to
be a yellow, orange fish. So I'll go back to
my layer three. But first, let we um get this foiliage
together as a group. Foilage. I hope I did
it well like this, so I can mix it. These are the jelly fish, this one, this one, this one, and this one, group them
together, rename jelly. So we can move on to the fish, and we'll be doing that
in the next chapter.
11. Drawing a sweet Fish: So in this next chapter, we will be drawing the fish. I go to the middle
one of this yellow, and I'm taking the size three
of my illustrated pencil, and I'm going to draw
the outline of the fish. Maybe it's a little bit too big. Go to size two. And I'm going to fill this in on a new layer,
I'm going to draw the fins of the fish
with the size two again. And I'm bringing that layer back to below the
body of the fish. And why it's because
we never get a sharp edge here as I want. So if it comes from behind, it's much better visible. So it will have a fin up back one below the belly
on this side of the fish, and one a little bit smaller that comes
from behind the fish. And we also have the tail part. And we color that in as well. Let's get back to the
body of the fish. I want to create
highlights and shadows. So again, we going to create a new layer on top,
create a clipping mask, and we go to the darker
color underneath the belly, and we're going to create this
illustrated texture brush, and we're drawing
some smooth lines. Just back and forward, lift
your pencil every time. We'll be doing the same on the top part with
the lighter color. But just keep on bringing
that pencil up and down. And then when I zoom in, mix and blend those colors a bit because it would give much more pleasure to the drawing for
the illustration, and maybe a little bit darker
towards more of the bottom. Maybe a little bit of that pinkish also in
there towards the back. Then we'll bring some
color back again. Just a little hint
of that color. And we're going to
do the same with the with the tail and
the fins of the fish. So create a new layer on top of that one with a clipping mask. And we going to use very small? With the orange one, we draw some stripes outside the fins. Make it darker coming from
behind. And that's what I see. It comes from behind the
fish, so that's okay. I'm going to get rid of
the illustration for you, so it's easier visible. So that's what I meant when
you're coming from behind, it doesn't show too much if you don't have very neat lines. Maybe also a little bit
of the darker one again. And we'll be doing the same
with the tail as well. And take those lines with
the shape of the fin. That's very important
for this one. Taking this bigger
one, darker one. And the lighter color and
draw it back inwards. You can see those colors
blending in smoothly, and you can see the lines
drawing in smoothly, just as if you're
doing hundreds and layers of pencil strokes. And when you use
them out, you have a lovely color blending
fish, so that's fun. What we're going to do
now is only on this tail, we're going to
merge these layers together by smudging
them, pinching them. So these colors are
on the same layer. You leave this one as they are. But this is important for the next step we're
going to do later on. So create this one
as a pinch layer, create a new layer on top. Don't clip it, but we'll be using a lighter
color, this one. And we'll be using the illustrating pencil
at the smallest size, size one, and we're going to
draw the outline of the fin. And maybe I'm making it
a little bit smaller, but I think this would be
fun to keep it like this. Maybe a little bit wavy line, so like this, make it as
smooth line as possible. So we're going to create maybe even smaller
lines within that. So drop it halfway. Let me see. Drop it halfway here size one. And just go back and forward
with the shape of its tail. We'll be doing this
on this way as well. I think we have a lovely
fish in the sea right now. And what are we
going to do next? And this is why we had to do what we did by
keeping this together, is we're going to softly erase this with the soft
brush, small size, maybe a little bit
less opaque and just get rid of a little
bit of the color. Just make it see through and
just as a smooth blending. And there you can see that the stripes we did later
on will be visible. Still, so you have
a see through of the shoes fins, tail fins. Maybe a little bit smaller. And the reason why I did
it with less opacity is we can make a yeah,
very more precise. Otherwise, we would have
erased it all the way through. So now we have a little
bit of see through fins, and we can see that
if we clip the fish, make the fish to all of the
fish of one group again. We now move the group.
You want to keep the fish in front or
between something, you can see it's see through. And that's why the
group is very handy. We can make some changes of where the fish
is coming from. Maybe I want to keep her
here or I don't know. I don't know where she
came from originally. Ah, a little bit off here. So yeah, we can play with
that or can duplicate one and make something or something
go out of the area. She needs still have a
lovely face, as well. So I'm going to create yes. Within this group, we're
staying with white.in her face. Let me check where I created. Eyes. Make them big again. And the fish is looking
upwards to the jellyfish. I create a new layer on
top of that and create a circle within that. The reason I did it on
top is that I can make changes if I'm not happy or satisfied or I
want to look it down. I can still change
that a little bit, give it a little glare in the eyes and reminder
of this glare, I want to have the
glare at the same side. So I'm going back to
my smaller brush. Plant this in a little bit. So it's just glossy again. Yep, she can have
a little mouth. And she's smiling. And maybe some little
rosy cheeks, as well. And then easily
create fun like this. A bit random. Don't
think of it too much. Maybe go on multiply, so it darkens also
at the bottom. And create a new layer on top of that because I want to
do also some white, but white doesn't
stick on multiply, so I have to do it on
a new layer as well. I think this is a cute fish. So this is mostly the
illustration so far. We have to play with some
lightning, have some bubbles. You can illustrate
much more if you want. If you want to create some
other creatures. That's fun. Fine by me, as well. So I'm
going back to the background.
12. Add Magic and Final Touches: So now I want to
create some bubbles, and I want to create
some sunlight, and we'll be doing that
all the way at the back. So this overlay layer was also for darker
parts of this one. So I'm going right above that. I'm going to use the
bouquet lights on yellow. The bouche light is the
brush from Procreate itself. Let me see what it does and just slightly drop in some bubbles, make it bigger, smaller,
whatever you like. I think it's less visible
here than it is on camera. So I'm going to create a
little less like I want to. So I think for the
screen, this is fine now. And I also have a bubblish brush created
for you, fun bubbles. I will create that with
white on a new layer. And I'm going to there
where the plants are, I'm going to create some
fun bubbles as well. So just play with that. And if you don't like it,
it's also fine. See for yourself what you like. And now for the final part, the last ray of sun
through the waters, I will going to
create something. I want to get rid
of the drawing, the illustration,
the sketch we made. And I'm going to create
another ray of light, and I'm going to
all the way on top, and I'm going to choose this What kind of
color would I like? I think I'm going to keep
with this lightish yellow. I'm going to the
illustrated texture brush. We're now going to
create an ugly face, a very ugly ugly face, so, Okay. But we have to do
this step by step. So on this layer, we're putting it to d and I'm going to create this
brush and make it very big. And I'll be drawing some rays of sun going from the
middle outwards. And yes, this looking very ugly. And I do soft stripes, but I want you that you
see the stripes from this. This is very ugly, right? So let's keep that in mind. We'll be doing this
with different steps. Don't go with me as
we are doing this. Just look for yourself
first, and then do this. I'm going to use
Gachenblur very slightly. Magic one Guhenblur, and I'm
moving slowly to the right. But you see, I want
it softened and smoothened but I still want to see the stripes.
I don't want this. I still want to see the stripes. And the point I like
the stripes is where they just get fuzzy
enough, still visible. But yeah, I know they are way too bright now, but that's okay. The fun part is, it's also catching the lights
on the plants, and that's why I do this on top. Yeah, so it's very light now, but it's okay because we can always make it
soften right here. So there you have
your ray of sun, and it's still visible on the leaves and through the
plants and everywhere. And I think I want to have
a glow more on this pearl, so I go back to my octopus. Yes, here it is. And I want
to give this more shimmer. Maybe I can duplicate it. Yeah, and then go one lower
and then maybe bigger. Let me see what that does. Okay. Maybe a little bit. Less. But I wanted to pop it
the light of the pearl. Maybe I can get it
a little bit darker around here and a little
bit lighter up here. So I go back to the background. Let's bring it back. And maybe add some darkness again with overlay or multiply. It's also fun. Multiplies
even a little bit darker. Maybe I will do this with
the soft brush again. So you can see it slightly changes creates a very
different effect. I'm going to create a lighter
also maybe at the bottom, at the top, a little bit from where
the sun is coming from. Maybe this could be
a little less Yeah, I think it's funny
like it is now, maybe some green here, a little bit more greenish. You can play with
this as you like. These are just small details. And we can even create
go back to this plant. I like to go back to this one. Yeah, that's these and I'm going to create a new
clipping mask on top of that, and let's see what this does. Maybe I don't like
it. That's okay. Maybe I don't like it.
But let me check first. I want to bring in some white because I think
it's very dull now, so I have to bring in some more lightning,
lighter stuff in there. Yes, I think it immediately
gives something extras. You see, without the
white and with the white. So always add some white in your painting to
cheer everything up. I think here can be a
little bit of sand. I think I would love that. Sandy color, little
bit beige color. And let's play with this brush, and it will be in front
of all the leaves. So I think also in front of the foilage That's just a
little bit of a rocky bottom. Just a little bit. I think she's funny. And maybe she can have some little dots under
her head as well. So let me check if I can
do that. That will be fun. Maybe also on an ad
layer. Let me see. We just check and
creating some fun here. Or screen is also a fun one. Let me see what that does. Illustration, brush.
Let me check. Maybe. Slightly. No, it isn't fun. It isn't it is nice. Maybe darker would
be nice. Let me see. Uh, go to normal, change color, like,
into this one. Select fill layer. So you can play with
this however you like, maybe multiply. Yeah. This will be fun. Yeah, I think she would
be cuter like this, so you can make any
change you like. So explore a little bit. You can create more
plants in the background, so go back to the background. Um Shadow plants. And what plants
do we have still? Oh, we have such fun plants
here, like these are fun. All the way to the top edge. Multiply, bring them back. And it's also fun to create this at the foreground
a little bit. Well, maybe between
the plants like here. With the yellow ones. But this a little bit too small, but you can see where
I'm coming from, maybe a little bit
behind the first ones, so a little bit bigger. So you can play and have
some fun with these. And again, you can
make some shadows. You can do anything
you like with this. So go to a little bit darker
color on a clipping mask. Maybe orange. It could also be fun.
Then we will bring back some orange like clipping
mask I was doing. Maybe go back to this orange. Not too much this one. Just to give it a little
bit of color difference. We can bring in some
green ones as well. What kind of green would
be lovely for this one? Ah, we haven't
done this one yet. Oh, yeah, we have done it, but in the background. Create a clipping
mask on that one. Just a hint of stripe
on the top one. Maybe a little lighter. Just play with these
colors and let it pop. You can go in as deep as
you want with this one. Maybe we can give
a little bit of glow behind the jellyfish. Let me see. This is Octo. Where is the fish? The jellyfish, go layer
behind the jellyfish and create with lights
and soft brush, a little bit of kind
of a halo behind them. So they're all lightened. This one is a little
bit too big, I think. It was a fun idea to let
them glow a little bit. Maybe a little less. Yeah,
I think I I'm ready. Maybe this is a little
bit too dark now. I can play with that.
I can play with that. Bring back this opacity. The overlay layer. And this a little
bit back. Yeah. I think we have a lovely
illustration now.
13. ss underwater final thoughts: Thank you for watching this
class until the very end. I hope you have a lot of fun while learning a
lot of new things. You can get the best out of this class when you draw
a new scene yourself, create to your own liking, discover and design
your own creatures. Don't forget to post
your end result in the project and resources
section of this class. For me and for everyone else to see what you
made out of this class. Also, if you're on Instagram, I would love to see you work. Tag me as **** Webble
and maybe you will see your class project
reposted in my stories. I would also like to ask you to post a review
of this class. It would help me
and other students to know how you feel
about this class. So thanks again for watching this class
until the very end, and I hope to see you
in the next class. Hi.
 Brenda Bakker, Sharing my skills is sharing my joy