Transcripts
1. What you will learn in this course: Hello and welcome. If you're watching this, you probably like to draw color with colored pencils and
are looking to learn or improve your colored
pencil technique. Whatever your
artistic journey is. I'm glad you're here
because that means that you willing to take your skin tone coloring to the next level. So why her skin tone
so fascinating, difficult, and important in art? Well, it's all about
the faces, isn't it? Research shows us that
human beings respond to human faces way stronger and more positively
than to anything else, followed only by dogs,
cats, and sunsets. That means that
using portraits in your art, whether
you're drawing, painting, or coloring, will make your work more likely to
be noticed and admired. But just portraits
aren't enough. They have to be beautifully
and professionally executed. Now, this is not a
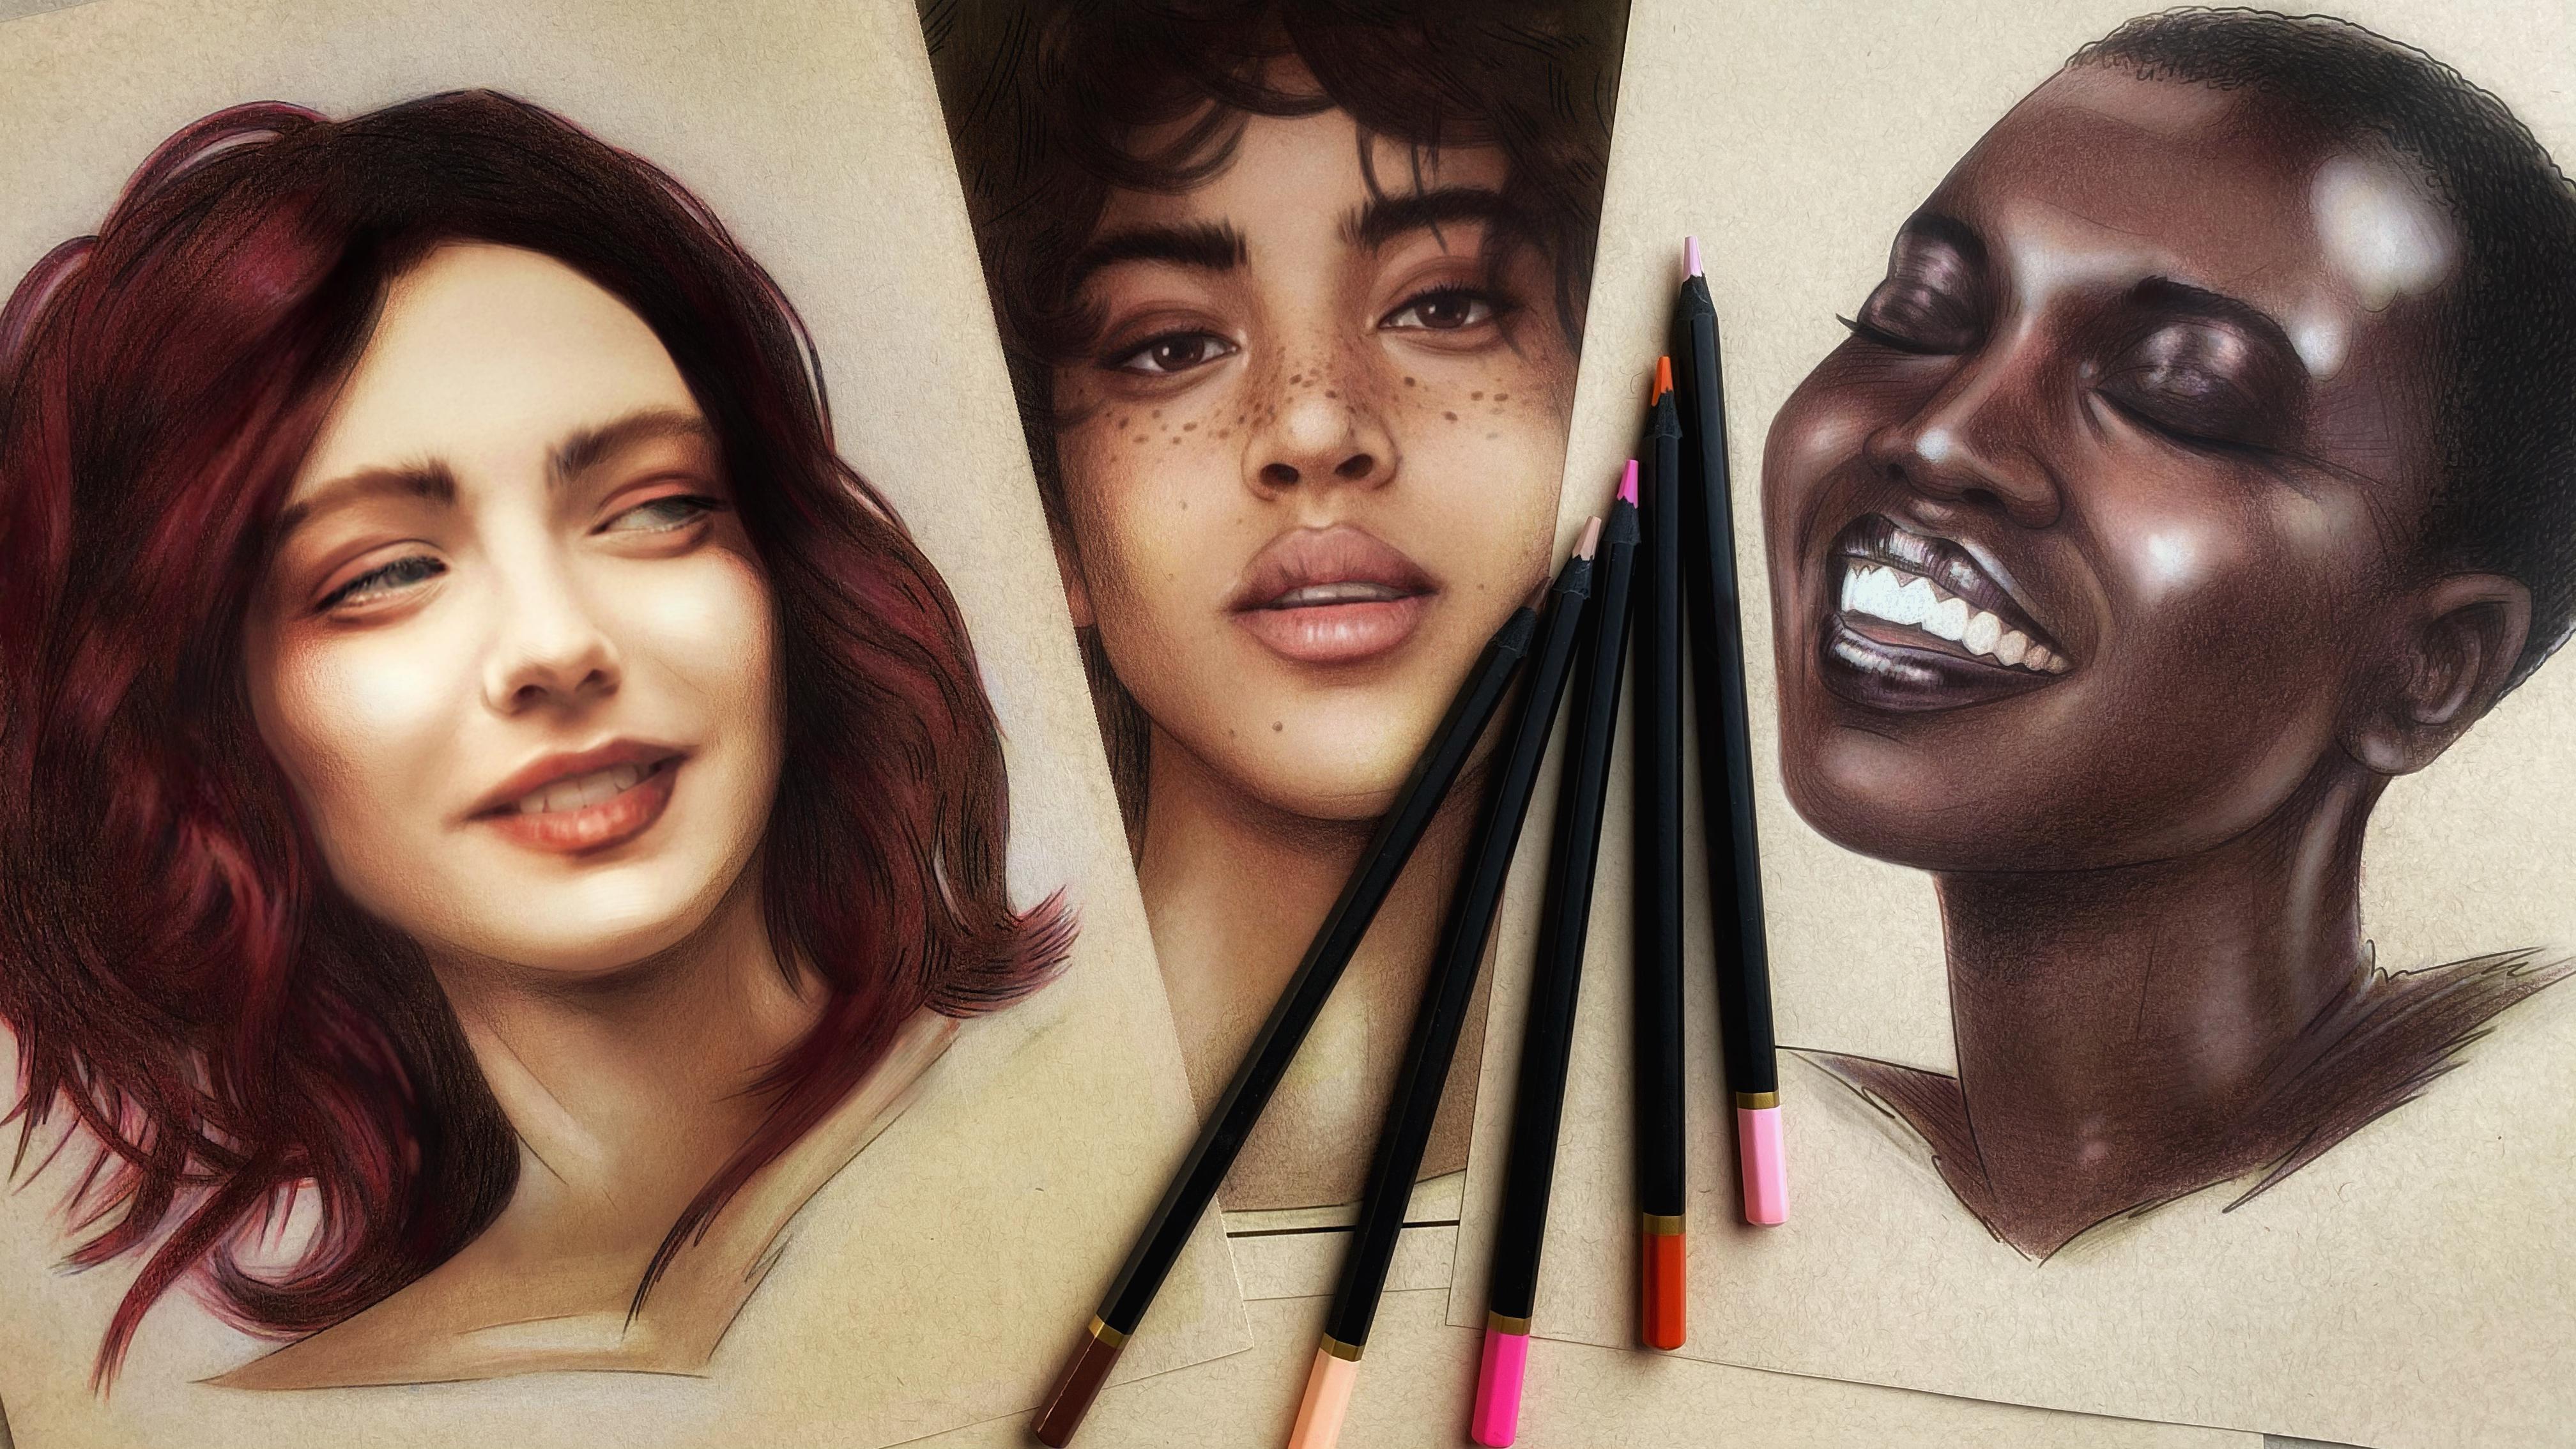
portrait drawing class. We won't be learning proportions and sketching and angles here. That's a totally separate topic. Here we will focus on skin only. So in order to jump straight
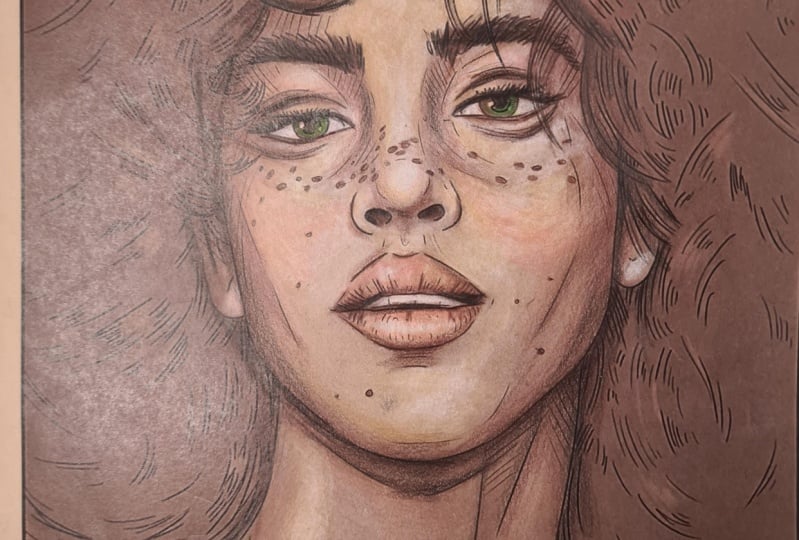
into skin tone coloring, I've created three
digital oil paintings for us to use as
reference images. If you're an accomplished
Illustrator already, you may wish to copy these
characters or draw your own. But if you're a colorist or just wished to skip the
sketching or drawing step. I've also made each one
of these models into a grayscale coloring page and
into a sepia coloring page. So you have plenty of
options to work with. Personally, I will be working on the sepia pages printed
on tantamount paper. And I will take you on a
step-by-step journey from just a line drawing to a complete color portrait
done in pencils. I will teach you my color
selection strategies. Introduce you to some
fun new colors that you may not have ever
thought of using on skin tones teach you different shading techniques
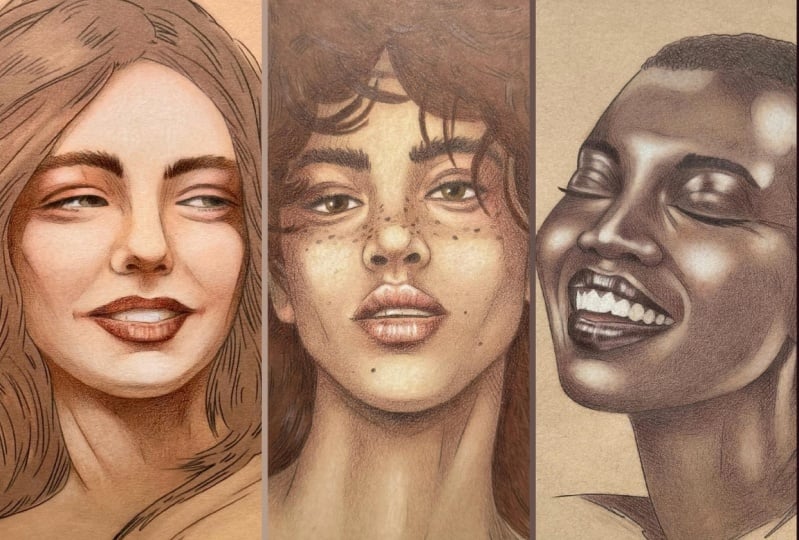
and much, much more. We will start with
a pale skin tone, move on to olive skin, and finish the course with the most challenging one of
all, the dark skin tone. I strategically chose
this order based on what I've learned from my color
and community over the years. So please follow the
lessons in order. So when you're ready,
I'll see you in class.
2. White charcoal (pale skin): So the first thing that
we will do is we'll prime this page with
white charcoal, but not the entire page, just the parts that matter. Let me show you white charcoal. White charcoal is amazing. This is my favorite tool to work with when I
work with pencils. I never ever do a pencil coloring or a pencil drawing without
using the stuff, especially when I'm
working on tantoned paper. White charcoal is not
like regular charcoal. In fact, it's not
charcoal at all. It's synthetic, and it's
mostly chalk and pigment. It has nothing to
do with charcoal, nor does it behave
like charcoal. It's not powdery at
all, it's not smudgy. I tend to use the sticks
rather than the pencils, and you can see that
they're not leaving any pigment on my
skin whatsoever. In a minute, you will see
how it behaves on paper. The way that I sharpen this
stuff, it is very simple. Most pencil sharpeners will fit this type of a
stick perfectly, so you can just run it
through a pencil sharpener. Or what I've been
doing lately is I've been using a razor blade
to sharpen my tip. That way I actually collect
a lot of the pigment that I can later use with a Q tip
for additional shading. I use it just the way that
I would use a pencil, and I shade with it with the
side of this triangle tip. Try not to hold your
pencil vertically. That's a general
rule in shading. Don't hold your tool 90
degrees against the paper. Try to make the angle as flat as possible so that you're coloring with the side, not with a tip. In that way you get
smoother application of pigment that
works for any tool. And I'm working in little
circles technique. Once you get to know me
better as an instructor, you'll see that I do mix and match my various
shading techniques. Depending on the situation. I never really speak 100% against something
or for something. There's a time and a place
for everything here. We want very smooth application. We want to gently apply as much of this white
charcoal as possible, but we don't want these
stroke effects on the page. This isn't a rough sketch. This is actually part
of our coloring to assure that it's not random sketch marks
all over the place. I am using circular motions to apply this white charcoal onto the lightest
parts of my drawing. How am I deciding where to
place it In Very basic terms. For those of you
who are colorists, I'm applying it to the parts that don't have
any gray shading. That's as simple as it gets. And that's certainly
an easy rule to follow for any type of
gray scale coloring. However, if you are more interested in drawing
and painting, and perhaps coloring pages that are not
necessarily gray scale, that only have line work, then knowing where to place these white highlights
is very important. Where I'm placing them is exactly where the
light is falling. We're not going
to concentrate on any unusual or dramatic
lighting in this course. We'll just do basic, very flattering, very soft,
traditional daylight. There won't be any
dramatic shadows, there won't be any
trick of the light. The light is probably
shining from above and onto her cheek bones, more or less from
the front of her. These are the parts of her face that will be lit the most. And I'm applying more
of my white pigment there when from scratch, and I'm working with a
black and white charcoal. This is how I approach
my drawing as well. I will make a sketch
of the face with all the features with
light black charcoal. And then I will apply all the white pigments
with my white charcoal. And only then will I go back to create the shadows
with more black. The strategy is the same. If you are a person who draws,
you know all about this. Don't worry about this looking a little bit
stark right now. I know she looks like she has
way too much sunblock on. That's not the look that
she will end up with, but it is important
for us to prime almost the entire face
with this white charcoal. We can leave the parts that are heavily shaded on the side here, but most of the rest of
the face should have it. Now notice that I'm not just
coloring the whole face in white from one
part of the face going all the way
to the other side. That is not the idea. We don't want a flat
white background here. I'm actually building it up to make the face
look three dimensional. You see here I
worked on the cheek. I'm adding more of the white
pigment to the center of the cheek and diffusing
the white outward. Same here on the
tip of the nose. Same here on this cheek. Already, this is
looking more three dimensional than she was
without the white charcoal. Keep that in mind as well. We're building a three
dimensional character, not just the caricature. We're going for realism here. Remember, ultimately,
we want this to look like the digital oil
painting that I made. Don't rush this part,
take your time. Don't worry about all
the little artifacts that you're seeing
on the paper by. Zoom this in a little
bit, you can see. That the texture of
the paper is now very clearly visible because of the white charcoal pigment
that I'm applying. Be patient, a trick is coming to clean that
up a little bit. But for now, what
we need to do is to concentrate on applying just enough of this white pigment. It's extremely important to
do this part right now and to do it correctly because once we start applying
colored pencils, we won't be able to add white
charcoal to them anymore. White charcoal will only
go onto a clean page. You can't apply it
over colored pencils. Watch this video several times. Watch my hand movements. Watch the decisions
that I'm making on where to place these
white charcoal effects. Also, you have a PDF download. Don't sweat it too much, if you mess it up, print
another one, Try it again. That's the beauty of
having PDF downloads. You can try the same
effect 1 million times. Okay, that looks great. That's as much pigment
as you want on the face. Now for the magic trick now, what I like to do is I
like to take a Q tip, just a regular Q tip, and smooth out this
white pigment. Again, working in circles. I like to work
from the center of the light area and
out to the edges. I'm barely applying
any pressure. You don't want to grind
this into your page? Just lightly stroke the
surface of the page in circular motions and it rubs the pigment into the
page very nicely, creating this diffused effect. And also notice that all
the little artifacts of the paper are suddenly gone. We don't have that scratchy, whitewashed wood look
on her face anymore. It's now smooth and it already looks like the
beginnings of a painting. Don't worry about
going over the lines. In fact, we want that. We're just applying this diffused white powder
all over her face. The reason we use tantone
paper is because it already establishes
the midtone for us. All we have to do now is add the lighter areas and the darker shadows,
plus the pigments. The tone is already there. It saves us a lot of time and
it introduces an element of unity to the whole image if
you want to do it my way. Tantone paper, white charcoal,
and colored pencils. Let's take another close
look at how this came out. What we did here is we printed our sepia page on tantone paper. We used our white charcoal to gently apply a lot of pigment. The lightest part of the face, the lightest part of the
face were of course, suggested by the gray
scale picture itself. We decided that this is
basic diffused daylight. We only added the white charcoal to the front of our face. No dramatic shadows. We do want the relief
effect on the face. For it to look
three dimensional, we did have to have
gradient variation. It's very pale,
it's very subtle. But there is gradient
variation on this face. To further smooth
out this effect, we used the Q tip. Go ahead and give this a shot. Print your page, grab
your white charcoal, apply it to the face. Use the Q tip to smudge it, and we'll continue together
when you're ready.
3. Colored pencils (pale skin): I never believed
in skin tone sets. As a lifelong artist, I know how to create skin tones. I know that you can
possibly put all of the skin tones in every single possible
scenario into a single box. First of all, there's an unlimited number of
skin tones on the planet. It's not just the gradient
of six skin tones, the 12th skin tones
or 100 skin tones. Every single person has
a slightly different, very specific and
unique skin tone. Now take that and
consider lighting. Every single person is viewed in and photographed and in very,
very specific lighting. So you can't even reproduce that when we draw
and paint portraits. Lighting is the single
most important thing. You can have a very pale
person completely backlit, and then you have to
use the browns and blacks and deep purples
to create that skin tone. You can have a very dark
skinned person completely overexposed and lit with
his dramatic lighting. And then you have to use pure
white and pink and blue and green even you can have neon
light and it goes on and on. You get the idea, it's madness. So literally every
single color in every single pencils that is
needed to create skin tones. I heard about skin tone pencils. I thought it was just a gimmick. Just another way to make money, sell you something
but you don't need. But when I got to know black widow pencils and I
personally know the man who, who created the brand. I am not sponsored by
black widows by the way, nor will I encourage you to buy black widows if wax
pencils and not for you. Don't worry about it. You use any other
pencil that you like. But I didn't want
to share my story about how I was proven wrong, about my disbelief in skin tones when I receive
these from Black Widow. And I opened the boxes, I was very surprised to find a whole bunch
of different pinks, some yellows, some
greenish tones, gray tones, black,
brown, purple. All colors that I as a professional artists use
and creating portraits. And these are very small sets. These are just 12 pencils sets. They have such incredible
unusual colors that are more than enough to
create amazing portraits. There are other skin
tones sets out there. I'm not familiar with
every single brand, so I won't tell you that this is the best choice on the planet. But for me, these are
extraordinary pencils. I don't use them
just for skin tones. I use them for a whole bunch
of other paintings as well. But having said that, even though this says light-skinned tones and this is dark skin tones,
make no mistake. There's no way that you can
take a box that just says light skin tones and create a light-skinned tones
person portrait. It's impossible. You will need the darker
shades for the shadows. You will need your purples
and your blues and greens and a whole range of other colors to create a
professional portrait, especially if you start
playing with lighting. So please do not buy into the idea that this one said is enough to create
light skin tones. Likewise, dark skin tones. There's definitely not
enough colors here to create a dark skin
tone person portrait. You will need other colors, again, depending on the lighting
that you're working in. The way that I like to work with this particular set combination
is I like to use both of them on any kind of skin tones
plus additional pencils. So we will also be working
with a whole bunch of other sets of black widows
to add additional colors. For instance, I
have pure red and some other browns that
I have set on the side.
4. First color (pale skin): Alright, now we have the
white charcoal part all done. Let's move on to color. Would I like to do when
I select my college, is I like to have a
piece of scrap paper. And then I actually just take the pencil
that looks good to me. And I tested on paper and
I see if it is in fact, what I'm looking for. I will test a couple of these. I've decided. Just start with this. This is a color
called Olive brown. Again, to bring that point
across one more time, this is from the
dark skin tone set. Just because it's
called dark skin tone doesn't mean that we're working with
the dark skin tone. With this olive brown, we will start suggesting the first shadows
and you'll already have some of these suggestions
with my gray lines. Notice how far back
I'm holding my pencil. It's even further
than halfway back. There are several
reasons for that. The main reason is pressure. You don't want to apply too
much pressure to your page. You want to gently
glide on the surface. We definitely don't want to destroy the
tooth of the paper. The tooth is the
texture of the paper. When we talk about 80 pound
paper or 90 pound paper, we were talking about
how textured it is. It says 80 pound paper, so it has a nice texture to it. You can feel it on the
surface with your finger, can run your fingernail
over it and you can kind of feel that it's
a little bit textured. It's not crazy rich
like watercolor paper, but there's definitely
texture and we certainly saw it when we applied
our white charcoal. And we've got that kind of faded beechwood effect
before we used our Q-tip. That's texture. The texture of the paper is very important and very desirable. So when I see colorist on YouTube of preached
that you need to press really hard into the paper and
flattened the twos. I cringe because it's
a big no-no in art, you really don't
want to do that. You don't want to flatten
the juice of your paper. If you don't like the
tooth of your paper, don't use paper that's that TC, find something that's
smoother and work with that. But it's important to use
your tools correctly. If your paper has a
certain amount of tooth, work with it, don't destroy it. When we flatten the tooth
of the paper where actually preventing ourselves from
adding more layers of pigment. Another thing that I hear
a lot from my colorists, from all colorists is I've applied to many layers of pigment and I can't add anymore. I've added three
layers of pigment and my paper can't take anymore. I'm going to tell you
right now this should never happen if you've applied for layers of
pigment to your page and your pH can't take anymore. You're doing something wrong. Unless it's really crappy. Printer paper, like really, really crappy, that
should not happen. Professional art paper can take dozens of layers of
colored pencil pigment. And that's exactly what we're going to do with
these portraits. But the trick to being able
to apply all those layers of pigment is applying
correct pressure. So we don't want to press
on the page at all. We want to glide on the
surface of the page. No smashing of the tooth, no grinding the pigment
and we're just gliding. And one of the main
ways that we can ensure that we're not squishing the paper and adding too much pressure is by
holding the pencil correctly. The further back you
hold the pencil, the more difficult
it is to apply any kind of a pressure
with the tip of it. A lot of people tend
to hold their pencil too close to the tip the
way that they hold a pen. And the closer to
the tip you hold it, the easier it is to press onto the page you don't want
that, that's, that's bad. That's bad. For your paper. It's a bad habit to get in the habit of holding
your pencil correctly, hold it far back, and just get in the
habit of gently, gently stroking the
page and moving faster than perhaps you used to. That cheating is an
excellent technique. I use it all the time. Notice that again, I'm not just coloring from left to right
or from right to left. I'm not just doing the
outline of the face first, are working only
on the eye first, I'm jumping around this page. It may seem counter-intuitive. You may not know where to
begin. Where do I store it? I often get asked, do I start with the eyes, do I start with the nose? Notice that I'm
literally working on the beach at the same time, which seems almost impossible. But look how fast this is coming together and how am I
making these decisions? I'm making them on the spot by evaluating the entire face. I'm looking at the
parts that need to be a little bit better tinted. I'm adding my tenth. They're very fast on the
spot decision-making. And of course you have your
reference picture to work from getting the habit
of working faster. You want to apply this shadows as quickly as possible
without rushing it. You definitely don't want
to make a mess of things. Certainly, if you need to
spend more time on it, please spend as much time is
needed for you personally. I don't want to preach brushing, but I do want to preach, finding a golden balance
for your technique. When I teach my
private students, I talk about balance a lot. Everything in art
is about balance. It's like you're
on a tight rope. You need to know what
your personal balance is. Working too slow can prevent you from creating
certain amazing effects. Working too fast can lead
you into making a mess. You need to find that balance. That's a perfect balance
between your main tool, your hands, the little
muscles in your hand, what's comfortable for you? What's comfortable
for your shoulder, your posture, your
actual physical setup. These are all
things that I can't control because they
are specific to you. So it will only
demonstrate how I work. You can take those
lessons and apply them to your specific situation. You want to pick your
color, your first color, and you want to apply it gently
to all of these shadows. And you want to diffuse it with the white charcoal that
we've already established. Now, how did I pick this color? The reason that I chose
this particular colors because I want it to go with something that's very close to the color of my paper. So a tan color. I wanted it to be a little bit on the yellowish side because I imagined that this
character is lit by sunlight, so I want my skin
tone to be very warm. I'm going for a natural
golden sunlight on very pale skin. So this kind of a yellowish, mustard ocher color
is what I chose. And again, the name of this particular pencil
is olive brown. From the skin to onset from the dark skin tone set
in the Black Widow line. I don't usually look at names. I don't have little charts. I don't actually keep my pencils in the boxes
that they belong to. I open these brand new
boxes for the sake of the course because they look so attractive when
they're brand new. But in reality, I just have all of my pencils and
all of my brands just dumped into a single
box and all mixed together. I don't look at neither brand
names nor pencil names. When I pick a color, I just dig into my box and
I get a handful of pencils that more or less match the final
outcome that I want. And I test them on the paper
just like I showed you. If I like the color than I set
it aside and I go with it, I usually pre-select about eight to 12
colors for a portrait. And I work with that. And sometimes I don't
use all of them, but it's nice to have options. So notice here that I've added quite a bit of this
pigment to my shadows, but I'm also coloring over the white that
we've established. Again, using my
shading technique, holding my pencil
really far back, just shaking the
pencil very lightly. You can practice doing it over the page without touching it. And then lowering the
pencil to the page and see at what point it starts applying enough pigment to
the page that it looks good. And at this point, I'm coloring over everything that's white. But again, I was
building it up from the shadows towards the center. Not just left to right, flatly coloring the entire face because it's not a
mask, it's a face. It's three-dimensional,
it has relief. We definitely want to bring that out on the lips and
the eyebrows as well. Even though we'll be adding
other colors in the end. But we want this undertone to be universal for the
entire portrait. And I'm not going to bother
with the neck so much. Mostly we'll concentrate
on the face. But I do want to establish
this nice shadow under the chin to keep the whole
thing looking realistic. Notice also that I'm constantly changing the direction
of my strokes. I'm not just sitting in one position and
coloring that way. A lot of colorings that I see clearly have the sketch
marks in the same direction, which sometimes is acute effect. But ideally you want
to get away from that. You want this to look
as smooth as possible. Because once again,
we're going for a more painting style effect. So why did we prime the
whole thing with white? If now we're coloring
over it, you may ask. And furthermore, we're
coloring over it with a color that's almost identical
to our background color. Well, that's the trick. Almost identical, not identical to make this face look
three-dimensional and not flat, we want all of these very
subtle color variation. And because this is
a very pale skin, as we decided in the
beginning, it would be, we want the strongest
purest saturation of our very pale colors to come out on this page
That's a little bit dark. We can go into lighter
than the color of the page unless we
actually lighten the page. But we also want to keep all of the beautiful mid tones that we have on the background and the
hair and then the shadows. So to preserve all that, we chose the tantalum paper that we later primed with white. That's just a stronger
effect for those, for those lighter
highlights on the face. For the three-dimensional look, most people tend to be
a little bit timid when it comes to skin tone coloring,
especially colorists. That's one of the reasons
why we started with the light skin tone
first is because that's, that's already the tendency. So we'll build on top of that. Well, we'll take that timidity
and we'll work with it, but will also work
through it together. So notice that I'm adding a
little bit more pigment to this area right here
because I imagine there's a little bit of a shadow
caused by the hair, again changing the direction of my strokes so that I don't
have the visible lines. And don't worry if you don't add enough of this
pigment right now, we can always come back
and add a little bit more. That looks very nice
because these were wax pencils and because the first pigment is on
top of white charcoal, I'll Q-tip will work here again. So once again, I
will take a Q-tip, the clean side of it, not the one we used on
the white charcoal. And it will smooth out the pencil pigment that
I've applied as well. Now this is a very
subtle effect. It's not as obvious as it
was with white charcoal, but it makes enough
of a difference. This is looking very smooth. We don't have any sharp edges on our gradients, on our colors. Still a Cepheids
sketch of a face, but the Cepheids sketch is now starting to look a
little bit more human, a little bit more
three-dimensional. So go ahead and
give this a shot. Choose your color. I would go for a beige or
a mustard, a light Bronze. Very, very light
color, applied very, very lightly just to
the shadows that are already suggested with the
gray scale around the eyes, around the nose,
by the hairline. Very, very gentle color over the white charcoal as
well, but super smoothly. Remember to hold your
pencil correctly, hold it far back was very, very low pressure and with a very low angle
against your page. And finally, when you've
applied this color, remember to smooth it
out with your Q-tip. Very subtle effect,
but I really like it. So go ahead and
give this a shot, and when you're ready,
we'll move on together.
5. Precision shading (pale skin): All right, This
looks really nice. Let's continue with
adding some colors. For my next color, I want to choose a middle brown. Chestnut brown. You want this to be Oberyn, chestnut chocolate,
that kind of a color. Again, it doesn't matter
what set it came from. It doesn't matter what
brand it came from. Go with your gut feeling. Go with what your eyes tell you. What is more attractive to you. It's not about matching colors, It's not about one
specific palette. The idea is that you
want to learn to apply my strategy to any
kind of a portrait. For my next color, I chose
one that's called rusty, and this is not even
from the skin tone, so this is from a monarch Black Widow set in
the skin tones. We certainly have no
shortage of Brown's, plenty of brands to choose from. There's one that looks very
similar to this one as well. But I like this rusty color. It doesn't have to be
from a skin tone set. Again, just because a
box of pencils says skin tones on it doesn't
mean that it will magically create
skin tones for you. You do the work. Here. We're applying our
darkest shadows plus a little bit of the
actual skin tone pigment. There will be a lot of reddish
elements in this portrait. She has a dark red hair
and she has a little bit of this pinkish kind of makeup around her eyes and
her lips as well. And also there's this pink
undertone to actual skin. So we do want to find
a color that's more on the pink side without using
actual pink at this stage. So this kind of a very warm reddish brown
is what we want. And notice that now I'm
working a little bit slower, a little bit more precise. I'm holding my pencil, not that crazy far back. This is not fast
shading anymore. This is precision shading. Physically moved up closer on my pencil to about
a third of the way. And my strokes are now
smaller, they're shorter. I'm still applying the
same amount of pressure, which is barely any. But I am paying more
attention to details here. I'm not just applying
general shading to the face. This is precision shading. We want it to be precise. So again, a little bit
here under the hairline. A lot to the parts that
will actually be darkened and eyebrows, eyelashes, lips. We want to prime them
with these colors before we move on to something darker. But mainly we want to focus on the shadows around the
eyes for this part. Oh my gosh, there's
a dog in a studio. Hi puppy. Dog in studio. Shelby will be teaching the
next part of this lesson, the shadows around the eye. She knows all about the
shadows around the eyes. She's the queen of eyeliner. Back to our program. Did she did she moved my camera. I guess this is why dogs
don't teach art lessons. They can't operate the cameras. Once again, even though I'm using a slightly
different shading method, precision shading
versus fast shading. I am still following my rule of changing
the shading direction. Generally, I like to follow the curve of the actual subject. So here we have the curve of the nose and the
curve of the eyelid. So I will follow these
lines, but not entirely. I will also color across to make sure that the
shading is smooth. But I definitely want to
go over this crease in the eyelid over several times. Remember what we talked about when we talked
about pressure? The tooth of the paper. When you're adding these
effects, be patient, I would rather you take
several minutes to go over the same area
multiple times. Then take your
pencil really close and press enter
this eyelid to make the crease look really
dark because you will prevent yourself
from being able to add more colors later on, we do want a lot of colors here. The trick to skin tone
coloring is that our skin, no matter what color it is, no matter what shade and variation and then
what lighting it is. Human skin picks up
a lot of colors. It is somewhat reflective, so we're also picking
up the colors that are around us in the
room or outside. Their different skin colors
within just the space area. Obviously, her lips are
a different color in her eyelids are slightly
different color. So there's just so
much variation here. We can't limit
ourselves to just a pale beige and brown
for the shadows, which is how portraits
end up looking flat as people get timid, like we talked about,
and they choose. One pale color and one slightly darker color for the shadows and
leave it at that. And that's just not enough. We'll be adding a
lot of colors here. And it's important to not block ourselves from being able
to do that later on. So don't kill that to speed very careful
respect your paper, your paper comes with a
certain characteristic. It has that to
SUID, work with it. Don't work against it. Don't kill the tooth
of your paper. You will just shoot
yourself in the foot. So again, going
over this crease, this is my favorite part, by the way, is working
around the eyes. We'll be adding a lot
more colors here. So it's very important
to be gentle. And this particular brand, the reason that I love black
wheels so much is firstly, I'm a huge fan of working
with wax pencils, especially on toned paper, and especially with my
white charcoal trick. But I also like how
strong the pigment is. If you've seen any
of my crystal work, you know that with this brand
it's possible to create some astounding effects with just a couple of pencils and hardly any
pressure on the page. It's, it's absolutely amazing. So just because we're
choosing to make this particular
character look very pale, make no mistake. It's not because the pencils unable to produce a
stronger pigment. It's because we genuinely
want this to be very soft, very gentle, and
very, very pale. This shadow under the face
is extremely important. This is what makes the face look three-dimensional
and obviously closer to us than the neck. You definitely
don't want to just give her the dark chin strap. Make sure that the
shadow is realistic and that it trails
off down to the neck. The other thing that creating
this shadow does is that it hides the really
sharp outline of the face that I have. The problem with coloring pages, any kind of coloring pages, even grayscale coloring pages, is that you have to have
these clean outlines. And normally in
drawing and painting, we wouldn't have outlines. When I draw in charcoal, I use sketching as the basis
of the final creation. And I do have light
outlines in place just to know where everything
will go in the end. But I don't actually keep them. The ultimate goal of a drawing
is to have no outlines at all so that things
look 100% realistic. With coloring pages,
it's impossible to avoid because the
lines are already there. So they're helpful, but they're also harmful
at the same time. So here we will work with
the lines as much as we can to stay true to the
style of this drawing. Of course, it will be
impossible to get rid of all of these lines completely, but we can hide them
in our shadow work. I design these pages with
this course in mind. I designed them specifically
for this course. In fact, I intentionally made
the line work as light as possible so that it comes
out and when you print it. But so that it also doesn't mess with our actual
drawing style. I wish I could show
you a closer look. There's no way that I
can show you on camera how little pressure
I'm applying. Imagine having a feather being brushed against
the back of your hand. Literally that much pressure
I'm applying right now. I would rather have you
go over the same area 1 million times with
the same pencil, rather than just do one coat of color but pressing too hard. Notice how she's starting to
look a lot more human now. Also notice that the two
colors that we've picked, the light mustard color and this chocolate
brown color have nothing to do with her actual skin color because her skin is probably
very similar to mine, maybe even more pale. And a lot of times when we choose a certain skin
color for a character, we make the mistake of
picking a color pencil that matches the actual
skin color and that's not the way
to approach scan. If I was to choose
just a pale pink for this portrait and
apply it to her face. It wouldn't look natural. That's not what we're
actually seeing. We rarely see the actual
skin tone on the face. What we see is the
light playing off of that skin tone and the effects that the light is creating. And that's what we're drawing. This is the part of
the portrait that will take the longest. So normally when I draw
and color this part may take up to 30 min with
just this one color. Again, don't rush it. Certainly you don't
want to work too slow. You don't want to fixate on just one part of the portrait. Try scattering yourself. Like I do. I need a shadow over here
that looks attractive. I immediately went over
to this side to match it. I added a shadow under the chin and then I added
the shadow under the nose. And I'm constantly balancing it. I'm looking over here. I'm actually physically
assessing it. I like to step back and see if what I'm drawing actually
looks good from a distance. And I see stepping
back, physically, stepping back that
this part is a little bit more saturated
than this part. So I will add more pigment
on this side to match. Every single one of these will
look completely different. And that's wonderful.
It's not just okay, it's absolutely wonderful that your portrait will look
different from mine. That every student will produce a slightly
different version of this. That's art. It's taking the
general technique that I'm teaching you and applying it to your own work with your personal twist on it. So go ahead and pick
a nice middle brown, add it to your shadows. And in the next video,
we'll do the lips together. So when you're ready,
I'll see you there.
6. Lips (pale skin): All right, I hope it went
well with the middle brown. Let's paint those lips. Now, lips are tricky. The reason that lives are so much more difficult
than the rest of the face is because they tend
not to have clear outlines. Here on this coloring page, I suggested basic outlines, but I tried to keep them as
light as possible so that the lips don't
actually look like they have lip liner on them. If I was to draw this, I wouldn't actually
have clean out lines, would use only light and
shadow to create lips. But this is a grayscale
coloring page, so we have a little bit of
an outline to work with. I'm keeping the same pencils. This is still the monarch rusty that I keep calling
chestnut or chocolate. The middle brown that we worked with to create the shadows. Same color for the lips, will enhance it later, but it's important that
the base color of the lips is the same color that we're using for the
shadows of the face. And I'll start with
the upper lip. I'm holding my pencil a
little bit closer now, about a quarter of
the way to the tip. Because now I'm working
with a lot of tiny detail. But again, very low pressure. The pencil against the paper can be a little bit more steep now. But all the same rules apply. Remember not to grind your
pigment into the page. Don't flatten that tooth. Don't apply more pressure. I would rather have you apply many more layers and some pencils are more
friendly than others. Again, the reason that I work
with wax pencils is because the pigment is so easily
applied to the page. If you find that
your tools are not doing what you want them
to do, change them out. There's a sea of tools out there of coloring
supplies, of drawing supplies. It try it out, read reviews and see what
other people were saying. Join OACD communities and talk about other
people's experience. I'm certainly not telling you that you should go
out and spend all of your money on every
single brand and try them all out until you find
the one that you like. If you can avoid it, certainly go for it. But I don't think
that's the best way. I think try something and if
that works, narrow it down. If you like wax pencils. If you've already decided
that you like wax pencils, try a different
wags brands to see if maybe they can
offer something new and exciting to you. Again, talk to other
creators out there, or it is a social beast. Talk to other creators,
talk to other artists. Alright, back to our lips. Because I'm working
with the same color. I'm also adding
the shadows under the lip and around the
lip with the same color, which creates very
natural effect. One of the biggest
mistakes that I see in the coloring world with
lips is people doing amazing shading
techniques on the face and leaving the lips
blank only to take a red or pink or purple
color and just flatly apply it to the lips and it just destroys the entire
illusion of a portrait. Treat lifts like
they're made out of the same stuff as the
rest of the face, just with a little
bit more pigment. And that will solve a lot of your drawing problems
and coloring problems. Here again, notice
how important it is that this shadow
under the lip is the same exact color as this shadow on the
upper lip itself. The angle here, the slip is
darker because it's it's kind of angled this way and so is this part under
the bottom lip, and that's why they're
the same color. So that already
looks more natural. It's not about picking a color for the lips
and applying it. If we want her to have
some kind of makeup on, we can add that later, but start with the
natural color first. Just like you would
apply make-up and real-life same thing
with the eyelids. Create the natural effect first, and then add any kind of
makeup that she might have on. Here. I'm not playing with the
direction of shadows anymore because I want to bring out the
texture of the lips. So here we'll have
these parallel lines on the lip itself. And I want to follow along those lines to create that
realistic lip effect. Again, just one color. I'm not going crazy with
any kind of a pigment. No red, no pink, just the same brown. And that's the part, this is
the part that scares people, but lips aren't brown. My lips aren't brown. The lips and the
final drawing or in brown there clearly
kind of reddish. It doesn't matter. You need that undertone that matches the rest
of her undertone. And even on the inside, even on the teeth. Adding a little bit of the
same color for the shadow. I want the lips to
be as diffused as possible without it looking like she has lipstick
smeared on her teeth. But a little bit of that color will be reflected in a piece. Teeth are highly reflective. People take that for granted. The teeth for it is also a very difficult part,
very tricky part. Because while they are
very close to being white, in reality, this kind of
an ivory white color. That would be true if we just had a tooth
laying on the page? Yes, it would be very, very close to being white. But that's not what
we're looking at. We're looking at a
whole row of teeth hidden mostly in her mouth. And with this very heavy shadow from her upper lip
covering most of them, we won't actually see
a lot of white there. We'll just see the
shadow on the teeth. We certainly don't want the teeth to make
her look awkward. So when it comes to teeth, avoid these clean lines
between the teeth because that will just
make her look kind of snaggletooth and scary. And avoid pure white. The safest way is to just keep the color of your
paper, this tan, tan color and add
just a touch of white smudge and a nice
gray or brown shadow on the top for the teeth. You probably noticed that we're working on this systematically. We're not switching colors midway were working
one color at a time. So go ahead and continue using your brown and
color those lips. And when you're ready,
we'll continue together.
7. Pink (pale skin): All right, I hope it
went well with the lips. Let's add some pink. For my next color. I'm going with a
nice soft coral, kind of a pink. This is Saffron from the
light skin tone set. Again. What will I say? Sets don't matter of
brands, don't matter. Pencil names don't matter. Just pick a nice soft
pink or a coral pink. And that's what
we're working with. Here. Our skin tone is
looking very lovely. Everything looks like a
nice old Serbia's sketch, but it's still not looking
very much like a painting. It's still kind of
in a sketch form. In a drawing form, we need to add some more human
colors to this, make it look like it stands out from the back of the page
from our background colors. So we're adding this
pink because her tone, her skin tone is so
pale to begin with, and we've already decided on
that kind of a skin color. I'm adding this pink, I'm back to my fast
shading techniques. So holding my pencil
really far back, almost flat against the page and working rather fast all
the way from the edges, going over all the brown
that we've established. And towards the center. Very, very gentle, can barely see the pigment
applied to the page. But you do see that
a difference is happening more around the
eyes, under the eyes. Because we're applying this pink over the mustard color
and over the brown color. It looks natural. If we had started with this, he would look like
maybe he's not feeling so well though it is, it is important to
pick the order of your pencils that is ultimately friendly
to your character. Make sure you know
how your tools work in certain progressions. For instance, some brands
are very friendly with lighter tones on
top of darker tones like prismacolor
is great for that. You can add a lot of very
light colors on top of already very dark colors that you established
on your page. But other brands like wires
or not so friendly with that, they are much better at starting from light tones and
adding darker ones on top. So know your tools, know your tools well, be friends with your
tools and trust them, and also make notes. If you discovered something, if you discovered
that a certain, this one Denzel from
this one said works beautifully when mixed together with this one other pencil. Make a note of it,
keep a journal. And that will be your trick, that will be your trademark in the drawings and
colorings to come. So notice that she's
starting to look a little bit more,
more lively now. This pink in combination
with a yellowish tone and the chocolate tone is creating that beautiful
pale skin effect. So none of these colors are
the color of her actual skin. We're building an illusion. We have to work with
just light and shadow, not the skin tone over
the lips as well. And of course, on the neck. Once you introduce a new color, it's important to apply
that color all over. For instance, I'm now
introducing this nice pink. I didn't just add it to the
nose or just two cheeks, or just to the eyelids. I'm adding it everywhere. That consistency is extremely important in portrait
drawing and coloring. Now the amounts of these
colors that I'm adding vary. But the color itself has to
appear everywhere for the illusion to work a little bit
less to the lighter areas, a little bit more to
the darker areas, even more to the ports
where I believe she'll be wearing some kind of a
pink or brown makeup. And of course, a little
bit more to the lips because ultimately we
want them to be brighter. A little bit less to
the neck, actually, because the neck is
mostly in shadow, so a lot of this color will
actually be lost there. But it's important
to add some of it. Again so that the overall
color is consistent. That's it. It doesn't take that much. Make sure not to
overdo the pink part. You don't want the face to look red or pink or
flushed or anything. We just want to enhance the colors that we
already established. So pick a nice soft pink. Don't go crazy begging
really bright pinks, know, neon's at all. Nothing on the heavy side. Just to a middle pink, a lighter pink, but
obviously pink or coral. And add it over your shadows. And when you're ready,
we'll go ahead and enhance those shadows
even further together.
8. Purple (pale skin): Okay, The skin tones
are looking lovely, but the shadows can use
a little bit of work. Let's see what we can do. Now, the thing about shadows
is that they always appear a little bit bluish or
purplish to the human eye. That's how we know
that it's a shadow and not just the
change in pigment. So what I'm going to do
right now is I'm going to add a little bit of this kind of grayish
purple color. This is called washed purple, and this is from
the dark skin tone set from black widows. And this is exactly
what I was talking about when I was
praising the sets, is the fact that they have this kind of a color
selection in them. This is obviously
not a skin tone. But whoever, whoever holds Albert create this
set is definitely an artist and definitely understands the elements that are needed in creating
realistic portraits. Shadows tend to be purple. And this washed purple is
perfect for our purposes. We're adding it now over
the areas that we've already colored with
brown and with pink. And we're making them
into this purple color. And that right there is the single most important step in making shadows
look more realistic. Now, it doesn't have to be
this wash purple color. It can be any other
kind of purple. Even blue will work
beautifully for shadows. This is a little bit
on the timid side. I would even go with a brighter
purple for the shadow. But remember we're starting
timid and we're building up our confidence with this
very pale skin model, moving up to darker
skin and darker skin. And building up our skills
and building up all confident for more amazing
skin tone affects. See the difference that
it makes a little bit just a touch of purple and
the shadow, night and day. Now it's no longer
a flat drawing. Now it's starting to
look like a painting. A touch of purple is
magic for portraits. Do not underestimate this step
and do not skip this step. This is extremely
important. It's scary. There's no purple in
the skin tone at all. It's only in the shadows
and it's only an illusion. But that's what we do when
we draw, when we call it, we create illusions, Two-dimensional illusion of
something three-dimensional. So you must keep that perspective in mind when
you create these effects. They're not real. You're not recreating
the color of the skin. You recreating the illusion of a three-dimensional object. So working now with this color, what is this, our
third voice color, it's suddenly becoming very obvious why we didn't want to destroy the
tooth of the paper. Why we want it to be
so gentle without pressure and with our
color application. Because at this point, if I
had already prostitutes of my paper and I would not be
able to apply this effect. That's it. Like the eyebrows
would have been ruined, the eyelids would
have been ruined. I wouldn't be able to
add any more colors to them to do be careful, because ultimately I add anywhere 6-12 layers of different
colors to my portraits. You want to be
able to do that to create these amazing effects. To create these
realistic effects. It's not about working
from one edge to another, picking the perfect
colors as you go. It's not a mosaic tile work. We're approaching it
the same way that I approach oil paintings
one layer at a time. Now, granted, with
oil paintings, I would actually start even darker and keep applying
my lighter effects on top. But that's a slightly
different story. We are working with
pencils on paper. So certain adjustments
had to be made. Again, the same rule applies. We introduced a new color. We have to introduce
a new color to everything that skin
on this drawing. So off we go the
rest of the face, the neck, the mouth,
the nose, everything. All you have to do
is decide where you need more of this color and
where you need less of it. So what do we do? Work from our reference photo. Thankfully, you already have the painting that
I've created for you, so you can use that
as a reference. But if you're working on
something completely unrelated, if you're just taking this
knowledge to apply it to your coloring of
other artists work, of your own work. You know completely
different characters than I highly recommend that you do some research on photography. Pick a character whose skin
tone you want to mimic, the lighting that you want
to mimic and work from that. Don't copy directly. Take notes on what's important,
the important elements. Pre-select your colors. Pick a photograph that your inspiration photo for
your coloring page. And three, select the colors
that you believe will be needed to recreate
that effect. And work systematically. Don't just try to blend
everything on Canvas, on paper. Work one color at a time, building up your tones. That way you can keep
everything consistent that way. There are no surprises
that way you don't have one I different from an other eye
or the nose being a completely different color
than the rest of the face, you need consistency
and skin tones. The way that you secure
that is by working systematically one
color at a time. More to the shadow
here under the lip. Remember we don't actually want clean outlines on the lips. So I'm working over this outline in both directions,
applying my shadows, making them darker and darker every time so that ultimately, I don't have these
outlines at all or have as little of them
visible as possible. But notice that I'm
continuing to treat the lips like they're made out of the same stuff as the rest of her. Just a little bit darker. So all the same colors. Nothing new. If I want the lips to look a little bit more
reddish in the end, we'll add a little bit
more red in the end, but not now, we don't
start with that. Any strong color that you want on your page. You
need to build up. You need to invest into
it with multiple layers. Don't just start with it. Otherwise, it will look
flat and unnatural. A lot of this washed purple
to the neck and the chin. Okay, another layer done, give it a shot, find
a nice middle purple. That's, again not obscene. Don't go for like the
Prismacolor, deep purple. That's just this beautiful, absolutely beautiful
amethyst purple. But it's not the
right thing for this. For this you want something
more diffused, more pale. Wash purple is perfect. Lots of other
purples and lots of other sets will
work just as well. Maybe even a blue, like a grayish blue
will also work here. Give it a shot
when you're ready. We still have a lot of
work to do on the shadows.
9. Contrast (pale skin): Alright, shadow work continues. The purple made
this look amazing. But I feel like it's still
needs a lot of definition, so we need a darker color. For my next color, I picked
a really dark brown. Now this, this should
be super easy. All of the coloring pencils
sets have dark brown colors, just in the Black Widow sets. They're probably 20 to
30 dark brown colors between all of the sets. The one that I happen
to take is a color called mud from the
dark skin tone set. But again, there's so many colors that are very similar to this in pretty much
any pencil set. So this should be a no-brainer, very, very dark brown. And what I'm actually
going to start with, with this dark brown
is her eyebrows. And here I am not really shading anymore,
but rather drawing. So notice that my fingers
yet again creep closer to the tip of the pencil
because I'm working with detail rather than shading. So a lot closer, I'm applying a little
bit more pressure here. But once again, not
grinding into the page, no. No paper is being
harmed in the process, the tooth isn't being watched. But I am working
along the line work, color these eyebrows
and it definitely want this part closer
to the bridge of the nose to be a little bit darker than the part that
goes out to the edge. And it's this contrast
definition that will make her skin look as pale as we
actually want it to look. Because everything
that we perceive, we perceive by contrast. So by adding really
dark effects at her eyebrows will be really dark or eyelashes will
be really dark. The creases around her I, eyelids will be very dark or
lips will be much darker. And of course, ultimately
her hair will be this dark red,
nearly black color. All of these things will add to the illusion of a
very, very pale skin. He really wanted to exaggerate
this crease in the eyelid. For me that is just very attractive for this
particular portrait. And also starting to add more
pigment to her eyelashes. Be a little bit of an
outline on the eye. Color in the iris itself. Same thing on the other side. When it comes to eyes, I always like to balance
them immediately. As soon as I make any kind
of an effect on the left, I immediately move over to the right eye
and the other way around so that my effect a balanced and are done
with the same pencil. More under the eye. Over here. You can see how this
definition with this very dark pencil is making the rest of her face look
very pale by contrast. But still with a lot
of color variation. Pale doesn't mean lack of color, it just means very pale colored. So look at this part right here. This is very dark brown
and it's on her skin. So don't be afraid of
adding the strong shadows. And this is very
strongly leading into the next section
when the skin tone itself will be much darker. So we'll have to be braver
with our colors. Here. Again, leading into
the edges of the face, making the shadows stronger. This is the shadow
that I really wanted to enhance back in the chocolate brown phase and
exaggerate the cheekbone. Notice how I
automatically switched to my fast shading technique
without even realizing it. I'm working on a different
part of the face now this is the cheekbone. Bigger area of wider area, more surface area to cover. And immediately my fingers crept up to the back of the
pencil and a switch to my fast shading technique versus my drawing technique that
I used on the eyelid. Keep an eye on that. When you're coloring. Don't just get locked
in, in one position. Keep that variation and over time it will come
naturally to you. I didn't even notice that
I did that just now. Again, more detail here, so closer to the tip for that
little bit more control, a little bit more pressure. Not too much as always. And of course, constantly changing the
direction of shading. Noses are also very tricky. Even more tricky than
lips, I would argue, because they are very
few actual outlines. We only really have
outlines over here on the nostrils, on the wings. And we have, we tend to
have, with basic lighting, we tend to have this shadow
on the tip of the nose, a little bit under
the tip of the nose. And of course, this part over here as well
on the upper lip. That's looking very
good under the chin. Remember this is a
very important shadow, very underrated. But we don't want it to
look like a chin strap. We want to really
invest the time into defusing the shadow all the way down into this
triangle pattern. So practice your shading, private practice your
smooth shading technique, you're fast shading technique. And at this point, all of these layers of
colors that we've established are
working in our favor because I have so many
layers of wax on the page. My pencil is now gliding
on the surface of the paper, even smoother. I barely need to
do any work here. I'm just touching the
page and pigment appears. So all that work that we did in the beginning is
really paying off. Now, this shadow right here is what makes
the face look like. It's actually rounded and the chin look like it's
actually rounded because no matter how wonderful you make
this shadow on the neck. If you don't create the
secondary shadow on the chin, the face will look
like a flat mask. It may be counter-intuitive. I know, I know it's
really scary to add these dark colors to
the pale skin tone. But that's how we
see shadow work. And now some more
definition to the lips. Still with my dark brown
pencil, this is mud. Again, fingers crept
up to the tip. We're doing more detail work. Adding a little bit of this dark color here
to the inside of the mouth because
that's the part that's just hidden in
darkness over there. Very important element to make
the mouse look realistic, such a tiny detail and makes
such a huge difference. A little bit more
to the corners, corners of the mouth, a little bit more to the shadow. A bit of an outline for
this part of the lip. And at this point, I'm going to add some
pigment to the hair. Because now the
hair is looking a little bit too washed out. And it's difficult to
see all of the beauty of the face pigments
that we've created because of this very unnatural
and flat looking here, I'm going to switch
to my rusty brown. And I'm going to add just a little bit of this
pigment around the face. I'm now gonna do the whole hair because it's not a hair lesson. And because you already have your reference image,
my oil painting, but I'll do just enough of it around the face
so that you can see how the skin tones that we've picked
work with the hair color. Okay. You see how adding the
pigment to the hair changed the entire
look of the face. This is why I don't like to do the skin tone
first, then the hair. The hair than the skin tone. Generally when I
draw and I paint, I work on the whole
thing at the same time. Now I didn't want to
distract you with hair because this
is a skin tone. Listen. But it is important to know that everything has to work together. The hair color adds to the skin color of the skin
color reflects the hair color. It's an extremely
important element. So, especially if you're
feeling a little bit lost, if you're working on your
skin tone and you're like, I'm not really sure if it's
looking realistic or not. Start the work on the
hair and see how this hairline around the face
works with the skin tone, you will make a huge difference. So go ahead and spend
some time on this step, see if you can add a little
bit to the hair, try it out. And let's continue working
on this thing together. When you're ready.
10. A touch of fire (pale skin): Now comes the really fun part. Let's add some red. Red, actual pure red. Now the skin tone sets that I'm working with don't
come with red. So I had to go digging
in my other boxes. And the reds that I picked, Our, this very classic red, this is called fire
from the cobra set. And this is another
one that I picked, that's a more burgundy red. This is called Blood Diamond, also from the cobra set. And I picked the
burgundy one mainly for the hair and the
lips and the makeup. But we'll start
with this classic red and we'll start adding
this red around the eyes. Even if she didn't have
this very pale pink makeup, I would still add a
little bit of red around the eyes and
around the lips, and even a little bit
to the cheeks and nose. But be very, very careful here. Read only works at this
stage because we have so many layers of pigment
on this page already. And because these were
wax pencils and it's so easy to glide on them. It seems scary, right? We're adding actual pure red. This beautiful skin tone
that we've established. It's scary. I get it. It's even scary for me after all these years of drawing
and painting portraits. But it's a very cool step. And it does make her
look more human. And a little bit, maybe a little bit flushed
because her skin is so pale. We're going specifically
for pale red heads skin that we want to bring
out more of the pink tones. I prefer to bring out
the pink tones by adding red overweight rather than
bringing more pink pencils. That's just me, that's
my personal preference. You may build up these colors with various pinks and browns. That works too. But for me, I really
like a gentle wash of pale red rather than a pencil that's actually pink and we're
adding a lot of it. So all of these are distinct decisions that
are now yours to make. This is now your project. You have my page, but what you do with it
is entirely up to you. I'm only arming you with the
tools that I myself use. You may choose to use
only parts of them. You may choose to use
them in different ways than I use them totally, entirely up to you because you are now the
artists and command. That's another term that I
use with my private students. You are the artists and command. You make the decisions. Always with my little Q-tip. And this red is our
exception to the rule. The rule of if you
introduce a new color, you have to use it all over. Red is the first color that
that rule doesn't apply to. I want this read
only in the areas of higher interest and specifically for this kind of skin tone. So here I'm only adding
it around the eyes. Choose ellipse into
the hair on the lips. Notice what this red
does to the lips. Imagine if we just
started with red without building up all
of these natural tones, it would look completely
different and completely flat. Adding the red on top really looks like the
lips is slightly tinted, but it doesn't look like they're flat little red
cardboard cutouts. You can't easily tell
if this is light makeup or the natural color of
her lips and her eyelids. That's exactly the look
that I want to go for. The other thing that
this red is doing, it's also creating
higher contrast, something we've already been
working on on this piece. And higher contrast in
these areas of interests, areas of high detail makes
the skin look more pale. By comparison. Very red lips obviously will make the
skin look more pale. Very dark hair will make
the skin look more pale. Pale doesn't mean boring. There's a lot of play
of color in here. There's a lot of definition, lot of three-dimensional
effects. Going to add a little
bit of this red to this shadow underneath
because of reflections. Just a touch. I'm going to add a little bit of this
red to the tip of her nose. Just a little bit.
Don't go crazy. We don't want her to
look like a drunk. We just want a touch of blush on the nose and a touch
of blush on the cheeks. So I'm going to add a little
bit of this red over here. Be very, very careful here. You don't want this
to actually look red. We don't want red
blush on her face. We want a little bit of a
pink blush on her face, but a lightly applied red looks more natural than a strong reapplied
pink in my experience. And that's it. That's all that we're
going to do with. Well, you can play
with the hair as well, but I'll see you in the next
part for the final detail.
11. Shades (pale skin): Okay. I've added some more
red to the hair. Again, normally I would do
the entire head of hair, but this lesson is on skin tone, so I don't want to
get carried away. The only thing that's important here is that we can see how the color of the hair weeks
with the color of the skin. So for the purposes of this particular stage
of our coloring, this is more than enough. We see that the
color of the hair is reflected in the skin
tones and in the makeup. So for our final effect, we will increase the shades of our colors by
adding some black. This black is from the
dark skin tone set, and this is called midnight. I think all of Black Widow
sets have a black color in them except for the monarch set, but all of them have black. And pretty much every, every single colored pencil
said it has black in it. Very simple colors to
compile obviously. And it makes it match
my brands as well. So if I didn't find
a black widow black, I could have used
Prismacolor or a Lyra. Actually really like
using layers over, over black widows as well. But I use my black always as the last possible pigment in most of my drawing
and coloring. And the reason that
it's always the last is because I'm using black not to color the areas that are actually
physically black, but to increase the shade of any given color because
that's what black does. Adding a certain amount of black to a color
increases its shade. 10%, 20%, 30%. 508100100 is of
course, pure black. But you get the idea. So here we already have very
strong colors established. Even though this is a
pale skin characters. She has very bright
lips, very bright eyes, very bright here, ultimately
should have right here. So now we will only
add this black to increase the strength
of certain colors. For instance, here
this crease in the eye shadow by adding just a little
bit of black over it. It's not black, it's
not solid black. But all of those
colors that we've created a suddenly
that much darker. And it's very important to have all those layers
of colors so that this trick right here works. Everything that we've done so far has been leading up to this. Again, here on the eyebrows
are already brown, but adding a little bit of black to the parts
that I want to be darker gives them a little bit more
shape. To balance out. Eyelid on the other side. Of course, the eyelashes, I actually want to be black. So I'm going to go over them. Nearly black. We have some brown
in them already. A little bit more definition here in the corner of the eye. I want to enhance the
shadows under the eyes. A little bit of black there. Anything, any kind of a shadow effect that you
want to make stronger? Now is the time to do it. You don't have to find pencils that match your color perfectly. This is another mistake
that color is often make. They get these sets that are
200 pencils, 500 pencils. And it all looks so
delicious that you have every single one of these
tones of brown in there. But it's too distracting. It's too much to choose from. Build up your colors with basic pigments and then make
them darker by adding black, It's a much better effect. Here again, I'm going
to add more black around the face to the
shadow of the hair. Ultimately, this will
be dark burgundy, so it would actually be a very beautiful
dark burgundy color. But right now I'm just, I'm just making
it a dark shadow. In this dark shadow
also helps me eliminate the
outline of the face. Remember, we talked
about outlines in the beginning of part one, about how it's very difficult to create coloring pages
without outlines. But ultimately in drawing we
don't want clear outlines. So to make this coloring page
look more like a drawing, more like a painting,
ultimately, we want to hide as many
outlines as we can. And we do that by adding very dark pigment around them in these
gradients. Here I will. It's kind of hard not to get
carried away with the hair. And I want to add
more burgundy here, but now I have to stop, stop. And this is the
ultimate demonstration of how high contrast makes
the skin look really pale. The higher the contrast of the elements of
interests like hair, eyes, lips, eyebrows, the
higher the contrast there, the more obviously
pale the skin looks. There's some really
beautiful reds and the Black Widow set. So it's very hard for me not to, not to just switch
to coloring the hair because it would look
absolutely gorgeous. This shadow under the chin, I keep working on it. In enhancing it with black is a very powerful
move at this point. But makes sure that the colors that are underneath the black. Stronger than the black
because we definitely don't want black to
look black or gray. We want to very gently
and very skillfully, and hence the shade of brown
that we've established. Notice that it
looks natural just like the red when we added read, it didn't look red on the face. It looked like blush. Same thing we're
adding black and out. Very scary, very dangerous. You don't want to overwork it. But very, very
important without it, the whole thing,
they look too flat. We do want this
level of definition and look how this outline
is disappearing now. Because we're bringing the
black all the way up to it. That looks very professional. That's the look that you want. Very important that the black that you're adding
doesn't look like gray. Definitely want to enhance
this shadow and do some more work on the
lips with the black. Again, this black is
not actually black. It's just an enhancement
of a shadow. Very, very important
distinction. If we will work on the lip separately in a lot of colorists like to big things in step first to the eyes,
then do the lips. I would highly disagree with
that, with that strategy. It may work for some. I'm not saying don't
do it, don't try it. But for me, there are too many disadvantages
in that strategy. Building everything up together
is a much stronger move. In my professional opinion, in my professional
lifelong experience. Build it up layer after layer rather than
element after elements. At this point I'm just
assessing the whole thing. Again, I'm actually physically standing up and
stepping away from my drawing To see if it looks
good from the distance. And if it does, then I
don't want to overwork it. It's hard to stop
sometimes as you can see, I'm still struggling
with not working on the hair because I do
want to see it completed. And once you see the whole
thing done with this, this is my area of
concentration right now. So I see that this eyebrow needs a little bit more work because it's unrealistic that
the shadow would fall here and wouldn't
fall on the eyebrow. So this needs to be adjusted. And notice that I'm
not switching colors. I'm not bringing in
deeper reds for the red. I'm not bringing in deeper
browns for the brown. I'm just adding
black to everything equally because that's
how we adjust the shades. For these elements. It's important to practice
having a very light hand. Do practice holding
your pencil in different ways so
that you don't apply too much pressure like we
talked about in the beginning. So I'm going to call this done. I've completed the
hair and you can tell right away what an important
part the hair place. You can see the burgundy
color of her hair is now clearly
accented and all of those nice red tones
that we used on the face here kind of
brings everything together. So what did you think? Did you have fun? Try it out. Follow my method step-by-step. Remember we started
with white charcoal and we started building
up our colors. Washed the lessons again. Every single lesson
comes with a PDF with notes and with pictures,
my progress pictures. You also have the
downloads for this page. You will have the downloads
for the pages to come. Take your time with us. Go through this course
at your own pace. Try out different effects, try out different prints. You have a PDF to Print, you can print ten copies, 20 copies, and try out
different effects. But do try to match my process and my tools
as much as possible. So definitely toned paper, but it doesn't matter what
brand of tones paper, definitely colored
pencils, doesn't matter what brand of colored
pencils you get the idea. Give this a shot, and
when you're ready, we'll move on together
to olive skin tones. And that's a completely
different ballgame. Similar effects,
similar strategies. Of course, shading effects are going to be
consistent throughout, but the approach to darker skin tone is a
little bit different. However, it is
important to understand the approach to a lighter
skin tone before we move on. So do spend some
time on this lesson. When you're ready. We'll move on together.
12. White charcoal (olive skin): Hello and welcome to part
two of coloring skin tones. In this section, we'll concentrate on the
olive skin tone, will approach it a little bit differently from how we
did the pale skin tone. So I hope you had fun
with your pale skin tone. I finished mine with the hair and I'm
quite happy with it. Let's move on to Olive. Just like with the
pale skin tones, we'll start with
our white charcoal. Now, white charcoal
has nothing to do with the final outcome
of the skin tone. Whether you're
doing a light tone, mid-tone, a dark tone. The white charcoal serves
a very specific purpose of being a primer so that we have our
highlights established and so that the colors that we're
applying to the face, I add their best possible
potential and pure saturation. So even if we get to really dark brown shadows,
dark purple shadows, black even we still
need to have a layer of white charcoal just to
ensure that all the transitions and nice and soft plus like we talked
about in part one, the white charcoal allows for slightly smoother blending of wax pencils that are
applied on top of it. So let's do this part together. It may seem a bit overwhelming, knowing that the skin is going
to be a little bit darker, actually darker than the
actual color of this page. But we're starting
with white charcoal. I know it's a little bit weird, but exactly as we
discussed in part one, the whole point for working with this medium is to establish
those highlights. And this is exactly
how I work when I worked with white
and black charcoal, withdrawing was just freehand
drawing from scratch. I would make a sketch similar
to this and then I will establish my lightest areas
and my darkest areas. We already have the darkest area established with my line
work and my shadows. You don't have to
worry about that. The purpose of these lessons
to teach you where to place late and which colors
to choose for the skin tones. Because most of you, I imagine a colorist, some of you are
probably illustrators. You may be an artist. You may not have any idea
what adult coloring is, but you'd like to draw portraits with color,
with colored pencils. This course is for you. And of course if you already
know how to draw it, and this is exactly
why we skip the, how to construct the face stage and went straight to coloring. This is all about how to
achieve the skin tone, not how to build up the face, but the beautiful part
about white charcoal is that you can't add
too much of it. Even if you feel like
you've added too much, like you made the face too late. It doesn't matter
because first of all, it can easily be removed. You can use a kneaded
eraser if you really desperately need to
remove some of this pigment, this works great on removing white charcoal as well as
regular black charcoal. And I wouldn't even bother
with that if I add too much, which happens
sometimes I overwork this part and I add
way too much white, way more than I need. If that happens,
I just leave it. I just leave it and then I
add all the colors that I need to cover the areas
that are too light. So don't worry about it. But the thing that
I would like you to pay attention to is just like in part one on
our light skin tone. I'm not just blindly, systematically coloring
from left to right, from one corner to another, making this flat white mask, I am building up a three-dimensional shape
that is very important, that carries a long way. It will show all of this detail work that you're
putting in right now. We'll show in the end, it will come through as
something that you took care of that you actually put
a lot of attention into. So don't rush this part. This is the single most
important investment in our coloring stage. Take your time. The lighting here again is
very soft daylight lighting. I imagined straight on her
face and slightly from above. So nothing extreme. There will be no
dramatic shadows, just basic soft lighting, which is the most
common type of lading. And of course, this is the
type of lighting that you would generally
have in a portrait. I strategically drew
these models facing forward as they would be if they had their picture taken for a profile photo maybe or,
or something like that. Obviously not a passport photo. These are a little bit
more creative than that. There's a slight
tilt of the head, but mostly they are
facing forward. So generally when
photographers pick this pose, they also have very,
very basic leading. Clearly illuminates the face
from the front and leaves these very attractive shadows around the face on
the cheekbones. The rule of thumb here
is that I'm adding more white to the areas that
are clearly protruding. Her cheekbones are closer to us. Her eyelids are bent this way. The tip of her nose
is the closest to us, so it is the lightest. This part on the lip
will be shiny and is also a convex surface. And of course, the chin. I'm working from my
reference image. Remember that I've
actually created these characters as
digital oil paintings, which you have. Please pull them up on a
separate screen or print them and use them as your reference for where to place
light and shadow. Notice that I didn't cover the entire face with
white charcoal. That is because I'm
switching to my Q-tip. And acute it will do all
the blending from it. So even though I didn't color these tiny areas
over here that are shaded, I can pick up enough
of the pigment from the really wide areas and actually transfer them onto
this part of the face. So now I'm just going to very gently smoothes all of
this white charcoal, keeping the lighter
areas lighter, keeping the darker
areas slightly darker, but nevertheless
covering the entire face with some amount of
this white charcoal. Again, because I
want that nice base for texture as well as
for color saturation. Alright, that looks nice. That's all we're going to do
for the white charcoal part. Remember, white charcoal doesn't
need any kind of fixers. You can run your hand
over this and nothing. No smearing, no smudging
the white YouTube, really the worst Q-tip. Any color you choose. Nicely locks it into the page. So go ahead and print your copy. I highly recommend that
you try to sit here on tantalum paper and apply a
layer of white charcoal. And when you're
ready to move on to color, will continue to get it.
13. Starting dark (olive skin): All right, by now I imagine you are a pro with
white charcoal, so you're probably ready
to move on to color. But this one, I'm going to
show you a different strategy. Remember that with
pale skin tones, we went from later tones
to slightly darker to slightly darker until we got two really exciting
colors like red. And that's one way of
approaching skin tones. You build up your colors to balance for their timidity
that we talked about. A lot of colorist,
especially colorists, are quite timid with skin tones, which is why we
started with pale. I want to take this opportunity, this amazing golden
olive skin tone to show you how to work
from darker to lighter. So for my first color, I chose this new pencil from
the dark skin tone set, and this is called nigra. This is a nice dark brown like a deep chocolate
brown color. And with this
brown, I'm going to establish my darkest shadows. This is exactly how I work
when I draw with charcoal. I like to start around the eyes. We're going straight to
precision shading on this one. I'm holding my
pencil about midway. You can hold it a little
bit closer if you wish. I find that the further
back I hold my pencil, the faster I'm able to move it. If I hold it really close, then I'm kind of going
at a lot slower, so it's great for detail. But I control the speed
with which I shade. By how far back I'm
actually holding my pencil here about midway from
my comfort level. But you find yours. Remember to vary
the directions of strokes that way the color
appear smoother on paper. And again, because this is
very basic, very diffused, straight on lighting,
the shadows will be more or less symmetrical
on both sides of the face. So it should be very easy. Of course, my line
work is guiding you. When working with
symmetrical faces and with balanced
lighting like this. I like to match my left
and my right side as I go. Meaning I'm not
just going to color the entire left eye
and the eyebrow, and the eyelids and the
cheek and everything. And then move over to the right. I tried to balance the elements. For instance, I worked on this shadow on the bridge
of the nose towards the eyelid and immediately a balanced it with the same
shadow on the right side. This way I know that I can
keep things consistent, imbalanced, don't
have to be identical. In fact, you can
see that this face is clearly not
perfectly symmetrical, but I like that
it shows realism. This one of course is
based on a real person. So I used a lot
of photography of this actual model for reference when I
created the painting. I'm going to color over
the eyebrows as well. Pretty much everything
that's in shadow here. We want to replace
the shadows of the gray scale drawing
with this brown. I'm going over the white parts, the really white part a
little bit, but not a lot. I'm creating a smooth gradient from this dark brown to white. And how dark you want to go with this is entirely up to you. It depends on how dark
you want your skin to be. But remember, if you
want to go darker, don't use more pressure, you use more layers. Again, I made an effect
on the right side here. I immediately go
to the left side. Just like with a
light-skinned tones will be working in one
color at a time. That doesn't change. You can change the
order of your colors. Of course, like we
talked about already, we can start with
lighter tones and build-up to darker
ones or vice versa. Neither way is correct. I am showing you both so that you can make
up your own mind. But the important part
is to do it in steps. If you're adding a color, add that color everywhere, make sure that you
liked the distribution. You liked the saturation, like the shading effects. If you're happy with that, move on to your next color and make sure that each new layer of color somehow enhances
the previous one. Notice that I'm just freely
going over the hair here. I'm not trying to
color around it because the hair is ultimately going to be a much
darker colors. So it doesn't
matter if we cross. In fact, I'm going to start shading the hair
with the same color right away and will build
up the darkness as we go. But it's important that
the whole composition has that same undertone. In this case, it's
this chocolate brown. Just like in the
previous section. I'm not going to go crazy coloring the entire
head of hair at this stage just enough around the face to give you an idea
how it all works together. And then at some point
behind the scenes, I will complete
the hair and show you the finished result. But you get the idea, this is a sappy or
drawing right now, we're using only two
colors, white and brown. Only to establish
where the light hits the face and where
the shadows form. Because we're building up so much more pigment than
we did on the pale skin. This is going to take
quite a bit longer. Don't rush it, get in the zone and just
enjoy the shading. This isn't a race. You don't have to make
these effects really fast. You don't have to
complete these colorings within a few hours
or a few days. Take as long as you need, work at your own
pace and have fun. This is supposed to be
relaxing and therapeutic. For those of you who
are adult colorists, most of the portraits
that you'll be working with will be
considerably smaller. Most coloring pages come
with smaller characters, are full body characters
that just have tiny faces. You can apply all
the same techniques just on a smaller scale. But obviously it will
take a lot less work, a lot less strokes on the page. So a face that's this big will probably take you just a
few minutes to complete. But since this is a
full-size portrait, it will take us a few hours. I apologize about
these lines that appear on all of my friends. This is not in the file, this is an artifact in my
actual printer at home. Everything that I print, it comes with this line. I need to pull out my, I guess the cylinder and see if there's something
stuck to it or I guess there are something
that's rubbing on the actual ink rollers and it's creating this line
every single time. So again, you won't
have this in your file. This is very specific
to my machine. I'm just going to try
to fill it in and hide it like I did another one. Remember this shadow
under the chin? Very important. This is what makes the face
looks three-dimensional. This point, you know, the various shading
techniques that I use. So you can see that I'm
just naturally switching to my fast shading technique on the areas of the face that
have less definition. The jaw, the chin. There's there's nothing here. There's no detail, not like
we had around the eyes. So here it's okay to go faster. And I'm going to leave
the lips uncolored for now because I want to do them together in a separate lesson. So let's just add the shadows everywhere
but the lips for now. And then we'll concentrate
on the lips specifically. And I almost forgot
her freckles. She has these beautiful
freckles on her cheeks. We'll use the same
color to go over them. You can freehand these as well. I imagine they're more
freckles on her face that I've actually established here
with my line drawing. Can add as many as you want. You can make them bigger
and add more of them, can make tiny ones. Totally up to you. And I'm also going to
color in the eyes. Ultimately she will
have dark brown eyes. Okay, go ahead and do this. Pick a nice dark
chocolate brown pencil, not the darkest one in your box, but a rich brown, not a middle brown, not a dark brown
somewhere in-between. A nice rich chocolate brown. And go ahead and add your
shadows around the eyes, the eyebrows, around the
nose, cheekbones, ears, neck. You can finish the
hair if you want. Leave the lips. Let's do them together when
you're done with this part. Remember, at any point
during this journey, feel free to send me photos
of what you're working on. You have any questions at all, or if you just want feedback. Remember, I'm a real person,
not just the recording.
14. Lips (olive skin): Okay, I hope this one, well, I hope you have your nice dark
brown shadows established. Let's talk about those lips with the same dark brown pencil. Let's work on some shadows that actually built up the lips. Remember, in real-life, lips don't actually
have outlines. So these lines that
I've drawn for you that are kind of guidelines, we're going to
extend the shadows on both sides of the line. So it's going to be
a diffuse gradient that goes from dark brown and a center to lighter
up in later down. Every little pressure shadow under the lip will
be darker just because of the way the
we have our lighting established in the lipids self will be a little bit later. It's very important to work
with the same pencil here, no new colors yet. This part right here, this
tiny little part right, right under the lip. That's always the darkest part. A ways. Obviously, if she has a flashlight or campfire
laid right under her face, it will be a
completely different a completely different scenario. But in this kind of
leading from the front, from the top, That's
always the darkest part. Same thing on the top here. We can go around the lip, not necessarily outlining it, but adding shadows around it. And now for the lips themselves, they will be a shadow on this lower part
of the upper lip. Here I like to follow the lines that are the
actual texture lines of the lips and darker towards
the corners of the mouth. The corners of the mouth or in extremely important element in making this part of the
face look realistic. Make sure to not bring whether you're
drawing or coloring. Don't bring the line
of the upper lip and the line of the
lower lip together into this nicely fitted corner that just looks FAPE unless
she's wearing lip liner, that will never happen. You see how this
outline kind of gets diffused when we
get to the corner? Same here. The top outline
gets totally diffused. There is no definition there. The only thing that we have, these little corner of the
mouth shadows right here. Again, working with the lines of the actual
texture of the lips. Another shadow over here, darker towards the corners. Bit of a shadow on the teeth. And cute. And that's it. This part of the lips
is done and now we're done with this pencil
color altogether.
15. Olive color (olive skin): I hope you had fun
with those lips. Let's move on with color. For my next color. I chose this. This is kind of a
greenish olive color in the Black Widow sets. There are a lot of these beautiful colors in the skin tone sets as
well as in other sets. This one is called
leather and it's from the dark skin tone set. But there are others as well. There is this beautiful, absolutely beautiful
pencil that I like to use cold all of gold. We may actually
use this later on. There's also olive brown, a lot of choices. And if you're working with
other brands, same thing. They're usually this type of pencils in most
professional pencil sets. So something that's
actually very similar to the
color of all paper, but a little bit darker and a little bit more in
the mustard side. With this color, I'm going to go over everything
that I've already made in brown and everything that I've
already colored in white, blending it together, making the brown pop and adding this more natural
glow to the face. We don't want anything that's
pure white on her face. In the end. This is a gorgeous color. I use this color for
skin tones all the time. All sorts of skin tones, not necessarily dark or light. Remember that the lighting also directs a lot of
the color choices. It's not all about the
skin color itself. It's about where the
skin color is displayed. It's a little bit on the
yellow side, which I like. It makes you think that she's
lived by natural light, like sunlight and warm tones, light is usually more
flattering for portraits. So if you have an option, go with warmer colors. The reason I started with a darker brown and
I'm now adding this beautiful olive color
is because there's so much dark brown and the olive is now
serving as a blender. Again, personal preference,
either way would have worked. You could have started
with this color and then added the
dark brown shadows. But if you like, working
with wax pencils, you need to find a flow of making most attractive effects with your particular skill set. I noticed that I'm really
good at blending colors. So I'm finding ways to use
the pencils to my advantage. In this case, using a
lighter color on top of a darker one creates a
softer blending effect. So play with it. Try out different patterns,
different orders. See what works for you, see what creates the most
beautiful skin tones, and go with that. But know where the
shadows must go. And of course, if you're working gently not applying
too much pressure, you can always adjust all of
these things along the way. So something's not light
enough, we're not dark enough. All of that can be adjusted. Yeah, I see. This
kinda just makes it smoother if I already had it down and I was
adding brown right now, so much brown, you
would probably see the actual pencil marks of
where I'm adding the brown. It would be a little bit
more difficult to blend. Remember, our first
layers that we apply over the white charcoal are the easiest to blend with acute HIV. As we add more and
more pencil layers, pencil layers on top
of pencil layers, the Q tip trick doesn't
work as effectively. It trails off towards the end. So plan your blending
techniques, know your tools. Do this one's
following myMethod, following my exact steps. See how it works, get a feel for it, and then try it a
little bit differently. Maybe you'll discover
something new, something that works
better for you. I do want to leave
some areas very light because I find the shine on her face to be
very attractive. But not pure white. Just very, very light. On something like
this makes sure that the tip of the nose is the lightest part because it's the closest one to the camera. The channel will be
the second lightest. Not counting the actual
reflections on the lips, but on the skin, nose, chin than cheekbones, and then all the details
around the eyes. That's the order of lateness. Going to apply the same
color to the lips? Just a little bit, not a lot. I hope you remember
from part one the rule of introducing
new colors. The general rule is as soon
as you introduce a new color, added all over, not just
two parts of the face. You don't want it to
come out looking patchy. Everything has to balance. It's easy to neglect
the neck because it's kinda boring compared to the really interesting vase
with all these features. But don't, don't
neglect the neck. It's important that the
whole thing works together. If you don't have the shadows and the color is
established on the neck, the face will look like it's
just floating in space. See how this color brought
the shadows together. Now it looks like we're
using the colors, the tone of the paper to create this three-dimensional
shape that's kind of coming out of the paper. It's quite an attractive look. It's still not a
realistic skin tone, but at least it looks like
we're starting to sculpt it. So go ahead and pick a
nice soft mustard color and apply this as
a blender layer. And we'll continue
shaping this face together when you're ready.
16. Going darker (olive skin): Okay, I hope you're
ready to continue. Let's add some darker brown. So it's not that I'm
necessarily going from darker to
lighter on this one. The opposite of the first part. But I'm switching it up. Going dark. I'm balancing
it out with late, adding some more dark. We're going to balance
it out with a nice pink. So it's, it's a balanced
game on this one. A little bit of darkness, a little bit of blending, a little bit more definition
with a darker color, a little bit more blending. We're sculpting this
face essentially. So here I picked a
really dark brown. I believe we used it on
the previous portrait. This is called mud from
the dark skin tone set. With this really, really, really, really dark brown. We're going to go over the, obviously there are
details like the eyebrows and eyelashes and eyes and these corners of the
mouth that will make the face look a lot
more three-dimensional. So here we're not
really shading, we're drawing in the details. Feel free to add this
color to the hair as well. Ultimately, the hair
will be so dark brown, it will appear almost black. And I'm adding this color to the strong shadows on the
side of the face as well. Really enhance her
cheekbones at this stage. And I also want a lot of
this color around the eyes. With this model, I imagined that she's not wearing
makeup at all. This is just the natural pigment of her skin and the
natural shadow placement. You can make her freckles little bit darker at
this point if you wish. Only going to enhance
a few of them, not all of them because I find that variation in the
freckles very attractive. Remember to keep balancing your left side and your
right side of the face, but don't obsess over
perfect symmetry. In fact, you want to avoid
it for more realism. You want the light to
be naturally balanced. But the face itself cannot be. Human faces are not
perfectly symmetrical. So you see how it's noticeably
quite a bit more work than I was on the light skin tone and a light skin tone with it, the the white
charcoal background and we added a nice soft color
and then the shadows were, they weren't so many of them
and they won't so dark. Here, we have to take
really good care to make sure that the gradients
is smooth and that everything fits
together nicely and believably to create an illusion of this three-dimensional phase. But there's so much more pigment that we need to add here. So I cannot stress this enough. Don't rush. Take your time. Consider scale. If you're not comfortable, or you just don't have the time or the patients to color or draw something this
size, make it smaller. Even if you're working
with my coloring page, printed at 80% or 60% of the size and work on a smaller scale and
we'll go a lot faster. Just some fun things you
can play around with. There's very important
shadow under the chin. I want to make this
part right here. The darkest. Be careful with these lines
on the side of the face. I see this a lot in
drawing and coloring where people follow the this, this part of the cheek or it's sunken in depending on if
you're smiling or not, but that whole part, they just make it into
these straight lines. Sometimes, sometimes that
works if it's more of an art deco style of drawing
than that, absolutely works. But if you entire portrait is
done realistically and then you have these sidebar and looking things on
the side of the face. That's not a flattering look. Try to avoid it. And here's how you
see that it kinda started happening to me already. And I'm correcting
it because it's a little bit too harsh. Yes. I want a stronger shadow here, but I don't want it to be a line that comes in on
the side of her face. So I'm adding a lot
more pigment here to diffuse that line that
I accidentally created. So this is what I talk about
when I'm talking about correcting your work
as you're creating it. Everything can be
adjusted on the spot. And of course the
adjustments can be made only if you don't apply
too much pressure. If you made something
too dark and you can't lighten it with other
colors or with an eraser, then the way to correct it as to make everything
else just historic. So I made this very dark
shadow on the side here. I like it, but now I
have to balance it with the one on the other
side being just as dark. Otherwise it's going
to look very strange. Of course, can always rely on your trusty
Q-tip to save the day. Smooth out any kind of an overkill decision
you might have made. And now let's work a
little bit on the lips and we'll be done with
this color in no time. Of course, the absolute
darkest part of the mouth is the inside part where
there's no light at all in over here on the corners. Be very careful in
this area right here so that she doesn't end up looking like
she has a mustache. And I want to make sure that this lower shadow on the
bottom lip is really dark. The darker the shadow and the wider the fuller
her lips will look. Remember, no corners. We call it the
corners of the mouth, but we really don't want
them to be sharp points. Okay, this looks really nice. Go ahead and add your
super dark brown. And we'll continue
making this face look more human. As
soon as you're ready.
17. Breath of life (olive skin): For my next color, I'm going with this
beautiful coral pink called. Sure, but this is from
the light skin tones it. So what's going on here? Beautifully shaded,
very three-dimensional, very balanced, very not human. There is no life in his face. This is the color of the paper. This is a sepia colored face. We have a little bit of the
mustard yellow glow on it, but not enough over
human skin tones. So we have to add a
little bit of pink. Now, I'm not a fan of adding straight up pink to
any kind of skin tone. So I tend to go for more
coral type of a color. This sharp it is perfect. And once again, I'm
going to add it over. Not in a single
sheet, but as always, building up my
three-dimensional shape, building up my layers, and covering all the areas
that will lift weight. This is kind of a blush color and required less
of the skin tone. You will have a little bit
of this blush present. Remember that humans skin
is highly reflective. So whatever happens
to be around her in the room will also be
reflected in her skin tone. Since we already
established that this is sunlight or some kind of a warm natural light
reflected off something. Perhaps a room filled
with natural light with very warm colored walls
that are highly reflective. All of that nice sunlight
bouncing around, bouncing around the space
and reflecting off of her skin will create a lot
of yellow and pink tones. If you don't have in your
set fancy coral colors, if you only have a
straight-up pink, that's fine because
we're balancing it with a nice mustard yellow that we
already have an undertone. So when I say that, I don't like pure pink, That's just a
personal preference. I think it's a little bit
too flat for skin tone. But remember you can create any color combining
your pencils. So if you have to add an extra layer of something that's a little bit more
on the yellow side, then by all means do that. Looking better, right? It's not a drawing anymore. It's starting to look
more like a painting. In reality as well. The way that our
eyes perceive color, the way that we perceive
human's skin as a natural skin tone isn't by identifying a single color
and then seeing that it has shadows that are just a
darker shade of that color, That's not how it works. Next time you are actually physically sitting
across from someone. Pay attention to their face. Pay attention at all
the colors that you'll be able to see as they move, as they turn their head, as the lighting changes. It's going to be
a little creepy. Maybe you should
explain yourself, but do pay attention to that. Notice the blues that you
will see in the shadows, the purples, you'll see green, you'll see all sorts
of amazing colors. Pink, yellow, skin tones are so rich with reflections and shadows and all sorts of
pigments. It's amazing. Definitely time for fast
shading on this one. This is not detailed
work anymore. This is just adding this screen of this
color over everything. If you haven't been
grinding your pigment in, you should have no
problems at this stage. Again, just freely coloring over the hair, doesn't matter. It's going to be so dark. All of these colors that I'm just layering over,
it will be hidden. I want my widest parts
of this portrait, ultimately to be the teeth, the white reflections
on the lips, and the white
reflections in the eyes. I don't want any pure
white on the skin. Very pale, pink or mustard. But not why? Because we want her skin to be saddened and reflective
but not shiny. Shiny, shiny what she
needs to powder her nose. A question came up the other day that I thought
was very interesting, very relevant about holding
the pencil far back. What happens when your
pencils are so loved? This short. To begin with, you can hold it any further back than here. In that case, I would recommend actually
using pencil extenders. Don't suffer with short pencils unless you're working
on tiny detail. I would, I would find the
pencil extender so that you are able to hold the
pencil far back. Now, we can add this color
quite generously to the lips. This is the part of the
portrait where we can store it. Differentiating the lips, their texture and their colour
from the rest of the face. So if you want to go
more pink on the lips at this point, now's the time. Don't neglect the neck. Remember the whole
thing has to look good. Go ahead and do that. Find a nice peachy coral
pink added all over. See the difference
that it makes. But it's not quite
enough. When you're ready. I'll show you more.
18. Go crazy (olive skin): This is a little bit scary, but we're going to
add chartreuse, actual bright yellow chartreuse. Why are we doing
this crazy step? Well, very simple. Sunlight. Remember we
talked about that. The actual lighting and imagining
where it's coming from, sunlight is quite yellow. And so far we've established a lot of beautiful
brown and pink tones, but it's not quite
on the yellow side. So I like to take the brightest yellow
that I can find and apply a really soft
glaze over it, all over, over everything. Now this is super-fast
shading, super, super, super, super fast and barely
touching the surface. It cannot stress this enough. And look at the difference
that that makes. Now I will scan went from
being kind of pinkish, all of a sudden to being
this beautiful olive shade. Pretty neat, right? We don't need to
add it to the lips. Just the skin. Pay attention to what the chartreuse
is doing to the colors that we've
already established. If we started with this color, it wouldn't have done anything. It's very important to know when to introduce
these crazy colors. We had our shadows established. We had a nice skin tone, tone going, but
it wasn't enough. This is a glaze. Very gentle, barely there.
And a little bit scary. This far, it was so quick. Let's just continue
with the next color without breaking this up
into a different section. I feel like we need
more brown variation. So I'm introducing
this new color that's a little bit reddish. See how many we've already had. You want a lot of colors
and complicated skin tones. This is like a burgundy brown. This is called brown bug, and this is from
the scorpion said, I felt that I needed in the areas around the
eyes and the lips. It's a stronger brown than
what we've been using so far. And it has a hint of rust to it, which I think is
very attractive. You can add it to the
actual eye color as well. That might look really good. Yeah, this was a good choice. And of course, the freckles. Keep in mind that all of these decisions
are made on the spot. This isn't a formula
that I have written down somewhere and follow for
every single portrait. It's different.
Every single time. There's a fly in
here or something. If you get 100 artists
in the room and tell them to paint this portrait from this reference photo, you will have 100 different
ways of getting there. Neither one is right. So follow my method,
follow my steps. But then DV, when you work
with other portraits, when you work with
other line work, try different approaches. Just try to remember
the lessons. Tried to remember why we're making the choices
that we're making. Don't just make a
list of colors and try to apply them to
every single face. It won't work. But do make a note if you if you aren't going
to make notes, instead of making notes on the specific order of
the pencils that I use to make note on the pencils that you
find to be enjoyable. We all have that one, one-inch benzyl in our, in our pencil said that's the one that we
use all the time. That's so loved,
it's almost gone. I'm sure you have that.
Make a note of it. Find the color that you
go to, that's your, that's your ultimate
favorite pencil. And make a note of that. Those are much more interesting
notes, for instance, I noticed that I use this
brown bug quite a lot, especially for skin tones. Now I opened a brand new sets for the purposes
of this lesson. But in the sense that I actually use when I draw and color, brown bug is quite short. And yours will be different. Make note of that. Make notes of everything. I feel like down here
on the bottom lip, I didn't diffuse the
shadow quite enough. That outline is
still very sharp. So I'm going to correct it now. And that looks great. Remember to take your
shadow in both directions, both to the skin, to the lip. No matter which color
you're working with. Again, I don't think
she's wearing lipstick, any kind of makeup at all. I'm going for all natural
colors on this model. My favorite shadow
under the chin. Always the darkest. And let's see if we need
any Q-tip work on this one. And actually, despite what I said in the beginning
of the lesson, everything is still
blending quite beautifully. Even after all these layers of pigment that
we've established. These are quite
extraordinary pencils I really like black widows. Not all brands will
behave this way. Do keep that in mind. I think that was the
coolest step yet. I think this particular shade of brown really brought
everything together. And there's always
that one moment in your drawing and
then you're painting where things just click. That was it. So go ahead and
find your perfect brown and see what kind of magic you can do
to your portrait. And when you're ready,
well, it just some shades.
19. Shades (olive skin): I write final step. Let's add some black. Remember that I always
leave black for last because I'm not actually
using it as a color, but rather as a
shade adjustment. Here, our shades are
going on pretty far and we're going close to
100% in the nineties. Nearly black, not like
in the pale skin tones, but it's still shading, not using straight black. So I'll start with the
most obvious parts, the eyebrows and eyelashes. And then we'll see what we can do to the rest of the face. And of course, I still
have the hair to do. You might have done
the hair already. You can do it at any point. I just didn't want
to get distracted from what we're
actually learning. The black that I'm using is midnight from the
dark skin tone set. But it really doesn't matter. Any black that you're
comfortable with. So even though some
of these elements will look almost
completely black, like the eyebrows right now
and the hair will later. It's still not solid black that I always picks up
on the difference. This is Richard, this has
definition that says undertone, that brown undertone
is very important. Solid black, just flat black doesn't look good,
doesn't look natural. No matter how dark it make
it have that undertone. And of course, with
so many layers of bags on our page right now, there's absolutely no sign
of paper texture anymore. This is really smooth. This is more like
a pastel painting or an acrylic painting. To the shadows on
the skin as well. But very lightly. We don't want the
skin to look like it has plaque bruises on it. We want to take the
brown parts that we've established and make those brown parts a
little bit more dark. That's it. A little
bit on the freckles. Remember, vary the freckles. Some will be darker
so it will be later. And of course, the eyes, the eye lashes will
be pure black here, or as close to pure
black as possible. Still with that undertone. And this crease in the eyelid. We want to exaggerate as well. Here's a fun fact for portrait
drawing and painting. The only part of the
portrait that can ever be solid black
is the pupil. And the only part that
can ever be solid white is this white light reflection. And I, the rest, nearly black, nearly
white, but not pure. The only two pure black
and pure white elements. The pupil and the reflection. We want to go as dark as
possible on the nostrils. But you don't want them to be perfect circles create
a gradient from really, really dark in the far side, the deepest part of the nostril and trail it off where
you have more light. Same here. We'll have really dark pigment inside the mouth where
there's no light at all. And we'll have these
really dark corners, corners, not corners
of the lips. But again, with nice soft
gradient transition. And of course, I want
this shadow to be darker. One of my favorite shadows, the one under the lip. And this L most important
shadow under the chin. That makes the face
really stand out. And of course the hair. I won't bore you with having to watch me color
this entire heap of here. But I will complete it. And show you the final result. And you can judge how dramatic you want
the shadows to be. They can be a little
bit better defined. They can be a little
bit more subdued entirely up to you and
you'll lighting decision. Consistency is more important
than actual saturation. Remember how many colors we went through to
get to this point? And this isn't even nearly the full spectrum of what I sometimes use
on my portraits. And look at the order. We went from a middle
too dark brown to a nice mustard color
to a super dark brown to a coral
pink show trues, and then burgundy
and finally black. You probably wouldn't
think of using all of these colors to create
this skin tone effect. So what that shows
is that skin is highly diverse in all the
colors that it can reflect. And there's no limit,
there's absolutely no limit to what colors you can use
on any given skin tone. The idea is to have enough color variation so that
the skin looks realistic. Have enough contrast so that the lighting looks realistic for you to pick and choose exactly which skin tone in which lighting you're
actually depicting. So I hope you have fun
with this character. Go ahead and give it a shot, finish it up with black. Send me pictures. I can't wait to see
what you've done. And when you're ready with this model and ready to move on, we'll move on to really
dark skin tones. And I have some surprises
of my sleeve for that one. So have fun, and I'll see
you in the next section.
20. What to highlight (dark skin): Hello and welcome back to let swatch leases hair grow several inches over the
course of a few minutes. As you can tell, these courses take quite a bit of time to record introduce. Since you are here, you are already way ahead
of the rest of the class. I think you didn't notice. But statistically,
most students don't get further than 20% into the course even
if they paid for it. So the very fact that you made it all the way here
is incredible. I'm really proud of you. And I guess this means that you are having fun
and our learning. So let's move on and color
some dark skin tones together. If you've been following
these lessons in order, we already completed
our light skin tone, our olive skin tone. Now going to do the
really dark skin tone. Let's get started. Believe it or not, we're still going to store
it with our white charcoal. As you can tell, my white charcoal, good, very loved over the course of these lessons,
it is quite short. And when that happens, I like to use my
pencil extenders so that I can keep
using my tools. So here we will not cover
the whole face with white charcoal
because the scan will ultimately be very, very dark. So we can actually use the color of this paper
to our advantage. But there will be some
glare on the skin, some very nice and natural shine on the skin, on the lips. And of course the teeth
will be very white. So I will add my white charcoal only to the areas that I'm anticipating to be nearly weight or weight at the very end. The pencil extender is actually a really great idea
for white charcoal, regardless of how long
your white charcoal is. Because naturally,
naturally from the factory, they come in about this length. And you can't, you don't really have the advantage of holding it further back for
different kinds of shading that we've
already learned. So they extend your, allows you to turn this
essentially into a pencil. And of course, I'm working
from my reference image. I have my digital
painting nearby. I'm actually looking at it. And I'm placing these
white highlights where I have the white highlights in the final version
of the painting. And you have all those images
as PDF downloads as well. And of course, you
can also tell where the lightest areas
are because I left them completely uncolored and unshaded on the gray
scale coloring page. So you can clearly see where
the latest areas or that's a very safe way to know where to place
these white highlights. Remember, don't grind it in. Rather work these
little circular motions to just apply more
and more pigment, but you don't need to
press on a page a lot. This particular
skin tone will have a lot of layers in the end. So be prepared for that. Remember everything that
I taught you so far about shading and about
applying pressure to the page. This was all leading
up to this amazing, beautiful skin
tone because it is our most complicated
skin tone so far. One that will take
the most care, the most planning and
the most shading. Adding too much white
charcoal is not a problem. If you cover the areas that will ultimately not be this light. Don't worry about it, Don't
even bother erasing it. We can just color over them. However, not adding
enough white charcoal at this stage is dangerous because you won't be able
to add it afterwards. So make sure that you get
all the highlights in place. Don't rush. Take your time. As always, don't
think like the neck. The neck is very important
because the face by itself without the neck just looks like a mask
floating in space. We don't want that. Alright, that looks good. Let's smooth it out a
little bit without Q2. White charcoal also comes
in actual pencil form. It's the same exact stuff
just in a pencil form. So if you need to
touch up any of the tiny details, for instance, if you want to get
really detailed on the teeth and get
really clean out lines, switching to a pencil
is a good idea. And also these little
details on the lips. I tend not to work
with the pencil for the general shading because
it's a little bit scratchy. For the stick form, it's softer, more powdery. Then the pencil, the pencil
has to be condensed, a little bit more
condensed than, than the stakes so
that it sharpens well. But the material is the same. Also, it takes a lot
longer to create all of the shading with a pencil than it
does with the steak. But for tiny touch ups, take the low glare
spots here and there. I do like to switch to a pencil. These are just personal
preference tricks that you'll develop
along the way. Some of you will only
work with pencils, some will only work with sticks. Some of you may
not have been pick up the white charcoal habit and just go with a white pencil and that's perfectly fine. Alright, that looks good. That was really fast
and really simple. You're probably already a
pro with white charcoal. So go ahead and add these white highlights
and when you're ready, we'll continue with
the color that you're probably not expecting.
21. Unexpected color (dark skin): Okay, ready for a
really strange color? Get out of scrap paper. And the color purple, lilac. Purple, something very
soft, very gentle. I like this color a lot. I have a lot of
these purple colors in the Black Widow sets. This one is called Purple Haze. The other one that
I really love is called tulip to beautiful color. It's very similar to this one, but a little bit, a little bit brighter, a little bit more flowery. Another colors that I had
set aside here is this. But I see now this is
called pastel purple. And it's too much on the pink side for
what I'm looking for. So I will go with
this purple haze. This will be our undertone. This dark brown, chocolate brown skin
tone is so gorgeous, but it's so easy to make it look too dark and too
overwhelming and too flat. I like to give it an
undertone that's lilac. And you will see that
when we build up the chocolate brown colors
on top of this lilac, they will really pop. So now I'm going to color everything that's the
color of my paper. Everything except for
the white highlights in this beautiful lilac color. Remember your different shading
techniques here will be switching from my fast shading
to my precision shading, to my detail shading depending
on where I am on the face, on the areas that have
less definition like cheeks and the
neck, the forehead. That will be fast shading. And of course we will practice fast shading by holding
the pencil for the back. And then the areas that have a lot more detail like the lips, no brown eyes, the ear. All of that will be
more detailed work. And for that, we
will be holding up pencil a lot closer to the tip. I know this looks weird. We are coloring a purple face and ultimately this will
end up looking realistic. It's quite unusual. But this is a technique
that I really like for my dark
skin tone portraits. So do, do try it out. Don't get intimidated by
this very strange color. I encourage you to experiment and also
don't be timid with it. This isn't just a very light purple suggestion
of an undercoat. This is a proper thick layer
of this mid purple tone. And they will serve its purpose. Very, very important. I cannot stress enough
how important it is to not apply too much
pressure at this point, this layer is the single most important
step in this painting. I keep calling them
paintings because ultimately that's
really what they are. They're just pencil paintings. So do take your time with this. If it takes an
hour, that's fine. But takes 2 h, that's fine. If you want to just work on this today and set it
aside for a few days. That's fine too. But do not rush this
step. It's an investment. Very important to do it right? Notice that after my
previous two models, a strategically didn't
give this model any hair. Or very little here. I'm just fed up with it. It was fun. It was fine, but we
wouldn't coloring here, we were working on faces, so the hair was just
really distracting to me. Especially on the
second model where they hear took up
the entire page. I don't know what I
was thinking there. So after that okay. No more hair. Like little hair
that she does have. I'm going to color
over it as well. I want that beautiful
purple undertone, even in the hair, even though ultimately
the hair will be black. You probably notice that this model is also
different from the other two because
her eyes are closed. This is the first model that
I drew with her eyes closed. Just for fun, just
for us to have a little bit of
variation because closed eyelids are also
a lot of fun to color. There's so much texture here. The skin is a little bit
different and alike. All these little shiny effects that we can have on the lids, the lips as well, and even the gums. Everything. I want everything to have this beautiful purple undertone. I'm going to smooth this
out with the Q tip as well. And we'll be done with this
layer in just a minute. Well, that was
properly weird, right? Go ahead and find a
nice middle purple. Allylic is something that looks like this purple haze or the tulip that I mentioned. And apply this base layer. Remember this is the single most important step
in this portrait. So take your time. Take care practice
the different types of shading that we
already learned. When you're ready, only
when you're ready. We'll move on to yet.
22. Brown (dark skin): Okay, ready? Let's add some brown. For my next color. I want a really rich
chocolate brown. This is what I came
up with. This is a color called nigra from
the dark skin tone set. And now we can build up
the actual skin color, as well as the shadows
going over this purple and see what it does. It doesn't look
the same way that it did just on blank paper. It's changed. It's a lot more interesting. There's a lot more play, especially in this
gradient transition from brown to white. And of course, the
application of color itself is physically smoother. Adding that layer
of purple served an extra purpose of being a base layer and not just
in terms of a base color, but an actual base layer of wax. Now, everything that we
apply over it will just glide on the surface of the
paper that much smoother. The danger with coloring
really dark skin tones is that it often ends up
looking like a doodle. A colorist may rush the process
and it will come out like an actual scratch chicken
scratch doodle with a lot of the sketch marks and it's
just not an attractive look. The face looks hairy or scarred, not, not a desirable
look at all. So to get that smoothness
in your color application, having a base layer of
a lighter color that's already smoothed out with
UQ tube is a huge help. And of course the
pencil sketch marks are more obvious
with a darker color. So applying this
dark brown just to the naked paper would
be very difficult. It's doable, of course, but it's very difficult
and it's very dangerous because it
may look to sketching. But now we don't have
to worry about it. We can sit back and let the pencil just do
the work on its own. Again, working from
my reference picture. I'm adding brown pretty much everywhere that I already
colored in purple. And the brown that you pick
is entirely up to you. There's so many there, there are a hundreds
and thousands of different browns among all the pencil sets
that you may be using. I'm working with
black widow pencils, but I always preach
that you should work with whatever
you're comfortable with. I'm not going to
say that this is the best brand on Earth. It is the best brand
for me at the moment. You may be going through
a different phase. You may prefer different
kinds of pencils, but a selection of
brown colors is often one of the richest ones in the professional
coloring sets. Prismacolor pencils have
an amazing arrangement of Brown's virus have
some delicious browns. Of course, black widows. Don't be afraid of going dark. The reason we started with a light-skinned tones
and moved on to olives. And only now are
working with really dark is to build up
that confidence, that competence that is
often lacking in colorist. Just adding a little bit
of a dark shadow here and a little bit of a dark
shadow there isn't enough. These aren't shadows anymore. This is the actual skin pigment applied generously
but applied gently. The biggest fear and going dark, of course, is losing definition. You want the features
to still be readable, which is why we added all those white
highlights to begin with. The shape is now very
well established. We have high contrast. Don't worry about
losing the details. They will still be there. And of course by
now you probably suspect that our final
color will be black. So with that black
will clean up all of the details and bring out any of the tiny little nuances that you may wish to bring
the viewer's attention to. Look how gorgeous
that brown looks. Just the touch of
purple underneath it. It's magic. Notice all the gradient variation
that I'm creating here. I'm not just flatly covering
the whole thing was brown. I'm playing with the amount
of purple that I have. The dark pools of brown
that I can create. For instance, I want
this area to be darker, but I want a nice smooth
gradient transition here on the forehead, leading into the shiny parts. When working on the eyelids, I like to follow the actual
curve lines with my pencil. I don't cheat across only to smooth out
the shading and part. But generally I want to
exaggerate these lines, these folds that happen on our eyelids when the
eyes are closed. Again, this area right here that's up against the
little highlights, it will be much darker
than the other gradients. Really want to bring that out. And of course, we'll
cover the hair. Even though it will
be black in the end, we need to build up all
the same undertones. That which doesn't look
like she's wearing a hat. Treat the whole head
is a single object. Don't separate it into
elements. It's not. Here, eyes, nose, lips. The whole thing is one rounded object that
responds to light. That's what you are drawing.
23. Brown continued (dark skin): Not all of the highlights
of pure white will only have a few super shiny
areas like these guys. But some of these are just
a lighter shade of brown. I'm coloring over them. Remember to vary
the direction of your brush strokes,
your pencil strokes. Don't want this to look sketchy. You want it to be
smooth and attractive. Looking like a
painting. Same here, under the eyes, any kind of a
prominent line on the face? I like to follow the direction
of the actual line with my shading around the
nose, these smiling lines. And only then after you've
established them you can go across to smooth
out that cheating. Now this cheek, this is crucial. This is extremely important. Crucial is even more important
than extremely important. I cannot stress enough how
important this cheek is. This is the part
that scares a lot of colorist and artists
and painters. And no matter how
professional you are, this is a very
intimidating part of the portrait because it's
a big wide open area. And we tend not to color very wide open areas
with dark colors. When we do portraits, it's
a natural habit to add shadows around the areas in the safe spots
around the news, around the ears, under the chin. But we tend to leave the front
of the face, the cheeks, or the cheekbones, the chin, lighter, and that's not
always the case here. This very dark shadow on
the side of the face is extremely important for building our
three-dimensional subtract. So do spend some time here. Don't rush the cheek. Keep adding layer after
layer after layer. We really want this part
to be extremely dark. Just like up in these areas. Very important. It's looking lovely. I really, really liked the way the brown
lays over the lilac. We've already done a
few lessons on lips. So I want to separate this
into an individual lesson. We'll continue working
the same way that I would actually approach this. If I was working by myself. I would not do the
lip separately. I would just do them
as part of this stage. So same pencil. Overall, the purple, applying the pigment to the areas that will
ultimately be the darkest. And again, you have
my shading and my sketch marks to guide you on where to put
the darkest parts. Remember the shadow under the
lip, that's very important. And no clean outlines. Here. The skin is so dark
and the lips will ultimately be even
darker that it's actually quite easy to make the outlines disappear
almost completely. With lighter skin tones. The coloring page,
it's a little bit more complicated because it's a, it's hard to make those
black lines disappear. But here I think we'll
be able to do it. And of course, you can
always print these pages on a lighter setting
so that the lines aren't actually black or gray, but are a lighter, much lighter shade of grey. Be careful on this
part inside the mouth. We don't want to accidentally
color over the teeth. So I'm slowing down and I'm
going back to detail work. Just to make sure that everything is nice
and clean and tidy. Remember, I like to
follow the lines on the lips to give
them some texture. I love coloring lips. It's one of my favorite things. A little bit on the gums and a little bit on these
teeth that are trailing off into the depth of the mouth. We want a little
bit of shadow here. You never want your
teeth to be pure way. That always looks a
little bit weird. Even if by some freaky
occurrence of nature, she has perfectly white
teeth, which rarely happens. Even if they're pure weight. They will be partially in shadow because they're
inside her mouth. Never pure white on the teeth. It's impossible. Remember the corners of the
mouth aren't really corners. We want to create a nice
little diffused shadow. I'm saying the word
nice a lot today. A nice little something. I think it's my inner
Bob Ross coming out. Happy little corners of the mouth and happy little
shadow under the lip. I love Bob Ross. I grew up watching his shows. Dreaming that one
day I will have my own show and have people watching on their TV screens copying what I'm
drawing. Wait a second. That's exactly what's happening. Bob Ross would be proud. Remember this whole side of the face needs to be very dark. Don't skip this part. This is very, very important. Take the time to build
up those layers. And it's good practice to, when you get stuck on a portrait like this and that's stuck on, but when you're spending a
certain amount of time on a, on a portrait that
is going to be several hours, several days. Don't focus on the
final results. It's not about rushing
to the finish line. It's not about completing it. Enjoy the process. Really lose yourself
in the process because every project
that you work on is an opportunity
to practice and perfect your tools
and your techniques. And every time you get
a little bit faster, little bit smoother,
little bit more precise. None of this goes to waste, even if you don't
succeed the first time, if you make a portion that
you don't really like, or if a certain
effect doesn't come out exactly the way
that you wanted to. It's not wasted time. You've learned something, your hand picked up
a new habit, you, the tiny muscles in your
hand and now a little bit more in tune with
what's in your head. None of it is wasted, so please don't get discouraged if something doesn't
work out right away. The very act of coloring
is learning, improving. You may not see that you
are improving, but you are. And on that note, we
are not very good at seeing our own progress and
seeing our own successes. I call this the artists curse. We are unable to see and properly judge our
own creations. So it's very important
to share your work with other people. Almost
forgot the hair. That took awhile. A little bit of the
Q-tip blending. And we'll be done
with this layer. Go ahead and give this a shot, spend some quality time
with your brown pencil. Remember these aren't shadows. This is the actual skin pigment. Invest their time into making the proper smooth gradients. Gradient variation is extremely
important on this step. You don't want this
face to look flat. There's a lot of definitions, a lot of relief. We have a beautiful
model to work with. Spend some time with her a day, two days, as long as it takes. When you're ready. We'll
continue together.
24. More purple (dark skin): Character place any bets on
what the next color will be. My trusty paper. And the next color,
we need a drum roll. More purple. I wanted deeper proper
royal purple at this point. And now this is shadow work. The color that I picked
is called Deep Purple. What do you know from the
Black Widow scorpion set? So here with this deep purple, we'll go over everything that
will ultimately be black. So the eyebrows, eyelashes, the nostrils, the really, really dark shadows there
will be nearly black hair. And of course we'll do some
detailed work on islands. Again, the brown and the purple, they're just playing
off each other. This purple doesn't
come across as clean, dark, deep purple. It comes across as a
deeper shade of brown. But somehow more interesting
than just flat brown. And I'm adding it
to all the areas of the face around the eyelids, all of the all of
the relief areas that will have the
darkest shadows. Anywhere that you want, a higher contrast and you've
been able to establish with the colors so far,
add this color. If you added your brown
generously and smoothly, this step should
go pretty quickly. And it should also look
very smooth and natural. And not at all like Deep Purple. Remember the rule of
adding a new color? We're adding it everywhere, just in different amounts. So even here on the
cheeks doesn't seem like it's that necessary, but it is. Just add it very lightly because we need that
overall balance. We can't have certain
parts of her face actually appear to be
a different color. But we do want that
gradient variation. See what that does
for our 3D look. Everything just looks. So real. Contrast is everything. In portrait drawing. Contrast, I would argue, is way more important
than color. We could make this
face in green, we could make it in blue and yellow and pink and any color imaginable for the skin tone. And it can still
look amazing and realistic if the contrast
is established correctly. Make sure when adding
your purple colors that you're adding them
to enhance your Brown's. Not to make the skin
look actually purple. Now we can add this dark purple and very
generously to the lips. Not pressing, never pressing. But more and more
layers of this color. I want her lips to
be really shiny. So contrast is essential here. When shading like this. Also be careful with what you
have underneath your page. You see that I have these
white papers underneath. There's a whole stack
of these papers because the cardboard itself
under the papers, That's my drawing board,
has a very strong texture. So I've actually done portraits with shading
techniques like this. With my page placed directly
on the cardboard and the entire texture
of the cardboard came through in the portrait. It was the charcoal piece and it was just really
painfully obvious. I couldn't see it in real
life, but on camera, all the texture of the
cardboard came through and the face just look spotted
in the symmetrical spots. It was awful. I had to
redo the whole thing and I learned my lesson that you
need to have a nice soft, cushy surface that doesn't have any strong texture
to it because it will show through on
whatever your coloring. So if you're drawing directly in your notebook and
your sketch book, that's ideal because
of course you have the whole stack
of papers underneath. If you're coloring and you've printed this on a
standalone page, make sure to have a nice
thick layer of something, somewhat soft underneath,
not too soft. You don't want a whole stack
of pillows under there, but I have five papers underneath on top
of the cardboard. That works for me. I tend to learn the hard way. So I want to spare you
guys some of the lessons. And in the life of an artist, just save you some
time and tiers. Notice that my Q-tip
smearing is getting rougher and rougher and it's
taking less and less time. It's because everything's
already really smooth. We don't really need
the help of a Q-tip. But I like this kind of
an airbrushed touch. We only have a few steps left. So go ahead and add
your royal purple, and we'll move on together
when you're ready.
25. The missing colors (dark skin): Remember that we talked about skin being highly reflected. This is looking great, but it's still little
bit monochromatic. But at least it appears a
little bit monochromatic. I feel like we need
more definition here. So let's add a little bit
of a peachy coral color. I'm going to go with this. Orangey pink coral. Even orange itself
would be nice. This is called sure, but I think we used it on one of our other
portraits already. Severity, nice color. I tend to go to it a lot
when I work on portraits, as you can see, regardless
of the actual skin color. And this is going to be fast, really fast shading and just
low accents here and there. With this sharp it is doing is bringing warmth to the face. We don't really want
her to have blush because she wouldn't
with the skin tone. But she is picking up
a lot of sunlight, that reflective quality of
skin that we talked about. I want nice, warm, friendly light on her face. Remember that portraits
and more attractive in warm lighting than they
are in cool lighting. We've added so much purple here. It's easy to get carried away with purple and have
the whole thing look a little bit cold,
little bit grayish. Even we don't want
this to look cold, we definitely don't
want it to look gray. So a touch of a warm tone. Any warm tone, orange, ochre, pink, coral, peach. Just to these transition
areas where we go from the purple
brown to the white. That will do the trick. Very, very fast shading at this point can add it a
little bit to her tongue. That looks good. And a lot to these lighter
pools of light on her face. It's even her expression. You'll talk to your characters. Try to imagine a
story. Where is she? What is she thinking about? The way that she has
her face slightly pointed up and her eyes closed. I imagined she's outside. I imagine she has actual
warm sunlight on her face. I want to bring that out
with my warm colors. Again, not a lot. We don't want her to have
pink spots on her face. That's not the idea. With skin tones. The trick to successfully
coloring skin tones is understanding when you're
adding a color to the pigment. When you are adding a
color to the light effect. And you'll get a hang
with, with time. And with practice, you will start picking up
on things when you work from photography or if you work with real models,
which is ideal. If you can get someone to sit still for you for a few hours. Do it, do it, do it, do it. Grab a friend, grab
a family member, make them watch a movie
or something so that they actually sit still and draw them in different
lighting on different days and see that even though you're
drawing the same person, you're using different
colors every time.
26. Missing colors continued (dark skin): That's it. Lightning fast. That took, I don't know, 2 min, less than 2 min. Really, really, really fast. And because it was so fast, Let's actually add
another color. While we hear. Olive brown. Again, one of my
favorite Mustard colors. You know, I love my mustards
over the pink, over the way. This is a hint of that sunlight. There is no perfect
skin tone pencil. They don't exist. We have to build up all
these layers and we have to build up all
of these illusions. That's what this
course is all about. I hope that throughout
all these lessons, you've picked up on all of my messaging of how to
build up colors and how important it is to develop
your own style and building up these colors and
your own intuition. It's not a formula. It's about looking
at what you've done so far, assessing it, and seeing if it's
missing anything and if it is adding more. That was it. Just a few
strokes with this color? I'm going to take
a look at this. I'm going to take it all in, see what's missing for me. And what I think
is missing here is a touch of something like this. Some kind of a chestnut brown. This is called frosty. Going to add this rusty
brown just a little bit to the areas that are in shadow. And this color is serving
the same purpose. It's adding warmth. It's the same darkness of brown that we've
been using so far, but it's much warmer. Could you have
started with this? Absolutely. Maybe you did. Maybe this was the actual brown that you chose for your
first brown color. And that's perfectly fine. It's all about balance. But adding this many different
colors is essential. Don't try to find that one
perfect brown and doing the whole portrait in
it and just leaving some parts later and making
some other ports darker. That's not skin tone color and that's
monochromatic shading. We want a painting like effect. In painting, you mix
a lot of colors. This stage of the coloring, this is like this
is like playing with filters and
effects in your photos. Most of the work
is already done. We just want a slight
shifts in tents and tones. And of course,
every new color you add adds to the smoothness
of the whole shading effect. So the more the merrier. Remember what we
talked about when we talked about flattening
the tooth of the paper. If you do this correctly, if you do this my way, you should not have any problems with adding
this many layers of color. The paper is not ruined,
It's not flattened. I can keep adding and adding
as many colors as I want. So when you do this on your own, that's one of the
most valuable lessons that I want you to remember. Not at all about
color selection. It's about how you
treat your page. It's about how you
treat your character. Treat them carefully. You treat them with the
respect that they deserve. They will pay you back
by looking at these. For my final touch on
the missing colors, I'm going to go with a different brand,
believe it or not. So it's very hard to
see on this paper. This is a pencil called
20 per cent French gray, and this is from the
Prismacolor set. This is the only pencil
that I still use from the Prismacolor set while working with my
black widow pencils. This is my ultimate
blender pencil. And you'll have these, you'll develop your
personal preferences. There will be very specific. I don't expect you to have
this particular pencil. You may. Maybe you don't. It's not necessary. But I wanted to
share this with you because this is something that I would do on this portrait if I was working on it by myself. The reason that I
like this 20% French gray so much is that I can use it over my
established colors. And I can add a little bit
of a shine to the face. It's not it's not white. It's a very, very light gray. It's a very soft gray. And it's a very specific
chemical reaction that happens between black
widows and prisma colors that I find extremely
attractive. And this is why it's
so important to have a test paper and to practice and to draw something
different every day, to color something
different every day. And to constantly be
trying new pencils, new pencil variations
and combinations. Because you'll come
across stuff like that. I'm sure there are thousands of different pencil
combinations out of there then I'm not
even aware of yet, but I will be as I keep working, keep experimenting,
trying new things. If something doesn't
work at all. So what, who cares? Try it again, try it
on a different page. It's not the end of the world if something didn't work out, but you've learned your lesson, you've made your node,
you won't do that again. But maybe you'll come
across something absolutely amazing,
very subtle touch. I really, really like it. Look at the blending that I
can get here on the gradient. Can do a lot of low shiny effects here on
the lip with this pencil. It's the tiny details that take our work from good
to incredible. And I want you to be an
incredible colorist. The best tip that I can give
you is keep experimenting. Don't just blindly follow somebody else's collared shirts. Learn your own lessons. Make your own notes. Make your own art.
Every coloring that you complete is
indeed a work of art. Okay, I think that's enough. We definitely don't want
to overwork this step. This is an interesting one. This is a step that takes the most personal
decision-making. So spend some time with it. Don't overthink it. Trust your
gut, trust your intuition. See what's missing. Try adding different colors. Don't go too crazy. This isn't a salad.
We don't want to throw everything at it. But three or four new
colors to balance things out is just what
the Dr. ordered. Go for it, add your colors, and when you're ready, we'll do our final touches with black.
27. Final detail (dark skin): I hope that went well. I hope it wasn't too
scary, too intimidating. If you did get intimidated
and didn't add a lot of these colors
just to play it safe, just to be able to move forward. That's perfectly fine. You will develop that confidence
as you keep practicing. But do keep practicing, you will not master skin tones just by following these
three colorings with me. This is something that
you need to take with you into the rest of your life, into the rest of your career
as an illustrator or as a colorist practice every day, not necessarily with
a full-page portrait, but with something as
long as you're shading, as long as you're working with
color, you're practicing. So even if you're working
on a small scale, if you're coloring and coloring books, practice,
practice, practice. Every day. I know that it's a scary concept to be
doing something every day, but honestly that's
what it takes. I'd love to tell you
that you should draw and color on your own free time when you have time off from
walking the dogs are going to the office
or going to the gym. But that's not how it works. You need to find the time
to practice every day. If you can find 10 min to sit down and practice
your shading skills, you will improve really quickly. So find the time, put it in your actual schedule. Reward yourself for doing it, whatever works for you. But practice every day. The dimension practice everyday. Practice everyday. Our final touch,
of course, black. Here, we're going
to add black to all the areas that
will be the darkest. So as we already discussed, that will be the facial features like the eyebrows,
eyelashes, the nostrils. But also we will add it for contrast on the lips
to make the lips look more shading to the hair
and to some of our shadows. As you learned by now with
my other portrait work, we don't add black for the
sake of the black pigment. We add black to
create new shades. I've already established colors. So here we have a
beautiful brown gradient. But I want it to be a little bit darker for that high contrast. So I'm very, very gently adding some black to make
the contrast stronger. Remember that
nothing should have really sharp outlines
on the face. Even things like eyebrows, no matter how well
she her eyebrows are, even if she goes to the
salon and gets them all plugged or whatever people do with their
eyebrows and salons. It's not going to appear
like a clean outline. I'm doing a lot of
gradient shading in this area right here. Very few actual outlines. This is one of the few is the eyelashes because they are actual individual
hair follicles. Everything else, all the facial features, they're all diffused. This is one of my favorite
areas to work on. These final steps on the eye, on the eyes and eyelids. It's where we bring out
all the definition, all these beautiful
wrinkles that she has. These folds of the eyelids. Naturally wrinkles. They're really folds. We, we all have them and
they're really attractive. And to anyone who is
worried about losing definition on a face
with a dark skin tone. Look at how much
definition we have. In fact, I feel that
we have a lot more definition here than we
do on a pale skin tone. There's hardly any
definition here at all. A lot of the relief
around her nose area and her cheekbone areas just lost because there isn't
enough pigment to play with. Here, however, we can see
everything a lot cleaner, a lot more clearly. I want to add a lot of black to the lips for the high contrast for that shine effect
that we talked about. And also to see if I can clean up these
outlines a little bit. Or rather diffuse these
outlines a little bit because they are
quite clean to clean. In fact, we'll try to hide
them with this pigment. That looks really nice. A little bit of a darker
shadow in the depths of the mouth to make it look
more three-dimensional. And of course, this part, nice. I really liked that. We're really hiding
those outlines now. Yet her lips don't look black. They have so much colours, so much definition in so
much structure there, beautifully rounded and shiny. At this point. Spend a lot of time just stepping back
from your drawing, from your coloring
and assessing it. See if it still makes
sense from a distance. If something looks off
with one of her eyes, looks a little
weird, or her cheek is just not
three-dimensional enough. Go back and correct the areas
that need to be corrected. I do this a lot. I actually physically
stand up a step away. I assess my drawing, and I go back to the
drawing board with my corrections with
my adjustments. Because if you have your nose
buried in your coloring, you don't see the
bigger picture, you just gets stuck on
that one tiny detail. And finally, when you're done and only then you step
back for the first time. It may look a little
lopsided and you're like, Well, I did everything right. I followed all the steps. Don't get stuck in one position. Remember to step
back and assess. I think mine is done. I think she looks great. She looks balanced to me. She looks attractive, her
face is very realistic, her skin tone is beautiful. I could certainly
keep working on this further to make it
more photo-realistic. But I think for the purposes
of our demonstration, we can call her done. Now. I can't wait to see
what you create. So I hope you
enjoyed the journey. Go, go practice, make some amazing skin tone
colorings. Have fun. Bye.
 Lisa Mitrokhin, Live life in full color.