Transcripts
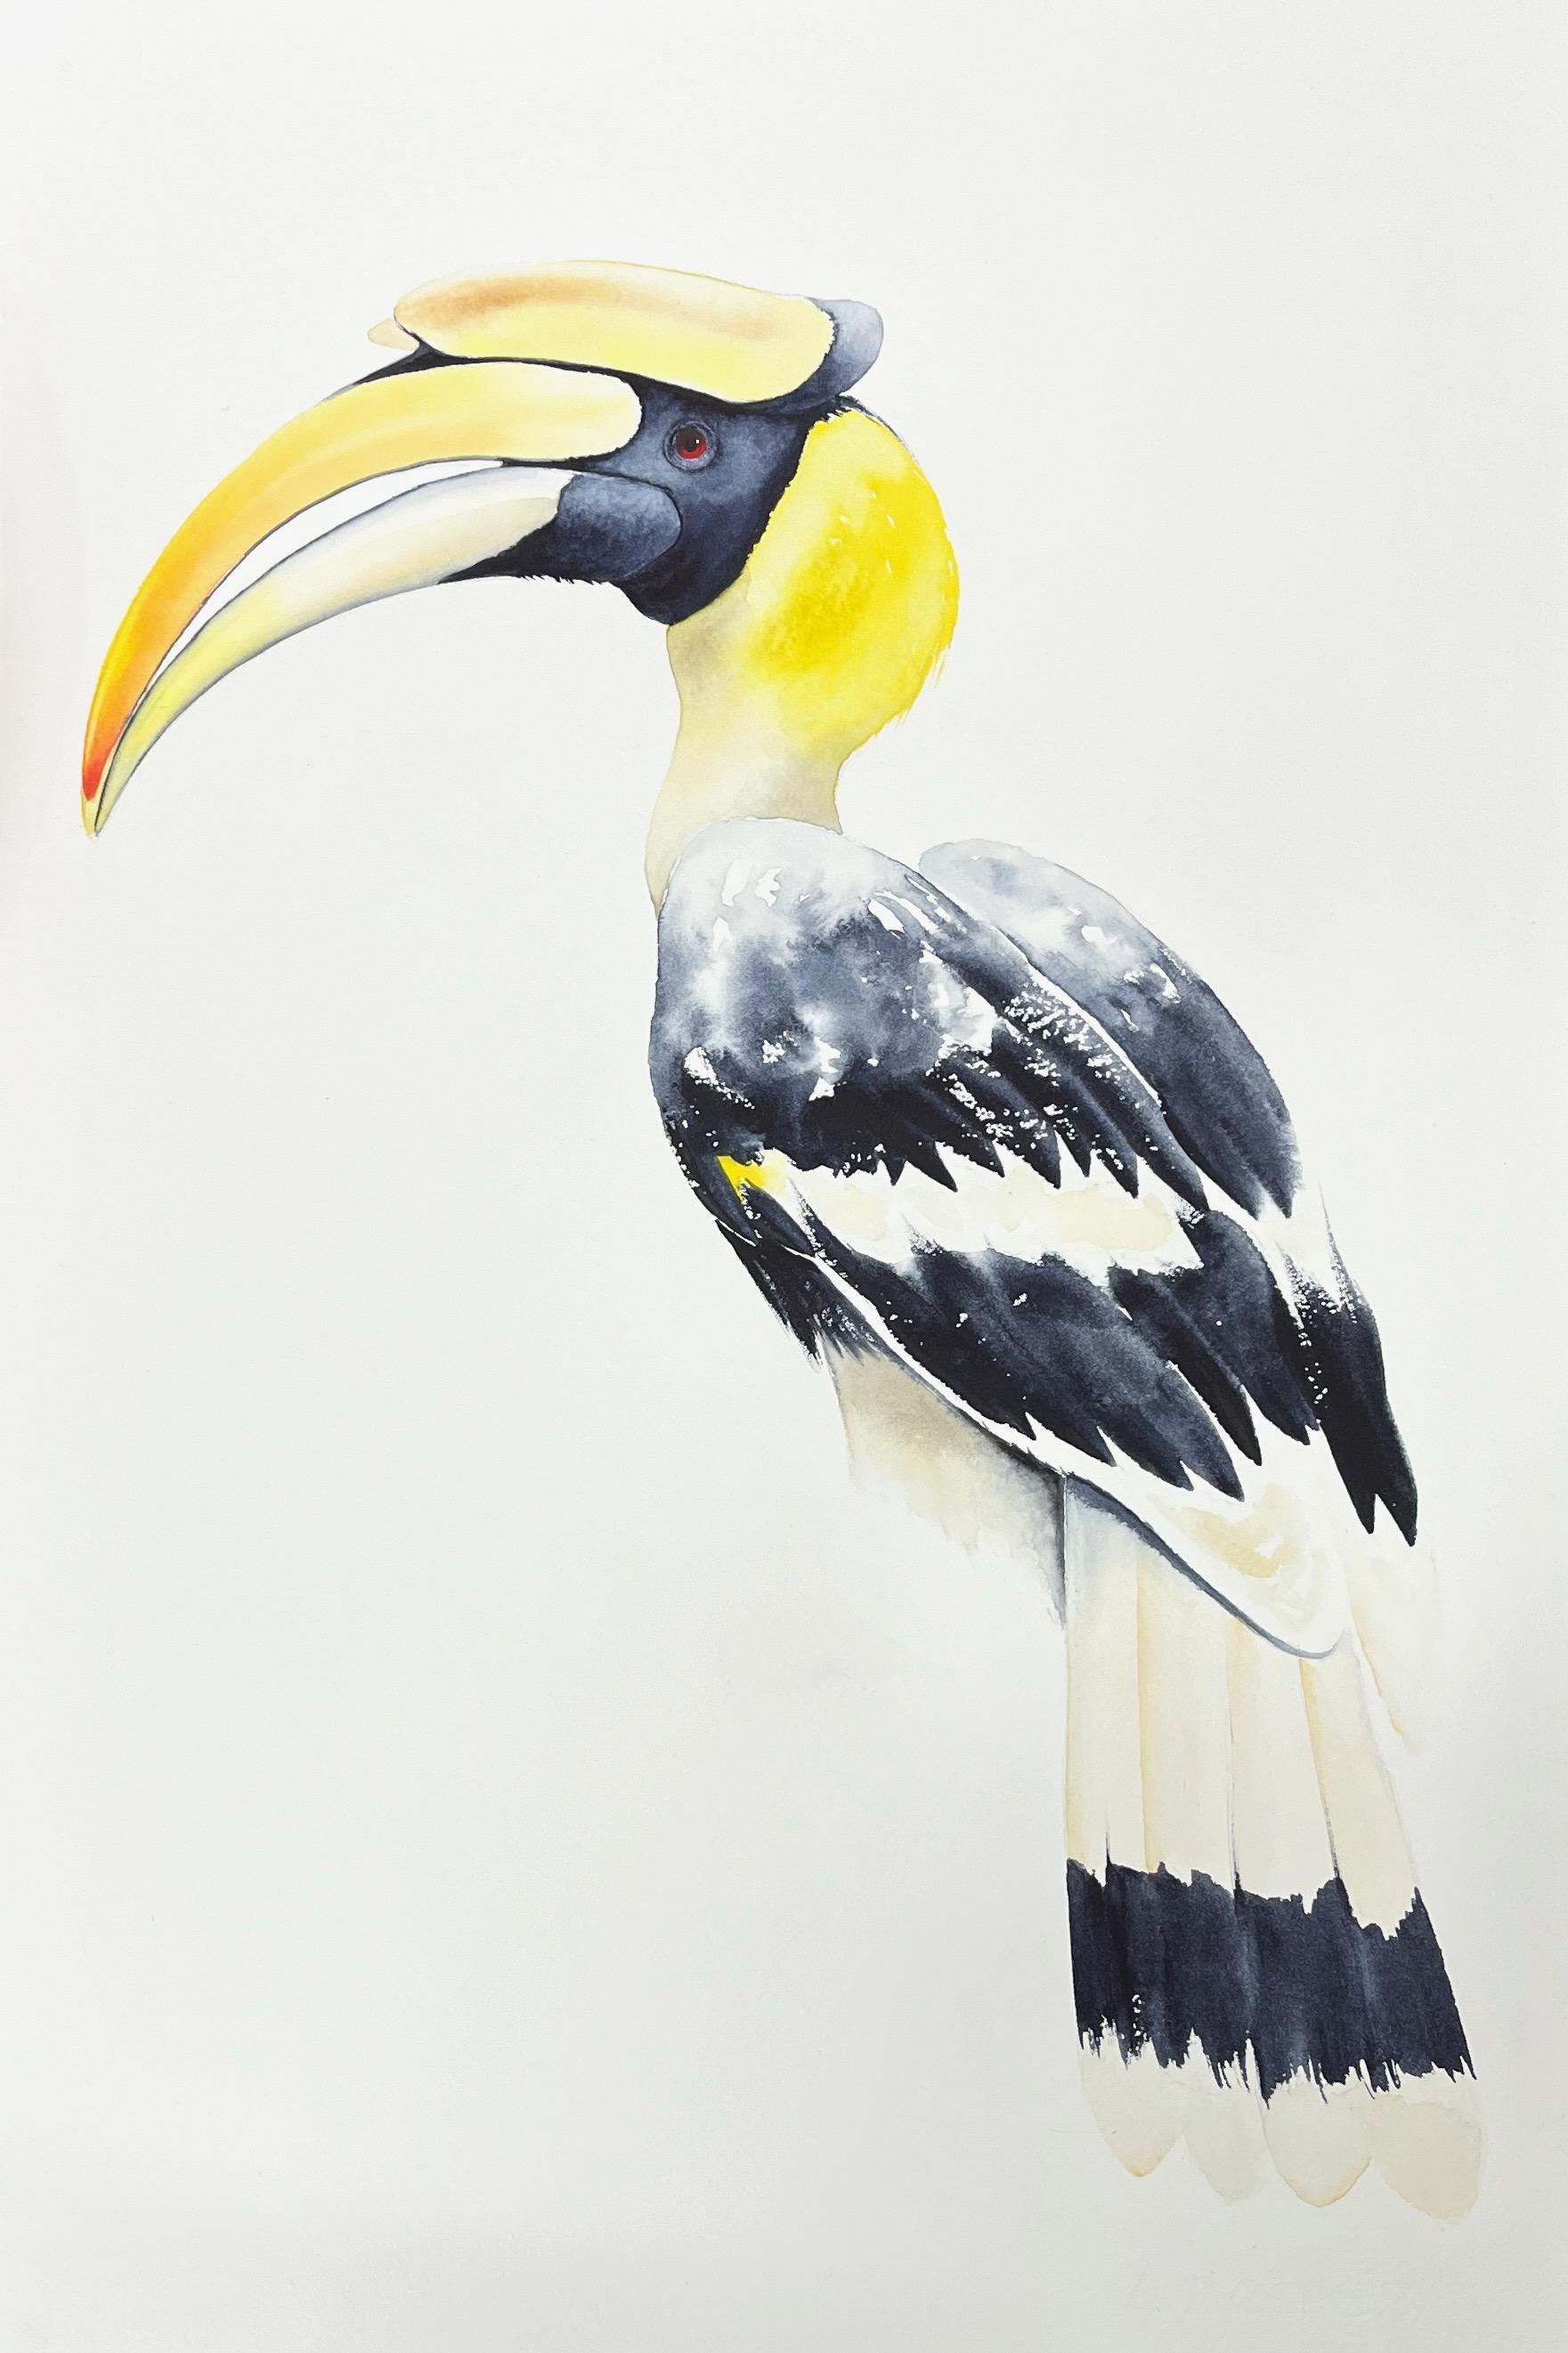
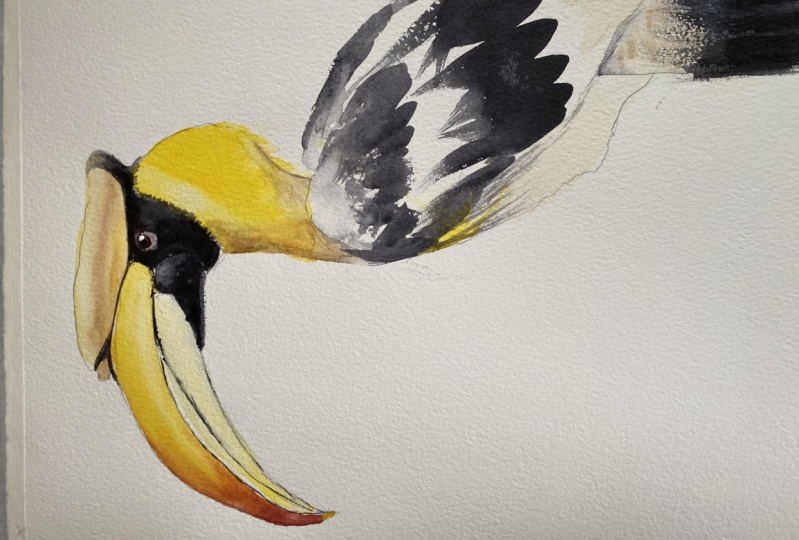
1. Introduction: Hi, my name is Nadine. I'm a watercolor artist
from Melbourne, Australia. And today, I want to
do a subject with you that's really, really vivid. And the exercise is about realizing that even though we've got really strong colors, so we're painting
a horn bill with really bright yellows butting
up against the dark darks, that actually it's
still about retaining the light that we don't
have to have layer upon layer of paint to make an effective painting that it's more about really
judicial placement. Of really strong darks
and really light light. So getting that nice
tonal contrast. So what we'll do is we'll go
through the reference photo, the sketch, the materials, and we'll go step by step
through the painting. Now, for me, this one
is quite a long class, this one, but it's
a lovely painting. So I'm really hoping
that you'll stick with it to the end
and that you're happy with what you've
done. So let's get started.
2. Materials: Materials for this class. We'll start with a
reference photo. This one is from Pixabay
and I've got a link in the material section
for you that will take you to that photo. Now, I am painting
flat on a board, but I'm not taping it down. I'm using 300 gram
arches cold press paper. Now, for the paints
for this one, I've used quite a
few, even though it's a really simple palette, really. I've got some cadmium
red scarlet hue from Daniel Smith
and some Pyle red. You don't really
need both of those. You could use one or the other.
That's just for the red. The Pyl red is there in the eye and this little bit
of red in the beak, the orange is from
cadmium red scarlet. Don't stress, just use whatever
reds you have for that. The black that you see in here is all Daniel Smith Indigo. The brand of indigo does matter. The Daniel Smith indigo is
quite dark, white black. If you're using, for
example, Windsor and Newton, it will be really quite blue. You can back that
off with adding some burnt umber into it or
some Bandyke brown, just adding something
else into it. The yellow, I'm using some
huntsy yellow medium from Daniel Smith and
some yellow ochre from Windsor and Newton
as well in here. I've also got a touch
of burnt umber. I have also for just a
little highlight in the eye, I've used a little
bit of white gouache, but if you've got titanium white or China white, that
would be fine for that. Now, you also need a pencil
and a regular eraser. And now I apologize in advance. I used a whole lot of brushes.
I'm not quite sure why. I just I kept grabbing them. You don't need
this many brushes. You need a good
medium size brush, somewhere in this kind of
range to get the beacon, to get these lovely feathers in. These shapes, that's
from this brush. See what you've got in your
kit that will give you a nice one feather per stroke. This tail I did with
the larger brush. But again, you don't go
out and buy one of those. You can get away with
whatever you use for this, you could use either of those
brushes to do the tail. Then I had a couple
of smaller brushes, just little synthetics
for the detail. Now, this one, I've got all the details of those
in the materials list. Now, this one, you don't need this unless you make a mistake. I made a couple, so I've got this stiff bright white brush
to lift out some paint. Now, other than that, you'll need your palette,
box of tissues, and probably a couple of
jars of water I would recommend because
you'll get dirty pretty quickly using indigo. I think that's it. We'll
move on to the sketch.
3. Sketching Up: So we'll have a look at
the sketch for this one. This is it printed out
on an A four sheet. I've obviously gone
larger than that and I do find it easier to
paint larger than smaller, particularly when we want to
get some of these strokes in with just a nice sweeping
movement of the brush. Now, I've run out
of 300 gram paper. This is all I could
find in my studio. I've had to draw
right to the edges, and I really wouldn't
recommend that. I tend to find if I have
to squeeze the image in like this that I get a lot
more tense while I'm painting, you're much better
off giving yourself more room around your sketch. So pay attention to
the shape of the beak, I've changed the eye a little bit because it
looked a little bit evil. I've made it a little bit rounder than it is in the image, and it's quite hard
to see in the image. Don't worry about
the feathering here, we'll deal with that
with the brush. Just give yourself an indication of these lines through here. Keep the pencil fairly light around these areas that have got yellow because pencils
quite difficult to get off under the yellow. If you really don't
want to sketch it, I've also included
for it, particularly. I know that sometimes it
can be hard scaling up. So this, I've got two
templates for you, they go together like that. That's two A four sheets
if you want to use that as a template, go ahead. I think we're ready
to start painting.
4. Starting the Beak and Head: Okay, so we're going to start in this top part of the beak. I've got some freshly
squeezed out Hansa yellow, and I've got some at mem scarlet hue squeezed
out in my well here. Now, to make it easy, I want
this really clean wash. So I've got clean water. Make
sure your brush is clean. I'm going to paint
with water first, this top area of the beak. I'm going to stay out of
that little yellow tip. I'm just going to start
with the orange starts. So clean water and
just wet that down. So come right to
the pencil edge. I am where's the light? I'm not saturated, but I've got a reasonable
amount of water on there. Then I'm going to grab. I'm going to start with some of my orange down in the
bottom, not enough paint. Starting in that tip, I haven't I squeeze that paint out a
little while ago. There we go. That's better. And then moving on
to some yellow. So coming on top of the orange. I've dropped that
into the web page. Then I'm going to tease that. Up, wash my brush. Dry it off a bit and just use the clean brush to drag
that all the way up. Each time I go back on,
I'm just drying my brush again because I don't want
to introduce more water. All right. Now I'm going
to drag my clean brush through that central area. Just to get, I want a bit of
a variation in my washers, I want a bit of tonal
variation there. I'm just lifting a bit
of paint in there. I might come. I've got
to keep my brush dry. Drag that through. Now, there'll be another
layer to go on that, but I just want that
first layer in. I want stronger
orange down here, but I want to leave this
transparency through the yellow, and I'll have more
paint up here. But I want that first wash on, then I'll come back
when it's dry. Now I'm going to do the
bottom one as well. I'm going to do the same
thing. I'm going to paint it down with water. I can't touch the
bottom to the top beak. And I'm staying out
of that black area. Now my water is
already quite yellow. I've got a little bit
of color on there, but I'm going to
take now just the yellow and down the bottom here, I'm going to throw some paint in and let it bleed so that I'm transitioning up and
keeping the light here. Now, underneath here, I've
got a bit of a shadow. I'm going to start
that shadow with just a little touch of I've got some Daniel Smith lavender in my well. That's
what I'm going to use. Just tidying up that. Shape. A really soft at the moment. But while it's wet,
got a little bit of lavender didn't get enough
water in my lavender. I'm just dropping just
a touch while it's wet into the bottom of that beat to get that
really soft ble. I'm going to pop a little bit along the top there as well. While the page is damp. I'm just drying off my brush and then just pushing
it around a little bit. Or really gentle or really
soft at the moment. Now, while that's drying, I'm going to pop
the yellow in on the back of the
head here as well, because I've got the colors out. I'm not going to do this
one yet because I want to make sure this is fully
dry before I come to there. But here it's a separate shape so I can get
some color on. Just my first wash. What
I'm going to do here again, just popping down
some water first, probably patchy initially,
damp not soaking. I'm going to pick up
some strong, thick, creamy hearts yellow, pop it in, come up onto the
tip and just drag. I want those little flicks. Now my pencils quite heavy
there so that you can see, I would normally back that off because that's going to be hard to get off
under the yellow, but I'll leave that on there so that you can
see where I'm going. Coming up here under that chin. Then I'm going to wash my brush. Then I'm going to
switch I've got some yellow ochre here and
that's what I'm going to throw in underneath because
it's not quite that same yellow under the
spit of the neck. At page is still wet. Teasing it through. I might get a bit more light. I just picked up some water. I think I want a
little bit more light around the face here. I'm just lifting a bit
of paint while it's all wet just to get this highlight at the
back of the head here. Now, all through here, there are all sorts
of darts going on. I'm not going to
worry about that just yet. I want
to do that later. At the moment, concerned about getting a little bit
of a highlight through. I've got a few little
flicks in here. I've got a couple of bits
of white paper and I'm going to leave them.
I don't mind them. I'm just going to tidy up
this little bit here. Okay. Then that's it. I'm going to come
out, let that dry. I'm going to make
myself cup coffee, let it dry for 15 minutes before I come in and
do anything else. Now, the reason
I'm doing this so that this yellow has
got to stay clean. I want to have that on before I start mucking with all
the black on this one, because once you start bleeding, the blacks, you can
get into stripe. Step away, let that dry.
5. Top of the Head: Okay. It's been maybe 15
minutes. I'm well caffeinated. We're going to do the
yellow up the top here. Now, I reckon I can
see a little bit of burnt in there as well. So not just a straight yellow. Sticking with my medium
brush. Same idea. I'm going to wet,
that was dirty. I've got my jars to clean. It's dirty on the
edge. All right. So I'm not too worried about this little bit here
because that's black. So I'm not being too tidy, but just wetting down
up to my pencil edge. I'm fully dry here, so I don't have to
stress about that. Okay. The pick up a bit of yellow. Put it maybe on the bottom part and maybe on the top where
there's that highlight. Just let it bleed. I probably should put in
a little bit of the cad. What is it? I haven't
used this one before. Cad red scarlet.
That's what it is. Pop a little bit
of that so that it matches the beak a bit. I'm just dropping that
into the web page. Then I'm going to pick up a bit of I've got some
Windsor and Newton burnt umber freshly
squeezed out. I'm just going to drop
that into that web page, dry my brush and then
move things around. I tried if I didn't dry my brush then and
tried to move it around, I would create blooms and mess
and get myself into strip. I just want to make
sure when I'm pushing the pigment like this that I'm absolutely not introducing
any more water. Keeping eye. It's quite dark up there, but I won't worry about
that until later. Now, I do want to keep this
highlight at the front, so I clean my brush and I'm just going to
drag my clean brush. Over the top. I'm going to
push that around a bit. Now, this isn't dark enough, this isn't finished and I need some of that
burnt under down here. But because I've been
mucking in here, I'm already dry. Well, dry ish. I I try and add more paint here, I'm going to I risk
mucking things up. What I want to do is let
that fully dry and come back and do a second layer in
there when I need it. I don't want to judge that yet. I also need to remember what colors I've used there
so that I can make sure I use similar colors in
this little the other horn, but I can't do that yet
because this is all still wet. Come out of that and let it dry and then I'm also
just going to pop a little flash of yellow I don't really
need it there yet, but just to stop myself painting over it when I go
to do the blacks. So there's just a little
flash of paint there. So I'm going to grab my brush, just pop a little bit
of water into that where those white feathers are, and just throw a
little bit of paint. On there. That's all I'm
going to do in there. Come out and let that dry. And before I stop, I'm going to do a
color in the eye. I'm actually going
to use some par red. I can't find it. I
think it's this one. Let's see. Yeah. So I'm
just going to paint. If you go on Google, go and
look at Horn Bill photos. They've got a nice red eye. This brush is too big.
That's not going to work. Find a smaller brush.
Hard painting circles. Alright, try that again. Smaller brush. I'm just
going to paint in. Okay. And when you put that in, just lift your page up to
make sure that it's round. Okay, go to let all that dry. Then we're going to
come in and start with all our blacks.
That's a fun bit.
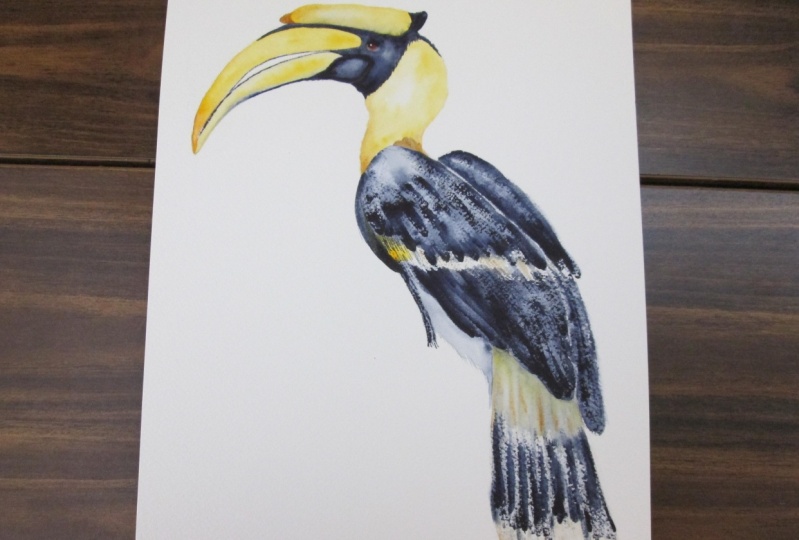
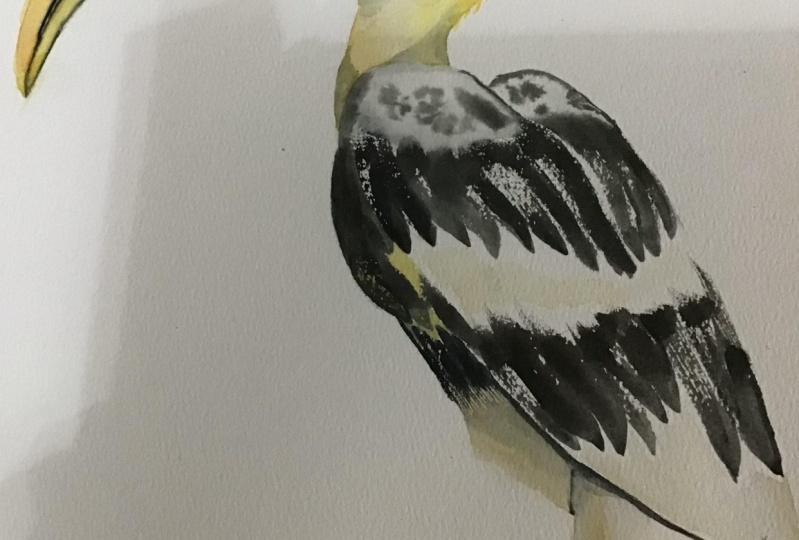
6. Wings: Okay. We're going to do the
black in the wing now. I said before this
is the fun bit. It's a fun bit, but it's
also a bit where it can go disastrously wrong because
you really only get one hit. And when you're using
really staining colors, I'm using
indigo for this. Once you've got it on, not really much you can
do to get it off. So you have to be confident, take a deep breath and just go. Now I'm moving up to
my size 12 brush. I've got clean water,
so I've gotten rid of my cactus jar and I've got
freshly squeezed paint. Now, there is still a lot of light through the shoulder here. And there's a little bit
of light through the back. If you've done any of
my classes before, you'll see me do
this lots of times. I'm just going to roughly wet down patly through I'm
completely drying that yellow, just patally wet through the wing down to about where I hit that white line of feathers. I want to keep some separation between the shoulders here, but I'm also going to
pop just a touch of paint water, through here. Now, underneath
here, just to help me underneath this white bit, I'm just going to
run just a touch of water way down that wing. Let me see if I can had it, then lost it. There we go. Patchy wet. Now,
I'm going to start. Where am I going to start?
I might start here. I'm going to get up some
paint, really creamy paint. I've picked this brush because I like the shape that it makes. I'm thinking about these
feathers down the bottom. I'm not thinking too much about where those whites are
other than I probably want to start start
my strokes down here. I'm going to keep my
finger on about where I want to start so I don't Sure. Okay, so deep breath. I'm going to I've got a big
lump of paint on there. Don't want that. All I'm
using the tip of my brush. Down, up, down up. Keep moving along,
load up again. And the feathers
change around here. Kind like that we'll do. Now I'm going to move up
before I dry up here. Where are we? I Probably need. That probably comes up. This
is one of those issues. I like that little dry stroke, but I know I need a little
bit more black here. Try not to cover it. All right. Now, this yellow, there's
actually a black feather. Just covered most
of that yellow up. That's okay. We'll go again. Now, I'm going to start this other line of feathers and I'm going
to turn my brush on the side and change my angle
a bit as I'm coming through. I don't like that
one's a bit too. I'm just going to must
that one up a bit. After these dry strokes. Now because I went and
set up my phone to film, I've dried out a bit up here. I'm just going to whack
on a little bit of water and let that start to bleed and bring that
all the way up. My rooms quite warm, so I've dried pretty quickly. Now I'm just whacking
on a little bit of paint and letting that
water move it around. Now, what I don't want to do is get too heavy up the top there. I just need to carve
out that shape. Then I'm going to switch
maybe to this guy, smaller brush and just tease that up to
that shoulder, join. I need some white paper, but I don't want it all to be too many whites.
I'll look spotty. Softly softly. Okay. Now, I've fully dried on this side as well now because I've
been mucking around. So I'm just going to
wet it down again. Now I threw my big brush
into my water jar, so it's going to
be really soaking. Before I pick up more paint, I want to dry that
off because I want solid paint in here. Now, this one, I'm
going to start. Where does the see that one probably maybe I'm
going to start about here. No one's ever going to
see reference photo, so it doesn't really matter. I'm going to do a
couple of strokes. Then I'm going to come
up into the top part. One, two, maybe that way. Then I'm going to move
up. That's funny. That's what happens when you drink too much coffee.
My hands really shaky. What I was hoping to do
my brush is too wet, so I haven't got any of
these little sparkles on this side, so I dry it off. They don't really match
as well as I would like. I want to match that shoulder with that shoulder
to start with. I'm going to take
a bit more water and like I did on this side, just let it bleed up so
I don't get too heavy. It is darker on this side, but I don't want to get really strong too early in the piece. That was a case of my phone started ringing
while I was painting too many distractions
and that didn't quite go to plan,
but I don't mind it. The only thing I'm a little bit annoyed about is
that I would have liked some of those
broken straight set, but I can't do anything about it unleasGt them on that side. There was too much going
on then. Don't do that. If you do do that, B that's staining,
because it's indigo. You need to be a bit quick
about getting that off. I would tend to give it a spray to get the
worst of it off. Then I've got a magic sponge. Just a supermarket job that you get in the
cleaning aisle, works a treat for that. Because if you
leave that indigo, if you've splashed it,
it is hard to get off. All right. So I'm going to come out
of that and let that dry and then we're
going to come and do the blacks in the face and
then we'll do the tail.
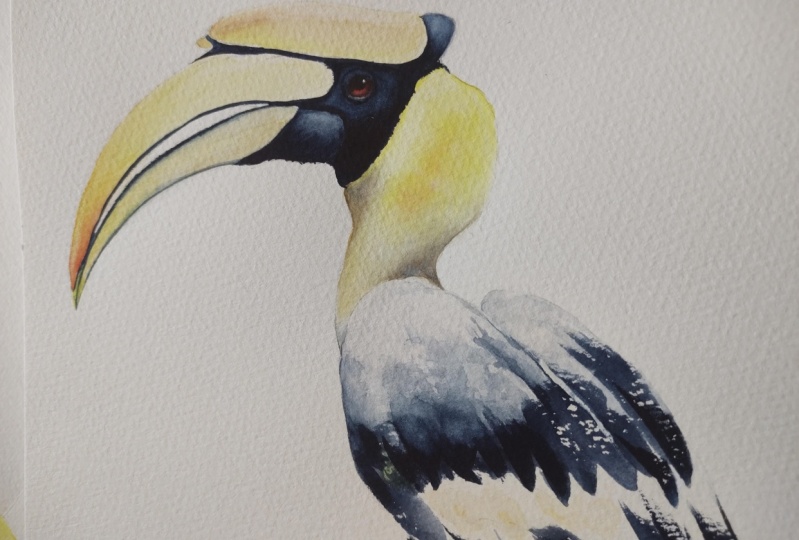
7. Starting the Darks on the Head: So it's been about 10 minutes. I can get into here without if I put my hand on the
wing, it's okay. So we're good to go back
up into the face now. Now, I'm going to use a couple
of smaller brushes now. I know I keep switching between a lot of
different brushes. You don't really need
that many brushes. It's just I've got
them sitting here, and I keep picking them up. So I've got a medium
to small brush and then this really little guy
to get into the small bits. So I've cleaned my water. I'm going to wet down with the border first just
because there's a lot of. Although this is black, there's still a lot of light in here. I think I might start
around the eye first. Actually, no, I
start in the beak. Here. Now, my brush
isn't very clean, but that's okay because we are going in here
with the black. Damp along that join. Painting to my pencil edge. Really not saturated. This is just Not a
huge amount of water. Now, while that's wet, I pick up some indigo. It actually there's a little
bit of brown in this black, but because I haven't
done it on the wing, I'm going to stick to
the straight indigo. Often I put in an extra color into my indigo to
make it a bit richer. In this case, you could
put some burnt umber, a bit of van **** just to make
it a bit more interesting. Can't talk and paint. Can't get close to the pencil
line and talk. There we go. What I'm after, see how it's starting
to bleed up there, but I haven't there's
not quite enough water. It's not enough movement, so I'm just going to throw
a little bit more water on. Don't have to be terribly tidy around this bit
because we've got more black to go
and tease that up. All I'm really
looking to do is I just want to keep that
highlight that's in there. Now that that's all
wet, I can pick up my cremia paint and
mean it a bit more. I'm really thick paint. Now. I'm just coming in. There are a few little this line along the beak here
isn't completely smooth. There's a little bit of
texture going on there. Now, there's a little bit of feathering. Let's see
if we can get it in. Along the bottom
of the beak here, there are some little flicks. So the trick with that is not do really big
fat one like that, but also to not get to
what you'll find yourself doing is that you
get really pattern and you put them at
all even spaces, which isn't really
what you want to do. You want them a
little bit random. Now, this will dry lighter, but that's okay because we can go back and add more later. It doesn't matter if we
have to go in a few times. Now, I like the idea
there's a black along the top there where
it joins the other one. I'll pop that in now I want to wash my brush and
just tease that up. Dry brush because there's
enough water in the page, softly working that
until I get to about the intensity of paint there. I think I probably like
that amount of light there, but now I need to
strengthen underneath. While it's still wet
enough that I can keep adding paint,
I may as well. Last time, I'm just going
to try my brush and again, softening that transition
from the dark to the light. I'm going to come
and do this spit now and reconcile
what's going on here. Now, of course, again, we've got a lot of
light on the top here. So wetting down. And then I'm going
to grab paint. I think I'm going to
come from lets see. I'm going to come from this end. I'm turning my hand because
I can't get that shape in, but be careful of
touching this one. I'm just going to come along, tip down, dragging my brush through until I come
up and touch that wet. Come back here and I'm just
going to put that shape in. I'm just going to tease my brush dry brush down the very top of that beak and then I'm going
to come back fill in here. Now, if you can't do that without putting your
hand in this bit, wait until that's dry
before you get in there, but maybe it'd be easier
if I turned it this way. All right. I'm just
looking at the reference. It comes a little bit
around the front there. Okay. Now, that's all dry
under there, coming around. My room is so warm that this
is drying pretty quickly. I'm just going to throw a
bit more water on here. I'm getting caught
on everything. This is a problem with
trying to fit within a small video frame. All right. So now I'm just teasing it up. You can see I've got no
movement there because it's dried so quickly. I'm just going to throw
some more water on the top, being careful not to get too heavy because I
want the light up there. I'm going to
strengthen. The light probably stops about there. I'm just dropping more
pigment in there. Then there are some it's going to pop a
little bit of paint along the join between the yellow orange and black just to get a
little bit more interest. Then I'm going to pull the black down behind the back
of the head here. I can go on with a
dry stroke for that. Because I see these
little flicks because he's a bit fluffy there. I just want to touch
and then I can tidy up this shape. Underneath now. I'm pretty dry here now. If you're not, just sit tight
for five and let it dry, but I'm now going
to put in the darks in the rest of the face here. I'm going to wet down
dirty water actually, you'll be able to
see where I'm going. I'm going to be a bit careful. Although I'm dry ish, just make sure I've not
got any water there. I'm being a bit careful of
touching there at the moment. Coming on my join
for the yellow. I'm going to leave a little bit of a
ring around that red. Front of the face. The reason I'm doing this is in
sections because I know I want to leave
some lighting places. If I go really hard all at once, I'll know that I'll paint
everything in and then go, actually, I meant to leave a highlight there and I didn't. Now there's black
under the beak. I'm going to take thick paint, paint my tissue, come and paint along underneath
that beak there. I'm coming probably
starts from way down. Doesn't have to be completely tidy because lots of
raggedy bits in there. That's where the join is. Coming along. Now I need a bit more water in my paint
to actually go the distance. Now, I'll load up my brush. Really, I'm really drying
quickly in here today. It's not usual it's
freezing in here. Now, I can see I can join
that up because I think I am dry there. All right. Then along this little yellow
edge, I keep picking up. I've got dry paint underneath
freshly squeezed paint, so I keep picking up
really lumpy bits. Along this little edge, I want a few little
flicks and broken, not broken, different strokes. I don't want to paint
just a straight line. I want to suggest a
little bit of feathering. I might get my smaller
brush to do that. Now, I can sit
back. I know I need some light around
here. It's too dry. See how I can see my strokes. What I'm going to
do, I'm going to throw some water on that and force it to bleed a bit. Just mess that wash up because it's too I can see it's stroky. I don't want to see
my strokes in there. Okay. I'm going to
throw it really dark. That underneath here is one of the darkest
spots on the painting. So I'm going to throw
some more pigment while I'm still drying. I'm going to pick my smaller
brush up. I've got this. This is new, so it
has a nice tip on it. I'm going to see
if that will let me do this edge a bit better. I'm going to pick up some paint, paint my tissue because I've
got too much paint on there. I know that was
terribly wasteful, but I don't want a
big splotch of paint. Still a bit too wet. I'm
just kind of putting. I know it's a tiny detail. But when someone comes and puts their nose right
up on your painting, it's nice to have something a
little bit more interesting for them to inspect. All right. Okay. Now, the same, I want some of that around. This bit around the beak
here isn't all that tidy. There's a bit of messiness
going on in here. Just wriggling my brush over and trying not to make all I don't want to
make them all the same. That's going to be
darker in there, but we'll worry
about that later. And just before it dries
because it's nearly dry, I'm going to strengthen the
dark like we did down here, but just underneath the horn to suggest that that's
casting a shadow.
8. Bottom of the Beak: Okay, I want to paint the
black along the bottom k here. I'm going to stick with this
really small brush actually. I've got a bit more
control of that. I'm going to drag it from it
probably comes all the way. I haven't drawn that
yellow bit painted that yellow bit in yet, so it probably comes all the way in it's a bit ragged
and a bit shaky. So I can get some of that in. Okay. And again, I might
need to strengthen that. But while it's there,
I'm going to grab the brush and I'm going
to run clean water. I might go my slightly
bigger going to go in a slight bigger
brush, dry it off, and I'm just going to run
water just a little bit, just under the edge and see
if I can get it to move. You know, I reckon still
it's too hot in my room. That's dried almost
instantaneously. So what I'm gonna do is pop go again with another
layer of the indigo, 'cause I just want a
little bit of a bleed. All let's see what
happens now. A bit more. Go again. I'm doing exactly
the same thing again, getting that larger brush
and just running some water. So just really, really
softly in there. And then before I let you stop, I'm going to strengthen the
dark on the bottom, as well. And for that, I'm going
to take my medium brush. I'm going to run water along. Then I'm going to grab a
bit of indigo this time. I know I started with lavender, but I wanted a bit stronger. Just get my brush and
soften that off. Go again. I can't see whether
that's paint or pencil there. Wash my brush. Damp brush over that
join to keep it subtle. Okay. I know I keep
saying I'm going to let you stop. One more thing. Oh. Did it again. I don't have a magic sponge
in your kick, go get one. So I know I keep saying
I'm gonna let you stop, but I just want this in
before I forget about it. So clean brush. I'm going to go straight
onto dry paper. And I'm going to get
a bit of the yellow, a bit of the cad red scarlet. And then I'm going to chuck
in a bit of the burnt sienna. Not burnt sienna.
I got burnt tumba. I just a touch. Just so it matches what's
happening on the top. If they're not mixing, just grab a bit more water and
throw that on. Okay. Now I'm going to let you stop. Come and do the
work on the bottom for a bit before we go
and finish the phase.
9. The Tail: Now, please don't be
cross at me because I'm using another brush now. Now, you don't have
to use this brush. It's just because
this is nice and big, it makes it really simple
I'm painting the tail. But if you don't
have one of these, just use whatever you
used for the wings. What I'm going to do, I'm
going to pop a little wash of yellow Ocha stained water on the tail to just
start to get that in. I don't want to go into this
feather here on the wings. To avoid that, I'm going to just paint a
little bit of water down along that edge so I can stop my brush stroke
before I get there. I'm going to pick up a bit I got some yellow ochre I might just clean, it's a bit dirty. I've got to be yellow ochre and it
doesn't matter actually if I touch into the lavender. I'm going to start at the base, and I'm just going
to drag my brush, push down, drag up, push down, drag up. It's going to a bit
much color on that one. Push down, drag up. Then
I'm going to just wi off. I probably put because I use
this big brush to put it on, I probably got a bit more
water there than I want, so I'm just going to
wick that up a bit. Now, then I'm going to go back to you could do that
with the smaller brush, give yourself a
bunch of strokes. I'll just take a few more
strokes to get there. Now while this is wet, I'm going to suggest a bit of a shadow underneath this wing. I'm going to pick
up a little bit of indigo with my small brush. I'm just going to touch
a little bit of paint. And chisel out the
shape of that wing. That page is from water I've got on first and then
from the yellow ocha. Just starting to softly
trying to straighten up. I wasn't very straight
there trying to straighten up that tail. It's a really light wash
just to get my eye in. Okay. While that's drying,
I'm going to come and have a look in what's
happening in here. There's a bit, probably a bit more black here that I've missed and then I've got
this white under here. Now I can paint this
as long as I don't put my hand in this and I
don't touch this to here. I don't want to introduce any water from here
into that part. Going back to my
slightly smaller brush, I'm going to wet this down. Then I'm going to
grab a little bit of yellow oka because I need them to match the
tail and this little bit. Just if you're drawing claw
and the log, that's fine. Go ahead and do that. I am not, which means I need to be
pretty light on here. Little bit more yellow ochre. It's quite dirty under
here, quite yellow. Then I think I'm going to
take just a bit of indigo, live on the edge,
and just see if we didn't get enough paint. Not enough water
on my brush there. I'm just going to
paint a little bit, just to get there's a
little bit more feathering there that I missed and
then I'll chisel that out. Join that up. Then I'm going to paint my tissue
and I'm going to just drag. Because there's all that there's nice little white tips of feathers under there that I don't really want
to get too hung up, but I can suggest it by just popping that little bit ndigo in and just
letting it softly bleed. I'm going to extend that down. This is nearly dry there, but extend that dark just
a little bit further. Wash my brush. There'll be a few more darts to go in there, but I want to come
out of that bit. I'm going to have a look at
what's happening over here. Now here, again, I need to match all of these elements
here, the tail to this. There needs to be a little bit
of this yellow acorn here. I do want to keep
some white here, but I need a flash
of yellow ochre, apparently, I need
a flash of Indigo. Let me wash my brush. See if I can get rid of that. I'm showing you all
the mistakes today. Maybe I'll get myself to
clean tissue as well. Just whacking a bit of
water in here and in this one I'm just going to pop a little bit of messy yellow ochre
into both of those. Now, this one,
that was too much. I'll back that off a bit, wash my brush, soften that back. When you put on
too much pigment, you can just flood
it and wash it off. You don't have to panic. If it's not going
to move at all, I can just touch my tissue
to it because I need a few defining lines so that when I rub off my pencil, you can still
see what's going on. Now, there's more work
to go in there and more I need to put my darks in. I reckon I can do that
now. I'm going to pop those stripes in. I reckon we're going
to go with the medium, slightly bigger brush for this, pick up my indigo, creamy paint, not overthink it. And just pop in, putting my brush on the side and
then coming up on the tip. This one doesn't have a
very good tip anymore. Then I can come and tidy up. Watch out. I've got that great
big lump of paint there. Come and tidy up my shape. I'm going to turn my page
sideways and I'm just going to drag I can't get it. I thought I've not quite got enough to put
me in the page. I just want to drag
up a couple of little lines to suggest, doesn't really matter where. Just to give you that idea
of the feathers heading up. I also I'm going to have to do I'm going to have
to probably put a little bit of colour
down on the base of the tail to show
where that ends, but I'm going to let that settle in and deal with that when we finish off the tail
with these shadows. Okay, now I want to go
back into the face. I can't do that until this is dry because I'm going
to put my sleeve in it. So come out for five
and let that dry.
10. Finishing the Face: Okay. Fiddly bits now. Finding in my mess, right, small paint brush. I'm going to pop in a pupil
with some straight indigo. Again, lift it up so you can actually make sure
you're putting in a circle. Then I'm going to wash my
brush and just wet down, keep it dirty and wet
down around the eye here. It doesn't matter if you
touch the red bleed a bit. Wet the page with my dirty
brush and let it bleed a bit, and then I'm going to
grab a bit more indigo a bit wrinkly around the eyes. I'm just going to drag
a few lines through. I've got different
strength lines. Now I'm going to make
it darker up the top. Doing that, my lines
disappeared, so I'll go again. When that dries, I'm going to darken off the top
part of the red, but I can't do that
until that's dried. Now I'm going to work a
little bit on the shadow underneath the chin here. For that, I'm going to use slightly bigger brush just because I've got
a bigger area to go. I wet that down gently. I don't want to shift
that yellow too much. It is dry, but if I push
too hard, things will move. I'm going to bring
it down, covering that area you can see my
pencil line underneath there, which will not come off
now under the yellow. I'm going to mix a little bit of burnt umber and a little
bit of indigo together. I've got the blue and the brown. Then I'm going to drop that
into the page, wash my brush. And soften that in. Again, I know I keep
saying soft soft, but I need softly, softly wet and wet to get
this to work to best effect. Now, if you touch
that indigo edge, it will bleed a little bit
and that can look nice, don't stress if you touch that. I quite like that
hard edge there, so I'm going to
try and keep that. Tease that down a bit.
I'm also going to do. What to do? I think I'm
going to do in here, similar colors in this join. I've got a little brush now. I'm just wetting that down. My water is a bit dirty, so it's a little bit
it's indigo water there. I'm just wanting to actually I probably should have stuck with the same brush
because this is a little bit. That's too small. And you can see that by doing it
wet and wet like that, you get that really
nice soft effect. I'm repeating myself, I know. I think I'm going
to go a little bit darker actually there are actually some black
feathers there, but I didn't really put them in. Again, nobody will know that. I love those bits.
They're so fun. I might back to the
small brush now. I'm going to do the same
thing just on the chest here. Fiddly but effective. Wedding just in there. Kind not on the reference,
but just to make it work for what's
in front of us. Put a bit of paint on, clean
my brush, soften that. Nice and gentle through there. Now, because I had
to go and pick up my kid in between filming that
and that, my eyes now dry. I can darken off the top here. I'm going to use the
same blue brown mix, the burnt umber and the indigo that I use
for those shadows and just come in and
darken off that top. Part of the eye wash my brush
and just soften that in. If that dilutes the pigment, just go and pick up a bit more and drop it into
the top part again. When that dries, I'm going to pop a little bit
of a highlight in. Now, I'm just sitting back. I think I probably want to strengthen up shadow under here. This isn't quite
like the reference, but I really like the glow
that's through there. I'm not sure that I'm
going to touch that. I think I'm going to
leave that, but I am going to pop a little bit of. I want some of the
yellow ochre that's down here up on this beak. I'm going to go onto dry paper. I'm going to take
my medium brush, take a bed of yellow
Oca, milky yellow ochre. I'm just going to
put my brush down. And drag through, and
then a bit lower. It doesn't matter if I touch that indigo and
it doesn't matter if it bleeds, grab
a bit more paint. The purpose of doing that I'm just thinking about
the three dimensions, three dimensional
appearance of it here. I just want to curve that under, I could go a little
bit more again. Keep not picking up
quite enough paint. And that sort of
gives me the balance of the yellow ochre. The other thing when I sit back, speaking of balance is I'm
going to need a little bit of yellow ochre in
there, but not just yet. Now, I forgot about this bit, so I'm going to pop that in. That's pretty yellow.
So I'm going to go. My hands are yellow with my
small brush and just pop that shape in and pull it up. We're going to close
in that gap there. I'm going to strengthen the yellow right
at the base here. Just so that those
two match each other. What I am going to do, I
might come to regret it. I'm just going to see
this bit here bugs me. I should clean my water.
I'm not going to, but if you're doing
this clean your water, I'm taking my hard oil brush and I'm just going to
see if I can lift. A little bit of
light through that. I just don't like that little lump of paint that
I've got there. I just wash my brush. It's clean and just lifted
a highlight in the front. You might not even
be able to see it, but I've just got a little
flash of light there. My eye has dried, so I'm going to pop
just a spot gouache in the back corner straight in. That tiny highlight. I think the only other thing I'm going to do with that face is there are two flashes of light that don't
really make sense. I've got this flash of light here and that flash
of light there. I'm going to close those
in really carefully onto dry paper because it's catching my eye because it doesn't really make sense that
there would be that flash of light neither of those
places and this one. I think that's probably all
I'm going to do on the face. This is one of those
ones where I'm sitting here looking
at the reference. This doesn't look exactly
like the reference, particularly up
here in that horn, but I love the washes
so much and I love the light that I would
rather leave it as it is, not try to match the
reference and be happy with the painting that
I've got in front of me. I'm not going to
touch that face. I do need to now finish up down here and some yellow ochre
in the wing there as well.
11. Finishing the Tail: What I'm going to do to
make it easier for myself, I'm just going to write
out my pencil lines. Okay. We're on the homeward
stretch, I promise. Now, a couple of problems
I can see down here. So I can fix, some I can't. So first thing I can see this I didn't get I knew
that when I did it. I mucked up that. I
didn't get that straight. I'm going to just see if I
can tidy that up a little bit with the hard brush again. So I'm just going to clean
my brush and just see. Want to see if I can kind
of pull that out a bit. Just because every time I
look at it, it bugs me. Then what I can do is
rework that shadow. Because my water is
dirty, I'm making it. This is a little bit dirty, but we've been at this a while now and I'm being lazy and
not changing my water. I don't know why it's an
annoying thing to do, but that's okay.
You get the idea. What I am going to do now
is while that's still wet, I take my indigo again and just now reconcile
where that tail. Joins onto the page
and just soften that. I've moved that line
over just a touch. I really want to strengthen
this dark underneath there. My paper is wet here, coming on to dry down there, washing my brush,
pulling that through. Then I'm going to take
a little bit more indigo and drag that through. You can see it puts it sits
it on top of the tail. I think that's
nearly dark enough. You know how we put the brown
in the shadow up there. I could also put a little
bit of brown in here, but I think I'm going to stick
with the indigo for now. You can tuck that back up
to show me that that's where the wing sits
over the tail. Don't think I'm going to
worry about that one. I'm going to I think I probably need even a little
bit of dirty water. In this tail, I can't see
where those feathers end, it's not a huge problem, but I think I want
a little bit more. I've got dirty water here
and I'm just throwing that on I might just pop in just on the edge down the bottom here,
that was too heavy. Trying to do what I had here, a little bit of a hard
edge of the yellow ochre, just to chisel out
where that tail ends. Doesn't have to be really dark. I just need a bit of something. Even just that touch there, you know what? I think I want. I'm going to do a couple
of stripes of yellow acre. I'm just going to pop some
water down a couple of places, and I'm just going to drag Just a couple of strokes
veloca just to get a bit more. That was too dark.
I'll just get my brush and run it over the top. Maybe because I accidentally changed the color on there because I didn't clean my brush, maybe I'll do a little bit
along that edge as well, see if we can back
that funny color that I've got there might
just make it worse, but you can just do a
better job than I did. I'm officially hitting
mucking stage in there. I'm just going to
darken off in there and we're probably finished. I just need a bit
more mph in here. I'm going to wet this down. Be careful with this wet edge. I'm going to pop a little bit of my indigo and bunt
umber under here, softly softly, let it bleed. Se all of that. That's what we
want. Then in here, I'm going to go harder
with my indigo. I've got a bit of
brown there too. To pop the tail, this is behind the
tail for that, I need to strengthen the dark. Like that to push that
part underneath the bird. Softly, softly. Now I'm just sitting
back and having a look. I will put you can't quite see everything
in the one frame. I'm going to have to
tidy that up a bit. Just softening that in. Pretty happy about
that. The only thing I think is I probably
need just a touch. I don't want to fill
it in too much. I'm just going to pop a
little bit of water in here. In that white and throw just a little bit and you might not end up being able
to see it on the video. I just want a touch
of that warmth of the yellow ochre through there because it's
the whitest part of the paper and it will draw your eye I don't want that to
be the focal point, that's not where I
want you looking. That's a bit better.
The only thing I'm going to do before I stop, I'm just going to see
if I can tidy up. It's always one bit
of the painting that you muck up in the first
place that then you spent ages trying to fix and just trying to straighten
that edge back out. I should have waited
until I think I touched. I should have
waited until it was fully dry and I did not. Potentially, these
need to be darker, but I don't really want to
fiddle with that right now. I'm just looking I put pencil up there because I knew there was a little
bit of dark up there, but I can't rub that out. Let's see. Pretty sure
it's under the yellow. I'm going to have to put
because it's bugging me. I have to put a little
bit of water down. I'm just going to
pop a little bit of my bun tumba mix under there
and just soften that back. Last one, I do want to put some of that yellow that I
painted over in the wing. I'm just going to put that
flashy yellow back in. Stepping away from the painting.
12. A Final Word: Well, I don't know about you, but that felt like
quite the marathon. Marathon to me, so
I hope you made it to the end without giving in and that you're happy with the painting that
you've produced. And I'm hoping what you
can see is that even if a subject looks
really bright, really strong, you
know, that was really big yellows, big blacks that you don't have to paint 52
layers of paint to get that, but there's still a lot
of light in the subject and you still have to
try and retain that. If you have made it to the end and you're happy
with your painting, I'd love you to upload
a photo of your project to the project section on the Skill Share site for
me to have a look at. I love seeing what the
students have done and I'm very happy to give feedback.
Thank you for joining me.
 Nadine Dudek, Professional Watercolour Artist