Transcripts
1. 01 introduction: Thank you for taking this class. In this class, I will teach you how to make heat candy bar. I will first teach you how to make the chocolate
cake batter. Next, I'll teach you
how to bake the cake. Then I will teach you how
to make the chocolate. Next, I will show you how
to make the width Tukey. When all of the
ingredients are ready, I will show you how to
assemble your parfait. A self taught Baker. Many years ago, I
decided I wanted to make cakes and other deserts
for special occasions, using online classes, books, videotapes, and live classes, I honed my kick decorated skills until I felt like I was at the level that I could make professional-looking
cakes for other people. I then opened up my
own home bakery. I had this business
for several years and tell my husband got a job
offer in New York City. We decided this was a good
move for us and so I close down my bakery and we moved across the country to New York. Now here in New York City, I do not want to go through the steps to open up
another homepage, but I still love baking. As retired teacher,
I loved teaching. I decided to share my
skills with you on Skillshare Class is
from a video that I made several years ago when
I had my home business. I had a blog that went
with this obviousness. I no longer have to home
business nor the blog. But this is still a fun t-shirt recipe and I felt like I wanted to share with you, this class is aimed at the
bakery that would like to learn how to make parfait, making the printing
from scratch, the cake from scratch, and the whip topping
from scratch. I'm excited to teach you
the skills in this class. Let's move on to lesson
number one, making the cake. Yeah.
2. 02 Making The Cake: Today I'm gonna show
you how to make a candy bar parfait or trifle. It's fairly easy. The first thing you
need to do though, is you need to make
the chocolate cake. To make the chocolate cake, the first thing we're gonna do, we're gonna dump our
four eggs into here. Then we're going to 1 fourth of our chocolate mixture here. Now, all this chocolate
mixture is the water, water that's been
brought to boiling, and then the cocoa
together stirred, and then it is brought back
down to room temperature. Now what we're gonna
do is just mix this. Now ready for when we
put it in with the cake, We are now ready to
start mixing up. We're ready to now add
our dry ingredients. We are then going to
just turn this on, just slow The love to mix it up. Once we have that mixed up, we're going to go chocolate. The button. We want to incorporate,
mix this up. Well, we want to turn this onto just
a very, very low. We do that until we see all the dry
ingredients are mixed. I just want to scrape this down. The next thing I'm gonna
do is I'm going to turn this up to medium speed. That's now mixed for
a minute and a half. What we're going to do now, we're gonna scrape
down the bowl. We're ready now, if you add that in chocolate
mixture to this, but one thing I forgot to do, this mixture is add the vanilla. So I'm just gonna stir that. We actually have all
the ingredients. We're going to take this
chocolate and egg mixture and added to the batter that we
have in our stand mixer. What we want to do it
in three equal parts, having a mixed for about
20 seconds in-between each part for a total of a minute at mixing
time to incorporate, I'm going to pour about 1 third, just eyeballing it into
their lift this up. And then I don't want
to start telling me mine my 20 seconds until
I see that that is fixed. If I wanted to be a
medium speed, perhaps 27. Alright, now if I turn that off and I lower this back down because I find
it's easier to add my stuff. That's right. I'm gonna raise this up. I'm just gonna do it all. So I see that it's
pretty much fixed. It, it's gonna go back up. In trying to do
that one more time. This time we want to
make sure we get all of the stuff off the sides into the delicious chocolate. I'm just going to quickly
scrape down the sides again. Just try everything. We are now just going to definitely need it
for 20 more seconds. We're now ready to pick
this in our cake pan. Because we're going to be
breaking this cake up. I chose to click my cake
in a Jelly Roll pen.
3. 03 Baking The Cake: You'll notice my Gelly Roll pen has a silicone mat
in the bottom. I also spray down the sides. I'm gonna do is just dump
my cake batter into. I just want to make sure the whole cake pan is evenly distributed
with the cake batter. Because this is an
a Jelly Roll pen. It's probably only going to take 20 to 30 minutes, somewhere
in-between there. So I don't want to start
checking this at 20 minutes. This is radical in the oven. We will come back
and check it when the timer goes off
in 20 minutes? Yes, Justin, I'm
gonna pull this out. You'll notice it
comes out three. Pull this out of the quote, will be ready for
our department.
4. 04 Making The Pudding: Now to start making the
printing part of art, let's go to the stove
and make it to this pan. We're going to add sugar, cocoa, the cornstarch, the salt. We're just going to
stir it up together. We're now going to
turn the heat on immediate temperature and milk. We want to get this mixed air and we wanted to come to a boil. Stern at the whole time. Heats up. You'll notice there's less and less specks
in it because the chocolate and
the cornstarch in the sugar are dissolving
into the liquid. I'm switching to a width because I'm hoping I have
a hug to dissolve better. Notice, most of that chocolate
is now dissolved in. Now we're just
waiting for it too. It to a boil. When it
does come to a boil, we're going to want to
boil if two minutes. Starting. Now we're gonna look well Stern,
for two minutes. We want us to do it because
we don't want it to go lumpy. I can feel that
it's thickening up. The timer is about
ready to go off, meaning it's boiled
for two minutes. I got to turn that heat off. We're now going to put the
butter and vanilla extract. We will then stir it until it is mixed in and
the butter has melted. We're going to let this cool before we put in the parfait. We're now ready to
make the homemade.
5. 05 Making The Whipped Topping: We're going to start the homemaker whip
topping on the stove. We're going to pour
this 1 fourth cup of cold water into this pond. We want one teaspoon
flavored gelatin, which is less than one package. And I'm just going to
sprinkle this over the water. We're gonna love this for
two to three minutes. This has been sitting for
two to three minutes. We're now going to
turn the heat on medium-low until that is the result that is completely
dissolved and clear. Now we're gonna
turn the heat off. We're going to let this cool. We're going to place
one tablespoon of our whip cream into this bag. We're going to also put cream of tartar 1.5 teaspoon
into this bag. We're going to fill up the bag. Then we're going to mesh
this around until that is completely dissolved within. When I can't fill
anymore cream of tartar. I know it's ready. Now we're gonna take this cream of tartar whipping
cream mixture. We want to get it
into that vote. You notice it's kind of
sticking to the bag. I turned inside out. I'm just going to scrape
it all off into that boat. Then I also want to pour the
rest of this whip cream and over that to help clean anymore cream of tartar
that might be on or off. I'm going to put sugar
in my hand mixer. As you can see
this, this started. We want to add gelatin water. You can see it starting
to thicken up. I do want it to be. Now. I'm gonna take my friend
Nala, gonna dump it in there. I'm going to mix it just
enough to mix that. You have your homemade
with topping. Ready to go into heart failure.
6. 06 Assembling The Parfait: I have all the
ingredients now made and ready for printing
the perfect together. My K expect I have my
substitute in the fridge. I made the chocolate pudding. I also ground up
my six heath bars. Next thing I need to do is I
need to crumble up the cake. I have my fall and I have my k. I'm going to do is
grab from here. It doesn't have to be
neat and crumble. It. Maypole. I don't need really small, fine like when you
make cake pops, but you do want
it to be crossed. If you abolish not big
enough to hold it all that, sorry, I just fill up the bowl. And then you need more. You can come and more. We are ready now to
start putting together. Parfait are trifle made and one big container
that college trifle. When it's made an individual
cops to call it apart fate. I'm gonna show you
how to do both today. You can use many
different types. This is the one I'm gonna
use for the tri-fold. I'm gonna use this
one for the parfait. You can use round ones, you can use champagne caps, you can use wine goblet, whatever you want to use. Visa, what I chose. I like these and
I get him there. The disposable you can watch movies began because
they are hard plastic. One reason I like
these where I do the individuals
because I can find a whole lot of
really unique shapes to have my do certain. If I'm having a big part in, I don't really want to clean up the mess afterward by
washing all of these, I can just toss them because
they're not that expensive. I want to I can clean them up. Either way. They look really great
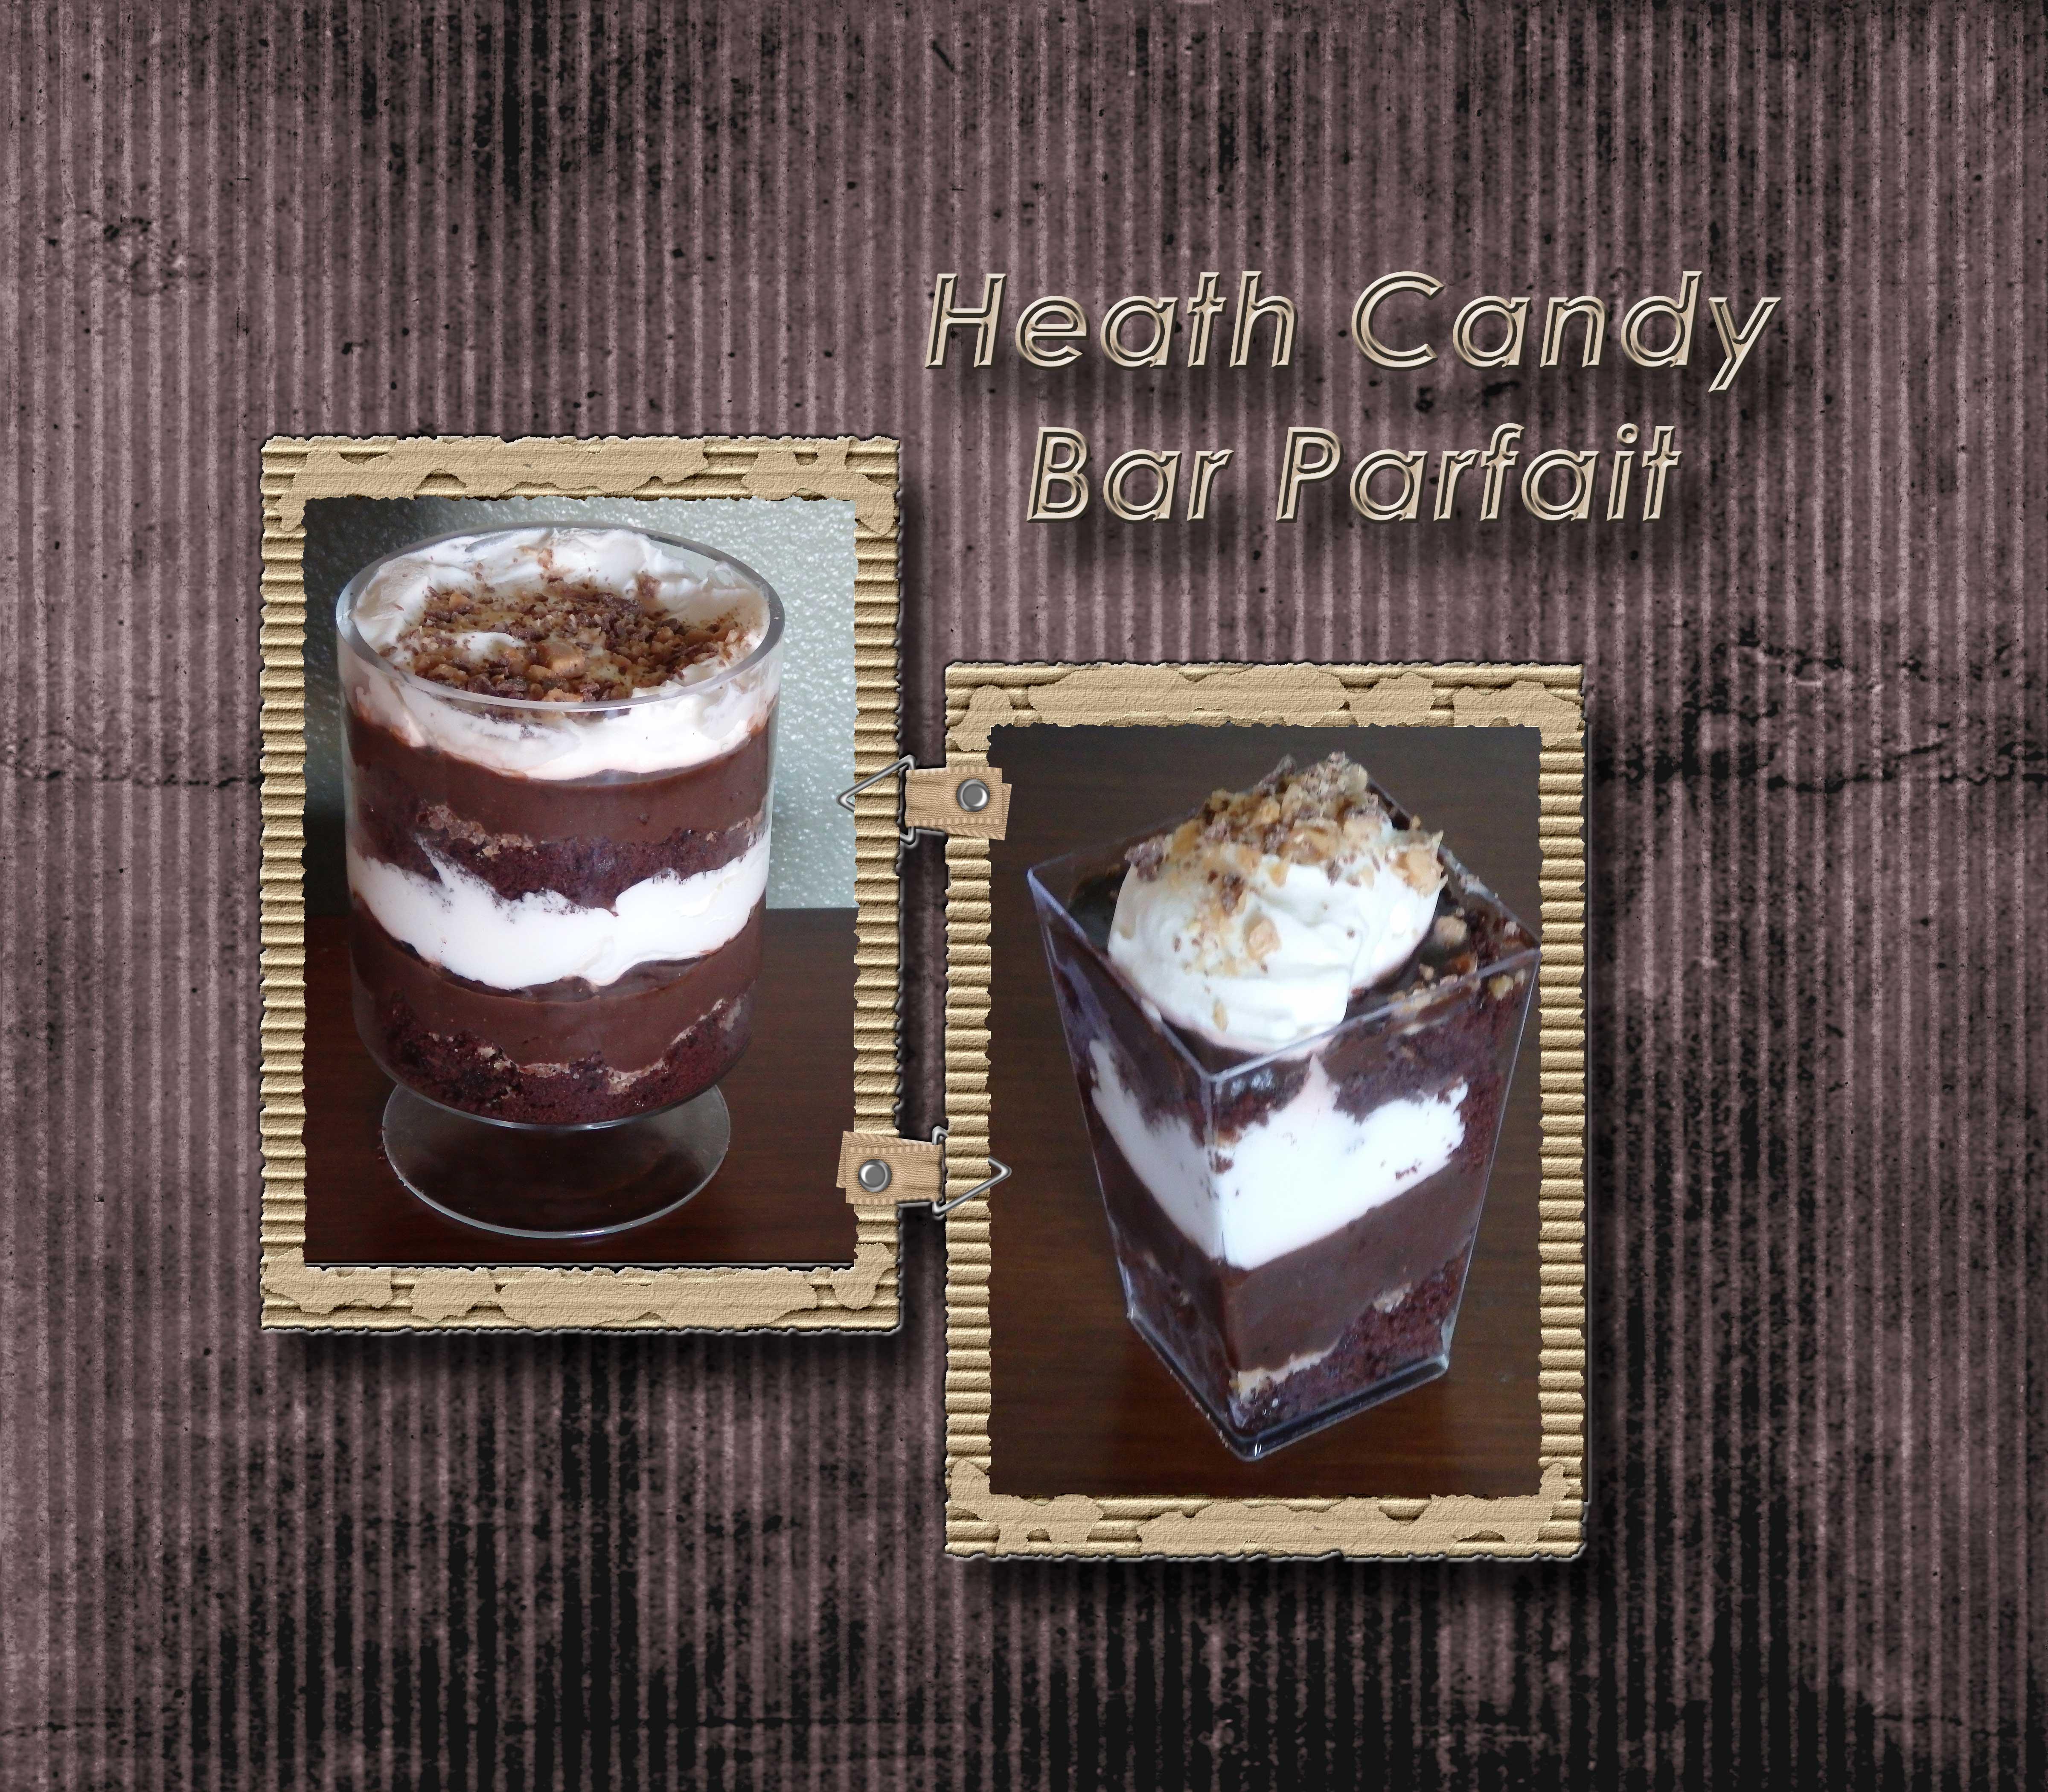
when there'll be insert. So let's get started. The secret to make
them polar phase or trifles is to layer them. With this one. We're
gonna start with a layer of chocolate cake. I'm just going to pick
in the bottom of my co, about a one inch layer, 1.5, one-inch layer
of chocolate cake. On top of this layer, I'm just going to sprinkle a layer of the heat candy bars. I'm gonna put my hand. Now what I'm gonna do, it, just boom it in their next
layer we do is the talking. Like to keep this pretty clean. I don't want to see white or
whatever I don't have there, so I keep that wiped off. Get a paper towel. I keep this wiped off because
I want showing through the glass B what that layers we're ready to
do our second layers. I just want to add more K12. That cake layer again, I'm gonna a candy bar. I want to get some
more, some more cooler. Just to help make that look
a little bit prettier. I am gonna spirit on
just a little bit at the more air you have a trifle. Let's move on to the parfait. Usually set up about
four to six at a time to do several at a time. Then I just picked a
handful of Crohn's. Notice I'm just using my
hands on this because it's that spoon
actually gives more than I wanted to know
because I just want it about an inch like that. Just put in Hansel. And then on top of that, I'm gonna speak with just a
little bit of the heat candy. Then we're ready to
do small spoonful. You may need to wipe that down. If you're trying to get
it to look just perfect. Remember we need to
put a lot of layers so we don't want to reinforce, unlike the trifle
like I showed you, is great if you're just having five or six or whatever people, not a whole lot of people. But if you're
having a big crowd, you're probably going to want
to do the individual just because the individual ones, you can make a whole
lot of little bit more. If you're not able to pick
the full two layers on. If it's only big enough
to put like one layer, then only put the one layer. I'm gonna try to get as
much of the two waves. These ones are a
little bit small, so I may not be able to
get before two layers. Gonna try. I want to ask someone
what the kick. I'm going to kind
of push that down. I want to try to at least
get a modified to layers. That way I can push
down that whip cream. We want to add some more with that last slide with whipped cream
is over at the top. It's gonna be okay. You just don't want
the rest of it. The caps, I'm going
to fill up the perfect with the chocolate. All we're gonna do now
is the whip cream. I've got this ice cream
scoop. I'm gonna pit. I could gap what she'd done a little
bit, but that curse me. More decorative on top. And then just push it
down a little bit. That gives me more that
rounded look on top. Then of course, I want to
finish up with sprinkles. We want to make sure they know
this is a heap candy bar. What does, does not gonna enjoy? A delicious personalized heath kind of par or Fe
for their dinner. Desert. The scratches, heat candy bar, chocolate truffle,
which you pick, your guests are going to enjoy.
7. 07 Final Thoughts: Thank you for taking this class. We had fun making our heat
candy, chocolate parfait. You learned how to make
the chocolate cake, chocolate pudding,
the whip topping. After making all
these components, we crumbled our cake and
crushed the heath candy. We started to build into layers. Our first layer was
sick, crumbled cake. It was sprinkled
with the heat can be pretty whip topping. We then repeated each layer, ending with an extra
layer of sprinkled candy. As I showed you in this video, this desert also works
great as a trifle if you want to do family style where everyone's
scoops up their own, I hope you're
parfait or try faux. Turned out the way that you
planted to your project for this class is to make it there
are multiple hard phase, at least 61 large trifle. Makes sure to take a picture of what you made and posted on
our project page. Tell us how it went. Look forward to seeing your
work and hearing from you. From my kitchen to your kitchen. Happy painting.
 Nadine Thomas