Transcripts
1. Welcome: Hi, my name is George, and it stays beautiful glass. You'll learn how to make
this wonderful landscape. Would over ten years experience as a
professional RNAs and over five years teaching both
online and in-person classes, I've developed a beautiful
method of teaching. This method focuses on
having fun and creating a wonderful project
while focusing on developing core
principles of painting, landscapes are a very
beautiful subject to paint, especially when you
use vibrant colors and luscious texture
with the help of a big flat brush and
it's beautiful corner, you will create some
beautiful clouds and a wonderful sky. You will understand
everything you need to know about the palette
knife in order to create some wonderful textures with the beautiful
small flat brush, you will blend some
wonderful colors together. This class is all about letting
go and having faith that your tools will create beautiful
and wonderful textures. This painting might seem
complicated, however, with some well-placed
guidance and encouragement, you will finish it in
under 30 minutes if you are ready to have fun
and play with some paint, Let's start the class.
2. Advice before painting: Before you start the class, there are a few things
you need to know. One of the most difficult
things to do in painting is to let go and trust that your tools will do exactly what you
want them to do. You might think
that this requires a lot of experience,
but it doesn't. All you need is a little bit of courage and to let
go of the outcome, every artwork is a great
opportunity to learn and see what your paints and
your brushes can do. And now, if you are ready
to let go and experiment, Let's have some fun.
3. Materials: For this wonderful painting, you will need a few materials. You will need a Canvas. This one is 30 centimeters
by 30 centimeters. A big flat brush, a small flat brush. A palette knife to create wonderful textures
and mix some colors, you will also need
some acrylic colors. This is white, this
is brilliant blue, carmine red, lemon
yellow just over here. And that's all you
need for this course.
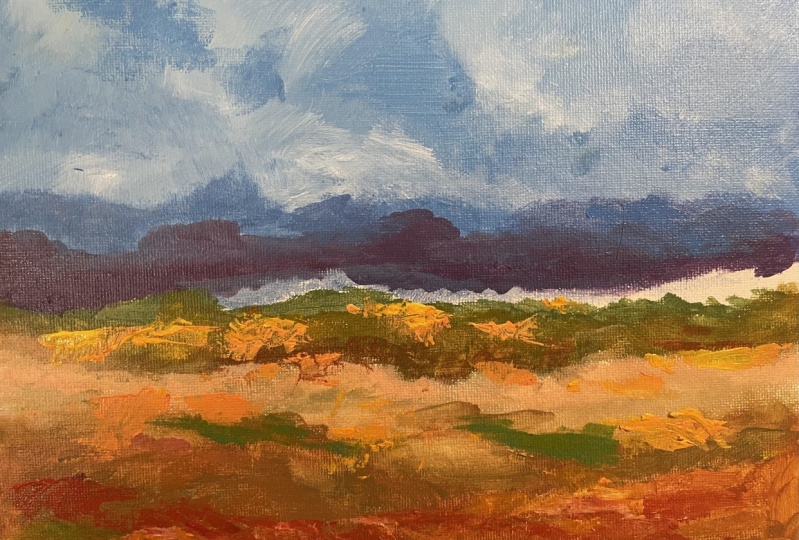
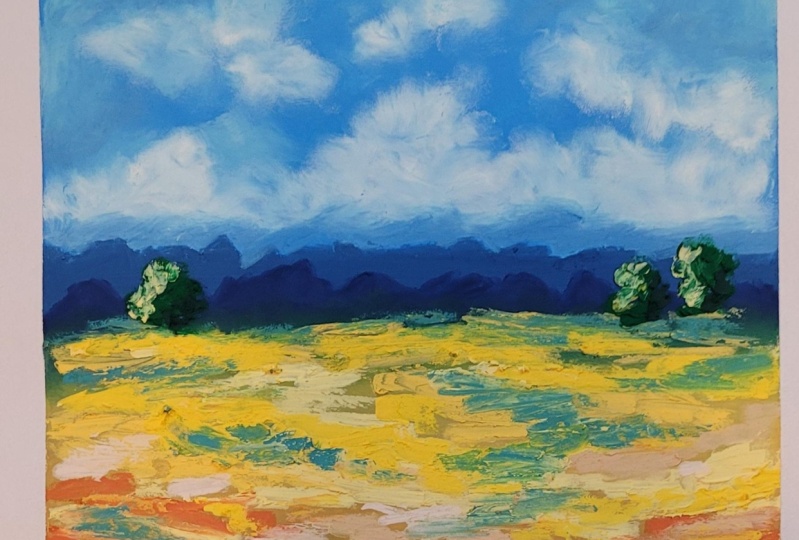
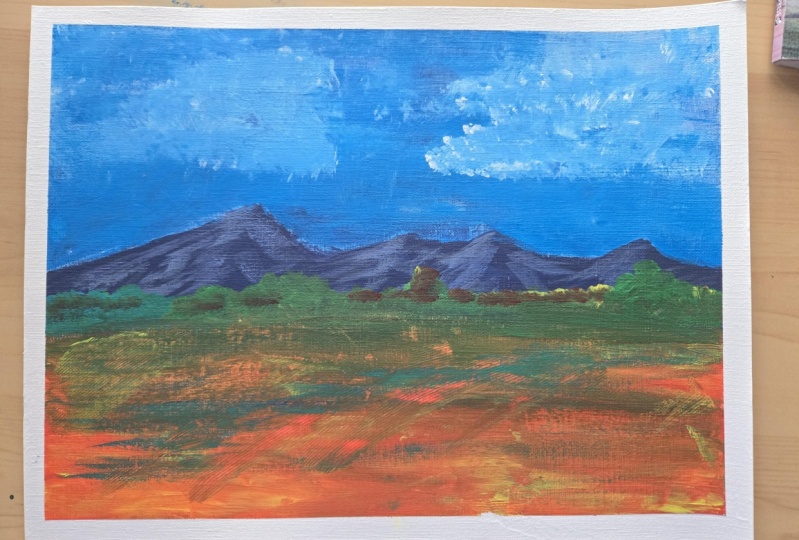
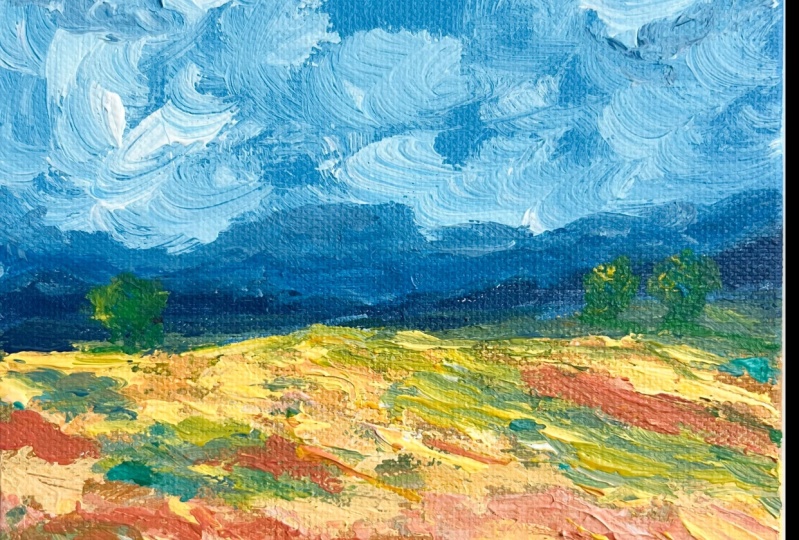
4. Blue sky color: This is gonna be a
very simple step. You will need the flat brush as well as the palette knife. Alongside those tools,
you will need two colors, white and blue as a simple tip, when working with
the flat brush, you need to press hard in order to get that paint
into the pores. Now, let's get into the step. Now let's get this beautiful
blue on the mixing plate, just over here at the top. And some white. Let's go get some white and put it over here on the
left of the blue. Okay? Once you've done that, you can grab the
beautiful palette knife, mixing in some white
into the blue. Just mix it very thoroughly with the palette knife and
grab some more white. Mix it well. From side-to-side. Put a little bit
on the middle of the canvas just to
spread it around, making a beautiful horizon line. And get that palette
knife clean. Just so you can grab
the big flat brush and grab a nice
amount of this paint. Remember to press very hard. And until about the middle side, just a little bit above the
middle side of the canvas. Just apply this color go and
spread that beautiful paint around until it
covers the top side of the beautiful canvas. Perfect. Okay. Going down and pressing a little bit and fuzzing
up that paint. Going from top to bottom until the top side of
the canvas is covered. Okay, let's put this
beautiful brush down. This was a very
simple and easy step. You press very hard on the brush and covered half of
the canvas with blue. Things don't have to
be very complicated in order to create
a beautiful effect. Now, let's go into the next one.
5. Fluffy white clouds: What a wonderful step this is. You will get to use the big
flat brush on its corner. And with some white
and some blue create some beautiful and
fluffy clouds. Remember, the Canvas
is still wet. Let's go into this step, grabbing the beautiful white and putting on top of the white just so we have a
little bit more, the Canvas is still wet. This is important,
grabbing the big, beautiful flat brush and mixing in with some blue, this Whites. Once you've mixed thoroughly the colors and you have
this beautiful medium blue, you can go onto the right-hand side corner and
add some beautiful clouds. Remember those
clouds need to have a beautiful and very
interesting edge. So it's not just the round, simple edge getting
some more color just to make it a
bit more white. And once you've mixed
the colors thoroughly, you can go onto the right side corner and start with the
corner of the brush, making some interesting edges, some interesting Clouds try to vary up To edges as you go down, leaving some beautiful
small spaces for the clouds to appear fluffy, getting some more color
and mixing it in. You can swipe a little bit once you have a
little bit of color, just so you create
some runaway clouds, starting from the left side, you can go down a little
bit, grabbing more color. This time, a little
bit more white. And putting some
beautiful accents of lighter clouds at the top and at the bottom in the middle, starting from the left
and going and making some textures and a beautiful
big cloud in the middle. And just a few runaways onto
the left and the right. Beautiful. And some more runaways onto
the top and to the right. Just over here. As you can see, things are very, very simple. The brush does everything
you need to do. And going to the left and making a few more clouds and onto
the right, onto the corner. Just so we mix this new white into the
beautiful lighter blue. What a fun and easy
step this was. It's extremely easy to paint once you let go of
the outcome and start letting the brush and
the paint play on the Canvas. Remember there are no mistakes,
only happy accidents. And now let's go
into the next step.
6. Far away mountains and dark clouds: Until now you've
learned how to make a beautiful sky and some clouds. You've used simple and easy ways to create those interesting
shapes and edges. Now with the small flat brush, you will get to create a
beautiful line of mountains, as well as adding some beautiful
shadows into the clouds. Let's go into the step, adding some more
blue to the palette. Just here at the top. Okay, adding some red as well. Just so we can create a darker blue with a
beautiful small brush, grabbing some reds and mixing it in right
next to the blue, grabbing some blue and going straight on the horizon
line just over here, indicating it onto
the right side. For the mountains,
you need to create some beautiful
interesting shapes. Don't make them all triangular. Tried to make them a little
bit squarish as well. And going to the left, remember to cover all the
canvas, all the pores. Press hard, grab
some more color. This time with some blue. And mixing it very well. We can go and create
just a little bit of another color over
here, under the clouds. Mixing in those edges. Whenever you touch
the mountains, try to keep them as
visible as possible. Don't blend too much. And going to the left
under the clouds, grabbing some of this blue, once again, mixing it
in with some white. Just so you can create another transitionary
colors in-between. Beautiful dark color and
the light of the clouds. These will be the shadows
under the wonderful clouds and the connection to
the darker part of the sky in the background
going to the left, in-between the clouds and
the darker part of the blue. And you can also put
this color at the bottom of the wonderful mountains. Okay. Softening up
a little bit of the mountains just because
they are very distance. Okay. Grabbing some of this darker
blue and mixing it in over this lighter one
in order to create some shadows into the
left side corner. Just go down and
mixing it fairly well. With the white on the canvas, with the blue light on the canvas going in
the same corner, touching it up a
little bit more. And on the right side just
under this white clouds, making it a little
bit of a shadow. Just to make those colors have a more interesting dynamic. And just going at the top
and cleaning up the brush. Don't go overboard
with this color. Try to blend it very well. And then cleaning up the brush
a little bit more lower on the canvas and making some more textures over
the lighter clouds. And there you go with
this step as well, with the small brush you've concentrated on the
middle of the canvas and create a darker
patch of mountains. This created a lot of contrast with the white fluffy clouds. Now let's go into the next step.
7. Earthy colors for the ground: In this step with the
small flat brush, you will mix together some beautiful oranges and
some beautiful green to create a luscious batch of greenery on the
bottom of the canvas. Now let's go into the step, adding some beautiful
yellow onto the bottom of the
plate just over here. Cleaning up the brush
nicely with a paper towel. It doesn't have
to be very clean. Grabbing some red, just a
tiny amount mixing very, very small amount into the
yellow just over here. Remember to get a little bit of this wonderful blue
into the mix as well. Mixing it in with the beautiful
brush, getting some red, making it a tiny
bit more orange, and mixing it well
together until you find this wonderful greenish color. Now going into the middle of the canvas and pressing
down to create this wonderful patch of grass at the middle
of the horizon line, going to the left
and cleaning up the brush on the canvas. Now, mixing a little bit of
red and going a bit lower, grabbing some more of that blue in case you don't have it, you can take some
blue and put it at the top of the horizon line, grabbing some white pudding, a beautiful amount onto
the bottom of the plate, grabbing some red and mixing it in with that beautiful
green yellow. And going for this beautiful
sandy color at the bottom. Just going and creating
some wonderful lines over the green and continuing
very loosely on the Canvas, grabbing some more
green this time and a little bit of blue to create
another line of green. Just below the sandy color. Some red and some white over
the beautiful green yellow, grabbing some more green, mixing them very well. And continuing, as you can see, it's tiny bit more orange, grabbing some water and
mixing it very well. Spreading it around the
canvas at the bottom, grabbing some more color and
going onto the left side. Adding some more yellow
to the mixing plates in order to make some beautiful
colors with some red. Mixing it very well
with the yellow, adding a bit more. And touch of blue, touch of red, making this
intense ocher orange color. And going at the bottom to finish up the canvas,
creating some textures. And going lower onto the right and the
left of the canvas, grabbing some more color all
the time just so we cover all the nooks and
crannies of the canvas. Okay, And remember about
the sides of the canvas. Since it is a little
bit slanted in, needs a little bit of attention until it's covered
from side-to-side, making some beautiful marks. In this one, you've played around with some
beautiful greens and went a little bit into
the oranges at the bottom. Don't worry if the colors have
become a little bit muddy. Earthy tones are just what you need for the grounds
and the grass. You can see how easy it is to paint once you let
go and have fun, Let's go into the next step.
8. Textures for the field: In this lesson,
you will learn how to use the palette knife. This will be so much fun. You will create some
beautiful textures with luscious amounts of paint. Let's go into this step, adding some beautiful
yellow onto the mixing plates
just over here. Grabbing the palette knife, cleaning it up a
little bit out of this wonderful blue and
grabbing some white, adding it to the yellow, mixing it very well. Adding some red over it. Just so it is a tiny bit more close to the
color of the ground. Just a tiny bit. Grabbing some color
just on the bottom of the palette knife and going into the middle and going to
the right and the left, creating a beautiful edge. And then varying
the angle just with the top side of the palette knife,
creating some textures, just dabbing with the edge and scraping a little
bit down just a tiny amount to create
some textures. As you can see, most
of the textures are created on the bottom side. Going on to the right, a little bit more vertical, just so you can create
some wonderful lines. You can also go with the other
side of the palette knife, grabbing on the edge and
creating some more lines. At the top. As you can see, the
lines are a little bit sharper and thinner as they go to the middle
of the canvas. As you go down, you can
start to create them a little bit more
freely and thickly. Remember to leave those textures wherever you see a
beautiful texture. Leave it showing, Okay, seems like we've grabbed
a little bit of white. Let's mix it in quite
nicely with the yellow and add it to the middle of the
Canvas over the white. Okay, going down with some textures onto the
right side and the left. Remembering to leave some of these beautiful
textures untouched and giving a little bit
of love to the side. And then going and
taking some red, mixing it in to create
a beautiful yellow, orange, mixing it in
thoroughly with some white. Holding the beautiful plate. Just so we can mix it very well. Going at the bottom, scraping some of that
color on the left side, and going towards the
middle and to the right. As you can see, the yellow
hasn't been touched. This is because you don't want to mix those two colors yet. Going and taking some
white and mixing it in to this wonderful
orangey pink color. And going on top, just over here at the bottom. And trying to mix those two
colors together just so it's a little bit more
close to the yellow. Beautiful, creating
some more textures. Remembering not to over
mix on the canvas. So you can still have
some beautiful contrast, adding some more yellow at
the top of the mixing plate. Cleaning up the lab knife with some paper towel
and grabbing some straight up yellow onto the palette knife
and into the middle, as you can see, dabbing
some beautiful lines. You can also grab
some of the color in case it is too much, you can scrape and dab a little bit more of this color
just as a highlight. Don't overdo it. Going onto the middle, just creating this
beautiful hill. And then onto the right side, creating some more textures. And onto the left, let's add some more and mixing in with a little
bit of this orange, scraping a tiny amount
of this orange, just so it creates some wonderful transitions
with the yellows. And there you go with this step. You've played around
with the trusty, rusty but let knife and
created some beautiful grass. You can see how easy
it is to create interesting textures
by just leaving them untouched here and
there and having a darker color
underneath the textures. Now, let's go into
the final step.
9. Green trees at the horizon Thank you: Can you believe it? It's the last step. Just a few more touches. And you will have a
finished landscape with some wonderful trees
in the distance and some blues into the ground. Just so we bring that sky color back and harmonize
the landscape. You will finish this
painting in no time. And with the small flat brush, Let's go into the step. Let's clean up this
beautiful flat brush onto some paper towels, squeezing all of
that orangey paint and grabbing some of this
blue on the mixing plates, some white, still has a little bit of
yellow. That's good. And going in-between
those textures, the paint is still wet so you can grab a tiny bit
of that yellow and integrate those blues back
into the wonderful ground. Grabbing some more
blue and going a little bit darker
onto the right side, middle, and to the left side, dragging some beautiful
lines and textures, dabbing the wonderful canvas, grabbing some of this
yellow and going over those green parts you've just created and adding
some more textures. Mixing it with the blue in order to create some
wonderful greens, adding an harmonizing the
beautiful colors with the sky. And in the middle of the
canvas near the horizon line, adding some more of
this wonderful green, blue and some more
yellow over top, just so it creates some
wonderful textures and colors, grabbing some more of this darker green color and
with the corner of the brush, just like for the clouds, create some interesting
edges for a tree. Go a little bit
more to the right and create a bigger one. And to the left chest
over here you can start to see how simple it is to
create some distant trees, grabbing some yellow
and mixing it over the green to add some
highlights onto the threes. Just on the left hand side, going towards the
middle of the trees, cleaning up the brush nicely, grabbing some more
blue and some red. Mixing it very well to create some shadows
onto those trees. Don't worry if it is too dark. Now going back with the green and making those dark shadows appear a tiny bit
lighter. Perfect. And there you go with
this step as well. You've done it. You've created another beautiful landscape. Not only that, but
you've created some wonderful clouds with the corner of the
big flat brush, some beautiful textures for the ground with the
palette knife and width, the small flat brush, you've created some
interesting detail. Thank you for being part of
this wonderful community. Don't forget to post
your painting and if you are gracious
enough, leave a review. See you in the next one.
 George-Daniel Tudorache, Together we will create amazing things.