Transcripts
1. Welcome!: Hi everyone. It's Chris from
sweet seasons art. Welcome to happy potted plants. I'm so excited that you're
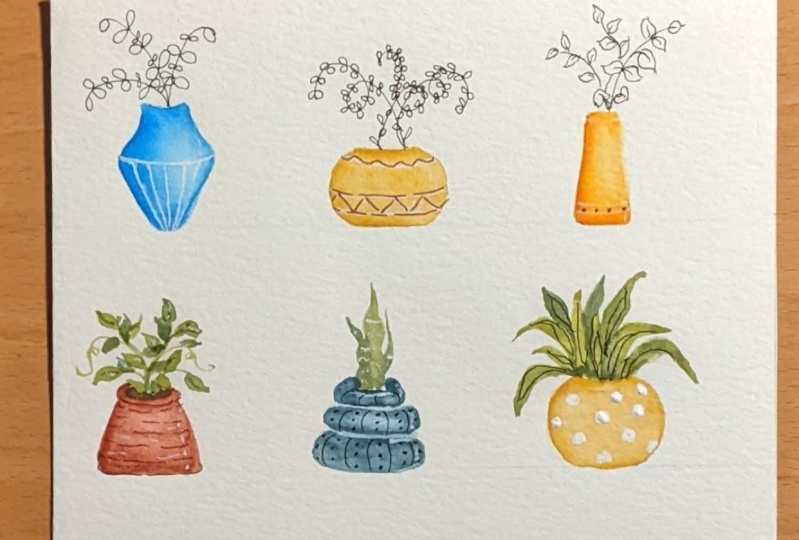
here to paint with me today. Maybe you have some little plant babies at home like these. I need to get these potted, but I thought we could use
them as some inspiration today in painting our
own watercolor and ink. Happy little potted plants will do some vases and
some inked plants. And then we'll add
some ink detail to our watercolor plants. Just like these. This project is
great for beginners. And your project will be to
paint your own happy plants. Let's get started.
2. Supplies: I wanted to quickly
talk supplies with you. I have some cold press
watercolor paper here. I've made two horizontal
lines where we'll be drawing our vases and pots
is just to keep us straight, which is hard for me to do. Usually, I have some
pigeon letters, round brushes,
watercolor brushes 62. I have two ink pens. This is a Pigeon Letters
Monoline size 01. This is a unit ball white pen. Then obviously you need some
water and a paper towel. And also I wanted to swatch
some of our colors for you. So we're gonna do
a yellow ocher. We're going to do
also a burnt orange, which I really love. That's Daniel Smith. For our greens. We're going to use just
some traditional sap green and I think also
some undersea green, which is Daniel Smith. It's just a little darker. I want some contrast in our plants so that one
will be a little darker. Then I think for the
blues in our pods, we will go ahead and
use some turquoise. This is a cobalt turquoise. I'm going to darken it with probably a little
indigo or some black. We might also use a little brown for the dirt in our pots, but those will be our
supplies and we're going to jump right into painting
a row basis right here.
3. Watercolor Vases and Inked Pots: I want to just go
ahead and jump in and start our first vase. Let's start here.
So we don't start over here and then drag your
hand through our painting, which I do quite frequently. Do some fun shapes
for these vases. So I'm just gonna do
a little line here. I might actually dark in
this turquoise a little bit, just to give it a little
more dimension to your, just a straight
talk to our vase. And then I think we'll
bring it down in a, a triangular shape. Then maybe we'll take
it straight back down in to our line here. I'm very bad at keeping
things symmetrical and we're not going to worry if
they are symmetrical today. Once we have our outline, we are going to go
ahead and fill it in. But not to precisely a lot
of water in there. Right? We'll keep it nice and loose. If there's some
white spots showing, we won't worry
about that either. Only thing we might
do here is darken up or exterior lines. A little, gives it a
slight bit of dimension. And I like the bleeds
of these tones. Indigo has a great granulation. Honestly. There's our first face. So let's go ahead and load
up with yellow ocher. Our next face will make it. Let's do it a little
bit of a oval. Maybe there'll be a little
shorter than that first one. I'll start with a top. Then we'll try to keep it as
symmetrical as we can. Okay. It's not going to be
because I'm not good at it, but something like that. Again, I'm going to fill in
the center with paint and water and try to get
rid of those lines. If you get water on your page, tear a little paper
towel, soak it up. It a little more pigment here. Put the bottom on this guy. Sure, his top is good. And again, if there's some
white showing, long here, is really just looks
like a shine on the pot. I think that's just fine. We're going to add
ink detail later. So we don't need
perfection here. Right? There is our base number two. Our third one. Let's get some
really nice orange. Let's make a tall skinny. Let's make a tall
skinny kinda base. Again. I'm not great at straight lines, but we're just wing it. We put the bottom on him
here again trying to I'm trying to keep to
my horizontal line. I drew top right there. Sorry. With water here. If there's white
showing that's fine. Maybe the sun is hitting it
dark and the edges a little. Now before we do our plants coming out of
these and before we ink, detail the vases, we have
to wait for these to dry. So get a hairdryer
if you want to speed that process or be patient
with me, which I'm not. And we'll start once
these are perfectly dry. Now that we have our basis, Let's go ahead and take our black ink and put
some fun plants in them. We'll just do this
kinda loosey-goosey. I'd like to do three
stocks and H1 because I think that's odd
number looks good. So we'll do three
stocks going out of each one of these and
slightly different plants. And it might be a little hard
to see my hands in the way. So I'm going to try
to show you as I go. Usually start with the center, like a center stock, because that will be the one at the front and I draw the stem. And then I just add, this one will just add
little loopy leaves. I didn't leave a lot of
space here for myself, so maybe you'll be smarter
and leave more room. There are some little
wonky leaves and now this next stem will come
out from that same side, but it's going to be hit in a little behind
this first one. So I'm going to start off doing sort of leaves that
are a little bit tucked behind you can't really maybe maybe see them, right. So maybe like that. Then we'll just go like this. Keep going. These are just fun. You can see these are
very imprecise shapes. But leaves, you see them
from different angles. Don't look exactly the
same all the time. And the last one I'm going
to do looping out this way. So it's actually going
to come out from here and then it's gonna
kinda go Medallia, a little like this, may have to change the
angle that you're drawing. To do this. It's a
little hard to do. See the stem would
come like this way. Now the leaves are
gonna get hidden. So they're going to be
a little bit weird. And it'll go like that. Draw that stem in
a little darker. Then it goes back there. That's really, I think, fun. And just right for that one. If we want to add a
little detail to the pot, we can add some white
ink detail to this base. Let's try a bad with
straight lines. I said so let's use
a little cheat here. Let's try a straight line. Right here. Remember you have to get your white pen going. Cold press paper
can be hard on pen. Maybe something like that. And then let's add, just add some lines
going down like this. The base, maybe for fun. Let's try our second one. Yeah, this one we'll
do three stocks that look a little
bit like eucalyptus. You think about how
eucalyptus looks. Let's take one out. This way. Eucalyptus has little
straight lines when you see the side of the leaf and loops where you see the
whole round leaves. So sometimes you see the whole thing and sometimes
you just see a line. And sometimes it's
at an angle, right? And sometimes it
blocks the stem. Might come out this way. Very wonky, very imprecise. And I think that that's fun. So let's just do some
leaves like that at angles. And so something
like that for some, for some eucalyptus
I think is good. And then maybe we'll
do another one here. So again, maybe
some little here. And a bigger leaf here. Maybe a leaf like that. Stem. Maybe. Then it's going to
get hit in here, right? So you might see some of these, but you won't really see them. All right? And then let's just
do a third one. Alright, let's add some fun
ink to this one as well. Maybe something simple
like right there, I do it just a straight line. Let's try maybe a
straight line here. You've got to get her ink going. Here we go.
4. Watercolor Pots and Plants: Alright, let's use
our same colors for our plots that we
use for our vases. And let's do sort of a
traditional start with sort of a traditional
hot for our first one. We will just do the top. We're not going to
be too precise, but we shouldn't do the top. I'm leaving the back open because our plants are
going to come out of there. And I don't, I don't
want to paint over top of the pot basically,
if that makes sense. And then we're just going to
bring bring our pot down. I'm going to bring
it out a little at an angle just for fun. We're going to try to
keep things symmetrical. If at all possible. Real pot, there'd be a shadow
underneath the top of it. I'm going to paint a
little darker here. Then I'll add more water. As we go. Again. Nice
and loose guys know. We're not going to stress
over perfect lines. These are supposed to
be fun and whimsical. So maybe darken her. And she's a little. Then I might go back
with my tinier. He's my little tiny brush here. And I'm just going to bring
up the front of the pot. You've probably heard that a dry brush is a thirsty brush. So if we wanted to make the lip of this
stand out a little, take a dry brush and pick
up some water and pigment. Then we add some darker
tones underneath. Again, it just gives a little
dimension to your pot. Necessary. But I think it's fun. All right, we might add more dimension at the
end, but depends, We're going to,
we're going to ink it so we don't have
to be too concerned. Now, I thought we'd start
with just a sap green, pretty light and do some little, just happy little
two-part leaves. So when I say two-part
leaf, this is, if you're a beginner to see shapes essentially
touching each other, I'm going to keep this
light because these are our first leaves
and then I'll add some darker ones behind. And we'll just see how this goes when I came
out a little dark, so I'll just get more water. Larger leaves down
towards the bottom. And tenure leaves up at the top. You quite a few. And then we'll just talk. We will talk some of that
darker leaves behind. What we're gonna do is connect these along a
slightly darker stem. And I love when we get
some pretty leads going. Dashes in here. Maybe this guy up like this. Just really simple. And then just for fun, let's add a little brown sepia. Gotta be careful if your
pot is wet that we don't just totally ruin it. But again, these are very loose. Alright? So we might wait until some of these leaves dry a little bit to go back because if we start putting darker
leaves behind, they're just going
to blend into those. And it's gonna be a big mash. So let's start our
second pot here. While we wait for those
leaves to dry just a little. I'm gonna go back
to this blue color. I really like it. Maybe a little more
indigo in this one, but essentially are same mix. Let's do something fun. Let's do like a three
tier blobby pot. We're going to see
how this goes. Starts off the same way
essentially though, right? We're going to start off with our pot where we can kinda see. You can kinda see the dirt would be going to round
this down a little, up, a little pigment. Alright, now I'm going to
add another tier that's almost exactly like
that below it. Me a little bit bigger. I did Google like pots. And I also looked on Pinterest just to get some ideas
of some fun things. So we wouldn't just be
doing anything boring. Right? And then let's add
the last tier, which is a little bit even. Maybe thicker, doesn't
matter if they touch. I'm leaving some space. Just again to add in some
darker pigment and give it a little bit of dimension
because it will look like parts are indented
right there farther away, the darker is the farther away. Okay, So this is just kinda
fun and funky little pot, but I think he's kinda cool. All right. Let's go back and pick
up our small brush. It really careful not
to run our hand through our new pot would be sad. So fingers crossed,
we don't do that. Let's add some darker leaves. So I'm picking up
some undersea green. And I'm going to add
some leaves that are behind these other leaves. So say for instance, this one might have a leaf
that was tucked right there. And here might be a leaf coming down that was tucked
behind this guy. And so is tucked
behind that guy. So now our plant just has a
little bit more dimension. Maybe one that hung
down this way. So I think that's good. He's kinda crazy. He could add, we can make
him a little bit more interesting if we add
another leaf up top maybe, and one that goes out this way, just so it's a little
more shape to him. But you could do it
every like on this. He's gonna get a
little, a little crazy. The side and leave
shows here, right? It's not a full leaf. Maybe that's true here too. So this guy just ends up
being kind of a wellness. Again, if you want to darken
this line underneath, you can go back. You just might have to
blend your line in a little so you don't
have a big watermark. All right, let's go
back to this guy. That guy is fine and we'll
add ink to him in a minute. I'd love to do a
cactus and this one, I think that would
be really fun. So I'm gonna go for a really
light green to start. And we're going to do
the same thing where we start with our top layer. So I'm going to literally go and like make just
a wavy line like that. Pretty pale. You can
see it's pretty pale. I'll do another one. Maybe a little
fatter next to it. A little bit of
darker pigment along the edge just to give
it a little contrast. Then we'll come back with
our darker pigment in a bit. We're going to start with those two and then we're
going to add some in behind to make
that like a cactus, but we need to again, we need to wait for that to dry. So let's do our third pot. Civil, go back with
our yellow ocher. Let's do, this guy
was kinda oval. Let's do more of
a round pot here. Let's try to really
make him rounded. Will make him a good
size to a little smile. And then I really
want him to be fat. And so the symmetry
might be a little hard. I might have to sort of
keep going back and forth. Then I get into
trouble because it'll just grow to be huge. But let's try this. Again. Not perfect, but that's
not what we're going for. Darker pigment under
the lip to right. We can go back in and make
that more precise later, just like we did here. Darken the edges, okay. Let's go back to our cactus and let's get some of the
undersea green and actually want to
pull in a little of the indigo just because it's in that indigo pot and
it'll kinda make it blend coordinate better. What I wanna do is put in
little cactus guy here. He's darker, so he's
going to come out behind. And then there's gonna
be one right here. And this is gonna be
tricky because you're going in behind these two. So it's only going to show you're going to have
to kinda do a really. Then he's going to come
in here and then down. Alright, so I know
that's really precise. Use your little brush. And he is right there. Right? Then let's do one
more on the other side. And we can go ahead and
put a little in the pot. I don't mind if that
gets blended in with the base of the plants because I think it
just kinda does. So it's okay that there's still some wet paint down there. Okay. And so we'll have some fun
when we incur them as well, doing some ink on
the cactus there. We have our last guy here, a big fat, such a big fat plot. And I'm just going to
use my bigger is said. And I'm going to do some
broad leaves like this. Again, we start with
the lighter color because we can't
paint over the dark. Maybe one that goes and
then things out a little. And I don't mind if these blend, we can add some
dimension and shadow and a little bit while we wait
for these leaves to dry, let's go ahead and ink this pot. I'd like to add a little
white ink details to the leaves to give them
centers just like this one. So make sure your pens working. Make sure your dry just
adding a little vain. Let me think that looks cute. The side, once you
wouldn't see it, you only need to add it
where it would show. Let's get them as dark leaves. And then maybe
we'll do like that. Could leave the pot or
we could stripe it. It looks good the way it is, but I kinda want to
add some more to it. So I'm going to cheat
again on this one. I'm gonna get my black pen and I'm going to
be very careful. I don't want to smudge my lines. That's cute. Let's go into this now. And you know how the
cactus will have the little white
like squiggly lines. And I'm going to make
these little squigglies with the white pen
will cooperate. I think that's fun. Or leaves are dry here. So I want to take
our larger brush again and get some of
the darker greens going. So we have more dimension. This is where plant
is large hill. Maybe. He's tucked behind. Then even do it'd
be careful here, but we could even do like
a darker got real dark, darker toned up some of that. Just a little too much blue in that darker toned leaf here. He's tucked behind that one. Then we have a lot of variation
coming in there on those. And then I am going to put just a little bit
of dirt in the pot. I think. Let's get our black pen and
go ahead and add some ink detail to the
leaves on this pot. I'm going to just do some
centers here where I think they would show on these leaves that
are tucked behind. And then we'll deal on
the front leaves too. That I think is kinda fun. Now this pot, he's so big. I don't really want
to do stripes on him. I'm not I'm not entirely sure. Maybe he's a polka dot guy. Could also do this with white. Quash, would probably be
a lot more efficient. So something like that. He's kind of crazy,
but I like it. I think it works. We might go in and fill
those in a little better, but I kinda just like the
crazy white polka dots. And I hope you do too.
5. Final Thoughts: I hope you had fun painting
plants with me today. I hope you'll look
for me on Instagram at Sweet seasons
art and tag me in your projects when you paint your very own happy
potted plants, I'd love to story your work. Bye!
 Sweetseasonsart Cris, Let's think Spring with some happy flowers!