Transcripts
1. Introduction: Hi guys, It's Chris from sweet seasons art was self-taught watercolor artists
in Richmond, Virginia. And if you follow
me on Instagram, you know, I love
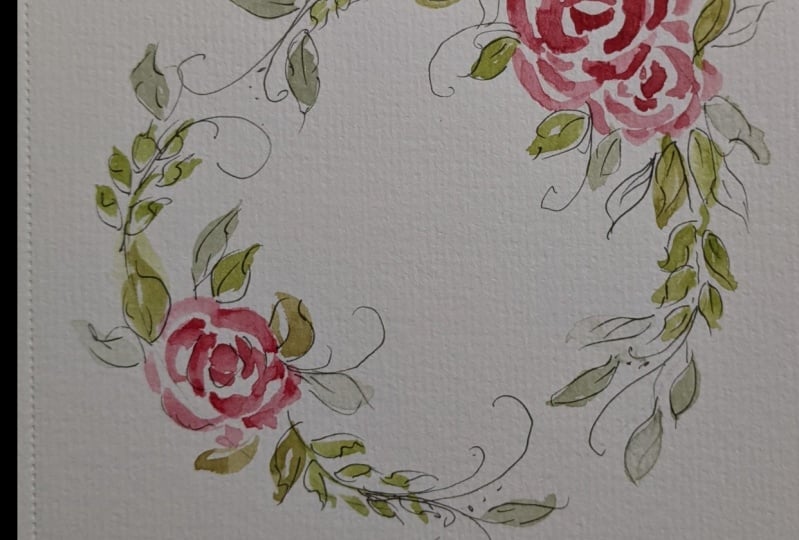
to paint a wreath. Today, we are going to paint an easy Rosie wreath with ink, just like this one. This class is great for
beginners and your project will be to create your own
watercolor and ink wreath.
2. Supplies: Okay, everyone,
Let's talk supplies. We need paper. You know, I love arches, like a 140 pound cold press. I'd like to use a block. This is a 100 percent cotton. I also use Fabriano artistic. Oh, it's extra white and I
also use a block for this. Use whatever you have on hand, whether it's scrap
paper or sheets, any kind of
watercolor paper will work. We also need brushes. What to use to round brushes, a larger and a smaller. This is a 12 and a six. You could use a 10 and a 4. These are from the
pigeon letters, and I like these precious. We're going to need
a monoline pen. You can use micron. These are actually from
the pigeon letters. I have a 35, I'll probably
end up using the five. It's a little bit thicker. And of course, we need paint. I get two shades of green, at least maybe
even a darker one. This is a sap green
and the olive green, it can get a green gold. And then I'm going to
use different shades of pink, use whatever you like. This is opera rose. There's permanent rose here, Scarlett lake for
some real bright red, but use whatever reds
you have on hand. But he nice clean water. And of course, paper
towels for blotting. We're going to paint
a wreath, so it's obviously a circle. If you want a little
quick cheat tip, get around bowl, put it
right on your paper. Trace it really light
pencil line around it. It helps you keep your
shape as you're going. I do that sometimes just as a little cheat
to make it easier. Let's get some practice in now. The next clip.
3. Practice: So we're going to
start with two ways to paint leaves today. Very simple, very straightforward,
fine for beginners. So load up your brush with
a little green paint. Any color will do. So just on this first one, just use the very
tip of your brush, touch it to the paper and push and drag and the
lift at the end. Literally that's it. That is a leaf. It's a thinner leaf. It'll only be as wide as
your brush will spread. But just try it again. Just touch the little
tip loaded with paint. Push it down and slowly drag it and pick
it up at the end. And I like to dab a little bit of color along there if you don't get enough
pigment, but that's it. That's a very simple, really super simple leaf and that's what we're
going to stick with today. It's just easy for everybody
and that goes real fast. So here's a second
one. Same motion, one side, and just repeat
it and connects them. You can leave space in
the middle like I did. I like to do that kind of delineates the
center of the leaf. Or you can go ahead and film and add a little
darkness to the tip, maybe shape it a
little if you like it. Let's try that again. Push out and pick up. And then this one, I did it right next to it. So I didn't leave the
center of that time. You can see what
that looks like. Here's one that's
really dark and then I think we'll
get some water, just water on this
side and watch this effect connected
and do the same motion. Let's see how that
leaves a nice variation or one side is darker
than the other stem. So take your time
and practices as much as you like or
we can just move on. We're going to practice
our roses now. I'm still using the
bigger round brush. And I'm gonna do, again, we're gonna do two
types of rows. One is more of
Lubbock blobby rules. Again, we're going
to start using the tip at the Amarna kind of blob it out a little bit
and not be very particular. So you see my first
two shapes here. They're just like two little
C shapes next to each other. We're just going to keep
making the same shape around and around
offset as we go. Sort of adding more water. And it's okay if you
touch your back, pick up some pigment, refine the edges
of our C shapes. But the motion is just to
touch and push out and lift, just like we did with
the leaves really. So I kinda think of these
as a bunch of offset see shapes working
your way around. So they overlap a
little at the ends. And then they kinda pull
off a little bit just at the tips where the petal
would be thinner like that. I kinda like that shape. Just going to go in now
with a lot of pigment on my brush and touch where it's wet on the inside of each pedal. See the beautiful bleeds
we get when we do that. It adds a little depth and
dimension to the rows. And I think it's
really pretty effect. So just touch where it's wet. It's the wet on wet
technique of watercolor. And it provides just
a little extra color and a little more depth. So I like that guy.
We will let him dry. You do a little more structured, same, same brush, big brush. And we're going to a little
more of a structured rows. So we're going to
start by making two little shapes that
look almost like tadpoles use just the tip of
the brush and they look like little tendrils
will touch and lift. And then it's just the
same process that we're going to make slightly
irregular sea shapes now, where we touch and
pushed down and then we really kinda
drag it out a little. Or we push right away and
then lift up and drag. And they're still
offset, see shapes, but they're more irregular, less consistent, and they have a little more
structure to them. And there's more white space
in between each shape. So they don't touch
each other or blend and bleed into each other. Again, we get larger as we go. And with a little less
pigment as we go, a little more water, they
get a little less intense. So you see how I'm
dragging them out. You can see the difference
here between the two of these. But the idea and the way you
approach it as the same. You see I'm kind of making
these really irregular. One thing to do is not
make them all the same. I have a tendency to try to
make everything perfectly, you know, carbon copy petals. And you really want
to have variation. Some are kind of lumpy
are and some are thinner. And you can stop
at any point when your rows you feel like it's complete or you'd
like the shape. You could kind of go on
forever through this process. You've got to be
careful that you don't just make it huge. So I think we'll
wrap this one up. I think he's, he's
good like that. So let's get a little more
pigment on our brush, really intense pigment and go back in like we did
with the other one. And see how beautiful
I love this effect. It's like my favorite
part is making the rows. What a board, deep, a little more bold. And you can go into all the
different layers and really huge him up a little
with some intense color. We can even touch our first
rows where it's still wet. Again, you only want to do that where it's wet or
it'll just kinda sit right in the middle
like a big blob. But if, if you can
see where it's wet, you can still go in and
add even more depth to it. And it still adds a nice effect. So just keep touching
them sort of until you like the
effect you have. And then we're going to wait
for the blobby one to dry. And then we're going to go
in with a little ink detail. Well, we're reading
for these to dry. Thought maybe we would just
practice inking a leaf. It's really the same shape
and process that we painted. Sort of a C and a backward C could add a little
center detail. This is just a practice. If you want to mess
around with your pen, try the five and C, that's a little bit of a
larger tip on the pen. But if these are dry, we can add detail on our, on our painted leaves. Can make them where
they kind of peek out from another leaf. I love this effect
on the wreath. It's the effect of
layered leaves. So I like that effect and we can do it anywhere where
there's like a dry leaf. See how I'm going
to tuck this one in-between these two leaves. I think that really looks neat. You don't have to add a
vein if you don't want one, but I like to add some
little leaf detail, but I like how that
sort of hides away. It makes that
Greenleaf kind of pop out of the page at you, I think. So. We can do that on
these roses as well. I'm basically just going to
go in and trace the shape of a petal and make the curve
not exactly along the line, but similar or sort of you kinda have to gauge
where you want them, but basically where
the petals would be. Just add a little more
detail and you'll see, I'm going to add some thickness. Maybe at the center
of these lines, maybe at one end. And it's okay if they don't follow the painted pedal, right? They can go on to the white part or start or end on the way. That's fine. They can
overlap with other petals. Just gives a little definition. And you might like this
effect and you might not, maybe you're just
a purist and you don't want any ink, that's fine. You don't need to do that. Might go in and add
to the centers and make those shapes similar to
our more structured rows. But I like to go in and make these lines not
just one thin layer. I like to add a
little bit of like a thicker parts
in certain areas. Then we'll just
add a little here. This is kinda what
you have to gauge. You could really
ink this up a lot or you could keep it simple with just a few lines to extend
that out into the white part. I like that effect
where it's not exactly along the
line of the paint. You see now that just
gives it a little depth and I think it
looks kind of cool. Do as much or as little
ink as you want on your, on your leaves like this, you can just add a
little center on your painted leaf or just, you know, little detail like
we did on the other ones. Just to practice
with the ink and get and get an idea of what
you like and don't like.
4. Painting Your Wreath: So now it's time to
paint our wreath guys, this is our fun part. If you want to get a
bowl and trace it so you stay on a circle, that's fine. I'm gonna kinda wing it today. I'm going to start at
the quote unquote, corners, opposite corners of
what would be our wreath. And place our large
flowers there. Start with our
large brush again, sort of gauge where
those corners might be. And I'm going to
start with the rows. So I think I'll do this
as a structure grows. We'll do it just
like the second one. And we'll see where it goes. Every one is going
to be different. Yours is not going to like mine and mine is not going to look like the first
practice one I did. This is kinda looking halfway in between the blobby
London structured one. And there's really
no right or wrong. Add a little water and
do some larger petals. And really I'm just going to see where this ends up, guys. So don't stress about it, just let it go. If it gets really
blobby and messy, we can add some ink. If we like how it looks, we can leave it alone. So just get a sense of
how large you want it. It's pretty big. It's probably about
maybe as big as we need. So let's go add in some of
our darker pigment here. And maybe we'll just
leave this one like this. This will kind of anchor where
our wreath is going to be. So I went and took
another smaller one right next to it to, so there's a little more to anchor the wreath
at this top part. So I'm going to start
this kind of close to the other one
just so it will, like I said, like tuck in and
you'll see how we do that. We get get closer. I'm going to sort
of treat it like I'm building and rows just like normal with our different
layers and build it out. And then add a
little more water. Kinda make the fatter pedals. And see I'm going to start
this petal like it's coming out from under
the other rows, it's going to get
a lot of pigment. And then we will move
that petal over just like it had continued
underneath the other rows. One way to make
that really clear is to make that
dark right there. It's like it's in the
shadow of the other ones, so I'd like to darken it where
it might tuck underneath. Try a little extra water here, and I like that. I'm going to leave that alone. I think I just really
loose and kind of messy and I'm want to put
another rows down here now. So this is the other corner. And again, we're just
gonna do the same process. So just paint along with me. You can do one or two
roses down on this side. Your call on how it looks, how big your rows
tends to grow on you. Mine tend to get a little, little out of control sometimes. So just paint along and
see how it works for you. You can see this
one looks like it's oriented a little to the side. So I'm going to go and fill in some petals over here
to balance it out. We definitely want to
remember to touch these inside of the petals while
it's still wet in there, it looks like it's drying. May want to go in and do your little darker
highlights as you go. So this guy's really
getting out of control. I think we'll stop
right there and just let him live just like that. So now we need to fill in
the circle of our wreath. So we're going to start
with our green leaves. And I want to teach you a
trick on how to make sure that your greens always
work with your colors. So one way to do that is by blending some of the pinks
or the other color you're using in with the green that you're going to use
for the leaves. And I want to show you
exactly how we do that. So I have a bunch of green here. I'm actually going
to pull some of the pink I've been
using into the grain. And then I'm going
to add back a little more of my sap green here. But that's going to ensure that these greens and pinks
will actually coordinate. We're going to go
ahead and fill in the loop of the wreath here. We start off again, just like we practice, we're using them
larger of our brushes. And we're going to
make, make some leaves. Can do this and leave the center like we did
on some of our practice leaves where you can go ahead and fill those in and
the kind of string amount. Both techniques. And I'll make some little
darker and some little lighter. Just one more. Squeeze water. Psi. And again, I like to add some of the darker pigment at the
base or the tip of the leaf, just adds a little
depth to the leaf. These aren't really supposed
to look super realistic. But I think that adds
a nice dimension to put something
over on this side. And we're just going to work out from both sets of flowers here. Syllable single leaf. It looks like it's
kind of dropping down. Who put them right
next to each other. We're just going to kind of
fill in some of the spaces. We're not going to fill
in all the space because we're going to leave
space for our ink. I find it helpful to turn the page and I'll do this a lot. I hope I don't make you dizzy, but I think it's easier to
turn the page sometimes to get a better angle and also to keep track of the
shape of the wreath, it's easier to kind of
see it if you move it around and get a
sense for, you know, if you're keeping
it fairly round or if you're making
more of an oval shape, which is also completely fine, Let's just keep making leaves, leaving some spaces
and recognizing that we're going to go back
with ink detail as well. Again, with a wet on wet, you can touch them
while they're still wet and add more
pigment if you want. And we can do some
larger fatter leaves and then smaller leaves as well. So right here I'm
going to hide a leaf. When did you half a leaf? So it looks like it's
coming out from behind the rose to do a
darker pigment we talked about that makes
it look like there's a shadow to a darker
pigment along the rows. And then with some water, just pull that out
and see how it looks like that leaf is just popping out from
behind the rose. I love that effect. And go back and add more depth. In all of these. I'm going to take a smaller
brush now this is a six. You can use a six or four and some smaller leaves
on a little sort of like stock just to fill out
the shape a little more. I don't want it to get to full. So here we're going to make small leaf see the same motion. It's exactly the same motion
as the larger leaves we did. Again, they're not
precise, right? These are not perfect,
perfectly shaped leaves. We're going to just pull
out just the hint of like a stem right here. Let's, let's turn it again. Get a better angle, but
it's still to doing the two little swatches
to make each leaf. And again see how I'm
leaving a little space. I want to talk
some ink in there. I think it looks really
neat when you mix it. So skin idea where you feel
like it could use a little more green and a
little more help with the circle shape
that we're working for. I think this will help
fill it out really nicely. I think you might
be fun to lighten up our leaves a little. I'm going to add a
little more green gold to the green that I had mixed up just to give it a slightly different, maybe brighter leaf. I'm going to make these a
little bit smaller than our original ones,
but not exactly. But you see, I was
just a little bit of a variation to add a little green gold or
even some olive green. We're just going to
fill in a little bit more of the whitespace here. Not quite connecting everything, but just leaving it so we have a good circle shape or oval shape as it may
be turning out to be. Remember, you can tuck
leaves back behind other ones and sort
of off and quote, outside of the reef. They don't have to all be in
the perfect circle shape. See I like that. There's a
little bit of contrast there. And that can be right
next to each other too. So I feel like we're
getting a good shape here. We're really filling
in with green and I don't know if we need a lot
more before we start our ink, we can always come
back in and add more. But sometimes it's fun to add
some leaves in the center. What would be the center
of the reads to me, we'll add a couple here. So I think that's nice. And then there's kind
of a space here. We could put like an ink
leaf kinda in-between. And I think that would
look really neat. So let's get started with our
ink and the next section.
5. Inking Your Wreath: So I really like how
this is looking. I hope you like the
shape of yours. I think this is good
right where it is, Let's make sure
everything is dry now. And let's go and add some ink. So look at your whitespace
and let's go ahead and add ink where we
have these whitespaces. We can add some
independent leaves or we can tuck them in behind
our painted leaves. This is just a judgment call
and how much ink you want to add or if you just want
to leave it alone and not, not have any ink at all. Let's start by
tucking a leaf here. We touch it right up to the
edge and then, and then stop. Maybe one over here. Now it would go under that one. So c, I'm going to stop and draw my lines like it
was tucked under. That looks like a really
neat layered leaf. So pay attention to where
your painted leaves are. And I think tucking the leaves
under looks really cool. We add a center like that. It looks really neat. So let's just look
around at our wreath and pick spots to add ink. Again. Let's turn it as we go. Here, I'm going to
add the little leaves in where I left spaces. I think that's kinda neat. Maybe add one or two at the end. We can connect the little stems. It's kind of a cool effect. We'll do that over here. At your little leaf in here. Maybe add another one, just connect everything so it
comes from the same stalk. And we're just gonna
keep looking around. I think a leaf here
would be neat. Tuck it behind the painted one. I think that's a nice
detail and we can just look at the shape of
the wreath and decide, here's a lot of
whitespace over here. So maybe we'll just add a
leaf that's on its own. Fill in that space. Maybe add one
takeaway over here. And just, just keep looking at the shape and the
whitespace on your wreath. Add one here right
up against the rows, just like the one we painted. But now it's with ink
tucked underneath. I think that looks really neat. They don't need to all
connect to each other. We can kind of draw
in stems as we go. And we said we
could put one here. I think that would look neat. So let's add gold leaf
tucked in behind these two. Kinda comes back in like that. It helps to make the painted
leaves pop off the page. I feel like it gives
it to mention right there where those kinda connect. Let's just add some ink
leaves as we go and then we'll stop and take a look at where we
are in a minute. So right here I'm going to
add another little stem of leaves like we had painted. And instead of leaving
space for an int leaf, I will leave a little
space so we can add back in a painted leaf here. So I want to go in with
a smaller paintbrush now and just add in leaves a couple of places
here where we left space. Again, we're going to tuck
it behind this other one. So I'm going to
seem like the tip here and paint in behind. And I think there's
just a few places I'd like to add some more green where it can tuck in
behind the ankle IEP. So we've talked a
lot of ink leaves right behind the painted leaves, but we haven't
actually talked to me painted leaves back in. So I think we'll just pick a few spaces where we
need a little more green. Go ahead and darken these. Pick a few spaces where we
need more green here and then we'll go ahead and add some
half leaves and right, like we tucked in
behind the rose before. We'll just talk these
behind our inked leaves. Remember, add the darker
pigment at the edge, and then it really
gives the effect that that leaf is over top, right is over top of this. It's casting a shadow
on the painted leaf. And maybe it will take
another half leaf here. Using the same technique, same way of painting it, just talking it back
and adding a shadow. Let's finish off some final
details in the next section.
6. Final Details and Thoughts: So I really like the
way this is looking. I think we just need
a little more ink to tie this all together. I want to add some details to the inked leaves and
connect the dots here to make the stems of some of these leaves
linked together. So I'm going to go in and make centers on the inked leaves. You don't have to do this. You can add little ones
like we did in practice. You can add ones like this. I kinda just like to add
these intricate back in just like it would look
behind the other one. Makes sure that your
paint isn't too wet at this point because you will smudge it
with your hand. I do it all the time. Connect these leaves so they're growing from the same stalk. That looks neat. Should be filled in
and connected some of these spaces that
we've left open. At a center here you can see where it's again
tucked underneath that that rose petal like to be consistent and do it all on
all of my anchor leaves. Just checking to make
sure that it lines up. So I'm liking this was forget sometimes to
get all of them. So I have to keep looking back
and making sure I haven't left any leaves
without their center. That looks really great. We could leave it right here. You could stop right here
if you, if you like, I'm going to continue a
little bit and connect these leaves into the not kinda hanging out there in
the middle of nowhere. Think that looks cool. And then keep looking at
it. It doesn't need more. Could add ink on
the painted leaves. I think I'm going to leave
my patient lives alone, probably put me on
these little ones. I'll just add little centers. I'm just going to plant
my pen and kind of flick out a little
center on these. That looks cool. Do that on all these
little leaves. I think. You do want to
make sure your paint is dry before you put ink on
it or I'll just really blur and kinda get messy. So make sure those are dry. Took another leaf in here
and then add centers. Okay, What do you think? I really like how this turned out and we're really happy
with the way this looks. We could add ink to our roses, but kind of maybe
want to leave them alone if you want
to add ink detail, go ahead and do it just
like we did in practice, but I'm loving this and I
hope you had fun today. Please post your projects to Instagram and into
the project site. And I love to share them and I'd love to hear your
thoughts on my class. Happy painting.
 Sweetseasonsart Cris, Let's think Spring with some happy flowers!