Transcripts
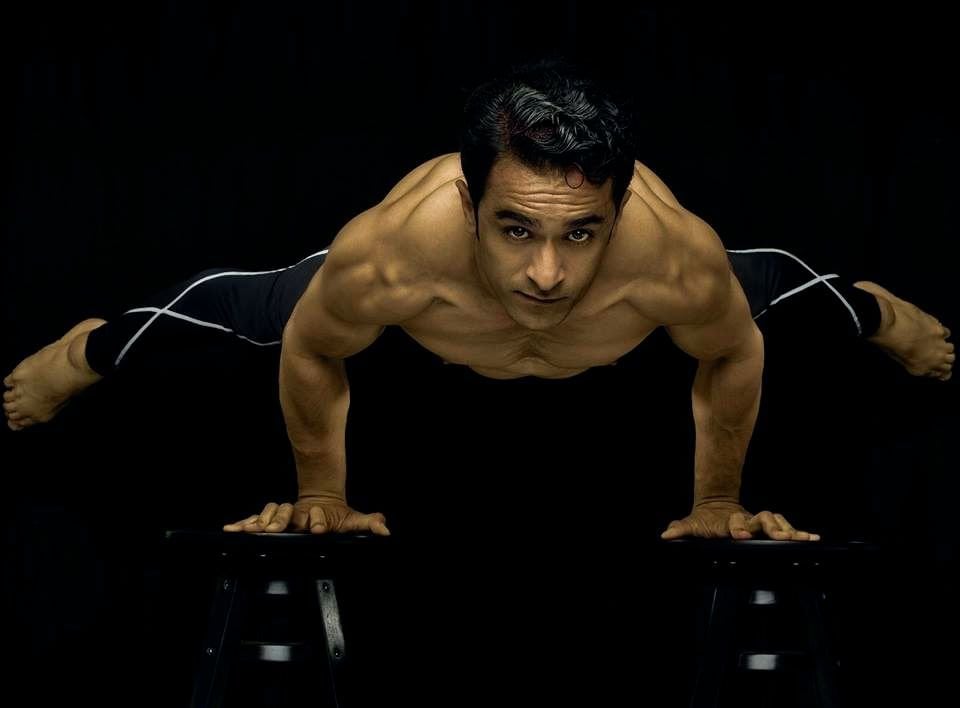
1. HS 102 Intro: Hello, welcome back. My name is Enrique ESCA have this is a handstand 1, 0, 2. So I'm assuming you've watched Hanson went to one at this point, enhance a one-to-one. We focus a lot more on body alignment and stuff like that and trying to keep the shoulders, wrists, and everything altogether. So if that was the primary focus, what I would like to now shift towards is a little bit more techniques and how to manage that standing on your own. So we want to deviate from the wall a little bit, but we're going to build upon the techniques we've used from the first one. So we're gonna do a little warm up that will add to the already warmed up that you are continuing from 1, 0, 1. Then from there we'll, after calibrating our bodies a little bit, we're then gonna do a little bit of work on the wall so we can learn how to come away from its slowly. But afterwards there's a certain point in time where we just sort of have to get into it. In which case I'll get it into the learning how to fail or fall down safely segment again. But now it's an, a different way. And afterwards what I would like to is build towards conditioning for harder tricks or different Stan stuff like press ups into handstand or even stalled or presses into hands-on. It's much further in the future, but it's just things that we'll need our core and compression and flexibility to help us with. So if you'd like to know the conditioning, that'll be at the end. And until then let's get into a handstand Stowe fab.
2. Warm up: So one of the things I would like to add is to the warm-up. There's going to be at least three things I'd like to add. So we're gonna just gonna take the warm up from the first one and then add these next few things. First is, in this case, we'll start with the wrists. And so the risks, I will bring it down to the ground here for that. But the risks, we're going to just put them down on the ground like so. And I believe the last one we went the forward and backward, right this time what I'd like to do is start just adding different mobility areas. The range of motion to the wrist. So we're going to go all the way around in one big circle. You don't need to put a lot of weight on it right away. In fact, I would recommend starting kind of light and then working your way up to little bit more way each time. And then you start messing with the flexibility and going a little further over your hands. And you can see, I'm purposefully using the shadows. You can kinda get a sense of like how much over I'm going on top of my hands. And then if you lift your legs up just a little bit like a lift the knees off and then I can go around a circle, then that's more weight on top of the risks. We don't need that intensity. If you're getting that comfortable, then let's just go the other way around and make sure that the hands get very well warmed up. And are the risks. I mean, and when they are warmed up, what we're going to do is really take my hands off the ground, shake that out real quick. And we're going to take the tops of the hands, put it down on the ground and I'm going to do something similar to start to the side and then rock here. I'm kinda of what I'm imagining like a boat rocking read, just kinda go side to side here. And this is leading back for this particular scenario. Good. And on this side it doesn't need to be too intense. We're just getting the wrist used to being used in a similar fashion that our angles are used. And since they're not normally use that way, prepping them helps a lot.
3. Frog hand stand: For this next one we're gonna do is the frog stand. The frog sin is going to be a type of calibration we're going to do, but this calibration is focused solely on the trying to balance using your hands. I like doing this one because it's going to have you think about how far you need to go over your fingers before you need to start pushing back. But we don't want to push back too much because we don't have like a heel at the back of our risks. And so we don't want to go completely down. And we have this maneuverability here by squeezing everything in some of you that have done yoga probably you know exactly what I'm about to do. But we're going to squeeze into like a little ball, right? So like I talk down into this position, I'm going to put my hands on the ground. I want I'm gonna do is I put my knees on the outside of my arms here. Now you can go really wide if you're super flexible. And this kind of turns into like a straddle exercise where you can keep it really close. The point where I want to emphasize though, is I have to lean forward either way and I bend my arms just a little bit. Once I do that, I should get you buy here and I start pointing my feet. I'm not sure if we could see that subtle change. Feet, they're not touching the wall, they're not touching the ground. But I'm what's happening at this point. I'm really in a handstand, right? So in this hand stamp, I'm standing on my hands, but all my body's tucked it. But notice my fingers have to do the work. It's my hands doing the work here, but everything else is account for. I don't have to worry about like what we didn't want a one where my legs and feet are all up in the air and my hands again, we've covered this already. They're not doing nothing either. You don't get to just chill here. There's a, there's work happening. I'm going to zoom in on this, what you'll see. Okay, let's do this again. So I'm going to put my hands here in the middle. I'm going to try to not get in the way of the camera here, but same thing can apply on put my feet over my legs, over my elbows and I leaned forward, watch my hands as they try to work. I don't wanna go too far over. It's just enough. I'm going to push a little back. We see that for watched the amount of work, you could see the shaking. You can literally see the shaking in my hands like there's there's work being done.
4. Elbow stand: Here's the next step. Well, we want to try and do is what I like to call elbow stance. We're going to take the same premise now. We're going to take the hands, which was having that balance point going back and forth, but we're going to have the entire elbow to do it. The problem with this one is that we have to arch your back a little bit for it because we are elbows. We'll go to about where I had is that we're going to be tempted to do this and there's balance to be had there, but we need to afford to look up while also opening the shoulders a bit. I'll show you what I mean. I'm going to turn our backs is going to go to the law, elbows on the ground. I'm going to kick up, aiming up. The, the goal is to have all the energy going up that doesn't change. So I'm going to come up. And so that's why I want that gentle touch on the wall because all the energy is going up. If it's a hard smack yeah. Like that. That means that energy went behind us. Have that same stretch so you can go through shoulders. We're looking up. That's too much on my part. Yeah, we go and here we get to manage that same balance, but we get our legs up in the air. And we have a large window of opportunity to balance that through the arms rather than just the hands down sideways version of this. Here we go. We're going to kick up and the energy comes straight up. And then look at this, I'm going to start going through the shoulders here. And I still want that extension to reach towards the ceiling. There we go. Now. I want the shoulders to be opened for that consistency and then look, I can use my hands a little bit. I get that wait, telling towards the hands and then I get to push back using the arms. If I close off and I arch the back that starts arching even more flexibility that I just don't have at the moment. And let's find me. So drawing a couple of those in this moment just to sort of feel how much the shoulders need to open up her. Okay. Let's move on.
5. Diamonds: For this next one, we're going to use the wall a little bit more now, okay? But it's going to be our last bits for the most part I want us to ease off of it. So what we're going to focus on, we're going to focus on the coupled with a focus on a couple of key aspects. And I wanted to play with body shapes first. And so we're going to do that on the wall. And some of these by shapes are going to help us get off the wall. So the first one is we want to trick ourselves in a way to get into a Hansen. And one of them is going to be what I like to call diamonds. And diamonds is we're going to start off in a straight-up hand side. We're going to kick up to the wall just like we normally have been. And then afterwards we're going to go into a straddle. Then the feet will come together. That will bring the knees together and it'll go right back up to straight. Now I want you to go to straight with a tuck tail bone and relatively squeezed, but so go straight up the line. And that should sort of trick your body into doing a handstand. It's pretty loose, but it gets your body moving in a way that you still are required to keep those shoulders open, what we were just playing with. So we're trying to move while maintaining this consistency. Okay, so let's get into it. Here we go, straight up, all energy up. Here we go. Hello, Okay. Now that I'm here, I am going to take my legs, not dubs the light here. I'm going to straddle and then I'm going to bring the feet together and the monies together. And then I go up. That up should keep us pre-lab or you're going to find that you need to engage your hands a lot on this. And that's that same sort of engagement that we felt in like the frog hand stamp. But that maintaining of the balance is still fight. There we go. And you should be gently on the wall. But that reach, reach, reach, reach up. There we go. Yeah. Those are diamonds. So let's keep practice that a little bit. Seeping. Get a couple of hover moments where you just sort of kind of coming off the wall yeah. All right. Onto the next one.
6. Slow Descents: This next one's one of my favorites. It's going to struggle hands then maintain your open shoulders on this one. But we're going to do is we're gonna straggler legs. When you straddle, I want you to rotate the legs coming downward, but we're going to do it so slow that you're going to end up passing through a balanced point. When you get to that balance point, hold it, just hold it for a second. Then continue going down. I'm going to get a couple angles on this so we can get the full, just the full angles. So okay, so Xiaowei, same approach to the diamonds. Kick straight up. We're going to all butt up, come through your shoulders. And then we're going to go into our straddle. And now here's the weird part. Your style, you're going to be slightly arced when you straddle, but start tucking it in, rotate, rotate, roti, there's balance and keep going until we go down. Keep that as close to compression like you want your knees to get to your chest when your legs come down and let's do another angle of that. Yeah. So this particular one I want a different angle on just because I want you to be able to see that last bit of compression here at the end. So we're sinking, kick right up. I'm going to straddle. And here we go. Here comes that part. So you can see my back is little arch. I want that to go, uh, keeping the stress not as much as you can like there's active struggle happening here and then start rotating, but keep the shoulders open even though that's rotating it, I'm completely free here. Now I finish that off. Then we see how like there's that moment where as it rotates, you're going to pass through every single time. If you go super, super slow, you will have to be in a hints him for a period of time. Now, if you get to that point and you want to play with it more, go into like putting your legs together right away. Maybe you put your feet together. When you put your feet together like in diamonds, keep your knees out. Does that all make sense? Yeah, that makes sense. Okay. That's the hip rotation method. It'll accidentally put your hands on every time so long as you go very slow. So practice those a few times and try to get used to doing a handstand and your straddle position. Because it, that's a very it's a very good position to get used to doing Hansen's it. And then this particular maneuver is actually negative for stuff like press up hand stance, which we can push on further. And I'll get more in depth later.
7. Pull off the wall: This next concept you've done before, and I see it a lot happened when we kick up and we're trying to move away from the wall, since I want to get us away from the wall further, I'm going to have a start further rather than having the hands here. The hands are going to be way back here and we're going to have the legs come this direction. Well, they're likely going to come in this direction. And it's going to cause a back arch to get away from the back arts. We're going to take one leg to come off the wall. And here's the thing that I'm talking about. It happens often. We tend to want to push off, even a small push off from this with us still on the wall, ends up pushing us off balance completely. So we don't want that this exercise. I want you to get further from the wall, have one leg come away and then this leg over year the free leg glean so far and stretches so much this way that the lead on the wall gets pulled off. But just a little bit you do it so slow and so slight that this has no choice but to come up about this much. And then once it's there, it can't touch the wall anymore. It's going to come. They start closing together at the same time, do this whole thing very, very slowly. I'll demonstrate. We're going to have a camera below and then this one here so we can see it get pulled away. So again, further from the wall, I'm going to be back here and I'm going to come up and this causes my back arch. Yeah, We see that I'm going to start engaging everything. One leg reaches away and watch that back leg, watch, watch, watch is going to get pulled off. Once it's pull off now I get to start closing together and they meet in the middle. And that's where I come back. This is a common mistake where we tried to reach just a little bit here and then people can pull off and then you have no choice. You can't even really hold your balance anymore. Is it clear? And then you close? No pushing. Let this leg pull you off in slowly bring back. It requires so much patients. It's the worst feeling in them. But if you just let this get pulled off, ill work and now you have another set of patients you need to work as this comes close together, start reaching half the whole torso reach, reach, reach, reach, reach. Just like in 1, 0, 1. But now that reaches mix of page. Yeah. Okay, practice this a few times. Cv and get that balance sort of maintained. Once you've come to this point here, you will end up being further away from the wall. Worst-case scenario if you fall out is going to go this direction. Yeah. Okay. So that's the pull off the wall. We're getting a hang of finding that balance now. We've got the core principles of like bringing everything stacked together and reaching up. But what we're missing at this point is being able to do this right off the bat, right? You want to be able to do this like in any field, any open space, really want to get away from the wall. So I'm going to go downstairs in the living room space where it's wider and there's less was I find space. My recommendation to you, if you have a nice open space, maybe you have to move the tables away, but find a space where you can safely fall or something like that, right? Where you're not going to kick any hard edges, like tables, desks, shelves, whatever. We don't want anyone getting heard here. I'm going to teach you how to bail out of this and it's going to require a certain degree of being able to hold yourself up and doing a cartwheel. So we'll learn the basic area, what we're trying to do there, you'll practice with a cartwheel and eventually this turns into a bail without actually having to fall. Yeah.
8. Bail out: This next section, we need a little bit of space for if you have a wide living room, I suggest using that. If you want to go outside to like your front yard or your backyard, he used that, but we need space because we're going to learn the section on walls gossamer, last one, but kind of successfully failing. I like to just call it a bailout though, right? So first explore the space where the carbonyl. So with your cart wheel, you want to start with a lunge forward. And then when we bring our hands forward, we want to bring your hips over our bot. You want about that much space, right? So what we're gonna do is now try to do the same thing with the lunge forward, but we're not going to cartwheel override away. It's going to come up to the his and tap and then it's almost like a back down. So when we come all the way up here, go too far forward. Keep looking at the ground. If you keep your spot on the ground when your hips go slightly over, that's what you're going to bail out. Like that. I just keep my spot being tired time. And then it's going to sort of arch my way over. I would suggest when you lunge forward, go to your tap and hold it, and then go too far over. Having these delays give us that little zone of going into a handstand. And then by going too far over, you get to learn what is too far. Like, not just you overshot it, but just go and choose the tab and then you have no choice to going. Okay, Then try to prevent that using that stretch from the level 1. So we're going to come forward and reach, reach. There's my edge right there at the edge of my window. I'm going to carry over and bail out, play with that a little bit. Use the space for that sort of freedom to successfully fall out of it. But in a safe way. That is our bailouts to kinda weird handstand cartwheel variation.
9. Taps: I'm back upstairs now. We know how to fail as it were, successfully and safely. Now what I wanna do is I still am going to use the safety of my bedroom to try to make this next step happen. And I have this little freeway here to do lunges and I'm going to do taps. I'm gonna do my taps from significantly farther away from the wall. And now that we know how to bail, we can still use it. I recommend still using a whitespace. I think I'm in a particularly to close space environment. But if you want, you're still welcome to continue to continue to use your bedroom space. I even advise going between the bed and the wall itself. If if that's still something that you want to feel comfortable and if you feel bold enough or comfortable enough to be in a wider space, Let's do this exercise. So at this point, we're going to do our lunch similar that we've done before. So the slides we're going to come forward. I'm going to go in this case too, about the edge of my bed and I were gonna do tabs. I'm going to lunge forward and then tap up and then back. Now, when you go up, saving, get both legs up and then come right back down. Do this a few times. Eventually, I want you to do what's kind of similar to the hip rotation movement that we did earlier, where it stalls for a second. We're going to do the same thing. So we're going to take this lunge forward, come up, stall hold, hold, and then come back down. See if you can extend this longer and longer every time. We're going to come up. Stop. If you can even still here and hold this position, go to a straddle and then rotate down. We're going to start mixing. My desk isn't the way. Let's see if we can start mixing some of the body shapes we've already done, right? So I just did a stroke. I want to do the next position. Let's say it's a TOC. Yeah. So I'm going to come up. The TOC is the exact same thing with the diamonds. When I come up, I think go here and then right back down but just the feet touched but the least statewide. And then I'm going to bring the knees together and the heel stay at the bots now I'm going to tuck position. Then I'm going to go straight up and then back down. All we're doing is taking all the elements from what I just taught from 1, 0, 1 to the earlier stages before the successful bailing and put it together in a stand alone aspects. So you know, all these things, you've tried them all up at this point. We're just trying it away from the Long Now. That makes sense. What's the next one? We get another position. Let's make so we're gonna do a side split now. So we've demonstrated, let's do, let's do a stack. Okay, We're gonna do a stag now. The stag is an interesting one because it's almost like we're reaching. So we're going to come up we're going to come up and stall. And then what I want you to do is you're going to separate the legs into a split, but bend the knees. One leg is foreign, one leg is back. And you'll find that this helps counterbalance for you. I like this one a lot for that reason. So try the stag. It's actually a nice helpful area to bounce in because you've got your links counterbalancing you. And you have less of your legs to try to keep track of for your hands to be balancing the whole thing. So just sort of makes things a little bit easier.
10. Degrees of tension: One of the things I want to talk about now is after we've done all his hands and we can put stuff together. There's like you can start playing with this. Degrees of tension is where I've, what I've been calling it that. But you know how I've been saying have all the citizens squeeze everything in your button, reaches high as you can. You want to continue to do that. The reason why I suggest doing it in extreme case, at least in the beginning, is to get all the muscles in the body consistent enough to maintain a predictable body alignment for your hands to handle. When it relaxes, you can still have a degree of predictability, but if you're not fully aware of your body just yet, sometimes it gets way out of alignment. So we want to operate in our window. So if you want and you're open to it at this particular stage, we can start playing with certain degrees of tension. And the meaning. When we come up to her and sign and we reach and you're having pretty long stalls or a long hovers where you're in the air. Just like you've got a pretty solid handle on your hand. Stan, what do you get to that stage? Start seeing how much you can relax it in the same way if you're standing normally, there's a you can start seeing like okay, like what I still know. Like I could still be standing in this position. Whereas enhance and they'd be harder to sing. Same approach to the Hansen. I'm going to lunch, come up an imbalance. Now. I have maximum tension, your right butt squeeze, really reaching forward my toes are a little since I can see my toes are kinda cheating it. But as I reach up and a line up, I'm going to start relaxing my core a little bit here, right? And then my butt a little bit. And then I'm just going to have some bend. But I can still maintain. The reason being is that the shoulders are open. That's why my biggest stress has been maintaining the shoulder, staying open. But I can play with degrees of relaxation in the handstand and then that's more tension. Maybe it just sort of tense or relaxed on the core. But keep the shoulders open. You want that degree of predictability is like, but this always stays open. I think at this point we're starting to get to where we can manage this open shoulder motion. Okay, let's move on. Now that we've got all this setup, I'm going to have us, let me step back now that we've got all this setup, Let's do some conditioning because we want to start aiming towards other things, right? Other body positions and different types of entrances into the Hansen. If that's your interests, will keep moving forward a little bit. But otherwise, keep practicing these things and see how long you can Hansen. One of the things is put a timer on and like hold it for a minute. See where your stamina is in terms of holding those shoulders open. Using the wall as a guide sometimes helps, mostly upset.
11. Conditioning: One of the first ones is for conditioning that I would like us to try is doing negatives for press up handstand. If you're not familiar with oppressive hand stand. It looks so I'll turn around and it looks something like this. You're going to being a straddle. And then when your hands on the ground, the goal is to keep things close. But you want to go up to a hints and from your straddle here, we push straddle. And then we've pressed all the way up to our handstand. Now, if that's really difficult to do, I totally understand. So we're going to go up to the wall with our back to the wall. And for working the muscles that need to work to do this, press up hands, then you're going to go into a straddle while you're on the wall. You can do that same thing we did before. It's going to rotate the hips. And then what you want to do is keep them close, keep everything close. Hands, try to get to where the feet tray. Get to where the hands are so you can keep everything close. That's going to be the negative version of the press up hand stance. You want to do everything you need to do going up, do that in reverse, coming down, keep it as slow as you posited, like the slowest you would even whatever you think slow as going up. And that negative, that working those muscles will help over time. Yeah. There's other access we can do and I'll go over those in a second. But that's one of the primary. Now, this next one we're going to try a handstand push-ups. I've realized for some that sounds impossible or ridiculous. So we're going to do a sort of like a breakdown, right? We're going to do a negative for the, for the negative. So this is a little strange because we want to go down using the guidance of the wall, but we want to push up a little bit away from the walls. I have the recording happening from the side as well. Here's something that I advise get pillows or some sort of cushion for your head. So when you go here on the side, you won't land on your head. We're not trying to go down to our head, mind you, but just in case have something soft here. We're going to come up, take up, say Well we always do. And then we're going to come down maybe about halfway using the wall and then it will step away from the wall and then push up. Yeah. If you need to use the wall used well, you can use one like to actually help you up. But come down, push up, isolated, push up, isolated. You need to come on, come on over him. And then he could practice pushing up like that, all the way down. And then building the strength is going to help for stuff like press ups. We don't want to muscle it too much. We don't need it, but having that strength will come in really handy. This eventually can evolve from the frog stain that we didn't the beginning. So if we have that same frogs and where we lean forward, when we go forward, where our legs come up, we're going to arch, are back just a bit to get our legs up. Make sense. That's sort of tilt through is the key. We want to bring this around so you can see that one more time. So seeing this from a side is going to help a lot. Then as you can see, as I tilt forward here, I went to school, I had through the shoulders and that's the key to getting that through. So we come up and then it come through and then send my legs back. But the through here is what helps me get up. And then to balance, everything is kind of operating within this compression. The opening shoulders. So I feel like you're starting to see where these all connects like that through and keeping the hips close to the compression here. All that like what's essentially the hollow body mixed with the open, automatically puts you in this upside-down stable position. So that's what we're aiming for. These are the muscles we're trying to work. Here's another one, another exercise we can do for the precipice and it's going to be focused on the core. And for this, I don't have that much space, but if you're in like a living room or some with wider space in a Lambda grabs, you're going to straddle up. And then you want to bring your legs, lift them up, but keep them as close to your chest as possible. Close, close, close, close, close. And then before you know, you're going to start coming here on the way back. What I want to do is keep the knees close to your chest and then let it slowly go down one vertebra at a time. This should be a lot of effort here. It's really close, really close, really close. We're not just relaxing and letting things drop. It's compression. This can like it's almost as if someone's going here and then letting this down 11 vertebra at a time. That way we used to do at all with your abs controlling that down the entire way through and then saving the legs as they go. Oh yeah, You want that straddle for the rotation? To be part of that compression. All right, let's do another exercise where compression, for compression on the opposite end rather than coming legs to the head, we can always go the opposite as well. So for this particular one, we're going to pipe down, go as far as your pike allows you. But we go to this is where mine is at the moment. We reach forward with her hands to help that compression happened to bring the chest closer to the legs, the knees in this case. But once you get there, what I would like you to try now is take your hands and have them go behind you without your chest lifting up. So we're trying to maintain this close compression here and my hands come behind and a normal lift them up. Keep your core engaged. Because that's the thing that's keeping you close to your knees. If I relax and lift my hands up, it lifts up the chest. Right. But we want to keep this close because we know how much we need that compression to get our legs up overheads. So keep that compression here and then slowly move back. And then you start activating that core to keep you down. And then when you lift up, it should activate even more. And the same thing would happen in reverse if say, I straddled my legs a little bit, now I put my hands on the ground, Let's say farther you reach the heart of this OB. So I'll put them about shin length here. But when you're here, you're going to lift up your legs. That's the same compression motions that you want everything close together. I'd say do about 10 to bees, like do set the tone like maybe three sets of 10. But this sort of exercise is the kinda thing that's going to help you for stuff like the press up, but also stuff like the stalled oppress. Yeah. We want these sorts of motions to keep that core engaged. These are tough. Okay, We did it that is that conditioning, that is the techniques. That's all the stuff for handstand one or two everyone. I hope I've covered everything to help push you forward a little bit worn your hand sense and you feel that much more independent and getting to stand on your own, keep practicing these techniques repeatedly like these. I'm going through on the video, but yeah, keep practicing them and find your own special like moments where you can hover in place before you fall. The key to preventing that fall is the shoulders though, record yourselves legit, record when from the side specifically. Because you're going to see when those shoulders sort of collapse, you're going to get tired. In all likelihood, you'll be here pushing, pushing, pushing, and then all of a sudden visceral happened just that little bit that little bit of shoulder closing ends up making your legs come down forward is if you keep this open and that hollow while your hips stay open, that contradiction, we're bring it back to 101, but that contradiction will keep you up at the shoulders are the primary once you have a much larger window between the hips and the torso than the shoulders. And so if that's the primary, that's the stuff you want to focus on the most one of the things that I find helps, um, I, if you do this standing up for a second, if you balance on one leg and you just look at a point on the ground, you're balanced, becomes more stable. Just pick a spot on the ground. Versus if you're just sort of like looking everywhere suddenly like while you can maintain balance, it's a little bit harder to hold. I like, but pick one spot and that becomes solidified. Go up onto your toes and pick one spot. Now is even harder, but it's more doable as opposed to looking around, then you fall back. So the same thing's going to happen when you do your handstand, when you're here looking up, pick a spot. If I was going like here and you were looking straight up at my handstand. I would honestly like come through here and my spot would be somewhere just beneath my poems. Just a little bit like I'm looking up but I don't want to see my hands. That means I'm like, um, Archie my back. So I'm going to be here in through, Let's do this lab when you do this right now, Okay. I'm doing this on my cell phone, so the audio is going to be weird, much like when I did the go probate. So here I'm going to put this down here. Here's the wall, right? I'll even showcase here. I'm going to pick one spot and you're going to see me go through my shoulders. I've got my hands right in between evenly with the cell phone. As I pop up, I'm going to come do a kick my desk. But watch, watch, watch. I'm coming through the shoulders here and I'm paying spot just below the phone itself. And now I'm more aligned because the moment I close, just like what I was saying and what cost just a little bit there. That's when I lose it. See you.
12. Conclusion & Project: Who? So it's really important that we keep those shoulders open and pick one spot to look at. Focus on that one spot so your body for whatever reason feel stable everywhere else. Okay, Cool. That is it for 10 to work on these things? Work on the conditioning if you want to push for and do press appendices if your Kappa year gray. But one of the things I'd like to do, I just filmed this yesterday, two days ago. I filmed it behind me. But we're going to go out and do a little project and we're going to pick a spot, your spot of choice. Film yourself working on a handstand. I'll explain the whole thing and how I'm doing it and where I went up to go but find someplace serine, do a handstand, do like taps, install them a little bit, and post your videos, post your photos. I advise doing videos because I would love to see where you're at in your handstand journey though, it's particularly in your own self-assessment of your alignment while you're doing it. So that's the key. Thanks for joining, and I will catch you on the next one. Here is the project. We're going to go ahead and take your cell phone, whatever camera you have. And I want you to find some sort of like open field. Maybe it's a place in your house that you think like there's a great door frame and set up, but find something that you enjoy. Picture ask, do a handstand in it. So in the case of what I'm choosing here, I happen to live close to a pond. I'm going to go to this little doc and I will do a handstand there. I would prefer video, but if you just want to send like the screenshot or a photo of it, just do the photo. But we'll take our tripod. I'm assuming you have one or some sort of setup with books, water bottle, whatever. We'll take a photo and post your hand stands because you're at a point now at the very least, that you can capture a stall during your kick up to your bailout. And so I would say choose that it would be extra points if you do a straddle in that photo or even a tucked position, I'll try to do all three for this video. The voyage is, let's find something to do. A handstand in front of or behind, feet away.
 Enrique Escajeda