Transcripts
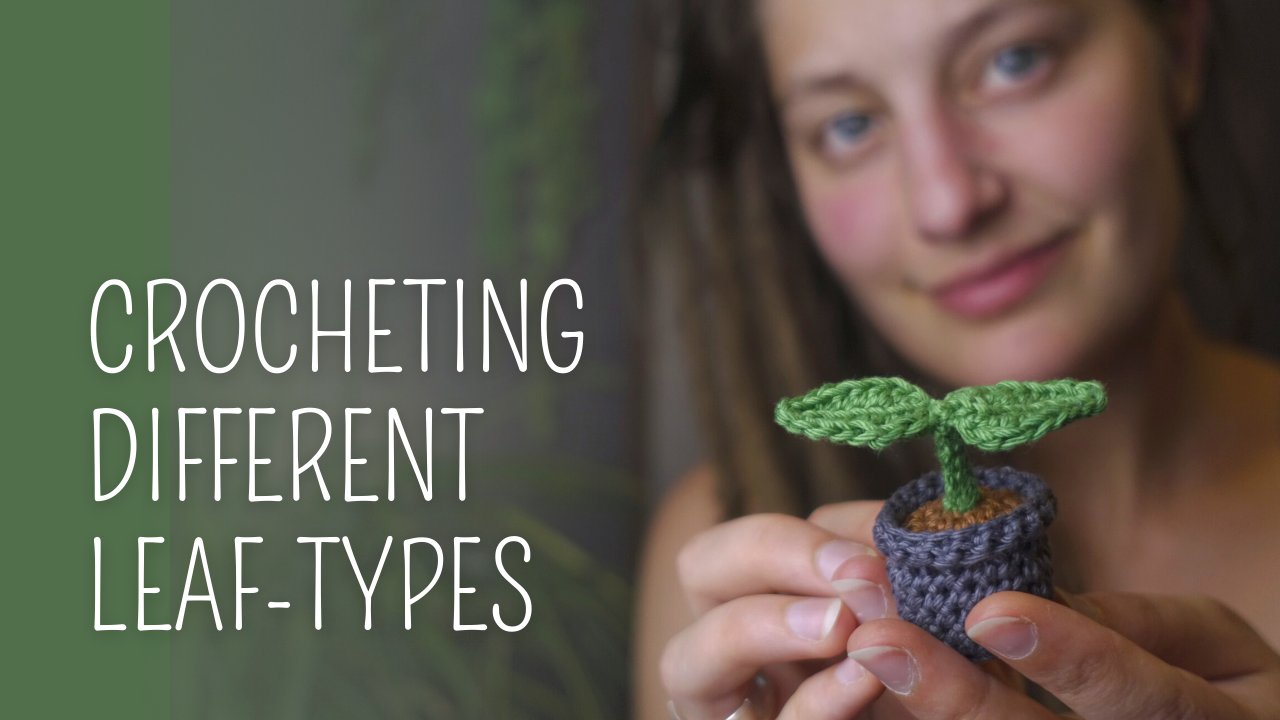
1. Intro: These crochet
hanging plants make great gifts for your
friends and family. But they're also a nice
accessory for your own home. Don't need sun or
water to stay alive. So they are perfect
for the bathroom without windows or maybe
even your camper van. Hi, my name is Lisa. I completed a three-year
apprenticeships for being a professional Taylor. I currently work at an opera
house here in Germany. And I saw suits and costumes for the opera
singers and actors. In my free time, I do
other crafty things like, for example, crocheting
these lovely hanging plants. In this class, I'll explain step-by-step what tools
and materials you need, which stitches we will
use and how they work. How to crochet the
individual pieces and taught to assemble them. There's a free PDF file below. You could download with a written crochet
pattern to follow along. To complete the project, you should be able to crochet
even rows of stitches. I tried to explain
every stitch you need. If you've never tried before, I'd recommend you to take a beginners class
here on Skillshare. And once you've got comfortable
with your Coke and Yon, come back and thought TO plant. Alright, now grab your hook yarn and join me in the class.
2. Tools & Materials: To complete the project, you just need a few things. Tools you need are
a crochet hook. The one I'm using is
three millimeters. I would recommend using
2.5 to 3.5 millimeters. They come in a lot
of different sizes. Scissors, a tapestry needle
to weave in the ends. Materials you need
are crochet yarn. I use 100% cotton. The thickness of the
yarn should match your 2.5 to 3.5 folk for the strings, I use different tones of green, brown for the soil, black for the pot, and white for the plant hanger. I used a slightly off-white
here for staffing the pot. I use small cut
fabric scraps and the yarn I cut off after
weaving in the ends.
3. Stitches: In this lesson, I'll explain the different
stitches and how they work and the magic ring
and increasing stitches. I won't go into detail too much, but I'll try to show
them as best as I can. The pattern for the plot starts with eight single crochet
in the magic ring. Take your yarn like so, holding the end of the yarn between thumb and middle finger. Then crossover and come
around your fingers again. Puppet in with the
end of the yarn and hold it on the other side. You should now have two
parallel strands of yarn. Now with your hook
under the first one, grab the other one, pull through and twist, then grab the same
strand of yarn, twist it, and pull
it through the loop. Congratulations, you've
created a magic circle. When you now sit your single crochet stitches into the ring, you can tighten the ring
to get a neat circle. Next I'll show the
different stitches. First chain, and it's
probably the easiest stitch. You just grab the yarn
with your hook and pull it through the loop
on your hook. That's it. Grab the slip stitch, stick the hook through
the next stitch, grab the yarn and
pull it through. Now you have two
loops on your hook. Pull the first loop
through the second one. That's the slip stitch. As I started crocheting, I always made a slip
stitch, white you tied. So keep in mind that
you let it loose. The single crochet IS probably the most common
crocheting stitch. It's easy, fast and makes
a nice-looking surface. The hook through the stitch, grab the yarn and
pull it through. Now you have two
loops on the hook. Sling the yarn around the hook, and pull it through both loops. That's the single
crochet stitch. Stick the hook through
the next stitch, grab the yarn and pull through. Then grab the yarn again and
pull it through both loops. For the half double
crochet stitch. Sling the yarn around
your hook before your insert it into
the next stitch. Now grab the yarn
and pull it through. You should have three
loops on your hook. Now let's link the
yarn around the hook and work it through
all three loops. It's basically like
a single crochet, but with a third
loop on the hook. The double crochet starts
like the half double crochet. It's Linda yarn around
the hook before you stick it through
the next image, wrap the yarn and
pull it through to have three loops on your hook. But now you go to, to sling the yarn around the hook and pull it through
the first two loops. Now you should have
only two loops left on your hook to the same again, to have only one
loop on the hook. That's how your crochet, a double crochet stitch. These are odd stitches
you need for this plant. There's the chain stitch, single crochet, half double crochet, double crochet. There is one more abbreviation
left, inc, increase. To crochet a circle, you need to increase the
number of stitches each round. To do this, you simply make two stitches into one pack, this first stitch into the
same, the second stitch. Now you know the basics so we
can start crushing the pot.
4. The Pot: We start with a magic ring. So again, windy yarn or at
your fingers and hold it. Then hook underneath
the first line, grep the second
through and twist, wrap the same string and
pull through the loop. Then into the magic circle, make eight single
crochet stitches. 12345678. Pulled the end of the magic
ring to close the hole. As we bark and rounds, you should always
mark the first stitch of a new round to
not lose track. Believe me, it works wonders
as I started crocheting, I always thought I
don't need this. I can count and it
probably will work out. But no, it never
turned out as a chit. Just do it. It's also pretty easy to just crochet
a little piece of a different colored yarn into
the first stitch like this. The second round
increase each stitch, like I explained in
the previous lesson, make to single crochet
stitches in one, to double the number
of stitches in this round till you
reach your marker. It should now count 16 stitches. 123456789101113141516. Again placed a
different colored yarn and the first stitch
of the next round. This is the one single crochet. Then increase the
following stitch. Then again one single
crochet in the next stitch, and increase the following. Repeat until you
reach your marker. This makes 24 stitches
in the third round. Now we're done with
the button up the pot. The next round on
the stitch through the back loop of your stitches. Make a single crochet
in each backlog. Don't go through the full loop, but only through the back loop. Now make single
crochet rounds in the full loops till
you like the height. I crochet at about six
pounds for the wall. If you aren't happy with
the size of your cut, you can make the bottom
of the pot bigger. After around three. Making one single
crochet, then increase. Make around with
two single crochet, then increase and repeat to
end up with 32 stitches. If you like it bigger than that, make around with three
single crochets, then increase entropy to
end up with 40 stitches. You probably understand
the strategy by now. To make a little rim at
the top of your butt, make one round of single
crochet only in the front loop. This haves the last round to fold over to create that rim. Fill out your market thread
and end the last round. But the slip stitch. Then cut the yarn and
pull out the loop. Take your tapestry needle and we've the end of the
yarn into the pot. I'd say there's no right
or wrong to do this, but it shouldn't be
visible from the outside. Let's move on to the soil.
5. The Soil: The soil is essentially the same pattern like
the bottom of the pot. Start with a magic ring. Again. Why do Yana
rotting fingers hook underneath the first-line, grab the second floor
through and twist. Grep and I would look into the magic circle, make eight single cohesive 12345678. The end of the magic
ring to close the hole and increase each stitch
in an extra round. Don't forget your marker. You should now have 16 stitches. Then make one single
crochet in the next stage and in your marker and
increase the following. Repeat till you reach America. This makes 24 stitches in the third round and your
soil now fits into the part. Finish up with a slip
stitch, cut the yarn, and pull the loop through tapestry needle. And within the end.
6. The Plant strings: For the plant strings, we start with making a
row of chain stitches. To start slowing the Yana
out your thumb black that hook us in the
loop from underneath. Wrap the yarn and pull
through the loop. That's your starting loop. Now, make about 15
chain stitches. To crochet apparel. Go back into the next stitch
and make one single crochet, 1.5 double crochet, all
in the same stitch. One double crochet, 1.5 double crochet,
one single crochet. Join altogether with a slip stitch into the first chain
stitch off the chain, called loop to
tighten up the pearl. Then Jane, seven to about 13. You can alter all
in-between chains. And then Amber, next pearl, back into the next stitch. Crochet, half double crochet, double crochet, half double crochet, single crochet. Joined with a slip
stitch. Everything tight. Repeat this to do
like the length. I'd recommend making
different length of strings in different
green tones. After the last pearl, make a few chain stitches, cut off the yarn and
thread your needle. Then make a little
pair of by weaving in the end with a needle
and cut off any excess. You can also make a
crochet HD version of the string of hearts. Start your string-like the one with the Perth chain stitches. The string of hearts, you only need chain and slip stitches. Crash apec to slip, such as in the
last two stitches. Everything very tight. Then again, crochet back to slip suggests
in the next two stitches. The second one should be the very big one
you started with. Again, keep everything tight. Now to find the
heart a bit nicer. Stick the hook through the back loop of the
stitch in the middle, and also through the loop
of the first chain stitch. And make a slip
stitch prototype. The first heart has finished, chain about ten and
start the next heart. To slip stitches, back to chain stitches. To slip stitch a spec. Stick the hook, the back loop
of the one in the middle, and one of the loops on the first chain stitch
and make a slip stitch continued till you
like the length. To finish, you can proceed like I've shown for
the String of Pearls. Run after making the last heart and with the ends
into the heart. Just as you like. Now, make as many plants strings as you like to fit in your pot.
7. Assembling: The plant strings through
the soil to connect them. I use a smaller crochet hook. But you can also use to help you crochet it with all
the tapestry needle. Just stick your hook
or needle through the soil and pull the open
ends after strengths through. When all strings are
connected to the soil, I take false strings
and make knots. Cut off the ends. And
the first step is done. Stuff you're caught densely with your Jon and fabric scraps, leave a bit of space on top so your soil and the ends of
the plant strings fit in. Then take some brown
yarn and thread to a tapestry needle to
the inside of the pot. At the end I make an NADH
and we've been both ends. You successfully
part of your plant.
8. The Plant Hanger: The knotted planting, you
need eight strands of yarn. The length depends
on your liking, but make them a bit longer than you think you
want to plan to him. You can always cut them shorter. Make a note with all of
them right at one end. Then separate them
into four sprints. Cut off the end to
look a bit nicer. When you place the four
strands on your part, you get an idea of where the
first notes have to sit. Right at the edge of the pot. For the second row of knots. Separate the strands
again, not together. Each two strands laying
next to each other. Always placed his strengths
on the pot after you've finished a few nuts to
look if it's still fits. The last row is made
in the same way. Now I do just need to place your pot in it and you're done.
9. Thank You!: Congratulations, I hope
you liked this class and maybe you've already finished a cupful little hanging plant. Once you completed the
first few strings, you should be able to
crochet them while watching TV series or
maybe talking to a friend. You can easily crochet a lot of strengths for
your hanging plants. It's super nice to
relax your brain after a long day of work or just on weekend while listening to some great
music to come down. The best thing about this, you end up with a super
sweet hanging thin. You can give to
friends or family, or just hang it up your own
home and enjoy it every day. Please take some pictures
and share them with the other students and me in
the project gallery below. So we can all
appreciate your work. If you want. You
can also tag me on Instagram if you decide to upload any pictures on your
account or any questions, open a discussion
and at this class, and I'll come back to
you and answer them all. If you're interested in
other crafting things, check out my Skillshare profile. I've created other
classes about sewing a bowtie and hence stitching
a Taylor's buttonhole. Alright, thank you very much for watching my class
and happy searching.
 Lisa Kahlhöfer, Bespoke Tailor & Crochet lover