Transcripts
1. Dish intro: For this demo, I'll be
showing you how to make a dish using the slab
and hump mold method. We'll cover tools. I'll show you how
to roll out a slab. I'll discuss molds and how
to use them effectively. We'll cover the process of tidying up the piece
at leather Hard. And I would say this process is definitely beginner friendly. Hi. My name is Kelly. I'm an artist and
educator based in NYC. I've been teaching ceramics in community and university
settings for about ten years. I hope that there's something
in this demo that will provide something new for
year clay practice. Enjoy.
2. Tools and supplies: Our class project is to make a dish using the slab
and slump mold method. To get the most
out of this class, follow along with
the demonstration at whatever pace
feels right for you. Once you've finished your dish, take a picture of
it and upload it to the project gallery for feedback from me and
fellow students. To do this, go to
the Projects and Resources tab and click
on Submit a Project. The tools and supplies seal
need include a banding wheel, a Biscare mold, or
possibly a wooden mold, a feteling knife, a metal rib, a needle tool, a red rubber rib, a rolling device, a ruler, a sponge, water,
and wooden boards.
3. Making a slab: Hi there. We are about to
begin by rolling out a slab. I got a piece of clay here. Before I roll out the slab, I first want to achieve one of the dimensions for the slab
that I need for the piece. I'm going to start
squeezing the clay a bit so that this dimension
here is already established. Let's say you know
that you need a slab that's 10 " wide
in one direction. You can achieve that 10 "
before you even roll the slab. The only question mark
that you'll still have is, do you have enough material
that when you roll it, it will achieve the dimension that you want the other way. That sometimes takes
a little bit of practice to develop
an intuition for it. But usually if you
err on the side of starting with a little more clay than you
think you need, you're not going to run into a situation where your
slab is too small? All right. So for this, I'm going to be using this
wooden bowl for the hump mold. And what I'm going to do is
roll a slab that, you know, looks like it should
be able to cover about the space that I would need for like a
low dish or plate. And this, to me, looks great.
I don't have to measure it. So, you know, I got the ruler
here just as an example, if you needed something to be
precise, but in this case, I don't really need to measure because eyeballing
it is good enough. All right. So I'm
going to start off by flattening this piece
of clay a little bit. And that will make starting the rolling process at easier. And making the sides
kind of straight sometimes helps them to stay
connected to the rollers. Rollers go on the sides, and you want them to be touching
the clay on both sides, and now I'll start rolling. Okay. Looks good. I'm going to go ahead now and
smooth out the surface with my metal rib gliding
the curved edge as I press into the
tool so that it's bending and compressing and then making a sweeping
motion across. If you're rolling a slab
like this and then you're noticing upon
compressing the surface to blend it and make it smooth. You notice that there's
a bunch of air bubbles. Usually, that means
that possibly when you were prepping the clay, you got air bubbles in it by trapping air by
folding the clay. It is helpful when making slabs to start by wiring off
a chunk of clay from your block as one solid
piece that you have to do minimal folding in order to get into the
shape that you need. I'm going to flip
this over so that I can smooth out the
other side as well.
4. Drying process: Okay. All right.
Because I'm going to be using this wooden
bowl as my hump mold. Usually just by looking
at what you have here, the size, the shape, you can usually
tell without having to do any measuring whether
or not it's going to work. If you're confused
or you're not sure, you could always get your ruler, do some measuring
and then determine. What I'm going to
do here is first, I'm not going to worry
about the edge here because that will be cut off
after it's on the mold. First, I just want
to make sure that the slab is not
stuck to the board. That's really important
that it's kind of loosely placed on the board. In fact, if you had a
layer of canvas you wanted to put between the
clay and the wooden board, that couldn't be a good step in making sure that
it's not stuck, but I don't think we really
need to in this case. I am going to place my
mold here on the top, and I'm going to try to get
it as centered as possible, just by I looking at it. Then I'm going to put
my hand underneath the board and the other
hand inside and flip, removing the board, making sure the clay comes off easily. Then I'm going to start
pressing the slab down so that it
adheres to the form. Now, this style of mold
is called a hump mold. A hump mold will
always be taking on the form of the convex
aspect of the mold. Most well, not most molds, but some molds will
be able to be used as a slump mold or a hump mold
like this wooden bowl. You can use it on the
inside or the outside. The way that you
want to think about using these different
styles of molds, it's pretty significant
the differences. One thing about the
hump mold is that it's easier to get the clay
to adhere to the form. It's more difficult usually
to get it on the inside. But the challenging thing
about the hump mold, which is what we're doing
here is to make sure that you remove the piece from the mold before it
starts to dry too much. The reason for that is as the clay is drying,
it's shrinking. When things are shrinking, if there's something
obstructing, that gentle movement, that's
how we'll get a crack. So if you set your clay on here, you make the shape of
your dish or your bowl, whatever it is you're making,
and then you just leave it and you wait
for it to dry out. If it gets too dry, you might have a crack
coming down the side because it wasn't able to shrink freely. So what I would recommend
doing is think about using the hump mold as a technique that's used for getting the piece to be the
shape you want, but you want to feel like
you're able to take it off while the clay still has
a little bit of give to it. And that can be
frustrating if you're wanting it to be
perfectly straight, and it's a really
ambitious size, or maybe if you're working
with a really thin slab. So yeah, we'll keep talking
about that a bit more. The next thing I want
to do is shave off the amount of clay here that I don't want for
the finished piece. And I just realize I need my bending wheel. Be right back. I got my bending wheel. Now I can very easily make a nice line around the rim to decipher where
that rim should be. What I'm going to do is first look at the edge of
the clay all the way around and find the part
where it's the shortest, where it's not
coming down as far, and I'm going to hold my knife. You could also do this
with a needle tool. Doesn't really matter which one. Hold some tool
here at that spot. Hold your hands steady. So I'm not going
to move my hand. I'm going to move the wheel. So my tool more or less
stays in the same spot, and it creates a line
going all the way around. Now, usually, this is
not a perfect technique. There's definitely a lot
of room for error if your hand is moving
about you realizing it, or if this isn't perfectly
centered and it's moving while you turn
the bending wheel. That's why it's helpful to position this right
in the middle, right? So I might do this
a couple times. And the faster you
go with the wheel, the more precise it'll be. Because the longer it
takes to go around, the more chance it is
that your hand will have moved slightly
without you realizing. Okay. At this point, I'm going to look
at my lines here, see if there's any outliers that are probably not correct, and then zero in
on the ones that seem like they're the
correct measurement. Again, this is this is not an absolutely perfect
foolproof way of doing this. You can use a ruler if you
care about perfection. Now I'm going to go and
use that line that I just made as a guide so that I can
slice off the extra clay. When this piece is off the mold and I'm in the finishing
touches stage, anything that I'm
not liking about the rim and its unevenness, I will be able to fix them. So this is not really a point of having to worry
about perfect yet. All right. Getting
rid of that, clay.
5. Using the hump mold: Now comes the moment
where you get to decide how long you need
to keep this on the mold. It really depends on
what you're making. Depends on how thin the slab is. The thinner it is,
the more vulnerable will be to warping if you take
it off of the mold early, the thicker the slab is, the more easily it's
going to hold its shape, even if you took it off
the mold right now. What I recommend doing is always airing on the side of
taking it off maybe a little sooner than you think
you should just to avoid that problem of the mold
obstructing the shrinkage. All right. So something
about the mold itself. What I have here is a
wooden bowl that I'm using, and it has a laminate surface. It has a kind of
sheen finish to it, which means that
it's not going to be perfectly absorbent. The best mold material is actually something
that's very porous like plaster or just
straight wood that doesn't have a laminate
surface on it. But this one actually
works pretty well. One thing you can do
is if you have say, a glass bowl that
you're wanting to use as a mold or something that y, it's not porous at all. It's very, very shiny and it's not going to
absorb any moisture. You can potentially line it with some newspaper so that
the clay doesn't stick to it. You could potentially use some baby powder or some
cornstarch and sprinkle it on. If you're needing dough on a countertop so that the
dough doesn't stick. You sprinkle that flour on if you've ever had that
experience. That's similar. So you just want to create
some kind of buffer between that slick surface
that the clay is going to just stick to and
not be able to let go. So I'm going to be
setting this off to the side for
probably about an hour, and then I'll be taking it off. So we'll check back in then.
6. Removing the hump mold: Okay. So this has been sitting
for a little over an hour. And after an hour I checked it. It still seemed a
little too soft, gave it a little more time,
and now it's ready to go. Now, I want to make this
clear that In this case, it was an hour and a half, you might find that
it takes 5 hours. It might take 30
minutes if you're in a really hot dry environment and your clay is really thin. The time that it takes for
this to set up enough for you to safely take it off
the mold can vary greatly. It's up to you to decide when you try
to peel the clay off, if you try to pick up the piece, if it seems like
it's ready to go. And you don't push it if it still feels like
it's stuck on there, if it's not popping off easily, or if when you try
to lift it off, the shape is just like mangling in your hands under
the pressure. So I tested a little bit. It's good to go. What I'm
going to do is just carefully. If you want to, you can put
a board here and then flip. But at this point, the
shape should be firm enough that you can safely just remove it with your hands. If it's so fragile that you
can't do what I just did, it means that it's not ready. So I'll get rid
of the mold there and put it back on
the wooden board. Now I have this little dish. Well, it's not too little. I would say it's
like a salad plate. So I don't want to do the finishing touches on this yet because it's
not leather hard. So I'm not necessarily
waiting for it to be leather hard before it
comes off the mold. I'm waiting for it to be halfway between
plastic and leather hard. That's usually the sweet spot. I'm going to let
this sit and I'm going to come back
and do the finishing touches when it's leather hard, while it's sitting here, I want to be careful that
I'm not letting the rim get too dry while the
bottom stays moist, the bottom part and the walls. There's two options. One is if you feel like the
shape can handle it, you can flip it upside down. I do think that this shape probably could handle it
if I place it like that. If the bottom feels like
it's going to slump down, or if that's a concern of yours, then maybe don't do that. I'll give you an
option two for that. If you would like to let
the piece sit right side up while it continues to harden
before it's leather hard, you can take strips of
plastic and wrap the rim. That way, as the bottom
and the sides are drying. The rim stays a little bit covered up and protected
from drying too fast, and this is going to make it so that the whole
thing will be ready to go at the same time as opposed to the bottom and the sides being
perfectly leather hard, but then the rim
actually being bone dry. That's a really common
problem in ceramics, is that the part
that's most exposed to the air will dry fast and
everything else dries slow, and then you end up
with a problem when you're trying to do
your finishing touches. So what I'm going to do because
it's a pretty warm day, and I don't have to
really go anywhere. I'm just going to
focus on this for now. I'm going to put this
aside and let it sit. My guess is probably
two or 3 hours. It could be faster, so I'll be checking it probably
every 30 minutes. By the time I'm at the point where this feels leather hard, meaning that I can push
into the surface pretty firmly without making a
print with my finger. I'm not pushing very
hard right now because I can tell it's so soft
that if I push hard, it will make a mark, or if I bend the piece a little
bit, it actually will bend. It's not firm enough to hold its shape against the
pressure of my fingers. So when it's firm enough that my finger
doesn't make a mark, even though I give
it a good push, but it's still soft
enough that I pushed my fingernail into the surface,
it would leave a mark. That's when I want to
do my cleaning up. So I'll be checking
it every so often, and we'll get back on camera when it's ready
for the final phase.
7. Trimming and smoothing: All right. So this
is now leather hard. I can pick it up, I can put
a bit of pressure on it. I can hold it like this and it doesn't bend even
just a little bit. If there was any
slumping that happened naturally from
holding it like this, that would be a sign
that it's not ready. It's not leather hard yet. You want to feel like it's
firm enough that it would take quite a bit of effort
to bend or crush it. But of course, you
don't want to do that. Now, this ended up sitting
for about 3 hours. It was moved to the sun
in the last 15 minutes. You can put your
work in the sun. Just make sure that
if you do that, you're making sure
that the rim is wrapped or you turn
it upside down. You can also use a blow dryer if you want to try
experimenting with that, putting it in front of a fan. But all of these
tips in expediting the drying process
really are not ideal. The ideal is to let it just sit without any kind
of forced drying because you're more
likely to have an uneven dryness if you
use those techniques. But sometimes you
just got to do it. If you do make sure
that you're again, wrapping the rim or putting
it upside down. All right. In order to clean up this shape, I first want to
focus on the rim. The rim here is looking pretty thick and I want it
to look more elegant. You can create the illusion of thinness when you
make the rim thin. That's not to say that thin
is necessarily always better, but it does it does have a look of appearing to be more elegant usually when
the rim is thin. To clean this up,
I'm going to start by dealing with the rim by taking my sure form
and starting to gently shave down
this outer corner. If you wanted, you
could focus on getting rid of the inner
corner of the edge of the slab here along the rim with maybe the knife or maybe you could try with
the sure form. But I want the shape to look
a little bit more like it's curving in as opposed to
opening up along the rim, so I'm going to get
rid of the outside. Just really gently
carving down this corner. And you never want to be an autopilot mode when
you're doing this, especially when you're removing
material from the piece. Don't ever want to slip
into that state where you're just repeatedly doing
a motion like a machine. Because even though
the whole thing is generally the same shape, the slabs, the same thickness
all the way around, you will sometimes
have little spots where there's a bump or maybe something got a little bit thin from where you
touched it in one spot. You never want to be in the mode of just being on autopilot
where you're just cranking through a series of movements over and over
and not paying attention. You really want to
look carefully at every spot whenever
you're removing material, because if you end up removing
too much from one area, There's really no going back. You can't just attach it easily. There are ways to fix things
up when we make a mistake, but it's never easy, and it's never simple. Well, sometimes it's
easy and simple. But if you want to
have a good technique and have a good habit, think about the process of removing material
as like surgery. You want to really
be paying attention. This is looking
pretty good here. I'm going to turn it to the side so I can view
it from this angle. I think that I would
like to get rid of just a little bit more
along this part here. It's hard to access
when it's sitting flat, so I'm going to
tilt the plate up. Clearly, if this piece
wasn't leather hard yet, and if I moved it like this, held it in the way
that I'm holding it, it would definitely
damage the piece. Making sure that
the object is firm before you start doing this
process is really important. Because the slab itself
was already pretty smooth, because I had used the
metal rip to blend all of the little textures that were in it after I rolled it
with the roller on the wood. Because it was already smooth, I actually don't want to
go crazy with the sure forming across the surface because it already
looks pretty good, and the thickness of the slab
was created intentionally. I'm not trying to
make it thinner. The amount of shirt
forming I want to do on this thing really is
just along the rim. If you decide that the whole thing seems
really thick and heavy, you could go ahead and
shirt form the whole thing to thin it down and make
it a little bit lighter. But you'd be better off starting with a thinner
slab, to be honest. That way, it's already the thickness that you need
and it's perfectly even, and it's already smooth. That's looking
pretty good to me. I think that what
I'm going to do now is get rid of
all of these crumbs. I'll clean the, get them
off of my board here. Then I'm going to focus on smoothing out that formed
texture on the outside. If it feels comfortable, you can put it upside down and see if you can
get it from this angle. To clean up the sure
formed texture. I'm going to use my metal
rib by bending the tool, four fingers close
to the curved edge, thumb and the middle tucked
back, so I can bend it, get a really deep
bend like a C or a U, and then scraping that texture. You're planing it,
you're removing the high points of the texture. The remaining clay becomes level with the low
points of that texture. Then after you've planed that, then you can compress. I'm using these fingers here, pushed into the curved
end of this tool while I bend the metal rot and drag
it across the surface. I'm putting quite a bit of
pressure into the clay here. Again, if the piece was too soft and it was
really damaging it, you'd want to stop, wait
for it to harden a bit, wait for it to be
properly leather hard, and then you can continue. If you notice anything
else funky along the way, little textural moments that you want to tend to or get
rid of, you can do that. At this point, I
would probably take this opportunity to look
at the rest of the piece, see if there's any little ds, something that I
want to get rid of. This looks pretty good to me. Because it was
made using a mold, usually this already
looks pretty good, and that's part of the point of using a mold is that
you don't have to do quite so much manipulating it to get the texture of
the service that you want. It's part of the beauty
of working with slabs, too, because slabs are
inherently already good to go. Unlike a pinch pot
or a coil pot. I'm going to flip this
over, see how it looks. Then I'm just going to hit
the sides of the top here. Looking for any
spots that I missed. One thing that's the nemesis of someone who loves a smooth surface is these
little crumbs of clay. You really can't avoid them. They show up when
you're smoothing, when you're just managing to trim down something
on the surface, and they're hard to It's hard to get them to
go away honestly. What I recommend is
that you don't fret, don't obsess about
those little bits, and after you've
completely finished, you're done with everything, then I'll show you how I
would get rid of those. Before we get to
that point though, now it's time to
tend to the inside. This is the most important
part of the piece, probably. Well, maybe the rim is
the most important. I think maybe they're equal. Like I mentioned earlier, because it's a slab and
because we used a mold, We would probably assume that this surface is already pretty much what
we want it to be. But it might not be. If you want to take a moment to do a little bit of scraping, any spots that seem jagged or uneven or if you have just
something funny going on, you can use your metal rib
in the same way we had done before by
scraping the surface. The thing with the
metal rib is that it is a pretty firm edge, so it can nick the surface, especially when you're using it on the inside of
a concave shape. It's a lot easier to avoid that nicking if you're working
on the outside of a shape, like around a bulbus form, or if you're doing this
across a flat surface. When you're on the
inside of something, it's a little harder
to avoid those nicks. If you're having them show up, don't try to fix
them with this tool. There's a better way. We'll get to that as soon as
this is done here. That's really all I'm
going to do with this. Now, finally, the
finishing move. These little crumbs in the clay. If I go ahead and blend them in, they're going to make
a little dent or maybe a little flaw
imperfection in the surface, so I don't want to be
pushing them into the clay. What I'm going to do
is grab a sponge with minimal water on it just
a tiny bit of water. I'm going to squeeze out
the sponge completely. There's no dripping or excessive
amounts of water here. Then I'm just going
to lightly pass over the surface here and
pick up and maybe sweep away those
little crumbs of clay. Get them out of there. You can also go along the
outside too if you see little jagged edges or
little spots of clay, those little crumbs there. Once those are mostly
out of the way. The final stage would be using the red rubber rib to make a similar move that you
make with the metal rib, but this will get rid of all of the little nicks that may have been left
by the metal rib. It will also be your
finishing touch to get rid of any skid marks that
the crumbs of clay may have made on the
surface when you were sweeping them away. This tool is much more easy
to manage because it's so soft and it's much more
gentle than the metal rib. As you're using this, you don't have to be
quite so careful. When you're using
a rubber rib to finish off a texture
to make it smooth, the red one is the only one
that you can use for this. If you find another rubber
rib that's a different color, it's not going to be
as soft as this one, and so it's most likely not going to do this work very well. If you're using a
different rib and it's not working very
well, that's why. We're basically in the
home stretch of this. At this point, I'm
happy with this. I'll say it's done.
But if you are going for ultimate
cylindrical symmetry, ultimate marble smooth quality, you could start to go back
in and revisit some of the other steps after
you've finished it to rework th the cycle. Maybe going back to this and hitting any spots that seem
like they still need it. Compressing again, and then always ending with
the rubber rib. When I'm going for something that's ultimate
smoothness, perfection, I go through a cycle of these
steps several times because sometimes you don't
see imperfect spots until the whole thing is as smooth as it
can be around it, and then you see ha, there's a spot I need to
continue working on. But like I always say
with hand building, and building is an opportunity for things to have character. This is not coming
from a factory. It's not something that was
made on a potter's wheel. It was made by your hands. And to leave a couple
little signifiers of the fact that it is
a one of a kind object, and one little mark or
a slight tilt to it, it doesn't necessarily mean
that it doesn't function well and that it can't
be just as beautiful. So that's the takeaway
there. That's the dish.
8. Final thoughts: I hope you enjoyed this
demo on making a slab dish. Remember, when you
are using a mold, it's a pretty cool opportunity
to achieve precision and consistency across
multiple pieces because you're repeating
the same shape. It's a really good technique if you want to make
a matching set. If you want to fire
and glazer work, please check out the
PDF I've included. It covers a lot of
information about how to find access to firing and
glazing opportunities. Did you know that clay is one of the few art materials
that we can recycle? If you make something and it
doesn't turn out very good, there are ways to reuse that
clay, nothing's been wasted. So B bold and take risks
with your clay practice. Thanks again. Have a good day.
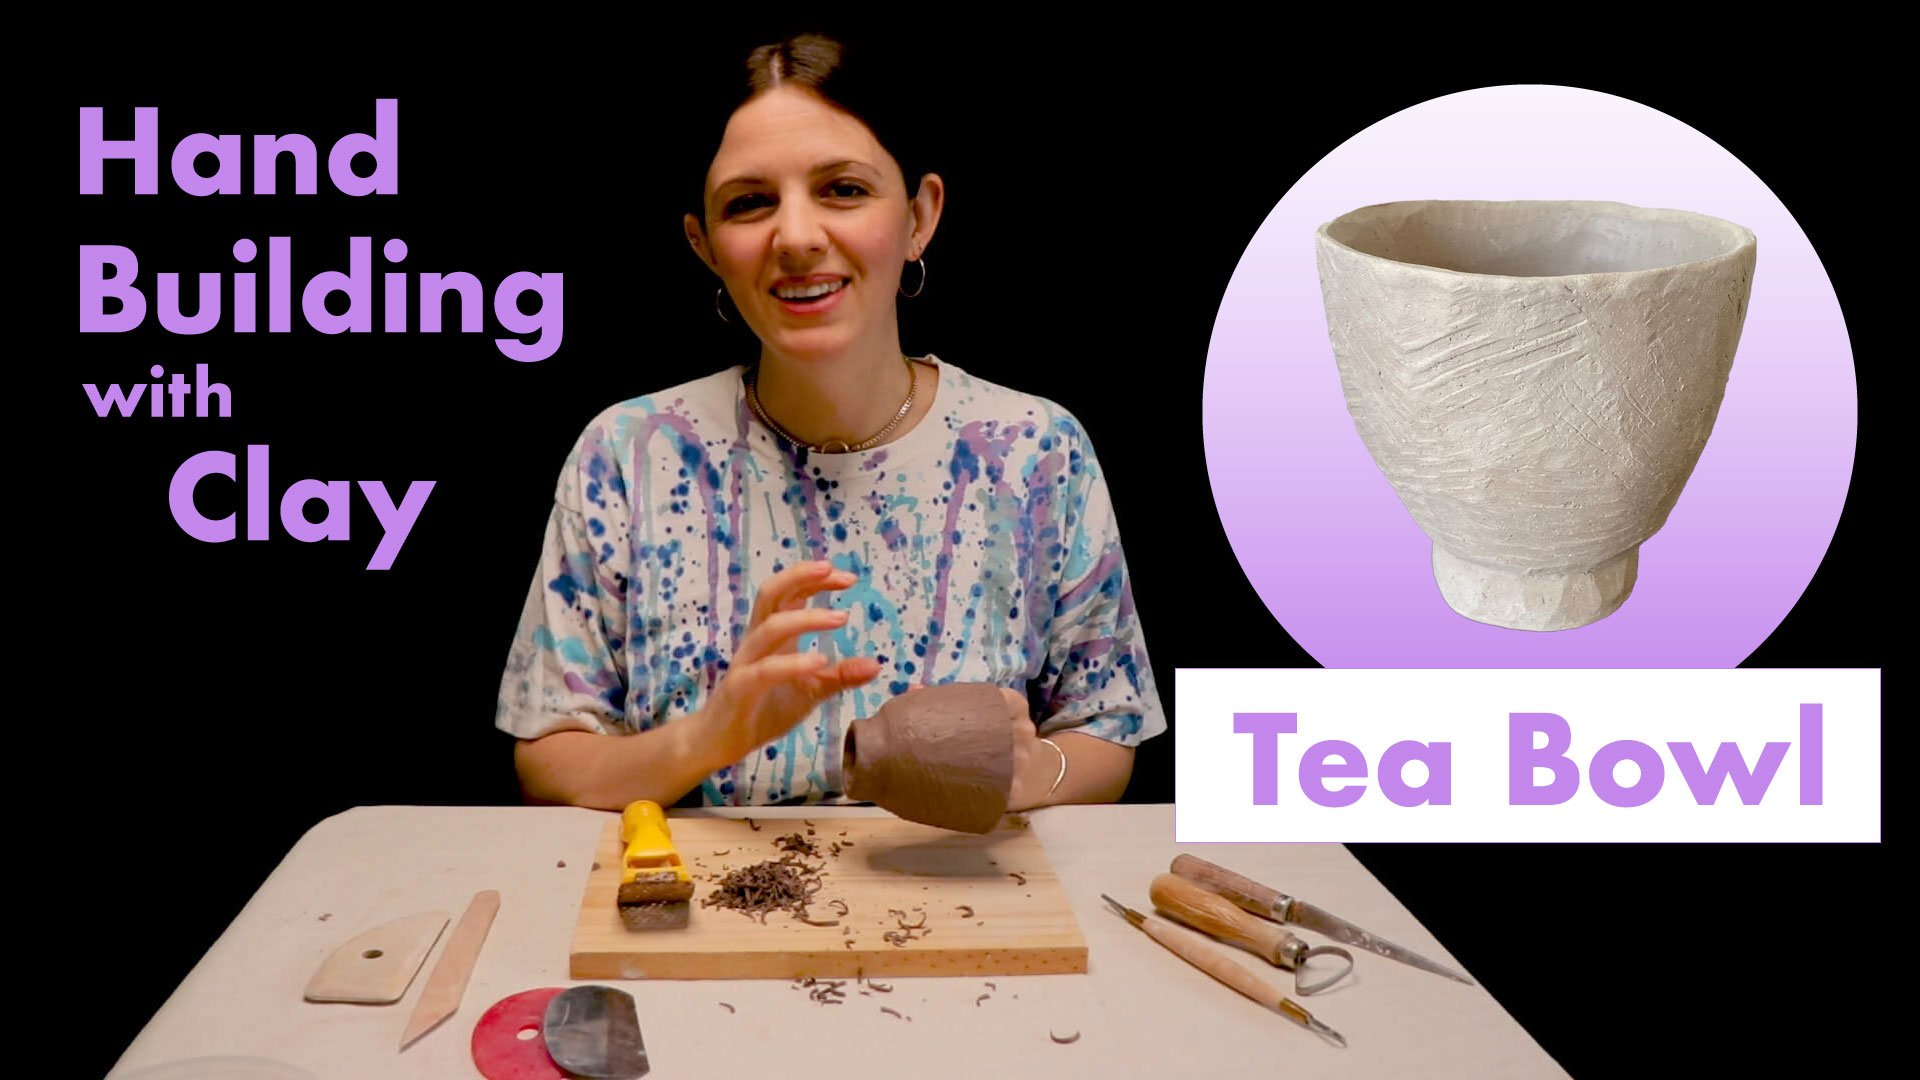
 Clay With Kelley, Hand building with Clay