Transcripts
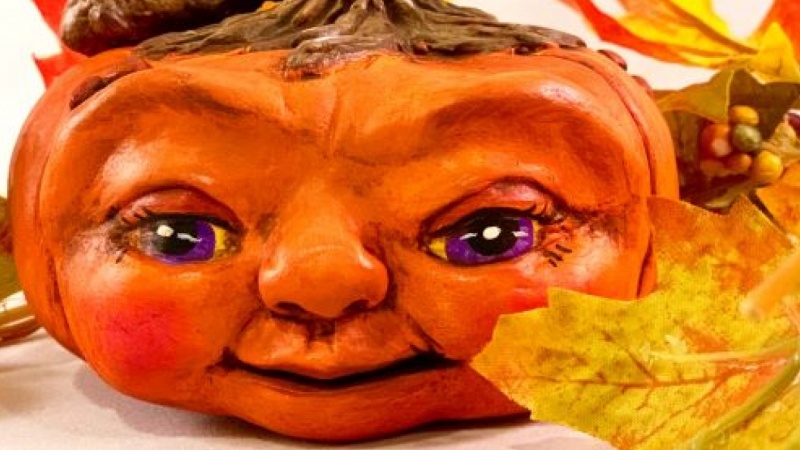
1. Introduction: Hi. Welcome to Sherry's cabin. I'm sharing Hall. I am an artist who has been blessed by God with creativity. And I am here to share that with you. We're going to be creating a pumpkin diva out of paper. Client. It is an easy project. And if you are ready to get your hands messy and get into learning to sculpt, this is the class for you. So let's get started.
2. Supplies: I think in this video we're going to look at supplies to create our pumpkin divas. Now, a lot of these air optional and I will give you a complete list. But I wanted you to be able to see what we're using. We're going to be using creative paper quite now. You can use any type of paper play that you want to you. In fact, there are recipes online that you can make your own. I happen toe like the creative paper, Clay. It's inexpensive. Dubai that hobby lobby and use the 40% off coupon. I'm not affiliated with them, but they're a great Christian organization that I support. Then they have the supplies I need. We'll be using creative paper. Clay, this is an air dry klite. We will need some aluminum foil and some masking tape to create our armature. We will be creating a pumpkin armature similar to this month. We're also going to need some sculpting tools that can be as simple as a skewer. This is just a pointed stick, a butter knife, a blunt needle. These are all things that you could probably find around your house. Now I do a lot of sculpting and have invested in some mawr sculpting tools. This wipe out tool you can pick up a hobby lobby. This is one of my favorites in one of my go to. It's got a flexible rubber tip, a stiff brush, these air. They're soft, but they are. They're not too flimsy, and this helps with wedding and smoothing the clay. You can pick up inexpensive sculpting tools at a craft store. These air wooden and I would suggest you have something that you can smooth with and something you can create creases and lines with. If you've got those two things and these were the best sculpting tools, you have your hands. You are good to go. They're just a wide variety of sculpting tools that you can purchase. But with a few of these simple tools, you can get started. We're also going to need some craft acrylic paints in a variety of colors. I have some orange, some yellow, black and white and some burn number because I like a folk art look that is aged, and I use a lot of barn number to get that effect. You'll see I have a flexible ruler This is optional, but it helps me. Don't know if you can see that it's just a little plastic flexible ruler. Use that to get my facial features where I want them be using some acrylic Jess Oh, to prep the paper clay. After I got it sculpted and dried and some sort of sealer, I like a mat clear sealer. I like that. Like I said, the folk art look and I don't like it real shiny, so I use the mat. But that's entirely up to you. What you choose on that another optional thing to have around his baby wipes. This gets messy on your hands, and baby wipes are good to have around. When we get to the sanding phase, I'll be using a 400 grit wet, dry sandpaper. Any type of sandpaper will work on this because it is. It's like sanding wood When you get done, you also need a durable surface that can be washed and cleaned. Paper. Clay is messy, and it sticks to things, so something that's durable and washable works great. This is just a quilt, een aura crafting cutting map that I used to to sculpt on
3. Building an Armature: in this video, we're going to be creating the armature or the base, that we will be adding the clay, too. We will need aluminum foil and some masking tape. We're going to start by shaping this into a pumpkin shape of sorts, really just a flattened ball. Now I don't press this so tight so that there isn't any gift. I compact it enough to make it strong and durable, but I don't want to add extra weight to this. And I want to have some flex because I'm going to be creating thes creases along the side to give that pumpkin effect so I don't want it to type. I think I want to add a little bit more oil. Now remember, we're going to be adding about 1/4 of an inch or a little less clay all the way around. So think about your size. But I want to add a little bit more, just rolling this along the edges, looking for any very large gaps. We don't want to have to use extra clay where it's not necessary to see how I have a gap right here kind of a hole. I'm going to take a little piece of aluminum foil and put into that hole and tape it right on so that I'm not wasting clay putting it in this hole. Two reasons. It's a waste of clay in another dry time, the thicker you get the clay, the longer and more difficult it is to get that dry. I'm going to grab another. Just a little piece of foil involved that up right there, and that's a great place to start adding my tape. Now I want to cover this whole piece with just inexpensive masking tape. It allows my clay, too. Stick and grab ahold of something I'll get from the first thing I'll do is type off that little added piece so that it doesn't come and I will begin wrapping this take. Don't worry about it being perfectly smooth. And don't worry if you have a tiny bit of foil sticking out, that's not going to hurt anything. Our paper, Clay, will it here just fine to this tape so you can see that I have a flattened patty. The more accurate we get our armature, the less trouble we will have, getting our sculpt to look like a pumpkin And so I want to create creases in the sides of this patty so that it becomes more pumpkin shaped. You notice I did it kind of thin here, My pumpkins not going to be very tall, this particular one. But remember, we're going to be adding klite on the top, and the bottom will be building up a brow on the face and adding a stem. So I didn't make this particular the depth of this or the height of this too thick. I'm going to take this sculpting tool. You could just as easily use a butter knife to do this. And I am going to start in my center here, and I'm I'm going to be putting a stem right out of the top here. And so if I poke a hole in this, it's not going to hurt a thing. I'm going to start mashing, increasing, and this is why we didn't want that foil to be to step. This will give me the shape and the contour of a pumpkin. You can see how of creased to that There. I will work my way around and do this all the way around my pumpkin. Now you can see that I have added those creases and some contour all the way around. I have caught any little pointed edges that seemed to be protruding. Just mash those down. It doesn't look like much at the moment. It will give us a base to start building clay and remind us of the shape that we're trying to achieve.
4. Adding the Base Layer of Clay: in this video, we're going to add the base layer of clay to our armature. I've opened my paper quite, and I have put it in a ziplock bag. I'm in West Texas. It dies out very quickly here. And so you want to keep this place very moist. You can see it's just paper, Paul. That's what it is as a terror piece off of this, I can mash it. It's almost like using a salt dough clay. If you ever did that when you were a kid, one of flatten it out to probably 1/4 inch thickness, not very precise about this. I flatten it out and I start layering it on the armature to smooth out the edges against the take armature here so that it sticks and I'll be attaching my next piece over the top of that. And that's one thinning out those edges. You have any large lumps where the client feels think you can just smooth those out with your thumbs. You do not want to get it so thin that you're seeing tape through the clay. The great thing about paper plate is that, as it dries, will get some cracks in the clay, most likely, and we can just fill those right up with some more paper clay and dry that out. So don't think. Is your working on this? If there's a problem or a mistake that you can't fix it, layer on some more clay here. From where I seem those together, I tip my fingers in a little bit of water, and just to rub over the top of that and you can see those seems disappear. Keep your water handy just in a cup next to you will be using a lot of it. This clay dries out quickly, and it also dries your hands out. So know that you'll need some moisturizer. When you get done, you will find your hands the most useful tools you have for sculpting these pumpkin divas. I am just going around the edges, rounding it out some. You can see where I had the intentions on our armature, those air starting to take shape. I can feel those as I am pushing the clay around. Don't worry about all of these lumps and bumps right now that is going to go away as we work. Keep your clay gets too sticky. You've added a little bit too much water. Just give that a few minutes and it will dry up. See here how I'm getting some stickiness. I'll sit that down just a few minutes and let it dry. Get a baby, wipe and wipe off my hands and we'll come back and add Are pumpkin intentions the seams along the edge of the pumpkin?
5. Laying Out the Face: I have my basic pumpkin shape. What we want to do is pick out where our face is going to go. I think I want my face to go here. This will be the center of the face. This will go along the cheeks. But I do want to add a little bit of clay here. Personal preference. But when I sit this flat and you can't really tell, this side stands up quite a bit taller than this side. So all I have to do is wet that just a little bit. Remember your best sculpting tools here. Just take a small bit of clay and what I like to do to add clay to an existing piece is to leave it thicker in the center and mashed down those edges so that they are thinner. Now add that right there. You can see it's quite a bit larger at the moment, but I'm going to use my thumb to just smooth that down. The more that you can smooth out areas as you work them. And as you move toward what, how you want them to look, the less sanding that you will have to do in the end Not to like a primitive field, my pumpkins. So they will not be completely smooth, like a store bought plastic pumpkin. On what? These two have character and a folk art feel. Since we're giving our pumpkin diva human features, I want to place the eyes in the center of the face as if she were human. I'm not going to be exact. I have my little ruler here and I see I'm dealing with approximately two inches one inch in the middle, taken just to make a mark with my thumb, I can used the edge of my ruler and put a center mark there, get a little bit off. I just remark and rub the first mark out with my finger. Now I want this and we're not dealing with perfect symmetry here. But on this particular section of pumpkin, I want my knows about the center of this section. So again, just approximate measuring. I take my ruler and find about my center there. Remember, we're not looking for perfection and because this is paper client and it is easy to heal itself. If I get deep with that cut, I just simply smooth it back over these lines are going to help me place my nose and my eyes. You can go with any type of look you want to go with, generally on my eyes, on my pumpkins, on a human I would put about and I wit in between the two eyes. I tend to go just a little bit wider on my pumpkins, just a style that I prefer. You can simply use your finger to mark these areas. I actually indent the clay and place and eyeball inside. I know it's all going to seem together with the clay, but it gives me the more realistic I that I'm looking for. I do have some I size er's you don't have to have these and there just happened to be a tool that I use with my polymer Clay. And I can use these to do the same in paper. Clay, what I will do, depending on the size of I that I want, I'll start right in the center of that cross that I made and push in doesn't have to be very deep. This is not going to be, and I don't worry. This is a guide to help me set an eye distance apart for my other two. I'm going probably another half oven. I out. You can see that moving away from this center hole just a little bit. I'm going to push in here and make an intention for an eye going to come over to the other side and eyeball that, huh? To catch that pun. There we go. You can simply use your thumb to do this. I'm going to go ahead and get my nose in and my mouth. It looks like I'm either going to have a very small mouth or I'm going to need to add a little bit more clay down here at the bottom. Your little pumpkin can be a stylized as you would like it to be. Now I want a nose right about Hugh. And no, this is not going to be my nose. But I'm thinking about how large I want to make this. I'm going to insert that knows you right into that indention that I made to help me seal up that clay together. What I'm going to do is take a piece of clay, roll that into a ball, and then I'm going to shape it into a teardrop. But I have kind of a teardrop shape of clay, and I'm going toe wet the back of that with some water. I'm going to lay it right in that hole at the moment. That is not a cute nose for this pumpkin. I'm going to pull this clay as much as I can and with my fingers, I'm not getting a real good grip on that, clay. I'm going to grab one of my tools. And this might be, uh, butter knife. This is a wife at tool that I'm using. You can grab those at your craft store, and I don't want this nose to fall off after I'm finished with my little pumpkin. So what I'm doing is joining it will be shaping. This knows more. So don't worry joining that along the edges there. If you start to get crumbs of paper play, just wipe that all keep you a baby, wipe pandey. Okay. I've got that joined right now. I'm going to decide on the placement of mine mouth. I'm not going to make much of a mouth yet because I want to get this nose right before I go on, but I can see half the distance from my nose to my little chin here, and I am going to add a little bit of clay. Take that in water and add a little chin here. Same way that I did that piece on top earlier. And I don't want her to have too pointy of a chance on rounding that out with my thumb. So I'm going to just about half way between the nose and the chin is where my mouth is going to be, and she's going to have a large smile. I'll just drawing a line. I know she's not smiling at the moment, but I know where my mouth placement is going now, something that you want to watch as you're building a face, and especially if you're doing humans pumpkins. It's not such a problem, but you want to look at your sculpt from different angles because you may end up where it looks great this way. But from the profile, there's something odd that goes on, and what happens with me a lot of times is that one side of the cheekbone will be much higher than the other, and you can't really tell what's wrong from looking at the front. See how we've got kind of a sunken in spot here? I will be fixing that before I'm done.
6. Sculpting the Nose: we want to come back to this cute little nose. Not so cute knows at the moment, and we're going to fix it. You can use a tool as simple as the end of a paintbrush. We need to make some nostrils in this nose. I got a little rubber tipped tool, but know that you do not have to have any kind of fancy tool. I'm going to poke that right into her nose and wiggle it around. I'm going to come over here on the other side and poke that in and wiggle it around and get those nostrils and go ahead and poke on up into the nose. It's not going to hurt anything. If you have a fairly deep nostril there, I can wet it and pull some of that clay upward and mash it to give it more of a button. The look on the end and we need to identify those little nostrils. I'm going to come in again with a tool that I have but remember, I could use anything, even my thumbnail to round this, but I can use a wife out tool with this little rounded tool I have here and the tool is not important. It's just to get the line drawn and I'm rounding around those little nostrils and I'm going to start pulling this clay a port. Even if I pull some off, that's okay, because I want this thinner as it moves up the price. Turn that over and hopefully you can see here going to pull some of that clay away from that cut that I made around that nostril. No. See how it's a little bit thinner along here. I can take a paint brush and dip it in water and start to smooth that out, rounding the end of that little nose up, and I want to push up underneath the nose here. I'm going to take a tool of some sort and push up right in here. Actually, roll that up into itself a little bit. Can you see that those nostrils to come in, not just a brush here. Stick some water in there and smooth out the rough edges. I'm locking her nose a little bit more, but I think it's a little bit too big on the end here, so I'm grabbing some of that clay and pulling it upward I can always get this off of the forehead. Later, remember, I'm going to be building a brow anyway. Sometimes I hit that know that knows perfect the first time, and I love it. And sometimes I don't. This one, I just had a little bit too much clay. And so you see how easy that Waas to pull some of that off and smooth it back out with some water, - Get the general shape of your nose like you want it. I could see I still want that a little bit more rounded. And don't worry. If you are not just in love with your nose at the moment, we can come back and make adjustments. After we get some other features on, you're probably noticing that you're Clay is starting to get leathery and dry. It will dry out on you if you continue to work and keep it in open air. So just be aware of that. As you work, you're going to be dipping your fingers in wedding. It don't let it get to the point where it is a hard, dry
7. Adding the Eyes: I'm going to go ahead and make the eyes and I start with one ball of clay. Do not take that ball and I go ahead and cut that in half doesn't have to be perfect, but this gets your eyes to be close to the same size now, depending on how deep your intentions were, you might want to leave a flat back on that so that they're not sticking out so far. I'm going to go ahead and roll them. Remember, I can make this fit right into those intentions by mashing it. So I'm not too worried if they're too large for the whole. As you get these little crumbs of Dr Clay, what will happen is if you don't clean your hands once in a while, you will get these little drive pieces that will fly, cough and stick to your sculpt. So don't do what I do. Go ahead and clean off your hands in your area. I'm going to wet those intentions and push my eyes in, and I know at the moment they look way too large. I promise this is going to work again. I'm going to roll two balls of clay Okay, I'm going to cut each of these in half. And instead of rolling them, I am going to flatten them out in somewhat of an elliptical shape. My play is wanting to crack there. I've got lights shining so that you can see this and intends to dry my clay out quicker than a I would like it to. Okay, I'm going to wet these eyes, going to take this eyelid. I want to make this almost kidney being shaped and thinner on this bottom edge. A place that over the eye. I want to do the same thing with the bottom lids. I'll smooth this in just a little bit. But remember, I'm adding a brow line. Just don't want him to fall off while I'm working. - I want to join the corners of these eyes. I can use a paintbrush to do this or my wipe out tool. - They want to push that bottom lead further down. Just depends on the shape of I that you want. I can pull that top lid going around. I can already see that this corner of this I is much lower than this corner. And so before I go, any further. I want to go ahead. Mashed this one down a little bit. You can pull that top lid toward the bottom. - Do you have to keep in mind that this is a pumpkin and not a human? So want to keep that pumpkin shape? I am going to take just a piece of quite and wrap over those eyes. You sure have added some water to the back, and now I'm going to smooth that in
8. Sculpting the Mouth: it's time to add the cheeks. I'm going to put a little ball here in a little ball here, going to cut that in half, and I'm going to press my, um, down inside of the back of that and smooth those edges fairly thin. It was like a little hat. It's a water on that, and I'm going to put that on the cheek here. Now, if you get this too big, you can always redux and pull some of that quite off. - If your claim really wants to dry out on, you can spritz it with a little water and put it in a ziplock bag for a few minutes and let it soak that up. Now I want to add my mouth this time going to put my foam in it. I want to stretch that out, and I'm going to put that right in there. Years ago, I got my basic sculpting a facial feature, just weird a place clay to build up the face, sculpting Sana's watching videos from a wonderful artist named Judith Clay Ritter. If I got her last name correct, I haven't seen or heard from her in quite a while, but she had some great techniques on building face facial features. She didn't do diva pumpkins, but I still use a lot of those same techniques. You can pick up things from so many artists and apply them to what you do. Now that we have our mouth area built in, I am actually going to cut it. And I am going to cut from the center out and from the center out so that I don't drag my clay. If you have a scalpel, it's wonderful. I happen to have broken mine a while back, so I will use my knife. Remember, this is your style so you can make that mouth as small are as large as you would like to. I'm going to take a tool, and I am going to poke it right in the corner of her mouth here and here. And I will fix that as I go along. I want to take something, whether it is a knife or a rounded tool of some sort. Reach in there, pull that lip out, going to grab this bottom one and start working it down and out as well. You can make an open mouth pumpkin you can add a tongue, you can add T. I'm going for a smile, but I don't want a lot of gap in there where I have to go in and add teeth or a tongue. Now I'm going to open it further and get my lips fixed like I want them. And then I will come back and close her mouth a bit. I'm going to push this up into a pair of lips. You can see I'm just working the edge of that. Try to get that centered. I can already tell from looking at a front view that I've got one side raised more than the other. Of course, this is up to you, but you may want to add a little bit of clay. If you're having that happen now, your mouth You can do all kinds of things with your mouth. If I wanted to indem right here so that she has a little bit more of a rounded chin. Let's do that intention, and then white my brush back and forth over it and you see that chin start to take shape there. If you want to thin your lips if you're feeling like they are too thick. Maybe you got a little bit too much clay when you cut and lifted. Simply just pull that to the signed with a butter knife. Or if you picked up some tools, don't be afraid to move your clay around. You can always go back and add some more. If you might come a steak somewhere may actually take a tool and go in and pull up the corner of that mouth a little bit and then take that brush. Push that Clyde down in that hole if you need to take that brush and smooth that lip back out. Sorry, I keep getting out of the camera. One of the things that you can do to mouth to make it look more realistic is to cut from the nose up to the mouth, cut not deep, but with some sort of tool and poke Radeon and then round that out with your brush. You can see on the mouth here that I have pushed up just a little bit on my lips and made almost an M shape with that top lip comes up and down and back up is to give it a little cove, not can come back in and work on that some more
9. Sculpting Details: what? I want her to have big eyes and I need her to look happy. I want more of her eyes showing. So I'm going to push this bottom lid down. Remember, we've put a lot of quite into these eyes, so we have the ability to move it around and reshape it. I'll just push that right down into the cheek. Don't worry. If it scars it up on the eyeball to smooth that out, you can see how now I can just push that right into cheek. I like to work back and forth on my two eyes so that I keep them consistent. - Now , remember, if you have purchased some tools from hobby Lobby like one of these wooden sets you have inside of this inexpensive set, you have a rounded edge there that will work just like this metal tool that I'm using. You have tools that you can create lines and you have the ability to cut. So don't think just because I have a specific tool that you can't sculpt a pumpkin diva. No need to give her some eyelids. At the moment. She doesn't have any, so I'm going to take wipe out tool. I'm going to give her eyelid. One of the things that I like to do to check features is to turn the peace over or look at it in a mirror because what you think books symmetrical or level once you flip it and look at it from another angle or from another viewpoint, it's not. And so I can see that this I is open wider than this I and from this I might or might not have have caught that. So that's something I want to see if I can create the same arched shape on this side. So I pulled this down in the corner. You can see that I've made quite a mess of this, I at the moment moving that clay around because I've just gotten it too wet. So instead of continuing to push it and make a mess, I just need to let it drive for a few minutes and work on another part of the face. - Got a little bit of a shadow right here that I like, and I want to recreate that here still would like to pull the corners of this mouth up just a little more. I'm going to push in right on those corners. See if I can't smooth that into kind of a rolled where she is grinning. Push that corner and just a little bit First that corner and just a little bit. - I'm going to create some eyebrows because she doesn't really have a forehead to speak of and very much of a brow bone. We're going to create just a line there that represents her brow. You're remember to clean your hands periodically so that you don't get all that dried klite. Remember to clean your hands periodically so that you don't get all of that dried clay in your piece. And why pure board occasionally or whatever circus you're working on, I'm going to take just a snake of clay. Pinch that in half and create to browse her. Similar in size
10. Sculpting the Stem: well, I realized I worked through the entire stem process and the camera wasn't recording. So you can see where I've pulled the top Back off. I've got some little dance here, which is fine, but I do want to show you how I go about creating a stem. So let's do this again. And hopefully the recording will catch it. This time I'm going to create a stump of sorts and I'm going to pull it out into little fingers on one end. You can add more of these. Don't worry. If you don't have enough quite to start with, we can build on this. These are as it goes down on top little pieces that grow from the pumpkin. And I will tell you it is great to look at a real pumpkin and see what those look like. This is not pretty at all. I'm just pulling these out again. Make sure that you have got them not so thin that you can't work with them because we're going to create some grooves in these going to drop that right back on her head like this. And No, this does not look good right now. Do not worry. We're going to get it attached and we're going to work this into a beautiful stem. I want to grab a tool that I can make some grooves with, as well as attach this. So I'm going to push down and start attaching. But as I do, I'm going to drag it into grooves. If you look at a pumpkin stem, they're not smooth. I want to make sure that you are mashing it down into the top of the clay. Now you do need toe wet the top. I had just done that for the first run of the video, and so it was still pretty damp. But be sure that you wet those pieces going toe lift off. Want these to come to a point as I worked them down, move your clay around. We'll come back and fix these as we go, and we don't want them all to match. Not perfectly matched in nature, and we do want them to come up from the top. I've got this one a little bit too flat, so I'll push that clay right back in there. Just drag it so that it comes out, - by the way. Totally irrelevant to this project. But this is a great way to do Santa beards as well, to give them lots of wonderful texture and paper. Clay Just f Y I. Because I know you're going to love paper kleiss so much that this is not the only holiday project that you're going to attempt. We will be back for Christmas, creating Santo's. Okay, I'll come back to this. I want to create the top peace now because that's looking rather silly. I'm going to put a few lines in so I can see where my ridges are. As I twist this, I just want to get an idea. You can use your hand on the other side to prop that up and put in a few ridges. Be sure that you don't smash your face. I'm going to grab this and I'm I'm actually going to smash most of these ridges. But it does give me an idea that I can follow because I'm going to twist this. I'm going to work quite a little bit of the time so that it doesn't break off and I want to get some good twists in this clay. You can create a thin stem. A big stem. It's entirely up to you. If it breaks off, don't worry where you join it and keep going. I'm going to continue to twist that. I think I wanted to come down. Maybe not like that. Don't get your clay so thin that it will easily break off. We know is we store decorations, things that protrude and stick out their thin will break off even though this is very durable. Once you're done now I'm going to follow that twist up with my ridges down from the bottom and up into the stem. - You can think of her stem as somewhat of a hairdo for her to give her some personality. Now, I have said that you don't want sharp edges, and that is true. But we want these to be a little bit more sharp than the rest of our sculpt. So what I'm going to do is just lightly brushed over with water to smooth out any really rough areas. Or as you're dragging, you will get some little crumbly pieces. We want those to be not perfect, but get rid of those little crumbling pieces and smooth down those edges. You can shape this into any shape that you want, I can see is I'm wedding. I'm losing some of the depth of my group's. I might come back in, put those back in after I get rid of these little pieces and parts. I don't have many grooves here. So while I'm working, I will just add those right back in. Always check the back side of your sculpt to make sure it looks as nice as the front and added this here just kind of a blunt in as if it will cut from the vine. Now, before my client gets to dry and I have let it go to pretty leathery back here, I may have to soak this, sprints it, wet it and put it in a bag. Kind of like that. Go a little bit far as far as hardness. I've been wedding the front pieces, you know, let the back Dr. What I want to do is go ahead and redefined those grooves before I lose them entirely. I am not going to put that groove back in the center of her face. I may go in and put just a tiny line there. I'll see that I do want to come along and I'll start at the back and I am just going Teoh mash thes back into the clay. Be careful not to mash my face or my still pull that down to the center. You can see that redefines that group. And now that it does have a little bit of a leathery field to the clay, actually holds it shape pretty nicely. Not going to worry about getting too far under that stem there. I'm going to hopefully keep that attached right in that position. I'll just wet that and smooth and out. So it gives me that rounded pumpkin. Look, I love it. Come along and find the next one. And don't worry. If you've lost your grooves, you can simply make some others. All right. I have finished up my lines around back side. You can see those got lots of imperfections here that I will smooth out once I've let hope dry quite a bit. I've just put those lines in, pulled them to the center, and I did end up putting one little line here above her knows that if I don't like a the end, I can fill that in. I've added some beauty marks. What I did is took the end of a paintbrush and just poked a hole down in the clay, rolled up a ball of clay, wet it and pushed that in. And you can certainly add any of those that you like, just like to give them a little bit of texture and personality. I see some things that I want to fix about the face, but I really need to let her. I see some things that I really want to touch up on the face, but I have got this to a point that I need to let her dry before I go any further. If there any things that are really bothering you, you can certainly add or subtract claim now. But I can see right here I need a little bit of extra clay. I'm going to go ahead and let her drive that, because what's happening is that the more I'm working around the peace, my thumbs are creating these intentions. So show you how to come back and fix the's. We are not done with her, although she is looking pretty cute right now. We're going to make some improvements. Once this is Dr and this is an air dry clay, you can sit it anywhere in your home that has good ventilation, and it will dry in just a few days. I like to speed things along, so I have an electric oven that I prop the door open just a little bit and put it in at about 100 50 degrees and leave it a few hours. And that speeds along the process. Another great way is just to sit in front of a fan like a box fan. That cool air blowing across will certainly pull the moisture out more quickly than leaving this sitting on a table somewhere.
11. Painting the Base Coat: we've sealed with Jess. Oh, and send it and we're ready for acrylic paint. I'm using just some craft acrylics I have mixed on orange and a white together, and I haven't completely started up. I'm wanting to get sort of a variegated look so you can go with any color you like. I'm going to just put on a base coat. I'm not worried about the eyes or anything. At the moment I'm going up against the still might be going over that with a brown. I will completely cover my little pumpkin diva with this light orange color. When you're adding this first layer of paint, it's better to go thinner on your layers and ADM. Or then to try to go very thick with your paint. It just works better. So put it on the end and you can come back and add layers of paint. You sure you're looking for areas that need smoothing as you're working
12. Painting the Stem: in this video, we're going to paint at our first layer of brown to our stem, and I have chosen a combination of maple syrup and coffee bean. Now I will be using those as the base coat and then come back with the dark aura. Excuse me. A lighter layer of brown, - some white paint on the tip here. Just add a few highlights here. Got a little too much on that one. I'll come back in. Take that back off with some brown. I had a few white highlights.
13. Painting the Face: in this video, we're going to paint in the eyes and you can certainly go with a white for the eyeball and then add your pupils because I'm doing a pumpkin that wouldn't a jackal entered would normally have a light inside going with the pale yellow. I took a because it was the yellow. I had just a saffron yellow and mixed it with some wide to give me a wider tone. Going to paint that in there? Can we got the yellow inside on the eyes? We can come back and touch up with some orange if you get outside of those eyes. If you get onto the lids, that's not a problem. I've got those pupils sketched in and I've tested a little bit of purple there, and I think I like that. So I'm going with a purple pupil. I have got my purple irises in. I'm going to take a little bit darker purple and come in across the top. Here, do that on both sides. More of a shadow effect in the eye. I want to take a little bit of white and purple and pull in some streaks along the bottom. Here I've let those iris is dry. I'm going to come back in with some black for my pupils and rather than a perfectly centered pupil, which is honestly the way it should be created, I'm going to come in an oval shape from the top so that it is dropping down from under the island so that she doesn't look frightened. Check your pupils in your irises to make sure they're an approximate match. Remember, they don't have to be perfect here, but we do want them to be similar in looking in the same direction. We want to add some white highlights to the eyes, so I'm going to take and do one large dot in a couple of thin lines. We do want to give our little pumpkin diva some rosy cheeks, so I've got bubble gum pink and I'm going very dry on an old brush, and I'm going to pat that onto her cheeks and I want to have just a tiny bit of pinkish white tip on her nose. I'm going to add a burnt orange and pink mixture just to the edge of her lips. Here. I don't want to go with a stark contrast Do you want to give them a little bit of definition? - I have just a tiny bit of brown and burnt orange, and I want to add some small brow line hairs here. A tiny eyebrow. We'll do the same on the other side to add some final details to our little pumpkin diva. I'm going to take these little beauty marks that I put on her and give them a darker color of got kind of lying color. Here. - There we go. I do want to come in right here and and just a little shadow. Well, I just a tiny little highlight to the nose here with some white and alone just about the eyes here. Maybe right underneath on the cheekbone. Very dry brush with just a tiny bit of what paint on it.
14. Sealing and Antiquing: we're done painting our pumpkin. Deba. I want to seal her with a matt clear enamel. You can certainly use a satin or gloss. I just happen to like a Matt finish and then we'll come back and add some antique ing, too. Sadly, the camera died as I waas and taking her, and I didn't realize that I would not get any of that video. So I'm going back through that. Although you can see she's already got some antique on her. Once you have sealed her, this is after she sealed. You're going to take some burnt umber paint. You do not have to add the antique to her. I just happen to like that. Look, what you're going to do is paint it and I would start on the bottom so you can get a feel for it. And you're just going to paint her with burnt umber paint in little sections. Don't let it dry. You're going to take a wet paper towel then and what that fat down until you have just that antique in your cracks and crevices. And then I take a drop paper talent. Just dab that off you, Comptel. I've done this on her face in a doing small portions. I will tell you that anywhere that you don't have a good coverage of your sealer. You're going to get some staining that stays. So be aware of that. It I love that look, but it is a little bit scary the first time that you add an antique in medium to a piece that you've finished. Once we got that done, we're going to spray her with sealer again to lock bad in. Well, we've finished up our pumpkin diva. We have her dried and sealed. The last thing that we need to do is sign our name to the bottom. I always like to put a date on there.
15. Final Thoughts: I do believe God has given us the gift of creativity, and one of the greatest things that we can do with that is to use that to make someone else's day. So get your little pumpkin diva created and pass her along to brighten up somebody's day. God bless and thanks for joining me.
 Sherry Hall, Creating by God's Grace