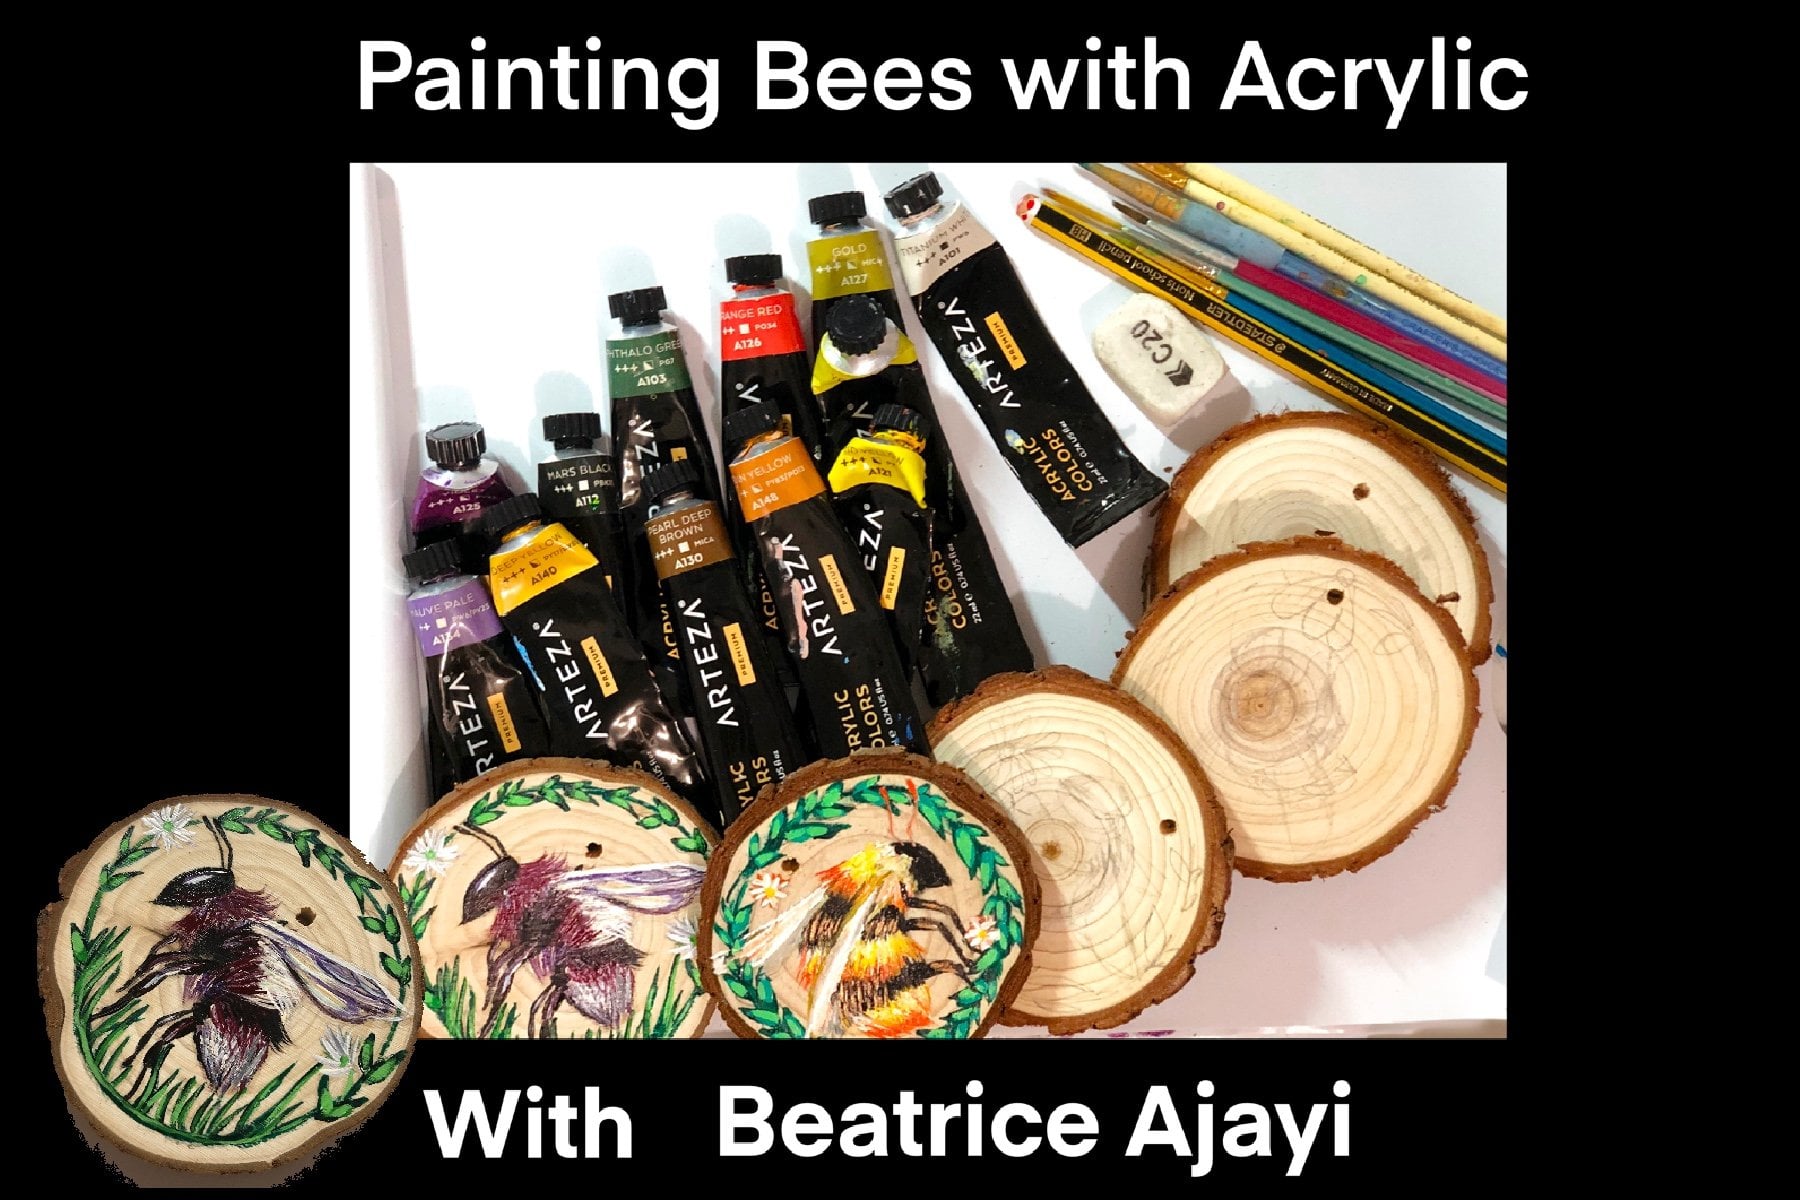
Transcripts
1. Introduction to Sculpting: Hi, everyone. And welcome to my new class here and skill share, which is a sculpture class. And in this class, we're going to be using air dry Klay to create little beautiful ornamental sculptures based on kind of a stylized characters that I create from my paintings. Um, which I'll put examples off somewhere here is well, but, um, just for you to kind of feel free to be able to be comfortable to create little sculptural pieces that you might have an interest in designing yourself and you've always wanted to do and just to show you the process Oh, the concept, the story behind it, the ideas and then coming out of the other end having a little beautiful piece that you have created in the class. So this is an example here, off a piece, he can see the three dimensional aspect of it her, our hands as well in our arms also kind of structurally, you can you can feel them. Um, then you can see her hair. And so we'll go about how we start from the beginning to the end of creating every single part so that there's a relief from the eye and the nose and the mouth and everything like that as well. And then I have another piece here as well. Um, so just to show you what will be trying to attain in the class, but just take your time and have lots of fun creating your own little piece. And once you've done the class and you can show examples of your work, which would be awesome, by the way, you can go on to create characters that you've had in mind without fear of thinking that it wouldn't work because he would kind of break down the whole process and how to achieve all the different least.
2. Where To Begin: everybody. And welcome to today's class here on skill share. My name is the interest A day, and I will be doing the class with you today, which it's gonna be based on cretin a sculpture Now for today's art. Um, I will show you a little snippet on the page here somewhere. Well, I'm talking off the little character that we're going to three, which is a little girl with her friend, which is a little elephant. So what I have been using is air dry. Klay. Just get that out. So, um, I store it once up, opened the air directly. I start in a little plastic container to try and keep it to be as moist as possible in between uses. That's a good idea to have a little container on what I have been using for the inside off the clay to kind of build original structure. I've seen different kind of variations in what you can do with this, but well, I used for my two characters, which I'll show you here at this little one here. Um, and this little character here is Well, so we gotta be creating something like these two today. So, um, I sketch a lots of different sketches all the time over the years, and I've always wanted to create a little sculptures like these on, and it's being hard for me to actually get to a place where I could feel comfortable to create something that I really liked, like these two. Andi. So it was really exciting recently to just have the space in my brain to say that I could actually create these on and how to go about their that and just basically using your imagination. There are no wait like perfect ways of doing this, but to create something that works at the end of this because you need to let it dry a very good amount of time so that they don't you know, the paint doesn't peel off or anything like that. So has been awesome. I mean, the clay was so, so easy to use. But then I'm saying that because I like to work with my hands all the time for those, and I'm not really use this claim before. So Ahmad watch lots of different processes online of people using different please. And I finally got round season this So this is if you're completely This is the best clear which you can order online from Amazon all these different kinds. But this is the one that I use anyway for this so I don't lift is turning backwards on that . I know it's D A s. Um it says best the best to model your ideas so you can order that online. That was really good. So so far from this, um, it weighs physically Trento Look here to find the size of it. It's not really wanting that out for me very easily, but basically, I created these two so far already from this under still quite a large piece left in it. So we're gonna use that today. So what I've been doing is using spoiled a part of damage, no structuring. So, um, when we start this, you could be trying to decide the size. So you need to be really playful of what size you want to do it. And also, I've been using this inside of the foil to actually puffed up a little bit. I mean, you could work with only the clay if you wanted, and that means that this wouldn't go as far as it's done, but also doing this where you give it a main structure helps to make the, um, actual final piece lighter. But there is weight on this still, because the Klay is just very, it's still quite heavy, but they're still await on our But it's a lot lighter because you built this structure inside beforehand so I can get thes air papers you get when you get deliveries from Amazon or something like that. So I like to reuse them. Either I'm using them for something creative, or I use them to line the bottom of my rabbits, Trey, basically for their hay and things like that. So basically, you just cut off as much as you thought you needed to make head or whatever the character is. What you find me, Um, impressive, quite a bit, because you don't want it to be to salt when you start working on it. It could kind of compress a little bit and things like that. It could build extra layers on it, but I don't mind that. So I kind of just I bowled their head sizes for this has a little bit more for this will be insight. And then I put that was over. So one sentence for over and then you can have conformed a neck as well. So I'll use some of that with that oil. Um, and for a neck as well. So I've got this little you can see here, a little kind of bold hit and try and kind of make it a circular as you can, but disappear. Remember that you can always fill the gaps with Klay, but get they had roughly to the shape you want, because you can always add onto it. But it's good to get have it as close to is that you like? So I'll have a picture off the character that we're gonna be making with a little friend just to decide here so that you can see that, um and so just formed the little characters head. Yeah. So you go from Yes, you've got her neck on all the Christianity inside the clay. So it's good to have a structure that can hold the piece together. I'm looking to seal that off the extra actually want to create the whole bloody from this. And then we were contemptible So next part I'm going to do this. The rest of her body, Um pretty. The elephant is well, without separately. And then I will kind of try and work that so that they're drawing together when I start characters together will be kind of stuck together. So I'm trying to go for a hike. Not more than this. So, um and this is about six Check 6.5, I think roughly 6.5 inches. Um, so I'll be looking about what? I'm working as well, trying different and so basically, like pieces of paper on this Basically smoke put it into the and what? I'm doing this as well. I'm also aware of the fact that I would like it to stand. So I'm taking in consideration when I start molding with abortion. But to have a left underside of this Yeah, just thinking about this and how I want this little character to be just a little oil was putting. I'm gonna join the head parts of this as well. So you could just ahead inside, or I'm So, um, in si said the flip it just gonna flatten out, have been been also now work. This is quite a long neck. Make it small off wanted. But like I said, you can fit clay over this and a deft everything. So it's just a play around with this and see how it works for you, as you're creating the characters of her neck is quite long. My compressor of it. Um so trying to look at what angle I want her to face with her little open. So what's gonna happen is I'm gonna come back in the next segment, and I'm going to do the little elephant as well. And then we will get started on the enemy. Just turn neck a little, but I need to get the angle where the elephant is going to be in comparison to her. So that was it Feels really quick. I am quite quickly working, but you take your time and you just go for it on shaking a little form. So conceive Example. Better. How just roughly the same size as this one. Um, I was gonna put this apron on, but maybe when you get to the clay stage, but yes. So it's Look, this little character like this another thing I did. Actually, I just remembered is I did put little pebbles in here just to get some wheat because he can do that as well. So I had, like, maybe four pebbles in this. I think I might take the and put some pebbles in that well, and I'll show you that in the next segment, so I'll be right back.
3. Building The Structure : So I wanted to show you the pebbles I used in the the body of this one. Just away down a little bit the last time. Um, so this kind of like a small light. Remember, couples, you kind of get them for decorative to put in a glass. Five bases of houses. So I thought these were just quite affordable. This is a town, and basically, you just put some of that just a handful of them, not tons pants. How heavy you want them to be, And it just only gives it a little weight. You don't have to put that much. Um, it's just to make it a bit more waiting at the bottom with the place will add. So I put usually for pimples in That's what. So from that got these four on open, they're up again. So it seems very delicate with, So just take your time and this is just a construction part. The clean part comes up there, but it's good to happen. Spot, right. And then you can take your time with Clayton, So I haven't done this before, but because I don't think I'm doing the oil, which isn't you did because you can hear. Do you take your time. If you want to do this on, you don't have a chance in the initial. I'm gonna put it in the paper bit because I wanted quite well compressed again. Get so I'm very free with sheets. Make. I don't mind. As I said, you can always add Moakley to get the Sheikh exactly the way you want to put this on the inside this time. Is that so? So until I'm using the clear, keep it quiet, closed things like that. But so this would be a little bit thicker because of the way I've done it now. So, hi, I'd be smaller. Okay. Um so you can probably think of taking a bit more time on this stage to, um, make it a lot more sturdy, but I just don't straight in. I kind of I just work by that very, uh, well stored. Very carefree. So I think you could find in this picture and losing it, which is not very good floor of the fact that we're doing the class something inside of Syria. So this is a little character that I'm thinking we should do there and so you can see I've got her little head. So I'm looking at the side, and she's gonna have quite for peace is gonna be quite forward. And she's looking Bentley. So we'll do the little elephant so that we can add that low elefant to the hoping as well. So I do it in parts you could trying to the whole body at once. But, um, this is also, you know, this Teoh safe wasting too much and then trying to the body of the elephants so a little strong with for a while that I will average simply a bank of the end, then its little ears. Another thing of this, remember, when we're talking about the years of this elephant is because we can also actually, for her hair, I used some boil as well to shape. All right here is gonna be That's a really good anchor full of the peace when you start creating it as well. So gonna do that in a minute. Let's get this little elephants 40. Since your attention to some of the key to he's gonna have some ears, so I can some shape in this. I'll show you drive Looks like, and you can use This is an anchor or okay, little legs as well. I'm gonna try and get some legs. And that can also anchor this Really your own what? Look like very much right now who it will all add up. I'm promising you to make a very cute little character once we have everything in place, I think I just want to cover that hole with skin. I could show more. Close that thing, like, straight away. But camera tends to get in the way sometimes. So there we go. We're gonna show you this. It's just fiddling with it on. So there's a little elefant, um, skeletal face, basically before you start. And so it looks nothing like, um, she doesn't. I'm gonna do her hair and have a look. Two pops up more again to her, Mick. Then I'm now going up through the puffs on the top of my head. And this is just anchors again to be able to create the crops of the we've been in talk a bit higher. That's you. I am on the head. So I might have to absolutely just get on overall. Look, So you kind of build. It's almost like a cast. Kasten. Uh, so or your character no longer neck again with another. So it's very friendly at the beginning, but is just having patients that something good will come out. That is just trust in that it will all work out. Faces trying to see. I want to That's gonna stay. Okay, I don't want to wait. Too much of the oil is Get the have your actual agrees. Quite well, just a shaper. And there we have a little character and we have our elephants, and then we'll just build this around this little elephant. Thank you. Don't want to have a little tail for the open. Well, a bigger out over. I'm gonna here. I think I had a little bit of meat here. I think I will. Does more. Okay. Sculpting insulting. And she'll be looking particular directions. Which one think this? So yeah, that's basically what I'm doing for her right now. Look, friend, we'll still build some more Klay onto that, so that's gonna look good. And that's very exciting. Make sure that term it's flat of the bottom. Don't everything that's compresses. I can make her. But then also to get balance to make sure I get with violence. And you could fill the rest with clean to kind of get extra results from that. So just look at her. You have been statements. Okay? Yeah. So, yeah, that's pretty cool. I will stick with Beth and still got the little elephant and got her. So it's just about adjusting a little bit and seeing how we go with and they will go on to the next bit, which will be put in the clear on, um, and anchoring them together. Really? So that will be really interesting stuff to get back to work with the tooth and kind of stand in side by side. So a kid probably put of a piece of foil around. Try and I have done really well together, so I think I might leave, so yeah, that should be fine. I'll work on it. I'm doing the play, and it should be fine. No. Yes. It will do the next stage of which will be put in these two together, Um, which you can't see very well right now. But that is the basic structure. But we're going to build on to make our Klay, please. Right. So I'll see you in the next section where I'll get the clear. I'm no start ruling it. Well, get ready to create a little characters and yeah, it's gonna be great.
4. Adding To The Structure : so Hi, everyone. And welcome back to this stage of the glass. So here we've got the two characters lying on their backs. And, um, what we're gonna do is probably actually work on these individually and then work together . So on what we'll do is start on the head. Oakland main character from what I tend to do is I've got some tools here which you can get also online there different kinds of metal ones as well, which could be used to kind of cut the Klay and to shape it in different ways. So they've got kind of tools on either end of them, like kind of, ah, different ends on either end of them so you can get these online as well. Then I have which was my daughter's old hair spray for one of her creams that we use for a hair and I can of the spray water on this to keep of moist as well, so well I'm going to do is go into the cle here and cut quite a sizable chunk. I think I'll probably end up. He's in all of this for the rest of this actual sculpture, um, one thing I was thinking about was any time I'm not using this. I see for me just kind of rule that make sure it's rolled up, put it away. And, um so, yeah, one thing I was thinking about, what this was, um Just to show you specifically how, um I work everything. So I kind of cut little slices off like this one. Rule them and rule them. Very. Um, Finley? Not well, Not very very. But enough to kind of when I show you what I would do next. Um, it basically old levels up, So basically just to roll it and too thin strands or thinner strands And I think the more you do it, probably you get used to what you should do with this. But so I'll do this here like this, So just roll it, and I'm basically gonna show you how I'm going to wrap it around. I think if I worked, um, around the main figure first and then we can start because it's gonna be a bigger piece of clay. So you can see how I've done this quite for long. From that basically. And then I'm gonna basically wrapped around characters next to some of its broken up here. But this rapid Leslie, not too much pressure on it around make. And, uh, we're going to keep working on this. And this is the way I put it on on the full sculpture is just like that. And that isn't for me. I feel an easier way to put it on than trying Teoh, um, of the initial stages, too, trying to stick her own. So that also will give a that thickness is kind of a Lear, But you can know, right? I've put that on. So it was quite good to do it this way. It's just a way that I felt makes sense for me to put it on. So it's just a rule. So every time I do it, it would be putting it on in strands so we just roll it and well, so I'm trying to get it evenly across and to get um, yeah, evenly across. And this would be the thickness. Roughly, you would just be added on to this, um, as you worked when your character. So I'm going to go up for its now just up to the head and just keep going round and making sure that it's touching. Um, kids, I want to make sure that all of the foil gets covered, so you just keep adding it like this and will play around with that soon. But it's just to cover the whole character as much as possible. So just cut them into kind of, um, que manageable chunks and then trying to rule that and just trying to get what you think of thickness for your character will be, and you can always add, as I said, So it just kind of take your time and evenly get out. You could always cut this in half if you want it in manageable or manageable chunks. So because I know that I'm gonna be added more to this head, probably in different things like that, I could make this a lot, then our But I wanna have quite a good thickness around the hole character. So on this ad and Adam thinking too much about it, then we'll shake this so you could probably just It takes a little wild to do this, actually, so I get to be careful for the class that I get this right, I might have to Reckless for two more. A If it can't finish it in the time I've logged for myself right now. So you just keep home, get into manageable sizes and rule in it. Um, and then we'll keep putting that on. So, uh, we'll focus on doing this head, but all the weight up to the if I did this of it, I'm just gonna cut some of this and then do a little bit within earlier, So I go to the top of her head. So it was just planted by I as you're going, Um, look around And I have been a bit So all this will be shaped. I worry about how it looks right now. It's going to keep on going around around another way I probably could have done this would be to do the head separately, dual the limbs, everything separately, and then kind of clue them all together at the end, but that I want to kind of work on this. Actually, I think I go around. How do these bits will be? It's probably so, Yeah, go up here and it's just filling in this beast. Really? So that I just pinch this a little bit, start ruling it. So it's kind of a way of saying that I think works for me, Um, for other people that might work differently. But it just makes me know that I've covered every single area and as evenly as possible with this cruel. And then you also have enough to kind of plea with after to the kind of smooth out. It's just round from around around the top here, starting to put the little buns in actual shape in a minute, so that's already heavier. Just doing that on the head, you'll feel the wheat as you start doing that. So you just basically keep on doing this till you get all the way around the entire, um, character. So I'm just going with my eye and trying to make it a certain thickness.
5. Repetitive Technique : - just fill in a single bit. Can you can see this here and then we're going to keep on going for the rest of the body as well. And into that's really bad. Done it this longer tickets. I want to just keep wrapping it when I start. So there you go. I'm gonna just turn it around, so I'm gonna have to smooth this out at some point, because it's not very even. I'm just trying to make sure I cover all of this when they have started. So doing up one at a time. Not both of them are ones. Um, so that you finish one and you can always and the Aga basically covering up all the forum. I can feel the weight. I'm already that's keep prepping all the way around. And so so that's this. Keep going here, ground. - It's so if you are doing this and need to keep overnight like I am about to have to do Once I finished this, um, I would spray a lot of water in there and put in a bag a plastic bag like I'm about to show you. So a few more bits done this quite quickly so you can see how much I've covered. So basically, you did the same for the elephant and you can have rulers, so it's clipped.
6. Creating Form: So, um, as I've done here, I wrecked this in a plastic overnight. Good morning. On I also straight some water, and this is well, that would dry out. So it's still very, very moist. There's you can see. And, um So what we'll do is just get on with still mold in this character. Um, So as I said before, you just basically you can get all these different tools. I've actually ordered some new tools for this class, so I'll use that in another segment to show you some other things you can do with that. But you know, this basically start smoothing this out on this little characters face and, uh, getting these lines to kind of disappear. Um, as you see here. So there were lines like this. You can see the lines all the way around from what we've put onto this little character. So now it's just too smooth all those things out and get a very, uh, even surface. So as you're going along, um, if you need, you can put more water in it. You can spritz some more water. Like I said with this little spritzer for, um just to keep it moist if you need any water on it, I'm just smoothing all the way around and a friend to get an even surface school there. The different tools, like of the other end of this to hear this is bull, which I used for, um, creating different forms as well. So you just take your time and the moves. I think the mean tool that I use is this one. For just to smooth this out and blend in the service, Do you really need to take your time and get to the level that you want us to be really smooth? Before that, I'd put on the features onto this. So if there's any excess ikan, take that off. So the moisture that the cle comes in is quite okay already. Teoh, just use on that level. You don't have to get it to wet because then it be really slippery. So, uh, this is quite OK for me already, and it's just smooth in it and making sure not to go too deep into it because, you know, the thickness that you ruled and you don't want to go deeper than that. I just want to go on the surface and just kind of blend that surface area together. So that's what I'm doing here. And you just have to go all the way around your entire sculpture on, uh, make it in the shape that you want. So these areas here, I wanted to make them a bit more prominent. So I'm gonna go into these corn is here and, um is pushed into push into them a little bit. So you kind of like, get an indentation here. So if I feel like it's a bit too sticky econ spree a little bit of my spray on it so that I could just smoother and it's not going to stick to my to, um and then he just basically keep working into it to get the indentation there. But you can see it's different. Now is a bit deeper. I'm trying to get the shape off her hair. So with this, I'm planning to do things like maybe add of the mediums to this, like maybe I could tell you ribbon in her hair here wants this old dried Oh, you just paint another color so that you can see the difference and all you can paint a ribbon on a swell, but I'm just trying to think of different ideas. Well, I wanted to. This stage is just to try and smooth to the standard and equality So you don't rush this day to take your time. Um, just what I'm trying to do in this class so that you see the process. You're able to take your time and do the same. The textures and the hair. I mean, these can smithies round. We could leave it if you wanted, but I'm going to smooth out and so that everything is together. But you could leave that design kind of over twisted look of the hair together, but I usually paint on textures on it. You could to use other tools to make it a little scratch here and have more bumps on it. And thanks, but just be aware that painting it afterwards would be a a different conversation, because you're gonna have to get into all those little minute areas afterwards so you can see how it smoothing out. So you're going to do this all over the whole body? Um and then I'm gonna do this other side of it more intense since I was a little spritz and then just Kenna, just work this in because this moist. So you just gonna sit down, have standing there, so just all the way around, working that all the way around and taking your time. So remember also that in this, I'd put some of the foil in here, so that's gonna help this to kind of be quite Richard underneath as well. You would never want to drop the's, but that little help to keep it together a little bit if it did, cannot drop, but hopefully wouldn't whoever has it. So it's a labor of love doing this. I think you take your time and your thinking of the little character, the personalities of the character. You're like, all right, this is a little adventurer on, um, she past this friend. That's the Elefant. And they get on really well. I mean, the sketch doesn't really tell you the story of what could be going on there, but I love putting them little characters together with wildlife. So it just happened. I'm very close to nature and just being aware off the fact that every single thing has a purpose and everything is beautiful and is, um and you can appreciate everything around you kind of thing. So I have an idea of why I do the kind of little illustrations that I do. So whatever yours is, you can just take your time and work that into your own characters that you create in the future. So this is just to try and show you how you can create a sculpture from a character from a sketch from and start to get there. So these sculptures I've done a simplistic as I kid because I usually draw like that anyway . But also, just to make it is painless as possible for me. Um, that's another reason that I take my time on this. So if I'm feeling that it's a bit tough, then I can just put some more water on this so that I make sure that they bled together quite well. So So this takes time to try and be patient and to you can add more likely if you feel it's not balanced in the way you want it to. I am quite carefree, and I'm quite happy because I've already put that layer you know the curved lives down, and I'm basically just, um, fusing everything together by rubbing this across. I mean, you just need to know when you're happy with the way it looks. Some people, once this is dried, will actually sand over again, which I don't do. I don't like the first of other light the dust from sanding the second bowl from me. I don't feel my characters need it because I love the texture. So even if this little ridges or thanks by that, I don't mind that a toll, because once I paint over it is just part of, like, the the base, the texture on actual it shows the journey that this is being through. So I'm quite fine with that. So it's just to smooth old early round. It's, um, uh, labor intensive. So our feelings too dry? Just put some more on it. This helps it to move across a lot easier. You just go all the way around, uh, working like this. So yes, in this class, basically, this is just to show you how work you can see a result, and then you can experiment from there with other little sketches. I mean, you can see my sketch isn't very complicated. But you could do so much. You'll see what I add. The hands. How are my mean and this. You see how I do that? And you just take your time? Uh, just keep going. Basically, um is a lot of fun during this? No, just like from the bottom where we added just yesterday, I'm going Teoh trying refusal this together. So I'm going in different directions sometimes to try and blend it. I don't have to go in the same direction That helps anybody to kind of fuse the clean together. So would be great to use actual, you know, clean. But you can use in the film, but I don't have the facilities for that. So this is gonna be the next best thing. So the fact that it exists is good is good enough for me to be able to use it. Um, yeah. And there's so many ideas I have to create. I can't wait, um, to do just a range off very, very unique pieces and characters. I was going to be awesome. I have always wanted to do this, and I hadn't understood how I could go about doing it. But now is the time. And I just wanted to translate my characters into three dimensional forms. Um, another friend suggested to me that I could actually, with my characters, create, uh, kind of postcards because I didn't take Don't show you in the snap anyway. I mean, this is settled, my paintings, You can see that, but basically, I have. These painters have created and just toe have my characters in that background and also to kind of create postcards and things. But I got different ideas. So is that all the fun things you can do? Basically, life doesn't have to be boring. There's so many opportunities and ideas that you could be clean around with. So if you've never thought to don't anything in sculpture for more with Klay before? Well, this is the class for you. Just Teoh, relax and experiment and to show you it's not that it's easy cause this mean my hands I'm always creating something, so I kind of know what I'm I've got in my head. I have a picture of my head. I want this to look like, um and I'm always being creative. So this is
7. Working On The Details 1: me is just like another drawing tool. Basically, I do digital artwork. I do, Um, paintings. Then this is well, and I do Dole's as well. So I'm always doing something in my hands to translate what it is I have in my head. And now another thing is I have this here. I don't know if you've seen this is kind of Ah, it's kind of like a plastic tile. I'm trying to think what to see, but this is kind of the surface that I do this on. And if I don't want to stick to the surface, which it does, sometimes I just put a little bit of water on it. So I want to do is actually push this down a little bit because I want to That flatter surface. I'm just gonna push this on it a little bit this to get a surface that this character can stand on. So I want to straighten her out of bed as well, because this elephant is going to come along and stand beside her. So there you go. There she is there, and I still tweak some bits, like see, it just raises camera a little bit but safe, right? You could see the top ahead there, So I'm gonna try and at her face. And now, actually, I wondered if I have enough clay. So I have ordered some more, but, you know, expected to hear this in the middle of a class, huh? But I've ordered some more, and so it's going to take my time film in this class. So by the time I need Teoh, maybe use some more for some other details, the other one will arrive. Um, this is technically bigger than the other ones that I have done because it's gonna have to characters in it. So gonna just try and get to be quite let of beneath. And I'm trying to think of what? So it is going to try and fix this underside here and with all of them, What? I've been doing this painting kind of ah, flower seen on them. But I could do anything. To be honest, I can try some colors. And if I don't like it, then you change it again on I've been using acrylics to paint over these. Some people will seal with a little bit of titanium white acrylic and then they will paint in gouache over. And goulash is a kind of thicker Walter color. Um, that kind of like the color when you use it. If you could get a flat, um, tonal result with it so you could use gouache. And there are varnishes that are gouache varnish as well. So there are so many options on how to go about doing this. I am using acrylics because I just love using acrylics. I too have goulash. But the fact that there's a specific varnish, uh, I have watercolor varnish. I'm not sure if that might work for you because it is in the water color family, so that might actually work. But I don't know. It might know. So I will just use the acrylics because I do have an acrylic varnish. Um, I have a spray one. I don't want to really use the fumes and the chemicals going into my nose doing that in here, so I will use the liquid varnish whenever that's required. Some castle within this out. But it might not be necessary, cause I'm still gonna have to. Could the little elephant own so we'll see how that goes. so I'm just trying to make this under surface as even as possible. I'm aware that the foil I think underneath has got certain kinds of gaps. So trying to see how to make this underside with this character and trying to Smith as possible. So, as I said, some people will send this once is dry. Um, but I'm not planning to do that. So you have got to be careful is Well, with this, I don't keep lifted it because I could end up stuck in the bottom of this off. So I'm just blend in it and blend in it as much as possible on the teeth on, uh, trying to make sure that this flat have also being actually, I mean for yourselves as well to think about this if you want to put to your local or something on your piece, Um, I have Bean using a stamp of my to stamp on the need, but you could do lots of different. So especially when I'm thinking I'm going to put the felt underneath. I'm not sure why. You don't know. Probably. I'm going to try and work on her face now. And so I've been doing is adding some eyes. I'm gonna add her newspapers, so just put some of that. I'm just gonna but a little Let's see what I think her no should be about here. You should technically look at my fixed trash and I before I do this because that's another thing. If you want it to look a certain way, I need to keep a note off. Where? What it looks like. It's a good idea. Okay, so just got a little nose there. It's no, it's critical that so I'm just an extra things here. I'm just gonna rule my several distant terrible, for example, And then I'm going to rule it into like a corner of the bottoms is gonna have a little peek of the bottom here. So there's like, a little pointy bit and then I'll stick it into the hole that I made on her. Can you see the little hole of May there in a district that in there before I then put the rest of it all but could make the hole bigger. It was a little This is a bit of an extra thing, but I don't think it's necessary. But For some reason I've got that in my head that I should do that. So very goes the little nose added on. And then she's supposed to have a bit more on decides. It was just kind of gauging what it is that you want to do the ones of the site. I don't really do anything with just gonna put it in. I'll decided bigger than the one in the picture, but he this sketch is always estimate to me. You can play around with it, then I can do an extra thing with this knows where, so you can see the nose. It's on there now and then I take another bit on my rule. It really, really Finley, like, really friendly. See? It's got some water on it. So it's Misbehavin, but on a drier. But it would be better behaved, really, really friendly. Andi just put it around the actual news. This will. It's like I don't know. I've got this thing about extra anchor on my favorite this closer, like an extra anchor around the news. What is going to wrap this round? And and then I'm gonna come back, and actually, um, will you with that. I'm gonna cut it cause it's just it was wrapped that around. And I don't play with this to kind of merger and habits. It can see that. Then for the eyes, I kind of go with the bits again. No need to gauge this. Actually, Just got quite big eyes. Mm. Have to gauge just for a head size my take extra off. So this kind of have to, like, a little bit like this and then split it in half to do. That's roughly and I'm gonna put this on her hit. We're going to check if I should come close over this, right? Okay, uh, let's just get that a bit queer. I'll do one at a time so you can see what I'm doing. So I'm gonna put one about here, so kind of flatten it to, like, the eye shape, so just drop that. So about the I shaped kind of thing on, just put it around where you think that I will be, but it about their and then the other one about here is well, roughly what you think the eyes are gonna be what I'm going to do first, though is just gonna make some lines on this. So just a little bit of I don't really know for makes a difference. But I have seen this before when people are doing it, so why not? And you do that kind of on the back of this as well. But this kind of wrote put some rules and trying to end to look it somehow I feels a bit bigger, so I'm gonna add more to this one, right to stick this side. Now, you have this happening. Basically, what I'm gonna do is now this spray this a little bit with the spray, and then I'm going to start kind of fuse and things together. So you kind of start does digging into this and this is how you get, um, the shape of, like happened the eyelids a little bit. So you do this idea and then start working on it. So I'm just gonna look out, see what angle dies to make sure that still, and you can see her. So I'm gonna be going around and trying to basically pushed this in to the actual I and going round to seal it as well. So those two things going on So ceiling of the edges, which is like an interest in we did it going back and forth with the clay all the way around. I need to make the whole surface look exactly the same. So it was just so you can make this stick out quite a bit. You can see here, and I could put Markley over that at the edges once up. So it's just be aware of how I'm doing the eyes, how I want the eyelids to be, so you can take it back up. But if you think it's too much and put that over and just keep going back and forth with the same thing trying to seal it, bring in the back until you get the eyes the way that you want it to me. So if you think it's too deep into ever, you can make it bigger. It's just playing around with it, really and how you want the eyes to be. So these Airil the fun bits of this and you need to take your time. It's basically drawing with the two except is three dimensional, and you're trying to figure out what you want this to look like you can see that there are . It was really, really interesting because you can see almost different I expressions and use off like physical language with ease in your your eyes and stuff When you're doing this, it was like, Well, I am I trying to get her eyes to see, Obviously looking at this kit, you can't have to decide which way you want that to be her nose. I'm going to go in here and start but Lynn about with this as well and blended that in, then going with a smaller tool in a minute. I think that this space is too small. You can always try and make it, but bigger pushed us back a bit. Can spritz some more water on if you think it's too. So it's just to see how I think that I should go here. Um, so you can see this here from what we did. So we started with the paper inside the foil. Been weak, ruled the clay on. Been from that we're now kind of bringing about the form off the features on the face. As I said, you can spritz on some more off the water. If you don't think it's working, it's got a no and its shape, this details on our nose a little bit, but this other fine or two. So it's kind of like a drug in and the details amazing. And I was going to do the mouth as well. So the mouth here, um, I could actually I'm gonna do is add some more right at the mouth. A little pinch more could make her jaw line a bit rounder. Actually, I'll show you how I do that. I want to make the draw like a little bit Rafter. So I wanted to add more to her cheeks, like just to make things a bit more, actually, let's rule it so you could start adding more at the bottom. You can see this, but here is opening up. So I'm just gonna can I join it together again? Because when you're pushing and pulling some bits trying to open up again so it's like, overlaying and over you've got to kind of figure out how to blend fits together this but here just got a blend, and, uh, I have to hold in all sorts of awkward manners. Now you've got sort of which you can keep added the layers and layers on top of it. Just to get this, you can shape a little bit more. You can see me shape in the neck that it looks a bit more like there's a sheep to the head pushing. But I've been pulling back a little bit than machine and you just keep going to you. Smoother, old together kind of thing. It's a little bit more shape. You have to keep working on it and believe it is going to get better and better on, uh, while you're doing it. Um, it might not look like that, but it's getting similar, basically. So I am very Thank you. This still some stuff from Nieto? Add on this bit just a sheep spit a little bit more. I'm gonna add a bit more in there, so I've put some lower here. What I'm gonna do is actually just use this shaper one to do it in Paterson. So you start learning what tools work better for you And what doing the more you're using them. So pretty awesome. So just blend of the center of the edges. Looks quite scary right now, But don't worry the old change a little bit. Her eyes are probably not as high up for some meeting. It's good, so space on the tops of my fingers down a little bit. So so but smooth in this area. Or there are eyes quite big this way. It's just going with your drawings and see what you wanted from your results. So it's so we're gonna put a mouth in here, some lawyer into a neck. It's a lot smoother over. It's a rough idea of what she looks like. Let's see. And until it's done, you can always make changes. So you just have to keep on using your eye, looking at your sketch roughly what you wanted. Her nose is probably a little bit smaller than it looks here. That's fine, because I cannot. That took because it's my piece, so those could be smaller. Maybe, but then you just blend all those bits away. Uh, I'm gonna put a little luck. It's been a little dot on then I could use this another tool here. There's so many of them. This one here could also have been a mouth. What amount isn't really that white, but so this waste, it could do this
8. Working on Details 2: lips on it before. And then this one. Sure, if I want to put the lips, let's go with this. So I feel like her face is Rounder, so you could add more to that. If you wanted not moist and they can blend some more. It's I don't like using my hands because that could make an impression a lot deeper. So I just kind of tend to use this and scrape a straight down as I can. So with a different part and blended, there's just a lot smoother than she was before. All the way around. Stare. I'm gonna leave our hair. She's got some kind of 12 and I hear so I can see a bit here on her face. It doesn't look very appealing to me. So technically, right now she looks a little bit. I think I could clown to me, so I don't really like that. It's much so I'm gonna go in here and try and push a little bit more to get so more of her actual hair. Here's a lot smaller, probably than I'm making them. It's, but it's a little finer. I'm gonna use some other method to make it smaller, not pointy. A little bit around our It's not those e just did this about It's trying to get this a little bit more squished. So you got to be careful with Just take your time on this. So I don't have saying that some other stuff off their heads. I'm just remember which is, like, here line have been going to put some hairline on her here. That can add another dimension to this. Uh, she doesn't currently have a hairline of this, but I put a line. Let's see, I raised this up a little bit, So across here, just like oh, are? Yeah. Oh, it was like I looked and sweetie, so you can see her. I is a high there. They could see that hairline there. So this I kind of spray this. Hi. His So a line. Some coming down here. So she has, like, Okay, Canada has, like, um, hair coming down here. Here comes out here. It's close, but, um, it's not really as close as I like. All right? A little trying to see her. Hi. This was a bit bigger down here. That this other one is very small rooms. And then I couldn't put this here because pm this side here, I think I might be your nose smaller because this supposed to be a look smaller. Good to kind of try and beat this down a little bit. Hold the time consuming bits. Tried together as close to your pictures possible. So just be prepared to take quite a bit of time of us, see very small in comparison. I'd have to take quite a little, so I don't think very much came off about. All right, So the department, that's a lot smaller, and I really don't feel like going back in here. People you get understand that that would be scrapping quite a bit of amount of work in there, but yeah. So once we've done basically her face Andi, we've made it the way that we wanted to look. So that's close, Not completely close. I could probably have made this a lot around or her face. But that will do. Then we're gonna work on the little elephant, so this little elephant is supposed to basically I think another way this could have been done is it was actually just glued on because I'm thinking here when I'm looking at this space that I should probably build this elephant around this close. This elephant could take me come off, but we'll see what happens in a minute. Because this is going to be kind of attached to Are so gonna have toe figure this out. Still, I'm supposed to have a rule. Auras. Well, actually just remembered, So I will get one of those at some point. But I'm just gonna go straight in here on this low elephants and start Oregon on his little face, So just move her over and it could be the same ruling the way that we do the elephant as well. I'm conscious that, uh, I need to get enough of this Klay around everything. So it's remembered my little elephant actually has a little tough this. Well, good. I just put alot thing here. I think there's little tuft this rule this out tuft ruling up. Okay, Another thing for this cut other character is that we've got to actually get her arm. She's going arm that actually goes over on, holds the elephants. So it's a conscious with that arm as well. Just basically getting this all on the foil is just all just under the skin of this. You don't want to put too much. I feel just a You could put more, but I don't feel the need for that. It's just a skeleton for me. So you working with this Elefant? Think of the sheep of elephants Face, body. So with Rob. So we've got a little face and things going on here. This one is a lot smaller, so I'm just really just going for it here. Just squeezing them out any excess. I'll get rid of a eventually. You're just going around and work in autumn. So you should saw the overall shape and then it's just to start trying. Teoh, get the elephants side of it out that this little body under this little elephant legs starting just have been an added go. That's Oh, the back now working on this little back. So this is a fiddly because there's a lot smaller on Deacon Smith. Things over after that one was a lot bigger. She was a lot bigger, so just filling in all the gaps around the spoil, and then we can shape it after it was just basically just working round and round and round around around. Got a little basic overall. Look for elephants. Um, let's go back. Go basic overall. Look for the elephants. Um, that it's not taking your time. Teoh adds to the details. So should be cute to see these little guys adopted at some point because it just so awesome . So cute. And I mean, look at the time of both and making this. So, um, yeah, it will definitely make you forget, you know, just general every day, spending time, doing this with the It's a clay sculpture and making little interesting characters that are in a world of their own, um, completely in a world of their own. Uh, see, this is a little character is supposed to go with this one. Um, I'm trying to think how this will work. I think they would have to probably go on a stand together because I don't think that this could blend in that easily with It's standing here, and it's three dimensional, so I think I would have to glue them come to stand together. So that's probably what's gonna have to happen, because you could have tried to blend them together is one sculpture, but that would be a headache, I think, um, to get the characters. But this would be a lovely three dimensional aspect to it, just to this hair comes out as it was, that of a bull on it. Sony to really work cover so that it looks like an actual bit of here kind of. But I can see why my rolling of things is so much better because, um, just then start using your tools to shape things. Because then I'm seeing quite a bit off oil still showing through some having Teoh calculate where to put that This is to show their hair and then need to even outside of the elephant's head. Doesn't look funny. It was the time again to not fine tune this so that it looks okay so much fun. Gosh, it's challenging, but it's gonna be so much fun. Let me get to the paint in stage. Can't wait. This is just an enjoyable process already as well. So I am working faster than probably I think I would I don't really watch myself. What time myself. So maybe I work fast like this, all the time. But you take your time on well, ever number of days. You need to do it. You don't have to do the same speed as I'm doing this. So if you look through my work off you've seen my stuff online on Facebook Are at Beatrice Ajai Bitches. Ajay Artist. Um, you find that, uh the way I paint my characters was quite colorful. So looking forward to doing that with this elephant and the designs are we put it on this little face. So yeah, I think it might still add a little bit more Dick. I think she's gonna have this little elfin is gonna have a little bull gonna tie and ripping around this, But because it's just so it's just begging for a ribbon because that's supposed to be the hair a little tuft of hair committed. It was just basically fine tune in and 19 and everything just going around, making sure that no foil is showing that you put in the ear. The three dimensional quality of it is working. And don't rush it because it will be worth it. In the end, when you've finished everything and you actually like what you go at the end. I was just tweak in That year's here. I'm just trying to get a little bit of a point. Uh huh. So, as I said, this makes it more accessible to do the actual sculpt in. So just have fun and relax and anything is possible. Just take your time and see how you go. Don't rush it and enjoy it basically, so
9. Sculpting The Elephant : most moving it over and things he does, admiral. Water that was made things a little bit. So that's like my little elephants here. You can see there. Elephants still have a little bit of a texture on them anyway, So I am not going to control too much of this. Going to just give a little point of for I hear a little bit of a point. Um, look about it's an elephant. I will give her a little Teyla's. Well, trying to close some of the holes I could use it to here. Just add a little bit more because thinking that this is this is all gonna get painted right than elephants on eyes coming up next. So I actually got a trunk to give to this elephant as well. This is all different things that need to happen, right? Let's see. So, just a little big. Should I make that actually, because then I'm gonna have to, uh, Hammett them. So it's just a little goodbye arms on yet, um, I ever throwing these arms on to think about this, right? My principles. And so it was just to keep going to the detail. So then It's just just that I just do what I did. So it's just a pusher in a little bit. Just a scrape a little on the side. Push it in and then you just go in with the, burnished her side and blend in. So that's a little elephant trunk. Could you get bit flatter, but it's got a three dimensional quality on that Now come on, David. Eyes not too big for these eyes to bake, so just distant little lines goes, but some gonna different eyes. I don't think he's too big right here, one and the other one of this side. I'm just gonna lift that up and that you can see that and then we're going to do what we did with the other one, which is same thing was to just push it in. I think this might be too big. Let's just take a little bit off, push it in a little bit and stop pushing it blend in. And it was just blend this in a little bit more aggressively than I did the other one that's a little bit on the nose here, like so the eyes here and it's start working on that again. So does the work and work and so active conversation over there with the eyes. So they will be staring the same way. There's something going on over here. Try to think. Right, Um, And to add on the elephant nose here just to constantly just keep home work can what can, ah, just things gonna burnish in here. My eyes is just so full of expression by the time you paint them and you see what I mean by that just in this style and so just getting doesn't nose done. So there's so many details I'd like to add in all this pieces of artwork and some of my characters. I want to add mushrooms. I wanted to so many things, but it's the They're gonna be very delicate. So, um, you can see here how that elephants and those looks think I'm gonna take that in a little bit. It looks a bit so a little bit. By the time I paint, it'll look a lot clearer because right now it's not as clear as it could be. Um, still, just kind of put this down a little bit, push it back a little bit because this blends a little bit into this background here. Maybe I got, uh, too much of a little well, like here, So just added some more just so that blended up. So yeah. So this is what this little elephant is looking like at them right now. Cut some of this. Offered another. This is terrible on the trunk. My little character. It would be too long. And I would just take some of that oath. Just leave it a little bit, like about I gotta go. It's a little bit more and then right for her. I've got on armed to put on here, which is kind of coming towards the low. Uh, but go use this bit here. If I stand this little elephant up against her here, I think that and I've got to get his lights right. Actually, I'm going to very stable, stable feet. It's not really joining on there, but the idea is gonna have little stable feet sometimes just trying to some of that right now, So I'm just gonna So by the time I put against it's not him. So she isn't forgetting what I'm doing. Right? Okay, So I would glue them against each other. But I will put them like that. It's gonna have a little tail as well with arms on a little tail. So let's see, trying to see what else people meet. But I would be happy with. And then that's it. So she has an arm she supposed to get coming towards this little character here. Good to get that right. You can put a little bit more with this arm and here. Okay. It's really she's got a little arm protectively coming towards her elephant here. That's quite lower. Thank God. Good. Gonna put it here. Right here. See? Let's Ellie is gonna be here. Arms here. Okay, so it's gonna take a little while. Me added this arm, right? Just trying to that. Trying to dry already. Thank it's so this is just like that there and things. And then you're gonna burnish that on, so just blend in. It's come a bit cool, sir. Blended the thin. So you just can't keep going till you think it's enough in. And you So you take your time and you really sculpt these in. Here you go. That's her arm in. I can make it a little bit more flatter here or whatever you want to do with that current. Just until you're happy with it. Just keep going until you're happy with it. Basically, on their this edge and here we want to make it look really smooth. Finish. And then So that's that one. These bits here. Actually, I'm not sure about that. Right. What I'll do it now is like the smoothness of some areas here. So I might Smith, this backup. I don't think I really like that. Well, look, Mira, I could maybe painted, but I don't think I like the way it looks better the lines that I put some just getting rid of those lines. I don't think I like, um, the eyes might come back in and deal with those eyes can. So I was just working on what you like. If you don't like it, you change if you can, obviously before it dries, because once it dries, that's it. You're done. There isn't any correct in it that way. All this well, I'm trying to think, actually, if you can add, you possibly could add new layers on toe, but it would dry a different rate. So you you to see how that works you individually. So I've got my little elephant here and I want to put some arms for the elephant And also, um, a tale as well, just because of being treat dimensional on it's just to get everything. So, as always, if you wanted to Smith things over and just add water and it's lights over a lot bear, it was just basically smoothing it over 12 spree about water on and then you can paint it wants his old dry. So this will take some days to dry. I just want to make sure that it's tried. Well, before you start doing anything else to it, um, I'm gonna put the arm zone. I feel like this and more stuff, But I could do right arms. I'm gonna make I feel like you have a hairline. I might put that hairline there myself, but just a minute just gonna do the arms off the elephant. It makes this very slippery, but I'm gonna do anyway, elephants arms are quite, uh, suppose to be quite bulky at the end. So state go back a bit because we're missing some trying to put his little arm on here. I'm gonna use this smaller 12 used to start foot back with it. Yeah, I'm not sure if I should be put in the water on this Whom we shouldn't put the water on it so slippery when I do that. - So just in the same with this one. So just go into shop, and then you can see this is what alot elephant looks like a little bit of the moment seriously, when they're painted them and they look so much different. So right now, it's still may be hard to comprehend what it looked like, but it all makes sense of the other end of this so instantly, We're almost at the end of it. Will be to wait for a couple of days for it to dry and then continued. I hope this wasn't too big. Um, a task to do if you've not done Klay before. Uh, but once this is done, I mean the challenge of it. You would suddenly realize how much you can actually do. Um, And then just to be patient, to use the color you want. As I said, I'm using acrylic Andi, If I don't like it, I will paint over whatever color I'm using again, basically said. That's just be carefree with what it is that you're doing. I don't see any restrictions for yourself a toll. Basically, you can, too. Any kind of character you want. That's the way to view it. Then you will be too stressed about it, cause you just do it basically. So I'm just going around. Trying to see this here is that I don't really like, um and then trying to kind of find Tune, that my fear is I could make a little bit more.
10. Finalising The Sculpting Process: me that I want it. I've got my little elephant. I've got the girl to do The elephants. Teyla's well, I still have a little bit left. So let's just do the little elephant's tail just because Why not? Basically, I'm trying to get detail in this and to show them really did get in my little characters, too. The level that they can be and for someone to actually spend the time looking at this on their, you know, their Shelvin And to this think while, um, it's so cute and it's so realistic for what it is. So a little elephant t two as well in the back. That is why I'm putting the feel, anything else. I'm just going around and trying to finalize everything. Cute. Um, yeah. I feel like some of it's a really trying to dry, actually. So yeah, so don't their eyes. This would just be painting it. Next can. I will also just purpose a little character. That and then what I would do is probably put it on another clay, um, bottom part there, trying to bank oil. So I want to do Let's just put some water on it in case. You want to change anything else? Keep it moist, trying to look her hair. Her face technical would have added a little bit more. But I'm gonna leave it like this because that was a lot of work to give it to where they are right now. So you can see what that they look like, um, trying to see if I want to do some more for here. - All right, So do is that the last. But I think comments have done the hair probable. Think I will try a little tiny bull, or should I actually treat a little? Um, should it be that I actually just clean clean bull there? I'm trying to think of the difference off, like, do a tiny quibble. Mm. See, can I actually make No, I have a feeling I should probably just let me just do this. I wanted to just actually Taya, Bull, the brain is saying I should just add one. It's gonna be very fragile. My goodness, that could this break that would just destroy the whole fate. Wouldn't I'd have to like, actually terrible snap another, but opened so scary. They're just I added a little boat too, This bit here. I feel so scary to do this because it feels so breakable. Okay, I'll leave it. We'll see how that goes, right? So lovable as well. And then I was thinking about this hair or right. So I brought it low extreme across and then down the street across street and then down. - So this here not much talking left. Basically, it's just it was blurry. It's just too Create the hair peace. And then I think that so will do for this stage off, um, creak of this little character. So we will wait until this dries, and then we will go on to the next stage off, which is painted. So that's gonna be awesome. Basically, um, So the painted state's gonna be lots of fun. That's just always trying to smith out areas. Get my fingerprints away from that. Um, so if I wanted, I could have put some, uh, some actual where they call it hair streaks of us today. Any of the back. - So what do I want to just been the detail than here? This trying to get this edge to build smooth? Yep. And then oh, that I want to do next. I want to put some here streets down the back. Well, that this tripped. No, just watch your hand. Um, should I put some hair lines coming down here? I don't think I always need to do that, but I could just to show, um, some variation on texture. Some just put it some lines down the head. Not very much. Just big strands. Um, and then they're gonna you stop down here like this. And so there we are at the stage. We're just gonna believe this of, ah, it can dry, and we will work on the next stage of the characters. So here, look up a little tail. So that till needs to show the back. So, yeah, that looks really pretty good. Um, and that's the stage finished. So we'll wait until it drives a little bit here as well. Um, which I will keep for another time. Think Well, this is any touch ups, Basically. So I just just made it into my, um yeah, I just managed to be able to make it from them up, but I had, which was maybe about 1/3 of that pack. Now it just for the air drying process. And they are very cute. Oh, my goodness, That is so cute. So we'll get out of the next stage once it's dried. And will Pete them looking forward to that, Actually, a lot of fun.
11. Adding Paint At The End : Hi, everyone. And welcome back to this stage off the sculpture class. So here you can see me putting on some Laura pink onto the elephants, trunk and ears. And if you've ever seen my paintings that I create digitally or just my acrylic paintings as well, I love a lot of color. And, um, in this class, I'm trying to kind of achieve an example of that. But obviously, this would take a lot longer if, um, I'm paying attention to the detail myself, and over some days I'll come back and look at these characters and add to them and everything. So, um, it's just a lot of fun to take your time and to know what colors you like and to use those colors in your artwork. Um, I would take a lot longer on, for example, her face, her skin tone and really work on trying to get as close to, um, acute character as I could. Kiss Kit is my number. One thing I look for for these characters. So I was thinking about why I create these kind of ah, of actual individuals in my work, and I am really interested in the innocence of Children on their playfulness and their adventure that they can have and how they can see life without the fill context. On DSO, they feel like they have no limits on what they can do. So, um, I thought this section I would talk about something like that because it kind of goes on for a little while, actually, just painting these characters into the colors that I like, So I'll just keep on adding the grays and building the layers, and you be able to see some of the layers coming through in the background as well and add in adding to the texture off the peace. So, yeah, I really love creating these characters. I have ideas of why, at the beginning I was initially doing things, But the more I'm looking into and thinking to myself, why is it that I am so interested in creating Children in art in different ways, and then all these animals? I mean, I got elephant here, but I do very large mice. Oh, I do Birds bears, um, so many different characters trying to think it's a more yes, So a lot of birds and bears and elephants, I would seamlessly sometimes fish on Ben. Also, I'll put them in environments. It seemed quite surreal in my paintings. So I will have the Maybe like, the bear will have maybe a doorway into its leg. Or the bird would be kind of in the head off the bear or the elephant Or, um, kind of showing what I feel is a symbiotic relationship that on a cohesive relationship, I think can be had in nature. So I'm really interested in my characters live in side by side in a peaceful minor and, ah, you know, very, um, loving manner and toe actually have care for each other. So I have that train of thought going through a swell. And the fact that Children's futures, um, are is something to look, too. So my characters are kind of enjoying nature around them, but in a very respectful manner and are unlimited by the the the things that hold adults back in our lives and then also their imagination is a lot freer, so they can have conversations with these animals and these characters in the pieces as well. So there's a lot of all that going on then the kind of materials I use. Um, I'm just still interested in texture in so many ways that I would use things like old greeting cards to paint on Andi, mixing papers with my artwork, like at the beginning, kind of having a coal ash effect and then also using different mediums. So sometimes in my paintings I would maybe star off, sketch in and then maybe gluing down some papers, um, drawing with different pens and then also using watercolors or gouache and just building the layers that way and then add in acrylics. Then at the very end, if I still wanted to add some other layers as well, I was going to add oils and things. So there's a length and breath of the kind of where I approached my artwork so it can feel , I think, for myself, even sometimes confusing, explaining this to people, cause now I'm working with the sculptures, but I've always seen my artwork as three dimensional, and I've just never understood how to go about trying to put that into actual fruition until now. And so it feels like I am of the earlier stage of this, but I really want to be able to replicate what I do in my paintings on to be able to represent them and in the way that I imagine as much as possible. So I just got really excited about creating these characters and obviously because it's the class if to meet, still feels rushed. But you can take your time painting with whatever colors you want. Um, I also have a friend who was asking me about the colors I used, why I used these bright colors and I just love color. And when I was younger, I was very scared of color. I didn't know what to do with it, and so I used to just drawing black or white. But, um, and I used to make the paintings or the drawings really, really detailed. So it's like the patterns and that would become the colors to me in my head. But then when I decided to start using color, I was like, You know what? I'm just going to go for it. What made it a lot easier was that I worked with my digital art, which was on my iPad, um, so I can't feel free not to be wasting paint and I could just experiment. But that and so that let me use the colors in ways that I imagine I could. And I have just stuck with doing that disease in bright colors ever since because colors, to me, is important. I like to make the mood through the color, or I like to show excitement. Or so I think color cheers me up the very minimum, basically and kids a very bouncy and full of joy a lot of the time. So as part of where I disuse the color as well. Um, so it's a lot of fun and a lot of these pieces also I kind of have a narrative for. So it's the idea of story talent as well, which I really love, which is something that, even with my kids, I love story tale. So, um, making up characters and making up a scene and just going for it. These characters live in worlds where you can imagine anything and they can do anything. So thank you for joining me in this class, and I really love to see the result off your sculpt in on. I'll speak to you soon
 Beatrice Ajayi, Founder of HyssopArts