Transcripts
1. Introduction: In art, book effects can add a sense of
depth, luminosity, and atmosphere to obese
finding tutorials and resources specifically
focused on oil pastel book. It can be challenging in
this famous painting, van Gogh cues bokeh
effect to create the sense of movement and
energy in the night sky. You can incorporate these
beautiful and versatile effect into your own artwork. Welcome to the class on driving Worker
Effect, oil pastels. In this class, you will
learn how to create beautiful bouquet effect
with oil pastels. A technique that can
add depth, interests, and magic quality to your
drawings and paintings. Whether you're a beginner
or experienced artists, this technique can add unique and captivating
element to your artworks. We will start by
exploring what book it is and why it's important to learn how to draw
it with oil pastels. We will look at examples of famous artists who have used
book effects in their works. And we will dive into the fundamentals of
drawing bouquet effect. Hello, We'll pastels. Throughout this class, I
will guide you through the process of creating your own drawing
with bokeh effect, you will learn techniques
to aid in depth, texture, and contrast to work. And you will have the
opportunity to experiment with different color combinations and blending techniques to
achieve the desired effect. By the end of this class, you will have a solid
understanding on how to draw for k effects
without pastels. And you will create your own styling
artwork with that showcases this
magical technique. So grab your oil pastels
and let's get started.
2. Your Project: For the class project, you will be creating your own unique drawing
with bokeh effect. To do so, I encourage you to watch for all of the
lessons of this class, to learn the fundamentals
of bouquet effect, and then to practice drawing
three types of bokeh effect. Soft-spoken heart, okay,
and swirly bookends. This will help you to move
on to the next step of this class and actually create your own drawing
with bouquet effect. Once you have completed
your project, share it with the class. You can upload a photo of your artwork to the
class project section. There you can also see the amazing artworks that
other students have created. I encourage you to take your time with
these class project and to practice drawing different types of
bouquet effect, but oil pastels, before you start creating your
actual artwork. And don't be afraid to take
risks and to try new things. You can try a different
blending techniques. You can try different
layering techniques with oil pastels. It will help you to find the best ways to create bouquet
effect with oil pastels.
3. Tools & Materials: In this lesson, we
will be discussing the materials you will
need for this class. So to practice and to create different types of
bouquet effect in this class, who has been using oil pastels? Oil pastels are versatile
and fibrin medial that can create stunning artwork with rich colors and textures. And they are just perfect for creating
bokeh effect as well. They are also easy to
blend and two layer, which makes them perfect for creating the different
types of bokeh effect. For this class, you will need oil pastels in a variety of colors that you
have at your disposal, then you will need drawing
paper or sketchbook, whatever you have at your
disposal to practice drawing bouquet
effect and then to create your project
for this class. Before we move on
to the next lesson, take some time to gather all your materials and
set up your workspace. And once you're ready, let's move on to
the next lesson.
4. Understanding Bokeh Effect: In this lesson, we will dive into the world of bokeh effect. And we will explore what it
is and how it's created. So it's important to understand that there is a term
used in photography to describe the aesthetic
quality of the pleura are produced in the out-of-focus
parts of the image is often characterized by Blu-ray circular shapes
that are created by the light reflecting
off the lens or the other
reflective surfaces. In art, book effector can
add a sense of depth, luminosity, and
atmosphere to a piece. By creating a blurry
background or foreground, you can draw the
viewer's attention to the focal point of the piece and create a dynamic and
captivating composition. Learning how to draw book, as with all pastels, can be a valuable
skill for any artists. And it adds another layer of depth and complexity
to your work. However, finding tutorials and resources specifically
focused on oil pastel book, it can be challenging. That's why this online
class is so valuable as it provides step-by-step
tutorial on how to create the perfect
with oil pastels. By the end of this class, you will have the skills
and knowledge needed to incorporate this beautiful
effect into artwork.
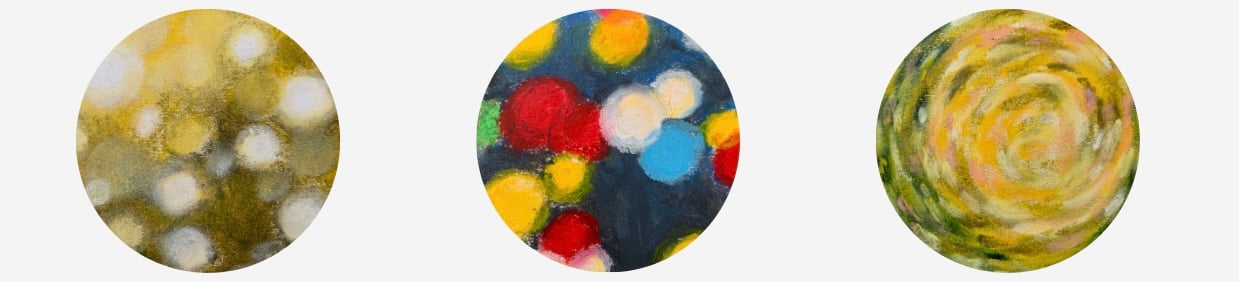
5. Types of Bokeh Effect: There are many different
types of bokeh effect, each with its own unique
characteristics and styles. At these glass,
we will look into three the most common
types of bokeh effect. South book Ethics,
power Mocha Effect, and swirling bokeh effect, which we already
discussed when we talked about Vincent van Gogh's
Starry Night painting. Let's start with soft bucket
is the most common type of pagoda effect and
is characterized by soft round circles of lights. Then there's hard-working, hard book is
characterized by small, defined circles are flat. And finally, swirly bokeh. Really Booker is
characterized by circular patterns that appear to swirl around the subject. To draw these different types of bouquet effect
without pastels, you will need to experiment
with different colors, blending techniques and
layering techniques as well to create
the desired effect. Remember that the key to mastering any art
form is to practice, experiment, and of
course have fun.
6. Bokeh in Art: So bouquet has been used
in art for many years by famous artists to create stunning effects in their
paintings and drawings. So let's look at some
of the examples. I'm sure you're already familiar with Vincent Van
Gogh's Starry Night. In this famous painting, van Gogh use bokeh
effect to create a sense of movement and
energy in the night sky. For that, he used the
swirling bouquets, circles, which add depth and
dimension to his painting. In Edgar Degas, dancers can use bucket
to create a sense of atmosphere and depth that's soft and blurry background
adds to the dreamy, ethereal quality of the dancers. Or let's look at the code. One is water lilies. Well, that is
well-known for his use of pocket in his
Impressionistic paintings. In water lilies. He used to create a sense of tranquility and
calm is the scene. So by learning how to draw
a bouquet of oil pastels, you can incorporate these beautiful and
versatile effect into your own artwork and create styling compositions
to draw viewers eyes.
7. Practicing Bokeh: In the previous lessons, we have already
discussed that there are three common types
of bokeh effect, which is a softbox, hard pocket and it's further. In the next lessons, I will walk you through the process of recreating different types of bokeh
effect with oil pastels. So grab your oil pastels
and drawing paper. You are going to be needing
it in the three next lessons. So that we can practice creating different types of salt
per gallon oil pastels.
8. Practice: Soft Bokeh With Oil Pastel: Welcome back. In this lesson, we will be creating a South bokeh effect
using oil pastels. Let's start right away by blocking in the
background colors. We'll be using a few shades of green and yellow
for our background. So let's start with our green oil pastels and
feel the surface with it. Live in some circular
areas untouched. These areas will be
for bucket effect. Soft bouquet creates a gentle and dreamy
atmosphere in the drawing. It's achieved by using soft
edges and pastel colors. Soft palate is perfect
for German nature scenes, such as forest, gardens, fields of lovers,
and so much more, where the light is diffused
and the colors are mute. K is also a great tool for
adding depth to drawing. It creates a sense
of distance and separate the subject
from the background. This effect is often used in portrait drawings to create a romantic and
intimate atmosphere. In addition, sows per k can be used to create a calm
and serene atmosphere. It's often used in
landscape drawings to create a sense of
peace and tranquility. Overall, soluble k is versatile technique
that can be used in various types of drawings to create gentle and
peaceful atmosphere. So before we layer the white oil Buster onto the
Proquest circles, we want to make sure that background colors are
smooth and fully covered. So we blend the
background colors to achieve a smooth
and even surface. Now, it's time to create
a bouquet effect. We take our white oil pastel and start layering
it on to them. Okay, Sorry. So just like that, we cover the circles completely. And we also want the white oil pastels to
overlay a bit to end, blend with the background
colors to create a soft transition from
bouquet to the ground. We continue layering
the vital pastel onto the professor calls, blending it with the
background, as we call. You can use your finger or
a blending tool you have at your disposal to help
smooth out the oil pastel. As we continue on
dropping bocce, we start to see the soft
bouquet effect to take shape. We keep adding layers until we achieve the desired level
of softness and depth. Remember that the
key to achieving a smooth and South
bucket effect is to lay. Remember the key. Remember the key to achieving a smooth and soft bouquet
effect is still there. The white whale pastel onto circles and blended
with the ground colors. Play around with
different colors and techniques to create your own
unique software K effect. And there you have it. A beautiful sound bouquet effect created using oil pastels.
9. Practice: Hard Bokeh With Oil Pastel: Welcome back. In this lesson, we will be exploring
how to create a hard book effect
using oil pastels. Driving hardware care
can be a bit more challenging and time-consuming
than South bucket. But the result is amazing
and it's gonna be worth it. So this time, let's begin by drawing our book lights first. We start by placing yellow
circles on our surface. Then we will add red, blue, and green circles, arranging them in a
pattern that we like. To recreate heartbroken. You need to create
a strong contrast between the collides
and the background. We want the edges
of the requests Heracles to be sharp
and well-defined, which means we need to be precise with our
blending technique. These votes make this
hard bouquet effect a little bit more challenging
than salt bucket. When we let bucket circles overlay and blend
with the ground. Using our fingers
or a blending tool. We carefully blend the edges
of lines with the ground, making sure not to blur
with the circles too much. Practice in drawing
Harper care with pulpal cells is not only fun, but it's also incredibly
useful for any artists. The ability to create sharp
distinct circles of flight can add a new level of depth
and realism to your work. This technique is particularly
handy when drawing e.g. nighttime cityscapes or street
scenes with bright lights. By mastering these skills
are drawing heartbroken. You can create a
unique and I catch an effect that will make
your artwork stand out. So don't be afraid to experiment with different colors and blending techniques to achieve with the perfect
hard bouquet effect. Once we've finished drawing, because their book elides, we will want to live the ground is I have
already mentioned, we want to create
a contrast between background and book highlights for creating a
higher BAC effect. So this time we will be using dark blue whale pastels
for our background. So here I will be
using few shades of dark blue oil pastel to fill the entire
surface that's left. This allows snippet grounds
and bouquet to overlap, but not too much. You want this bucket to
be more distinctive. And remember, the key to create an
harbor care is to create a strong contrast between the highlights and
the background. We want the edges of a bookcase circles to be
sharp and well-defined. So try to be precise with
your blending technique. Play around with the
different blending tools like your fingers, lending stems to create your own unique hard
bouquet effect. If you want, your heart bookends circles
to pop even more, you can add a layer of white
oil pastel on top of them. This will create
a strong contrast between the book highlights
and the background, making the circles
stand out even more. This technique may take a
bit more time and effort, but the results are
truly worth it. Experiment with different
colors and patterns to create unique hard book effects that you can use in
your future. Artworks. Okay.
10. Practice: Swirly Bokeh With Oil Pastel: Welcome back. In this lesson, we will be exploring
how to create a swirly bokeh effect
using oil pastels. So to achieve swirl the
bouquet with oil pastels, we will start by creating a background using
various shapes and colors that blend together in
a circular swirling motion. Then we will add smaller, overlapping shapes in darker
and lighter shades of green and white to
create a bouquet effect. So here we start by preparing the ground for
this fairly boot camp. Using different shades of
green and yellow oil pastels. We draw shapes on paper, making sure to blend
them together. We want the background to have the swirling effect to create
a more dynamic composition. The key to create in this
world, the bouquet effect, is to have a smooth and
well blended background. This will allow the
bokeh shapes to stand out and merged
together in a beautiful way. So take your time to blend
the background and create swirling effect before moving
on to the bokeh shapes. Early bucket is a
unique and creative way to add depth and
interests to a drawing. It brings a sense of
movement and flow, making the drawing more
dynamic and engaging. Book, I can add a magical
and dreamy quality to any drawing. It could also be used to create a sense of depth and space, showing the viewer's eye
deeper into the image. So once we have the background, we can start working
on this burly bookend. Here we will be using
small circular motions and draw the overall shapes of dark green and
fight oil pastels. We want to create
a swirly pattern that will blend well
with the background. To make this part of the
book and more defined, we can add more highlights
with white oil pastel, blending it gently
with dark green. This will give the
book a glowing effect, making it more interesting
and eye-catching. And with these steps, you can easily recreate this burly bouquet effect using oil pastels in
your own artworks. All right.
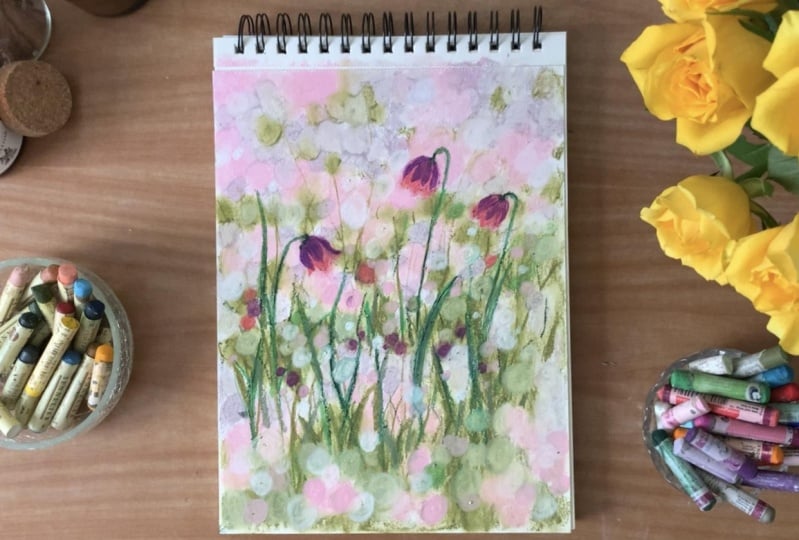
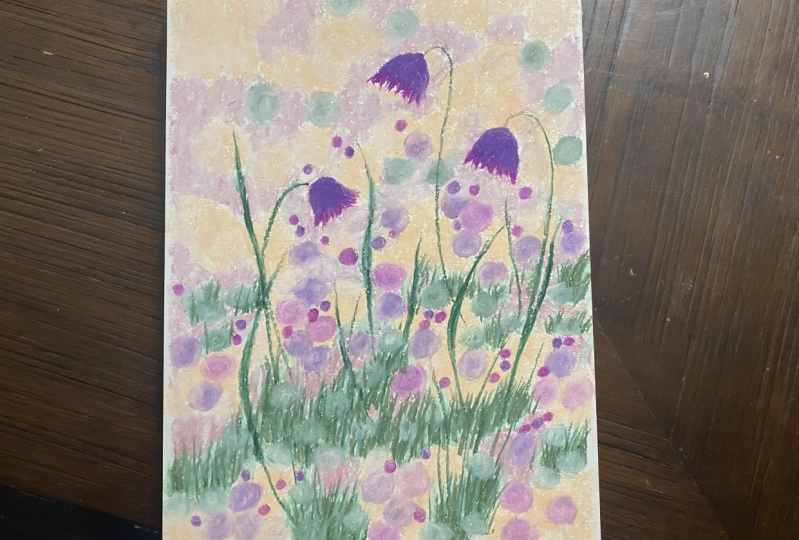
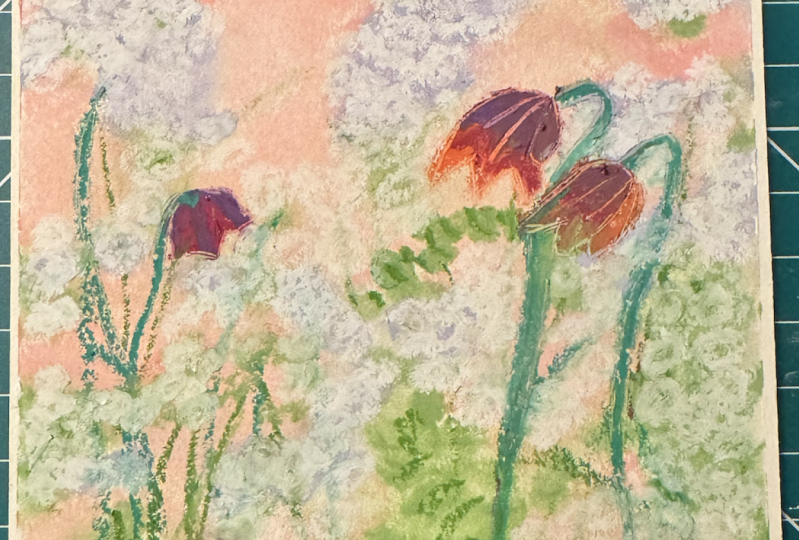
11. Project: Defining Background: Welcome to the final tutorial in our class on drawing bouquet
effect with oil pastels. In this tutorial, I'm gonna be showing you how
to draw flowers with oil pastels using the techniques we've learned
in the previous classes. To start, we need to define the background for our drawing. Will begin by blocking
in pink oil pastel using circular motions to
create a floral bouquet effect. These backgrounds will be the base for our bouquet effect. In the next lesson, we will add circles of buggy
on top of it to create stunning floral
drawing that will incorporate everything we
have learned about so far. When we start out tropical
flowers with bouquet effect, we block in oil pastels to create the base for
our background. Here you can see me layering oil pastels in a
circular motion. This will help us achieve a blurry and soft effect that
mimics the bucket effect. We want to make this
background as soft bouquet, but more Salvo to that. It doesn't overpower power the flowers and the
overall composition. By layering oil pastels
in circular motion. We create an organic and forming the ground that blends
well with the flowers. This technique is inspired by the natural and irregular
shapes of bookend. It also helps to
create a sense of depth and distance
to the composition. The soft bouquet effect as
a dreamy and thermo feel to the drawing and hasten the
overall mood and atmosphere. Starting with a soft locate
the ground allows us to build upon it with layers of
Berkshire circles later on. Also ensures that the
bouquet effect is integrate it into the
entire compensation. Creating a cohesive and
harmonious artwork. By starting with a
subdural background, we can gradually build
up the intensity of the bokeh effect without overwhelming
the viewer's eye. Then we will layer in darker violet oil pastel
in the same manner. And finish it by adding green oil pastel in the areas where we
want to create grass. The combination of
pink, violet and green. The soft and natural log of the colors work
perfectly together, greater than harmonious
and balanced composition. The pink else above
of brightness and vibrancy by an allylic
provides depth and shadow. The green brings a sense
of freshness and nature, making the flowers look like they're blooming in
the beautiful garden. All the color scheme creates a sense of serenity
and peacefulness and really captures the essence of the flowers in
the natural setting. Once we cover the paper
surface with oil pastel, it will be timed to blend it out to create a smooth
and seamless background. Also helps to create a sense of depth and atmosphere inventory. Now, blending can
be a bit of work. So make sure you prepare your fingers or bending
tool you prefer. But don't worry, the
result will be worth it. Remember to take into account the techniques we've learned
in the previous classes. Tried to make the background
colors merge together, creating this outfile
and blurry bokeh effect. This will give your drawing more cohesive and dreamy look.
12. Project: Drawing Flowers: Well, it looks like my favorite assistant has decided to join us
in this lesson. I'm not sure if he's here to offer some artistic
guidance or two, does to watch the process. But either way, I hope your cat, person entity
doesn't bother you. In the previous lesson, we've created a
beautiful Fleurus off the ground
using oil pastels, which will serve as perfect base for our
flowers and look ethics. Now, in this lesson, we will start drawing the main subject of
our artwork, flowers. We'll begin by drawing
three barbers, adding petals and choosing
colors like yellow, pink, and green
to make them pop. Will also add stems, leaves, and grass to give our
flowers more realistic look. So we start drawing
the flowers on top. Oh, they're finished background because it's easier to add details to the main subject when the ground is already set. Also, it allows us to make sure that the
colors and the shapes of the flowers compliment
the colors and shapes of the softbox
in the background. So we'll use a darker shade
of pink for the flowers and layer more dark violet to add shading and
contrast to them. By adding this
contrast of numbers, we'll stand out even
more against the soft, blurry bucket the ground. Later. We will add
bouquet or loss because it's a finishing touch and it will bring the
whole drawing together. By Edinburgh care. After
we have drawn the flowers, we can make sure
that the book is circles are in the right places and that they don't gather important
parts of the flowers. It's like adding the
final sprinkles on top of the cake to make it more complete and more appealing. So that's why it's
essential to draw our subject before
we add to the story, because we want
to make sure that our subject stands
out and the book, it doesn't overpower it. Once you're happy
with your flowers.
13. Project: Adding Bokeh Effect: Welcome back to
our final lesson. This lesson will be
finally Edinburg. Get to our drawing. Will bring a magical and
dreamy effect to our artwork, making it even more beautiful. To start, we will layer light, oil pastel to create
soft bouquet circles. Bi-layer in the white circles. We create the illusion of light reflecting on the
flowers and leaves. And in depth and
dimension to our drawing. We can make the circles overlap to make the bulkier
look more natural and play with the sizes
of packet circles as well. Just a heads up. Not all oil pastels
are created equally. Some white oil pastels are
more waxy and less pigment it. So they create more
transparent bouquet effect. On the other hand, soundbite oil pastels
are more creamy and more pigment it and they give
you a more solid color. In this lesson, you will be
able to spot the difference between oil pastels
from different brands. Here you see me using royal
talents while oil pastel, which is more transparent
and this white oil pastel creates a beautiful soft
effect, slightly transparent. And later on, I will switch
over to my signal here, oil pastel, which are more
pigment at and creamy. So just keep in mind
that different brands of oil pastels will give
you different results. It's all about finding
the one that works the best for you and your style. Next we will add a bit of
colorful bucket circles, like pink and violet. I didn't smoke colorful
bouquet effect between the flowers and grass creates a sense of tabs and
movement in the drawing. It's also tests together
the colors used in the flowers and the background. Making the whole
composition more cohesive. By varying the size and placement of the culvert
book as circles, we can create a more dynamic
and interesting drawing. It's important not
to overdo it though, as we want to
maintain a sense of balance and harmony
in the final piece. Finally, we can
finish our drawing by the final additional touch
of white oil pastels. And here I'm using my
single-view oil pastel, which is like I have
already mentioned, is gray mare and pigmented. What makes it perfect final
touch to the drawing. If your oil pastels are more
transparent and less pigment it like the ones I've used at the beginning
of this lesson. You can simply use
more pressured as you lead them to make the white circles pop up and
become more distinctive. These will add a final layer of depth and dimension
to your work. And to make it even
more beautiful. Remember, take your
time with this step and keep adding bouquet circles until you are happy
with the final result. Experiment with
different sizes and colors and have fun with it. And that's it. Thank you for joining
me in this class on recreating bouquet
effects with oil pastels. I hope you've enjoyed
this class and learn some new techniques that you
can apply in your future. Artworks. Keep practicing and I can't wait to see
what you create.
14. Project: Pro Tip: Welcome to the additional
prototype lesson of this class. Today, I want to show you a little trick on
how you can refine your oil pastel flowers
and add details and fine lines to them by
using any sharp pencil. This simple little
trick can really make a difference in the overall
look of your drawing. By using a really
light pressure. You can see me scraping off the excess oil
pastel pigment. This helps me to make the shapes of petals more refined and tidy. Just be careful not to
use too much pressure. We don't want to draw with
the pencil if we simply use it's sharp edge to scrape
off oil pastel pigment. This technique can
help you achieve more precise lines and details, especially then working
with small areas. It's also allows you to correct any mistakes or as much
as you may have made while drawing without
having to start all over again or blend in with
other oil pastels. So here, if you want to take your oil pastel trunk
to the next level. Q, this trick, It's why you might be surprised at
the difference it makes. Remember, just use LES pressure and be gentle with your strokes. Thank you once again
for joining me in this prototype lesson. And I hope this
little trick will be helpful in your oil
pastel practice.
15. Final Thoughts: Welcome back and congrats
on completing this class. In this class, we've
covered the fundamentals of bokeh effect and
how it's created. Step-by-step guides on creating
three different types of Bokeh effects with oil pastels and advanced techniques
and variations. Remember, the key to mastering this technique
is to practice, experiment, and have fun. Don't be afraid to
try new things. Make mistakes, and
explore different colors, textures, and techniques
to create okay effect. I hope you will
continue to explore this fascinating
world of effect. You will, of course,
incorporated into your artworks and into
your creative practice. If you have any
questions or feedback, feel free to reach me
out and of course, share your work with our
community of artists. Thank you for joining
me in this class. I look forward to
seeing what kind of beautiful and unique
artworks you create. Happy drawing.
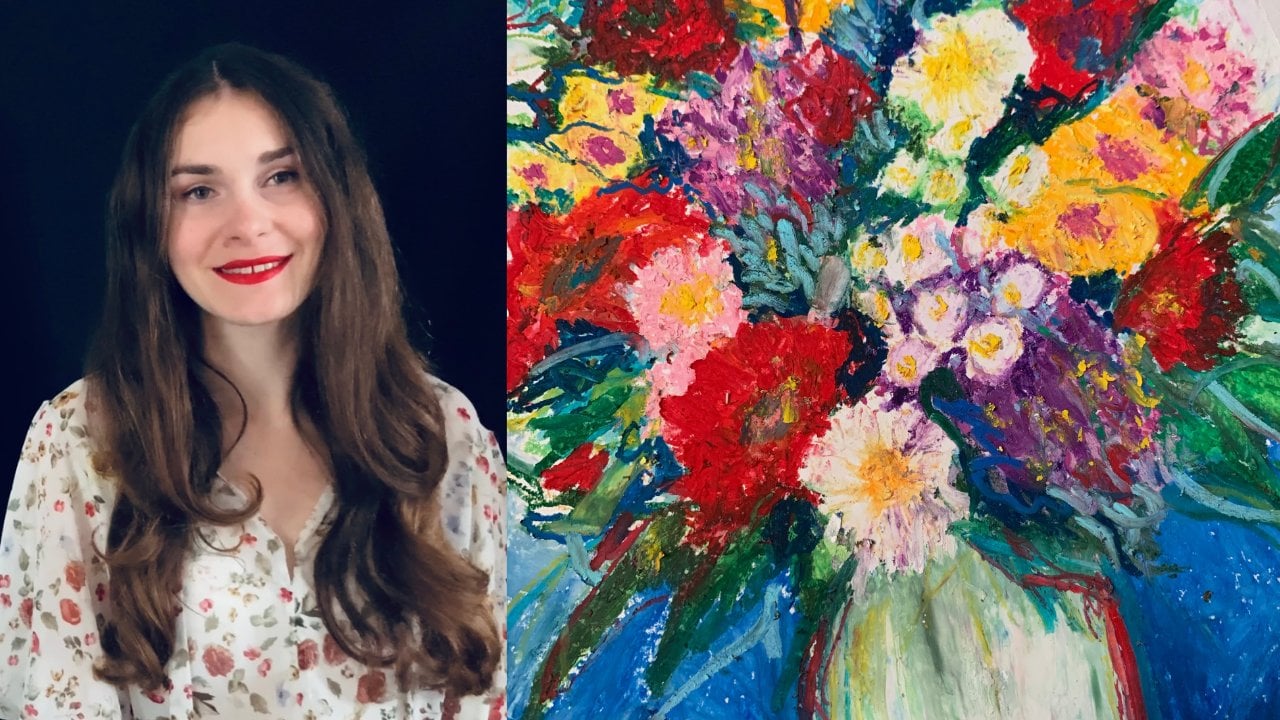
 Alina Harvi, Ukrainian Artist