Transcripts
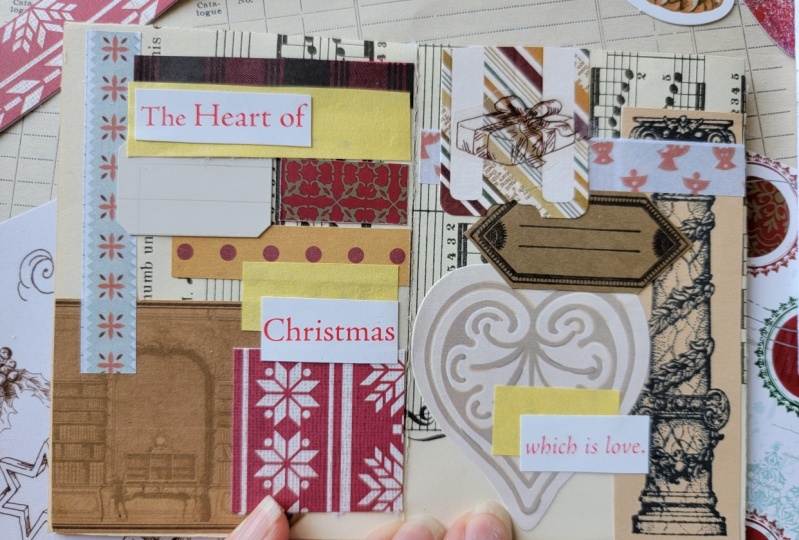
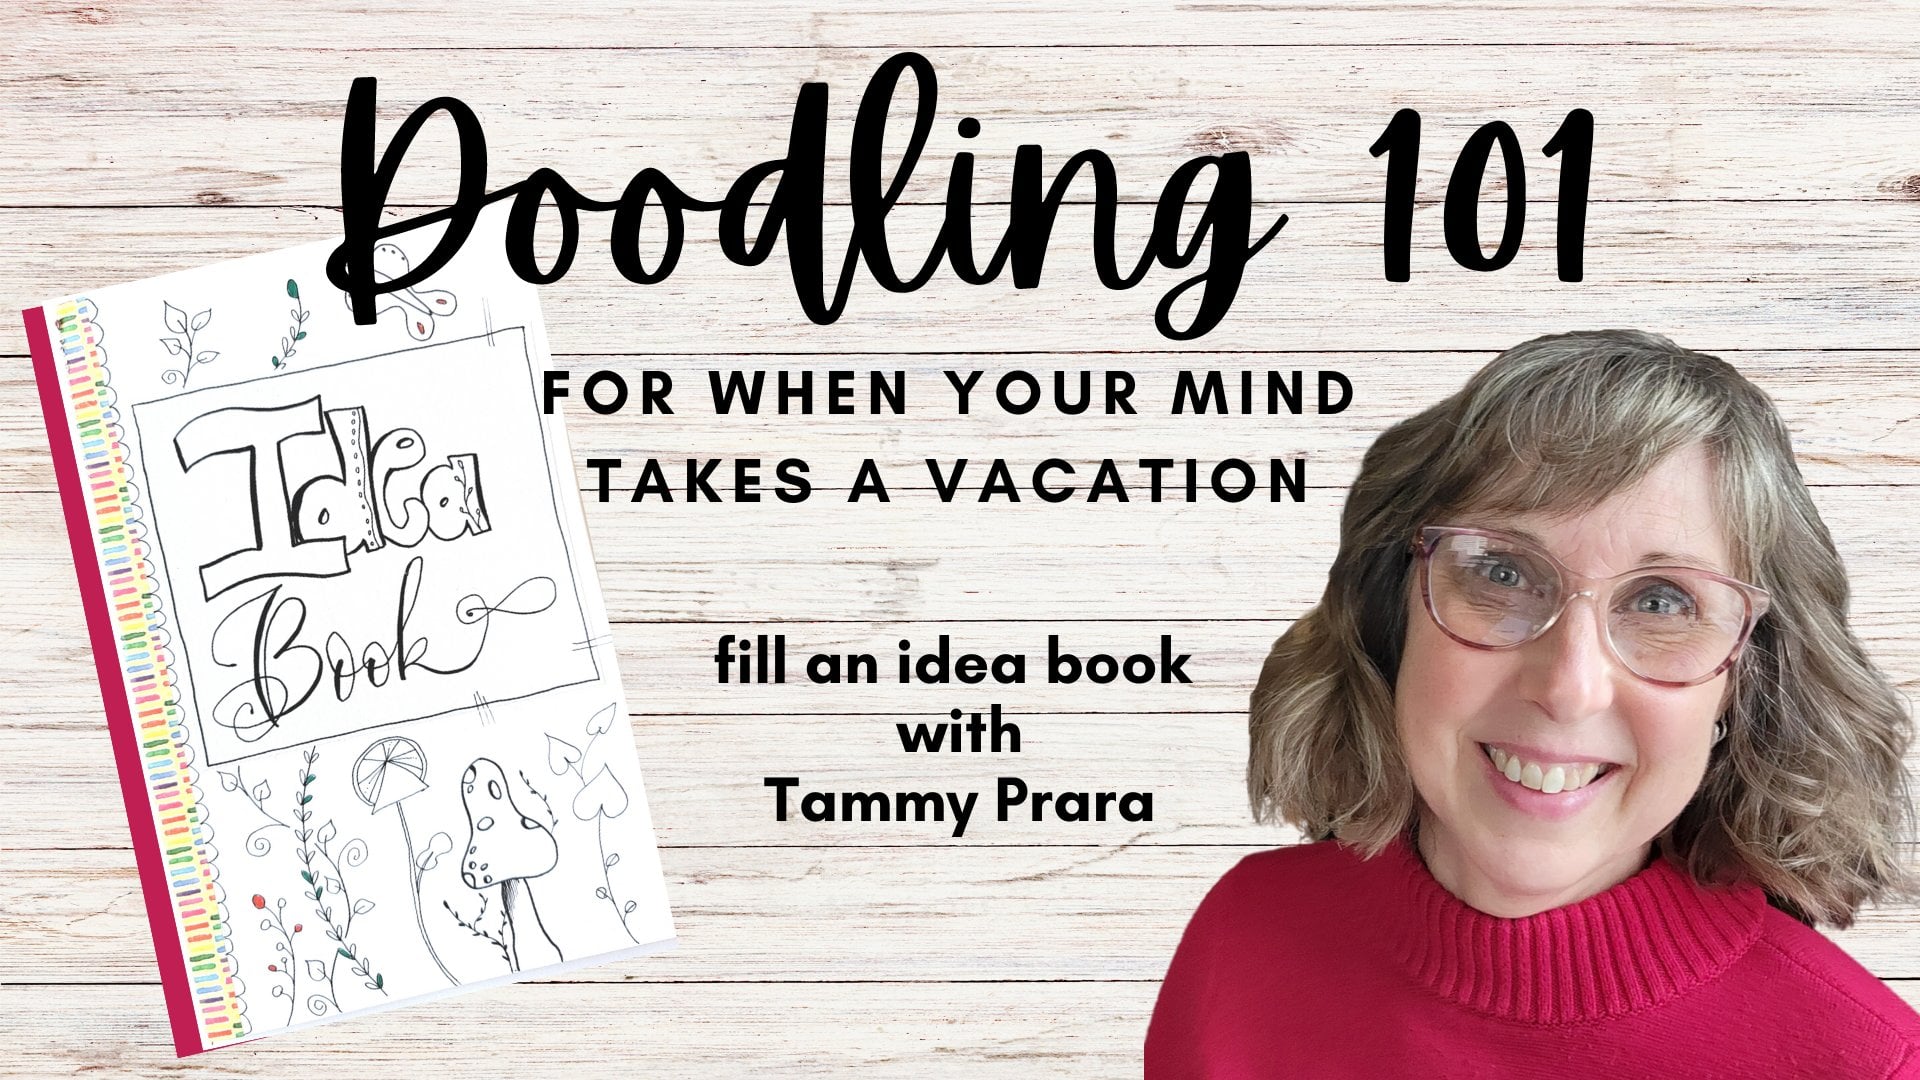
1. Gratitude Zine: [MUSIC] Spark conversation with this party favorite
gratitude zine. Guests can doodle, color, and scribble down
a few comments to share during your holiday event. Zines have been
used by artists and writers to personally
publish their work. I take this simple
paper folding technique to another level, and share them as a gift, and happy mail, a
stocking stuffer, a personal weekly journal, or create kids coloring book, scavenger hunt passport, and a party favor
for a birthday, Valentine's Day,
or family reunion. Once you try one, you will find other
opportunities to make many more. Hi, friends. It's Tammy Pera. Thank you for joining me today. Today we're going to make zines. Zines are little many books. It's paper folding
and one little cut, and you can make this eight panel
magazine, this many zine. Keep it in your purse
to jot down ideas. Make it your art journal. Our project today is making
a Thanksgiving party favor. We're going to create
a gratitude zine. It will have some doodles in it so your guests can either draw, or color, or doodle, and write a few thoughts of what they feel about what
brings them joy, or what makes them happy, and they can share
that with you at the table as you've all
gathered for your party. This would make a great
children's project. Make it a scavenger hunt, a passport that they can
go and find the things in the book and get
stamps or stickers. I'm an artist on Instagram, and I tend towards
the crafty side. When I find a new idea, I just dive in headfirst. That how it was
when I started with brush lettering, and watercolor, and collage, and here I am making zines for everybody
for the holidays. The class project is for
you to make your own zine. All you need is an eight-and-a-half
by 11 piece of paper, a pair of scissors, and a pen, and you are on your
way to making a zine. Share that in the
project section. I would love to comment, and share in the fun that you probably had
in creating this. So thanks for tuning in, and let's get started.
2. Class Project: [MUSIC] Your class project is for you to create your own zine. Go ahead and get your
paper fold going and get your marker ready, and then go ahead and
lay out your panels. Are you going to
tell a story with your panels and make it
like a comic book zine, or are you going to use
it as a party favor? Are you going to
make it a little art journal where you can doodle inside very simple shapes, and then just keep it
for your own pleasure? However you use the zine, I can't wait to
see your project. Share it in the project section. Just take a photo
and upload it when you're on your laptop
or desktop computer. I would love to see it, and I bet my students will too. We all learn from each other and are inspired in
many different ways. I'd love to comment
and encourage you.
3. Supplies: Paper. Get some copy paper. Eight-and-a-half by
11 would be perfect. Scissors. There you go. You can do paper folding
and make a zine. If you want to fill
out your zine, you're going to need a pen, pencil, I use afun suke pen. Also, add an eraser to help smooth out any mistakes
I make along the way. Those are the simplest supplies. I'm sure you have a pen and
paper and scissors on hand. Also, use Canva to
create one of the zines because maybe your handwriting isn't what you're looking for. You want to have printed text. So I'll show you how
with a couple of clicks, how you can create some
text panels for your zine, making it very easy. Maybe you want to
add a little bit of Clip Art and complete
your zine that way. Very simple.
4. Zine Folding and Mock Up: This is what we're looking for. We're looking for eight panels with a split in the middle. Let me show you how I
fold it to do that. Just going to take
one piece of paper. Now I have it in landscape position and I'm
going to fold away from me. This is my preference. You may see it done
different ways, I'm going to refold
up the opposite. Now, I'm going to turn
it to portrait and I fold away from me half, matching up my
corners best I can, and open that up and refold it. Now, this portrait position, I'm going to fold a
quarter fold just up to the center line that I
folded and redo that. I'm going to turn it
and fold a quarter fold away from me to that
center line, pressing down. I'm going to give it a flip
and fold it the other way. Now, where is your very
centerfold? Right here. I want you to fold on that line, turning it away from you. We have the open side and the fold line and we
can see four panels. We're going to cut from
the fold line out. Remember this was open. Take your scissors cut
along that fold line just to that quarter mark
and you can open this up. When you do, you should see your split right here in
the middle of your page. Now let's see, what's a good opening? I like to see that this
opening automatically happens. I had it this way and I wasn't getting it
as easily to open. But you can if you work it, I'm going to go back to where it just naturally fell open. Taking my two ends, I'm pushing to the center. I'm pulling my ends
closed and I'm pushing towards the center
and I'm getting that to open. Now, there's many ways to
make this book happen. Any of these could be a cover. But I'm going to go
taking my two pieces that are in my hand and
bring my hands together and I'm going to push
this top one to the back. That's just so I
will always remember and do it consistently
for each book. Given that a nice crease again, that way you might notice your book has this
opening right here. We're going to pretend
that doesn't exist. We're just going to open each leaf as if it
was a page in a book. Now the reason
that's important is because here's a
zine that I did my very first try and I've got it opened here where I have this diamond in the middle of my two ends. I'm pushing together. I'm bringing those together, and folding it to the back, and look how my cover is
in a different place. Not important, not a big deal. I just wanted to show
you that you can have your cover happen in
many different ways. Here, when they came together, I pushed those to the
back and my front one came across to the right so whichever way
you're doing it, whatever feels comfortable, whatever you want to practice, we're going to number our
panels as a next step. I'm going to do it with my book closed and I've identified
this as going to be my cover. I'm going to label it. This is book page 1 and page 2, 3 and 4, 5 and 6, my back page. Those eight panels became
a cover and a back and 1, 2, 3, 4, 5, 6 insets here in
your little book. Now let's open this up completely and let's see if
we can find the difference. My cover is here
and here's my back, here's my cover, here's my back. Whatever way you're folding it, I want you to stay consistent. For our class, we're going to make that folder
cover and the reason I bring that up is
because when you are decorating and you don't want to draw on all
your folded pages, you want to draw on
something that's flat, you can do it and you
won't lose place. Is my page supposed
to be upside down? Is it supposed to
be right-side up? Where's my cover going to land? All of that because you've got your mockup ready to go
with where your panels are. The other thing you
can do with your zine is insert this page 1
and 2 can be one zine. You don't have to do a panel on one side and then the other. You can make this
one whole zine. That way your story may have
three pages instead of six. There you go. That's
our mockup of our zine.
5. Computer Zine with Canva: This Thanksgiving Day
Zine was an idea I had. In fact, I practiced
on lined paper. This is how I made my mock-up. These were all hand-drawn. This was done on the computer and I'd like to show you how I made
that on Canva. Here I have my Canva open. Now we're going to start
with Create a design. I want to make a custom size. The width is going to be 11, and the height by
eight and a half. Let's create that inches. We're going to say 11 by 8.5
and create a new design. Now it's loading in a new page. Here we are, my page
is in landscape. First, I want to
make my squares. I want to know where to
lay out all my panels. I'm going to take a shape
and I'm going to stretch it. As you can see it right
now it says 2.7 by 4.3. I'm looking to have
about 4.2 and 2.7. Perfect. I should be
able to line these all up to fingered click
and I'm going to hit "Duplicate" and I'm going to drag it over and line that up. There's the ellipse
I was looking for, duplicate and duplicate. I have four of
them all lined up. I like how they just
snuggle up to each other. Now we're not going
to use these squares. We're just going to
use them as a guide. Now I've selected all four. I want to duplicate them all, and I'm going to drag
them up to the top. Again, this is my way of seeing every
panel, every section. Where's my cover? We discovered that our
cover was in this panel. Now if there's something
you want to type and you don't want to handwrite it. Let's go ahead and
type in that square. I'm going to come
to the word text and we're going to
find something fun. This is cute. I like the way the Happy Holidays font looks and this bottom line
right here is just fine. I'm going to shrink it down and move it into
this first panel. Let's zoom in here a bit so we can see exactly
what we're doing. Actually, I think I want to
put a line around here just to help me visualize
what it is I have. That's my first panel and I'm
going to move it out a bit. Then this bottom one, let's change the text in here. I thought I grabbed that
text. Let's try that again. There it's highlighted and
I'm going to type in 2022. I'm going to highlight
it again and make it much larger, a readable size. Now you can title your Z, whatever you'd like to. This was going to be my Thanksgiving Day Zine. Now, obviously my text is
a bit large for the space. I'd like to highlight it
and shrink it down a bit. There we go. Now
it looks like it's right on the edge
of my black line. If I print it, it might just come off the page. We want to be careful with that. Now, this panel is
the back cover. Actually what I like
to do is copy this. Let's duplicate it
also and bring it down here and my idea was to say each person had their own book and they're going
to sign their book. I'm just going to
add a dotted line to indicate that's where they
are going to sign their book. I added a spacebar right in there to give it a
little bit more room. It's bouncing all over the
page here. Sorry about that. I'm highlighting it
because I think it's a bit big for the back cover. I've just made that
a bit smaller. This panel, if you
remember your mock-up, this is going to
be pages 5 and 6. Now I want to doodle on panel 6. I'm going to delete that square. This is to remind me this
is where text is going. Again, I'm going to duplicate this because
I want to keep the same font and I'm going
to ask my question here. I think it's wonderful when... I'm going to take
this other line and highlight it and
just type right over it. I'm going to give it
two spaces to try to match up where my line is. Another way to do
this is just to draw a line with a drawing tool. You could definitely
hand do this and I've given five
lines for an answer. Not too intimidating. But look how if my panel
is the purple and let's make it a black line and this is outside that panel. I'm going to scooch it down and I think I may
even make this smaller, that font is awfully big. That was my title
page, remember? That's why it's awfully big. Now, let's take this. I like that. We're going
to duplicate this one. Duplicate. Now, where's
it going to go? Actually, if you're
following your mock-up, It's this panel right here. Look at this turning tool. I click and hold it, I spin it around until
that number says 180. We did a negative 180. But I forgot to change my text. Now I'm going to do that and now I hope that's
not too confusing. I was surprised by Joy about... and your guests
can fill in their answer. This is a doodling spot. That means this one
is a doodling spot. I'm going to take this, I'm going to duplicate it. I'm going to bring
it up here into this last section and I'll
type for you right-side-up, "I feel happy to know." What is it? They're going
to answer that question. But this is a different
section of the book. Remember, it's going to be necessary to turn
it upside down. Now, this page and this page
are opposite each other. This page and this page
are not side-by-side, so you would not see where
it's placed on the page. But if you want to
make them align, let's look at position
and we are going to make it the bottom position
and now they are aligned. I'm going to take the
gray off because I don't need that reminder of
each of those panels. I'm done with those and
I'm just deleting them. Now I have this
Thanksgiving Day Zine done, or you could come back
and find some elements, other shapes that
you're interested in adding to your Zine to
make it comic book style. Or you wanting to find more prompts for
things to write about? Did you want to do it in color? You could add these
elements to your book, leaves, and pies, and pumpkins. Any of these cute frames
would work as well. I plan on leaving it very plain. I'm going to name this. I'll leave that 2022. Thanksgiving Day. Of course, it automatically
saves for you, how are we going to
get this printed? Go to File and Download. Ping is just fine. I'm going to download this. Once it's completed downloading, I like to save it in the
file that I want it to go into and there you go. You can print this out and fold it and cut that little section there in the middle and you've got a Thanksgiving Day Zine.
6. Fall Shapes for Thanksgiving Zine: You have your Thanksgiving
Day Zine printed out. Now we're going to
add the details. Let's add a few doodles
on our pages to decorate and give our
guests something fun to do. Now before I fold, I'm going to go ahead and draw. I do have a pencil
and some pens. I want to try to recreate
this pilgrims hat pumpkin, some sheaves of grain, a few leaves, and let's see how
this turns out. Now, I'm starting about
just below the zine. I'm going to do this sideways,
really long C-shape. From here I'm going
to go straight up the two sides of the hat, and it's just below that zine. I'm going to give it a
slight curve upward, not a completely straight line, and I'm going to put my buckle here down close to the brim. Let's draw a line to the buckle, to the outside of the hat, but I was making a curve and it came just like the brim
was curling up a bit. Like it's really gotten a bit battered and a little bit on the top to give
it some dimension. I have this pumpkin
right next door to it. So if you remember how
to draw a pumpkin, I make a little
hook right in here, and it's a bit of
an irregular shape. My stem comes out from that
little C-curve right there. Then I like to draw a few not too straight
lines of my pumpkin. If you want to make it
look a little bit more 3D, had that slight bit of the
pumpkin right behind there, and another great the sheaf of grain is just these
little loops lying sideways. They're also mimicked
on the other side. Maybe a few tassels
here on the end, and one of the cool
things is each one will have a tiny little
tassel at the end. It makes it look like
it's got some grain, a little leaf
coming out instead. Actually, I'm okay with this, I really liked that look. I'm going to go back
in with my microns. I'm going to use my 05
for these heavy lines. Remember, we don't have to recreate exactly as we created. These leaves are so fine
and so little I think. Well definitely for
my [inaudible], I am going to go to my 02
Micron to draw my stem, and look, I didn't
even match my line. These little tiny nodules. I'm going to turn that so
that I can draw towards me. I'm going to go back and put
in these little tiny hair, one little hair and
it's a touch and lift as I drag my pen across
my paper, touch and lift. Now might not be really clean to see right here because
of the pencil lines, but I'm really happy with that. I'm going to recreate
this pumpkin, it's going to be really big. You know what, I think
I'm ready to fold because I'm getting a little bit nervous on where my panels
go and where they stop. Now, I printed this on some
very cheap copy paper, and I know my folds are going to be little bit more crisp. I've used some heavier
white paper and it was a very bright white paper, and it was just a bit heavier. That paper actually was a
little bit harder to fold. I wasn't really happy with how my book didn't
lay close very well. I'm going back to this very
inexpensive copy paper, and we're going to get the
scissors and do that cut. Now remember we're
folding one more crease, and we found that center. Our papers long ways
we found the center, and we're cutting from the
fold out on that crease line. It neatly comes together, comes towards me, and here's my cover. Now that's centered,
pretty done well, really happy with that. I feel happy to
know is right here, and I'm going to
be brave, be bold. I'm going to go ahead
and just draw freehand. I have a really tall pumpkin, and the reason I like that shape is it makes it
really easy to doodle. You can fill in these ribs with all unique shapes and designs. It gives you lots of
space to do that. Now, how about a leaf or two other side
opposite the stem, and I'm good with that. Next page is, I was surprised by joy about and I
have a little acorn. Very simple. Make a nice curve with a point. Try to have a matching curve
with a point at the bottom, and slightly past the
edges of your acorn. I am not making a straight line, and something
similar to the top. But I actually want it off to the side just to be
a bit of whimsy. We're adding a little
curly top here on the end, and a leaf. Very basic leaf,
nothing fancy there. I'm going to turn this over, we have one more panel, and my suggestion is a mushroom. I like to start with the base. Something kind of wobbly but generally more flat on
the bottom and up the side. You can make a little dress
for the center if you want. I call it a dress, a little ruffle, and we came up this sides
just a little bit. I'm going to create the
bottom of the mushroom, and up we go. Just love these wobbly shapes. I'm going to make one
little curve right here, attaching this little skirt part to the sides of my mushroom. Here I have something very easy to doodle inside lots
of space to do that. Let's fold up our book
and see how it looks. Pushing it in. I know where my cover is, and here we go, look at that. You've made Thanksgiving
Day Zine to share as your party favor at
your family gathering.
7. Holiday Doodle Zine: I want to recreate a book I did called Christmas Doodle
Zine with you today, and inside I have several
very basic shapes. The reason for that is
because I wanted to be able to doodle inside the shape to make it very
reminiscent of this journal. I'll do some doodling shapes
that you can think of. We're going to draw
the basic shapes in this Christmas Doodle
Zine together. I'm finding my cover page. I am just going to label
this Christmas Doodle Zine. I have a number five Micron. My very first page
is going to be a Christmas tree and
that's going up here. I'm going to turn my page over and I'm going
to change pens. In fact, I'm even going to
use a pencil and an eraser. I'm going to draw a
center line because I've found I truly can't
keep things equal. I'm going to bring one branch down and swoop and
one branch in and swoop and a little one
here and it's trunk. I'm going to try to
mimic that on the side. Now I'm using a
Tombow Fudenosuke, it's a brush tip pen. One of the things
I liked about it was some thick and thin lines, but I can also alter what it
was I liked or didn't like. Before I erase, I always give it a good touch. I want to pick up any ink. I think I got a tiny faint
bit of ink to come up. My second page was a gnome, and if I look at my mock-up, I know it's this
very second panel, so 1, 2, 3, and 4 will
be right in a row. I'm going to go ahead
and draw my gnome. I started with his nose. It's a c-shape that's laying on it's side and
across his nose, I'm going to make his hat fall. I came out about half an inch, made a bit of a wavy line. Two straight lines go up and another bit of a wavy line
to make it look fuzzy, fluffy and between
the hat and the nose, I start his beard. I came down with
a very long swoop and a bit of a curly tail. I come out almost
the same distance on the other side and I just joined it before the swoosh
of his beard. Now his cap can be all
kinds of different shapes, but for him, I basically
felt like making a flame. That's what his beard
looks like on the bottom, but it's going a bit more swooping to the
side here and down. Then I just did a bit of a base. It's not even really a body, but it's got that
familiar nose peeking out from the cap and so I
called him my gnome. I'm going to take my
Fudenosuke again. I just thought this
looked really nice as I don t even touch the beard. I leave that gap, and I just thought
it looked cool. Let's see if we
can recreate him. I made his eyes first. In fact, let's do it
in pencil real quick. A sideways eight
about in the middle, two loops a like, you're starting to
make a heart shape, but from there, I just
made a punchy little body, then I added a circle on the bottom, an
open-ended circle. His beak is a very
slight curve on top and a bit of a point
triangle shape here. Two itty-bitty eyes. Felt like I needed to
draw a bit of a head and I made his cap come
right to his eyes as well. Came up a bit. He's got a fuzzy brim. Now his cap could've been
something the gnome could wear. This is another option for you. This little tassel, I wanted
it to look like it was a bell and so I drew a
line down to the side, point down to the opposite side, made a little circle, and then I gave him not
even very good penguin feet and two little penguin
arms coming out the side just about
where his head joins, and I have a penguin. I started with my
top of my boot. That one was more jagged. This one's swooping away on me. I guess I got curves
on the brain. We're going to, not as far out, but just a little bit
in, make our stocking. Well, that's a big
fat toe, isn't it? We could erase,
completely start over. I'm going to leave it. This is my doodle book. I want to have some fun with it. Could make this a bit taller. Coming in on the
inside just makes it look like the stocking. I definitely fixed
my toe length. Up for my loop, I wanted something a
little bit bigger. Now if you have a
eraser that you like, go grab that and start taking
out those pencil lines. We want to do is to scan this, to make copies of it. You'll have lots of practice room to practice
different doodle shapes. My little penguin. Did you catch that
when I was making him? I forgot his eyes and beak. Let's see here little
penguin. How are we doing? I see a few more pencil lines. We are ready for two more. I decided on a different
Christmas tree. If you've got another
shape you want to try, maybe a bell or a star, go ahead and play with it, this is your doodle book. In fact, I'm not going
to play with the pencil. I'm just going to put
this triangle down. It's basically a triangle
with a frilly bottom. This ornament shape is
very reminiscent of the beard we made and I
just love that curvy shape. I did start with the cap. The cap has a roughly
bottom, slightly curved top. It's not perfectly straight. In here, let's see
if I can do it, two sides the same. I'm holding my breath. That's good enough. My back page is just
my name, the date. You can sign it
any way you want, but definitely date your work. If you love what you see, run to your printer and make you several copies
and then doodle in them, like I made with my very
first doodle magazine. Have fun with it and
fill in those shapes.
8. Wrap Up: [MUSIC] Thank you for joining me. I appreciate your time. Now today, we created a Zine. Did you make a holiday Zine? Did you do a gratitude Zine? Which one did you make? Or did you make it a party
favor or a scavenger hunt, or a coloring book, or was it a journal
to stick into your purse or pocket
when you're traveling? Let me know how you made a Zine and how you're
using your Zine. Is it a gift or is it
for you personally? I can't wait to
see your projects. You can find me on Instagram. If you share your
projects on Instagram, tag me, I'd love
to see it there. So come find my
other classes too. I have classes on job, plating, and doodling, and
making idea books. So I would love
to see you there. Thank you. Have a great day. [MUSIC]
 Tammy Prara, Making Matters