Transcripts
1. 00 Course promo: Hey guys, in this
course, 3D illustration, we're sharing with you my
process some necessary 2s a use whenever I'm
doing any 3D illustration. On lighting, tips, on choosing colors, tips on composition, some starting 2s
within Cinema 4D that can really make
this process easy. By the end of this course, you will be able to know my general process and my
approach to 3D illustration. Guys get started together.
2. Tip 01 simplicity: Hey guys, welcome
to the pollster. Naaman tip I'm gonna be sharing with you is
that whenever you have a 3D composition project,
get your reference. Sometimes when I have
with 3D composition job, one of the first thing I usually do is that I get references, references of things I
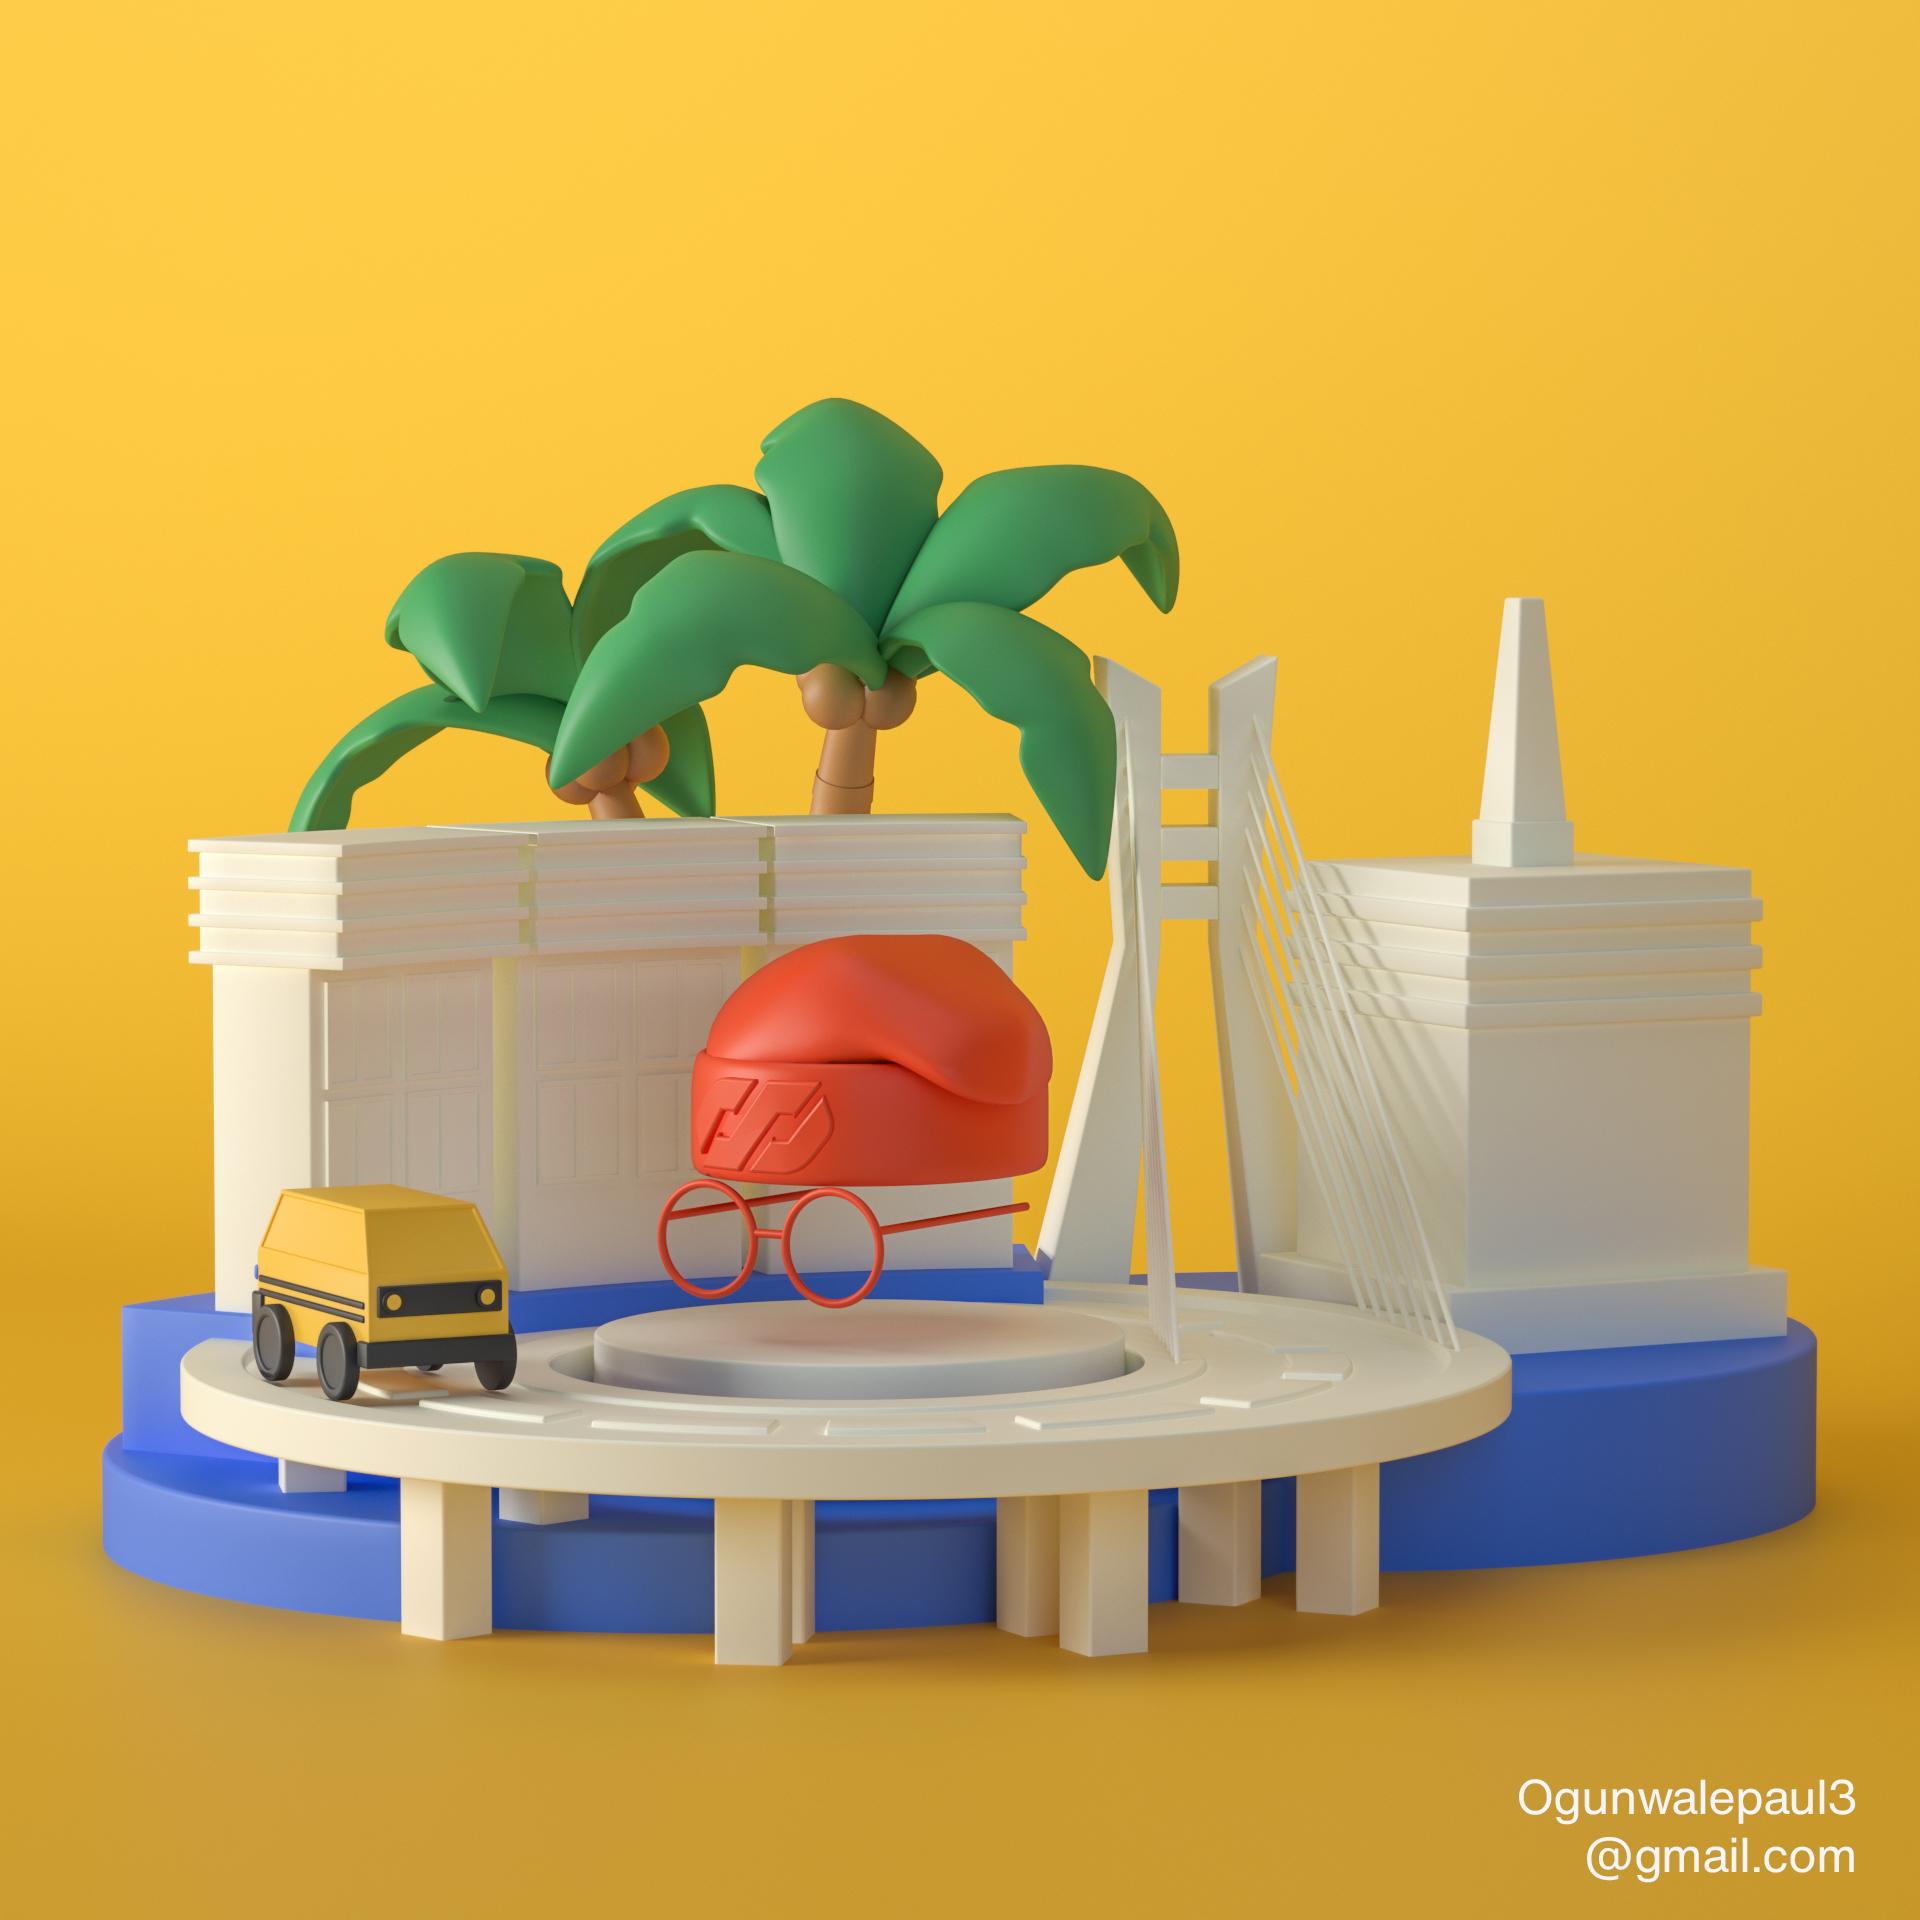
wanted to illustrate. Example, Abuja is a
capital city of Nigeria. It is the executive C2. I tried to look into some important landmarks
that I want to illustrate. One of it is the
Senate building. Apart from data. So the gates platform
that also the cutoff pump, the Zuma rock. Also don't represent everything. I just choose some important, important landmark,
important landmark. Whenever you want
to switch projects, encourage you get a reference. References are important. Activity is not
something from NADH. To start with something,
you have to start from something zoom and you
have to be inspired posts. So it's important to start with something and number two, tip, I'm going to be sharing
which you expect to these kind of project is
that always goes simple. Most of the time. Wherever
I wanted to start a 3D composition work, sometimes it looked false, get concerned with
too much details, but that is not
necessarily just have to make sure every
element is simplified. The final render,
which is this one. If you notice in references
to the reference that I used, I make sure that I
simplify everything. This won't be used for website, homepage loan, the DDD Dui Yu page where
it is wanted to be useful. Instagram or for anything else, maybe for an illustration. Can walk without doctor, because it is simplified,
not doing complicated. And also it will give
you opportunity to experiment some of the
illustrations that I worked with this
also, It's historic. City provision generally won't
be for the organization. So I try as much as
possible to simplify it, like Lumiere did not permit. And also, there's
another one-year Legos is the project that I use. Similar process was I trust, which are supposed to simplify. Simplicity is the best. It doesn't have to
be complicated. It just gets your reference
number one or not. So whenever you are welcome with the details, just go simple.
3. 02 Modeling timelapse: Hey guys, Welcome to this short time-lapse
about modelling. In this episode, I want to briefly show you
my modeling process. I approached modelling. I get it started
from blocking out, been adding more details in following the reference
that I am using. One of the very important way, watching some time lapses
that not only will you be able to follow, I meant to understand
the, the, the, the older view of someone's
modelling process. You will be able to lend some
sudden, sudden, excuse me, perhaps the way
you've been doing your own processes, Haley, who was trying to fix all your attention getting
all DTUs out ones. You don't walk from simple to more complex
kind of workflow. You'll be able to follow along. I often do Italy, wherever I want to. Lend. Software, will try to watch. So on, time-lapse about it, process, someone's
way we're doing things really helps a lot. If you're looking at
your scene from the, from the Roman video. I'm trying to get the
right proportion to write balanced composition start when, when something is sent to. It doesn't necessarily
means when you are modelling everything
in all details are we started making some
necessary adjustment or because some right
composition is easily, it is important to make that decision as fast and
as healthy as possible. Why? Because it will hit you in knowing which acts bit needed
to be modelled or not. For example, these
muddle the goal and the false places that
I want something simple, illustrative,
something straightforward. In doing so, I knew
early on that I don't need any camera from
the BACC services. I'm not animating it. So we're not that
I'm animating on. I know that the angle with
the camera is going to come. It doesn't necessarily The Del
dot u model every details. And it's going to put in
a lot of the half-halt. Make sure you know
what's been needed. Like I said earlier,
we don't know what's been needed when
you know that term, what's been added is frame from different short
from different angles. It doesn't necessarily
means you have to move the algorithm. What? Because a lot of folks, when they get
themselves involved in a lot of these process, when it gets too much evolved in trying to model
every single details, sometimes they lose
the true purpose of the study, the designer. So it is important to note that when you're
getting started, modelling, just
stick to the basics. Stick to what really works. Purchase your tracks today. Just the old tracks today. I begin on watching these. You're wondering, you
can't really follow true. It is important for you to watch some introduction to
Cinema 4D tutorials. Lot of them are on
Skillshare, motor cytosol. When you watch them, they go more step-by-step
on how you can use box modelling
methods. In Cinema 4D. You can use so necessary
story editing skills. And it doesn't
necessarily mean you have to use this in
my podium for these. If we are a blend of fun. In Blender 3D scene process can easily be sure spot to blend up. Does the amazing things about 3D software not this is
not really about it too. About the hottest. You
can express your soup. So you can just follow along and just look at the overview and you can just
learn one or two T's. That's really is to use
their own modelling. It's really a long way in helping you guys. One other thing I
want to share lastly, you want to improve
your modelling skills. It is important for you
to challenge yourself. Challenge that his
personal dodge. Maybe perhaps you
want to work on several modelling challenge
or you're going to engage in some design challenge or 3D modelling challenge
or 3D animation challenge. Elk to usually publish the boundary observers cuz this is very important
to trust me, it's really, really
walks a lot of times. Whenever you challenge yourself, you're consistently properties. Box modelling metal to
take it a little bit. Pulled out with surveys modelling and perhaps
also into sculpting. It is important that when
you challenge yourself, push the limit paul, bottom of your capacity on
the DSU returns to normal. So please, you already learned
modelling is similar body. Really lend the introduction
to modelling Cinema 4D. Find time to pass
a notch on end. Or perhaps they just join
one design challenge. And today you see your skews
a little bit for them.
4. 03 Tip importing illustrator files to Cinema 4D: Guys, I just quickly wanted
to show you after blocking it out on Add-ins,
unnecessary details. I just quickly wanted
to show you how to import Illustrator is
intracellular protein that is important because
there are some details that are difficult to model using some
similar policy tools. Solely just have to do is just make use of within industry TO Migdal, create
design industry. Tony put into Cinema 4D. We're using Cinema
4D alternate BY. We don't need to
go to some stress, can just bring that Illustrator file directly into Cinema 4D, but I'm using are 23. So I'm going to go to
the Illustrator file. Is the image. All I did is just to
decrease the outline. Who would suggest
you just want to turn to the mesh though? The nest and you
just have to do is just the copy I wanted to save minus CTL farm C4D copy. All I just have to do
is just put the name. I just have to press
the police because of mine and make sure that
I select illustrator. When I selected the history of cinema 4D is going
to identify that. When I save that,
then I can go to my Cinema 4D file over
here to File and my job, look for Illustrator file. If I look at my Illustrator
file and enter, it's going to bring
this box here. Sorry, I just have to
determine the scalar. I can just leave it as it is and slipped groups applying, press. Okay. Now we have our file in, as explained in Cinema 4D, to clean it up. Product of the file, up yourself to just to
some models like this. You want to make us wound, just connect ON, delete.
These swallowed. Just have to do is just to use
truth. To use the extrude. Just press OK. Us alone extrusion. Just make your input your
file into Cinema 4D. I can add more details to it.
5. 04 Tip Composition helpers: I quickly want to explain
2s that can really help you your composition
with Cinema 4D. Some afford it comes with some certain tools that can
really help you in a region, some of your, your
elements of 3D. Simply just by using
some decomposition, help us somebody
composition and help us. Located here. If yours is not York activated
or sometimes if you notice that you click this or not, it's showing on your screen is because you have
height, your camera. You have to unhide it. On comeback over the year. You will find the degree to
which is the rule of thought. You can read more about
how this really works. Medial tip that I often
use that or make sure that you always use this
coding section. That areas where I want my, really want the attention
of my viewers to see is always in-between
these lines here. If I change the color to something more
brighter, like red, you'll notice the coat
of harm intentionally. Please. Centered it in with the good
in section lines intersect. This is very important to him, whereby it's part
of the roots of compositions platform that also you can use the good in spirit. It's also depends on the
kind of work their work in wheat has a lot of
settings such as mirror. The mirror towards syrup
was showing you on. This is really great because it makes composition more easier. For a lot of books, dot, dot, dot want to get more
into technical expert. I always go with these rooms most of the time whenever
I'm doing my composition is that I usually
go with feelings. There is a way whereby human
heights can come detect if there is a certain
lack of balance. If ds in certain arrow Sutton, it didn't feel right. So most of the time, when I engage the
composition LPS, I will look into how it feels. Sometimes if it
doesn't feel right, I will change the
position of the camera. I will change the
position of the camera. Flip the model. This is a process. It's not something that you do. Wounds that is own. So sometimes when you move to the next page like lighting
or injuring or you felt like disposition
is not really showing the candidate will fill in
as I really wanted to show. Then the necessary
just have to do is just to flip your camera on. I mean, addressed
the composition. I'm sorry, you're going
to find something more interesting. I believe you have
learned something about the composition
hypothesis in Cinema 4D. This is, this is
very, very crucial.
6. 05 Tip lighting: Guys in this lighting, TPP will not show you my approach to link
to my 2D composition. First of all, when
it comes to lighten, it is important to note
that the reference is king. We talked to references. If you just start
like to my dad, is we can make a lot
of error or mistake. And if this node is particular goal,
frustration is inevitable. So some of the places that I love to go to
gather references. One of it in particular
is Pinterest. Pinterest up a lot of amazing. Short, some photo-real CGI. Cgi. You can see the light and
yet it shows some of them, some of the light studied. The same processes
just copied one of these 3D illustration
here. It is. Just beautiful. You can see the lighting CDIC. There's a middle light
that's lit up this object. And you will notice
there is not only about, it is not as powerful
as the other one. Such lighter study
done. Just repeated. So I also did follow purchase your tracks today. Purchase your tracks today. So during the test rendering, you can see now that at
least we are getting closer to the desired results. So it is important
that we render this in a short visit materials
of this ratio light PDFs. The amazing thing is that at least I can know what
each line is doing. Reason why we have
to do this test renders sometimes conceal BTUs. If you're using. You will be able to know
what each light dose. For example. If I started switching each light
one after the other. So I can see clearly
what each light dose. This is very important
sometimes so that at least the first
study I did in the materials and the
uncertainty issues, missing things about all this is that at least every process can be repeated
all the way again, whenever you need to do so.
7. 06 Tip material colours: Welcome guys. This next tip, I'm going to tell you my process in
our choose Columns. Now. Ration book from the
references again. One of the main rules that are often used whenever
I want to texture any of my 3D hubs that are
usually follows the taxi. I mean, 60 toxic rooms. But as some of the rules
that has been used, buddy interiors
designers, it is very, very important to read
more about these rule. It is just simple. You pick three colors on anytime you picked
out three colors, which is the primary, can take 60%, the
secondary completely 30%. Yes and colloquium take the 10%. Oftentimes whenever
you draw inspiration from color palette in
the peahen interests, or maybe beyond, you will notice this rule beam
trick consistently. For example, some of the
images that we are seeing, these immediate,
these color palette. You can see how these colors, the till took almost
like 60% of the image. Then we have the bold thick in the orange is sticky like
30% and we have to put 10%. So it is something that a
lot of people who shall walk with just the best
and easiest way to actually choose color easily. We choose the three
colors you want to use. The main three colors you
want to use speaking, inspiration on Pinterest
or from ado Carlos. Save it as an image and you
take that into semi-colon. I just follow these basic rule. Just make sure that the one tick in the larger percentage, you want aggressive limit was something smooth
or something cool. Then they won't take any
aggressive the taxi, or maybe taken the 10%. So this is the tau. I followed here and I create
your own palette out of it to create some variation. Can just drag and
drop some of you, some of your colors. Just the old tracks today. Doesn't have to be exactly like my clear along with your color. And press Render. Conjunct interactive rendering. Consider studied
our denote walks, the 16th, tin roofs.
8. 07 Tip post production Conclusion: Hey guys, welcome to the
last aspect of this course. In this last tip, I just wanted to share
my thoughts with you about about Photoshop. The reason why it
is very important, and also some
post-production soft tail, so like halftime
effect on the others. The reason is
because whenever you finish work within
introduced software, sometimes in order to consult time, reduce rendering time. You cannot push boundary of your render up because
that is also relative to the power of your,
of your hardware. Some of the editing of
the collection have been done using
post-production software. The likes of Photoshop. This is the Render
straight out of. I want to open Photoshop. Some really I've
created a lot of tutorials about how to edit
your image in Photoshop. So I'm not going to
pretend that again. Some of the simple acts
that I usually use a lot is that I just go straight up to View and I use my camera roll. It doesn't make some
simple edit data. That is very, very important. You don't want to
push the exposure just like me immediately
to a bit brighter. Most of the things I usually
do is just come to the cops. Make my correction. Dx. Firstly increase the vibrance. Don't actually play a
lot with the saturation. The web I just get
worked on for me. My light. You can even
save your presets. Sometimes we're mocking and
lots of walk like that. Just make sure that I
copied the edit settings. Sometimes I will
create it as a preset. So whenever I say,
anytime that I hope on another new one I've just
applied on Joe's mixture. I start from there
using Photoshop, really, really easy lifesaving. It goes not only those,
It's imagine this, imagine the different,
imagine the difference. If I'm trying to make lots of such correction
using my render out, sometimes it may
not be may not be the best decision for you
to make sure you edit, mix some necessary correction using post-production software. And also whenever you are creating your heart also it is important also to share it. Two, it is important to share it most of the time
or we just make sure that I posted both the sum of the workings of my
beyond the account. At least people who
reviewed to see it on torts would be
able to share it. And also whenever there is any any gay gap can be
conducted for fossil. It is important to
totally share your work. Is important on bales is one of the best one
that I find really login to use on our
platform dot also use them. I use Instagram. It goes both up. Very, very effective. It is, it is just powerful when you see the possibility that has been
given to for any creative, just to express itself. I mean him several,
express the half. Don't be afraid of sharing
your work. Don't be. Sometimes it is
important also to share the walkthrough,
those breakdowns. It is important
sometimes it gets a lot of folks excited about it. People I mean, love
to see, says search. This is also part of a series
of modelling that type. Did I just share the
work through it? This is very, very important. It's really helps you to one of their
immediate and he asked, it does is that it gives you
confidence as an artist, unless the doctor at least
able to do these mites there. Something that I can
call my wound beauty. Somebody you can call your own? The opportunity that the
modern day technology has really made available. Guys. California, my
Instagram account, you have it to pollution,
water pollution. When you make use of any
of the tips that I shared, please kindly told me. I will comment. I will share my thoughts and
I will also reposts some. Let me also see what's
created out of it. Thank you very much for
participating in this course. You've already quite can. Let me know if there's particular topic
you want me to cover, maybe particular harder to see. I want me to do
beginner's guide into it. I will be very Arp2
LLC and whichever way. Thank you very much.
 Paul Olusola, 3D Motion & Illustrator