Transcripts
1. Hi There!: Hi. And welcome to this class. In this class, we're
going to explore one of my favorite mediums, gouache. If gouache has ever
made you think, this looks so fun, but
what do I do with it? You're in the right place. In this class, we are
painting a bright, playful butterfly, and we
are keeping it super simple. No overthinking, no perfection, colour, creativity, and
having a good time. Hi. Made a mistake? Perfect.
Because with uh, we can layer over anything. I'll show you how to fix edges and build your
painting step by step. So even the messy parts turn
into something amazing. This class is made
for beginners, and kids can enjoy it, too. Just grab your paints, your
sketchbook, and jump in. By the end, you'll have
a colorful butterfly and a whole new
confidence with Guash. So let's loosen up, have
some fun and start painting.
2. Supplies: So first, you need some
sketchbook of some sort. I'm going to use a
sketchbook with tone paper, but you don't really have to. You can use any watercolor
sketchbook or anything that is at least 120 GSM or higher because we're going
to be using gouache. So we need to make sure that it can handle a little
bit of water. I'm going to be using gouache, and my gouache is intense. These are water based squash, not the acrylic ones, and you can use
acrylic ones as well. It works perfectly fine
for this tutorial. You can also use acrylics
if that matters. But I'm going to use
water based squash. So what I've done here
is I've taken the tubes and put some in these half pans, and I let them dry, and then I use it because then it's very easy to use on the go. But you don't have to do this. You can use it straight
out of the tubes, and that actually works better for this
ttoian to be honest. But it's your choice. You can use Guash in
any way that you want, and you can also
use acrylic quash. So for the brands,
I have Holbein, that is most of these
colors over here. I do have some Schminka
and royal talents, as well, as you
can see over here. You don't have to go for any
expensive brands of gouache. This tutorial is supposed to
be a messy play or, like, a messy butterfly, so you can use any
gouache that you want. But if you want to invest
in some good quash, I would recommend
the Holbein gouache, the water based squash.
And the Sminka. I think they are my favorites. I'm going to use only one brush, and I have a Escoda. This is number eight, so it doesn't matter what
brand brush you're using, as long as it's a bit
pointy like this. The reason you want it
to be nice and pointy is because you don't want
Oops, this paint on this. You need to have
a better control, so it's better to
have this nice, pointy brush. So I
have number eight. So this really depends on
how big your butterfly is going to be or how comfortable you are
using your brush. So do not go and
buy a new brush, use whatever brush you have, as long as it's at
least slightly pointy, need not be this
pointy, as well. A pencil. This is for sketching. You don't have to buy a
Carandache Luminance pencil. This is just what I
had next to my desk, so I just took it to sketch. You can use a normal pencil. It doesn't matter.
As long as you draw very thin lines and lines
that are not visible, not too visible,
that should work. So use any pencil. And of course, use some bowl
of water, not dirty water, clean water, and some tissue, of course, to just
dab those exsclors. And you're good to go.
Let's start painting.
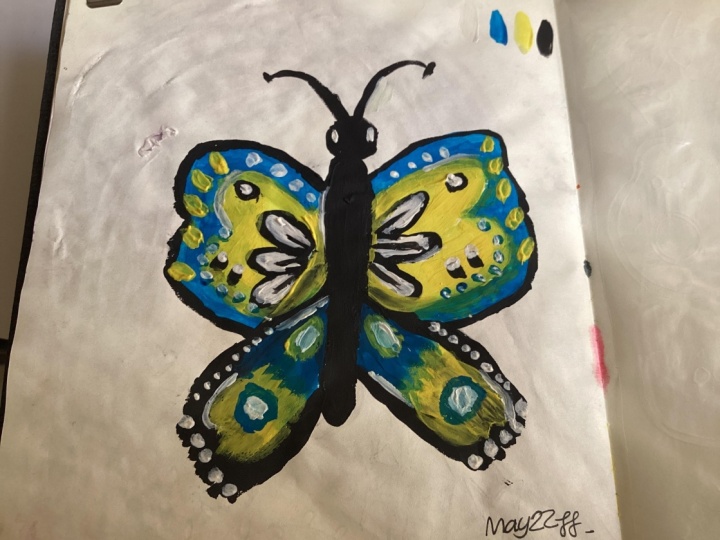
3. Class Project: Okay. The class project. For your class
project, you'll create a bright and playful
butterfly painting in your sketchbook or any
loose sheet of paper. Doesn't matter. Using gouache. You don't have to stick to the
colors that are used here. You can use your own
color palettes, as well. When you finish, be sure to upload your project to
the project gallery. I love to see your butterflies, your color choices, and the creative details you
add to make them your own. So yeah, go experiment
with Guash. Let's begin.
4. Let's Sketch and Paint: So let's start
with our painting. So this is going to
be super simple. We'll start off by
making a rough sketch so that we know where our
butterfly is going to be. So I want my head of the
butterfly to be over here, obviously, and we're
going to do the body, and then we're going
to make a shape. And, mind you, you need
not make them equal. Yes, you heard me right.
And then maybe make it this way. There you go. That's your basic
butterfly shape. So you can make these lines as dark as you want or
as light as you want. I would like to start it off with this light pencil shade. You can use any normal pencil. You don't have to use
this Luminance pencil. You can use even a
water soluble pencil so that it easily colors. Okay, so let's get started. So few colors that
I've chosen for today for this butterfly, that's one of them is, let me just wet my palette
and take out some gouache. You can use gouache directly
from the tubes as well, because that works really well. I'm going to use a yellow. You can use either this
yellow or any golden yellow. Anything that works, maybe
let me try some other yellow. Could use this yellow as well. It's totally up to you. And then I'm going to use
some bright blue. I'm just going to
use a plain old, simple blue like this. Okay, so let's begin. First off, I'm going to
start by marking the Aa. I said I want a color in. So basically, maybe let's
put this like that, so it comes off like that. So I'm going to make a shape. You can make any
shapes by the way. So maybe see, these are not, you know, uniform,
but that's okay. And maybe like that. Let's make it like this. Okay, I think our basic
shapes are ready, and now it's time to
fill it in with color. And that's what
gouache is all about. It doesn't matter if you colour it wrong because you can always go back and color it. So here I'm going
to go ahead and apply the color a thick
color, by the way, I'm going to use more water, but this is not watercolor, so you don't have to
use it like watercolor. You can make thick strokes
and colour it in like this. And don't worry about
going inside the line, like I told you, it's wash. So you can go back and paint it once it's dry with yellow, and it'll still remain
opaque and nice. Let me do the same thing
on the other side as well. The main thing about
butterflies is that it has to be symmetrical, and I understand that it is quite daunting to
make symmetrical things, but you need not always
have symmetrical stuff. Gonna add a bit here
as well. Here as well. With these strokes so that
it kind of brushes in. We're gonna come back and
paint this again, the blue, especially because
once we put yellow, we might want to come back
and fix this a little bit. But for now, this is good. That's perfect. We'll wait a little bit for
this blue to dry.
5. Let's Paint Part 2: So now my blue is almost dry. We don't have to wait
till it's completely dry, so I'm going to go
ahead and pick yellow. And I've decided that
I'm going to take this nice little
orangish yellow, and now I'm going to go
ahead and color this in and see it's watery, so that's why it shows up a bit like
that, but that's okay. You can go ahead and
paint like that. Gonna make this a bit thicker and paint
this side as well. It's much thicker here. Mm gentle strokes so as to not lift the
color from the bottom. If your color has
completely dried, then that's not a problem
because usually with quash, it sticks really well to the paper and
doesn't get lifted up. But if it's slightly wet, then you might have that issue. So I'm going to add
a thicker version of this paint because it
was a bit more wet here. You can see the blue
running through. What we can do is we can just
wait for the colour to dry, and then you can
go ahead and add it, add a different layer. I'm going to add some here. Going to lift up more color. Add some strokes. We'll come back
and put the blue, so don't worry about that, bit. And our yellow is
almost done, as well. I'm gonna add it slightly
closer to this wing here and make this better. Now, we just wait
for this layer to dry so that we can
add the next layer. That's the black. Or maybe we don't even have
to wait for it. And let's try to add some black. I have whole wine, black. You can use any
black that you want. Working straight from the tube is much better than
working like this, but this is my travel palette that I like to take everywhere. And let's add these
bits right now. So I want you to go ahead and
add in a way that see how rich this black is going
to add it that way. I want it from all the way up. And don't bother about being
uniform, like I told you. Gonna make it a bit like that. Gonna pull this out like this. And I want you to
hold your brush like this and make strokes. We gonna bring that here. That side as well. And bring it here. And of course here. This is too wet. We should
have waited, but it's okay. Use a tissue to dab it
and take it, lift it off. We'll come back with
a yellow later. Was? Gonna make the body. Of course, Antenna. I'm going to go ahead and
give an outline up here. Make more watery. M. D like that. And just this
to make it look better. I know it looks so not good right now, but
we're going to fix it. Don't worry. We'll fix it. I'll make sure. Okay. So next we're
gonna add the details.
6. Let's Paint Part 3: Now that the things
are almost dry, let's add some details. And I feel like the yellow
could be a little bit better. So maybe we can try to make
it a little bit better here. Maybe like that.
I'll take yellow. I'll make it nice and
thick and add it in. I'm going to add black
spots in between. They're still wet, so
we're gonna take some black and just add spots. Okay. So I'm gonna fix this. And I see that here, this one is a bit smaller
than the other one. So maybe we can make
it a bit bigger. So my anger with which
I'm drawing here, is slightly different, so I don't recognize I
don't realize that. Anyway, let's make
it a bit bigger. You're this boy, a
bit bigger body. And I'm gonna add one more,
but I'm gonna wait for that. But let's add some
blobs here like that with the side of a brush. I'm going to get some
yellow. Add some, as well. Oops. Too much water. Wise it'll turn out green. You can also make dots,
if you fancy that. I feel like I want to make these signs instead
for some reason. I'm going to pick up some blue. I feel like I need to give some here. There we go. Next go to say, take some white. We need to add some in
the center like this. I'm going to add a bit here. Need to add here as well. Take more and add
everywhere, by the way. 'Cause white kind of gives
makes it look nicer. I don't like how yellow
is very light here, so I'm going to go ahead and
add one more layer of it. There you go. You can add some
white up here as well. It's your butterfly. You can color it
however you want. There's one thing
I want to do is try to bring the blue up. Let me see if I can do that, 'cause sometimes
it doesn't work. It did. There you go. We'll
come back and fix that. Once it's a little bit, try.
7. Let's Paint Part 4: Okay, so now to add
some final touches. So I'm going to go ahead
and take the blue and make sure this is nice and dark. You wouldn't have
problems like this if you were using Guash
straight out of the tube. But since I'm not anyway, next, I'm going to
take a bit more blue. I want to make a circle
and goes here as well. Let's go back to black. Next, I want some white. I don't bet. It's
too much water. Okay. Just fix the body
take some yellow. We're just adding some final
details that we want to add, maybe here and here, like that. Good. I feel like the
yellow here, again, is one side is too thick
and one side is too thin. I know I said you don't have to worry too much
about symmetry, but I think a
little bit is okay. Like oh I want to take some black and
add it to the center, but I think it's not dry
yet, so we gonna wait. Now, let's go to black. Make sure you have
some nice thick black. Gonna put it in the center
like that. That's good.
8. Finishing Touches: I had to wait till
the black was dry, and since it's dry now, let's add some white
to that. There you go. It's okay. It doesn't
matter how you add it. And there you have it. You can add some lines here and there with the white because sometimes it gives a
very nice. I don't know. Is it makes your artwork
kind of pop for some reason. So go ahead and add it
if you want. Like this. This is optional. I'm just going to add it here and there. Okay. Don't add too much because then it
becomes too much, as well. Adding a bit here. And All's okay. And I think our super simple, messy butterfly is ready.
 Ashwini Pandeshwar, Artist, master procrastinator