Transcripts
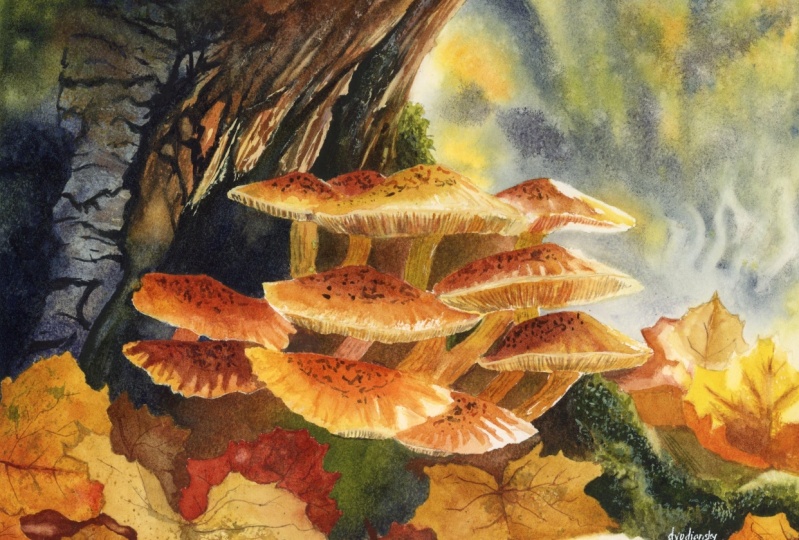
1. Introduction: Hello, and welcome to my tutorial on painting
golden mushrooms. With autumn just
around the corner, it's the perfect time to capture the cozy essence of the season, especially on rainy afternoons. Today will create a
warm autumn scene, featuring golden
mushrooms nestled beneath a beautifully
textured tree. The magic of this piece comes to life with glowing highlights, soft moss, scattered leaves, and the enchanting
atmosphere of fall. This tutorial, we will explore a rich
variety of textures, including the intricate
bark of tree, the delicate softness of moss, the vibrant colors
of autumn leaves, and the wonderful
shapes of mushrooms. Each of these elements will harmoniously blend
against a soft, dreamy background,
creating an atmosphere that truly captures the
magic of the season. Will learn how to
achieve a blurry wet on wet background that adds depth and tranquility
to your painting. As we progress, we'll delve into layering techniques
that enable us to render a natural and
lifelike representation of these beautiful
treasures from nature. Additionally, we'll
discover how to create captivating light
effects that enhance the sense of luminosity
and warmth in the scene. We'll also examine how
to effectively use wide quash to add
details with a variety of engaging
techniques to explore these tutorial
promises to enrich your skills and inspire
your creativity. Although this painting might seem challenging
at first glance, I promise it's more
approachable than it looks. I will guide you
through each step breaking the painting into
small manageable parts. Layer by layer, you will watch your artwork come alive
as we build each section. Aside from your art supplies, all you will need is a coal
mind and a bit of patience. Take a moment to relax,
gather your materials, and let's dive into this peaceful and
creative process together. Let's get started.
2. Project and Resources: I've prepared a selection
of helpful resources for your project available in the projects and
resources section. You'll find there a PDF file with the supply list I
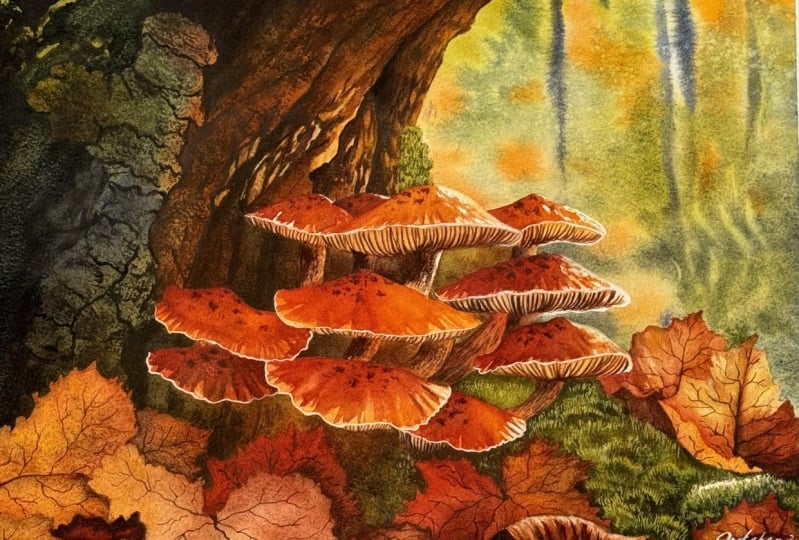
used for this painting, along with a reference photo and an image of my finished
artwork for guidance. Line drawings in various
sizes are also provided, so you can print and
transfer them onto your watercolor paper in the size that best
fits your needs. My painting is in a
16 by 12 inch format. Additionally, there are
work in progress photos to help you follow the process
and focus on specific areas. I've also written an e book in PDF format for you on planning
a watercolor painting. I hope you'll find it helpful. Feel free to explore
these materials and use them to create your own unique and
beautiful painting. I can't wait to
see your results. Please share your
progress shots and final painting in the projects
and resources section. I also encourage you to
take the time to view each other's work in the
student project gallery. It's always inspiring to
see what others create and the support of your
fellow students can be incredibly comforting. Don't forget to like and
comment on each other's work. Lastly, I highly
recommend watching each lesson before
you begin painting. This will give you a
clear understanding of what to expect at each
stage of the tutorial. If you find this class helpful, I would greatly appreciate it if you could leave
an honest review. Your feedback will help
me improve my content and assist other
students in deciding whether to join this class.
Thank you in advance.
3. Planning Your Painting: When you look at a
painting like this, you might wonder, how on earth
am I going to paint that? It seems so complex and you may not even know
where to begin. Believe me, even professional watercolor artists take time to plan how they will approach a painting before they
even touch a brush. For me, this planning phase can sometimes take a few days. Sometimes few hours, but sometimes I can spend
on it even a few weeks, especially when I'm
searching for or I'm trying to capture the
perfect reference photo. With time and experience, the planning process can get quicker depending
on the subject. There are paintings I now know exactly how to break down
into manageable sections, but other times it still takes a while to
figure everything out. Initially, I wanted to include a detailed guide on how to plan a painting
in this tutorial. But as I began writing, I realized this topic deserves its own in
depth discussion. Instead, I've created a PDF for you to download or
print, if you like. This guide includes a lot of the thought process that goes
into planning a painting. Showing you what I consider
before I begin painting, and then the steps
of the process. You can find it in
the class resources, and I hope you'll
find it useful. Before we start painting though, let's organize a couple
of things so we have a clear understanding of the elements I'll
be referring to. We'll be dividing the painting
into several sections. If possible, I always recommend this approach so you can
focus on one part at a time, rather than trying to tackle
the entire painting at once. For this project, I've
broken it down into the following sections and we'll be painting
them in this order. Background, tree and moss, and this is a fairly large area, but I've decided not to break it into smaller parts because I believe it's
better to think of this whole section
as one object, the tree with moss
growing on it. Then we have the leaves
and the mushrooms. Additionally, since I'm not
a native English speaker, and I know many of
you aren't either, I took the time to
check the anatomy of a mushroom so we can all
be on the same page. The main elements
that I figured out, and I'll be referring
to are cups, gills, stems, and scales. Now that we have a
clear understanding of these terms, can
begin painting. I wish you a pleasant
and enjoyable journey through this tutorial, and I hope that you
will find something in this project that will inspire your own future paintings.
Happy painting.
4. Applying Masking Fluid: Before we start painting, it's always good to
plan ahead and identify areas where we want to preserve
the white of the paper, or where masking can make
things easier for us. In this painting, there are definitely a few
spots worth masking. I'll be using Windsor
and Newton masking fluid to protect those areas. If we have tools that can make our lives easier,
why not use them? In addition to the
masking fluid, I will be using an
old bottle cup, a piece of soap, water and a brush that I keep
specifically for masking fluid. If you've never used
masking fluid before, it's important to know
that you should never use your good brushes for it as they will inevitably
get damaged. It's best to buy a cheap brush dedicated just for this tusk. I also recommend pouring some masking fluid into
a smaller container. I use the cup from an old
bottle of masking fluid, Quickly sealing the main barrel to limit its exposure to air. When masking fluid is
exposed to oxygen, it can start to form clumps, so minimizing this exposure will keep it usable for longer. To protect your brush, first, dip it in water, then
rub it on a bar of soap. The soap will create
a protective coat, protective layer
on the bristles, that helps preserve the brushes condition
for much longer. Once that's done, dip your brush into the masking fluid
and start applying it. There are two main
areas I want to mask. First, the edges
of the mushrooms. I don't want to worry about
accidentally painting over the mushrooms when I'm working on the darker
areas around them. Masking will help
protect these areas. I will apply the
masking fluid around the edges of the mushroom,
cups, and stems. Be generous with
the masking fluid. Don't make the layer too thin as it won't provide
enough protection. A thicker layer of masking fluid will create a solid
barrier against the paint. Can apply it over the entire
mushroom cups if you prefer or generally entire mushrooms
as they aren't very large, but I usually focus
on the edges. The width of the
masking fluid is about half an inch
or slightly less. Applying the masking fluid, try to be precise
and take your time. You're not in a rush, so calm your mind and apply the masking
with a steady hand. The edges of the
masking are important because they will define
the shape of your subject. For example, if you want a smooth line on
the mushroom cup, you will need to apply the masking fluid
carefully to achieve that. Jagged masking will result in jagged edges on your subject. Here are some examples of older brushes where
I didn't use soap. Without soap, the masking fluid dries on the bristles,
sticking them together. It happens after the first use. Once it dries in the bristles, it's nearly
impossible to remove. While you can try using vaseline or some specifics
like to clean them, it's honestly not
worth the effort. Just use cheap brushes and soap to protect your
tools from the start. I still have these brushes
because even with them, we can apply masking fluid, but maybe in a more
spontaneous textured way. Another area I
want to protect is the edges of the leaves at
the bottom of the painting. Masking them will make it easier to paint the
dark areas above. Apply the masking
close to the edge, but for creating the leaf tips, I use an embossing tool. Since this brush doesn't
have a sharp point, I switch to the
embossing tool to pull the masking fluid right to
the tips of the leaves. If you don't have an
embossing tool, no worries, you can use anything
with a sharp point. Maybe your brush is
better than mine, but you can also
use a toothpick, deep pen, barbecue stick, needle, or anything else
that you think will work. In the class resources, you will find an
illustration that shows exactly where I applied
the masking fluid. You can use it as a guide to
see which areas I've masked. Once you're done
applying the masking, let it dry completely. Once it's dry, we
will move on to painting the background. Okay.
5. Painting the Background: We're going to start by painting the background using the
wet on wet technique. First, let's prepare
some colors. We'll definitely
need a warm yellow. On my palette, I currently
have Indian yellow, but any warm yellow
like Hansa yellow deep, winds are yellow deep, or new gamboge will
work just as well. Yellow will be our main color and we will use it frequently
throughout the painting. Next time, adding burnt sienna, as these two color will help create this warm mood
we are aiming for. Yellows and browns will be the primary tones
for this piece. I'm also mixing green gold with a touch of ultramarine blue to create a natural green that will complement the overall
color composition. Plan to use a bit more
green in the background. I mean more than there is
in the reference photo, not only because it's
my favorite color, but also to create a connection between the main
subject and the background. In the main subject, we have
moss, which is also green. On the right mixing
space of my palette, I will have a combination
of ultramarine blue, paints gray, and burnt sienna. This neutral bluish mix will be the other dominant color for the background
alongside the green. Lastly, I will keep color that I would say is like silver. It's a mix of ultramarine blue and a touch of burnt sienna. These are the colors we'll
be using for the background. Now, let's start by applying a clean wash of water
over the background. I'll be using a size
12 brush for this. Begin by applying
a layer of water, starting from the top of the painting and working your
way down along the tree. Don't worry if you go slightly
over the pencil line, since the tree and moss will be darker than
the background, any overlap won't be an issue. At the bottom, apply the water right up to
the edges of the leaves. Although we could have
masked out these leaves, their shape isn't too complex, so we can carefully
paint around them. Take your time with this step. Apply the water carefully, making sure that there
are no dry spots or gaps. By the time you
reach the bottom, the upper end middle sections may start to dry,
but don't worry. Simply add a second layer
of water over those areas. Applying two layers of water will keep the paper wet longer, giving us more time to
work on the background. Now begin applying your paint, starting with the
yellows and browns. We're now starting to build up the colors and values
in the background. Since the background
isn't very dark, we will be painting
it in a single layer. However, there's
no need to rush. Use small amounts of paint on your brush and apply light
tonal values to the paper. Notice that I'm
intentionally leaving lighter areas on the left side near the moss and at the bottom. Start with light tones first. Avoid applying very
dark tones right away. By gradually building
up the color, you maintain more control over how the paint
behaves on the paper. While we could simplify
the background and apply just one big smooth wash. Want to suggest that something
is happening back there. Maybe distant trees or
even a bit of smoke. We don't need to replicate
every single patch of color, but we do want to create some variety in
tones and colors. We're using the wet on wet
technique because it allows the paint to spread and form
those soft blurry shapes. This type of effect
helps convey distance, making objects in the background feel far away due to the blur. My paint consistency is quite
watery. It's not too thick. Every time I add more paint, I'm also adding more
moisture to the paper, keeping it wet and
workable for longer. I have a bit of control over
how much the paint spreads. If it's spreading too much, that's a sign that there is
a lot of water on the paper. If I want to limit the spread, I can either remove some
moisture with a clean dam brush, or I can switch to a slightly
thicker paint consistency. Remember, your reference
photo is just a guide. It gives you an idea
of col distribution, but you don't have to
follow it exactly. M. One tip about yellow. It has a tendency to
push away other colors. If you apply it
over blue or green, it will gently push those colors aside and create soft
glowing yellow spots. Finally, keep in mind
that water color always dries lighter than it
looks when it's wet. At this stage, you will
want to apply colors that are slightly than the final
effect you're aiming for. Now that the paint is still wet, I'm switching to a
smaller brush size eight. I dip the brush in water, dub it on a towel, and use the clean
damp brush to lift out some of the paint to
create a smoke like effect. To do this gently brush from the lighter area into the
painted area in an S shape. After each stroke rinse and blot your brush and then repeat
the process several times. You may need to do this
in the same spot multiple times as the paint will tend to flow back into
the lifted area. Be patient and keep lifting the paint to achieve
that soft smoke effect. Of course, if you want to
create this effect in that area because you may decide that you don't like it and you
don't want to create it, then that's totally fine. It's your painting.
If you do this, always try to pull from the light area towards
the dark area. As doing the reverse would drag the dark paint
into the lighter area, which we want to avoid. I also want to add
some random texture by splattering water
drops onto the surface. To do this deep your
brush in water, then tap it against a
second brush or simply use your finger to fleek water
droplets onto the paper. At this stage, the paint on the paper is still
a bit too wet. Some of those lighter spots may disappear as the paint
continues to spread. The key is to find the right
moment to add those effects. When the paint is
starting to dry, but it's still visibly wet. In addition to water, you can also spatter color like green or yellow
to add variety. Or if you prefer, you can
skip this step altogether. Next, I return to the
bottom part of the painting to continue lifting out
paint for the smoke effect. In the sped up
version of the video, you will notice how the paint keeps flowing back
in after each lift. We need to patiently repeat this process until the
paint finally settles down. I'm also adding
more water droplets as the paint dries further. Once you're satisfied, clean
up the excess paint around the tape and leave the painting to dry
completely before moving on. One final note, we've been
using ultramarine blue, which is a granulating color. We'll also be using it
for painting the tree. Lately, I've come to
really appreciate the textures and granulation
that water color offers. I think granulating colors will work wonderfully in this piece. Feel free to use your favorite granulating
colors if you like. In the next section, we'll begin painting the tree. Oh.
6. Tree and Moss - First Layer: In this section, we'll
begin painting the tree. When I say tree, I'm not just referring to the
trunk on the left, but also the areas between
and below the mushrooms, as well as the moss. We'll treat this entire area
as one unified tree element. The tree is the darkest
part of the painting, and it covers a
fairly large area. To achieve these
deep tonal values and build the rich
textures we want, we all need to paint
in several layers. It's simply
impossible to capture all the depth and texture
in just one layer. Painting in layers allows us to maintain the beautiful
transparency of water colors, control the colors
and shapes more effectively achieve a balance between soft and sharp edges. Adjust the tonal values and
colors with each layer. Build up textures gradually and create the desired
depth of color. But where do we start? The first step is to identify the main colors we'll be
using and prepare them. We will need a lot
of brown tones, so I begin by mixing
burnt sienna. I already have some Indian
yellow on my palette, so this mix will naturally
contain a bit of yellow, which will add
warmth to the brown. The left side of the
tree is more in shadow. We can see darker bluish
tones with hints of green. To capture that, I will mix ultramarine blue with
a touch of green gold. For the darkest areas, we will need a very deep
brown, almost black. We can call it black. We can create this by
mixing ultramarine blue, paints gray, and burnt sienna. Although ultramarine blue isn't strictly necessary for this mix, I'm using it because it's
a granulating color, which will enhance the
texture of the bark. Plus, since we used
it in the background, incorporating it here helps maintain color harmony
throughout the painting. Finally, we will need
some green for the moss. I can see hints
of green not only on the right hand
side of the tree, but also in the shadow in
the upper left corner. It's very dark, but
it's definitely green. Let's mix green gold with
ultramarine blue for this. That we have our
basic colors mixed, we can begin applying them. Grab a large brush, a size 12 works well, but if you have a bigger one, you can even take a bigger one. With the main colors identified, we can start building the
tones in our subject. At this stage, we're
applying an initial layer, which acts like a roadmap. The goal here is to lay down all the colors more or less
in their designated areas. Remember, this is
just the first layer, so avoid using dark
tones for now. Instead, focus on applying the lightest versions
of each color. For example, in the
upper left corner, there is a very
dark green visible, but it's not time for that yet. I mean for that very
deep dark green color. Will apply a lighter version
of green in that area. The tree has sections
that catch the light. I will add more yellow
in those spots. For the darker brown areas, I will use a light
tone of brown and in the shadowy sections where
I see blues and blacks, I will apply lighter
mixes of those colors. Think of this as laying
a foundation upon which we will build the textures,
colors, and values. I'm using a wet
on dry technique, not wet on wet for
this initial layer. There are a few
reasons for that. One of them is that since
this is just the first layer, any mistakes I make can be covered up with
subsequent layers. This area is also very textured. Even if I create hard edges or blooms or any other
imperfections, that is perfectly fine. We don't need a flawlessly
rendered layer at this point. We just want to apply lighter
versions of the colors. Finally, using wet on dry
technique requires less water, which means that this layer
will dry pretty quickly. By using a large brush, I can cover this area
quickly with color. Notice that the consistency of my paint is watery.
It's not dense. Keeping it watery
allows the colors on the paper to blend
beautifully with one another. Between the mushrooms,
we burn Siena. That area at the bottom between the mushrooms
and the leaves, feel free to play around
with your colors. This section will be really
dark providing you with a great opportunity to experiment and practice
your water to paint ratio. Use yellows, greens,
blues, and browns. This is your chance to refine your paint consistency and
color mixing on the paper. If you're wondering about
the ideal paint consistency, think of it as quite watery, similar to a milky texture, but definitely on
the watery side. The best way to check if your paint consistency
matches mine is to compare the tonal values on your paper with what
you see on mine paper. If yours appears darker, then your paint is too thick. If it's lighter, you're
using too much water, so add more paint. On the right side,
shift your color to a nice mix of green gold
and ultramarine blue. However, avoid making
this area too uniform. There are brown leaves nearby, so add some brown tones here as well to reflect the colors
of the surrounding objects. Notice the strong
highlight in this area. To preserve it, it's
best to paint around it. Aim to create an
irregular jagged edge near the highlight
for a more natural. Oh. Once you've finished
applying your colors, leave everything
to dry completely. You'll notice that once dried, the colors appear much paler. Water colors often look
vibrant and rich when wet, but they can dry lighter. To achieve those
rich vibrant colors, one effective method is
to apply multiple layers. We've just completed
our first layer, so let it dry completely, and then we will move
on to the second layer.
7. Tree and Moss - Second Layer: Now that the first layer
is completely dry, we can move on to applying
the second layer. Before we begin, I want to highlight two
important points. First, I repeat it in
almost every tutorial, but I have to repeat it again. The tonal values are far
more important than colors. I know you already know this, and you have enough
of me repeating this, but I want you to
keep this in mind. Any stage of your painting, you can take a photo and
convert it to gray scale. This allows you to
compare it with a gray scale image of
your reference photo. By eliminating color, you can
focus only on tonal values. Here it's clear that
most of this area is still too light
compared to our goal. We will need to darken
these areas significantly. However, some sections like the sunlit areas
are nearly perfect, and we should avoid those
highlights for now. I will have to
keep that in mind. I will try not to go over those areas because I don't
want to make them darker. We also need to be
more mindful of the tree form and the
textures we want to build. Also one more thing to consider. If your pencil lines
are still visible, you may want to darken
them at this stage. When we apply the paint
now in the second layer, those lines will become much less visible because the
paint will cover them. If you like, you can make them darker now before you
start applying the paint. Now, let's prepare more paint using the same mixes as before. Our goal is to darken
some of the colors to bring the tonal values closer
to our reference photo. With the second layer, we will have a build up of two layers that will give
us much darker tones. Feel free to use slightly
darker tones than before, especially in the darkest areas, as they will appear
very dark anyway. Just remember to keep the
paint consistency watery. In my green mix of green
gold and ultramarine blue, I've also added burnt
sienna to create a richer olive or
moss green tone. Now, keeping in mind the yellow areas where the
tonal value is lighter, we will need to paint around
them as we apply color. Start with the green in the
upper left corner and then shift to other colors based
on the area you are painting. This is where we should consider the structure
of the tree. Notice the which is quite dark and gradually
lightens the right side. Aim to reflect that
in your painting, darken the left side while
lightening the right side. You can apply the paint,
rinse your brush, blot it, and gently pull the
color towards the right. Then while the paint on
the paper is still wet, pick up more dark paint and drop it into the
crevice to darken it. With this light yellowish brown, I'm trying to
define the boundary between the highlighted
area and the shadow. Once I establish this line, it will make painting
the rest much easier. Remember to keep the left
side situated in the shadow, more of a bluish green while using warmer browns and
yellows on the right. We can soften some edges
while keeping others sharp. Striking a balance between soft and sharp edges is
crucial in watercolor. Yes, I know everything
is crucial. But this balance adds
interest and makes the painting dynamic guiding
the viewers attention. I believe we've tackled
the most challenging part, painting around the
highlighted area. Now we just need to
fill in the rest of the tree up to the moss on
the right with darker tones. Essentially, we are repeating what we did in the
previous layer, but using darker tones to
enhance the depth of color. Also remember that layering the same color can
make it more vibrant. Many of you have asked how my paintings achieve
such vivid colors, and the answer lies in layering. A single layer typically
results in a paler hue, even if you apply a very
thick paint consistency. But applying several
thin layers, even just two layers are enough will significantly
enrich the saturation. When you reach the moss area, shift your technique
a little bit. You can continue
using the same brush or switch to a smaller
brush if you prefer. But now instead of simply covering the entire
area with green, focus on building texture. Use short random
brush strokes applied in an organic manner to
create the look of mos. Incorporate various
shades and tones of green to reflect the
structure you can see there. Notice little hells that are lighter at the top
and darker at the bottom. Try to recreate that defect with your brush and the
colors you're using. Take your time with this. There's no need to rush. Nobody's chasing you. I hope you have
already printed out the sentence and you
have it in front of you. The colors from the first
layer will pick through the gaps created by your
short brush strokes, adding depth to your work. Finally, pick up a
really dark mix and drop that dark tone at the bottom of each of those little hills. This will create a lovely
three dimensional effect, and with this, we can
finish this part. Here is how the painting looks once the second layer has dried. If we compare the black
and white version with the previous stage and
the reference photo, we can see significant progress. Some dark areas
are already quite rich and similar to
the reference photo, but we can still darken
the tree in several spots. One more layer shod suffice
to the right tones. Also take a closer look
at my pencil lines. As you can see, the second layer has made them barely visible. That's why I mentioned
in the beginning that you might want
to darken them. I can still see
them a little bit, but enough to add
details of the bark, which we will tackle
in the next layer.
8. Tree and Moss - Adding Details: This part of the
tutorial will likely be the longest and
most challenging, so get ready to dive in. It took me about 40
minutes to finish. So ensure that you
have the time to paint calmly over
the next hour or so. In this section, we will complete the tree
by adding details, darkening areas that needed
and introducing textures. Challenge here lies
in the patients focus and simultaneous handling of various techniques and areas. The good news is that we will be painting in a way
that allows you to take breaks whenever you need to without disrupting
the process. I opted not to break
this section into shorter parts as it would be difficult to divide
it logically. I highly recommend watching this entire segment first
before picking up your brush. This will help you grasp
what we are going to do and why better preparing
you for this task ahead. Start by mixing burnt sienna, ultramarine blue,
and Pines gray. We can consider
this mix our black, and we will need a
good amount of it. Below this dark pudal, keep some burnt sienna handy as it's the main
brown we'll be using. Begin with a smaller brush, I will start with a size eight, but I will switch to a size six shortly as the eight turned
out to be slightly too large. Load your brush with
the dark paint and start applying it from
the upper left corner. Our goal is to darken the deepest shadows
on the left side, and more importantly, to paint all the black cracks and
crevices in the bark. We can visually divide this entire area into
two main sections. The left side, which is in the shadow features
more bluish tones, and the bark appears old with
clearly defined sections. In contrast, the
right side is warmer and is more brown with
different textures and colors. Now let's focus
on the left side. Remember, you don't need to
recreate the reference photo exactly as no one will be comparing your painting
to the reference photo. Each tree is unique, its nature. There are no two,
the same trees, so don't feel pressured to
get every line just right. Can barely see my pencil lines now and I'm primarily looking at the reference photo to identify where those
crevices should be. But I don't stress if I
place them differently. In fact, I'll be
improvising a bit as well. After all, it's my painting. I could even add a little squirrel picking
through if I wanted to. Here I switched to
a size six brush to create more precise
and thinner lines. Notice that as we
apply this dark color, the previous layer appears
quite light. Don't you think? Even after applying two layers, the colors still seem pale in comparison to this dark tone. But that's perfectly fine. Not only will we darken
everything in this layer, but we also need those lighter tones to show
through the third layer. As you create the
pattern of cracks, use the same dark color
on the left side. You can switch back to a
larger brush for this. Cracks may dry paler, so we might need to go over
them again and perhaps even more to ensure that they
remain dark enough once dried. Now, using the larger brush, apply some greens and
browns at the top. Don't worry about achieving
perfectly smooth washes. I would even say we don't
want smooth washes here. Focus instead on
the in of light and the dark tones and the
overall color distribution. We're creating textures, so perfectly smooth washes aren't
a priority in this case. I've switched back
to a smaller brush to adjust the crevices
for the third time. I'm adding another layer of that dark color and making some random
marks here and there. The left side has
lost its high sheen. It's still wet, but
it's less watery now. I'm spattering some
water droplets to introduce variety into
this quite uniform area. This is where I start
to create textures. Feel free to take a break
now, if you would like. Take a deep breath, and return with fresh eyes. Now let's move on to the
upper part of the tree. I another dark mix
of burned Siena, ultramarine blue,
and paints gray. Here I'm applying
this dark color which transitions to
burn Siena on the right, while also trying to
depict the texture of the bark with slightly
elongated brush strokes. I'm spattering water droplets here to create
additional texture. We don't want perfectly
smooth washes anywhere. On one hand, this part
is easier to paint because we don't need to
strive for perfection. But on the other hand, there's quite a bit
to accomplish here. Using the black paint
and later in Mb Ciena, begin building the texture and tones of the bark in this area. On the left and
gradually lightens and worms toward the right side. A elongated brush strokes that collectively create a
nice bark like effect. Oh. While other areas
are drying slightly, so I'm spattering even
more water droplets. When I compare this area
to the reference photo, I can see that it's
still too pale. I'll repeat the
process by applying another layer of
black and brown. Notice that the
colors visible in the gaps between each brush
stroke are crucial for building the barks texture as those lighter areas represent where the sun hits the bark. On the moss, I'm applying many irregular green
dots to create texture. This technique of
placing lots of random dots next to
each other is called. Let's repeat a
similar process here. Identify the darkest areas, start with black paint, and then transition to brown, applying plenty of
elongated brush strokes to develop the bark texture. We have a nice, large, dark section where we
can apply a deeper tone. Using a darker brown, darken the whole area above
the highlighted section. On the yellowish highlight, add more bark texture, but be careful not to
lose those lighter tones. Spatter lots of water
droplets across the brown area to ensure it doesn't appear too
uniform or flat. With black paint,
focus on painting the most prominent dark
cracks in the bark. Concentrate on the ones
that catch your attention or feel free to create your
own without looking at the. Remember, the reference
can be quite complex, and we can simplify
certain aspects. Now we will try a different
technique to add texture. Dry brushing. I've switched
to a size eight brush. I will not deep the
brush in water. It should be just slightly damp. I'm holding the brush almost
parallel to the palette, trying to pick up the paint with the side of the bristles. Holding the brush at an angle, gently rub the side of the bristles on the paper to
create a textured effect. Because the brush is almost dry and the surface of the
paper is textured, we can produce those
irregular marks that work beautifully
for the bark texture. Notice that I'm rubbing the brush from left to
right, not randomly. But in a way that
follows the shape of each bruh section to create
those horizontal marks. It's important that
the brush isn't wet. It should be almost dry, hence the name, dry brushing. If the brush or the
paint is too wet, we will end up with
regular brush strokes instead of the desired texture. We can add this texture
wherever we like, and I think it will
look particularly nice on those light
bluish big sections. This technique creates a
very natural appearance. Unlike bh marks, we intentionally apply
for specific shapes. This whole area might look
like a big me right now, but once we paint the
mushrooms and other details, it will all come
together nicely. Before moving on, I want to
add a bit more black here and there to ensure these
crevices remain dark enough. The most challenging
part is over. Now we can take a deep breath, and if you'd like, take a break. With fresh energy, we
can continue painting. The rest of this painting
will be much easier. Here, all we need to do is apply another layer of
paint to darken ey. This time in addition
to applying the paint, we'll also spatter some water
droplets to create texture. In the most area on the right, I would like to
darken the green as I feel it's too pale
and should be deeper. This layer also smooth out the previous
layer a little bit. Now, take one last good look
at your tree and consider if there is anything that bothers you or that you would
like to enhance. For example, I think some
darker areas still are not d. I'm applying another
dark layer of paint. Since this lighter area is
illuminated by sunlight, I will use very diluted
Indian yellow and apply over the section
to suggest a warm light. This color will be
echoed later in the mushrooms and is also
present in the background. Finally, I would like to spatter some color
over the tree. We can spatter water droplets, but we can also load a
brush with paint and spatter it to create
random spots. If you choose to do this, I recommend covering the
background with a piece of paper or a paper towel to catch
any stray paint drops. With that, we can
finish this messy part. That was quite intense, now let's celebrate our success. We will return to the
tree and moss for a moment in the final
part of the tutorial. But for now, let's relax and enjoy what
we've accomplished. When you are ready,
we will move on to the next part and start
painting the leaves.
9. Leaves - First Layer: Now that our tree
is completely dry, I hope you took a moment
to relax and recharge. With fresh energy,
we can continue our painting journey by
starting on the leaves. Let's begin by removing the masking fluid
from the leaves. I prefer using a rubber
masking pickup tool, but you can also use your
fingers if you prefer. As we remove the masking fluid, we will uncover the beautiful
shapes we've created. Gently run your finger across the paper surface to ensure that all the masking
fluid is gone. Now we're ready to paint. Let's prepare our colors. I'll be taking the green
paint off my palette as I don't think I will
need it right now. In its space, I will mix some
shades of yellowish brown. This will be a combination
of Indian yellow, burned Ciena, and
ultramarine blue. I will also add a
touch of windsor red to shift the mix
towards a redis sue. Generally, when we combine
yellow, brown, and blue, we can create various shades of brown depending on
the proportions. That's why I will keep burnt
sienna on the palette. It allows us to easily
create other shades. Adding red opens up an even wider range of brown tones with a
reddish undertone. Leaning towards maroon shades. Keep in mind that adding blue
tends to mute the browns, making them less saturated. Now, using a size ten brush, let's start applying our colors. The goal at this
stage is to cover all the leaves with
their base colors. We'll be using the wet on dry technique and a
watery paint consistency. While we will be
looking at each leaf individually to identify
their unique colors, think of this whole area of all those leaves
as one large area. The colors from one leaf flow into another, that's
perfectly fine. At this stage, there is
no need to worry about. At this point, we're not focusing on the
details of each leaf. Instead, we are laying down
a foundation of colors, a roadmap for what's to come. If a leaf appears
more yellowish brown, use a greater mix of Indian
yellow and burn Siena. If it's more reddish, adjust your mix to
include more windsor red. Don't stress about achieving
the perfect colors. We'll be using the same palette throughout the entire painting. As long as we maintain
color harmony, feel free to experiment with
the shades of your leaves. You might even choose
to incorporate some greenish brown or more
red leaves, if you like. After all, it's your
version and your painting. I've added more ultramarine blue to the mix to
neutralize the brown further as adding blue tends to make the brown saturated and n. Now, let's focus on this
leave with a highlight. Try to paint around
that highlight. For these final two leaves, we need to consider
the increased light. Use a lighter tone of brown and paint around the
highlighted areas, leaving some white spots to
indicate strong highlights. For the lightest leaf, the one in front, I've added a touch of Windsor yellow to my light
Indian yellow mix. Windsor yellow is
a cooler yellow, and I believe that a very pale version of the two will work
beautifully here. When we mix a worm and a
cool shade of a color, we achieve a neutral tone, or some may call
it a primary tone. Combining Windsor yellow
with worm Indian yellow. Gives us a yellow called also a true yellow
or primary yellow. The same principle
applies to other colors. For example, if we mix cool magenta with
warm winds are red, we will get a neutral red
or primary red or true red. Well done, congratulations. We've applied the initial
layer to all the leaves. It wasn't too difficult, was it? Now we have a solid
base to build upon. In the next part, we will focus on enhancing
each individual. O.
10. Leaves - Textures: In this part, we're
going to have some fun with colors
and textures. Make sure you set
aside about an hour to complete the section
without feeling rushed. While this part isn't
particularly difficult, it will take some time. I'll be using a size ten brush. Let's begin with Burnt Sienna. As you can see, my colors on the palette aren't
perfectly clean, and that's perfectly fine in
this case for this painting. We want to capture
the natural look of various shades of fall. Start with the leaf
on the left side and apply the brown to the darker
bottom half of the leaf. Then pick up a darker shade by mixing burnt sienna,
paints gray, and ultramarine blue, and drop in the darker color to
introduce some variety. At this stage, we will focus
on each individual leaf, aiming to create
clear distinctions by adding more colors and
adjusting tonal values. This means we will concentrate
on one leaf at a time. Once you finish
painting one area, move on to another area that isn't touching the one
you just completed. In the previous layer, it was acceptable for colors to flow from one
leaf to another, as we were building the base. However, now we need to maintain clear distinctions
between each shape. Let's avoid any paint
flowing between leaves. I applied the darker
brown only to the bottom half of the sleaf because the upper half
is slightly lighter, which I will paint separately. At this stage, focus more on tonal values rather
than specific colors. Remember that at every stage you can take a photo
of your painting, change it to black and white, and compare it with the black and white version
of the reference photo. While we will refer to the reference photo
for color inspiration, our main attention should be on establishing the
correct tonnel values. Similar to when we
painted the tree, we may need to go over some
areas two or more times. For instance, this
reddish leaf may seem to have the right
tonnel value now, but later on, I might find it too light and I will need
to apply another layer. Next, I'll switch to a
smaller brush size four. With this smaller brush, I will spatter some
water drops on my leaves and add the
darker dots here and there. You can spatter the
darker paint or simply touch the surface
with the tip of your brush. Spattering creates a
more random effect, but sometimes we want to place spots in specific locations. Final effect of spattering
is always unpredictable. Even though we have a plan, the end result will
still surprise us. That's one of the wonderful unpredictable qualities
of watercolors. Now let's continue working
on each shape individually. Add more colors and
darken the tones. Remember you can always
revisit the same area later to add more depth
and darker details. For example, in this area, I know I can't achieve the desired effect
in just one layer. First, I will darken
this area overall, and once it dries, I will come back to
add finer details. We're building each leaf
with multiple layers. Always ask yourself
whether you're painting a leaf or
any other object. Can I accomplish
this in one layer, or should I break the
process into several? In most cases, you will need at least two
layers and often more to achieve the
correct values and color vibrancy and
also to add details. If you decide multiple
layers are necessary, think about the order of those layers and what
each will accomplish? For example, if I
know that leaves have veins details with hard edges, I will plan to add
them at the last layer Why? Because starting
with the veins would blur their edges
in subsequent layers, which is not the effect I want. Additionally, those layers
could cover the veins, making them less visible. That's why I have to paint
the veins in the end. That's why we're gradually building up the colors
and tonal values, starting with larger shapes and applying the basic colors. From there, we will enhance the tonal values and
slowly introduce textures. And finally, we will add the
last details like the veins, ensuring they remain visible and unaffected by later layers. I also want to touch upon a concept of painting
what you see. It's not essential to understand exactly what each shape
in the photo represents, whether it's a part of a leaf
or a tree or anything else. What matters is that it
looks good in the photo. Instead of fixating on
what it is, just paint it. If you tell yourself that
painting leaves is difficult, then believe me, they will indeed become difficult for you. Don't dwell on the fact that
you're painting a leaf. Yes, you know it's a leaf, but try not to think
of it that way. I know this may sound
unconventional. It doesn't make sense, but treat each shape simply as a shape that needs to be
filled with color and texture. There is no distinction
between a leaf, a petal, a mushroom, a piece of bark, They are all just shapes
waiting to be colored. If you keep repeating, I can't paint leaves. They are too challenging. You will find yourself stuck. If you can paint a flower petal, you can paint a leaf, you can paint bark, you can paint mountains. You can paint trees, everything. They are all just shapes, and your task is to find the techniques that make
painting each shape easier. It's not about the
difficulty of the subject, it's about mastering
the various techniques that will enable you to
paint all these subjects. Instead of thinking that
you are afraid of painting leaves because they
are so difficult, just think of it as a shape that has nice colors,
beautiful textures. Maybe there are some highlights, maybe there are some shadows, like in any other shape
and just paint it. I hope that makes sense. I hope that while
I was speaking, you were also focused on what I was doing
with our painting. As you've seen, I've been adding more and more
colors to each leaf. After applying the paint, I also spattered some water
drops on most of the leaves. In this case, I added darker
spots using our dark. It's a good idea to protect
other parts of the painting, especially the background
and the mushrooms so that the spatters
don't land there as well. At this stage, the
leaves are looking quite nice with rich colors
and beautiful textures. We can use a hair dryer to dry them before adding details. After drying with a hair dryer, resist the urge
to start painting right away as the paper
will still be hot. Wait until it cools back
to room temperature. In the meantime, I've taken
a regular eraser to remove the pencil lines
from the leaves on the right where the
light is strongest. I find the pencil lines
here are too prominent. Easing pencil lines can be challenging, if not impossible, once water or paint has been applied as they often
become permanent. However, here I just used
a bit more pressure to dig beneath the water and paint layer to
remove those lines. Now that the paper has
a room temperature, I've noticed that the tonnel
value difference between the light leaf in front and the leaves in the
back is not so big. They have fairly
similar tonal values, which makes it hard to
distinguish between them. To fix that, I will apply more reddish brown to
the leaf in the back. Notice how this additional layer that leaf further
into the background, allowing the leaf in
front to stand out. While this layer covers the previous texture,
that's all right. I can always spatter more water drops and paint on
top of this layer as well. Remember, water colors
are transparent, so some of the texture
will still be visible. For the leaf on the left, I don't want to cover the entire surface of that
leaf with a darker tone. Instead, I will apply a darker brown close to the
lighter leaf in front. This will create enough tunnel
contrast between the two. After applying the paint, I will blend it away
with a clean dumb brush. Notice how slow painting, building shapes with
multiple transparent layers makes the objects
more interesting. They aren't flat,
they have substance, instead of being painted
with just one flat wash, achieve a beautiful build
of many transparent layers. Now, here is a dark area
between the leaves. I will start by applying
a reddish brown mix of burned Ciena and
windsor red as my base. While this is still wet, I will drop in our black mix of Burnt Sienna ultramarine
blue and paints gray. While I'm in this area, I will also darken the
leaf at the bottom. With this, I think we
can finish this part. We've added more colors,
darkened the tones, made clear distinctions between the leaves and created
lovely textures. In the next part, we will
complete the leaves by adding the veins. K.
11. Leaves - Veins: O In this part, we will add the
veins to our leaves. While our main focus
will be on the veins, we can also make any
necessary adjustments to areas that still
need refining. I'll prepare more
of our dark mix, combining burn Siena, ultramarine
blue, and paints gray. However, I will also need some pure burn Siena as not
all veins are dark or black. For painting the veins, use a small brush
with a sharp tip. I'm using a size for brush. Start by picking up a
lighter tone and then begin painting the veins using
the wet on dry technique. Begin with the main
vein in the center, and then add the secondary
veins that branch out from it. One important point
to highlight is the necessity of using a
very fine point brush. The veins should be thin. A common mistake is
using a brush that is too large or
lacks a sharp point, resulting in thick
unnatural looking veins. The main vein should
be slightly wider near the stem of the leaf
and taper towards the tip. The secondary veins
should be even thinner. I'm barely touching the tip
of my brush to the paper as I want to paint with just the very
tip of the bristles. You'll also notice that
the veins aren't perfectly straight and that there
are gaps in the lines. This imperfection enhances
their natural appearance. Avoid painting them as
one straight, thick line. Instead, be gentle and precise, ensuring your lines
are very thin. In fact, my brush
is a bit worn out. The tip has become
slightly curved. I'm holding it at
a slight angle, allowing only the very tip of the curled bristles
to touch the paper. If you have a very
small spotter brush like a triple zero, that can work very well too. Notice that I'm not rushing
through this process. There is no need to hurry. It's a relaxing activity, and I want to paint
without feeling pressured. So, I am not following the
reference photo very strictly. While I may not see every
vein clearly in the photo, I can always use my
creativity to add some that I think will enhance
the leaves appearance. Another important note is to
change the colors as you go. For the lighter leaves, I'm using more
yellowish brown tones. While for the darker leaves, I'm leaning to my darker browns. Here is an abstract shape. There are leaves, but the
forms aren't clearly defined, and that's perfectly fine. I'm simply recreating
what I see, and I trust it will
look good in the end. I want to add more dark
tones and reds in this area. This particular leaf
is quite interesting. There are no
distinct veins here, but this leaf is very
textured. I've applied here. I don't know maybe four
layers or even more. Each time I add brush strokes that follow
the curvature of that, contributing to its
wrinkled appearance. For the leaf in the
bottom right corner, in addition to the dark veins, I'm applying another
layer of paint in the darkest areas because
I believe it should be even. I'm using a mix of windsor
red and Indian yellow, which generally is orange, but combined with
the darker colors produces a n deep brown. A few additional lines and
brush marks with Burn Ciena, and this one is finished. Now let's move on to
the last two leaves. Here I want to paint the veins, but I also need to
darken the leaf in front to create a clear distinction
between the shapes. As I look at all the
leaves together, I'm considering areas that
may need adjustments. For example, I think
I could add a bit of shadow near the
veins on this. The slightly darker tone so enhance the natural
three D appearance. I also feel that this leaf
is a bit too smooth and lacks texture compared
to the other leaves, so I'm spattering
some brown spots of paint to add more interest. Finally, I want to adjust
the leaves on the right. I'm applying a very pale windsor yellow to some of the
highlighted areas. I'm also darkening the
shadowed areas even more. With that, the
leaves are finished. Now we can remove
the masking fluid from the mushrooms
and in the next part, we'll apply the
initial layer to them.
12. Mushrooms - First Layer: In this part, we will begin
painting the mushrooms. Just like with the leaves, we will start by applying
an initial layer to all the mushrooms to
establish a solid base. First, let's prepare our colors. I'm cleaning the left
side of my palette to ensure I have cleaner
colors for this stage. Start by mixing
burnt sienna with windsor red to create a
reddish brown maroon color, which we will use for the upper part of
the mushroom cups. Then add Indian yellow for the middle part and prepare winds are
yellow for the bottom. In a separate mixing area, prepare a brown mix
of burnt sienna, paints gray, and a little bit of Indian yellow for warmth. Now, using a light tone
of our maroon brown, begin applying the coolor to the cup of the
first mushroom, transitioning into
yellow as you go. The goal at this
stage is to apply a light version of the main
colors to all the mushrooms. Wherever I see the maroon color, I will use a light shade of
the mix of red and brown. For areas that are
more yellowish brown, I will apply more Indian
yellow and burn Siena. As you paint, pay close
attention to the highlights. If there is a strong highlight, be sure to paint
around that area. While we could mask
these highlights, painting around them, I think, will look much more natural. We're applying the base
layer to all the mushrooms, so don't worry if the colors flow from one
mushroom to another. That's perfectly
fine at this stage. It's similar to when
we painted the leaves. The first layer was
applied to all leaves, allowing the colors to
blend on the paper. In the second layer, we created clear distinctions
between them. We're doing exactly
the same here. Laying down the base layer while leaving the
high lights white. You might notice that the maroon brown color
appears quite dark right now. This is because I know
it will dry paler. If I applied a very
light value now, I would have to add
more layers later to achieve the desired
darkness for the cups. So I'm starting with
a middle value, which will require fewer
additional layers to reach deep. The gills and stems are
generally leaning to beige. For this, I will
add a bit more of ultramarine blue
along with the brown, which as you know, neutralizes the brown and makes
it less saturated. M. Here's how our mushrooms look now. It's important to preserve those white areas as they will create a lovely,
magical light effect. Now eye and once it, we will move on to
painting the gills. Oh.
13. Mushrooms - Gills: Oh. I Now that the first
layer is completely dry, we can move on to
painting the gills. I will be using a size
for brush for this part. We'll use the same colors we've
been working with so far. Start with a light
tone of our dark mix. Painting the gills
is quite simple. All we need to do is create lots of lines in the
correct direction. Essentially, these lines meet in the middle where the
stem is located. Begin with a light tone
and as you progress, feel free to switch to more
brown yellow or red tones. Once you're satisfied with
the placement of your lines, you can drop in a darker
tone where necessary. I'm also adding more
colors to two first stems, but we'll focus on stems
in a later segment, in another video, so don't
worry about them just now. On the right side of the gills, I'm generally using more
yellowish tones because they catch more sunlight
and appear warmer, especially for the mushrooms
on the right side. Be careful not to paint
over the white areas. We want those to remain white
to convey at light effect. One thing to notice
that in some areas, I'm painting a Y shape instead
of just parallel lines. This is because
in the reference, not all the gills are
perfectly parallel. So overlap, using a y shape
helps create that effect. This is a
straightforward process. Continue painting those lines
until you're totally tired. And when you finish, we'll move on to the next part where we will
work a bit more on the cups.
14. Mushrooms - Caps: M. In this step, we will repeat what we
did in the first layer, but this time we will
focus only on the cups. I will be using a
size eight brush. The goal here is to deepen
the colors of the cups. As I mentioned earlier, one layer is often not enough to achieve those rich colors
in watercolor painting. Sometimes a single layer is enough depending on
the desired effect, but in this case, we want
those vibrant juicy colors. To achieve this, we will
apply another layer of paint. We will use the same
colors as before, but with the build
up of two layers, the colors will
become more saturated and more vibrant when they dry, simply because we are
adding more pigment. At this stage, we
will also create clear distinctions
between each mushroom, similar to what we did with the leaves in
the second layer. Not only are we
deepening the colors, but we are also using darker tonal values to separate the mushrooms
from each other. For example, I'm using the darker maroon color to paint the cap of the
mushroom in the back. Then I apply the maroon color
to the mushroom in front. But notice that I'm not going all the way to the
edge on the right. That edge remains slightly
lighter and more yellowish, which helps distinguish
the mushroom from the one behind it. I'm also dropping in some
darker tones where needed. This stage is quite
straightforward, and I don't have much
else to add here. Just continue applying the paint to make the colors of
the cups more saturated. You can also create a bit more texture
or an impression of a wrinkled surface by applying paint to the upper end
middle parts of the cup, and then pulling that
paint towards the edge, creating light stripes
of various widths. Once you finish, leave
everything to dry completely, or you can use a dryer for
a quicker drying process. Just remember to
wait until the paper cools down before moving
on to the next step. Oh.
15. Mushrooms - Stems: In this short and easy step, we will focus only on the stems. They are quite simple to paint, so you shouldn't have
any issues with them. I'm mixing Burnt Sienna
with pines gray, and I'm also preparing
some Indian yellow. On the other side
of my mixing space, I'm mixing Burnt Sienna
with ultramarine blue. The second mix is
similar to the first, but it's lighter and less intense than the one
with pines gray. Now to paint the stems, we will divide this
process into two stages. First, we need to ensure
that the overall color, the base color of each stem
is correct and dark enough. If a stem appears too light, or you want to make the
colors more saturated, start by applying second
layer to darken it. Some stems may already have two layers and
be dark enough, while others might
need this adjustment. Once you're satisfied
with the tonal values, use a tone of to add a few
elongated lines for texture. These shouldn't be too, just random lines
running along the stem, either from top to
bottom or bottom to top. The goal here is to create some texture and avoid
a flat wash of paint. Darkening the stems, you can quickly dry everything
with a hair dryer. Once the paper cools down, add those simple lines, this will enhance
the visual interest without complicating things. That's it. Nothing difficult. Once you finish, we'll
move on to the next part.
16. Using a Scrubber Brush: We're almost there. I know
you might be feeling tired, but if you've made it this far, take a moment to look at your painting and be proud
of what you've accomplished. I'm sure you will agree
it's worth persevering. In this part of the process, we will add a touch of
magic to your painting. This step is
completely optional, but I personally couldn't
wait to get to it because it creates this enchanting effect I've been envisioning and
I've been waiting for. I will be using my
scrubber brush. It's a Windsor and Newton
Galeria brush size f. I've had it for several years and it's my
go to for this technique. The goal here is to enhance
the glowing light effect. If you're new to my tutorials, you might not be familiar
with this technique, but it's one that I really like to incorporate
whenever possible. The idea is that when
sunlight hits an object, It creates strong highlight, which often appears
as pure white. In these areas, I leave the white paper untouched
because there is nothing more luminous in watercolor than the brightness
of the paper itself. Even white paint won't create that same natural glow effect. This white light typically meets either the background color
or sharp cast shadow. The magic happens when we
soften these hard edges. While sharp edges can
effectively convey light, softening them adds
a magical touch as if we've turned on
a gentle light source. I hope you can see this effect and the difference it makes. Using a damp scrubber brush, I gently along the
edges where the paint meets the p. Once the
paint is activated, I dab it with a paper
towel to lift it off, creating a softer edge that
enhances that magical glow. I will apply this technique
on the mushrooms, leaves and moss to amplify
the glowing effect. We can also use
the scrubber brush along the edge where
the gills meet the cup. In the reference, these
edges appear lighter. There's lighter line
along the edge. But for a more striking effect, we will accentuate them
with in the final part. Now let's move on
to the next step and paint the scales
on the cups. Ur.
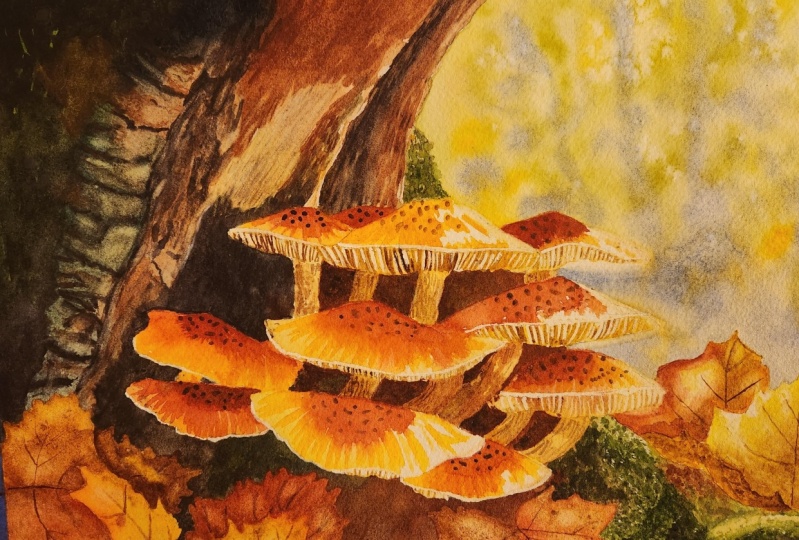
17. Mushrooms - Scales: Before we start
painting the scales, I want to address two
small sections that have been bothering me because
they are just too light. I will apply a
darker brown tone to these areas to give me peace
of mind for the next step. Now let's move on to
painting the scales. This is a quick and
straightforward process that you will find
easy to manage. We'll be adding irregular marks on the caps with a darker brown. Here are three key
points to keep in mind. Vary the color and tonal value. The mushrooms on the left, being more in the shadow, should have slightly
darker scales. In contrast, the
mushrooms on the right, especially those with beautiful highlights
can have lighter, perhaps more yellowish scales. Avoid uniformity. Each scale should be unique. Notice how some marks are more elongated while others
are shorter or rounder. They shouldn't form
a uniform pattern. Instead, aim for
natural organic shapes that enhance the
look of the cups. Follow the circles. Imagine their
circles on each cup. As you add the marks, orient them to follow these
invisible circular forms. If you paint them
in straight line, they won't appear natural. The scales should curve around each cup, reflecting their form. Those are the three main important things
to keep in mind. Well, we could spend extra
time perfecting the scales, adding highlights and tiny
shadows under each one, I believe these simple marks will be enough to create
the effect we want. Once you finish this part, we will move on to the final, also optional step, where I will show you what
else we can do.
18. Using White Gouache: As I mentioned, this
step is optional, but I would like to show you
how to use white guash to add tiny details and
refine some areas. I'll be using Windsor
Newton Designer's ga. I'll squeeze a little bit
into a piece of paper, but feel free to use
your palette as well. If you like, I prefer paper because it keeps the gah
close to my painting area, and afterward, I can
easily dispose of it. On its own, white guash can
appear too cool or harsh. I will mix in some
burnt sienna and Indian yellow until I achieve a
very pale, creamy color. Very similar to the color that I can see on the
edges of the cups. Once I'm happy with that color, I can use it for
several purposes. I can paint the
edges of the cups. While while creating
the edges with a scrubber brush can be challenging because scrubber
brush is not so precise. Painting them now with
opaque paint is much easier. I can also add more
gills if I need to. If there are areas that could benefit from
adding more gills, this opaque paint is
perfect for that. I can also refine the edges. We can paint and refine
the edges of the cups. Creating the edges with
a scrubber brush can be challenging because
it's not so precise. Painting the edges with the
lighter opaque paint and defining the edges
is really much easier and enhances
the overall look. If I mix the white guash with other colors like green
gold and Indian yellow, I can create a pale
version of green that I can use to add
texture to the moss. This is great for
those tiny moss leaves that catch the
sunlight and create that shimmering
effect as the opacity allows us to paint over
darker areas easily. Returning to that creamy coolor, it can also be applied
to the bark to add small highlights
that may have been lost in the earlier layers. These tiny details
may seem minor, but they enhance the overall
feel of the painting. Finally, I often mix Gach with the colors used in the
painting to sign my work. Once my painting is signed, it signifies that I
consider it complete. Even if I notice mistakes
or things I could improve, I won't touch it after
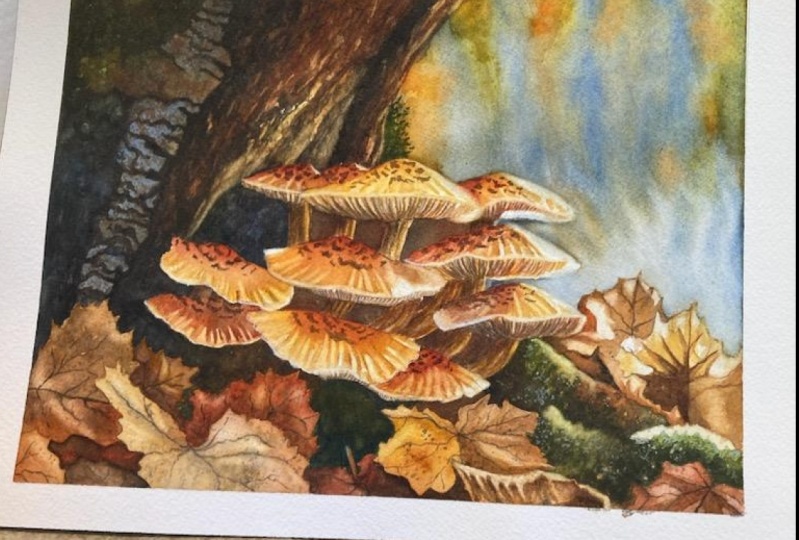
signing. I know. Now I can remove the tape and reveal that
nice clean border. Later, I will take
the painting off the gator board and
trim the edges, leaving just a white
border around. That's it. I'm really pleased
with how it turned out. I enjoyed working on all those textures and
beautiful fall colors, and I hope you are happy
with your result as well. In the final part, we will summarize what we've
learned from this tutorial.
19. Summary: Oh. Let's summarize what we've
covered in the tutorial. We learned how to create a soft, blurry wet on wet background. We explored how to achieve deep rich colors using
layering techniques. We painted bark, creating beautiful textures on
the tree and moss. We discovered how layering
can effectively render a natural look for leaves
and other natural elements. We practiced painting
fall leaves, building their colors,
adding textures, and detailing the veins. We tackled the structural
elements of mushrooms, including cups,
gills, and stems. We created a magical
light effect to enhance our painting, and we effectively
used a scrubber brush and white guh to add
highlights and details. This was a great project, and I hope you enjoyed
it as much as I did. Thank you for joining me
on this creative journey. I truly appreciate the
time you've spent with me. I encourage you to give
this painting a try. It's a really
rewarding experience. You've already completed your
painting, congratulations. You've done an excellent job, and I hope you are
proud of your result. Thank you very much for
watching and happy painting by
 Krzysztof Kowalski, Watercolor artist