Transcripts
1. Introduction: Are you an artist,
sewer or crafter, who enjoys using symmetry
and pattern in your work? If so, you might be interested
in learning how to create curved geometric patterns from a simple straight line
grid. Hi, everyone. I'm Clarissa, and I'm a geometric artist and educator
from Suffolk in the UK. Welcome to this geometric art class where I'll
be teaching you how to draw and stitch
curves of pursuit. These beautiful curvy
patterns emerge as if by magic from a
series of straight line. We'll first learn
how pursuit curves are constructed before I go on and show you how to hand stitch them onto watercolor
paper or card. They'll be beautiful enough
to frame in their own right, but they'll also make
wonderful greeting cards for the festive season. Finally, I'll also
be showing you some more design ideas to
spark your imaginations. So let's get started.
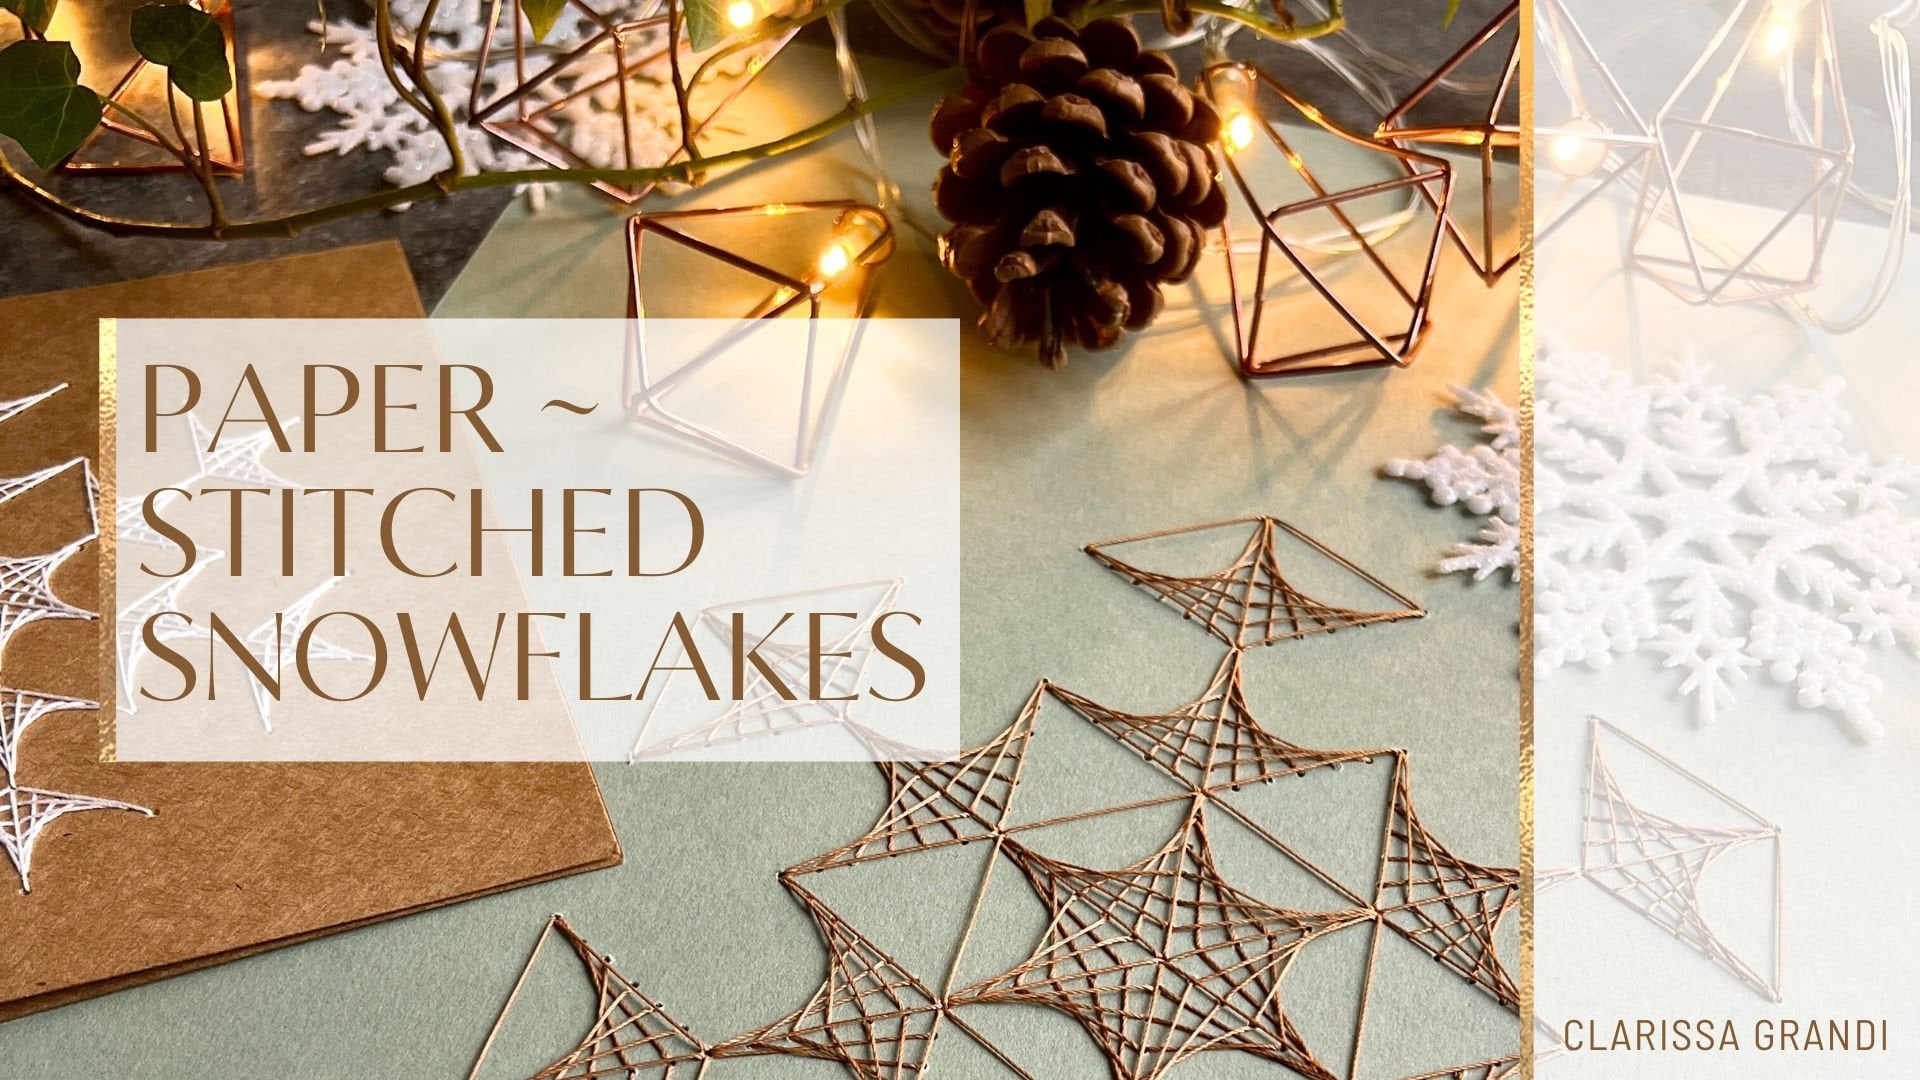
2. The Class Project: The project in this class
is to design and hand stitch a curve pattern onto
watercolor paper or card. We'll begin by looking at the materials needed to
complete the project. I'll then carefully demonstrate
the process of drawing the pattern on paper first so that you're
confident with how it works. Next, I'll show you how
to align the template centrally and how to punch the
holes ready for stitching. I'll also be showing you
some alternative signs to spark your imagination. You'll need your principal
templates ready, so do download the set
of class notes below. It comes with a handy
materials list, set of step by
step instructions, and four different
patterns for you to try. When you've finished
your project, remember to upload
some photographs to the project section. I do so love seeing
everyone's work, and it's also really useful for other students to have a bank of images to be inspired by. So let's get started
on our curves of pursuit with a closer look at
the materials you'll need.
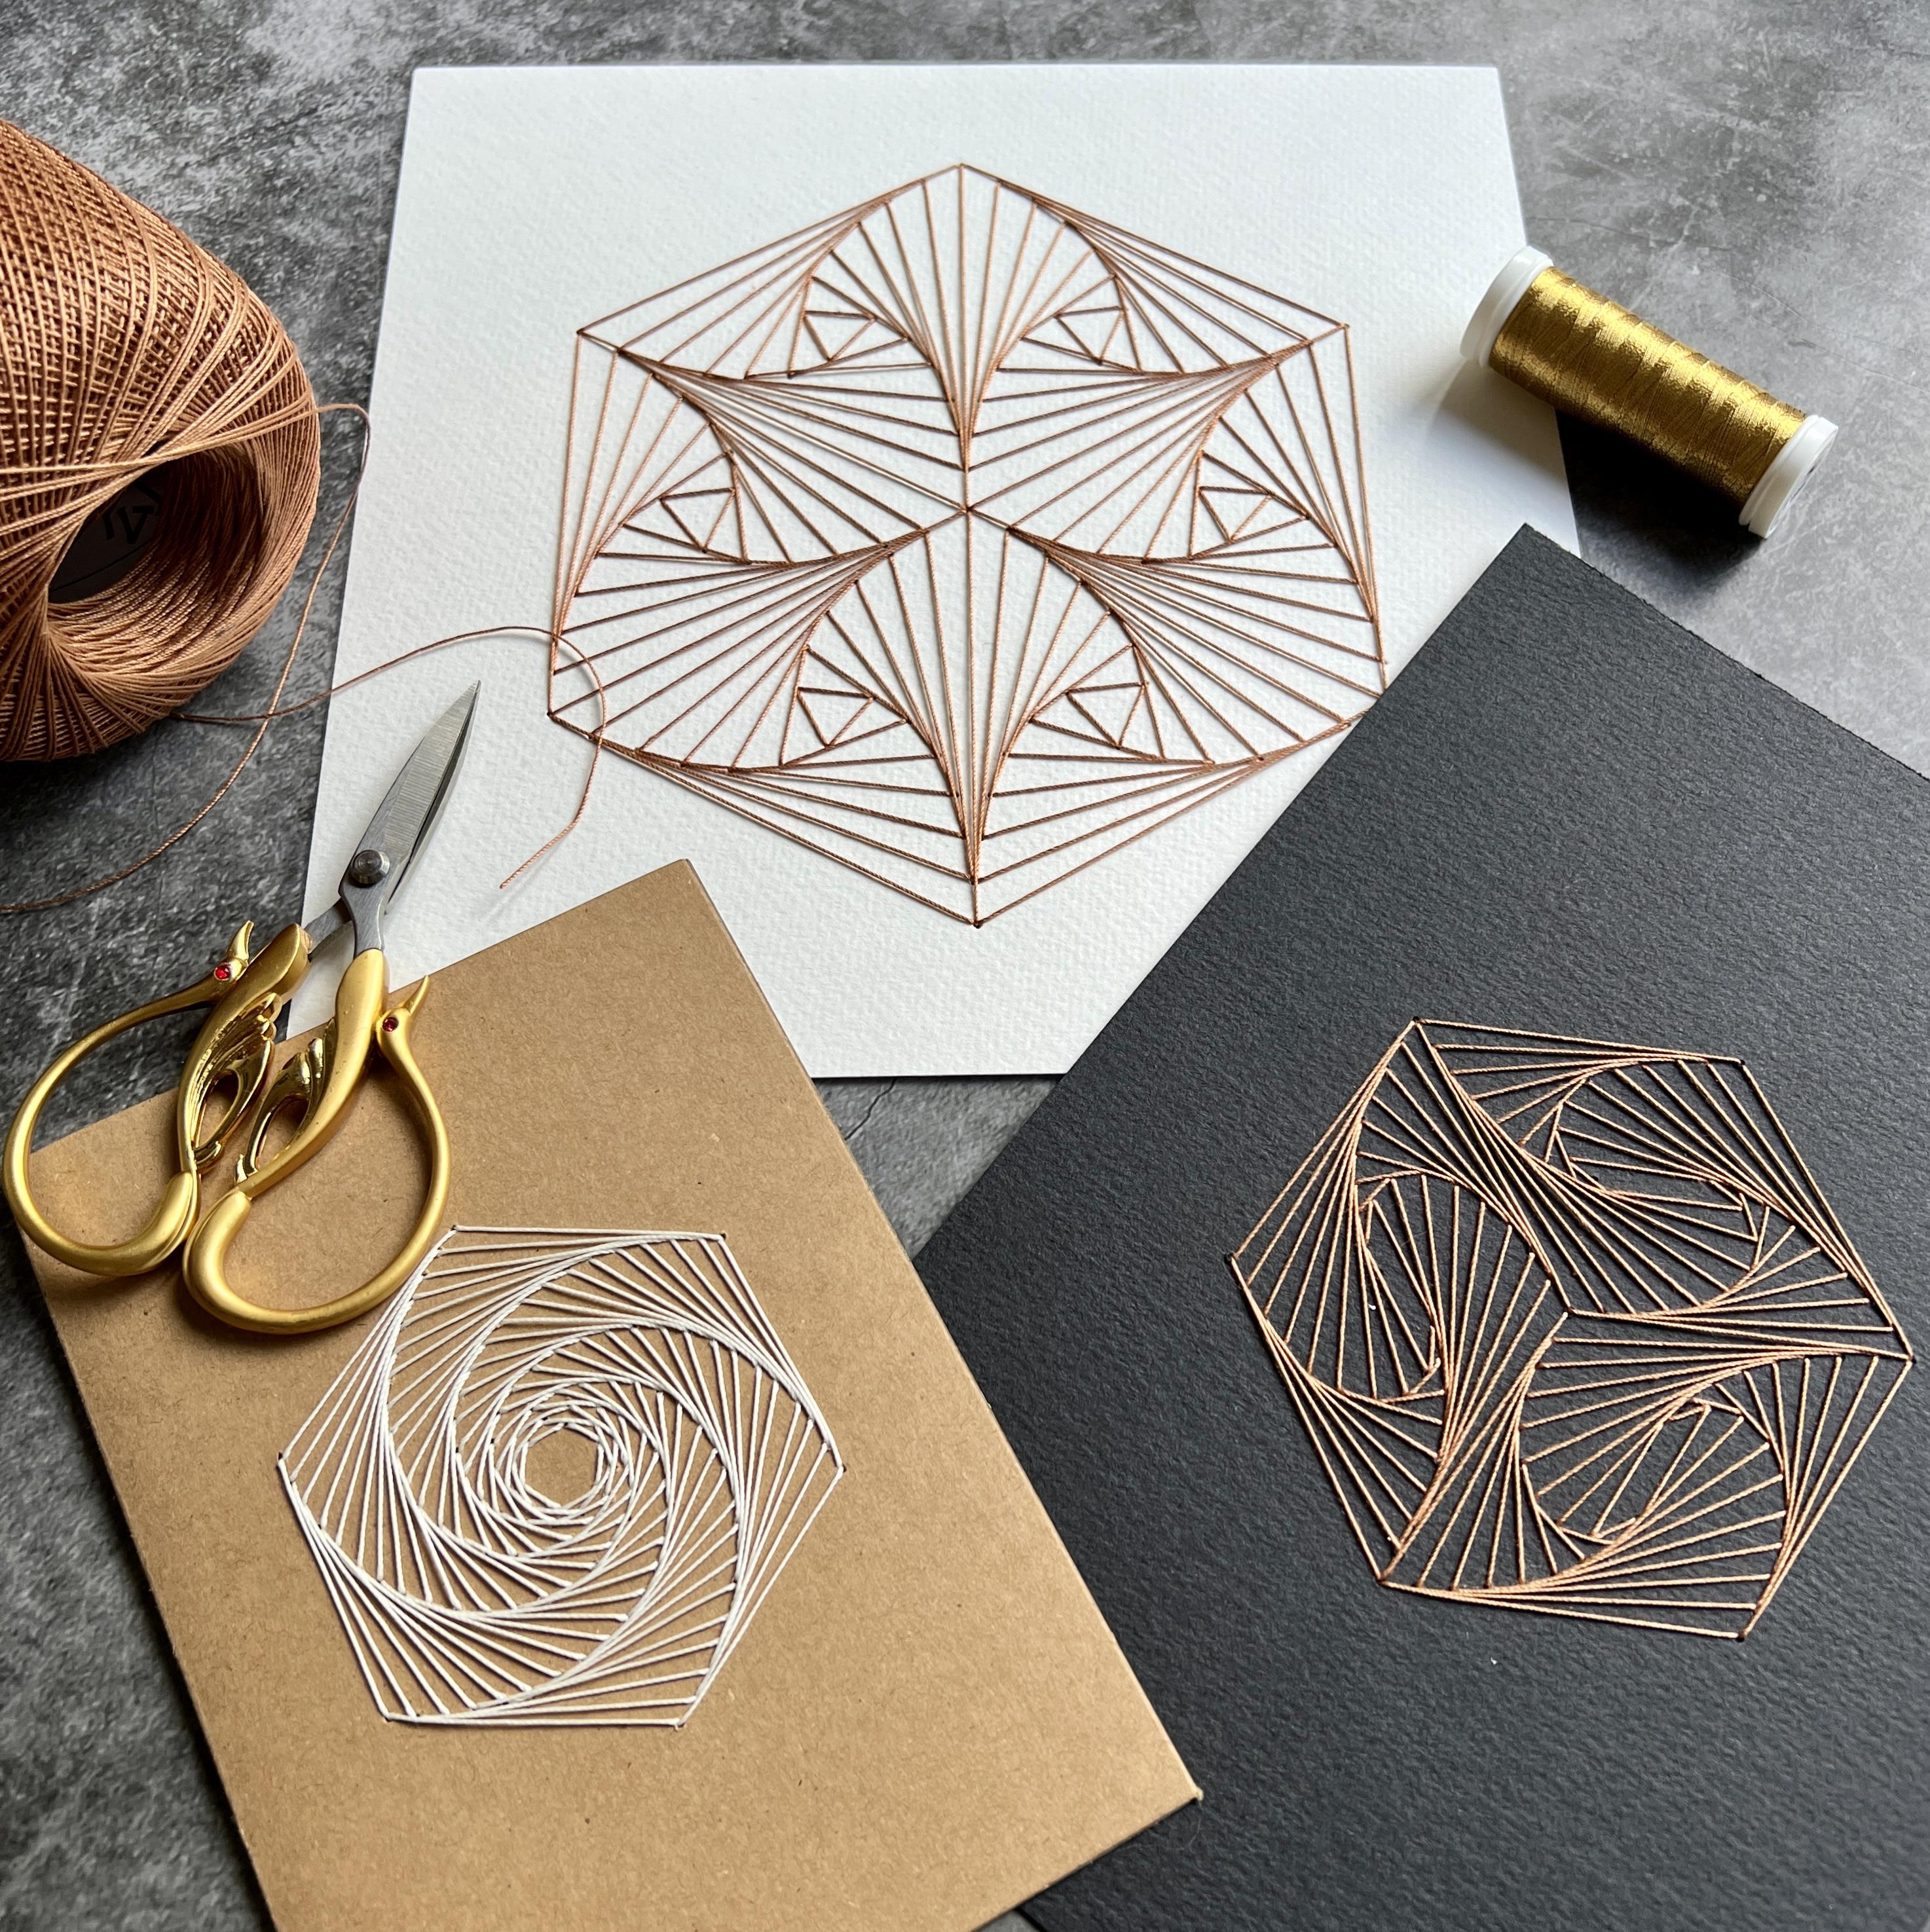
3. Materials for the Project: Drawing patterns is optional, but I would recommend it. It really helps you to understand
how the pattern works. However, the printable templates are all you need for
the stitching process. If you do want to draw, then it's a nice idea to print off the practice
templates or you can simply draw a triangle on
a fresh sheet of paper. There are step by
step instructions in the downloadable guide, and you can either print
those off or refer to them on your iPad
or your laptop. And then you'll need a ruler, a pencil, and
possibly an eraser. To embroider onto paper, you need to pre punch
the holes first. So for this stage,
you're going to need your ruler pencil and eraser again in order to create
an alignment grid. You'll need your
printable templates. These come in three sizes, small, medium or large. You'll need some tape to tape your template down
onto your paper, and you'll need something
to make holes in the paper. Now, I have this
small paper pricker, but anything from
a needle, a pin, or the pin that comes
in a pair of compasses, anything that's going to punch the paper easily but not
make too large a hole. You'll need a soft surface underneath your
paper as you punch. So I often use this
felt laptop cover, or I punch directly
onto a cork table mat. This, I think it's
polythene packaging foam. This piece is a bit small, but you can get larger pieces that come
in your packaging. That's great, too. And if you haven't got any
of these things, then a piece of cardboard from some packaging
is fine, as well. And finally, you
need the piece of card or paper that you're
going to be stitching on. Watercolor paper is perfect, around about 300 GSM, has a nice weight to it and
it'll support the stitches. Because these designs are
perfect for cards as well, you might want to
consider some card stock, make your own cards. Watercolor postcards are lovely. I've got a couple of
different sizes here. Black paper. This is
black watercolor paper. That can be really lovely
with white or silver thread. And this is probably
about as big as I'd go. This is 20 by 20 centimeter
watercolor paper. You could go as large as a
four or letter sized, as well. You don't want anything too
large because you'll be turning the paper up
and down as you stitch, and any larger gets a
little bit unwieldy. And then finally for
the exciting stage, the stitching stage, you're going to need
a pair of scissors. An old scissors is fine. A sewing needle, general purpose
sewing needles are fine. Just make sure that the eye of the needle is large enough
for your chosen thread. Pin cushions are useful just to keep track of
where your needle is. And I secure my work with tape. I just use masking tape. You could use washi tape. If you wanted something
with longevity, you could seek out
some acid free tape. And then finally,
you need to think about the thread
you'd like to use. One of my favorites is this machine embroidery
thread. It's very fine. I tend to use the
metallic Madeira threads, and they come in a host
of lovely, shiny colors. I'm excited to try this
Glo fine crochet thread. This is size 30. I love this sort of
bronzi coppery color. DMC pearl thread or any
pearl thread is also useful. This is size 12. I wouldn't
go thicker than size eight. Otherwise, I think it's
going to get too thick. And I haven't used this yet, but some of my students
have used it in the past. This is 0.45 millimeter
waxed polyester thread. This brand is glass, and this comes in some
lovely neutral tones, if that's your thing. Mmm.
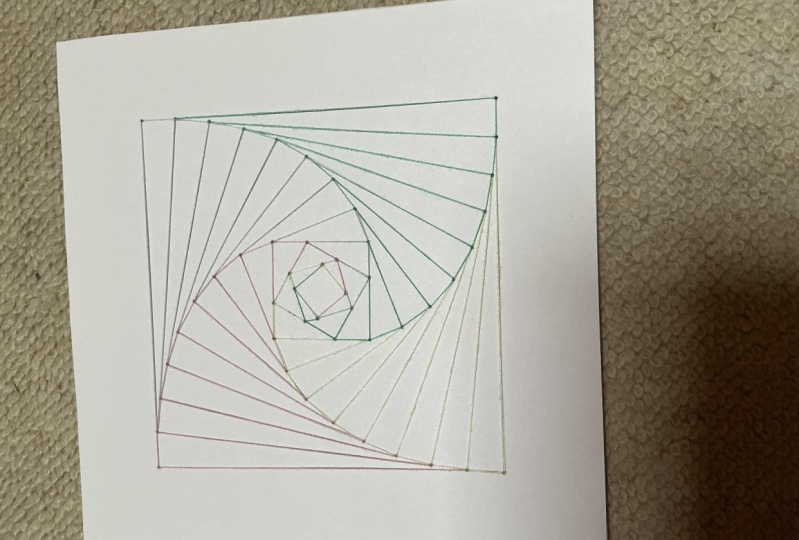
4. Curves From Straight Lines: So the drawing
stage is optional, but recommended to give you a better idea of how the
pattern is constructed, and then you can
go on and explore creating your own designs
at a later stage. You'll need your printed
template, pencil ruler eraser. And if you like, you
can have your step by step instructions nearby, but I will be demonstrating
it under the camera anyway. So these elegant arcs
that we're going to create from our series of twisted triangles are called pursuit curves or
curves of pursuit, and that's because they arise naturally in a situation where a predator is chasing a moving target or
pursuing a moving target. What happens if you're chasing a moving
target is that you continually have to adjust
your angle of pursuit. And hence, rather
than a straight line, your path of pursuit
traces out a curve. Now, we're going to approximate
our pursuit curves. And so we're going
to imagine that our objects that
are pursuing each other take one step
forward at a time. After each step, we trace out their new pursuit
Now, in a triangle, you have three pursuers
who are each pursuing their target either to the left of them or
to the right of them. If they pursue the
target to the right, you'll get an
anticlockwise twist, and if they pursue the
target to the left, you get a clockwise twist. So all that's left
then is to decide on your step size because you
keep that constant throughout. So I'm going to start with
1 centimeter step size, and then I'll demonstrate
on the bottom triangle the result of a half
centimeter step size, which results in a
more detailed pattern. So what I'm going to do is I'm going to start at my bottom left vertex or corner, and I'm going to make a
small mark 1 centimeter in from that corner. I'm then going to do the same to the right of each of
the other two vertices. You can twist your paper around. I'm going to keep mine in
this alignment just to make it clearer to demonstrate
under the camera. Once you have your three
little 1 centimeter increments all going in the same direction, you can then join those up. And these straight lines
represent the change in direction that each
of our little dots, our little objects
has to take to pursue their neighbor who has
now moved one step forward. And what that results in is a smaller twisted triangle sitting inside the larger
original triangle. Now we simply take
a 1 centimeter step forward along the edge of this
newest, smaller triangle. So I'm carefully making
sure that my ruler is lined up along my
new triangle edge. And again, 1 centimeter to
the right of each vertex. And join up these new paths, resulting in a new
smaller twisted triangle. We just repeat this
process now on each new triangle as it emerges. Measuring 1 centimeter to the right on my newest
triangle from each vertex, making sure I'm continuing in the same direction each time. Join those up and carry on. A And you continue until your final triangle is too small to take any
more steps along. So there's my first
pursuit curve unit. I'm now going to work
on the bottom one. I'm going to try a smaller
step length, and this time, I want to clockwise twist, so I'm going to be measuring to the left of each
of the vertices. A And we can see that although
it takes longer, actually, the effect
is much more dramatic. So you can do this process in shapes with any
number of sides. It's best done in
regular shapes, so a square, a regular pentagon, a regular hexagon, which is what we're focusing
on in this lesson, or any other regular shape. You can also do the process
in irregular shapes, and that's something
nice to try. You'll notice that you don't preserve the shape as you twist. The shapes will become more distorted as you
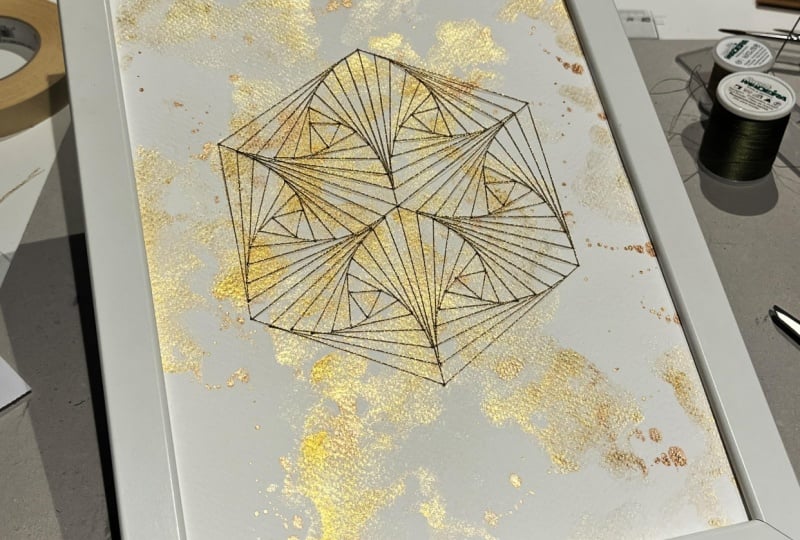
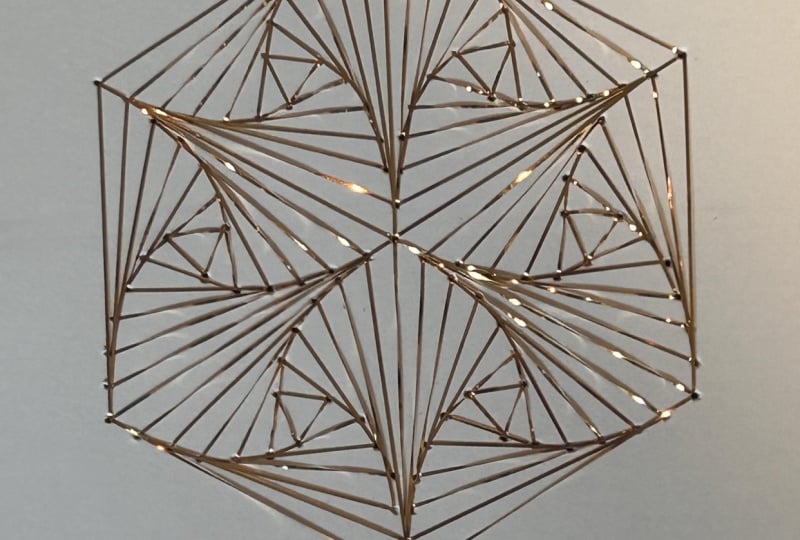
follow the process. So I've decided to focus this class on hexagons
because they're so versatile and you can get four different patterns from using a hexagon as
a starting point. If you just use the hexagon on its own as your starting shape, and follow the process
where you take the same step in from
each side as you go, join up all six points to make a smaller
hexagon and repeat, you get this beautiful
vortex swirl pattern. But hexacons can be divided up into some other
shapes as well. If you divide up your hexagon
into three rhombuses, you get the optical
illusion of a cube forming, and then you can do a curve
suit in each rhombus. If you twist the same
way in each rhombus, so each rhombus twisting anticlockwise or each
rhombus twisting clockwise, then you get this beautiful
cube slash Rhombus pattern with some really unusual
shapes emerging inside it, these sort of big twist shapes. Then finally, you can
divide up your hexagon into six equilateral triangles, and then you have two options. You can either have all six triangles twisting
in the same direction. So you would just take each
triangle as a basic unit, do your curve of pursuit
in each triangle in turn, and always twist
anticlockwise or clockwise. And you get this lovely
twist pattern emerging. Or you can alternate the direction of
neighboring triangles. So you might have one
twisting anticlockwise, and then it's neighbor twists
clockwise, anticlockwise, clockwise, anticlockwise, clockwise in each
of your triangles. And I think this is
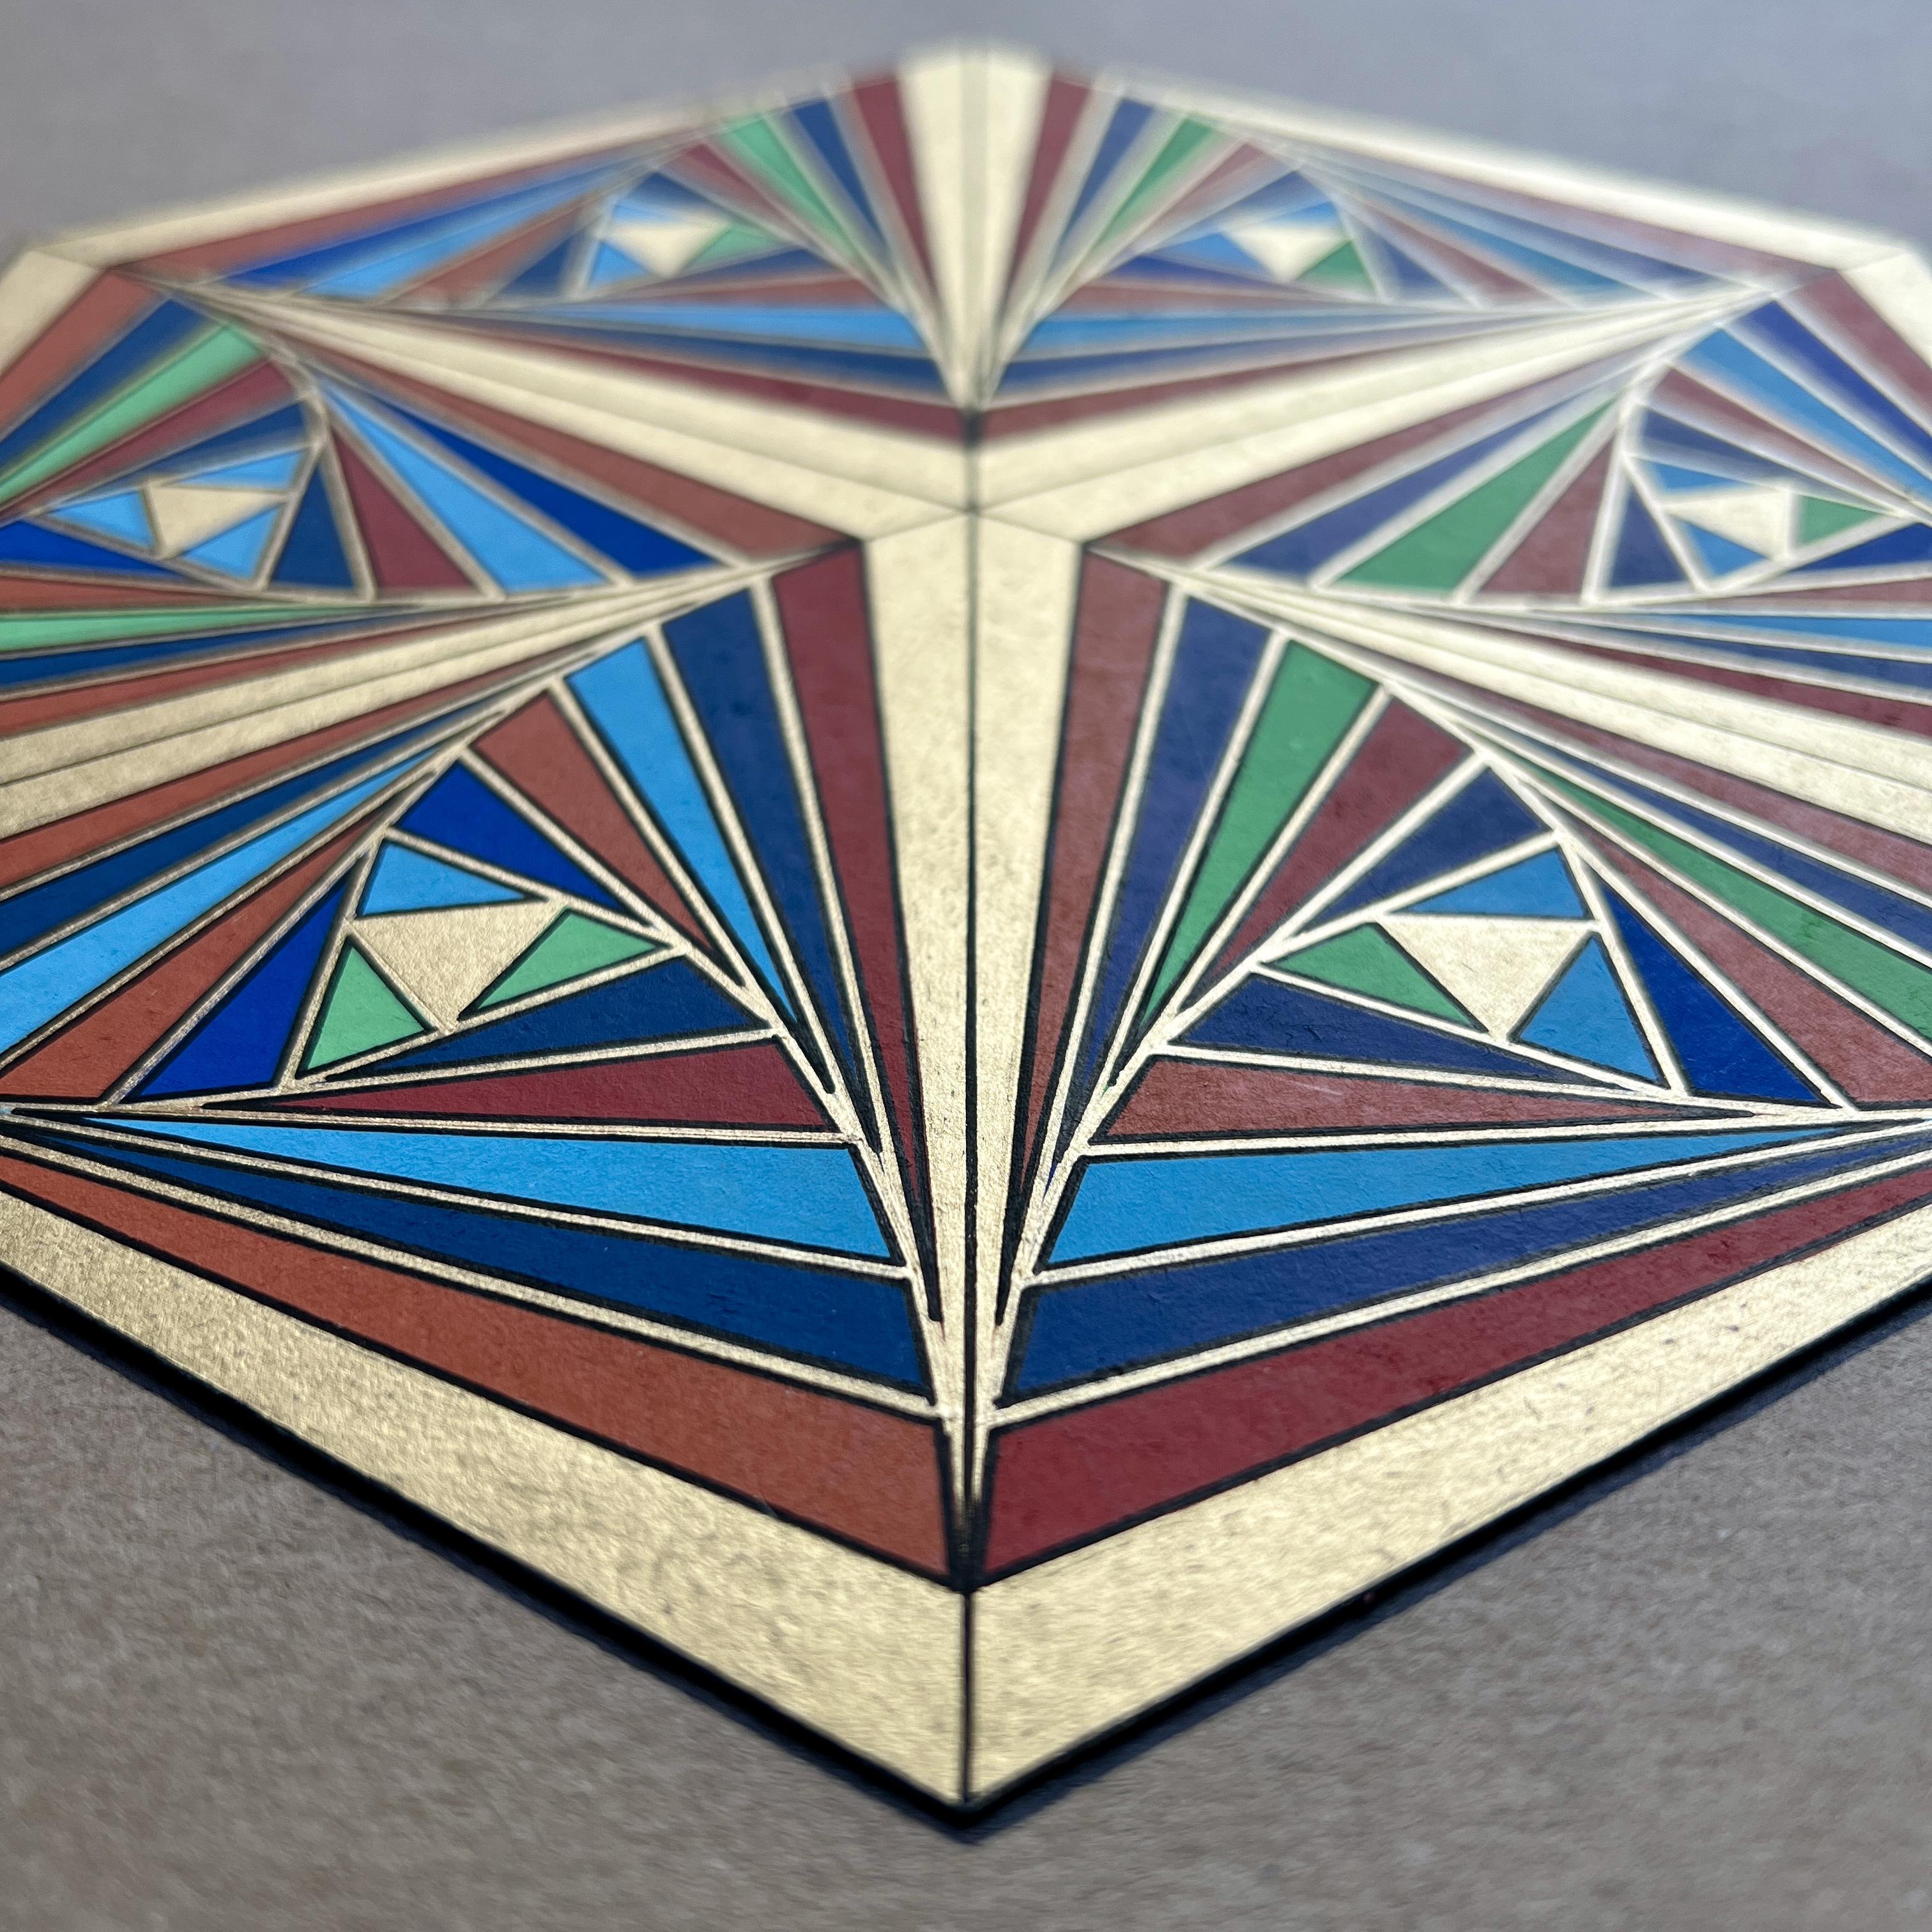
my favorite pattern. I love these fan shapes or
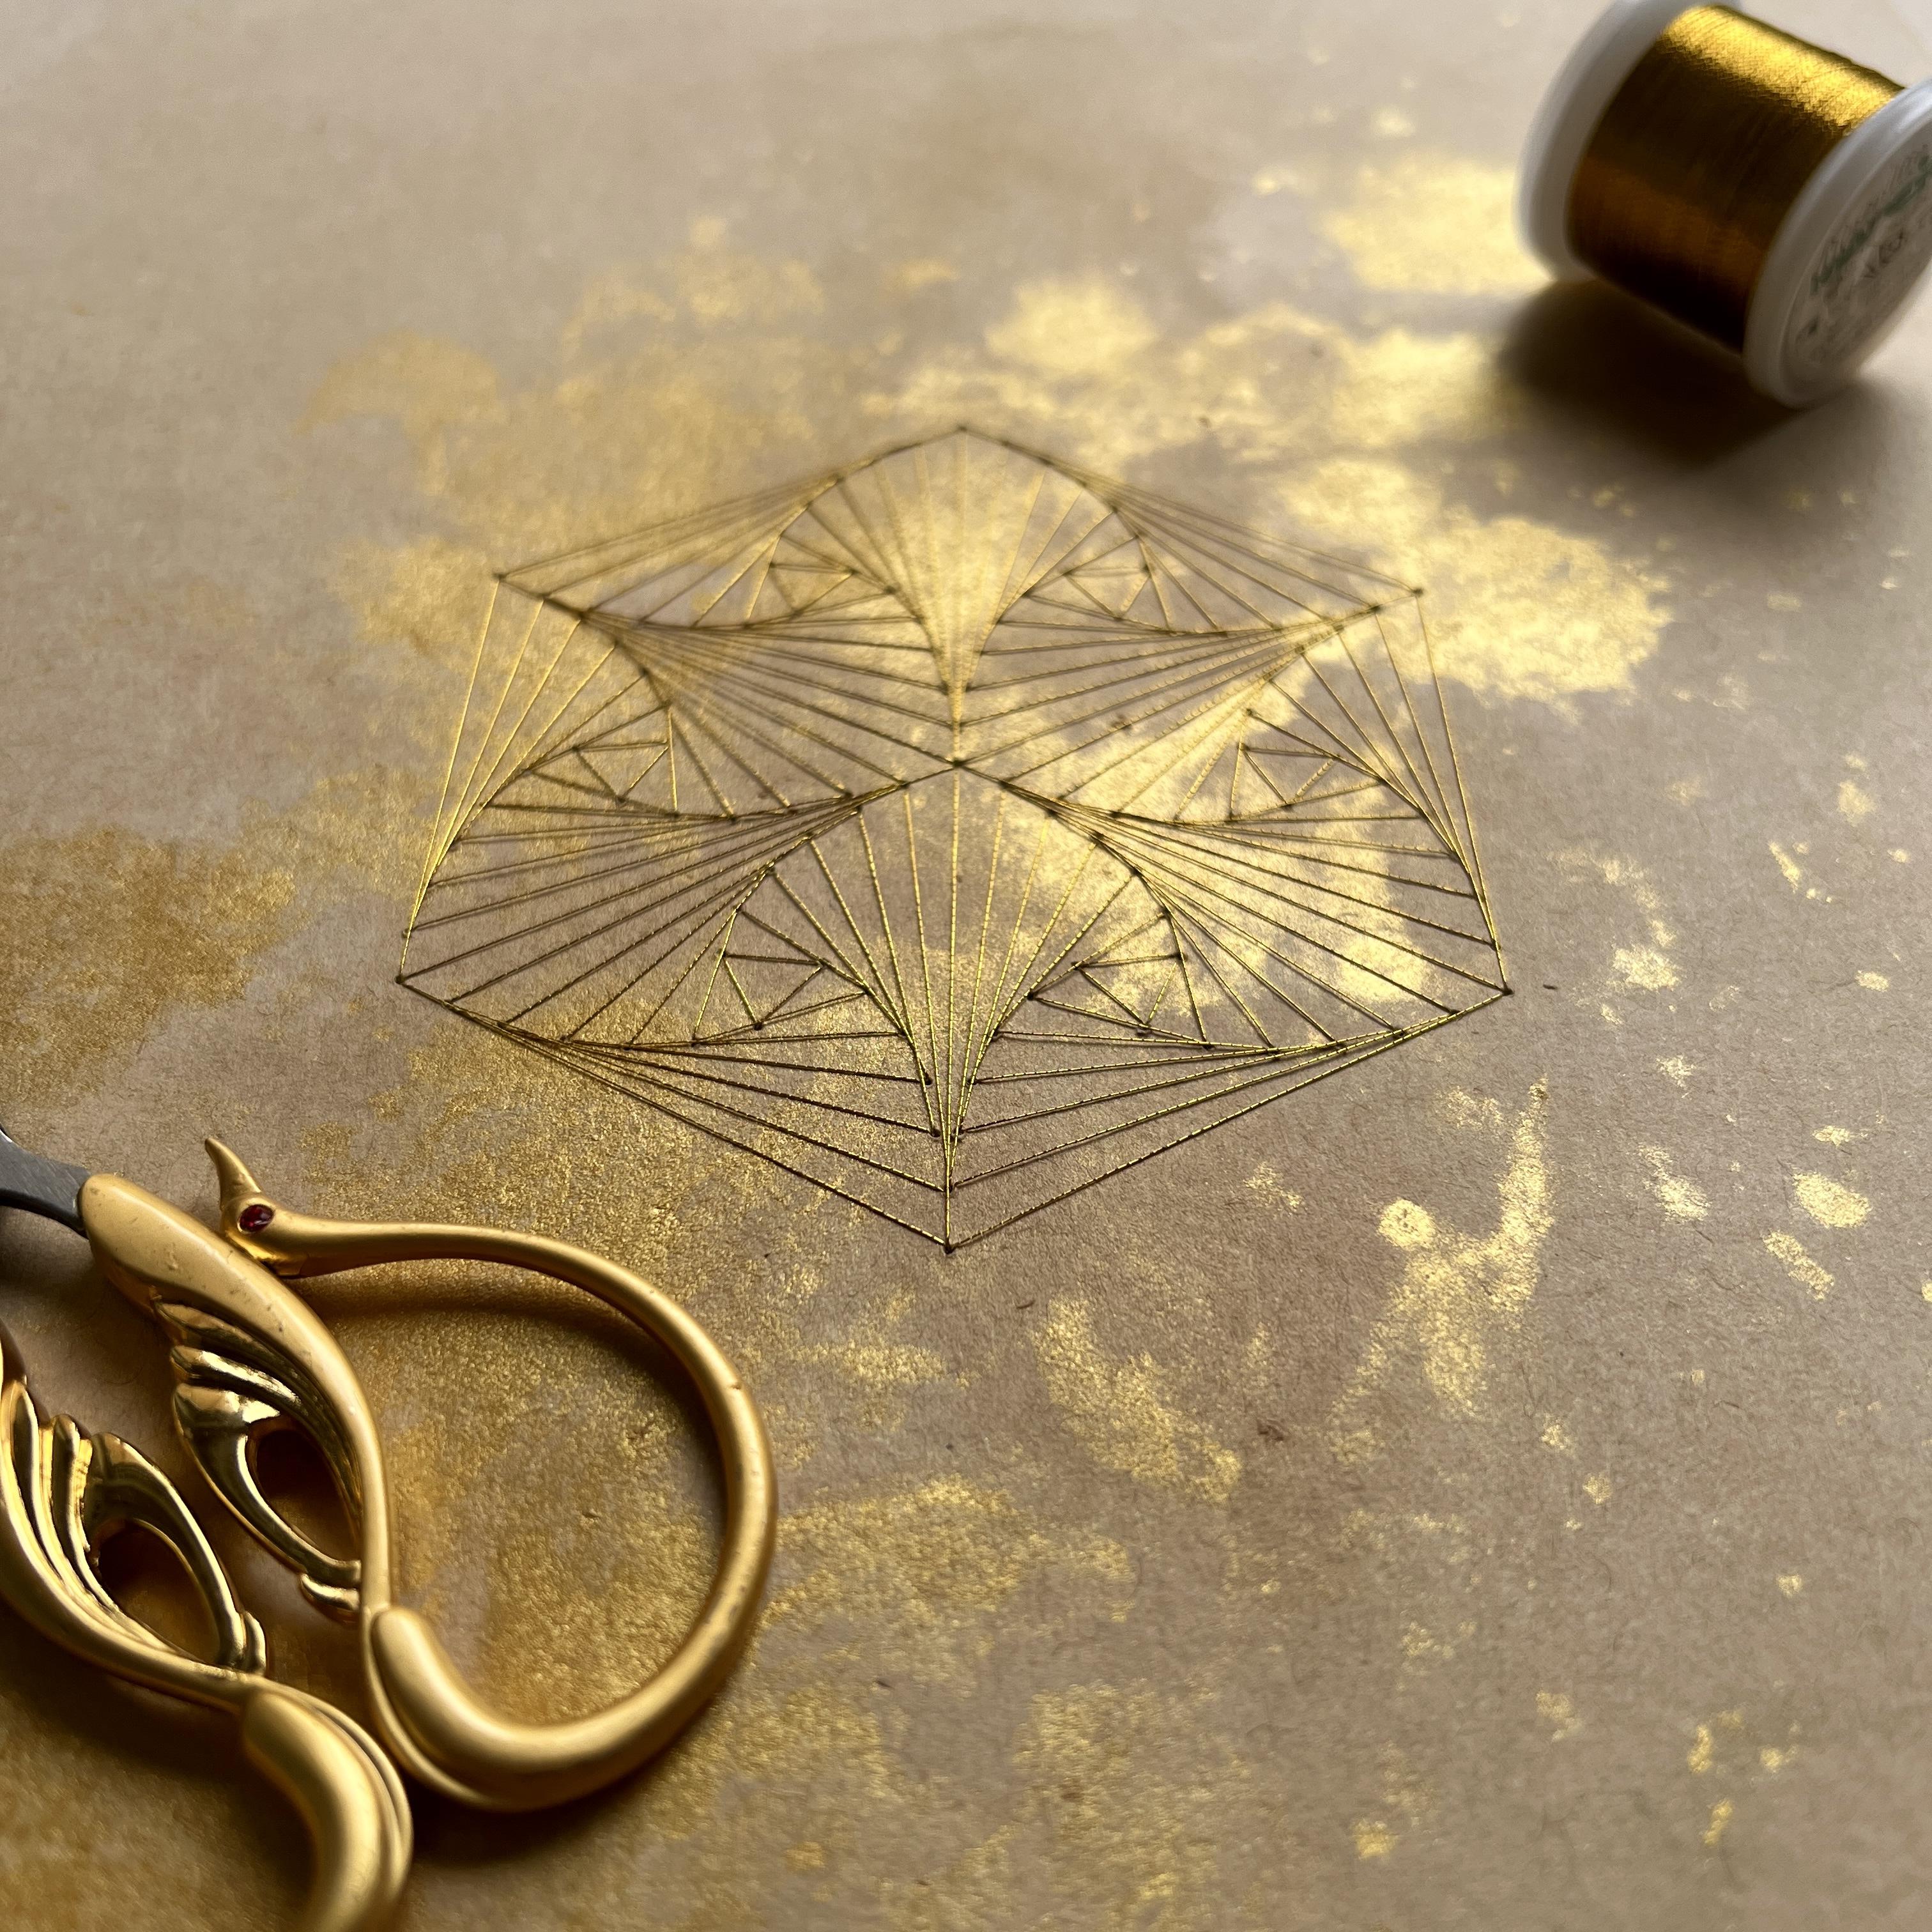
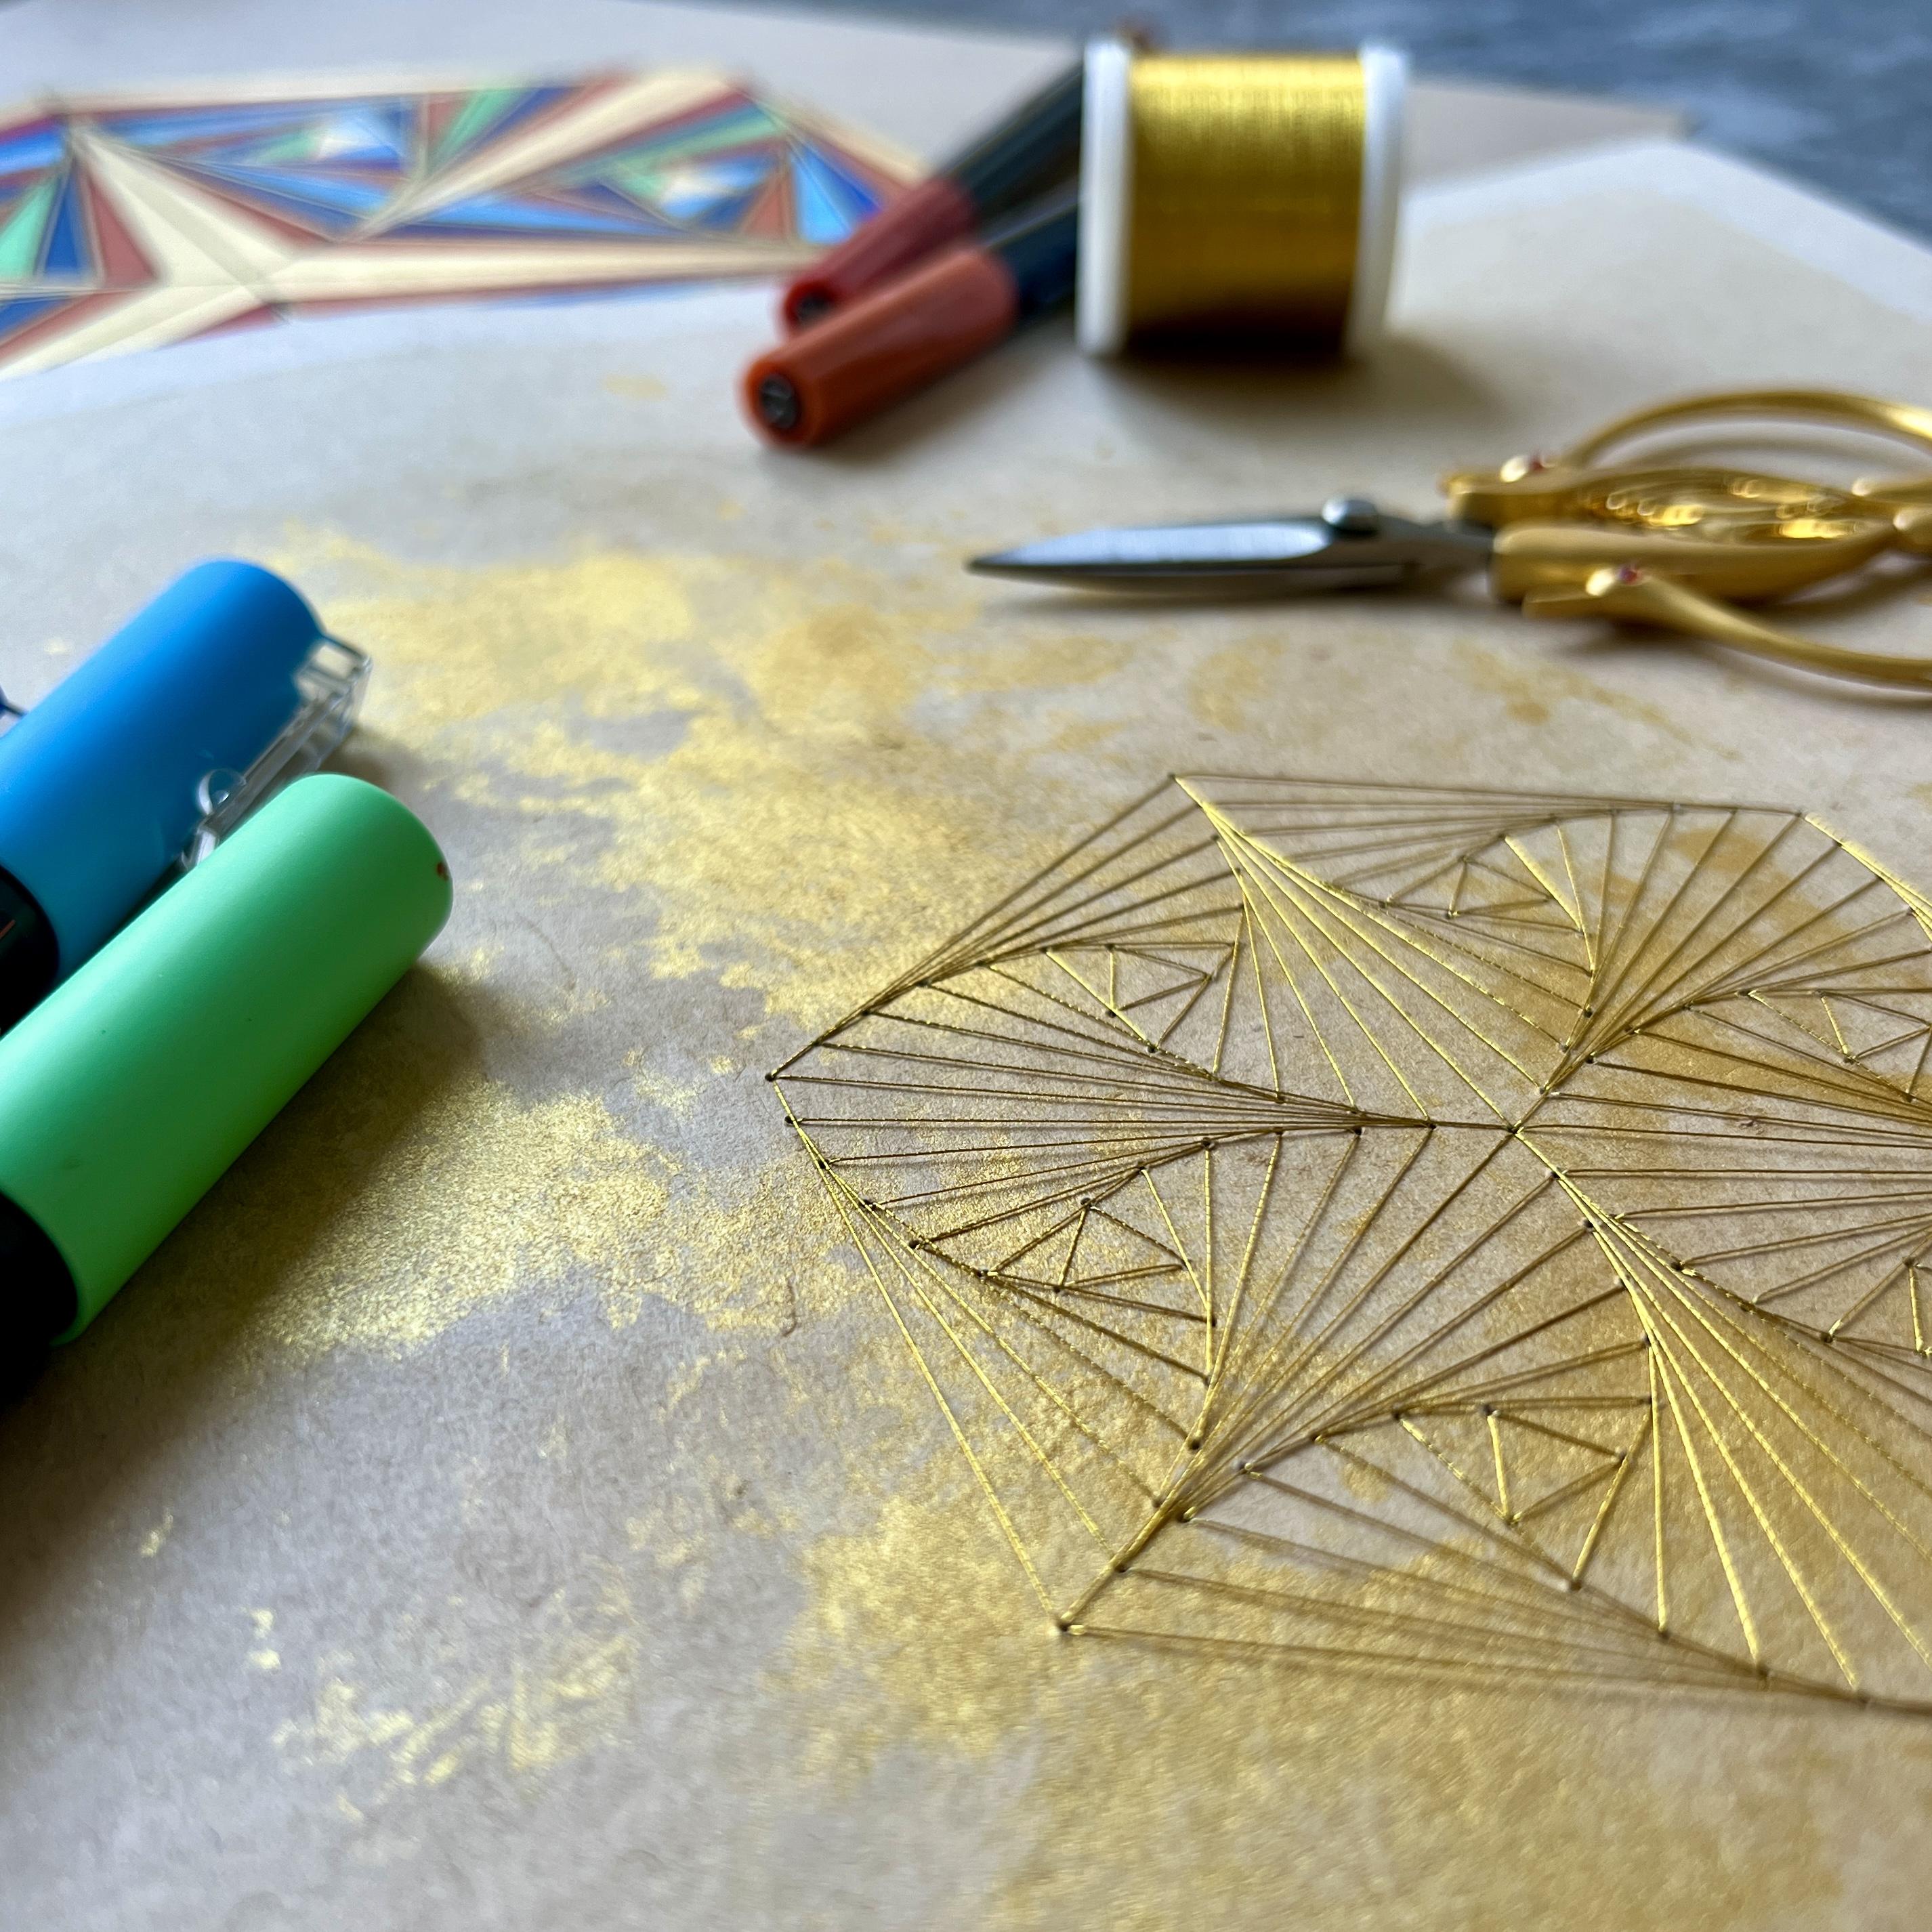
scallop shapes that emerge. And this is the one I'm going to demonstrate the stitching of.
5. Punching the Holes: Okay, so now it's
time to pre punch the holes onto our sheet of
watercolor paper or card. You'll need a ruler,
pencil and eraser. You'll need a pair of scissors
to cut out your template. You'll need some low tac
tape to stick it down. You'll need a soft surface to press on while you're
doing the punching, and you'll need something
to punch the holes with. I'm using my paper piercer. You could use the
point from a pair of compasses, a needle or a pin. So we're going to
start, first of all, by creating four sections of a grid that will orient
our template on the page. What you'll notice on the
template is that there are four small gray lines at north, east, south and west, which we're going to use
to make sure our template is aligned straight onto
the sheet of paper. So for that, we're going to need our ruler
pencil and eraser. And we're going to make two small marks halfway along
the paper horizontally, one in the top half, and
one in the bottom half, and then we're going to
do the same vertically, one on the right,
and one on the left, and then we can join those up. So I'm going to start by
measuring my piece of paper. It's got a width of
19.8 centimeters. Half of that is 9.9. So I'm going to start
with my vertical line, and I'm going to
put a small mark halfway in 9.9 centimeters. Really lightly with a pencil, and then I'm going
to do the same in the lower half of the page, 9.9 in halfway in. And then I'm going to do the same on the left and the right. Now my papers are square,
just double check. So I'm going to make
a small mark 9.9 centimeters up halfway
up on each side. And finally, I'm just
going to join up the outer sections of
these lines because I only need the line where it'll
emerge outside the side of the template so that I can align it with the gray line
on the template. So really lightly with a pencil, I'm going to work a little heavier just so that it
shows up under the camera. But you want a really
light section of line either side and at
the top and bottom. And you'll erase
this afterwards. Okay. Now I'm going to
cut out my template. Okay. And I need to decide
which way up I'd like it. Now, I prefer the templates in the orientation with the
point on the vertical. So the other option is to have
the flats on the vertical, but I prefer it this way up. And you can decide whether
you want the fan pointing upwards or pointing downwards. I'm going to go with
the fan pointing up. Now, I'm going to align my little gray lines with
the axis that I've drawn on, and but there we are. And when I'm happy, I'm going
to use my low tack tape, just a couple of pieces
to secure it to the page. And I'm ready to
punch the holes. Now, I would be systematic while you're punching the holes. So follow a line all the way in. And that way you won't
miss any holes out. You can always check at the end by holding your piece of paper up to the light and just make sure all the holes are in place. And then place your
paper pierc at the center of each hole
and give it a firm press. Okay, that's all
the holes punched. So now I just need to remove my template and erase my axes.
6. Stitching the Pattern 1: It's the final stage now, the stage when we
bring our patterns to life with the
addition of thread. For this stage, you're going
to need a pair of scissors, your needle, chosen thread,
pincushions useful, some low tack tape for
securing the work on the back, it's really useful to have your printable template to hand because the dotted lines on that indicate where
you need to stitch. However, I'm going
to talk you through a process for each of
the four patterns. So for the two
triangle patterns, there are six in the hexagon. We're going to focus on
one triangle at a time, and I think the best idea is to start with the
smallest triangle. Stitch that, then the
next one out, and so on. I'm going to leave
the very outer edge right until the end. I would do the same
for the hexagon. I would start with
my smallest hexagon and then work my way out a hexagon at a time until I get to the very outer hexagon, which is the frame
of the pattern. However, the three rhombuses are a little trickier to manage, and I would probably leave the rhombus pattern until you're more confident
with the whole process. Because rhombuses don't
start off as regular shapes, they distort as you produce
your curve of pursuit, and so they're
quite difficult to make out at the very center. So with the rhombuses Okay. I would probably start with the outer rhombuses
first on each of the three rhombuses
and work my way in because it is quite difficult to see where the very
central rhombuses are. So if you remember, for the pattern I'm
doing the fan pattern, each triangle has a
curve of pursuit that rotates in alternate directions
as you travel around. But all you need to do is just start with the
smallest triangle in each of the sections and work your way out doing a
larger triangle each time. Okay, so the first
thing I'm going to do is measure out a
length of thread. I'm using this new fine crochet
arm that I'm keen to try, and I usually measure
out an arm span's width, which I'm going
to double up as I stitch so that it's a bit
easier to keep track of. Because this is a bit thicker than the thread I normally use, I'm choosing a needle
with quite a large. I and I'm going to pull the thread so that half
of it is pulled through, which reduces the amount of thread I'm working
with at any one point, and I'll just
lengthen it as I go because I only want to
stitch with one strand. And then I need to identify this is where the
template comes in useful, I need to identify my
smallest triangle. So I'm going to start work
then in this triangle here, and its smallest triangle
is these three holes here. And so I'm going to come up through one
of these three holes. And I'm going to pull my thread through until there's
about 2 " left. And I'm going to pull
that to one side, making sure I'm not
obscuring any of the holes that I need
to stitch through. And I'm going to secure it. With a small piece
of masking tape. I'm going to make sure
that I press down really firmly over the thread
so that I know the tape is gripping the thread and
then press down the edges really firmly as well
so that they don't catch on anything
as I'm stitching. I like to leave a
couple of inches out because that
allows me to remove the masking tape and re tighten thread if it gets
baggy or loose. Then I'm going to identify that small central triangle and I'm going to stitch
my way around that. And then when one
triangle's complete, I went into this hole. I can see that the next
three holes that make the next triangle up are situated around the
central triangle, and I'm just going to
come up in the hole nearest to the one
I've just gone into. That saves a bit of thread. And I'm at the stage
now where I need to lengthen my thread a bit. Pull a bit more through. And then I'm stitching the
next biggest triangle. Give a gentle tug every
now and again just to make sure you're
keeping your thread nice and taut as you work. It's much easier doing that than having to tighten it
all up at the end. And second triangle complete. I went into this hole. This is one of the corners
of my next triangle. And so I'm going to come up through this hole as
it's the closest one. And then identify the other two vertices,
the other two corners. And we can see our pattern of
twisted triangles emerging. So I'm going to
continue in this way, and then I will next
demonstrate how to, if you like, cast on
and off when you get to the end of your current
piece of thread. Now, at this stage,
I'm just finishing off the penultimate triangle. I'm going to leave the final triangles until the very end, and then I'm going to stitch them to finish the piece off. What that means is I'm
not stitching over any holes that I need
in my next triangle. So once I've finished all but one triangle in one
section of the pattern, I've started with the top left. I can then move into the smallest triangle
in the next section. Now, if you're a
bit disorientated, double check your template, and I can see that I have
almost finished this one. It's just the final triangle which I'm going
to leave for now, and now I'm going to
move anticlockwise. You can move clockwise
or anticlockwise. I'm going to move around, and this is the next
smallest triangle. So looking on my sheet, I can see it's these three here. Just making sure
everything's nice and taut, and then I'm moving
out towards one of the holes for my next
smallest triangle. I and I think, looking at that, I've only got a few inches of thread left, so I think this is a good
time for me to cast off. So give everything a gentle tug just to make sure
it's nice and taut. And then put my needle in my pincushion so
that I don't lose it. And I'm going to
pull the thread out the side away from the
other holes that I need to stitch into and just
use a small piece of tape. You could, of course, use
scissors to cut your tape. And use a small piece of tape, make sure it's nice and taut, pull it out to the edge, secure it with your tape, pressing down firmly,
along the thread, and along all the edges. And then I'm just
going to snip it off before it emerges from
my sheet of paper. So just about there. Which needs enough of a length that if I need to
rework it at any point, I can remove my masking tape and tighten any work
that gets loose. Now I need to work
out where I need to start off my next
piece of thread. If I look at where I emerge, I emerge from this point here, which means I would
have carried on by coming up into this
next hole here, which is the first vertex of
the next size triangle up. I simply need to start
again from this point here, which is my natural next step. And remind myself
I came out here. That means I'm going in here. I pull through everything, but a couple of inches
and secure that down. Okay. And then I just
carry on as before. Got quite a lot of thread here. Let's just get that
straightened out. Okay, gentle tug, identify
my triangle, and off I go. And as before, I'm not going
to do the final triangle, which has got shared edges
with the triangle next door. Instead, I've done all but one, and I'm now going to identify my smallest triangle in the next section of the
pattern and come up in one of those holes there. Mm.
7. Stitching the Pattern 2: Okay, so I'm at this
stage now where I've completed all
six triangles, except for the final
triangle in each of the six. And there's quite a nice
easy way to finish that off. I can just do the hexagon that goes all the way
around the outside. And then the three axes that
run through the pattern. So where am I? Here. Mm gonna come out
to this point here. Knowing my luck, I'll run
out of thread halfway round. Let's have a look. So I'm going to focus
on that outer hexagon. I'll go all the way round and then double back to
fill in the gaps. Yes, I'm about to
run out of thread. How much more have I got? Enough one more side. I've done three sides
with gaps in between. I'm now going to double
back and fill in those gaps around the edge of the
hexagon, the cast off. And on again, I can see I have these two sides needing to do so I'll just come up at
any of these points. Come up here. Okay. Finish my hexagon sides off. Oh, wrong needle. This one. Right. So that's the outer
hexagon stitched. And now I just need to
I think I'll come up at the center and stitch out to each of the outer vertices now. When I come through
the center each time, I just need to be careful not to pierce the thread
that's already there. Fine tug to get it all taut. Ah. Cast off. And the back's a complete mess, but the front is beautiful. Mmm. Mm.
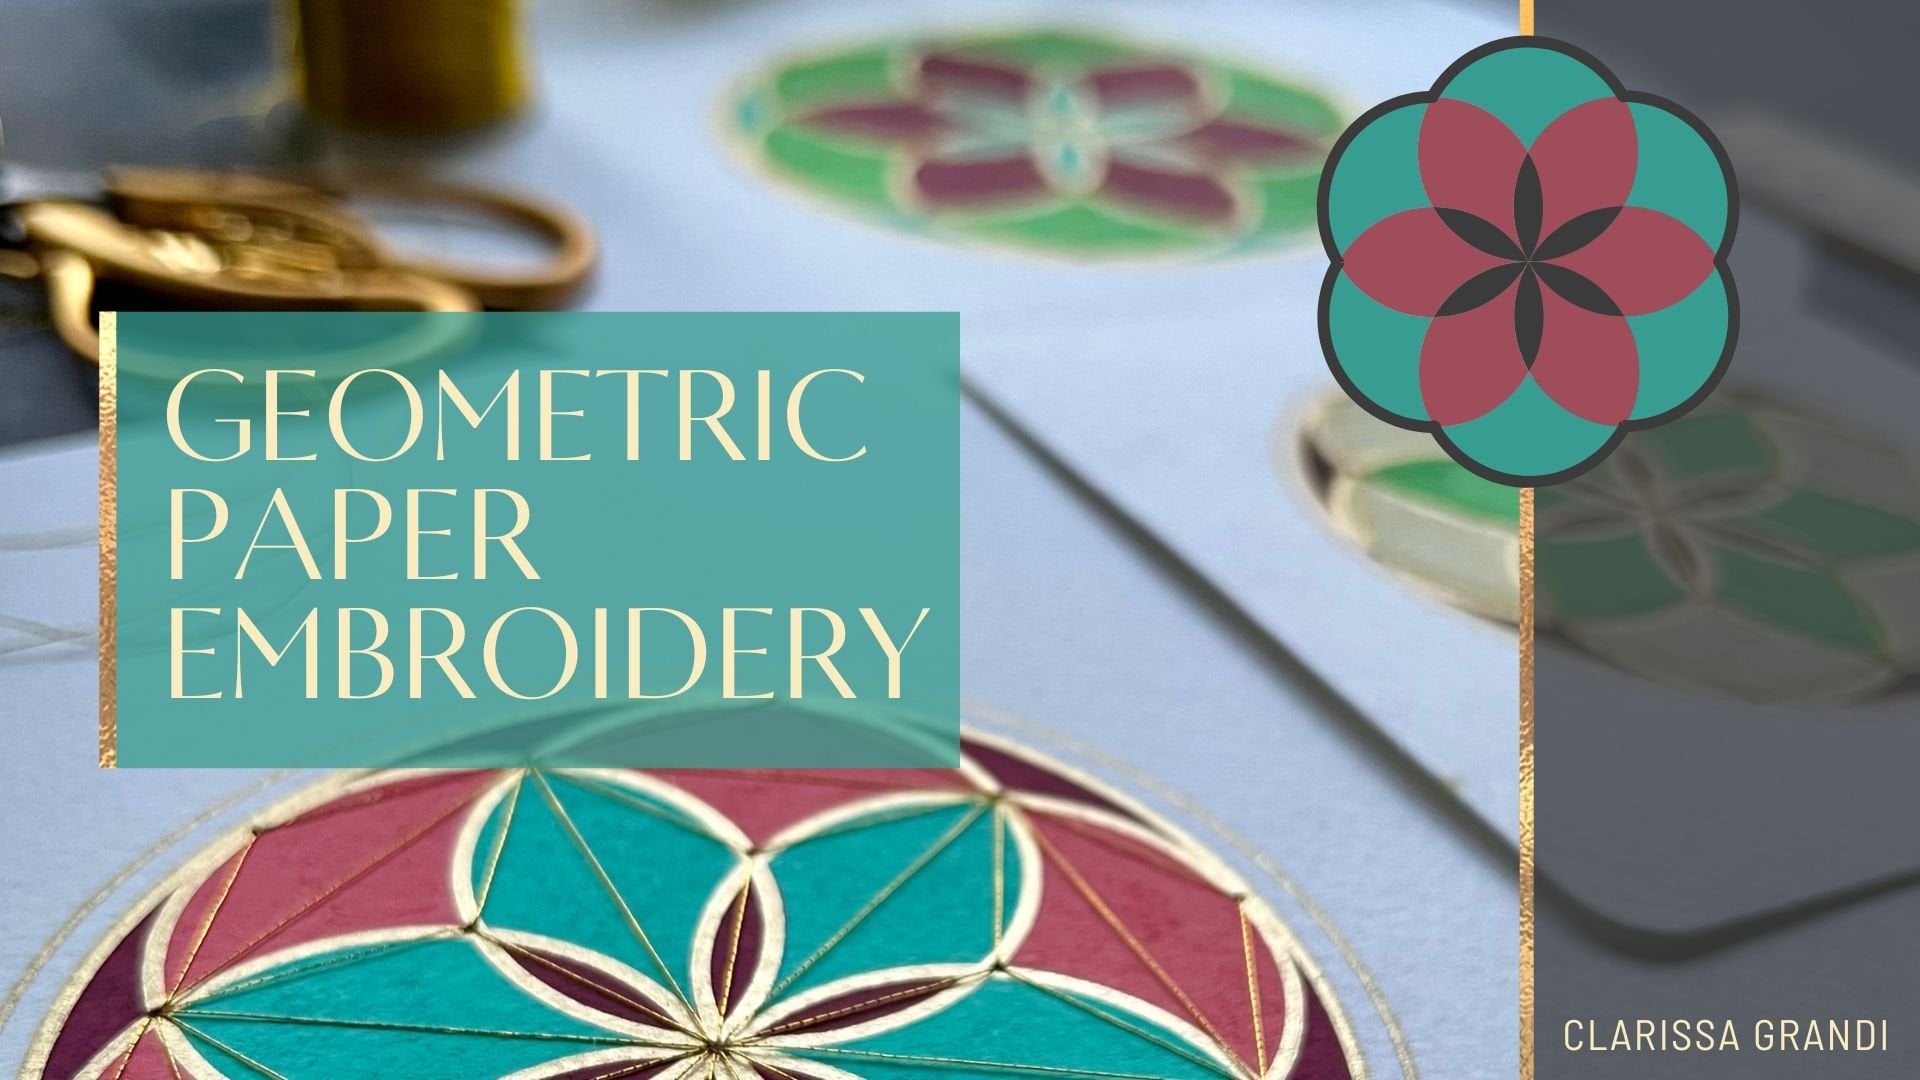
8. More Design Ideas: I just want to finish by showing you some
exemplars that I've created to give you some ideas for different things you
can do with the patterns. This is the one that
I stitched with you, the fan or scallop shapes made from the triangles that twist
in different directions. Really happy with
this one, really enjoyed using this
fine crochet yarn, so much so that I tried
it on some black paper, and I think it's
worked really well. Now, this is the Rhombuss
pattern, three Rhombuses. And as predicted, things
got a little tricky as I approached the
center where the shapes, they're no longer Rhombuses. They're parallelograms now. Where they get a little
difficult to decipher. So I've actually
modified the template, and I've removed the very
smallest one from the center, and actually it
works much better. So on black paper,
really happy with this. I think it's very effective. And then I had to go at
making a Christmas card. So this is the single
hexagon twist, and I've covered up the mess on the inside by simply sticking
down some white paper. And I think it's
really effective. I really like the white
on the craft card. It's got a bit of a scandy vibe. And then this is
something else I tried. This is a background of tea stain with some
splotches of gold ink, and then I've stitched in
my favorite gold thread. And hopefully that's
glinting in the light. And I really think
this one's effective. I actually quite
like the small size of the pattern on
the larger paper. I tried it again on gray paper, a larger version of the pattern, and this is the
triangle's twist pattern. I hope you can see. And
not quite so effective. I think I needed
a heavier thread, so I may actually
remove the thread and restitch this one
in a different thread. But hopefully you can
see the difference. This is the twist pattern where each triangle is
twisting the same way. And then of course, you can
just draw the patterns. You don't need to
stitch them at all. So this is a large
scallop or fan design, and I colored it in with my acrylic paint markers and a gold pen and outlined
it all in black. Really happy with it,
very dramatic piece. And then finally, you can use the patterns to decorate
polyhedron nets. It's really easy
to find these nets free online to
download and print. This is an octahedron, which means it has
eight triangular faces. So it was perfect to try out some triangular curves
of pursuiton because it has an even number of triangular faces meeting at
a point when it's assembled, that means you can try the alternating direction of twist. So I have got the
little fan shapes emerging where two
triangles meet, and I'm really keen to get
this one colored in and assembled just to see
the final outcome. So loads of ideas
for you to try. I'm really, really excited
to see what you all produce.
9. Conclusion: Thank you for joining
me for this class. I hope you're happy
with your hand stitched curves of pursuit. I'd really love
to see your work. So if you're on Instagram, do share it on the
hash tag paper stitched pursuit curves and copy me in at
Clarissagrandy dot. If you've got any
questions about materials or techniques
or anything else, please pop a question in the
discussion section below, and I'll be sure to keep my eye on it and get back to you. I regularly offer live
online Zoom classes on all things geometric art, and I've got a
growing bank of on demand video classes
on Skillshare two. So if you'd like to learn
more about what's on offer, please check out my link below. And if you'd like to do
mathematical art activities like this one with your
children or students, then do check out my
website, artfulmath.com. It's got a host of totally free lesson resources
for you to try, which have all been road tested
in my own math classroom. And I can report back
that they'll provide hours of mathematical,
colorful fun. So all that's left to say is take care and happy stitching.
 Clarissa Grandi, Artist | Educator | Author