Transcripts
1. Introduction: You looking for a creative, relaxing way to decorate your
festive cards this year? If so, you might be interested
in learning how to create these beautiful hand stitched snowflakes from a
simple geometric grid. Hi, I'm Clarissa, a geometric artist and educator
from Suffolk in the UK. Welcome to my new class
Paper stitch snowflakes, where I'll be showing
you how to use a simple hand
stitching technique on watercolor paper or card to create these unique
snowflake designs. They'll be suitable for
festive greeting cards or winter themed artworks
to decorate your home, and the class is
perfect for anyone, whether you're a
total beginner or already have some paper
stitching experience. So join me as I guide you step by step
through everything you need to know from the materials you'll need
to complete the project, how to prepare your paperll
card for stitching onto, and how to stitch your
chosen snowflake pattern. Finally, I'll give you
some ideas for modifying the provided templates to
create your own unique designs. By the end of this class, you'll have stunning
handmade Christmas cards to share with
friends and family. I'm excited to see
what you create, so let's get started.
2. The Class Project: The project in this class is
to design and hand stitch a geometric snowflake pattern onto watercolor paper or card. We'll begin by looking at the materials needed to
complete the project. Then I'll carefully demonstrate the process of
drawing one unit of the pattern onto paper first so that you're
confident with how it works before you stitch. Next, I'll show you how to align the printable
template accurately and how to punch the holes
ready for stitching. And finally, I'll
demonstrate the stitching of a simple snowflake
design before showing you some ideas for modifying the templates to create
your own unique versions. You'll need your printable
templates at the ready, so do download the
class notes below, which also include a
handy materials list and some additional
design ideas to try. When you've finished
your project, remember to upload
some photographs to the project section. I do so love seeing
everyone's work, and it's also really useful for other students to have a bank
of images to be inspired. So let's get started
with a closer look at the materials you'll need
to complete this project.
3. Materials for the Project: Before you start to
stitch your snowflake, you'll first need to pre
punch the holes in the paper. I use a paper piercer
tool for this, but any tool with a fine, sharp point, such as
the point on a pair of compasses or a pin
is absolutely fine. You'll need a pencil
ruler and eraser. You'll need some low tag
tape and a pair of scissors, and you'll need your
printable template in your chosen size, small, medium or large. You'll also need the paper
you're going to stitch on. The small template is suitable for a four by six inch card. The medium is suitable for
a six by six inch card, and the large template
is suitable for larger pieces of
watercolor paper or card. Finally, you'll
need a surface to press on while you're punching
the holes on the paper. I use a corked table mat, but a piece of felt or
a folded blanket or towel or a piece of
cardboard is suitable, too. And finally, for the
stitching stage, the most exciting stage,
you'll need a needle. A general purpose
sewing needle is fine. You'll need your chosen thread. A favorite of mine
at the moment is this Glo fine crochet yarn. This is size 30. I also like using pearl cotton. This is size eight. And I like this waxed thread, as well. This is not 0.45 millimeters. And finally, let's not
forget metallic thread. This is machine embroidery
thread from Madeira. You'll also need
some low tac tape to secure the thread on
the back of the paper. If you're like me and you're
constantly losing things, you'll need a pin cushion. Needle threaders are also useful and a small pair of scissors.
4. Curves From Straight Lines: So before we start to stitch, I think it's a really good
idea to have some idea of how the pattern is built up from a series of straight lines. You can see from the
example pattern sheet, that we have curved sections
that are created by simply drawing little line
segments between points on each section of the pattern on each
arm of the snowflake. These curves are called
parabolic curves mathematically. And if you want to
know a little bit more about how to
stitch with them, you can watch my parabolic
paper stitching lesson. But for now, it's enough to know that we're simply
going to be joining straight lines
between two points on V shaped sections
of the pattern. There's also a step by step instruction sheet which
talks through the process, but I'll be demonstrating it
under the camera as well. We can see from the
instructions that we focus our attention
on a V shape, one V shape at a time, and you can see that
we're going to be stitching between a
dot on the outside of one of the arms of
the V and a dot on the inside of the
other arm of the V, and we'll do a stitch
between the two. We'll then move one.in on one arm and one dot out on the other and
draw another line and repeat this process
moving in one dot each time on one arm and out one
dot each time on the other. And if we continue in that way, you'll see we get this
elegant parabolic curve traced out in the envelope
of the straight lines. One other thing you'll notice
is that when we stitch, we leave the very outermost and the very innermost
points on each line. And we're going to leave
those till the end. And that's because if you
stitch those two points first, you're covering up
all the other holes that you'll need
to stitch through, and it'll just get
annoying having to move the piece of thread
out of the way each time. So we're going to
leave our final axes the outermost to the innermost will leave those
right till the end. So you can see that I'm going to demonstrate on a
zoomed in section of the snowflake and that's so that you can see it more
clearly under the camera. I want to demonstrate stitching
between a narrow V and stitching between
a wider V shape so that you can
see the different types of curves produced. Now, as I mentioned earlier, we're not going to start with the outermost dot and the
innermost dot on our V shape. Instead, we're going to start one step in and one step out. And if you were
stitching, essentially, you'd come up through one of these two points,
say this point here, you'd come up through the paper, and then you'd pass
through the paper on the other side through
this innermost point. And you would create
this straight line. You'd then pass under the paper and come out in the
point next door one out on this arm and stitch
to the 0.1 in on this arm. You'll then pass under the
paper and come out this point, one step in and stitch to
this point, one step out. Again, under out
here, stitch to here. Pass under out through here
and stitch to one out. Then at this stage, we'll leave the stitching
because we're leaving the outermost
points until we finished using these axes. Now, if I wanted to stitch this piece of the
pattern next door, I still need to use this axis, but I'm also now
using this axis, and this is the V shape
I'm concentrating on. If you remember, we stitch
from out on one arm to in on the other leaving
that center point for now, leaving the outermost
point for now. So if you've just come
through the pattern here, you'll want to pass
underneath and come out either here or here. So I'm going to come out
here and stitch to here. Pass under the paper. Come out next door, one in, stitch to one out. Under come out, one out, stitch to one in, and so on. Now I'm going to
stop at this point because I want to
stitch these wider Vs as well and they make use
of the same set of axes. I don't want to stitch
over the axes just yet. Now I turn my attention to this wider V shape and the
two arms that make up the V, and I'm going to start one in on one arm and one from the
outside on the other. Pop out here, stitch to here. Pop out here, stitch
to here. Pop out here. Here. Here. To here. And then because I
still need this arm of the V and this arm of the V, not stitching the
outer axes yet. Instead, I think I've just
come in through here, so I might come out here, which is one point
in on this arm and stitch to one point from
the outside on this arm, as these are the two
arms I'm focused on now. Under the paper and out.
Under the paper and out. And at this stage, I've stitched all the
inner dots together. I finished this section of
the arm of my snowflake, and so now if I want to, I can stitch the final axis or I can leave that
right till the end. So for stitching the final axis, depends where you've last
entered into the paper, but you would want to come
out at either the center or the outermost point on
any section of line. So imagine that I come
out through the center, and then I might stitch to the outermost point on
the end of this arm. Then I might want to come up through the outermost
point on this arm, stitch into the center, come under the paper out here. Stitch over all these
lines into the center, and then finally
pass underneath. Come out here and
stitch into the center. And then this section of
the pattern is complete. Now it's up to you how you design your snowflake patterns. You may want to use
all of the points. You may only want to use some of the points
on the pattern. You may want to do a
mixture of narrow Vs and wide Vs or just
focus on one type. That's completely up to you. But the first thing I'd
recommend doing is printing off the largest template and having a practice at creating some
of these curved sections.
5. Punching the Holes: Now, before you stitch on paper, you need to pre punch
the holes because paper is a much tougher
surface than fabric is. So I'll talk you
through that now. You'll need a pencil
ruler and eraser. You'll need a pair of scissors
to cut out your template. You'll need, obviously, the paper that you'll
be working on. You need whatever tool you're going to punch
your holes with. You'll need a little
bit of masking tape to secure your
template to the paper, your chosen size of template. And there's a soft
surface to place under the paper when
I punch the holes, I'm going to use this
soft laptop cover. Now, one thing you'll notice
on the printed templates are these four little
sections of line north, east, south and west. And these are here to help
you position your template accurately and centrally
on your piece of paper. So the first thing
we need to do then is to add some
axis to our sheet. Now I want my pattern
positioned centrally, so I'm going to create
an axis halfway up horizontally and an axis
halfway in vertically. To do that, I'm
first going to make two small marks halfway
up on the left and right, and then two small marks
halfway in above and below, and I can join these
up with a ruler. So my paper is just
under 20 centimeters. It's 19.8. So on the left hand side, I'm making a small mark,
9.9 centimeters up. That's halfway. And
the same on the right. 9.9. And then I can join these, align my ruler to them and
draw on my horizontal axis, but I actually only need
sections of the axis that will emerge from underneath the
template either side. And so very lightly, just draw a couple of inches of straight line either
side of the page. I'm then going to do
the same halfway in. So at the top, 9.9 centimeters in,
and at the bottom, 9.9 centimeters in,
join these two up, and again, only sections of axis at the top and
bottom of the page. Nice and lightly because I'll need to erase them afterwards. Okay, then we need to
cut out our templates. When your templates cut out, we now need to align it with
the axes we've created. So I'm going to align it vertically first
and then move it up or down to align with
the horizontal axes. And finally, we're
going to secure it with some masking tape. We then need to decide
which of the holes from the template we're
going to punch and which we're going to leave, and this will depend
on your chosen design. Now, I'm going to
be demonstrating this design at the top. I haven't stitched it yet, and I'm rather in love with these beautiful flower petals that emerge in the
negative space. So I'm going to be
stitching this one, which is the simplest of
the example patterns. You can, of course, design
your own patterns, too. That means I'm not going
to need this inner ring of shapes because I just need the outer
sections of each arm and the three main
axes of the snowflake. Now, I know from experience that if there are
holes on the template, I'll punch them regardless of
whether I need them or not. I'm going to actually cross
through the ones I don't need so that I have a reminder when I'm punching of what I
don't want to punch. Now, I need my
three central axis. I need the forked
sections at the end, but I don't need either of these overlapping
triangle shapes. So I'm just going to
squiggle through them. So I don't forget that
I don't need them. Okay. Next, I'm going to need my soft
surface to press on. Now, when punching, it's always
a good idea to press down on the paper with your
non dominant hand while you're punching the holes. Then it's a good idea also to
be systematic and that way, you're less likely
to miss holes out. I think I'm going to
stitch my one, two, three main axes first and then work through the V shapes
on each of the six arms. I'm punching nice and firmly and cleanly through the
center of each hole. Then once you're done, you
can check that you haven't left any out by turning
over your paper, and you see this lovely array of raised dots from where you
punch the holes through. And then all that's left to
do is to carefully remove the template and erase those four sets of axes.
6. Stitching the Snowflake Part 1: Okay, so the final stage, the stitching stage, and I'm really looking forward
to completing this piece. For this stage, you'll
need your scissors, needle thread is useful. You'll need some low tach tape
to secure it on the back. This is my preferred method because it allows
you to remove it, retighten the
threads, and so on. You'll also need
your chosen thread, and a pincushion can be useful. And finally, you
might want to have your example pattern
sheet to refer to, or if you've designed
your own pattern, then the template
that you've designed. So the first thing
I'm going to do is measure out a
length of thread. I'm using this lovely
dull gold color from wonderful wonderful
pearl cotton size eight. And what does it go? And I usually measure out
about an arm span's width, and then pull most of it
through as I'm working or pull half of it through
as I'm working to just shorten my
working length. And then let's just reacquaint ourselves with the pattern. So if you remember, each of the V shapes is stitched as
its own separate parabola. And I'll be stitching
on each arm, two V shapes that make
the fork at the top, and then the shallower or wider V shape that goes down
the stem of the snowflake. Finally, I'll be stitching in between the arms of
the snowflake as well, six more mini parabolas
at the center. And the other thing to
remember is we don't start at the outermost or
innermost point of the V. We start one in or one out. So I'm going to come up through one away from the
top of the pattern, and I'm going to draw most
of the thread through. I leaving a couple
of inches out, which will allow me to readjust if I ever need to in the future. And I'm just going to secure that with a
little bit of tape. You could cut your tape with
scissors to make it neater. I tend to just tear a little
bit off and press that down, make sure that it's not covering any of the holes you
need to stitch through. Press firmly along the length of the thread so you can be sure
the tape is securing it, and then make sure that all
the little edges are firmly pressed down as well
so that they don't catch on your thread
while you're working. And then I've come up one in. I need to stitch to either
the left arm of the V or the right arm of the other V one in one out rather
from the center. So I think I will go
to this one here. And now to save thread, I'm going to come
up in the closest hole and then stitch back. So I'm going to come up one out in the direction
away from the center. And I stitch to one
in on the other arm. Come up. One in. Give a gentle tug to just make
sure it's nice and tight. Stitch to one out. Come up in this hole here. One out. Gen tug, go to lengthen my thread a
little because I can see. I'm getting to the end
of my single part. There we are. And
stitched one in. With this slightly thicker
thread, this cotton, you do have to pull through
quite slowly, otherwise, you risk tangles. I'm
going to come up one in and stitch to one
out. And this is the last stitch for now
on this little parabola. My final stitches from the outermost point to the innermost point would
cover up the holes, and I'm going to need this
set of holes again when I do my shallower curve on the sort
of stem of the snowflake. So now I've ended up over here, and I'm going to work
on this one next, I think. I'm going to come out. I could either come out, if I'm looking at this V,
I could come out here, which would be one in
from this arm of it, or I could come out here, which would be one
out on this arm. I think I'm going
to come out here. Okay, giving it another
tug just to make sure that the previous
parable is nice and tight. And I've come up one
away from the center, so I stitch to one
end from the top of the other arm of this V.
And then I'm coming down. Now I'm starting to
stitch through holes that have already got
thread going through them. So I just need to take
a little bit more care, make sure I don't split the
thread that's already there. And stitch to one out. We can see how quickly the
little parabola takes shape. And always keep in
mind that you move one out on one arm and
one in on the other. A And that's the second parabola
finished for now. Now, because I've removed
the second pair of Vs on the arm of the snowflake because I'm doing a more
simplified pattern, I can't see where sort of
the end would have been. So what I'm going to do instead is make sure I start here, and then I'll come
to a natural end when I've put on the one, two, three, four, five
strands of the parabola. So I'm going to come up here, one out on this arm, we'll stitch two, one
in on this arm here. So I'm coming up
through here. Okay. Check the tangles, and
I'm stitching to here. Then on in. Tangle to one out. And before I speed
up the process, I will just demonstrate the entirety of this
shallow parabola. So one out. Little tug. I feel like I need
to, that's why. This thread is not behaving. Right, so I've got a knot here. Well, this is probably a
good opportunity for me to demonstrate casting off and casting on because I'm
gonna have to cut it here.
7. Stitching the Snowflake Part 2: I'm going to cut the knot
out and pull this through. So I'm going to start again
with this piece in a moment. And this is the piece
I've had to cut. So I'm just going to stick this down as if I'm casting off, pulling it away from
the other hole, so I might pop it here. There's a nice bit
of space might have a smaller piece of tape. Pressing it down,
pressing the edges down. And then just cutting that off. And now I'm going to pretend
that never happened and figure out where I
would have gone next with this piece of thread
if I hadn't cut it off. So let's have a think. I'd just come in here,
so I'd come out here. So that's one down. And again, I am going
to stick this bitlon. Securing those pesky
sticky edges. There we go. Nobody ever sees the back, so we don't need to
worry about that. Okay. All right. That's better. Keeping a close eye
on proceedings. Possibly I started with too
long a length. One out. And one in, and I can see
that I need to stop now for the moment because my next
stitch would use the center, and I'm avoiding that for now. So now I want to do
the other side of this more shallow curve. So I'm going to come
out as I did before, one away from the
center on the main arm. Yep, that's right. Give
everything a little bit of a tug, and then I'm stitching
to this point here. One in from the end of the
V and proceeding as before. Okay, so now I know I won't
be using any of these one, two, three, four arms of the Vs. So I can now stitch over those.
So where have I ended up? I've ended up here
right near the inside, so I'm going to come up through the center and then out
to each arm in tur. Now, my center is hiding
under a piece of thread. There it is. Okay, so I might
go up to this one first. And then I can either
come back up through the center or I can come up through one
of the outer ones. It doesn't make
much difference if they're the same distance away. I might come up through there, then stitch into the center. Hopefully, I've got enough
thread to finish this section, and then I might come
up through here. In Tug. And finally, I've got this piece here, so I'm going to come
up at the bottom, and stitch back into the center. And we can see it really does finish it off rather
beautifully now. It looks complete, whereas
2 minutes ago it didn't. So one, two, three, four, five, six, seven, this is the very top of the next V. The bottom of one
V is the top of the next. So I want to come up
one in from the top. And I stitch, too. I'm doing this
here. So I stitch. There's my center. I'm going to stitch to one out
from the center. Then once you've figured
out your first stitch, you're off because you're
always just going one in one out tugging to keep it tight. And I know this is now the final part
of this parabola that I'm stitching for now because the final two stitches would make use of the
end and the center, and I don't want to do that yet. So I have a bit of thread left. I can think about moving
up into this arm now. Might be easier to
cast off and start again doing the same
process I did before, then I kind of know where I am. And I think I might
actually do that. Okay, so I'm going to cast off. I am wasting a bit
of thread here, but I think it just
makes sense to do that. As you become more confident with the way the parabolas work, you'll be able to sort of
just work your way around. But I think for
demonstration purposes, and if it's the first
time you're doing it, it's better to use a kind of system you've
already established. Okay. So new piece of thread, and I'm going to start on
the outside of this arm, this next door arm. And at some point, I'll cross over and do
this it'll V in between. So so I'm going to start on
the outside here somewhere. I could start at the
top of either of these little arms.
One in, of course. So I'm going to start
here. I started one in. From the end, I moved to
one out from the center. And then just continue. Okay. That's that one
finished for now. I'm now moving into
my two shallower vs. Um, I'm gonna come up. This is my center
still unstitched. I'm gonna come one away from it. So just double check
when you start a new V that you're not coming
up at the end of the arm, you're coming up one away. This is the center or end. So leaving that one free still and come up one away. I'm gonna stitch to one in. That first stitch is the
hardest, and then you're off. Everything's relative to it. Okay. So that's
another arm complete. The petal shapes not really well defined yet because
I haven't done the final stitch in this V, and that will complete
it and sort of fill in these little
gaps here and here. But I'm not going to
do that yet because I still need this arm when
I do this parabola, and I'll need this arm when I do this parabola. So I'm
going to leave all that. I might leave these six sections right until the very end. So as before, I'm now going to move to
this little V shape here. And I'm gonna come
out all on one. Come out one in. It's easier. Once you've got one
already in place, you're essentially
just copying it. Okay. And as before, though, I've got quite a
bit of thread left, just so that I don't
get in a knot, literally, I'm going to cast off and cast on again at
the outside of one arm. Actually I got quite a bit left. I might be brave.
Just figure out. Yeah, I'm going to trust
myself and trust you all, and I'm actually
going to continue. I think I might have enough
to do one parabola section. So because I've already
got two as references, I can see where I
need to come up. Now, this is the
end of my parabola. This will be the center
now between the two. I need to come up
one in from that. I need to come up
through this hole here because this one is the one that I'll be
stitching as my final stitch. So Basically got to
come up two away. Right. My calculations
are correct, I think. Yes. So I've come up two away. And now I'm joining this one. There's my sent to
avoid that. One away. Let's hope I've
got enough thread. Okay, so I've got to the stage where I've finished the
parabola that's in, if you like, the crook
of the snowflakes arms. I'm now going to start on
this outer section of arm, this shallow parabola
between the wide V, and I just need to remember
where to come out next. This one that's currently unstitched is my center that I'm leaving
right till the end. I need to come up
one away from that. I leave two gaps.
8. Stitching the Snowflake Part 3: So I'm stitching
my final parabola. And then I've just got to
finish off these six alarms, and my snowflake
will be complete. Okay, so I think I've got enough thread to
do the six arms. So I need to stitch from
the center to these points, one away from where my
parabolas currently end. So these outer six points here. So I'm going to come through my center and stitch out one. Then rather than repeatedly coming up through that center, I might come up through
the correct position. In the next one and
then into the center. And then out always checking
going through the right. And this is having
the desired effect of filling in those little gaps. And completing these
lovely petal shapes. Okay, final stitch. Gentle tug. Double check that
everything is stitched, or my axes are stitched. Yep. Pulling it taut and away from other holes. Okay. There we go, very pretty. Really
happy with that one. Now I will talk briefly through alternative
ways of securing. You could of course
knot your thread, but I find it really hard to knot close to the paper
when I'm finishing off. Because of that,
sometimes you can get bagginess in the threads if it's not really tightly
secured at the back. Also because occasionally I
make mistakes and things, and knots quite a
permanent finish, whereas tape can be, as you've seen, removed, you can unpick part
of it and then restitch it if you've
made a mistake. Also, tape is flat, whereas knots are more raised, and the thicker your thread,
the fatter the knot. Whereas tape is nice and flat. So if you're going to put
something over the back as you would do if this was
on the inside of a card, you would cover the back
up with some paper. I'll show you an example of
that in the next lesson. It just means that you
get a flatter surface. If, however you want a
more permanent solution than masking tape, you may want to consider
an archive or white tape. I sometimes use framers tape, especially if I've made a
piece that I want to sell. I just feel it's a more
permanent solution, and it's a bit neater as well. It's white, not bright yellow, and it just makes the
back a bit tidier. So those are some
options to consider. But most of my pieces I just
leave the masking tape on.
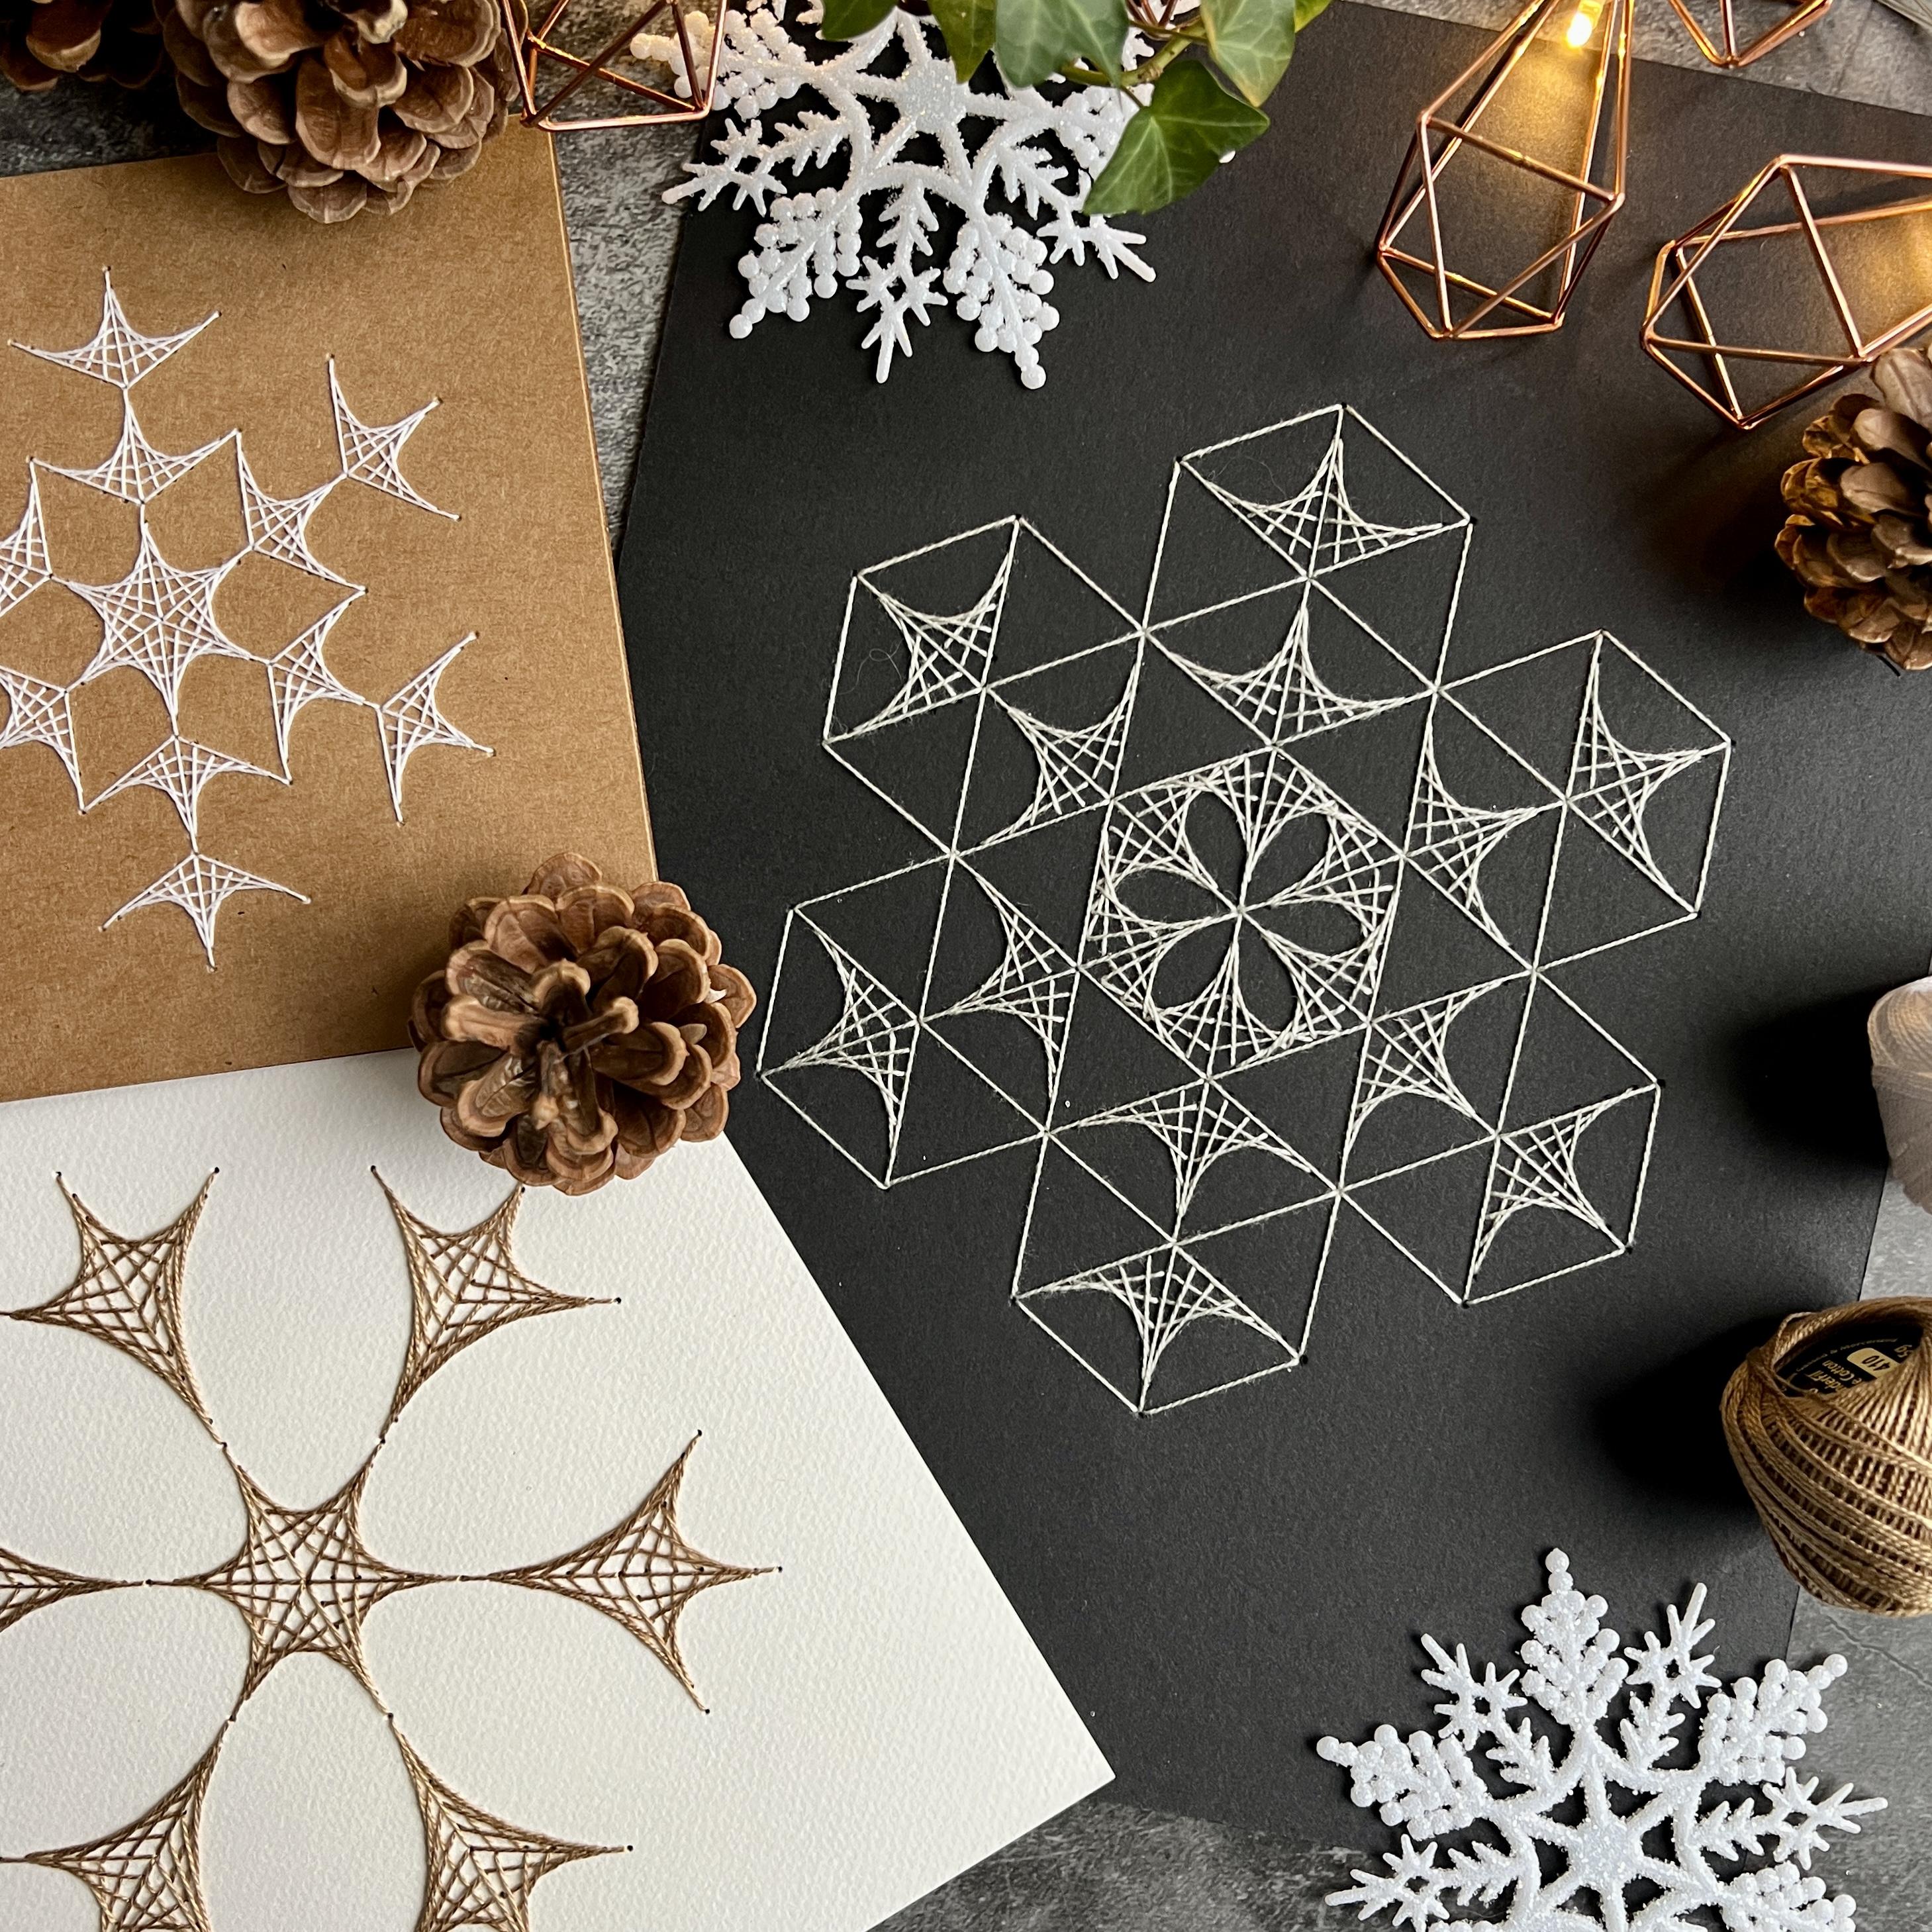
9. More Design Ideas: So I thought I'd finish off by showing you some different
designs that I've prepared. This one is, of course, the
one I stitched with you, and this is the first pattern
on the page of examples. I'm really, really happy with
how this one's turned out. I love the simple
elegance of this design. Now, this is one
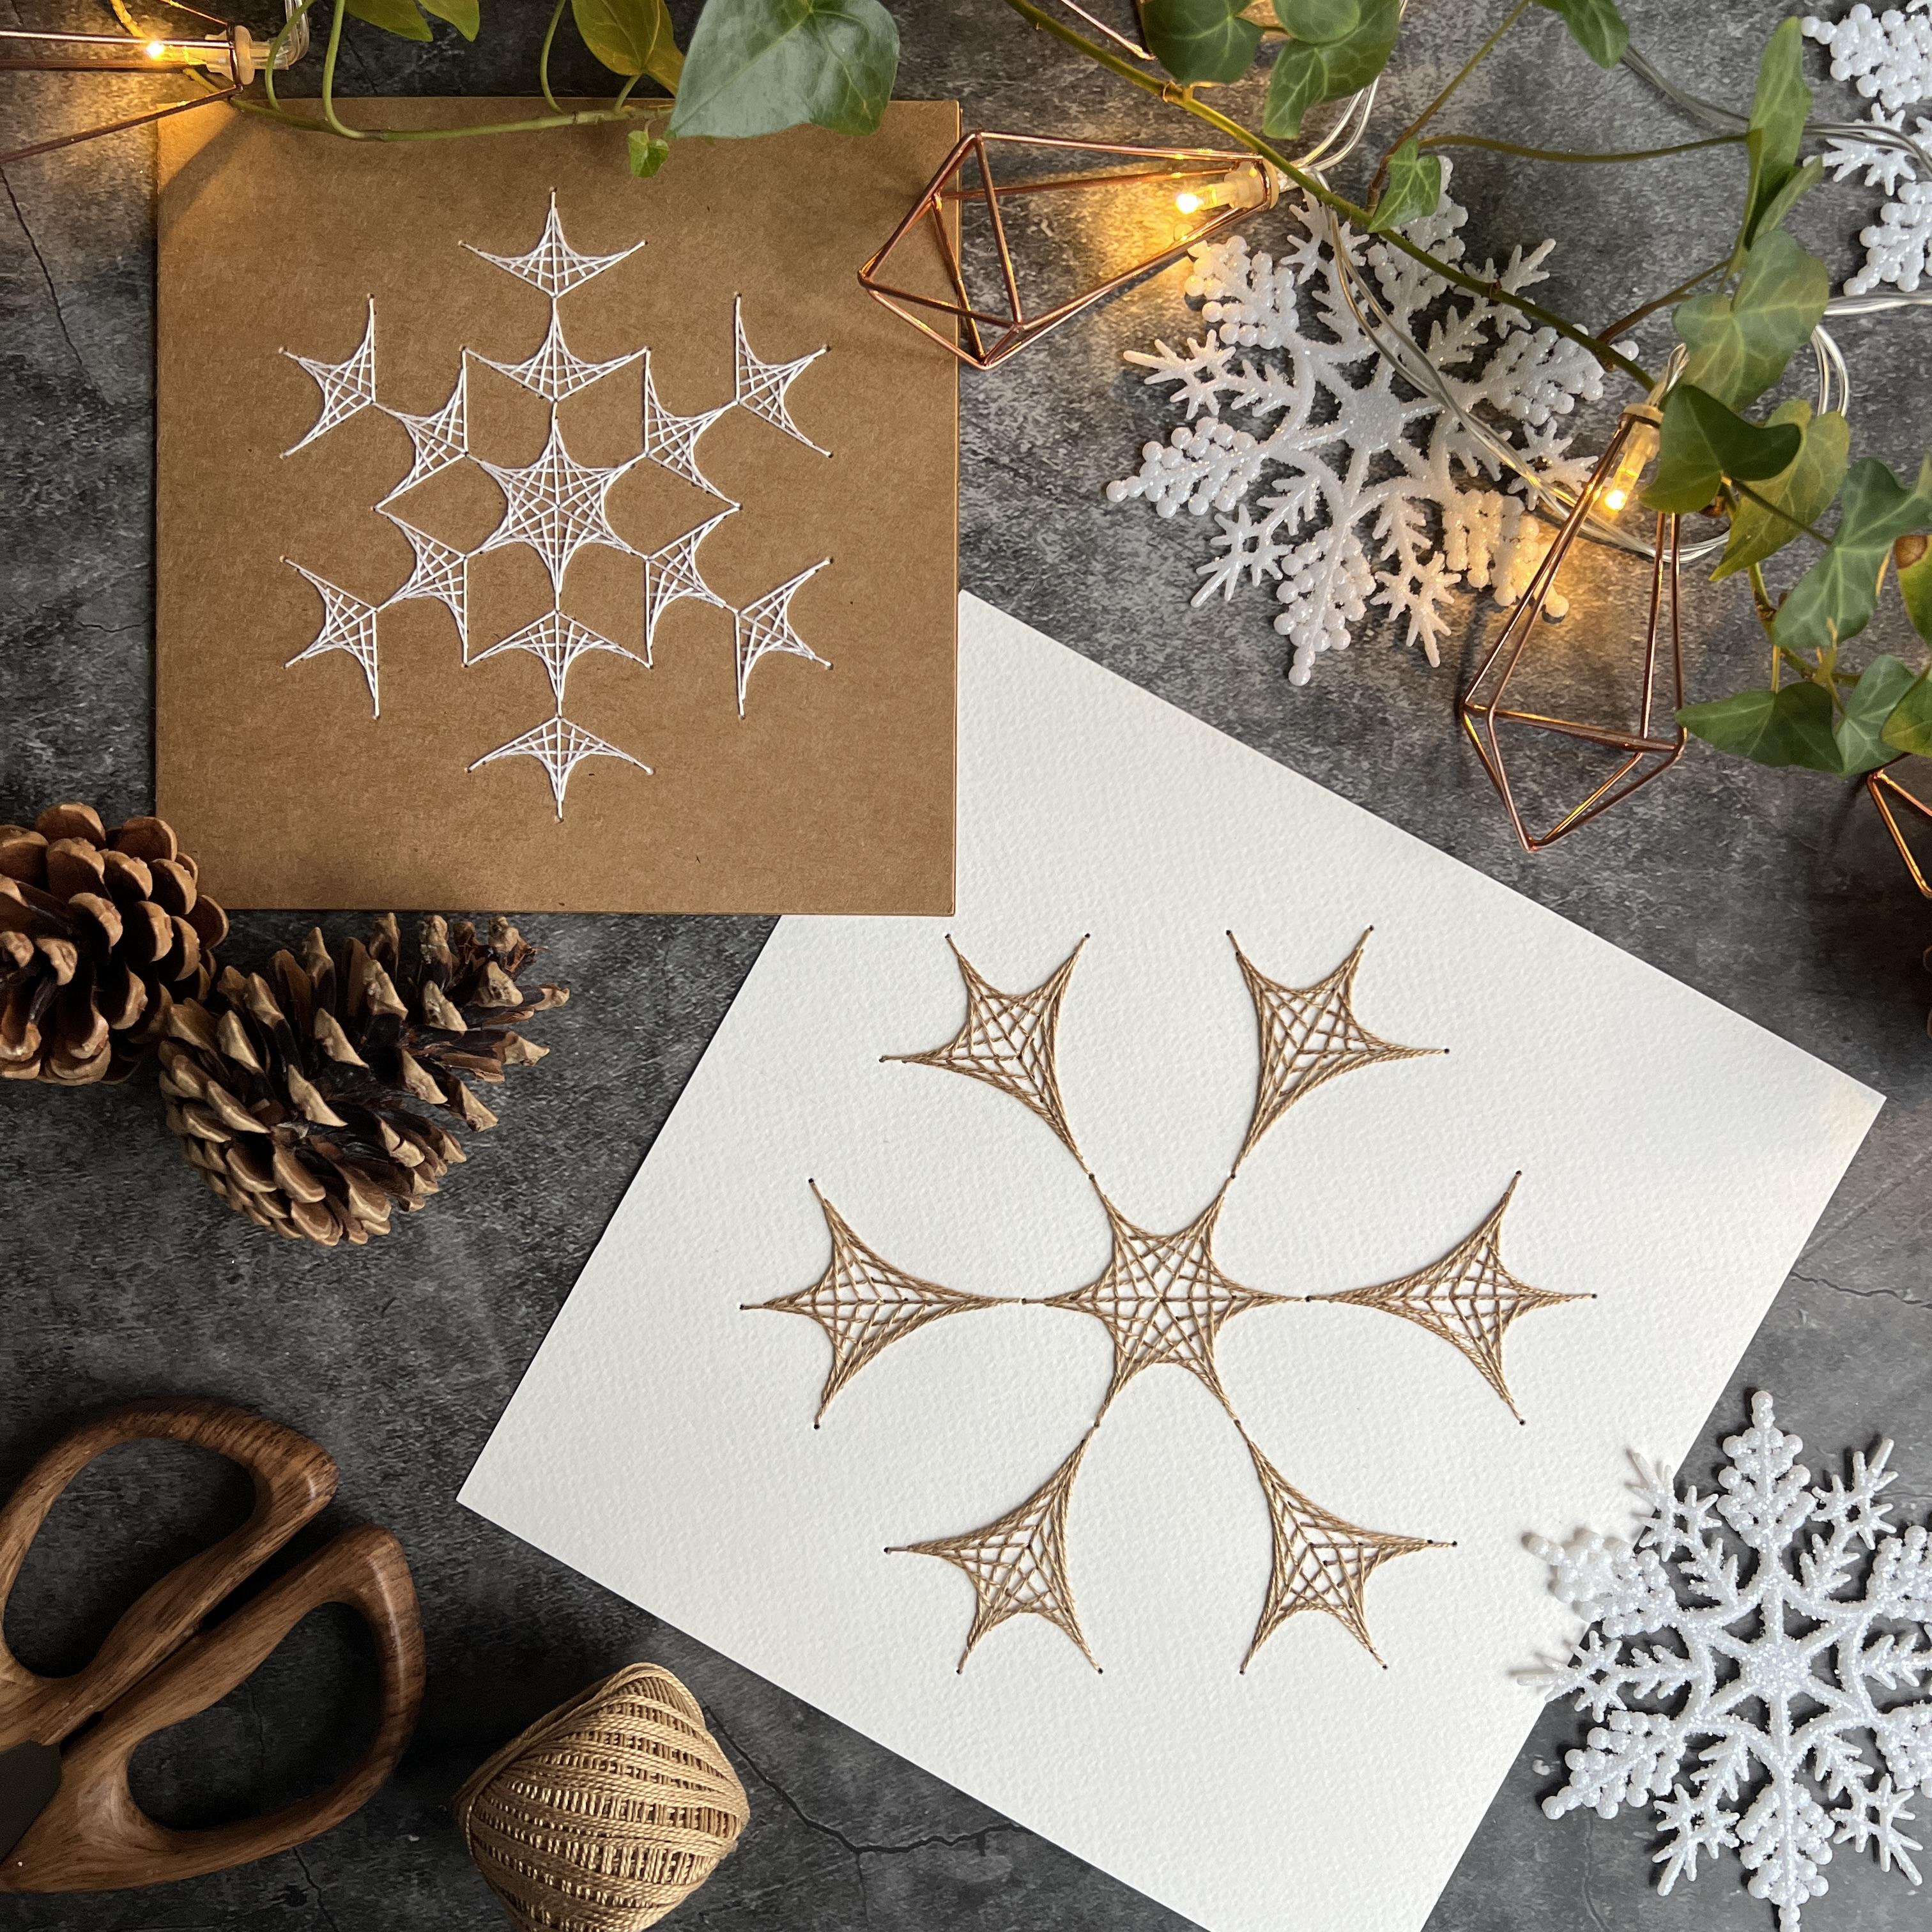
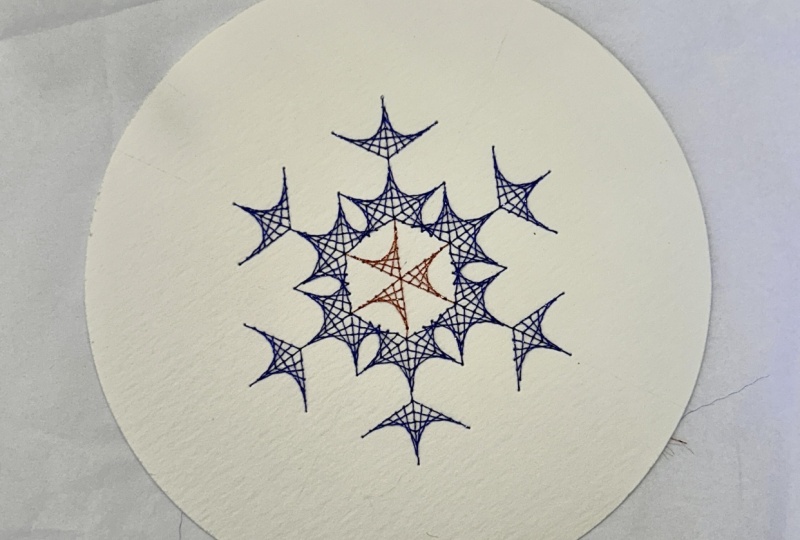
that I've stitched onto a greetings card, a blank greetings card. And this is the second
pattern on the examples page. And again, I think
it's really effective. I love the white on
the craft paper. And I've hidden the messy inside by sticking down a sheet of paper on the inside of the card. Now, this is a heavier
weight of paper. I did try it with printer paper, and it showed some of
the lumps and bumps. So this is a heavier
weight of paper. This is camps and mixed
media paper at 200 GSM, and I would recommend you try it with a heavier
weight of paper. And what I did was I measured the width and
height of the card. I reduced that measurement by 1 centimeter in each dimension. And I cut out my sheet of paper 1 centimeter smaller in
both length and height. That gave me border of half a centimeter
around the outside. And then I precreased my
paper before I stuck it in, meaning that I could align the center with the
center of the card. I used spray mount, but you can use any glue
suitable for paper. And I'm really pleased
with the outcome. It's a really
professional looking card that I'm looking forward to
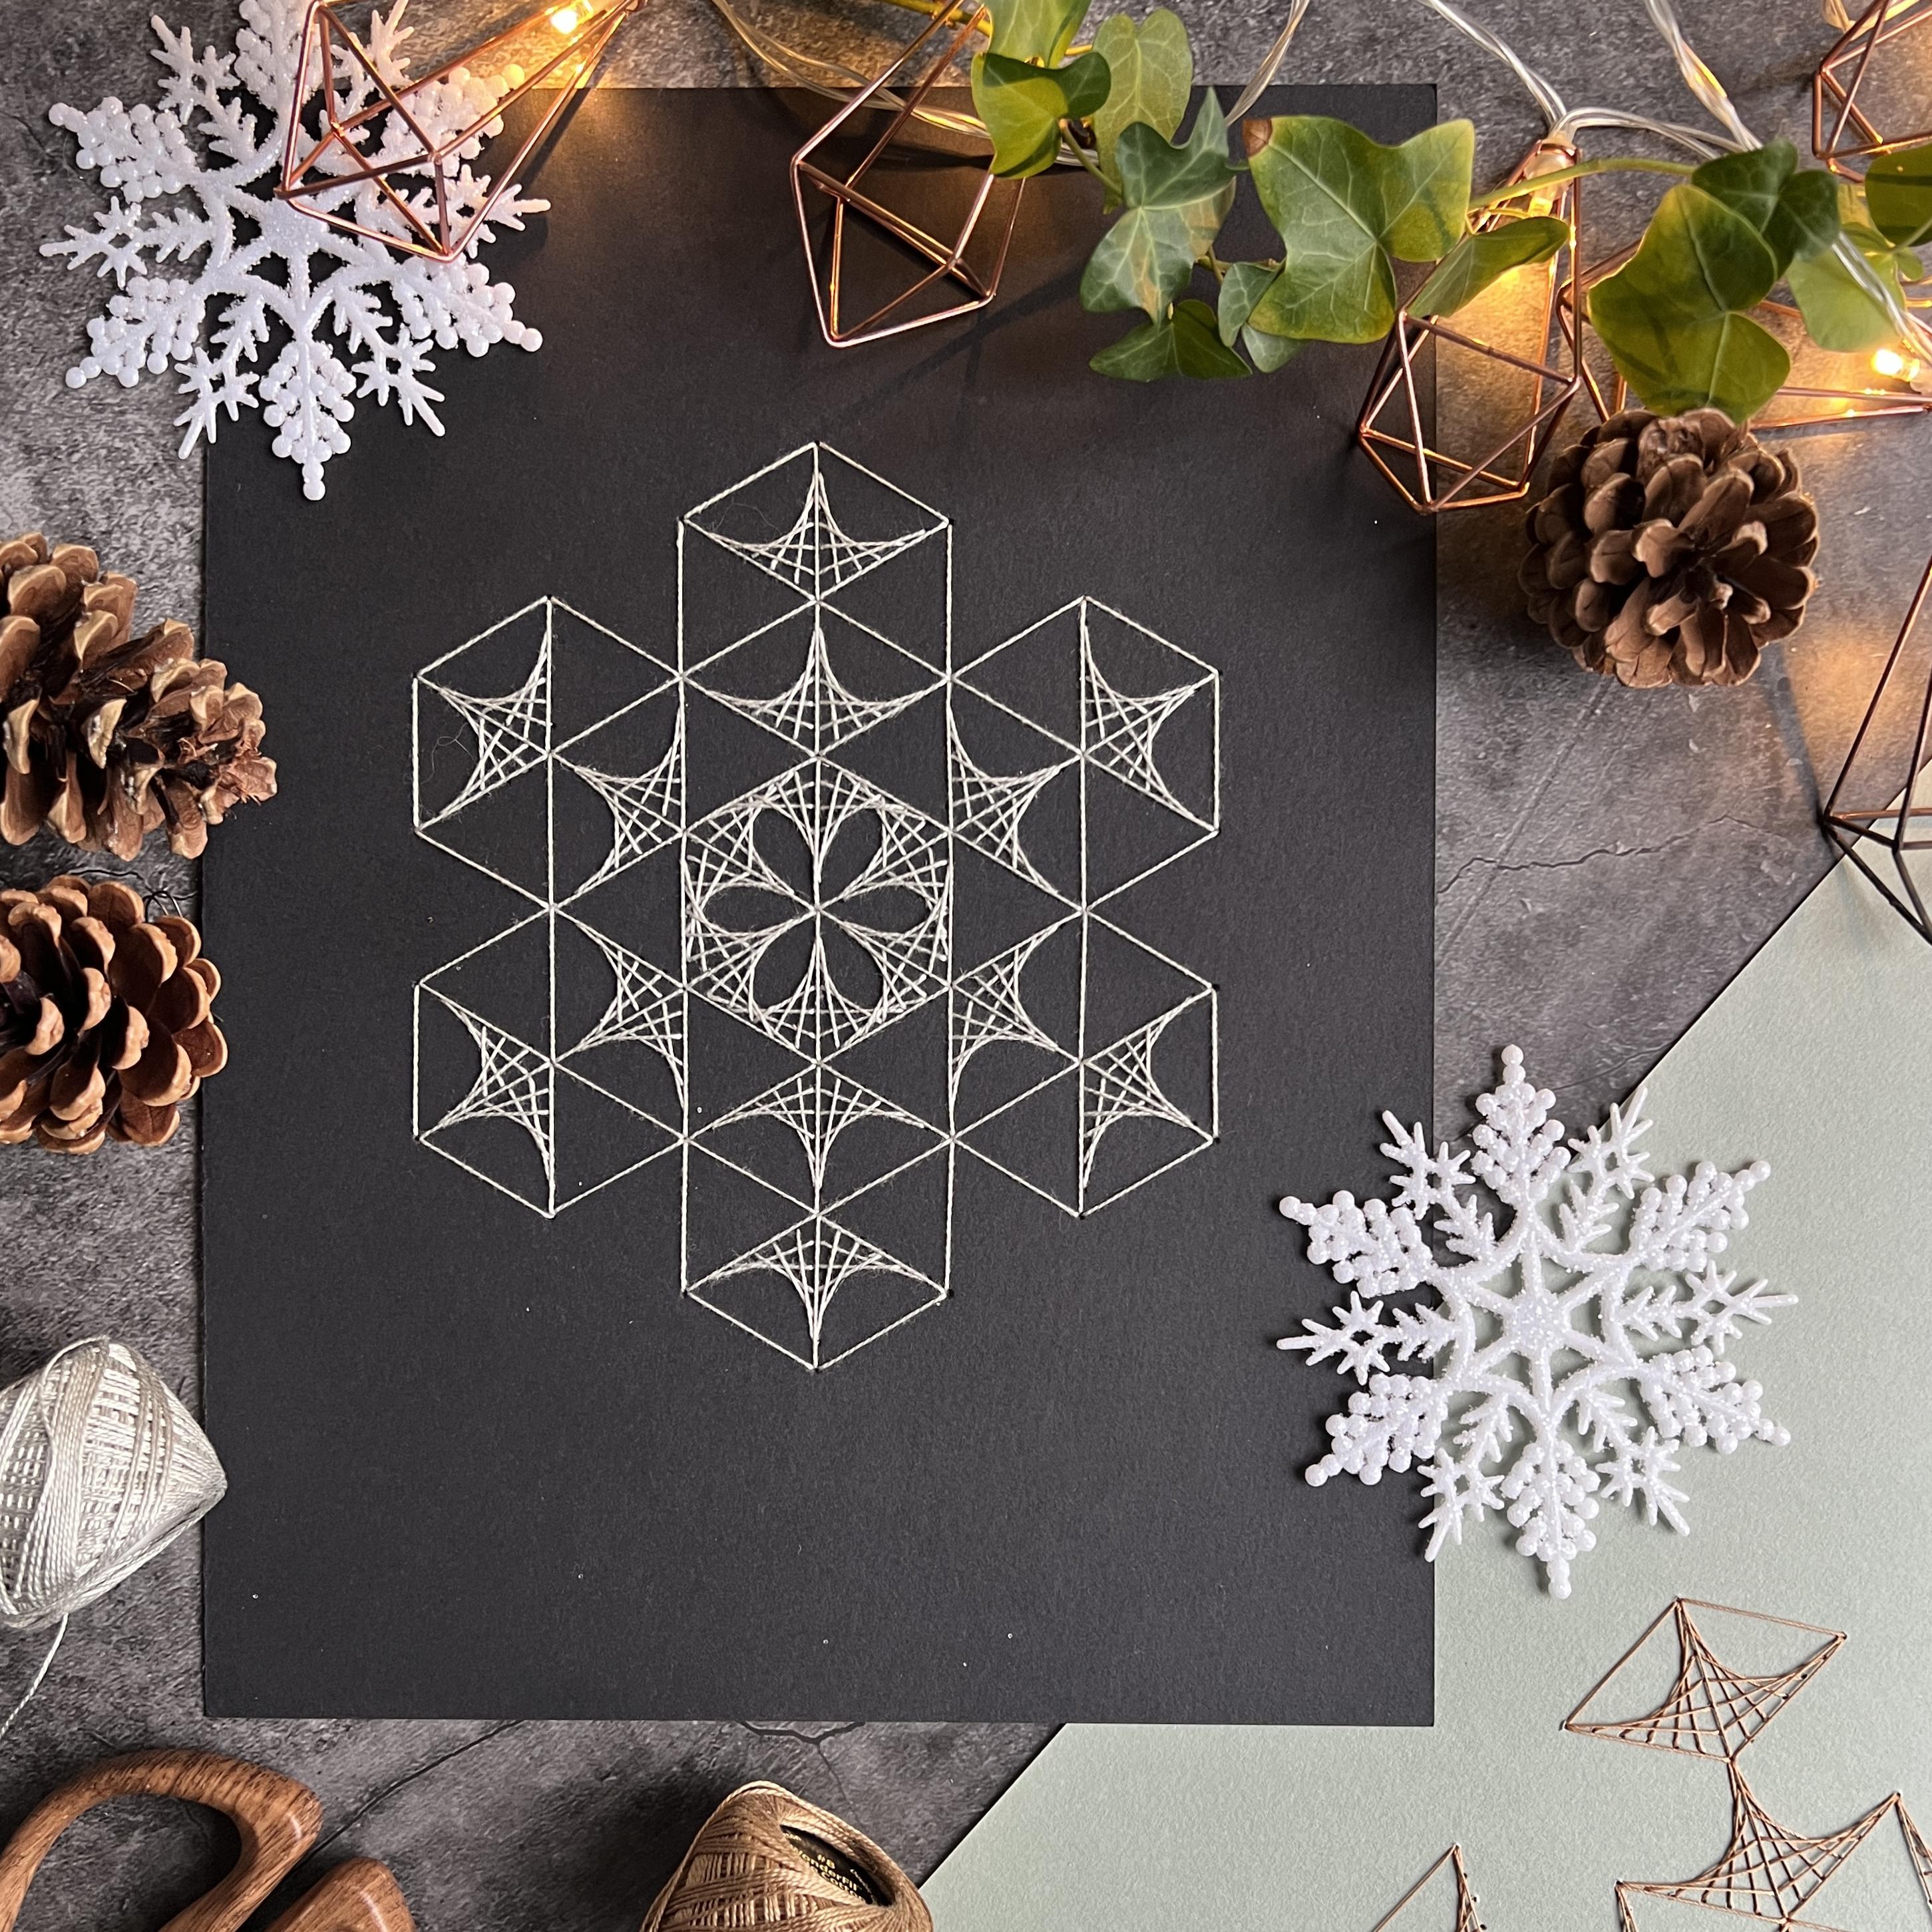
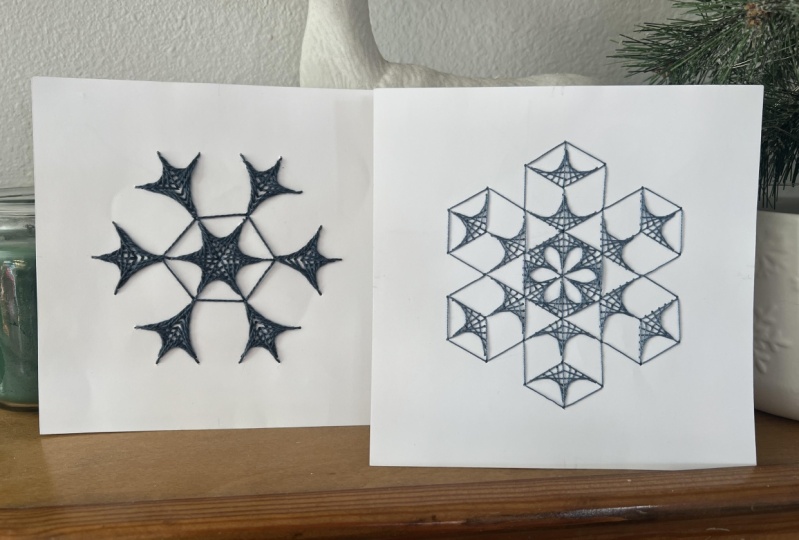
gifting to someone special. This piece I've done on black. Really happy with
it, I used a sort of silvery gray thread
on black paper, I think it's really
punchy and effective, and this is a slight twist on the third example on
the examples page. I've added an extra line
around this center hexagon. And this is a nice example to show that there's
more that you can do. You don't just need
to do your parabolas. You can actually stitch
between your parabolas to accentuate other symmetry and other pattern within the grid. I like this because it
shows off the hexagons that are often inherent in
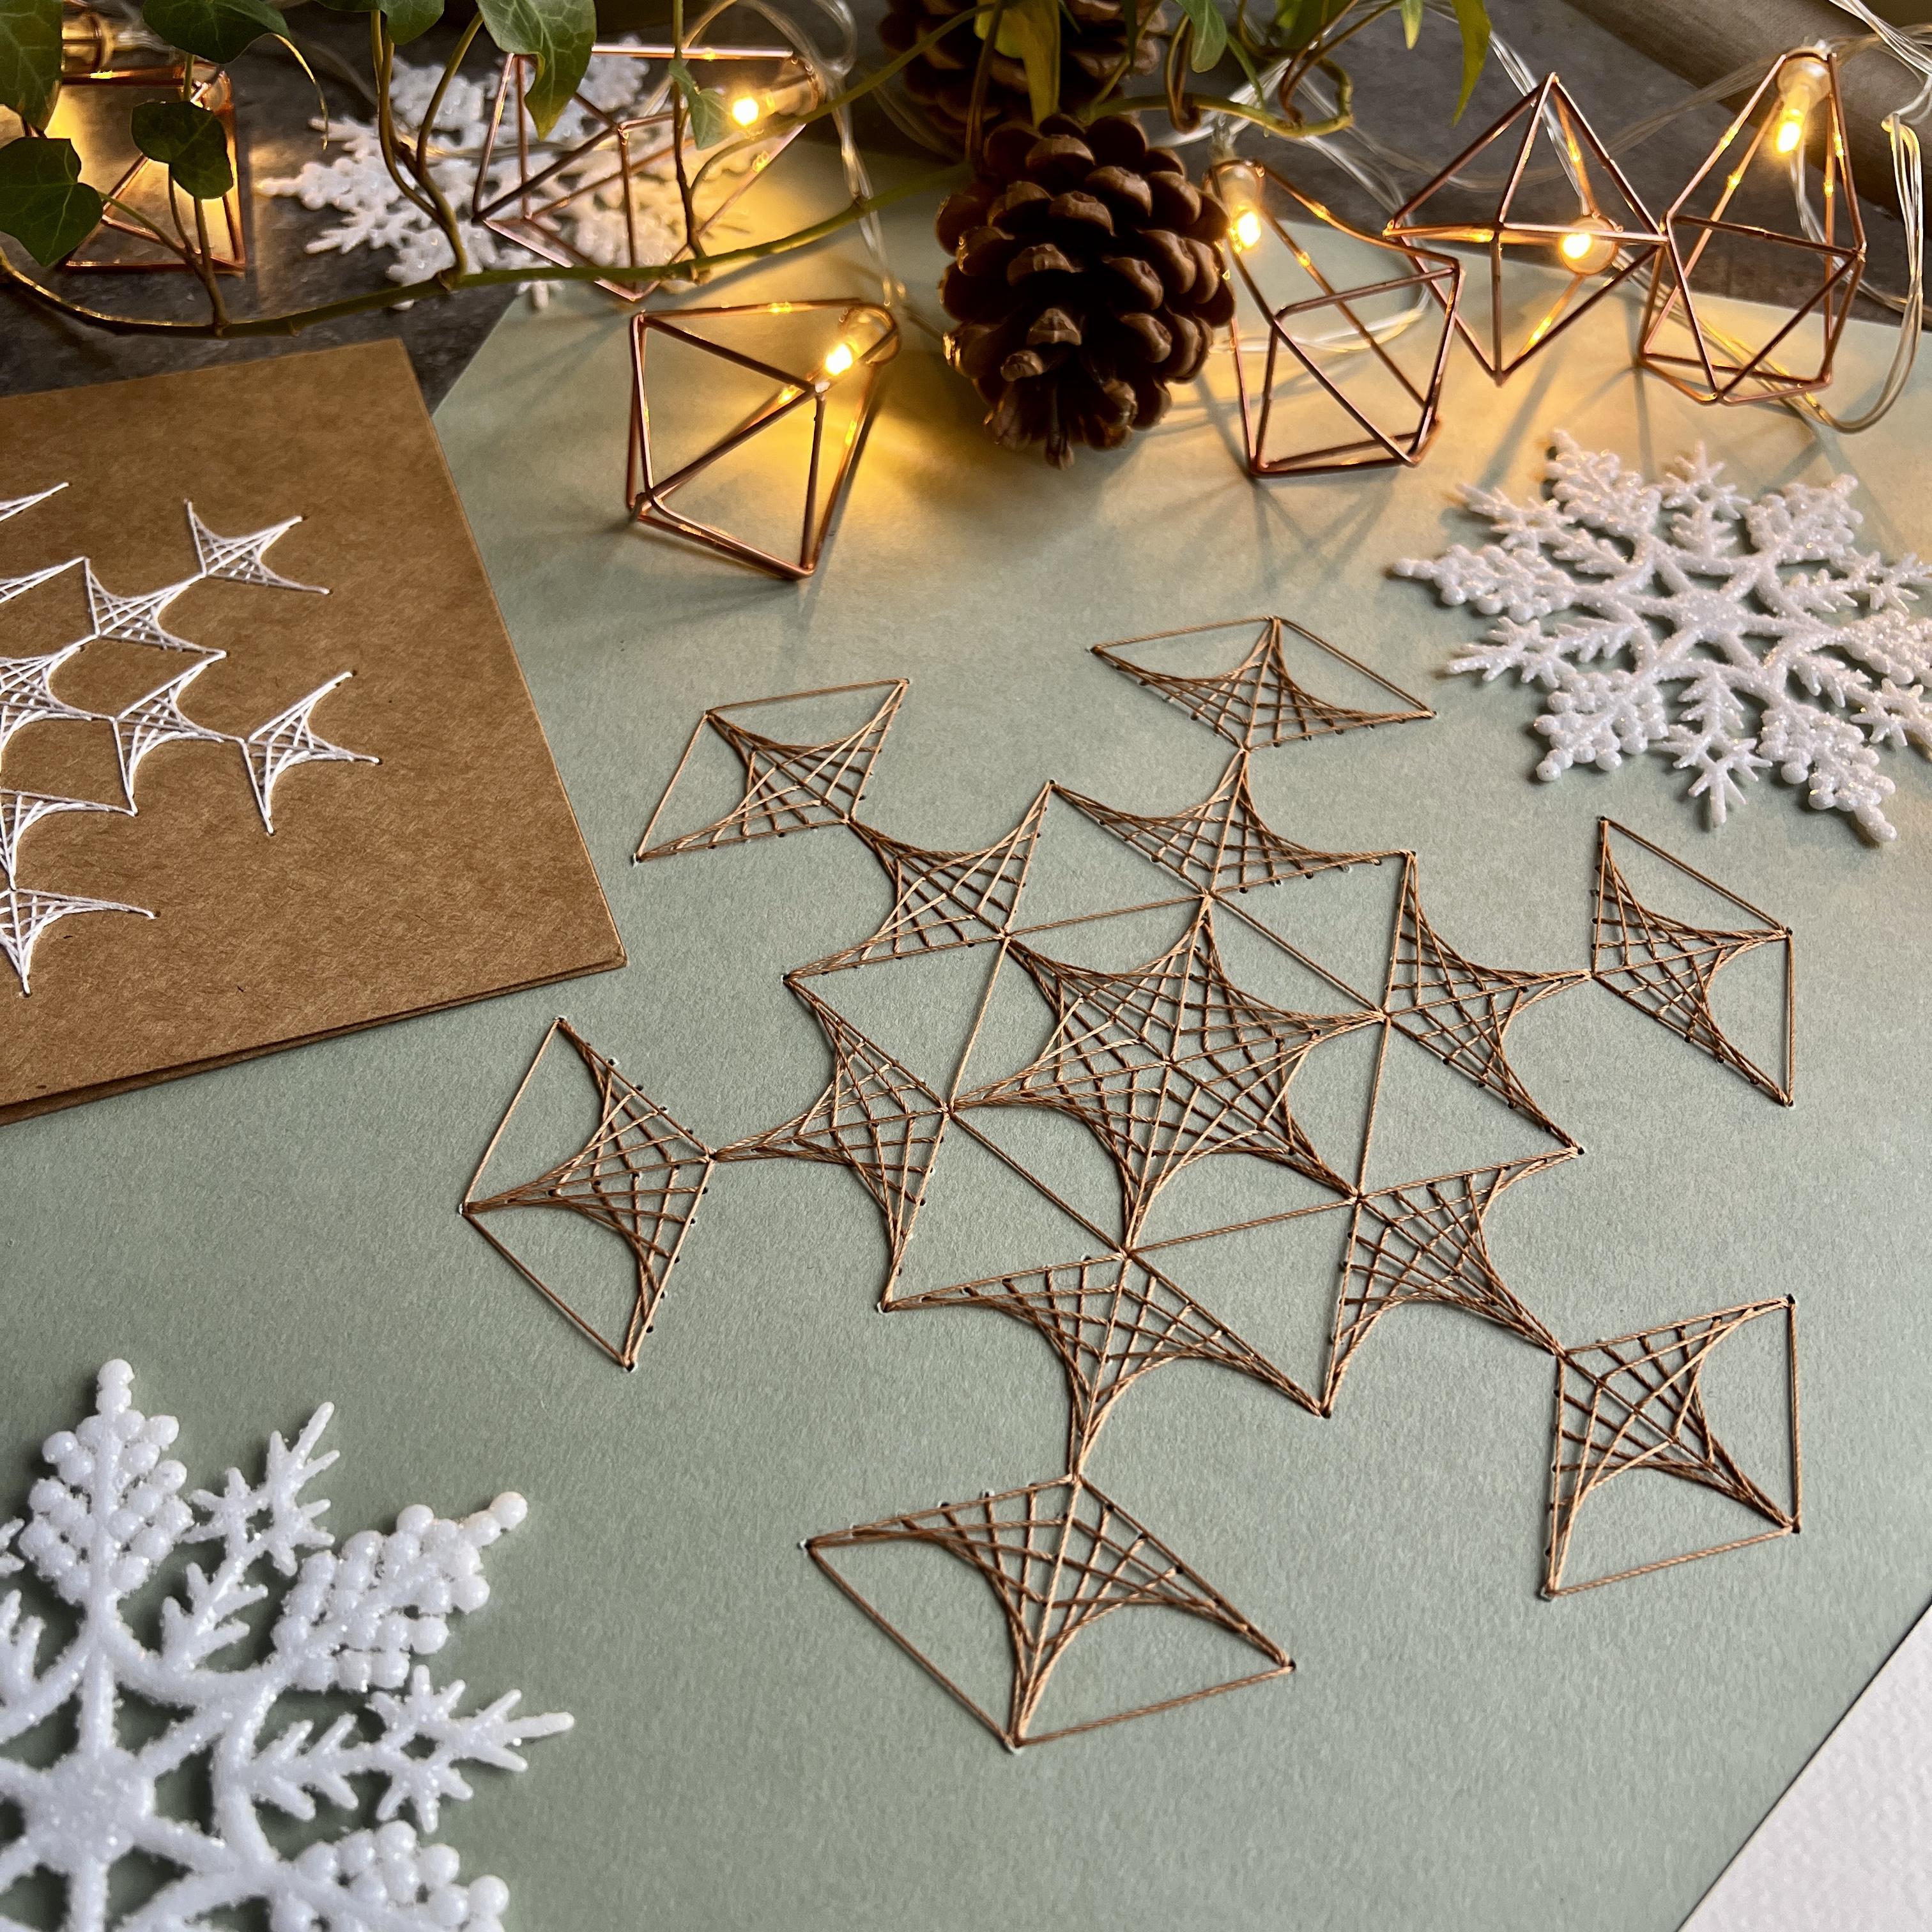
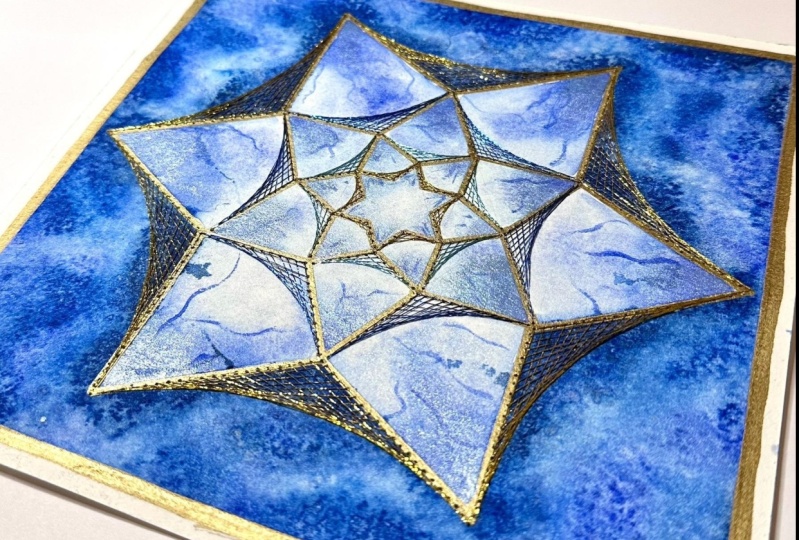
snowflake structures. And then finally,
another reminder that your snowflakes don't
have to be white or silver. I'm really, really happy
with this piece on A three, which uses a copper thread on this beautiful pale
green background. You can see that
this one is a play on the second design
on the Examples page, and I've added a few extra
stitches to highlight the central small hexagon and then these ends
of the arms as well. And this one's going
to have pride of place in my sitting
room this winter. So I hope that this has inspired you and that you're
looking forward to getting stuck into stitching your own parabolic snowflakes.
10. Conclusion: Thank you so much for
joining me for this class. I do hope you're happy with your finished snowflake designs. I always love to see
what my students create. So if you share your
work on Instagram, you can use the hash tag, paper stitched snowflakes and tag me at
Clarissagrandy dot art. Please post any questions in
the comments section below, and I'll do my best to
answer your queries. If you're interested
in the materials that I've used in this
lesson, in my bio, you'll find a link to
Mamzom storefront, which contains handy
reference lists of all my favorite kit. I regularly offer
live online classes covering various
geometric art forms, and I also have a
growing collection of classes on skill share. So check out the links in my bio if you're interested
in learning more. All that's left to say then is take care and happy holidays.
 Clarissa Grandi, Artist | Educator | Author