Transcripts
1. Introduction: Are you looking for a
new technique to add a little something more to
your artworks on paper? Perhaps you've
come across papers stitching before and you're
wondering how it's done. Then you might be interested in this my first Skillshare class
where I'll be showing you the basics of how to hand stitch a geometric pattern
onto watercolor paper. Hello. I'm Clarissa and I'm a geometric artist and experienced teacher
from Suffolk in the UK. For a few years now I've been incorporating
stitching into my geometric art works
on paper and it's a technique I get asked
so many questions about. So it seemed like
the perfect topic for my first Skillshare class. In this class we'll be stitching this cute little
geometric motif on paper. It's sometimes known as the
seed of life and it's one of the first patterns you meet when you're learning
geometric art. It's simple, easy to
construct for beginners, and it's got a really
elegant outcome. This class is for you whether you're a complete beginner or a more experienced artist looking to learn
a new technique. In this class I'll be taking you step-by-step through
everything you need to know. From the materials you'll
need to source beforehand, to how to use a compass if you've not used
one for a long time, to what sort of
paper is best for paper stitching and how to
prepare it before stitching, how to choose a color palette, how to plan a
stitching sequence, and finally, how to secure
and finish your art work. The best bit is
that you will have learned a simple technique that you can take on and apply
to much more complicated, ambitious projects in future. I think paper stitching
is my all-time favorite technique for
adding a delicate, elegant finish to my art. I'm really excited to share
the technique with you.
2. The Class Project: The project in this
class is to create your own mini stitched
geometric motif. If this is something that's
completely new to you, whether you're new
to geometry or new to stitching or both, then don't worry because
I'll be guiding you step by step through the whole
process from start to finish. We'll start by looking at the materials you
need for the project, and a lot of these you'll
have in the house already. For those of you who might
be new to using compasses, there's a step by step
lesson for getting to know your compass with some tips
for improving your accuracy. I'll be showing you
step by step how to construct the motif
with ruler and compass. I'll give you some
tips for choosing a nice color palette, and then I'll walk you through the rather nerve wracking bit when you outline
your pattern in pen. Finally, I'll talk you through
the stitching sequence. We'll look at punching
holes in the paper first, then I'll talk you
through planning a sequence for your stitching. Then finally, I'll
show you how to tidy up and secure your work. You'll be left with a cute
little paper stitched geometric motif that I think you'll just
fall in love with. I'll also be introducing you to three super inspiring
paper stitches, who I follow on Instagram, and I think you'll
want to follow too. When you finished your project, remember to photograph it and upload it to the
project section, because I'm really excited
to see what you make. Now to get inspired in
the very next video, I'll be introducing you to my three favorite
paper stitches.
3. Three Inspiring Artists: [MUSIC] It's now my absolute
pleasure to introduce you to three paper embroidery artists whose work I so much admire. All three if kindly gave me their permission to share
images of their work with you. The first artist I'm excited to introduce is Kellin Nelson, an American artist living
in Florence, Italy. Kellin's work is a
gorgeous combination of intricately precise
geometric stitching. Contrast it with
these delicious, chaotic inky
watercolor backgrounds and with lots of gold. Kellin describes
taking inspiration from her surroundings
in Florence. Once you're aware of that, I think it's easy to see a distinct renaissance vibe in several pieces of her work. She draws inspiration from geometric patterns of all kinds, from scientific diagrams, radio frequencies, and
astronomical charts, to Islamic geometric patterns and designs from Gothic tracery. She also often features
the simple seed of life motif that we'll
be working with next. The results of his work
of really elegant beauty. I can't get enough of it. Indeed it was Kellin and
I have to thank the first inspiring me to take a needle
and thread to my own work. The next artist I'm delighted
to feature is Liz Sofield, an artist and ceramicist living
and working in Australia. I've admired Liz's work
for a long time now. She combines her delicate, repetitive geometric
stitching patterns with folded paper and more recently with the delicate colors
of her handmade pigments. The resulting effect is one of the quiet minimalist beauty. I've tried long and
hard to put into words what it is that
draws me to Liz's work. I think it's something
to do with the way the folded paper is held in a gentle tension under the binding mesh of the
stitched white thread. It's like it's about to
spring loose, but can't. The overall effect somehow
captures the essence of stillness like it's a
moment preserved in time. It's just such lovely work. Now for burst of color, the final artist I'm excited to introduce is Petra Heidrich, a mixed media collage
artist from Germany. I've only recently come across Petra's work but I was
instantly drawn to it. Petra combines vintage
photographs and postcards with colorful embroidered
geometric embellishments. In a similar way to
the other two artists, she uses the geometry
of her stitching to contrast with the other elements
of her collaged pieces. I particularly enjoy the way in which the
figurative elements of the vintage images interact with the linear precision of
the hand-stitch geometry. I think Petra also uses these stitched embellishments
to cleverly direct the viewer's gaze and
create focal points in the artwork so that your eye is drawn in a journey
around the piece. Really interesting,
delightful work. I highly recommend following these three wonderful artists. You can find clickable links to their Instagram pages
and websites in the downloadable class
notes resource found on the right-hand side in the projects and
resources section. I'm sure you'll now totally inspired by all
this beautiful art. Of course, I must remind
you at this stage that you should never directly
copy another artist's work. However, there's so much
to be learned from the way in which these three
paper embroider is. Use that geometric stitching
to enhance their artwork. I hope that you are now
excited to begin your project. If you'd like to explore more paper embroidery on Instagram, then these are some useful
hashtags to follow; #paperembroidery,
#paperstitching, #embroideryonpaper, #stitchedpaper and
#embroideredpaper. I'm sure you must be feeling
really inspired now, so let's make a
start by looking at what materials you
need for the project.
4. Materials for the Project: [MUSIC] In this lesson,
we'll be looking at the materials you
need for the project. We look first of all, the materials you need for constructing the
geometric motif. Then we'll look at
what you need to decorate it before stitching. Finally, we'll look at the materials you
need to stitch it. First of all, you're
going to need a piece of mixed media or
watercolor paper, something with a
decent weight to it that will support
the stitching. Around 250-300 GSM, which
is about 140 pounds. For your first project, it's best to work with
a small piece of paper because we'll be
turning the paper up and down as we stitch. If the paper is too large, then it becomes unwieldy. This sweet piece of card is approximately 10
by 10 centimeters. This is an A5 postcard size also perfect and the largest I'd go is here's about 20
by 20 centimeters, eight by eight inches. Next you're going to
need a surface to press on while
you're constructing. I normally work on a
paper cutting mat, but the back of the
sketchpad is just as good. The cardboard makes
the perfect surface. Essentially you're protecting
the surface of your table, but at the same time, you're giving the compass point to surface with a
little bit of give in it so that it can grip
into it and not slip. If you don't have either
of these things then simply use a few
sheets of print paper, that has the same effect. Next, you're going
to need a ruler, a pencil, an eraser,
and a sharpener. Try to make sure that your
pencil stays nice and sharp. Transparent rulers are
best but if you don't have a transparent ruler then any
ruler you have will be fine. If you're, how should we say
in the prime of your life, then you might wish to
use a magnifying glass just to help with positioning
of the compass point, but it's not essential. Finally, there's the
most important piece of equipment, your compass. Now you might just have
your school campus, which looks something like this. That's absolutely fine for a really simple pattern like
we'll be drawing today. However, if you want to go on
and develop your geometry, then I would recommend investing in something more substantial. You may have already invested in a more upmarket
compass like this one and I'll be talking
you through using a compass like this in
one of the next lessons. It's also going to be really useful to have a pen attachment. Your school campus
will already have one. But some of the more
complicated campuses come with a separate
pen attachment, and I'll be showing
you how to use that. The next thing to
think about is how to decorate your patterns
before you stitch them. Now you don't have to
add any color at all, but I would advise that you outline your pattern
in a nice pen. I'm going to be using one of
my favorite gold markers, but you could use any pen really to outline your patterns. One with a little
bit of thickness to it is best and then it covers up any inaccuracies if you
do decide to color in. You must also be sure that your pen fits your
pen attachment. Although if you don't have one, you could outline
freehand if you wish. If you do choose to add
color to your pattern, then you can use any color
medium you're confident with. You might be someone who
enjoys using watercolors, in which case, of course,
you'll need a paintbrush. You might want to use your
mark pens or you might want to use colored pencils
or watercolor pencils. I'll be using my new paint pens that I'm very excited about. Finally, let's look at
the materials you need for stitching your
piece at the end. First of all, your needle. You can use any general
purpose sewing needle really. I just wouldn't use
anything too thick because that will make the
hole in the paper quite large. A general purpose sharp is fine. If you go on to do more
complicated patterns where you're passing the needle through the same holes again and again, then you might want
to choose a slightly blunt needle so that you don't fray the thread that's already
going through the holes. Next onto the thread, you can use any thread really, and I'd encourage
you to experiment. I like to use metallic
embroidery thread like this from
Madeira or core bond. It comes in all sorts
of lovely colors and I like the little bit of
bling it adds to my work. It's also quite thin and that adds a delicacy to the work. However, it can be a
little temperamental, it likes to get tangled up so just be patient if
you're using it. If you're going to be
using embroidery floss, I'd probably only use
two or three strands. You're also going to
need a pair of scissors. You might have some small
embroidery scissors. Those are ideal, but you can essentially use any scissors you've got lying
around the house, kitchen scissors, nail
scissors, and so on. You'll need some low tack tape, washi tape, painter's tape, low tack masking tape is fine. If you're anything like me and constantly losing your needles, you might want to
use a pin cushion. In paper stitching, we punch the holes first, so you're going to
need something to punch your holes with. This is a paper piercer, but if you don't have
anything like that, remember, you've
got the point on your compass and that
will do just fine. Finally, you'll
need something to place under your work to support it while
you're punching holes. I like to use this old
felt laptop cover it's perfect or a cork
table mat is good. If you don't have anything
like that then just a piece of cardboard from some
packaging is fine. Essentially, you need
some material with a nice bit of give
so that it accepts the point of your piercer or your compass and at the same time it's
protecting your table. Now take some time to gather your materials together
and then I'll see you in the next lesson where
I'm going to show you some tips for using
your compass. [MUSIC]
5. The Compass: [MUSIC] If you haven't used
a compass for a long time, we've just invested
in a new one. They can seem a little
intimidating at first. Fear not, I'm now going to
talk you through a set of tips to help you get to know your compass and feel
confident using it. We'll start right
at the beginning with opening and closing it. We'll look at how to sharpen
those strange leads, and we'll look at some tips for maintaining accuracy as
you use your compass. Finally, we'll
look at how to use a pen attachment if
your compass has one, and then there'll be
a practice task which I highly recommend you
spend a bit of time on. If you're using a school compass then that's pretty
self-explanatory. But if you've invested in
a higher spec compass, you might be feeling a little daunted about how to use it. Firstly, opening and
closing your compass, you'll notice there's a cog at the top which opens your compass slowly and helps you make
incremental changes in radius. However, you might
have noticed that your compass has some
quick release leavers. They don't all have these, but these are quite useful if you change your radius a lot. If you squeeze them down, you can open and close your
compass much more quickly. If your compass comes
with its own lead, then you will need to
know how to sharpen it, especially if you're undertaking a more extended project than we're going
to be doing today. Some campuses will
come with their own little lead sharpener like
a baby pencil sharpener, rather cute, but a lot don't, so how do we go about sharpening the leads that
come in our campuses? If you take a close
look at your lead, it's very likely to have arrived with a wedge shape cut into it. This is quite easy to sharpen. All you need is a nail file or emery board or a small
piece of sandpaper. You'll notice the angle
of the wedge in the lead, turn your campus on its
side and simply place the flat surface of the wedge onto your nail file and
move it back and forth. When you're happy
with the point, you can start
constructing again. Once you've been using your
campus for a long time, the lead will
invariably shorten. Some campuses come with some little refill
leads in a small pot. Simply unscrew to
remove your lead, replace the new one back in, reference to the point to get lead and pointer
the same length, and then tighten backup being careful not to over tighten because you
might crush the lead. The start of any
geometrical construction usually begins with
measuring out a radius, so you'd need your
ruler for that. Start by placing the compass
point at the zero line. Now, it's quite useful to have
pressed your compass point into the zero line so that you have a little groove
that it can sit in. I'm going to do that now. Now, each time I need to
measure out a radius, I can find that little
hole that I've made. Once your compass point
is on the zero line, use the quick release
bars to open up your compass to close
to the desired length. For example, if I was opening up to a six
centimeter radius, I'd use my quick release bars to open up to
round about six, and then use your
fine tune wheel to achieve a more
accurate measure. The next step is placement
of the compass point, and to demonstrate
that I'm going to make small cross on the page. That's something to aim for. Placing the compass point is one of the most
important steps in the whole process if you're
keen to maintain accuracy. I always hold my compass
on the leg with the point, I tend not to handle the leg
with the lead much at all. Holding the compass on
the leg with the point, you can use your other hand
to study it if you wish. You're going to place it
as carefully as possible, exactly where it needs to go. When you're happy, you can give a gentle press to make
a slight indentation in the paper which helps hold the campus in place
when you start to spin. If like me, you're someone
in the prime of their lives, you may want to use a magnifying
glass for this stage. Using a magnifying glass, I hold it in my other hand, and as I place the point, I hold the magnifying glass
in my line of sight and it gives me a much clearer view of where that point is going. Finally, when it comes
to spinning your circle, you use the twiddle at the top. I tend to move my hand
up to the twiddle, supporting my compass with
the other hand as I do so, and then because
I'm left-handed, I tend to spin anticlockwise. You're more likely
to be right-handed, so you will probably
spin clockwise. I lean into the direction of turn as I go and
keep a little bit of pressure through the leg with the point so that it doesn't
skip out of the paper. Leaning into the
direction of turn, you can spin your first circle. I would practice this, so you might want to spin some more circles until you get confident
with that motion. You might also want to play with adjusting the width of
your compass, the radius. Get used to using those
quick release bars, using your fine tune wheel and measuring out some
different lens on your ruler. Finally, I'm going
to show you how to use the pen attachment and how to line up your pen or
pencil in the pen attachment. You'll find on the side of your campus there's
another wheel. You can loosen the lead, insert the pen attachment and make sure that you twist
that nice and tightly. Open up the pen attachment. Then I always very
nearly close my compass, because when you insert
your pen or pencil, you want to make sure
that the pencil tip or pen tip and compass point are
nicely lined up together. If I was inserting a pencil, that looks about right, hold it steady while I
close the pen attachment. You can see you need to
slightly adjust as you go, and then it holds
it firmly in place. If you're using a pen, is exactly the same process. You're trying to keep pen tip and compass point in
the same alignment. That way when you open
and close your radius, the two tips are level. Finally, it's a good idea
to practice outlining circles that you've
already got on the page. I'll start with the
first one I did, place your compass pointing to the little groove that should be there already from when
you first spun the circle. Use the quick release
bars to open up, to round about the right radius, and then you can use the fine tune wheel to adjust your radius until
you think it's just right. I sometimes just make
a tiny dot of ink to check that it lands plum on the line that
I want to outline. When you're happy, you
can spin your circle. I can see from these little
bits here where the lines a bit fainter that actually I need to ink my nib a bit better. To do that, it's good idea to have a little
bit of scrap paper. Give the pen a bit of a shake, and then press it down
a couple of times on your scrap paper until you feel that there's a little
bit more ink in the nib. Another tip when using metallic pens to outline
is to turn nice and slowly so that the nib doesn't run out of ink
as you're spinning. That's a much better line. Now your task is to go
through and outline a set of circles that you've
already gotten pencil with your pen [MUSIC]
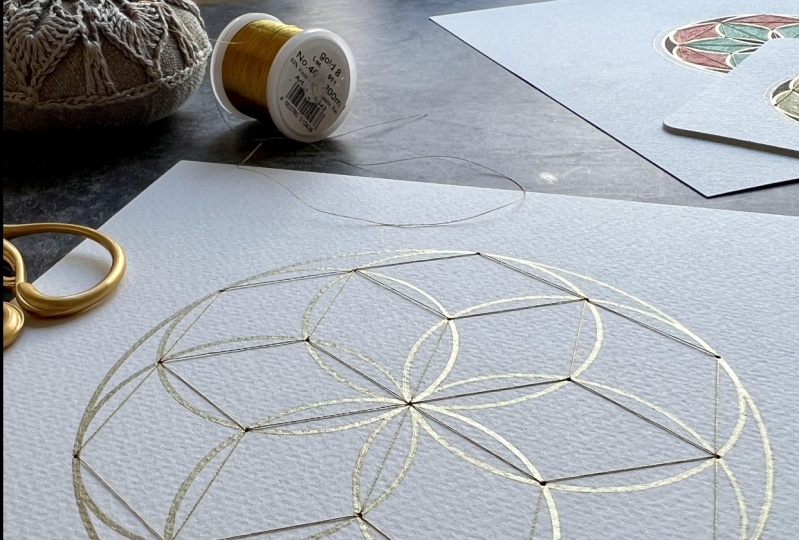
6. Constructing the Pattern: [MUSIC] So now you've
been practicing using your compass and
drawing some circles. We're ready to construct
a geometric motif. This simple pattern that
we're going to be drawing together is often called
the seed of life. It's a pattern that emerges naturally from the
geometry of a circle, and it's a motif that I often
return to in my own work. I'll also talk you through some design decisions you might want to consider and then at
the end of this lesson, your motif will be
ready to decorate. One last thing to note about this next lesson is that I
made the decision to construct in pencil so that I
could demonstrate erasing sections of the pattern
you might want to remove. But it means that the lines of the pattern are a
little faint to see if you're viewing it on a small screen such as a phone. It's fine on a larger screen such as a tablet or a laptop. But to support you if you're
watching it on my phone, I've created some
step-by-step instructions in the downloadable
class notes resource. So it might be an idea to have those alongside
you as you're viewing the lesson or to
refer to them afterwards. You'll need something
to press on. Your watercolor or
mixed media paper, pencil, ruler,
eraser, and campus. However, you might want to
practice on printer paper first and then when
you're feeling confident, construct on your precious
watercolor paper. We're going to start with a vertical line down
the center of the page, which will help orient our
pattern nicely on the page. To do that, we need to know the width of the sheet of paper. Use your ruler, place the
zero line on one edge, and measure the width. Mine is just under
20 centimeters. Then half that measure, so I'm going for
9.9 centimeters. Then move your ruler
up to the top half of the page and make
a little notch, your halfway mark, just lightly in pencil, and then do the same in the
bottom half of the page. Then we're going to draw
a light vertical line through those two marks. Finally, we need to know where
to start our pattern and for that we need to measure
halfway up the page. So you need to know the
height of your page. Mine is a square, so
it's just 19.8 again. Then once you know
your height of that, move your ruler along that vertical line and mark
halfway up with your pencil. This central point
is where we're going to place our campus
to begin the pattern. Now we need to work out
our compass radius. That will depend on the size of the page that you're
drawing the pattern on and how much of a frame of blank space you want
to round your pattern. I've decided I'd like four centimeters of white
space surrounding my pattern. Once you've decided how much
of a margin you'd like, double that because we need that at both
sides of the pattern. For me, 4*2=8. Next, subtract that
double measure from your total width. I'm going to call
mine 20, 20-8=12. That means that the
width of my pattern will be 12 centimeters on the page. Finally, take the pattern
width and divide it by four. For me, 12/4=3, and that means I need my radius
to be three centimeters. I'll go through
that one more time. Decide what width you'd
like around your pattern, double that, and subtract
from your total page width. The resulting measure divide by four to give
you your a radius. The next step is to measure out your
radius on your ruler. Find that little notch
you may have made earlier on the zero line
and then open up your compass to your
desired radius length. Now it's time to
spin our circles. Remember that compass
point placement is the most important
step really. Place your compass
point nice and carefully on that
central mark you made. When you're happy, spin your first circle by moving your fingers
up to the twizzle. These intersections will become the centers of the next
two circles we draw. So placing your compass point
carefully on your north, double-checking that your lead
goes through your center, and when you're happy,
second circle span. Next, choose
yourself most point, compass point carefully on. Double-check is going
through the center. Third circle drawn. You'll notice we've now created two lovely almond shapes
in our first circle. Each of the almond
tips now create four more intersections
that we're going to use to draw our
final four circles. Placing your compass point
carefully on one of the tips. Double-checking
your lead is going through the two little
checkpoints we have now, the center and the
north intersection and committing to
circle Number 4. Moving down to the
next almond tip, double-checking,
circle Number 5. You'll notice the subtle
six petaled flower beginning to emerge
at the center. Final two circles. Just checking for
accuracy as we go. Final circle which will complete the flower at the center. We're nearly done.
All that remains now is to erase that
central vertical. You might also decide
that you'd like to erase that center circle. This is an example of what
the pattern looks like outlined with the central circle and this is an example of
a pattern outlined and colored without a
central circle. So the flower petals aren't broken up with the
edge of the circle. I've decided I'm
going to erase mine. This next step is not important if you're not going to
color your pattern. But if you are, you might want to just go over these edges
that we've erased again so that you've
got a nice clear edge to fill in with color. To do that, we're just
going to use the holes we're already got
and we're going to redraw these little sections
of circle that we've erased. Work your way round
each circle in turn. Just completing those
sections that disappeared. Then when you're happy,
you can see all your edges clearly so that you
can color it in. You've got one last
decision to make, would you like to enclose your
pattern in a final circle? I'm going to do that. What I'm going to do,
is I'm going to place my compass point on the center. I'm going to open
out to a far edge. Check it against
some other edges. When you're happy, you
can complete your frame. Motif complete and
ready to decorate. Adding color is optional, but if you are going to add
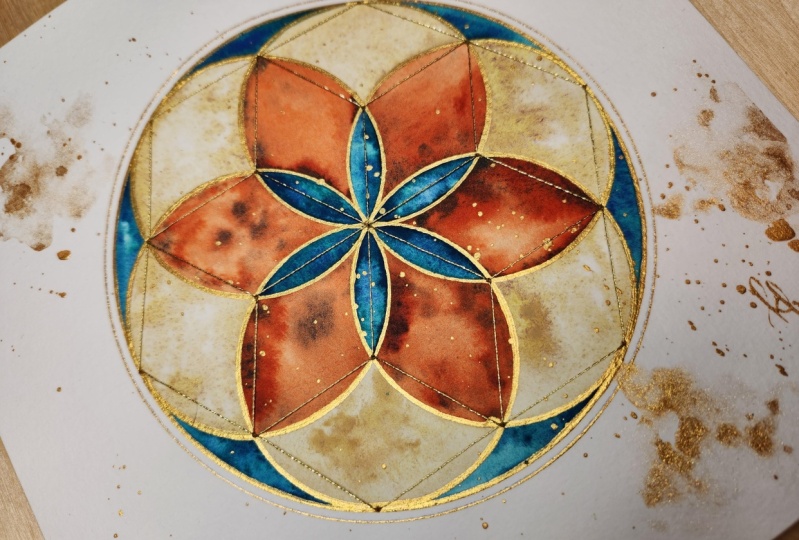
color in the next lesson, I'll give you some tips to help you choose your colors. [MUSIC]
7. Choosing Your Colours: [MUSIC] In this lesson,
I'm going to talk you through a simple technique that I use when I choose
colors in my work. It's a very simple technique where I just make
use of the colors included on the barrels of my mark pens or my
colored pencils, or from the swatches I create
from my watercolor paints. I'll first talk you through
some design considerations, like how many colors
you might want to use before we look at choosing a selection of colors
intuitively and then narrowing down to
your final selection. If you've decided to add
color to your pattern, then you've got to
choose your colors. I think this pattern looks nice done in three different colors. There are four sections of the pattern that can be colored; the small flower at the center, the next flower out, then the outer sections
of the circle. Finally, if you put a frame on, then the very edge
sections of the frame. Personally, I like to have my darkest color at the center. Then to balance the pattern appearing again on
the very outer edge. This leaves us with one, two, three colors in total, with the center color
appearing twice. Choosing colors can
feel a little daunting. What I like to do is
choose a selection of colors that I feel drawn to, and then make my
final selection of three from a smaller
selection of colors. That makes it a little
bit easier than being confronted by your entire
watercolor collection or your entire colored pencil
collection and having to make a decision with too
many colors to choose from. Once you've selected a
set that you're drawn to, without really thinking too much about whether they go together, your next job is to
partner with them up. You can just pick
three randomly. If you're happy with
those, then you're off. However, you might not be happy with the
selection you've got. You can start switching in some different colors just to see how they interact
with each other. Place some either side. I quite like this three. That's a nice combination. I might want a bit more warmth. I'll try that. I quite like that as well. Just keep playing with your
sets of three moving them around until you find a set
that feels harmonious to you. I quite like that as well. I think I'm going to
go with these three, orange, green, and teal. Teal is my darkest. I'm going to have
teal at the center and at the outer edge. If you've decided
you're going to add color and you've now
chosen your three colors, it's time to get
coloring. [MUSIC]
8. Colouring Your Pattern: In this lesson we're going
to be coloring in together. You can of course use any coloring medium you
feel confident with. I shall be using
my new paint pens. Because we're going to
finish by outlining the pattern before stitching it, you don't have to worry
too much about having perfect edges because
that will all be covered by the pen that
you're going to outline in. I'm going to use my darkest
color for the center and the outer edge and I'm
going to start there first. [NOISE] I find it useful to outline the section I
want to color in first [NOISE] before filling in
the section with color. You might find it useful
to turn the paper around as you go so that when
you're outlining, you're using the natural
movement of your hand to do so. Once you've picked
your darkest color and done the center
and the edge, you'll then need to decide
which of the two you want to do on the outside
and which on the inside. You can use your pen
lids to help you decide. That's orange on the
inside and green on the outside and the
other way round. I definitely like the contrast
of the orange next to the teal and then the greens almost like the leaves around
the edge of the flower. I'm going to have orange
next and then green. You might also be a
bit worried about smudging the work
you've already done. Using a sheet of
kitchen towel can be useful just to cover up your
work as you're coloring in. [NOISE] Remember to keep moving the paper around so
that the edges you want to outline align with the natural
movement of your hand. Now we're all colored in. It's time to crisp everything up with the addition of
an outline. [MUSIC]
9. Outlining Your Pattern: [MUSIC] In this
lesson, I'm going to talk you through using your compass with a pen
to outline the pattern. This is probably the most
nerve-racking stage, so take a deep breath and I'll talk you through
it step-by-step. I'll remind you how to use the pen attachment on
your compass and I'll also talk you through
some tips for using metallic marker pens, because those can be a little temperamental as you
are about to see. To outline your pattern, you're going to need your
compass with pen attachment. You're going to need the
pen you'd like to outline with ensuring that it fits in the pen attachment and it's also a good idea to have a little
bit of scrap paper to hand. If you are using a
metallic paint pen, then sometimes they
need a little bit of work to activate them. First of all, give them a
good shake with the lid on. [NOISE]. This mixes up the ink and ensures it comes
out consistently. Once you've finished
shaking the pen, It's a good idea to
release the pressure. To do that, have the nib pointing up and use a little bit [NOISE] of rough paper to press down to release the air that
may have been built up. This helps prevent
flooding that might occur when you first place
the pen on the page. If your pen is brand new, you won't have any ink
on the nib at all, and you'll need to press
up and down a few times to encourage the
ink into the nib. It's also a good
idea to do that if you haven't used
your pen for awhile. Test the ink flow out. Be careful not to over press because that can
encourage flooding. When you think the ink is
flowing well enough then stop. Next, we're going to insert
the pen into the compass. Remember that we partially
close the compass and then we line up the pen nib and the compass
points so that they're level. Ensure that the
pen is tightly in the pen holder and that the pen holder is
tightly in the compass. Then take a deep breath because it's the nerve-wracking
bit next. Next we need to
remeasure our radius. We're going to be
using the tips of the six petals of
the inner flower. There should already
be holes there from when we constructed the
pattern originally. Place your compass point
in one of the holes. You might want to open your
compass a little first. When you're happy
it's inside the hole, we're now going to adjust our
compass until it looks as if we've got the radius
in about the right place. It's a good idea to do a little test with the
tiniest dot of ink. I'm just going to
dot my pen down. Now I think, I'm in
the right place there. You can test it on another section of the
circle if you wish. Yes, I'm happy with that. Once you're happy, deep breath, remember we're turning slowly, especially if you're
using a metallic ink pen and off you go. Now, looking at mine,
especially here, I can see that
actually my radius has turned out to be
a little narrow. What I'm going to do
is I'm going to do my six circles with this
radius and then I'm going to incrementally
open it up and do a second circle in
each of the six. Locating the hole each time, easier said than done. [NOISE] That's a
better one actually. If you can sense your
pen nib running dry, you may need to give
it a quick press on some rough paper. I'm wondering if the issue here might be cleared up by simply re-outlining with
the same radius so I'm going to try that first. That's much better.
I think my nib wasn't properly inked
for that first circle. If you do have a problem where your outline isn't quite covering the edges
of your pattern, then you can do the
incremental adjustment, and I think I'm going to
demonstrate that for you anyway. What I'm going to do
is I'm going to very slightly open up my radius
a tiny bit further. I'm going to re-ink all six
circles and that will have the effect of widening the
gold line just very slightly. Placing my compass point
in one of the holes again, and literally the slightest
adjustment out and then another six circles and you can see this has
had the effect of fairy slightly widening the gold band. I'm much happier with that. Then finally, I want to
outline my outer circle. Compass point at the
center this time, and we're extending to the
outer edge of the pattern. Find that hole first. Find your measure. Maybe a quick dab down to
see where you actually land. I think I'm happy with that. Final swing and my pen has
decided to run out of ink. I'm going to use my scrap paper and do
just a press or two. [NOISE] It's better. Let's have another go. Now that's better, but there's just a slight gap between
the color and the frame. I could either choose
to go over it with my teal pen or I can slightly reduce the radius and do a second circle and that's
what I'm going to do. That's much better. Now to decide whether I want to add a second circle as
an outer frame, to help you decide I've got an example where
I've done just that. In this one, I've just opened my compass out a
little bit more. Enough that there's
a distinct gap, and put on a second circle. If for comparison purposes,
that's the difference. I quite like doing that, I think it adds a final touch before the
addition of the thread. I'm going to add
the outer frame. To do that, compass point
at the center again. Then, I want a distinct gap
so I'm going to open up the compass enough that when I nearly touch
it down on the paper, I can see there's going
to be a gap up here. You're just doing this by eye [NOISE] and because
I've been talking, my gold pen has decided to dry up again so a quick
press on my rough paper. Double-check the radius
and have another go. [NOISE] Because the lines in my pattern are
double thickness, I'm going to do the same to the outer line and I think
I'm going to come in slightly just to reduce the
thickness of the white band. [NOISE] An incremental
adjustment on the wheel. Maybe a quick test, yes, I'm happy with that. Remember to keep nice and slow so that the nib has
time to re-ink as you go. I think I'm happy with
this punchy color combo. The most nerve-wracking
stage is now complete, give yourselves a
pat on the back, and it's the final stage
next, the stitching. But before we move on, let's just have a quick look at the glint of gold in the light. Super pretty. [MUSIC]
10. Punching the Paper: [MUSIC] So now for the
really satisfying stage, we're going to pre punch
the holes before we stitch. Because the paper we're
using is quite thick, and we don't want to
be doing that with our needles while stitching, you'll need your soft
surface to press on, a ruler or pencil, and something to
pierce the paper with, either a paper pacer of some description or you can use the point
on your compass. As you've seen,
some artists stitch the curves of their geometry
with individual stitches, but in this paper
embroidery project, we're going to be using
our thread to create straight lines that connect intersections in the
pattern together. Now you can essentially use all the intersections in the pattern and connect
them up in any way you wish and I really
encourage you to explore different ways of connecting
up the intersections. But before we stitch, we need to create holes because paper is
quite thick and you don't need to be
forcing your needle through while you're stitching. I'm going start by
punching holes in the obvious intersections,
the center, the tips of the petals
of the small flower, the tips of the petals of the large flower and
then I'm going to show you one last place that it can be useful
to add some help. Support your piece of paper
so that it doesn't move. Then simply punch the holes that are already there from
when you use the compass, and pass your pacer
all the way through. [NOISE] Makes a really
satisfying noise. [NOISE] Just make sure
you're always finding the holes that the compass left or going right in the middle of the intersection if there's no compass point already there. [NOISE] That's all my obvious
intersections punched. But there is another
set that can be quite useful to provide a frame
around the pattern. I'll show you those now. As you can see on this pattern, I've added a set of six extra holes on the
outer edges of each circle. How do we find those positions? You'll need your ruler,
and your pencil for this. Essentially we are going to lie our ruler through our
small petal tips. We'll just take
each set in turn. When you are happy
that your ruler is going through all
three positions, then just make a tiny
little mark with your pencil on the outer edge
of each of those circles. You could, if you didn't want to make a mark with your pencil, just punch straight away. In fact, I might do that. [NOISE] Then the next set of intersections
through the petals, [NOISE] and the final set. There are actually many
different options for joining up this set of
holes we've created. I'll be showing you one way, but I'll also point out some other ways you
could consider. Now it's time to
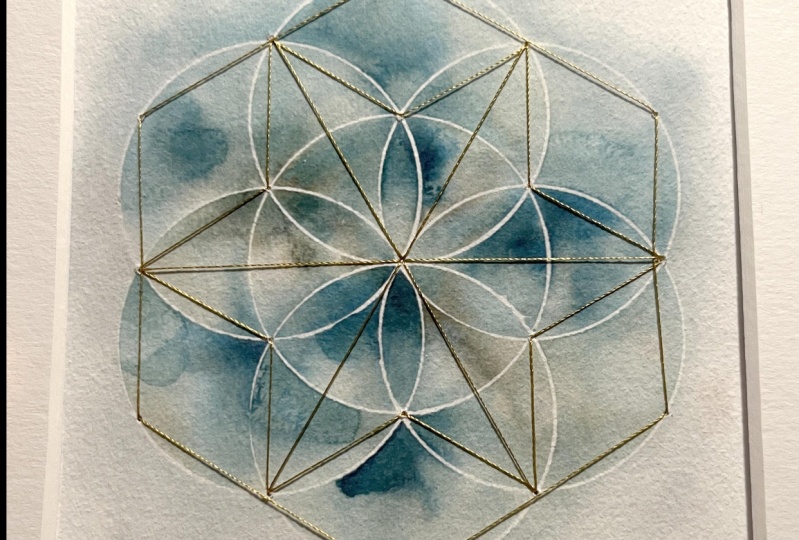
add the stitching. I think I'm going for gold. Finally our motif is
ready to add thread to. In the next lesson, I'll be talking you through
that process step by step. [MUSIC]
11. Stitching Your Pattern: Part 1: [MUSIC] It's the
stitching lesson at last. In this lesson, I'm going
to introduce you to the pattern we're going
to be stitching together, and I'm going to talk
you through how to plan a stitching sequence
so that you can tackle patterns of
your own devising. Then I'll show you
how to start off and finish off a sequence
of stitches. For this stage,
you're going to need your needle and perhaps
a pink cushion, your thread, scissors. A ruler can be useful for measuring out your
length of thread. You will need some low tack
tape like masking tape. It might also be useful to have a copy of the stitching
patterns to hand. You're also going to
need nice clean hands because we're going to be
handling our work a lot. One final check that it's a
good idea to make is that your needle passes through the holes that you've
punched previously. I'm going to quickly
do that now. [NOISE] Now that you're satisfied that
everything is in place, I'm going to talk you through
the stitching pattern. I've provided you with three different alternatives
for stitching. I'm going to be talking
through this one, which is the one on
this little piece, and then this one. This is the one I've used
to stitch this piece. Finally, this one built up of triangles is the
one I've used here. However, I really
encourage you to explore your own ideas, and there's a principle
template you can use to try out your own designs. Now I'm actually going to
be stitching this piece, just because the thread will be easier to see on a
white background. Now when we stitch
geometry in this way, essentially, we're doing
a giant running stitch. We'll emerge from one hole and then we'll pass
into the next, and then pass under the paper, emerge from the hole next door
into the next, and so on. We'll create a series of stitches with gaps
in between them. When you're planning your
sequence of stitches, it's a good idea to identify a circuit around the
pattern that you can do one way and then double back to complete the
gaps that remain. Looking more closely
at our pattern, I can see that a good
starting point would be this circuit around the outside. I'm going to stitch
this circuit around the outside and then double
back to fill in the gaps. We're then left with
this arrangement of rhombuses inside the hexagon. We could stitch each rhombus in turn and then double back or we could identify this
circuit around the outside and then
double back that circuit. I think that's what I'm
going to do because I just think it's going to
be easier to explain. Finally, we'll be left with
this cross at the center, and I'm just going to stitch
each arm in turn. [MUSIC]
12. Stitching Your Pattern: Part 2: [MUSIC] Now that we've planned
our stitching sequence, it's time to get our
needle threaded. Now, one thing to realize about thread is that the end
that you pull from the spool is the end you
should thread into the needle. Because I didn't know this
until I started stitching, thread tends to have
a grain so it has a smooth side and
then a rougher side. Now, I don't think
it's obvious with this metallic thread
but with some threads, it will be obvious as you
run your finger along. If you're using
embroidery floss, then you'll just want to
separate two or three strands. I tend to do that by
inserting a finger between the two sections and running it quite slowly down
the length of the thread. We're first going to
cut a length of thread. Now, you don't want to
use too long a length because it's got
a tendency to get tangled up and caught on
the edges of the paper. But at the same
time, if you've done a larger pattern like I have, then you need enough
to get around the outside in one go really, it would be ideal to. If I think I needed
a longer length, I tend to use arm spans worth. But if I'm doing a smaller
section then I use fingertip to the end
of my nose length, somewhere between 3-4
lengths of the ruler. Hopefully, that
should be enough. Now to thread the needle, I quite like this
metallic thread, it's nice and easy
to pass through. I'm going to be stitching
just a single strand, so I'm just going to pull about six inches through
the needle to secure it at that end and then I've got my
longer length trailing out. If you feel this
length is too long, for example, if
it's getting really tangled up in things, then just pull a little bit more through the top of the needle to shorten the length
that you're working with and you can
lengthen it as you need. We're going to start on the back and we're going to
start in any one of the points that we've identified on that first circuit
that we're stitching. I'm going to start here. I'm going to draw my
thread through for now until I've got about six
or so inches remaining. You won't need to leave
quite so longer length, more like 3-4 inches. I'm just leaving this extra
long piece so that I can demonstrate some securing
methods at the end. Pull the thread away
from the center of the paper and then just
use a small piece of your masking tape to
secure it at the back, making sure you're not
covering up any of the holes. Press the tape on all sides
to make sure there's no little bit sticking
up that will catch on thread as you're
passing it through. Then if you think
this longer length is going to irritate you, you can just fold that up and use another piece
of tape to secure it. [NOISE] Again,
pressing down to make sure there aren't
any sticky up bits. Then we're going to start. Now we're going to stitch
that first circuit. We're going to go into this
point here at the tip of this almond shape
and then come out at the circle edge and then in
the tip of the almond shape, out the circle edge, and so on. Then once we've
gone around once, we'll then return to
fill in the gaps. In at the tip of the almond
and then out at the circle, working your way
around the hexagon. As you go around
every few stitches, just give a gentle tug
to make sure that you're keeping everything nice
and tight as you go. Don't pull too hard
because sometimes this metallic thread can break. I've nearly completed
one circuit now. That's one way
around the circuit. I'm now going to come
up as if I'm going to continue along the stitches I've already got but I'm
going to double back so that I'm
filling in the gaps. Going back the way I came. I'm noticing now that I've got a double layer of thread all the way to the
hole so I'm just going to pull a little bit more through and lengthen the
piece that I'm using. Hopefully, I've got enough to make it back, I think I do. This is my final stitch
then on this circuit. The hexagon is done. It's starting to
look very pretty. Now we've got decision to make. I can either secure
this length of thread and use a new
piece for my new circuit, or I can just continue
with this piece and then change the thread midway
through the next circuit. So I'm going to demonstrate
that because I think it's useful to know what
to do in that case. My next part of the circuit is this zigzaggy piece that goes around the edges
of all the rhombuses. Where have I ended? I've ended here, which means that
if I come up here, this will then be
my first stitch. Then I'll come up here at the petal tip and then
go to almond tip, petal tip, almond tip, and so on all the way
around and then back again. Where did I say I was
going to come up? Here, I think, or here. Either one doesn't matter. I'm just going to give
everything a gentle tug again just to make sure
I'm keeping the tautness. I will show you a
way of dealing with baggy threads when
you're finishing off. But it is a good idea to try and keep that to a
minimum as you're working. I've come from here
and up out of here. That means I'm going to
go in here to complete my first stitch on the
edge of my rhombuses. That's almond tip and
then come back up at petal tip and then
in at almond tip, and I think my thread is
getting a bit short now. I can do a couple more. Into almond tip and
then up the petal tip, and I think I'm going to
make this my last stitch. Yes. [MUSIC]
13. Stitching Your Pattern: Part 3: [MUSIC] Now that I've
seen, I've got round about six inches or so left. I'm now going to just give this another gentle tug and secure it with my
piece of masking tape. It's not pretty at the back. So keeping it nice and taut. Pressing down all the edges of that tape and then if I think that's going to get in the
way which it probably will. Let's secure that as well. Then I'm going to start
a new piece of thread off where I need to
come up through again. So I've just come out here, which means I would have gone in here on my next stitch
if I'd been continuing. That's where I'm next
going to enter and then secure my length of thread. Continuing as if I was just
using the same piece of thread into the same hole, I would have gone into pulling through until I've
got about six inches or so and securing that away from the other holes so I
think just about here. I don't want to cover
up any of the holes, so I could have used a
smaller piece of tape really. Then this might get in the way, securing that down and
hoping for the best. We're going to continue our way round one
side of the zigzag. So back into the almond tip. Now I feel I've got too
longer length of thread here. So I'm going to pull that shorter length
through a lot more. That will shorten
the piece that I'm working with and I can
lengthen it as I go. So back into petal tip and then in the
final almond tip. I've got in here, I would
have come out here. But I'm not going to continue in this way because
I'd be doubling up then instead I'm going to
reverse my direction of travel. Going backwards now to fill in the gaps from petal
tip to almond tip. Now I can see I've got a
bit of baggy thread here. I'm going to figure out
where that's come from by just giving a little
bit of a gentle tug. That's better. If you feel that the threads
are getting a bit baggy and you're not able to keep them as
tight as you want, you can secure them
with your thumb, pull them nice and tight. Secure them with
your thumb before you make your next stitch. Then secure with your
fingers as you turnover. You'll find your
own way of working. Secure before turning over. Starting to look lovely. Giving a little tug
every now and again, just to keep it taut and I think that's
that circuit done. Yes. So now what remains is the six armed cross at the center and I think I might have enough
thread to do that. So that's great. Where have I come out out? I've come out at the
top of the almond tip. I think I'm going
to enter in here, which will be a petal
tip and that'll allow me to start my first stitch to complete one of the
arms of the star. Just giving it a little tug, securing it with my thumb while I pass my needle through
so that the thread doesn't loosen [NOISE] and then passing through the center. I think I'm just
going to work my way around the petals and turn into center out at tip. [NOISE] Then papers a little bit too large to be able to
clamp with my thumb, so I'm going to pull the thread back to clamp with my thumb before passing it through the
center and pull in through center. We're now passing quite a few threads
through the same hole. So just watch when
you pass your needle through that you're not going to pierce the thread itself. I think that's the last stitch. So giving it that gentle
tug just a few times and securing that
final piece for now. The stitching stage is done. I'm really pleased
that I've chosen this white and gold copy
to stitch on because I think it shows you
that it's just as lovely without color
as it is with. The stitching is
finished and you can see what your final piece
looks like now. We've got one last
lesson in which I'll show you how to
tidy up and secure the back and fix any issues that might have arisen during
the stitching. [MUSIC]
14. Finishing Off: [MUSIC] Now, it's
time to tidy up those loose ends and
finish the project. For this finishing off stage, it might be useful to have your needle and thread close by, pair of scissors to
hand, and your tape. The first thing I'm going to
show you is how to tidy up some little issues that can arise when you
stitch in this way. The first of these is what
happens at the entrance to the holes when you've got more than one stitch
going into the same hole. I'm going to zoom
in on this bit. But at this point here, at this Ullman tip, I have got a thread that's overlapping another as
it enters into the hole. I haven't got each thread
entering cleanly into the hole. Let's see if I can find another example where
that's happening. Yes, I've got the
same issue just here. I've got a thread overlapping another as
it enters the hole, so each one is not
entering cleanly. What I tend to do
in this scenario is I use the back of my needle. Just because this is
blunt than the sharp end. I'll just carefully, without scratching the
surface of the paper, drag the needle along to separate the two threads
where they enter the hole. I'll do the same here, where I have the issue again. Push the needle towards the hole and that separates
the thread so that each one, if you like, enters the hole
independently of the other. I'm just going to check for any other situations I've got, where I might have
that going on. But I think that looks fine. Yeah, I'm happy with that. Another common issue
is that you might have some sections of stitch that
are baggier than others, just where it was
difficult to keep the tightness as
you were working. I'm now going to
show you what to do to tighten your baggy stitches. I've got a piece
here that I'm not happy with how it's lying. It's not lying in a
nice straight line, that I might see if I can just adjust where it
goes in a bit fast. Looks better. This
little piece here, it seems to be baggier
than the other stitches. What I'm going to
do is I'm going to think about where it's
emerging either side. Because the piece of thread
that I'm going to need to tighten will be coming
out of either this hole, but on the other
side of the paper, or this hole, but on the
other side of the paper. Pulling either of
those two pieces of thread will help tighten this piece sitting
on top of the paper. These are my two holes, which are these two, so it's a piece of thread
either emerging from this one or from this one. Now, let's have a
look. I found the one. If you look closely, you can see that if I'm moving a piece of thread on
the back of the paper and that's got the effect of
tightening this stitch here. I've discovered that it's
this piece of thread here, that's the one I need to
tighten to tighten the front. What I'm going to do is I'm just going to use a piece of
tape to pull that one tot, is going to need to be
a little piece of tape, so that I don't obscure
any of the holes. I'm going to pull it tight, and then place the piece of
thread over the top of it. Then pulling that one tot, I've made the rogue piece. I can't even tell
which one it was now. The rogue piece of loose
stitch has now been tightened on the front by pulling through and tightening
a piece on the back. It takes a little bit of
detective work sometimes to work out which piece of thread
that you need to tighten. I'm pretty happy with how
the front of that looks. Now to the back. The back is never pretty. You can, if you want to, pretty it up a bit by cutting neater pieces of tape
with your scissors. But to be honest with you, what the eye can't see,
nobody worries about. I don't tend to
worry about that. But there are some
things to consider for the longevity of your piece, so it all depends what
you want to do with it. Now you will have noticed that I didn't start with a knot. That's for two reasons. The first reason is that this thread that
I use is so thin, that I would have to knot it several times to get a knot big enough that didn't pass through the holes when I
pull the thread. Then the second reason
is with a knot that big, your paper might not lie flat. If you want to use your
paper in different ways, for example, you might
want to use it in collage, you might want to stick
it onto something, you might not want a big old knot on the
reverse side of it. I don't tend to knot my work, although I know some
paper stitches do. Then thinking in terms of
the longevity of the piece, this is a consideration
you might need to make, if you're thinking of
selling your work. If you are thinking, for example, of
selling your work, then you're going to
need to think about the tape that we've used. If you want to
preserve the work and make sure it's
long-lasting or archival, then you may want to
replace the tape with an acid-free tape that has a little more tack than the
ones we've been using today. You can search online for
acid-free framer's tape, or acid-free artist's tape, and those should all be
good replacements for the temporary tape that
we've stuck down today. Another option if
you're considering the longevity of the pieces
to consider using glue. This would need to
be an acid-free glue that's designed for
use on artworks, and you can use it in two ways. If you want to secure your work onto a
backing of some sort, whether you're using it
in a card or on top of the canvas or as part
of a larger collage, then you're going to use
the glue over the back of the piece and glue it down. That will have the effect of securing the thread very well. If the piece is going to be
sold as a standalone piece, then you might want to
consider using glue to secure the ends of the thread where they emerge from
the starting hole. To do that, it can be good idea to essentially think
about replacing the tape with small pieces of paper that you're going to
glue on top of the thread. For example, a small piece
of paper about this size could be glued on the back and used to replace
these pieces of tape here by making sure that you're pulling with a few gentle tacks
nice and tightly, and placing the glued piece of paper and holding
down while it dries. You could then cut the length of remaining thread much shorter, so that it doesn't escape over the edge of the
paper at the back. I'm happy with my bright
yellow masking tape, though. What I'm going to
do now is I'm going to remove each piece, and just check that each of the threads is
nice and tight. Then I'm going to replace my masking tape
with a fresh piece and snip the longer length of thread off after retightening. I'm really happy with
my finished piece. I love the little glint of gold from the
thread and the pen, and I think these are
pretty enough to frame. If mine was any smaller, I'd also consider using it on the front of a greetings card, because I know I'd love to receive a card that
look like this. I really hope you're happy with your finished
pieces too. [MUSIC]
15. Conclusion: Thank you so much for
joining me for what has been my very first
Skillshare class. I really hope that
you're happy with your little stitch motif
and that you feel you've learned a new skill
that you can take on and apply to new
projects in future. I hope you've been inspired by the three wonderful
artists that I showed you and that
you're going to get on Instagram and follow them. If you post anything
on Instagram then tag me because I love
to see your work. Please take a photo of it and upload it to the
project section. If you've got any
questions about materials or techniques
or anything else, then please pop them in the
discussion down below and I'll make sure I keep an eye
on it and get back to you. If you've enjoyed the class then please do leave a review. That would be really
appreciated and it would help me get established on
this brand-new platform. If you came to hear about my next class and perhaps
the one after that, because I'm absolutely
fizzing with ideas, then do follow me on Skillshare. You can follow me on Instagram
as well and you can sign up to my newsletter to hear
about my other courses. All that is left to say is, thanks again, and happy
stitching. [MUSIC].
 Clarissa Grandi, Artist | Educator | Author