Transcripts
1. Gelli Printing with Ink Pads Class: Hi there, I'm Cheryl and welcome to jelly printing with ink pads. In this class we're going
to cover a bunch of different techniques used with
ink pads on a jelly plate. And then I'm going
to show you how to create cards out of them. Let's go take a look at what
we're going to go over. In this class. We're going to use
a jelly plate, the ones that I'm
using R5 by seven, you could also use an eight by ten if that's what you have. I'm going to use mostly
distress oxide pads. I'll go through in
the first video, side-by-side comparison between
regular distress pads and the oxide pads and why I chose
to go with this one here, There's going to be four
different sections of jelly printing for different
videos of jelly printing. And we're gonna go
over all sorts of different techniques
to use with it, making prints along the way. Then from there we can
choose which prints to use to create different cards. Now I'm gonna show you
how to create one video, a card using a jelly
plant jelly print embossed background. And then in another video we'll use texture paste
on our background. Will also go through how to just use a dicot with a
jelly print background and then how to die cut those jelly prints to create embellishments
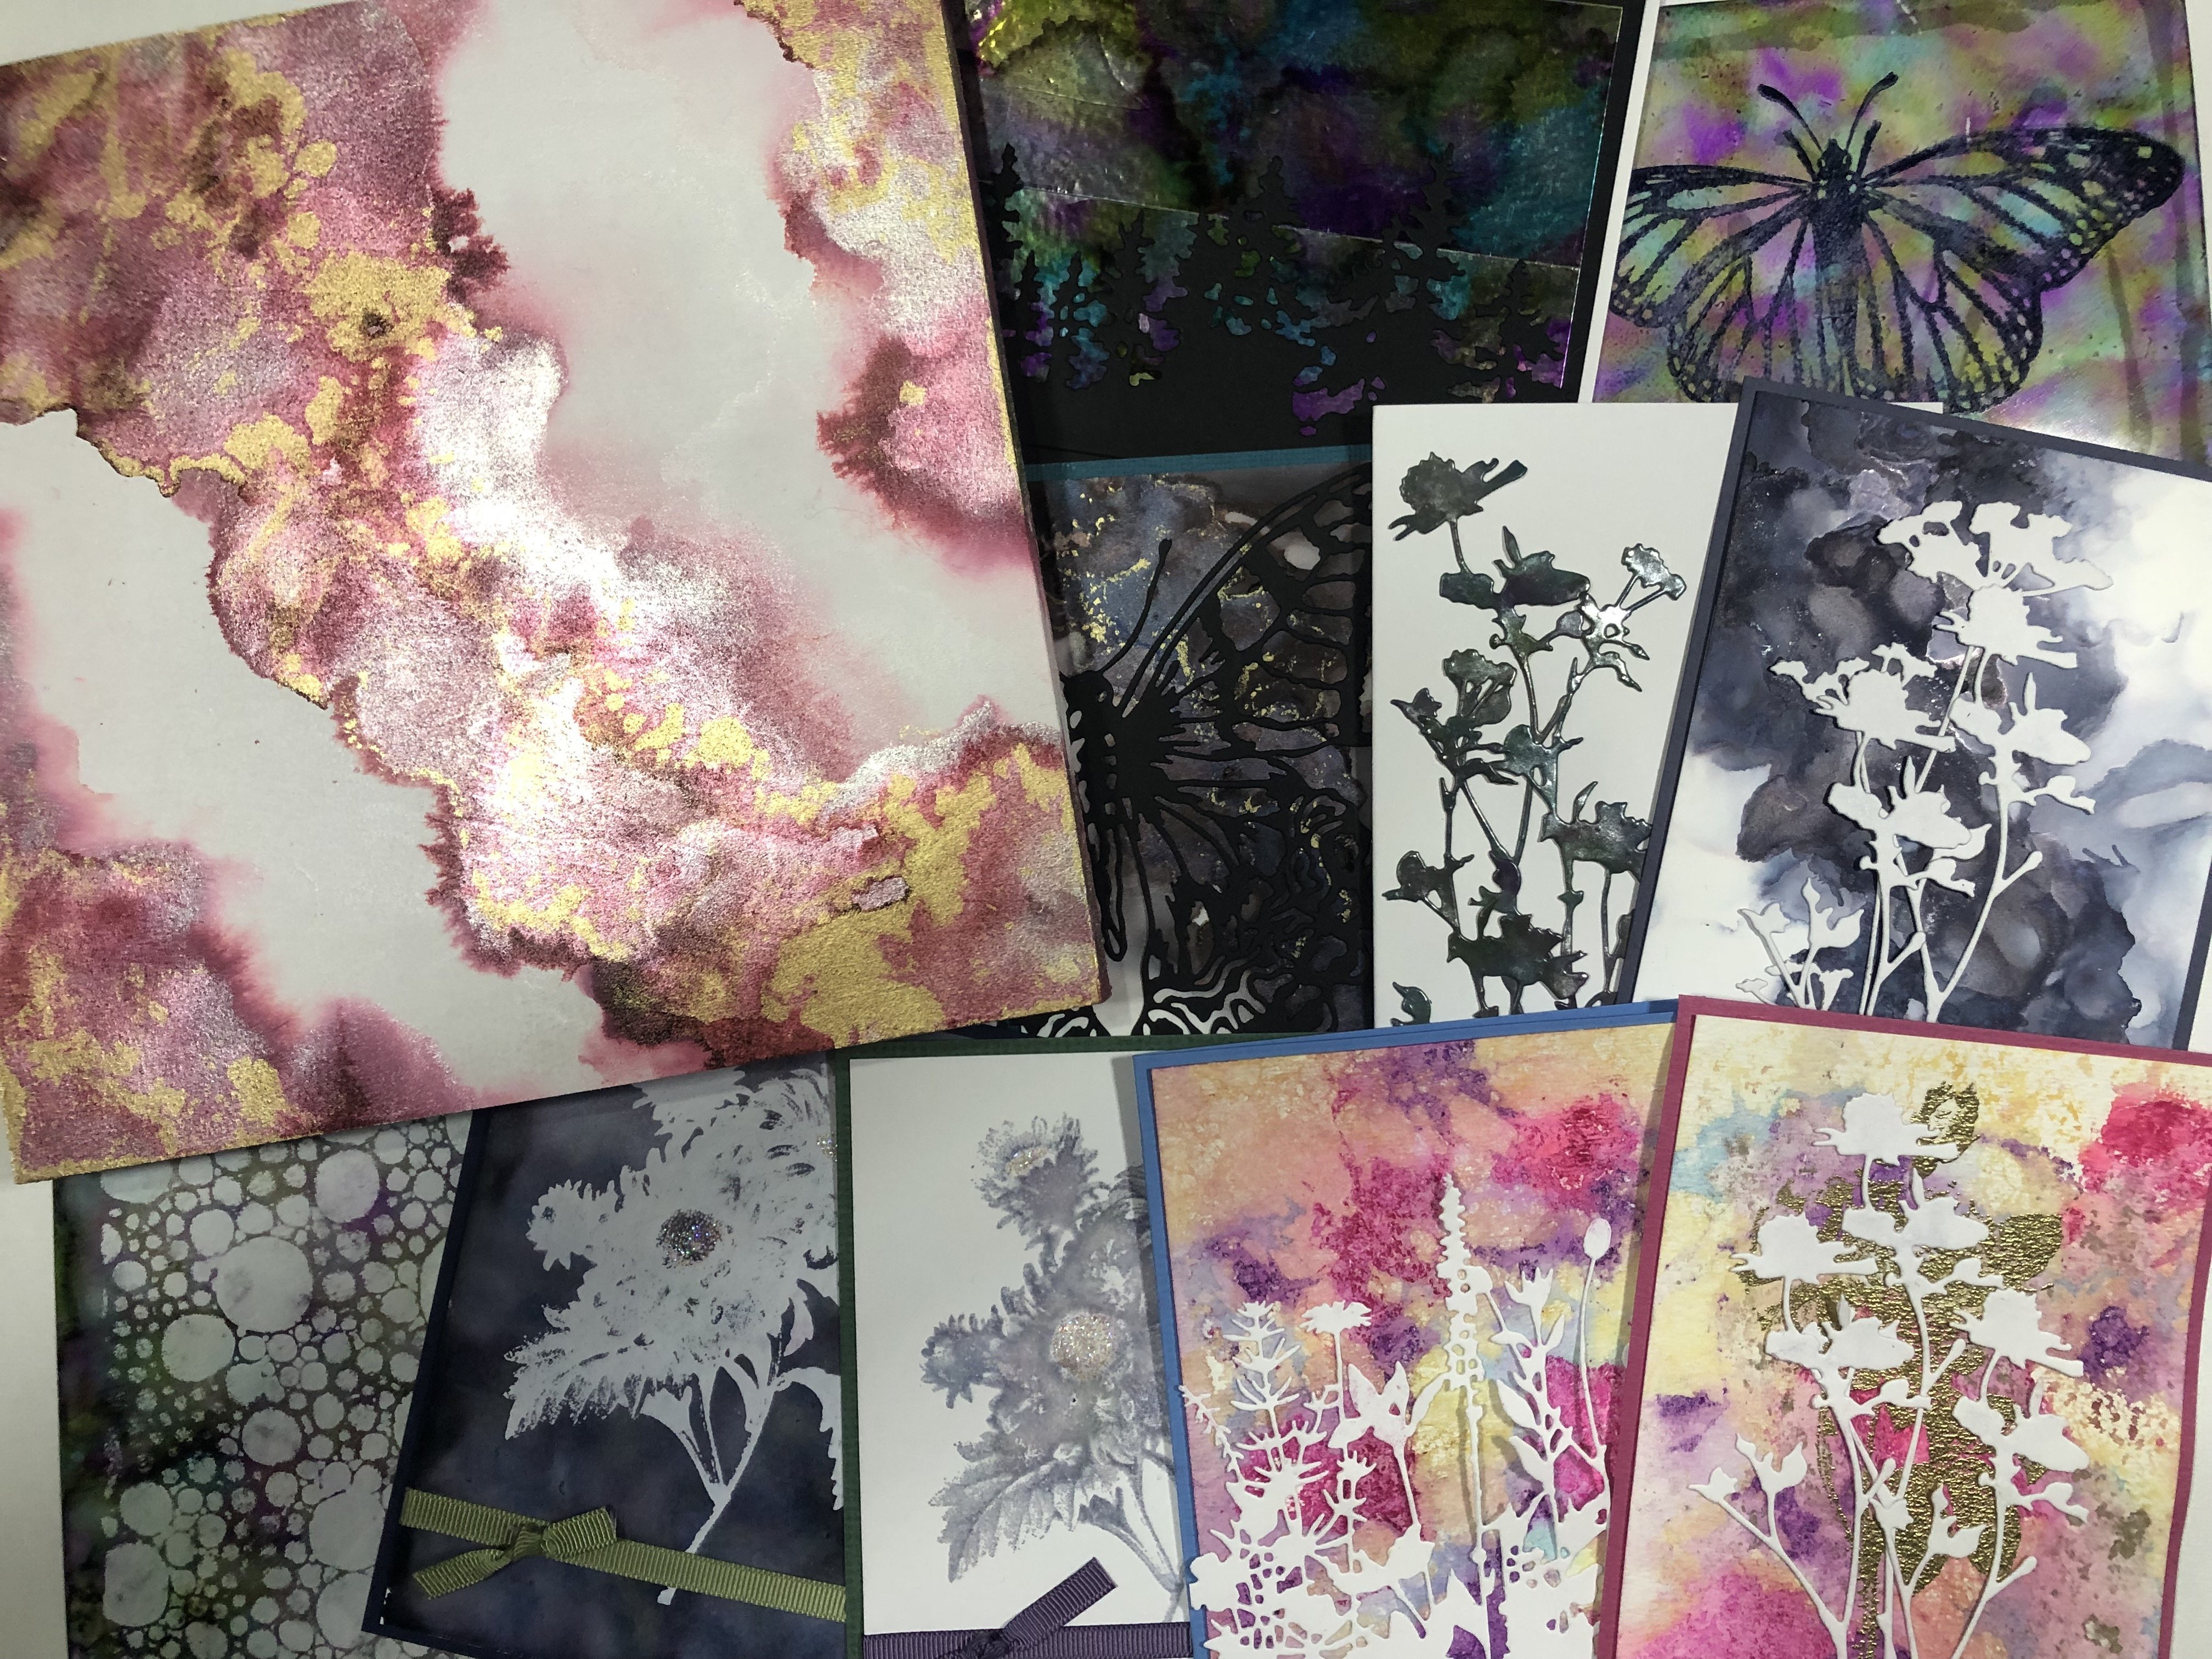
for your cards. These are the actual cards
that we're going to be making. Very simple. Two are very
similar to the sample cards. And the techniques are
very, very simple, but it's always
nice to know when you've learned how to
do jelly printing, exactly how to use them
and incorporate them. In this case, we're
going to do some cards. This class comes
with a supply list. It lists all the supplies
used throughout the class. And it'll be linked
to where you can purchase those supplies
if you choose, or just to use as a reference. Also have pictures of all the
samples there so that you can see the picture with the supplies used for
that exact sample. Now let's go start doing
some jelly printing.
2. Basic Gelli Print Background & Adding Stencils: Alright, so before we get started doing some
jelly printing, let's talk about the
supplies we have here. So I have 25 by seven
jelly plates here. Now, you could also use an eight by ten jelly plate
that would work as well. I'm printing on
some printing paper that I've just cut in half. If you have a eight
by ten jelly plate, you could use a full sheet. We're doing the printer paper
simply because it's a lot less expensive than
doing it on card stock. Once you've got some experience, you could print radon card stock because
you'd be a little bit more confident about how
it's gonna turn out. But if you're a beginner, doing it on printer paper is
an excellent way to start. Because if you have
prints that you're not liking as you're starting
out, as you're learning. It's not a huge expense. For the most part, I'm
doing the printer paper. There will be a few
times where I'm using other people or
paper and I'll share to share then what type of
paper I'm using and why. For the first Also, I'm using a six inch rare. It just works really,
really well for this size of in Jelly plate. You could use a smaller one. If you have a smaller one, you may want to wipe
between colors just so that we're not transferring color from one
thing to the other. Just realized I didn't clean
this off from yesterday. For the most part, the base of all of the prints
that I'm going to do in this class are going to
be with speckled egg, broken China, and prize ribbon. And I chose to use
oxide because I really liked how they blended together. But first off, let's do
a comparison between just regular distress
ink and oxide. They're very, very similar. If you only have the regular distressing or a regular D-pad, you could definitely
use it and get very similar results by using the same colors as a base color. You'll be able to see how the different
techniques work rather than seeing all the
different colors and not really being able to
compare them to each other. The first few videos
in this class are going to be just
doing jelly printing. And we're going to come up with a bunch of different prints. And then I'll show
you how to create four very simple versions of cards that could be used with many of the
prints that we're making. As you saw, I just
put a line of each of the colors on my gel plate. I'm going to take my brayer. I'm just going to blend it. Now. I could blend it right in there. It's not going to hurt
it, but because we're doing a side-by-side comparison, I'm going to clean
my brayer off. To clean it off, the best way is using some baby wipes and then some paper
towel to dry it. I do have some
scrap paper beside. I could break it off, but it doesn't do
it completely when we're working with impacts. Alright, I'm gonna
leave that on there. There's still a lot
of ink on that, Breyer and we're using it for 20 years or for the next sprint. Put your paper on
your jelly plate. What you want to do is you
want to make sure that you rub your whole plate to get really good contact
with that paper. Because any place that it's
not touching the print or the plate is where ink
is not gonna transfer, then we can lift it
up that there is the regular distress ink. Here we have oxide. You can see this is
very, very similar. I can even go back and
take another printed. It's going to be
just a lot lighter. I had just clean my
plate last night. So some of the beating up with the oxide is because I
just cleaned my plate. All right. Well, there's
no ink left on that side. Very little left on that side. Let's ink it up again. This time I'm just
using the oxides. I find that you can
usually can get two prints out of the ink from a brayer before you really need to add some more ink to it. See how they're still
ink on that Breyer, and see how that second
time in the print, it just blend it a
little bit more evenly. That seems to be
what is the most consistent with using
the oxides phrase. I find that it tends to blend
a little bit more easy. And I tend not to get as much of that little
spotty look to it. That's why I chose
to use the oxides. Because these are ink pads. They dry super, super quick. I really don't need to lay them aside
individually to dry. I can just layer them
on top of each other. Now let's take that up a notch and get a little bit
of texture in there. I'm going to ink my Oops, pads again or ink
my job plates again. If you find your ink pad
is a little bit dry, make sure to rethink
it so that we get a decent amount of ink. On your plate. Obviously this, these techniques will work with any colors. I just liked these three colors together and I liked
the ombre look. I just think it looks a little bit more interesting
by doing the ombre. Look. This plate is five
by seven cards. We're gonna make
our needed to be cut down to four inches by five and a quarter to go
on the front of the card. But by doing the ombre look or doing a several
colors at once, we can choose which part of that print we want most for
whatever design we're using. Now I just realized I said we were going to
use some stencils and completely forgot to
add this pencil to it. So let's do that again. Those playing on gray ones, you could use them
as is or you could go back and add some
texture to them, add some stamping to them. Alright, now let's not
forget the stencil. I have just a very simple
water drops stencil. And what I'm going to do
is add some darker ink. This is chipped sapphire. Just because I want
you to be able to see the different color
from the background. So I'm gonna use my
smaller Breyer here. Blend it on there. Now let's take that
and move it over here. Let's do, let's do it this way. Really either way
would absolutely work. Once again, make sure
your rubber really well so he's got good contact
with your plate. This one here because the
stencil is still on it. I want to make sure to press just a little
bit harder and press that paper
into the stencil. There. There we go. We got
the difference between the background and
the stencil and this one because we had the ink on the stance where we get a little
bit of ink there, but then we mostly
get the print from the background. Then from there. Go back. This portion is really just about playing with
techniques and accumulating some
different prints that we can choose from later. And we're really going
to be accumulating a whole lot of prints. Once again, this is
a watercolor pencil, but it absolutely
could work with any stencil pattern you choose. That one didn't show up very
well. Let's try it again. I know this is still
ink on this side here, so we're still going
to get a little bit of a light print there. Again, because we're using printer paper, it's
very inexpensive, so I'm not wasting
paper by doing this. And even this one here. Either I could use some
of those little bits as parts to dicot later
or I could reprint on it. Once again, that
didn't really show up. Let's see what happens
when we do this. That looks cool. So this is part of, part of
the fun of jelly printing is just playing around and
seeing what happens. In the next video, we are going to start
playing around with stamps as well as dies, as a way to get some extra
texture onto your plates.
3. Using Stamps & Dies with Gelli Printing: Alright, so first
let's play with some stamps on our jelly plate. Once again, I'm gonna
put my base colors down by using those same base
colors every single time. And not only do you see how the different techniques
change it up, you also get, are
you also don't have to clean your brayer
quite as often. Which means you can spend
a lot more time playing. Rather than cleaning. The base color is down. I'm gonna take that same chip Sapphire that I used before. Well, first one I'm going to
take a print up is this one. I'm not putting any income. I stamp. What I'm doing there
is I'm ending up removing the color from the
background on this one here. I'm going to ink up this stamp. I'm going to add some
color to our background. Now, obviously, as you can see, I'm not using acrylic
blocks with these stamps. You absolutely couldn't
use acrylic blocks. It's really not going
to change anything for you other than being able to remove the stamp
a little bit easier. Now, there's incongruence stamps that has come from
the gel plate. So what that means is once I
am done taking this print, I can also stamp, stamps onto some paper
and get a print that way. So there we've got
the one where we just took some color away. There's the one
where we add color. Now just remember
when you're stamping, it's going to be the opposite. So that script one is
actually backwards. But because of jelly printing
and stuff like that, you really don't see it.
You just see pattern. And this one here. If I were to use it on a card, I would want it to
be on personally, I wouldn't want it to be on the right side. When
I put it on the card. For this, I would
change the ombre. So it was from dark at the
top too light at the bottom. Let's take, well, before
we do this, let's do this. Let's transfer
that ink back onto the jelly print or jelly plate. For this one. Then for this one, let's just print
it onto the paper. I'm just gonna put the
paper on the plate just so it's within view here. There we go. Little bit of transfer
from that jelly played, he's come off so we
get a little bit of the turquoise color, a little bit of the
different colors there. I could've taken that and
put it on top of one of my other prints saved just with the Aubrey
background or whatever. Just to see how that looks. There we go. Now we've got the transfer from the plate or from the
stamp onto the plate. Those guys aside. Alright, so I have a couple of days cuts here ready to go. So these are just die
cut out of card stock. Now because their card stock, the ink is not going to stay on the plate where the dicot is. It's going to transfer that
color to the card stock, which means you could
use this as a way to color your dicots, as well as a way of getting
a print on your background. And this is one that
I did yesterday and I already printed
on that side, so I'm gonna do it on the
other side so you can see it. First of all, we
can get a print two this way. It does. It's not as detailed as
the actual dichotomy is. Just keep that in mind when
you're choosing dicots that are very detailed. That is going to change up
a little bit. That's okay. Like I said, the ink is going
to transfer to your dicot. So there'll be ink
on the back here, which you could use on
the front of a card, but there's still that outline
ink, the background here. We could also use that. So another way of getting some really interesting
looking prints, as well as creating
embellishments for your card. Let's take this one up. Now this isn't my
favorite way of using dye cuts with
a jelly plate. That one isn't nearly
as interesting to me is this one is still a
very cool background. Let me show you next what
is my favorite way of using dies with a gel player on my big shot here I
have some butterfly dies. Here. I've got some fun foam that
has a sticky back to it. I'm going to die cut
these butterflies. They cut like butter. They cut just as
easy as card stock. This week beside pop right out, let's move those
stars to the side. I've got a piece of chip board. You could use serial board, you could use whatever you want. You just want something to
be a little bit stiffer. And this is a nice, inexpensive way of having a
stiff background. Corrugated cardboard
would work as well. You just want to have
something that is sturdy. Going to set that to the side. These are ones that
I've already created. Basically, you're
using your dyes to create stamps
for your gel plate. Now before we move
to the next step, the other thing
that I want to show you is when the
pieces are too big, it's easy to have a heart to just create a
little handle for it. So you're going to take
a piece of packing tape. You're going to make
a little flap there that sticks together and then
tape it to the back here. This just makes it
really easy to lift off your plate when
you're stamping with it. Now obviously you can
use your individual dies and create a background or
you can use a background die. This one here. I created that
background die and then just use the circles
to create polka dots. You can use whatever it
is that you're wanting. I am going to use the leaf
and the veining things. We're gonna do two
things with it. First of all, I'm
going to ink them. And I put a light green here. You can tell that
I'm being super, super careful not about
where I put my color. I just want to make sure
the full thing is inked. I'm not really worried
about being precise. I'm just going to
put this one here. I've already got the ink
on my background here, just to save you time watching
me doing the same thing. So I did the same from ombre background as we've
been doing this whole time. And I'm just going
to randomly put that darker green there. Then. Press it all down,
same as a jelly print. You'll want to make sure
that everything is touching. I'm gonna get a piece of
paper here to the side. I just want you to be able
to see me stamping it. I'm going to lift this
up and I'm going to stamp it onto some paper. Create a print that way. And then I can take this, create another print there. And I can even go back
and do one more here, and it's gonna be
just a lot later. Let's do the same for this one. Here that I've got the
full thing covered. Then you get the positive image, and then this is
the negative image. Let's do one more and we'll
get a lighter version. Here. You go. There's one more way
you can use your dies. This one here I used and I
die cut some tuple paper. I'm just going to ink
my background will be back in a second and show you
what we can do with that. To my background is
inked and Breyer. So what I'm going to
do is I'm going to use a pink color for this one. Now, this is where you need
to worry, not worried. You need to be aware of how
much detail your dyes have. Because first of all, this one was a little bit more difficult to die cut out of the UPA paper because there
was so much detail in that dicot. There are some parts
of the central flower that I couldn't pop out, but it's still looks really
cool when it's done. I'm taking this,
I'm just going to turn it over and transfer it. Let us take this print here. So it still looks like a really, really cool background
and it's really interesting on the sample cards. So that is one of
the cards are one of the backgrounds that I
created a card with. I've got that one. They're going to lift
this piece off here. The nice thing with a UFO paper, because it's synthetic paper
is I can just rinse that off and reuse that
over and over again. So even though you pull paper is a little
bit more expensive, when you do something like
with this, it's reusable. And that's another
background right there. I'll see you in the next
video and we're gonna do some other ways
to do backgrounds.
4. Using Embossing Folder & Found Objects for Gel Prints: All right. Before we continue, There's
a couple of things that I realized that I had forgot to
mention in the first video. First of all, we did a
side-by-side comparison of how distressed ink look
as well as how distress oxide ink looked
with the background. And I just wanted to
explain the difference between the two of
them for a moment. Distress ink is just
a die background. Distress oxide is a
dye and pigment blend. Now for what we're using there, great because both of them are easy, Water-soluble cleanup. So that's why a baby
wipe would work. A wet cloth would work as well. So if you don't have either
of those types of inks, dye type ink pad would work. I'm not sure if
there's another brand of a dye pigment blend, but you want to
make sure that it's water-soluble in order to clean up off your jelly plate easy. The other thing
is, is you've seen me with a rare anytime
I put the barrier down, I don't put the ink side
down, I flip it over. There's always a stand on the different barriers and
that keeps the ink fresh. It doesn't create a line
in there with ink removed, as well as the fact that if you store your brayer this way, we end up getting a flat
part on your Breyer. So do want to make
sure that you turn it over and have it
lined up like that. I've got obviously you saw
me put ink on my brayer. Let's explore some
different ways of getting some textured
backgrounds. One way is with an
embossing folder. Now you can do this two ways. You could use the actual folder or you can use an
embossed print. And I'll show you the
difference between the two. So when you have an
embossing folder, there's a positive image
and a negative image. So you need to decide which
one you want to choose. For this, we're going
to actually use both. I'm gonna do one
side on this one, then the other side on this one. When you're using
embossing folders, you want to make sure that
once you're done doing this, you do clean them up because
if you leave ink in there, when you go to use it
for another project, you're going to have
eight contamination. But once again, they clean
up easily with water, so they're very, very
easy to clean out. You just wipe it right out. Run it under the tap
would work as well. What's gonna be
created here is you're going to get two
opposite images. One is going to be the background with the
dots and one of them is going to be just the dots. So I accidentally grab two
sheets of paper there. There's the one that
background there. And then there's the
other background there. In this case, they
look very similar. This one is where we pressed the dots and this one
was the background. But just something to
be aware of when you're just trying to create a printed background with some texture, either one would
absolutely work. Now, the other option is using a piece of paper
that has already been embossed with
a dye or sorry, within a Boston folder, I'm gonna do two different
ones here. 1 second. I just realized that
I forgot to rethink. My Julie played. You're not gonna get
a very good look if we haven't react. Let's try that again. I'm
putting my paper down, making sure to rub it to get
some good transfer there. Again, once this is
gonna do is it's going to transfer the
ink to the card stock, as well as transfer the
pattern to the paper. So these can either be set
aside and used regularly for jelly printing or you could use them to embellish
the front of a card. So we will be doing a card
that has an embossed front. Then now we can print off. There, we get the texture from that leaf embossing folder. Then the texture from
that stone is one. Now when I was playing around, I did a whole bunch of them. I'm going to show
you them quickly. So this one is a typewriter
embossing folder and you can see some
of them are better as backgrounds or prints and
sometimes they're better as the embossed or the
inked embossing folder. But it's fun way to try to use your embossing folders
a little bit better. This one here was
a second print, so I didn't get a whole lot
of ink on either one of them. But a great way to get
just some texture in your backgrounds with tools
that you may already have. The other thing that is
really fun to do with jelly plate printing is just using found objects
around your house. Bubble wrap is always
a popular one. Cardboard is also
another popular one. I'm just things around your house that have some
great texture to them. Once again, inked background. I have a bunch of
found objects and they began the sky is the
limit with this. You're only limited
to your imagination. This one here is just
a piece of cardboard. And I typically keep that
piece of cardboard and regularly jelly print with it. Because it just is a perfect
one for creating texture. This is another piece of box that happened to have a
really cool texture in it. Get some paper here. It makes you really think
of things around your house and how they might
look on a jelly print, what type of print they
might make. This one here. We could have also taken, and after we did it this way and then made kind of
a plaid pattern. Got two more things
here to show you. This one is just something from the dollar store with alphabets. So I'm gonna put it
backwards so that my print will be the
right way around. Wants to take that
plate with me. Then I've got some
bubble wrap here. Now this bubble wrap has
an acrylic paint on it, so that is likely to
transfer to the jelly plate. But it's not going to
affect what we're gonna do. And it can easily
be cleaned up with just some just a baby wipe. If it persists and if it's annoying to have little bits of acrylic
paint on there, you can always do a thin layer
of acrylic paint and then pull up the remaining
bits on there. That one there. Again, a cool background. Then I loved the
bubble print one. Just a neat dotted background. Really, you could have
dipped any of those things into ink first and then transferred some ink
over with it as well. Another super
simple and easy way for texture is tissue paper. Now this doesn't have to
be brand new tissue paper. You can use recycled
tissue paper, pull it, put it in there, listed up and get a print. The other thing that I've done is I've manipulated to try to create other patterns and then dipped it in there
and lifted it up. Again. It's just a neat overall
random background. Just a random crumbly
background that you can use in your projects. Now this one, when I
had this in my head, I thought it was going to
maybe look a little bit more like roses and it
really doesn't. But still it creates a
really cool background. I'll see you in the next
video and we'll explore some final ideas and different things that you
can do with jelly printing.
5. Emboss Resist & Using Sprays in Gelli Printing: All right, so this
is the section where we're gonna be using some different papers when we're creating our jelly prints. The first thing that we're
gonna do is an emboss. Emboss resist background. I'm inking my stamp with
some clear embossing ink. And I am going to emboss
it with some clear powder. I'm just using some regular
card stock with this. But this is going to work
much easier than trying to do it on printer paper and then blowing it onto card
stock for making cards. Just pouring the powder
on making sure that it goes over the entire surface. And then I'm going
to heat it with my heat gun and melting of the powder. There we go. Our background is
completely embossed. And I'm actually
going to do it a second time so that
we have two of them. We've got the second
one embossed. So first one is
regular card stock, second one is the paper
for my delusions journal. It's a mixed media paper, so it is made so
that it would handle other mediums so I can use
it with some distress. It sprays the sprays or wet mediums don't
really work well with regular card stock. It's not meant for wet mediums. So I've already got
my embossing here, I've got my ink down. Let's press it down
in background. And I just wanted you
to see the difference between how it looks with just an inch and Brainerd
background or with sprays. There we go, the
embossing completely resists the ink from
the background. If you get a little bit of ink bubbling on top of
the embossing powder. Embossing, just wait for
it to completely dry and then you can use a baby
wipes to wipe it clean. I don't find a mind that
that much after this, you can also just take a print of that background because some of
the ink stays down there and it creates
kind of a cool print. The next one is
with some sprays. Now, I have a mixture of regular distress sprays
and oxides sprays, try not to drop it
onto your plate. If you're using oxide sprays, you want to make sure
that you've mixed them together so that you get the pigment and the dye
mixed before spraying them. And now I'm going to
put my paper in there. You can see as we're going, my hands are getting
fairly blue from the die. It is dydt, it's going
to die your hands. If that bothers you, you can use some gloves to keep
your hands clean. I don't find it bothers me. So there we get another resist, but they look at
both very different. When you're doing this one
with some liquid mediums, make sure you're
using a paper that can handle the liquid medium. This needs to be
set aside to dry. I've still got
some ink on there. I'm going to lift that up here and create another
background with that. For this, the only thing appropriate for the
printer paper is just to be using behind it. Because obviously
these sprays on here look completely
different than that. They react totally different. And this is definitely a
not an appropriate use of the printer paper. These were using
the extra drips, not my favorite background, but it could be really
cool if it was die cut into a shape and
used in that way. Now let us put some more
sprays downloads, get. That other way. The
one thing was sprays. You want to make sure
you have your background covered because it is very easy to have over spray. You don't want to spray
on something that you're not wanting to get
over spray on. I could just print it like
this with just this phrase on. But let's have a
little bit of fun. I've got some micro spray here. I'm going to put some
of this micro spray on with this one and it's
just going to add just a really subtle shimmer. And then the other
thing I have here is some perfect pearls. In computer, I just chose
the pwd or simply because it was very similar color
to the micro spray. You can use again, whatever
color you're wanting. Perfect pearls are
a micro powder, but they have a
binding agent in them. So the liquid from the sprays, the water from the sprays will activate that
binding agent. I am going to spray
it with a little bit of water on this one just to get a little bit more
moisture with those pearls. If you wanted, you could take a paintbrush to move it
around a little bit. Because they do tend to
stay in the same area. They don't move and flow. So let's put one down. Let us put another one down. You could try just
using your finger to move the inks around
to get it all completely to get contact
with that jelly plate. But I do find the
printer paper helps. The subtle the print
or the sparkle in this one from the pearl spray, the mica spray is a very subtle, It's gonna be more
prominent in this one, but it is going to be
concentrated to the areas where I put that parole down. There you go. Once again, if you were to take a paintbrush before doing
it and move it around, it would be moved around
a little bit more. It's just an
interesting background, background with those
blobs of a mica. There. I'm going to
completely clean this up. And I will see you in
the next actually, no, I'm going to wait till the next video and
we'll clean it all up together while I talk about cleaning care of usually plate.
6. Gelli Plate Cleaning & Care: Alright, so I still have a
lot of moisture on here, so I'm just going to
soften it up with some paper towel just to
get as much as possible. Now, when it comes to cleaning and caring for
your Shelly plate. Like I said before, these
inks are water-soluble, so you really only
need a wet cloth or a baby wipe to get
those inks off of it. Where did my baby
wipes for me here. I bought all the excess
ink off it there. For this, I am going
to just clean it off with with the baby wipe. And you see that a lot of ink comes off when you
do it this way. There's a lot of ink often
on there that you don't see. So you didn't really
want to make sure after doing this technique that
you have it all cleaned off. So you don't have
some residual ink on there and I'm gonna do
the same with my brayer. I live somewhere where it's a very humid or
fairly humid climate, so I don't find that my
gel plates ever dry out. But if they do, you can just
use some mineral oil on them and help to rehydrate them. You also can get, there's a product that's jelly plate cleaning and conditioner that you
could also use as well. But really that is all there is to cleaning your jelly plate. Then once that is done, I'm just trying to
find the package. I put it right back
into my package and I store it in the package. The package, when
you get your plate, it comes with acetate
sheets off on it, one for each side and I always take them off
when I'm printing. And then store it within those acetate sheets and put it right back
into the package. Then it's protected,
are ready to go for the next time that I
want to tell the print. In the next part,
we'll show you how to create some cards with
some of these jelly, jelly prints and how to prepare
your printer paper pins, prints in order to use on cards.
7. Picking & Prepping Gelli Prints for Card Making: All right, so now we
have a whole lot of prints to pick out from
to create our cards. So I'm gonna make
one card with one of the 3D or the embossing
folder backgrounds. I'm gonna make one card with
texture paste on the front. One card with a jelly print
background with a dicot, and then one card where we die cut some
of the jelly prints. So I need to pick four
different ones out. And I think I'm going
to use this one for the 3D, for the folder. I think I'm gonna do
this background here, which is the plane texture
paste this one here. I'm gonna do the one with the embossing glaze
on top of it. I think that would look kind of cool with this here
on the background. It's great to have
so much selection, but it also makes
it hard to select so many different ones. For the woman of the dicot. I think the one that I
liked this card here. So I think I'm gonna do one of the jelly
prints on the DNA. The dianne really dialing delusions journal because it looks kind of like
ocean water to me. So I'm gonna use
this one for that, so that is already corrupt and then I need something
for this one here. Now, which one to print? I think I'm gonna
do this one here. And I'm going to do it
very similar to this. I'm going to use the
jelly print that has that leafy background on it. If I can find it in our stack, then I also want to pick out a jelly print in
order to die cut. Going to use that one for
a die cutting with bird. Actually going to use
this one is that I like. This one has got a
little bit more darker, a little bit more definition between the darks
and the lights. That leafy print, where is it? It's a little bit
more splotchy then the one that I did the other
day, but that is okay. We've got our footprints here
that we're going to use. This one. I don't
need to prep it other than cutting it down so
that one is good this way. These two here,
these three here, I need to prep them. So let's move stuff
out of the way. Let me show you how I prep them. So I've got my
three prints here. I'm going to get three
pieces of card stock here. Now these are cut
their quarter sheet of an 8.5 by 11 piece of paper. So they are four and
a quarter by 5.5. I'm going to cut this down to
four and a quarter by 5.5. I want to have more of the bottom side here
with a darker print. I'm cutting these at four
and a quarter by 5.5. They're gonna be glued
to the card stock. Then when I go to use
them for my cards, I'm actually going to cut them down a quarter inch further. So therefore by
five and a quarter, I'm making them a
little bit bigger to glue onto the card stock so that I have a
little bit of leeway. If it happens to glue on
just a little bit off, I have some space to trim down. I'm gonna make my burden on
the lighter side of this one. Here we go. Let's move the tremor. Get rid of my scraps here. These you could some of them you could keep to use
for other projects. I am going to just toss
them for right now. I've got some collage
medium and a Collage brush. This is just a piece
of tape backing. I'm going to put my
card stock piece down, add the collage glue, and then I'm going to
glue them together and then they need to sit and dry. The glue has to be
completely dry. Before we go to the next step. I hold it in the center
so that it doesn't move. And then just brush my glue on. Press it down firmly
so that it is glued in place and then
set it aside to dry. And then do that
for the other two. You'll want to make sure that this brush gets dried or
gets cleaned right away. After doing this, we
don't want that glue to dry the brush at all because
you'll ruin your brush. So see you there.
It's a little bit off now my glue is still wet. I can shift it, but
that's what I mean. I want to make sure that
I have just a little bit extra room so that
I can trim it down. It's nice having that little
extra bit for insurance. Now you'll notice I put my piece in the same spot and
that was just so that it didn't I didn't dip it
into the wet glue or glue onto the back of it to
try be a little bit neater. All right. I'm going to let
those completely dry, close up my glue, clean up my glue out
of my Collage brush, and we'll be back to
make the card with the embossing folder background
first. I'll see you then.
8. Creating a Card with an Embossed Gel Print Background: Alright, so the first
card we're gonna make is one with one of the jelly printed
embossing pieces. We've already chosen
our rocks piece. These are the two
samples I have. It doesn't matter what
your embossing folder is. It just creates a
textured background. And then we're gonna put
some dye cuts in the front. I'm going to do the flower
one here so I can show you how I colored those flowers. Got two of my dicots
already done. I'm just going to die
cut the last one here. I'm going to run that through. And then we can get the
machine out of our way. First step, we need to
poke them out of the die. Now all three of these flowers
are from the same set. They're just different flowers. It gives it a little
bit of variation. I will put on the supply list. I'll have a picture
of each of the cards and the supplies used
for each in case you're wondering what's used
for the rest of it as well as the ink pad colors
and stuff like that. All right, so we've
got those already. Before I start to color these. What I want to do is anchor around embossed piece
and I'm going to glue it to the card front
simply because these embossed pieces and this one
especially is quite warped. They need to be weighed
down in order to dry so that it'll dry nice and flat. And then it should be somewhat
ready for us by the next, by the time we're ready
to glue on the flowers, I've got a block here that I'm going to weigh it down with. I just got to take
the stamps off. Let's do that now. Putting the glue on, I want to make sure, especially to get glue on the parts that are going to make contact with our card base. I'm definitely not going to
be skimpy with the blue. Then I'm going to center it. I'm just putting it right here, so it's out of my way. I'm going to put
my acrylic block down a tiny bit and that
can hold that there. If you need a little
bit of extra weight, you can put some
extra weight on it. I don't have anything
else that's that heavy, so I'll just leave that
glue on every now. I've got my die cuts here. And I'm going to any bits that are in-between that didn't
come up when you die, cut them, you want to
take those out now, should've gotten this
ready ahead of time. But God about these
little things. These are little mini
distress blending sticks. And I'm going to use that
to help color my dicots. Gonna do the green for the
stems first and then I will use the pink for the flowers. Now what I didn't do in this one that I did
do in these ones is I used to jumbo doctor and
I inked around the edges. If you want to frame
it a little bit more, you will want to do that
step before gluing it down. I got a little bit too eager and forgot about that step
and just glued it down. So these basically they're just little pieces of foam
on the end of a dowel. You can buy them this way. You could also use a Q-tip
or something like that. That would work as well. But all I'm doing is using
them to color in my dicot. When I have a bigger die kettle often used like a
jumbled arbor or finger dollar for something smaller like this, a little
bit more detailed. These are handy because you can get in fairly
detailed areas. You can be a little bit more
precise with your inking. Now I got a little bit at
the bottom of the flower, but I don't really worry
too much about that. That could be just a
little bit of greenery. When you're looking at the
whole thing as a whole. When people are, you
tend not to look at all the fine detail exactly how it's colored for
something like this anyways. All right. Now the pink clearly got some of the
blue when I was putting it on the jelly plate. If you're concerned about that. I would say user
we anchor instead or smush it onto your surface first before
inking your plate. It's funny it didn't
do that the first time I used it that way, but it
didn't do it this time. So tends not to affect
the color anyways, because that's just
on the surface. In general, I don't usually
worry too much about it. Now you can see when I'm, when
I'm inking this here that there is definitely some
lines from my phone. I'm a little bit
heavier on the outside, it seems on the inside. You can, if you want, just direct that at a place that you want the
flower a little bit more, little bit darker. You can also use it in a
circular motion to blend it out. I tend to be a little bit more careful when I'm doing it in a blended
motion because it's just a tiny little piece of
foam that I don't think is very I think you would easily be able to
tear up the foam if you weren't careful. Alright. I'm going to glue
these pieces on here. And then I'm going to
weigh it down again. That probably wasn't quite
enough time to hold the die, cut, the embossed piece
down really, really well. So I want to make sure to put my acrylic block right
back over top of it to give it a little
bit more weight. While I'm doing the
sentiment piece. I'm just lightly laying
them on top of each other. I don't need to make
sure it has contact yet because the acrylic block, when I put it on there to
weight down that will do that. There we go. Use place
in however you like. And then sit them down.
I'm going to clean this off first before
doing my sentiments. Now the sentiment is from a set called tiny text that
I'll put on the supply list. It's just a full set of all different sentiments
and I tend to make an entire sheet of
them and cut them down so that I have a lot of sentiments
to use at one time. So what I'm going
to do with that, because I'm going to take a
piece of my blue here and I'm gonna create a mat around
it so that it just pops up. If I put this on
the card like this, you don't see it as well as when it has something around
it that frames it. Just had a little bit of
a paper tear on there. So let's get that up. I'm going to use this part here so that I can use some of this. I'm going to glue it on first. Then I'm going to use my
tremor to trim around it. No, it does get a little bit fiddly trying to cut a
really, really tiny border. And it's one of those
things that get, gets easier over time. Alright, now I'm going to put this room for my block here, trying not to shift it. I line it up with the ruler on my tremor in order to
get a nice straight cut. That's pretty good. And then I line up
with the one on the end to get
that cutoff there. There we've got our piece here. Now really, if I was
doing this just alone, I would make sure that I have this stuff
all out of the way. But I just wanted you to be
able to see this as it is. Dry. My phone pop dots. I had them right here but oh, there now I see exactly
where they are. One of those things
that you don't see, even though it's read
in front of you. You could glue this straight flat to the card as
well if you wanted. I like the phone pop dots because it keeps it
a tiny little bit of extra dimension. Back. He doesn't want to come off. There we go. That other backend
didn't want to come off. Alright. Line it up. There we go. Very
simple and easy card, just done with one of
the embossing folder, jelly print backgrounds will
see you in the next card. We're going to do the one
with some texture paste.
9. Creating a Gelli Print Card with Texture Paste: All right, so our second card is going to be using texture
based on the background. So we're gonna do this one
here with the bubbles. And we're also going to put some embossing
glazes on top of it. There are colors that match
are background colors. So I'm just going to put the
dark blue at the bottom, medium in the middle,
light at the top. You could, if you want to use whatever texture pace you want and put it on and let
it completely dry. Now you'll see with the texture
paste how it looks like. It's a little bit
colored that simply by putting it on the background and letting it dry the
ink below because it's water-soluble and
because it's a dye ink, it seeps into that texture paste coloring it all on its
own with no effort. First step is to cut your
piece down to the size. For our card front, we want this to be four
inches by five and a quarter. I've already got that cut down. Next thing we're gonna
do is we're going to tape, piece down, then position our stencil
and tape it as well. Now, typically you
would use it backwards. That would take the tape. This actually doesn't
take the tape. I'm just going
through the motions. The reason for the tape is
so that when you're done, when you're lifting it up,
you can lift it up like this. And if you happen to lose
your hand on it and it falls, it doesn't wreck your texture. Paste the side. I have a scrap piece of paper, and I'm going to
use that with this. Once I have my texture,
paste it down, I'm gonna be putting the
embossing glaze on it while it's wet so that it can dry with
the embossing glaze on it. Then we're going to heat
up the embossing glaze. Now, you have two
ways you can do this. You can either melt the
embossing glass wall, the texture paint is still wet. In that case, the
paste will bubble up, which may stay bubbled
up once you are done. Or it may go back down. For this particular one. I liked the look of
that with bubbles. So I'm gonna do it
while it's wet. But just keep in mind that that dimension may
not stay in there. And even when you're
done embossing, you do need to let
the rest of it dry. It will only be the top of the piece that is
actually in Boston bubbled the rest of the texture
paste is still going to be wet. So just be careful. I'm trying not to use
too much embossing glaze here because the excess can't be put in each
individual container. I do happen to have a container
that I use for mixes. But you don't want to use up a whole bunch
of your powders, not be able to put them back. I tend to have a mixture
of blues just for say, one day if I'm doing water
or something I can use that. You'll also notice that I'm not completely covering the area. I'll show you why in a moment. We're going to let
that powder bounce around to cover the
remaining areas before we take it off. I'm going to lift this piece up, make sure you're doing this
on a scrap piece of paper. I'm touching an area that
doesn't have texture paste. And I'm just going to
tap on the back and let that powder bounce around a little bit and that's going
to cover the rest of it. I am going to put the powder
right back on because I see there's a spot there that's not covered as well as read there. If it happens to get covered
with a mixture that's not exactly the same,
That's totally fine. There we go. Put that
powder to the side. We're going to use our
heat gun and we're going to melt that powder. For this version. Alright, so that is completely melted and you'll see some
of them are puffed up, some of them have
already gone back down. I need to set that aside to dry. Probably about 15 minutes, half an hour is what
it's gonna take. While we're waiting for that, I am going to take another
scrap of paper here. I've got my seahorse stamp. I am going to stamp it
with my embossing ink. We're going to emboss
it with silver. Now. I'm going to
take this print here. That was the second
print with those sprays. Going to use that
one minus we use some of the texture there. I'm stamping where I want to see the texture on my stamped image, going to put the powder down. Let's move the Inca to the
way the stamp out of the way. I'm going to emboss that, that I would hand cut. I don't have a die that
matches that particular stamp, so that would get hand cut out to use as an
embellishment on the card. Let's move the embossing
powder out of the way. And then the last
step to prep while we are waiting is we're going to use this particular
sentiment on it. And I'm gonna do that
the same way that I did the one on the last card. I want to have a
little mat around it. I want to trim that out. So once again, I'm trying
to put it on there as evenly as possible. My tremor to trim it. For this segment, I just
put my stencil to the side. You do want to
clean the texture, paste off of it as quickly as possible so that it
doesn't dry on there. But just be aware, don't
leave it aside and then let it accidentally dry
all the way your stencil, it's gonna be a lot harder
to get off if you do that. So I'm going to off-camera cut this out, let the
texture paste dry. I'll be back in a moment for you and we'll put
the car together. Alright, so our texture
paste is completely dried, so we're going to glue it
to the card base first. Now typically I would
just like the first card, I would weigh it down before gluing on
the extra elements. But for time, I'm gonna do it all at
once and then I'm gonna weigh everything
down all at once. So you'll see
things pop up here. And that's simply
because it needs to be held down in order for the glue to stick because
it's a little bit warped. I'm going to add the seahorse. Then on this part here because I've got
texture based on this side, I don't need to put my
pop-up dot on that side, but I am going to put it on
the side that just sticks to the card because I want to have a little
bit of extra dimension. I don't want the sentiment to be partly up and partly down. So by putting some pop dots on the one end that doesn't
have texture paste below it. That's going to help even
it out a little bit. It may not be the
exact dimension, but it's going to be closer than not having anything at all. There we go. The
card is together. I'm going to put my block
on that and I'm going to let that dry while
it's weighted down. So our second card is done. I'll see you in the next
video for the next card.
10. Creating a Gelli Print Card with a Die Cut: All right, so our next
card is going to be a jelly paint background
with a DJ iPad on top of it. And once again, it doesn't
matter which backgrounds you choose or which
dicot you choose. Now, when I do background or choose
backgrounds for cards, I tend to choose ones that
are a little bit simple. These ones are a little bit more fancy than what I normally do. And as you saw me in
the picking process, I chose to do this
one with the wheels. This is the one that I chose. It's got a tiny
little bit of shimmer from that mic spray. For the very first step is
I want to glue it down to my card base and way that down while I'm
die cutting the wheel. Just a little bit of glue around the edges and
then the center. Tuck it to the side here.
And I did it purposely so that the darker side
would be towards the bottom. Let's put a block on
there to hold it. And now let's die cut the wheel. In the sample card, I used a mat metallic card
stock in this one I'm using one that's a little
bit on the shiny side. You could also use just like a gray card stock that
would work as well. Let's run it through my machine. If you haven't done any
dye cutting before, I use my big shot a lot. So you've probably
seen one work, but this is the die. It's got all those little
raised edges are the blades. I'm going to put
the blade side to the paper and have it so that the blade
side is facing up. Then run it through super-simple and cuts the card
stock like magic. When I cut this out or when I
pull this out of the paper, I'm only pulling the outline. I want all those
pieces to stay in there just because I
liked the way it looked. You could use this just as an outline and pull
all those pieces out. It's just personal preference. So the other thing that I'm gonna get ready as my
little sentiment here, I have a strip from doing one
of the sentiments before. And it should be good width. So I'm just going to use that. Center it and then
I'm just going to trim the end
with some scissors. Something this tiny
is easy enough to get a nice straight cut in. Then we're going to simply
glue those pieces down. I'm gonna do my sentiment
first so that I can place the whale round it. Then because there's
all sorts of tiny little pieces on that way. All I want to make sure to get some glue at least
on each and every one of those so they don't pop out when my
card is completed, as well as getting some
glue on the outline. For the same reason,
I don't want things to little bits to raise up. I like it when the
top or the tail is up high and then the wheel is downloading and I need to place my block there to hold it
in place to dry as well. So it shouldn't take
too long to dry. It just having that block there, it just weighs it
down nice and evenly. When it is done. It'll look exactly like that, but just with a slightly
different color for my wheel. I'll see you in the next
one and we will create a card by dy cutting one
of the jelly prints.
11. Creating a Gelli Print Embellishment for Paper Crafting: All right, For our last card, we're going to take
one of our jelly prints and we're going to cut it up with a dicot and create an
embellishment for Ricard. Now in this case, we also used a jelly
print for the background. You could use plain
paper or whatnot. You could use plain
paper and then use it. A whole bunch of these bugs that are cut out of jelly prints. The sky is the limit. But sorry, some of
the prints that you're going to create are not necessarily going
to be ones that are great for backgrounds, but perfect for decoding and creating
embellishments that way. The very first step
is I'm going to glue my background piece to the card in a way
that down so that that has time to glue down while we make
our embellishment. And before I do that, I'm going to take the dark green ink pad
that we've been using. And I'm just going to anchor around my paper here just to
give it a bit of a frame. You certainly don't have to. But I just find that it
frames it a little bit. It adds a little bit more
of that green color to it. I just like to
look at lookup it. I'm going to actually
put it up here too. Dry. Let's glue it. Alright, so we are going
to leave that to dry. And now let's die
cut our bird pieces. I'm going to do just
like this one here. I'm going to do two of them in a solid color and one
of them in the print. If I did it all in the print, you probably wouldn't see
all the different pieces. And I think this way brings out some of the
interests of the bird. I'm going to cut this in half and use that
for my solo pieces. And then I'm going to
choose which part I want for my bird. Now, it's going to be
at the bottom here. So I'm gonna choose some
of the lighter colors. But I didn't want it
super, super late. Cutting it exactly the
same way as the whale. Your blade is face up. Your paper were
taught. If you can see any part of the GI
outside of that paper, then it is not
lined up properly. Cuts it almost like magic. We got the one piece there. Let's pop the other bits out. Now, these bird die cuts have little bits that
come out of them. Now that the ones have
come out on the wings, I'm gonna, I'm gonna
take them all out. There was some on the bird here that if they didn't
come out of the wings, I was thinking about leaving
them but that's okay. So what's going to
happen then is you're going to see some
of that other color coming through it. There we go. Now before we put
the layers together, I'm going to use
some foundry wax to put the silver
around the edges. And what this is,
it's a new product that's just come out. It is a silver liquid wax, and it comes in four
different colors. That comes in gold, copper, and then this one here, which is kind of a
different color, gold, liquid wax, that you
can put around the edges. There we go. Then you use your heat gun to bring
the leafing out of it. So it's a silver or
it's a leafing wax no matter what color you use,
I'm keeps saying silver. That's because those are
the one I'm using for this. It dries super quick, so I have to be careful and
be quick when I'm doing this. Just putting it around
the edges and on the feet and beak of the bird. And I would tend to be a little bit more careful
than that and not get I like getting some
blobs around the edges, but that was a bit much
and same with that one. That was a bit
much. Like I said, it dries very quickly. While that's drying. I'm going to clean
this up. So just needed some isopropyl alcohol, spirits at boron and then
use a cloth or a wave. I'm just going to use
dried up white chronicity. It cleans up that easily. I'm going to take
my heat gun out. I'm going to hold the
bird or the pieces down with my diaper bag so
that they don't float away. Just like when you're embossing, you see it go from
kind of like a matte to a really shiny leafing. One of those products.
When you have it, you start putting
it on everything. All right. I'm just
going to pop those up here to cool down for a minute. And it really doesn't
take very long. But what I'm going to do is do my sentiment while
we're waiting. This is quite long for a card, so I'm going to
be cutting it up. This one because it's as long as it isn't going
to cut it up in three. Use this little bit here too. Mad it. When you're working
on pieces this small, it's hard to get them
all exactly perfect. But I'm gonna try to
get them as close as possible to the same
size as each other. Glue it down, then trim it. I'm going to try to get my
trimmer or top of there. So you can see now
when I'm doing it, I lie on the edges of that
white dicot with my ruler. That's how I get it straight. I've gotten a little bit
of silver on my hands, so I'm transferring
it over there. You want to be a little bit
more careful not to do that. We're gonna do the same thing
for the other two here. One last one. Alright, so our
sentiment is ready. You are dicot together. For this one, it's as simple as layering all the pieces up. This bird here is
the lowest part. The wing. Really I could put it
together on top of the card as well. And just like the card base
I would typically put it on. I see that it's shifted when
I put my block on there. I would typically
put my dicot on my card for this one anyways, just because of the different
pieces that they tend to they tend to kind of curl up a little
bit with the liquid glue. I'm gonna put my sentiment down. Then I'm going to
put my block on it to hold it all down to dry. Obviously, whatever sentiment
you have will work. And it doesn't necessarily have to be in several
different parts. But I do like when
some cards have sentence split down into
several different parts. So there you go. I'm going to let that sit there, held down to dry. And now you know for
different card ways that you can use to use up
some of your gel prints. Because what's the point
in making these prints? If we can't create with them.
12. Gelli Printing with Ink Pads Class Thank You: Thank you so much for joining
me for the jelly printing with ink pies, ink pads class. I hope you enjoyed learning all the different
techniques you can use with using ink pads
on your jelly plate. And then have fun
learning how to make different cars into them. Hope to see you soon
in the next class.
 Artsy. Island Girl, Teacher