Transcripts
1. Introduction to the class: Hello everyone and
welcome back to another amusing
Skillshare class of mine. And this is fluorine
galaxy Mandela class. And this we will be
learning how to incorporate galaxy in plurals into our
medulla in an easy process. Okay, so let's get started.
2. Material list for Galaxy Floral Mandala: Hello everyone and welcome back. And let's see, this
applies for our session. We need a compass, a ruler, and we
need fine liners, 03.0 to j, and we need a pencil and it
should be in the light shade, so it won't leave marks. We need eraser and
we need a predictor. Now let's see the paper. I have used 300 GSM
watercolor paper. If you don't have this paper, you can go for 200
years or more, so both of the paper
will work fine. Okay, so now I have
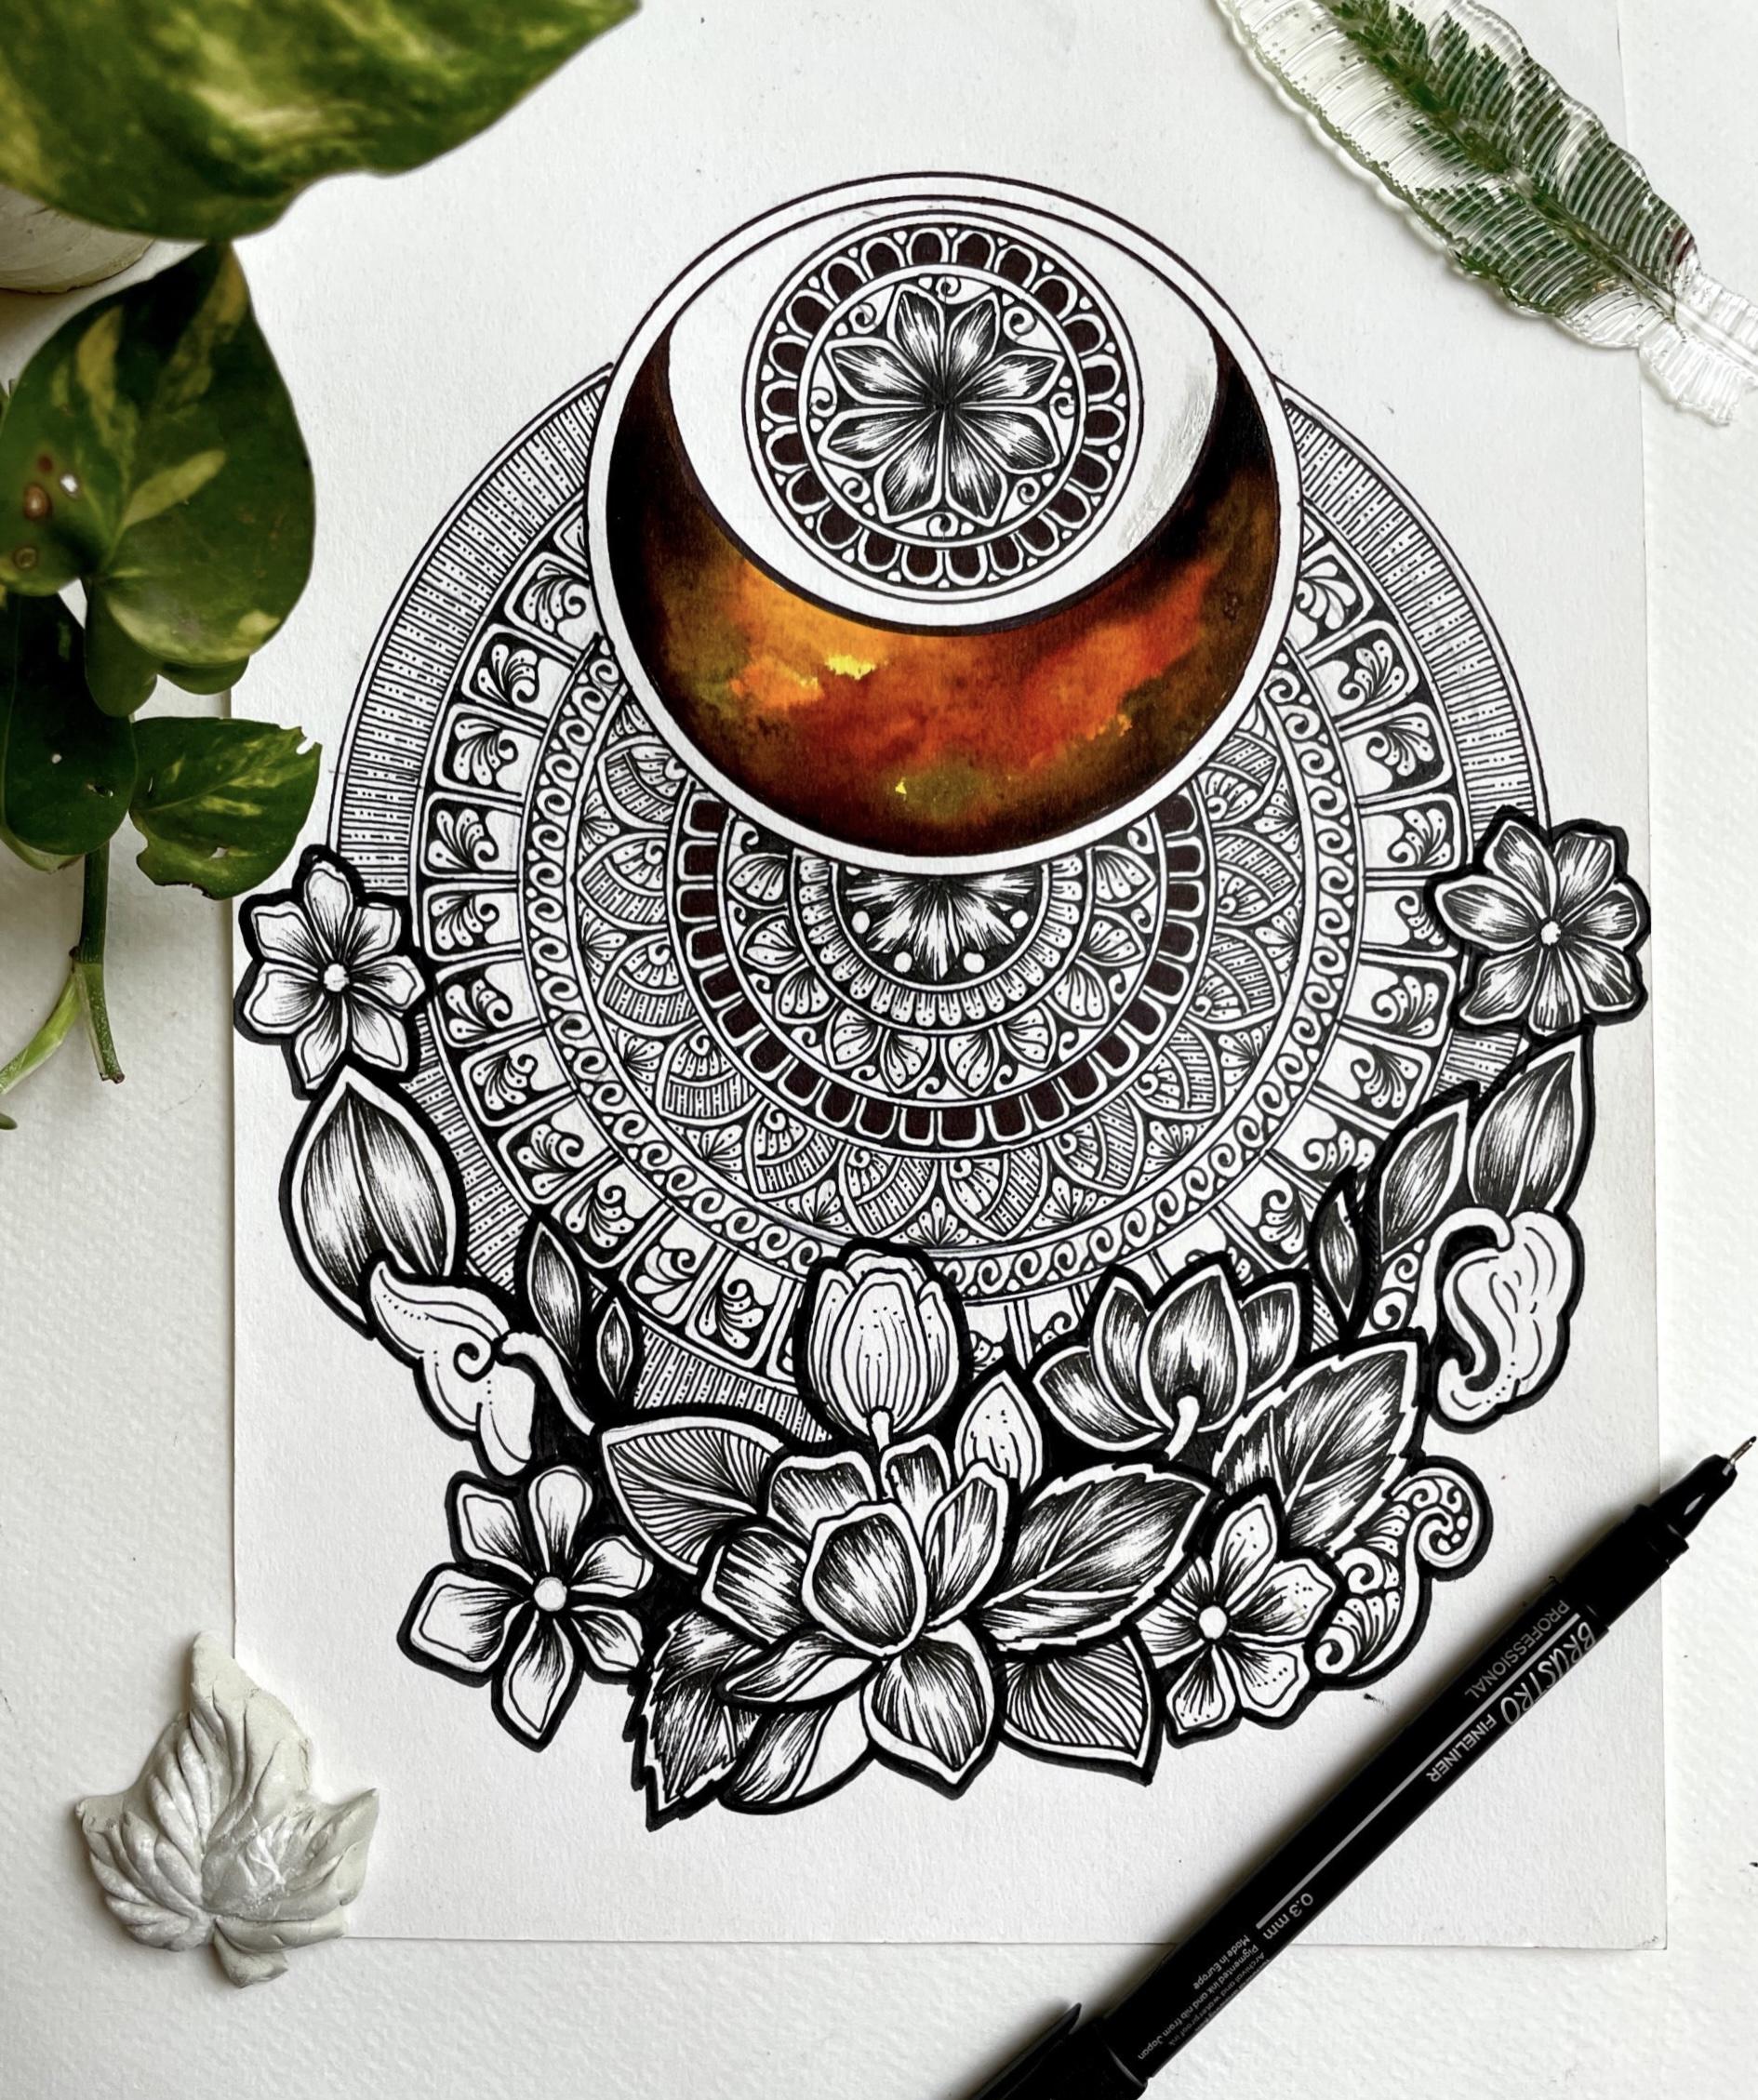
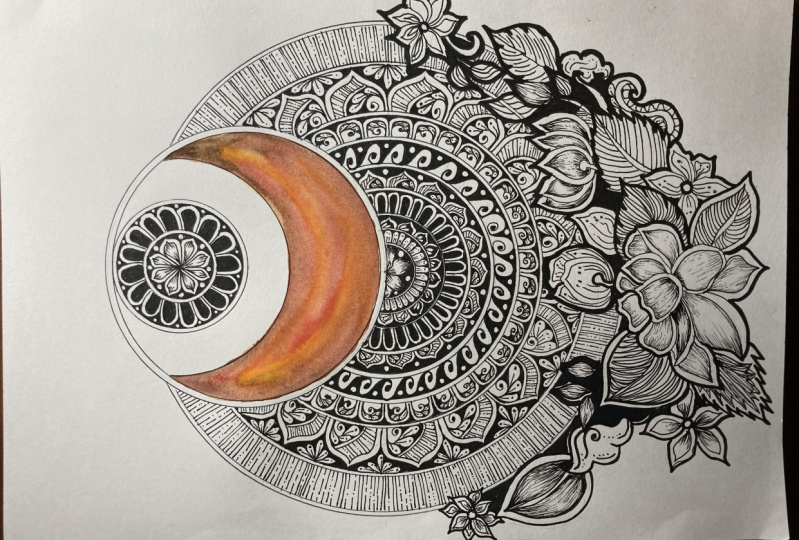
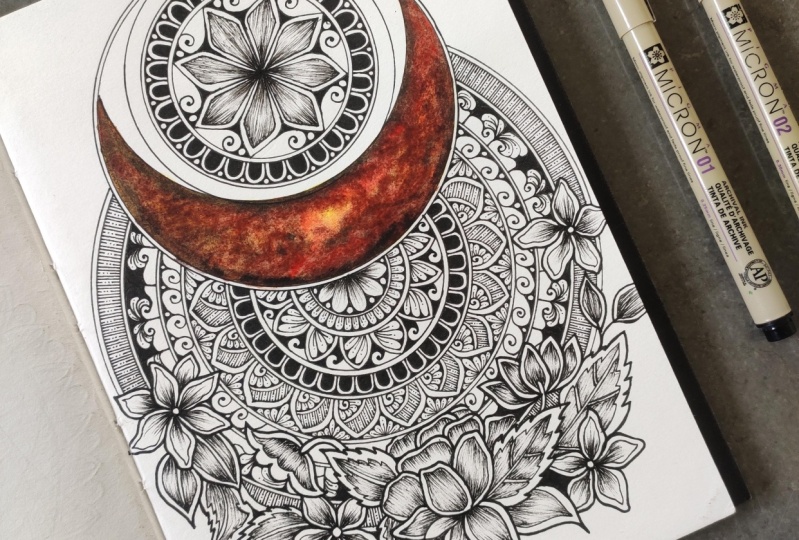
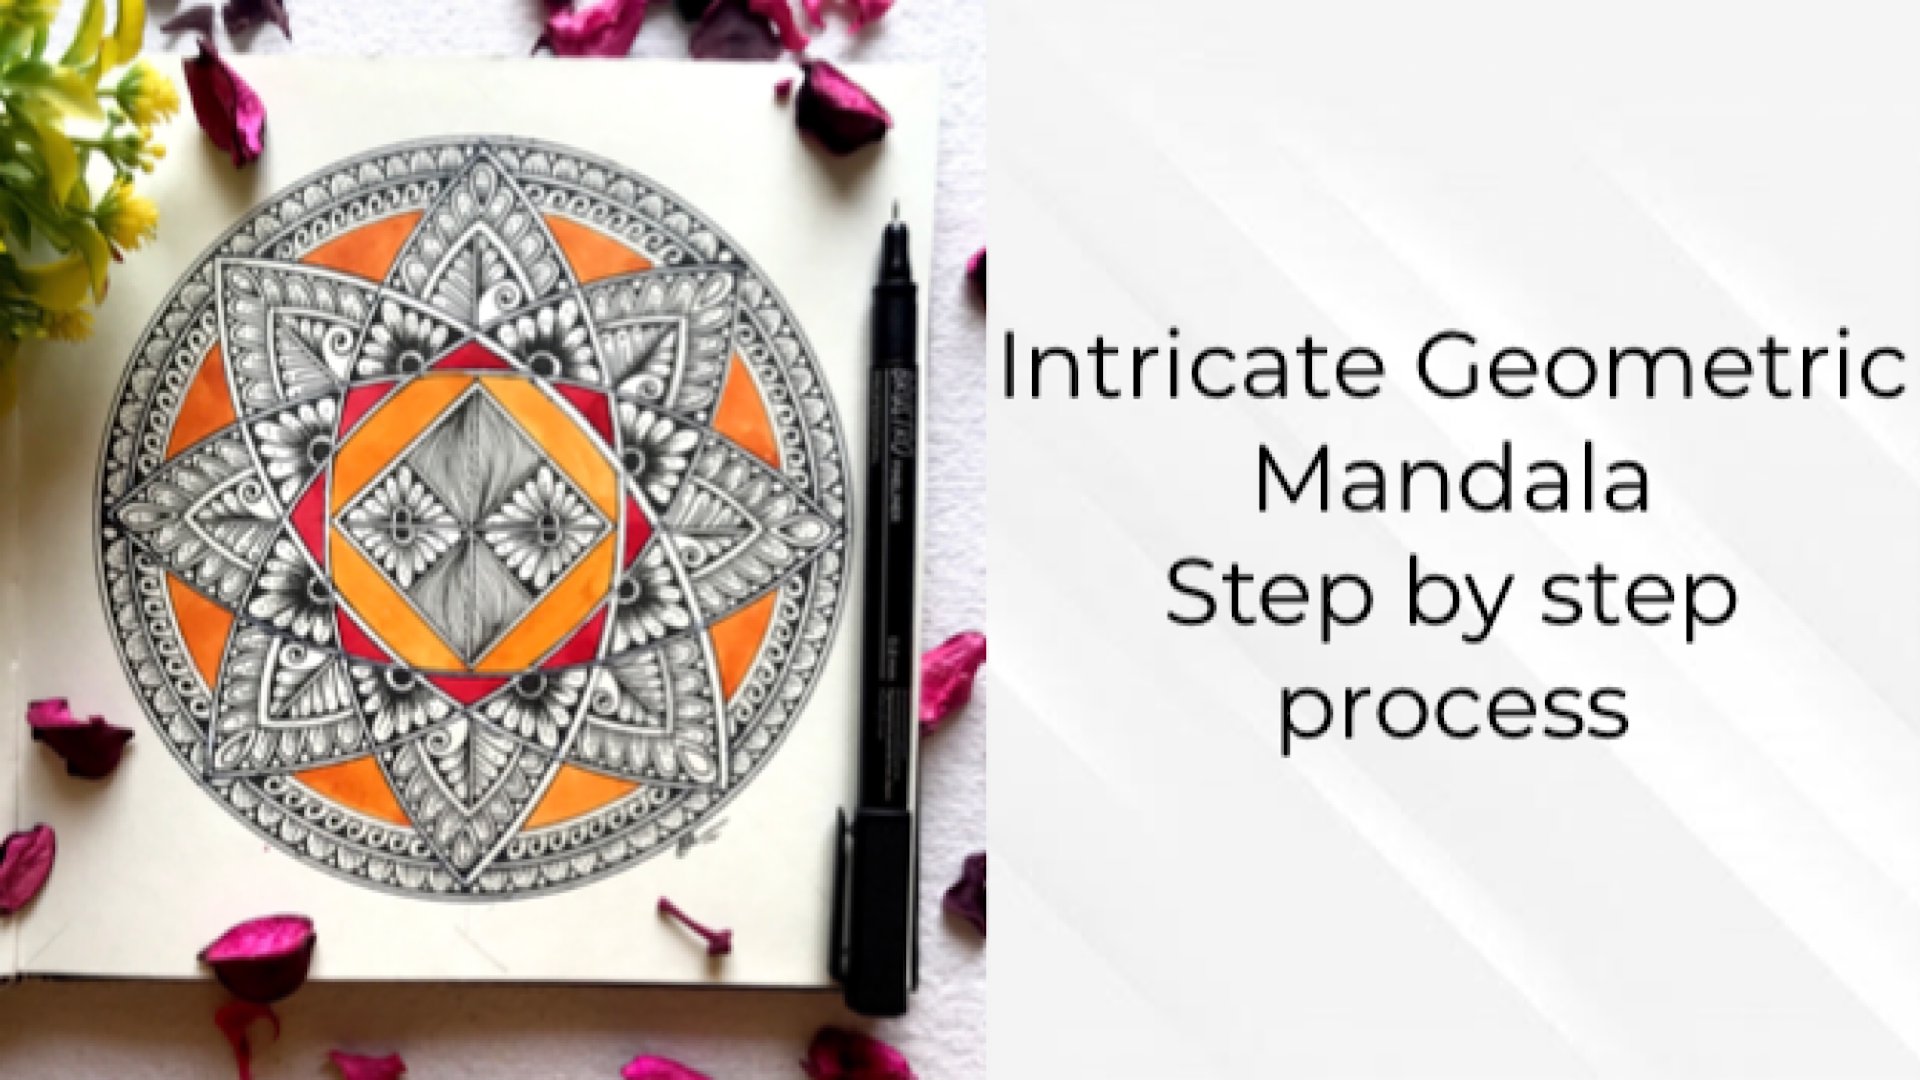
ten dB marker. This is a CD, DVD marker. I got it from a local store. So let's see our project that we will be creating in this class. This is a galaxy
moon, plural Madonna. So we have painted this galaxy inside the moon in Mandela. And we need red, yellow, brown, and
black color for this. And we have added florals
on the edge of our Mandela. So without any delay,
let's get started.
3. Half Moon Galaxy Floral Mandala: Hello everyone and
welcome back to another amazing class of mine. And in this we will be learning this half one galaxy fluorine
Mandela without any delay. Let's get started. Okay? So first we have to draw a circle off five
centimeter diameter. And to make this circle take a gap of four centimeter from
the very edge of the paper, and then draw this five
centimeter circle. Okay? So once it is done, take two centimeter distance
from the center of a circle. Place your compass on
this point and draw an arc to create a
half-moon. Okay? Now, we will double
outline the circle, okay? And, uh, once it is done, we will erase the
intersecting line. Now, we will place our campus on the very end of that
intersecting line. And we will start drawing concentric circles with
a gap of 0.5 centimeter. Okay, so the total diameter of this big circle is
nine centimeter. And what do you have to
do is you have to draw concentric circles
and a gambled 0.5 cm. Night, though, let's do it
and once it is complete, we will move on
to the next part. So now our concentric
circles are complete and I am going to divide
it into four equal parts. And then I'm going
to divide it into the angles off ten
degrees angles, each with the help
of my predictor. Because it is a big Mandela and this is the Snort Hoffman data. It's a semicircle Mandela. And so we have to form a grid, but precision and so Ritchie. Sure, you are using a
light shade pencil, as I have told you earlier, don't use a dark one because once you Hillary's
devil remarks. Okay, so let's complete our grid and then we will start
drawing the shapes. As it does Florida. Mandela, we will create plurals on the very edge
of our big circle. And for florals, I'll suggest please have a look of
on my previous class, that is Yin and Yang
class in which I have taught in
detail process how to create plurals and different florals and how to
do the shading part, okay? And definitely once we'll
go through that class, it will help you out in a much better way when you
are attempting this class. Okay. And up Florida
layout is complete. Now I will use my pen tip marker to
start inking the details. Okay. So for concentric circle, the first circle I have drawn, it is a freehand and then the concentric
circle next to it. It is a gap of 0.5 cm. Okay? And after that, it will be a gap of two
centimeter and vice versa, It's like 0.5 centimeter and then two centimeter and
then 0.5 centimeter. So it's more like interrogate Look to your mandala and giving it enough Smith, enough space to bloom out with different
kinds of patterns. Okay? Now, we will start outlining, inking our flora layout. And once it is done, we'll move on to the next part. And our layout is
almost complete. So let's move on to
the next chapter to start adding the details and Galaxy half-moon
Mandela fluid layout.
4. Inking the Layout: Hello everyone and welcome back. So we will start this
chapter by doing the double outline of our
Haldeman data layout. Okay, so let's start doing it. And I have speed up
the process because this is the same repeating
process that we will be doing. Right? Now. We will draw small, so small circle
with a diameter of two centimeter in the circle where we have treated
the half font. Let's start inking it and
working on the derailing pads. So first we have to double
outline the circle, and then we have to draw
concentric circle at a gap of one phase centimeter and
again double outline it. And after that, we will divide the innermost circle
into eight equal parts. So what you can do is
you can use your ruler. You can draw it freehand because these are just the guidelines
to draw up plural. Okay. Now we will start creating the leaves. And between the two lines
that we have drawn, all we have to do is
draw a line till half and then join both of the lines with a
dome shaped pattern. Okay, So this is the
easiest floral pattern and that is why we have created those guidelines to give it a more symmetrical and
perfect loop again. So once we have drawn the fly, we will start doing the double
outline and we will start adding padding in the empty
space between two leaves. So I have drawn us, and after that, I have drawn a very sponsored go on
the side of this. Well, because there is
some empty space left, if there is no space
in your pattern, there is only to create that. So what I always tell you that, please do select
Patterns according to the space provided
in your Mandela layout. Again, because if you
are not doing so, you are just complicating your
window and it won't look, the look of the Mandela
will not be more fit, nice and perfect date. So let's start doing the
double outline of the fluid. And one's a double
outline is done, we will start doing the shading. And what you can do is you can refer to my previous class, Yin and Yang Mandela class, in which I have taught
you in detail about how to do shading and how to do
how to create the florals. So that class will definitely
help you with this one and creating different kinds of floral and about the
shading technique. So let's get started
with the shading part. So now we're done
with the shading pot. And I am creating
a U-shaped pattern in the outermost concentric
circle that we have created. Okay, the process
is still the same. We have to draw the pattern
layout, button shape, and then we will
double our planet and we will add
the details. Okay. So don't forget to fill
up the negative space left between the two
U-shapes that we have drawn. And I have decided to
use a sponsor can, because we will be
using that color blocking technique here
in this pattern of genes. So Vanessa circle is done. I lived, you know, what does the color blocking technique? So the color blocking
technique is where we take the opposite colors on the color wheel and we pair them together to make an trusting and complimentary
color combinations. Okay? So for me, color blocking in Mandela
is more like blocking that negative space
that is left with in-between the patterns
all around the patterns. So I always prefer to use black color to block
that negative space. And this is the same thing
that I'm doing here. Again, this just gives you a more intense look to
your Mandela, right? So now our detailing part is
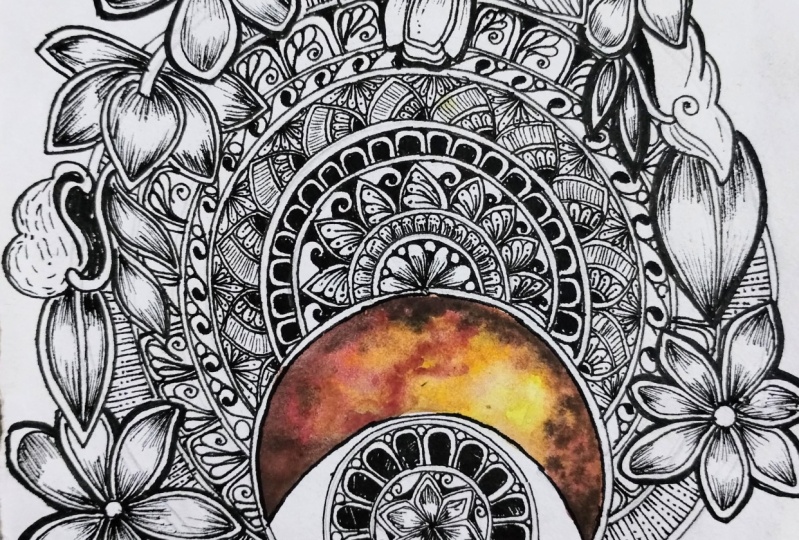
complete and we are going to create a galaxy in the half
moon that we have created. Okay? So we are going to work
on wet and wet technique. And this technique, we
wet the paper first and then we will start
adding the colors. So I have wet my
paper and I have start adding the yellow
color and as a base layer. Okay, So make sure you are using a round brush
number three or four, or whichever brush
you are having. Okay. And once we are
done with a yellow color, Just please orange
color randomly in-between and leaving
some yellow gap so that it really
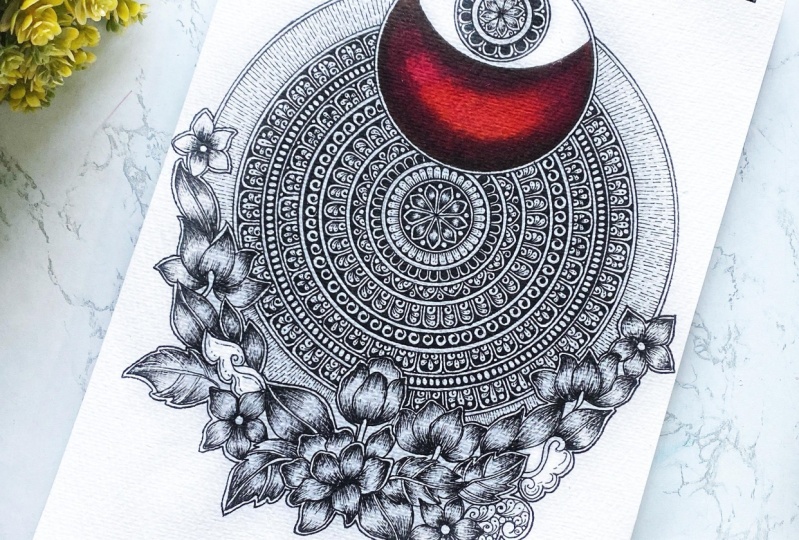
given effect of an orange and yellow galaxy. Okay, so now I'm going to
add some burnt sienna here. And so as I already
told you that there is no specific step-by-step process in which you can
create a galaxy. You should Give it a try
and please see colours randomly here in the creating some highlights and
some shadow areas. So yellow is the base layer. Then we have all been sienna. And once we are done with it, we will add some
highlights of red color and the black color on the
edges to complete our galaxy. Once the coloring
part is finished, we will do bold outline with the help of
attentive marker. Or you can use Posca marker
if you have three m, or you can use 0.5 and
0.8 fine liner to do so. And this chapter is
about to finish. And I hope you guys have
enjoyed this chapter. So let's move on
to the next one. Thank you so much guys.
5. Inking the Mandala: Hello everyone and welcome back. So in this chapter, we will start the detailing in our Mandela and I
have already started. And in this section, I am drawing three leaves
in the petal design. And I'm doing it not
in the one-way design. It's not like that.
All the petals, all the leaves are
drawing in the same way. What I'm doing is I'm doing
one right and one left. Okay? So they will create effect of butterfly wings when we will complete
this design. Okay, So now I am adding
details of line and dot. Once it is done, we will
fill up the gap that is left between the
two leaf pattern. Okay? So in that leaf pattern, I'm going to draw a sweater. Sweater and a small circle to fill up that negative space. Philip, this U-shaped pattern, I am going to use the negative color
block technique that we have used in the
previous small Mandela. I'm going to color the
negative space with black. Okay? Either you can
use a black sketch pan or fine liner authentic mark,
or you can do anything. Right? Now let's add the details to this
big leaf button, okay? And I'm dividing
it into two parts. I have divided this leaf into two parts by
drawing a life, by drawing a line, dividing it into two. And definitely we
have to bold outline at the section that is the 101. In that I will be
creating lines and dots and other part where I
will draw us with it. And I will draw three leaves
on top of that, Sweden. Okay, so let's get started. Make sure you are drawing the same number of
leaves in the pattern. It's like it should be
three or four, okay? And decide the number
of leaves according to this piece that is
available in the pattern Zhe, okay, don't overdo it. If you are having less
space than just draw two, It's non-mandatory that
if I am drawing three, then you have to also
do the same thing. Okay? You'll have to take
a conscious decision here, whether the spaces much enough
foot three or two, right? And once we're done drawing
the complete pattern, we will add fine details like
line and dotted the leaf. Now we will start filling up the empty space that is
left between two leaves. And here I am drawing a
simple floral pattern. That is a very easy, okay, So it makes our Mandela looks
fuller and more intricate. And don't forget to add
the details on the leaves. That is a simple line
and a dot on top of it. Now let's start adding details to this big
U-shaped pattern. And I haven't drawn what
I can see Omby bad and, and I have chon leaves over it. Okay? So I'm not going to draw this pattern in
the same direction. What I'm going to draw in one section it will
be from Left and other section it will be from the way as I'm
doing in the video. So whenever you are
drawing a complex pattern, please make sure that you are
dividing it into two parts. Like here, I have drawn the Omby pattern altogether
and all the sections. And then when funds it is done, I will start adding
leaves on top of it. Okay, so what it does that, it just gives us a little bit more time
to draw it with ease. Because if you're
drawing one pattern completely at a time,
it becomes tedious. So you have to divide
your pattern sections. You have to divide your
work into sections. Find that I have go
draws plus this part. And once I will complete
this and all the sections, then I will move on to the second part of
this pattern, okay. End up at then is almost
about to complete and the detailing in our
Mandela is also complete. So let's move on to
the next chapter. We will, we will
be adding details to our floral compositions. Okay, Thank you so much guys.
6. Adding Details in Florals: Hello everyone and welcome back. So we will start
the detailing in this chapter in the end
part of our Mandela, the way in which I am drawing, currently drawing
the lines and dots. So this part is also where
the florals or that. So we don't want to
create a messed up loop. So it is better when you are drawing the florals in
accordance with your medulla, please keep the border layout as simple as you can because the shading part in
the florals will go over part the outer
layer of the Mandela. Okay. So now I am drawing the double outline of the whole floral composition and a fine liner that I am
using it as 0.3 m. Okay, so once it is done, we will
start the shading process. So now we will start the shading process
enough fluid or layout. So I would like to recommend
my previous class, the Yin and Yang
floral Mandela class, which I have taught in a detail way about
the shading process and different floral
compositions so that the class will
definitely help you out. So I'll suggest before
attempting this one, please have a look
on that class. It will definitely be a great help menu when it comes to shading and
floral compositions. You can also incorporate
different kinds of food dude lingers and tangled
patterns in your layout. Again. So like here in this
Omby bad thing, I am just adding some freehand doodles
on swells and leaves. That's it. Okay, So you can make it
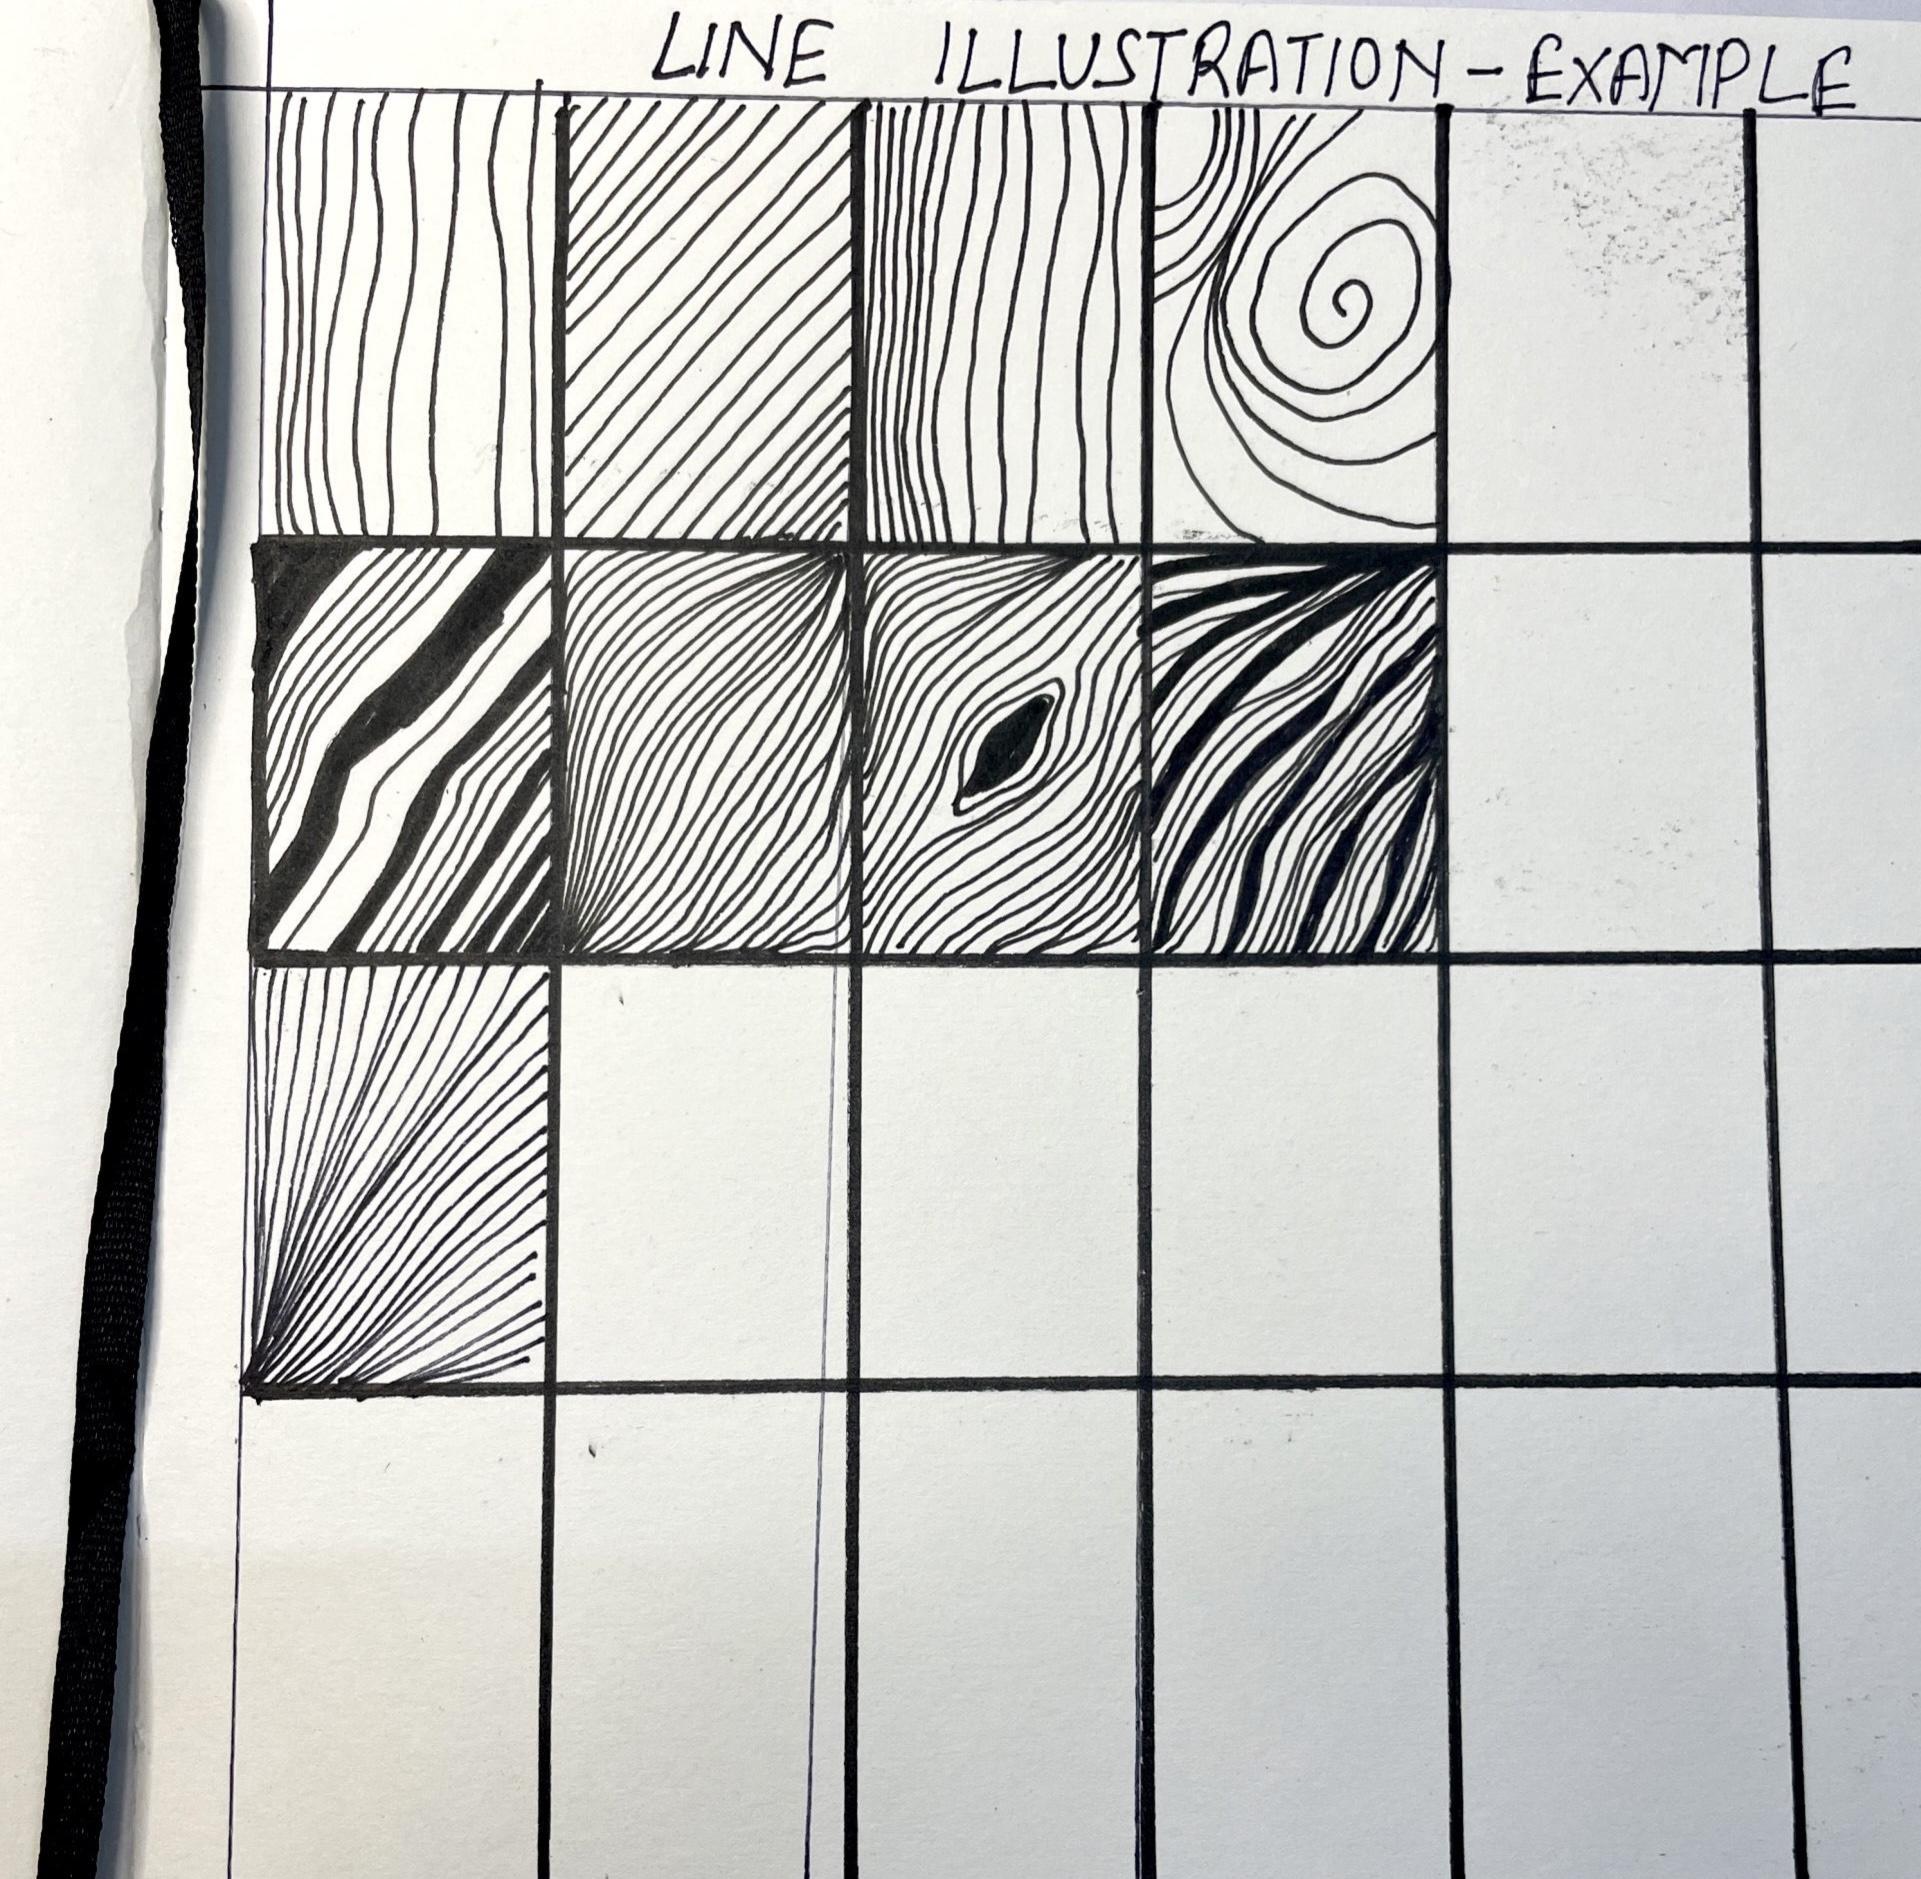
different in your own way. And this floral composition, I have used line illustration
method for two times. So in line illustration
method we basically use lines to fill up this space. We use different kinds
of line patterns, like some streets are my
horizontals and verticals. So that's completely fine. In, in here. I will be using just straight lines to
fill up that leaf part. Right now. I am just shading this
Florida and once it is done, I will do the line illustration. Okay, So here's the part where I was talking about
the line illustration. As you can see, I am
using just simple lines, nothing else, nothing shading
to fill up that leaf. Okay, so it is one
of the techniques that you can use in your
floral composition. Like you can create
some shading patterns and you can create some
line illustration leaves, so it will give more depth
to your composition, okay? So here again, I'm using the line illustration
technique and I have added a chapter about this Langley line illustration
in this class. So do check it out in
the project section. You'll love it. There are many different ways
to apply this technique. Okay. Now we are done with the shading part in the complete Florida
law illustration. And I'm going to use a bullet tip Posca marker to do the bold outline of the
whole floral composition. So advanced, that will complete. It will give you a 3D look and add $1, almost complete. And I hope you guys have
enjoyed the session and definitely learn
something new out of it. And don't forget to upload your projects in
the project section. I would love to share
them on my Instagram and thank you so much
guys for joining me in. It really means a
lot. Thank you.
 Richa Saxena, mandala & watercolor artist