Transcripts
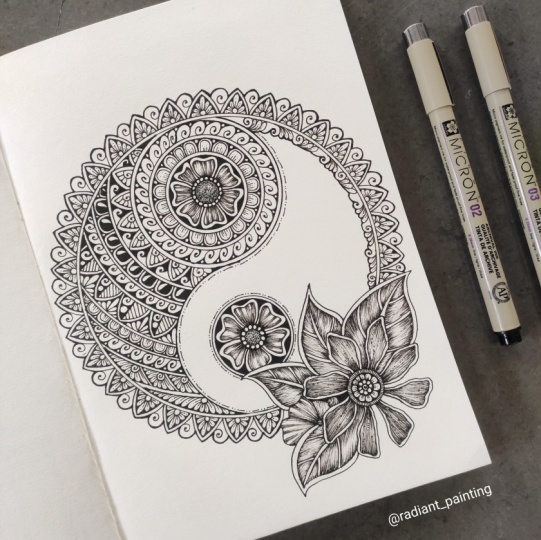
1. Introduction to Yin Yang Floral Mandala: Hello everyone and welcome
back to another amazing class. And in this, we will be learning this beautiful kin
and young Madonna. As it symbolizes the
interconnectedness of the tube words there can be no positive without negative and no light without shadow,
without any delay. Let's just start creating this beautiful Yin and Yang Mandela in a
detailed process.
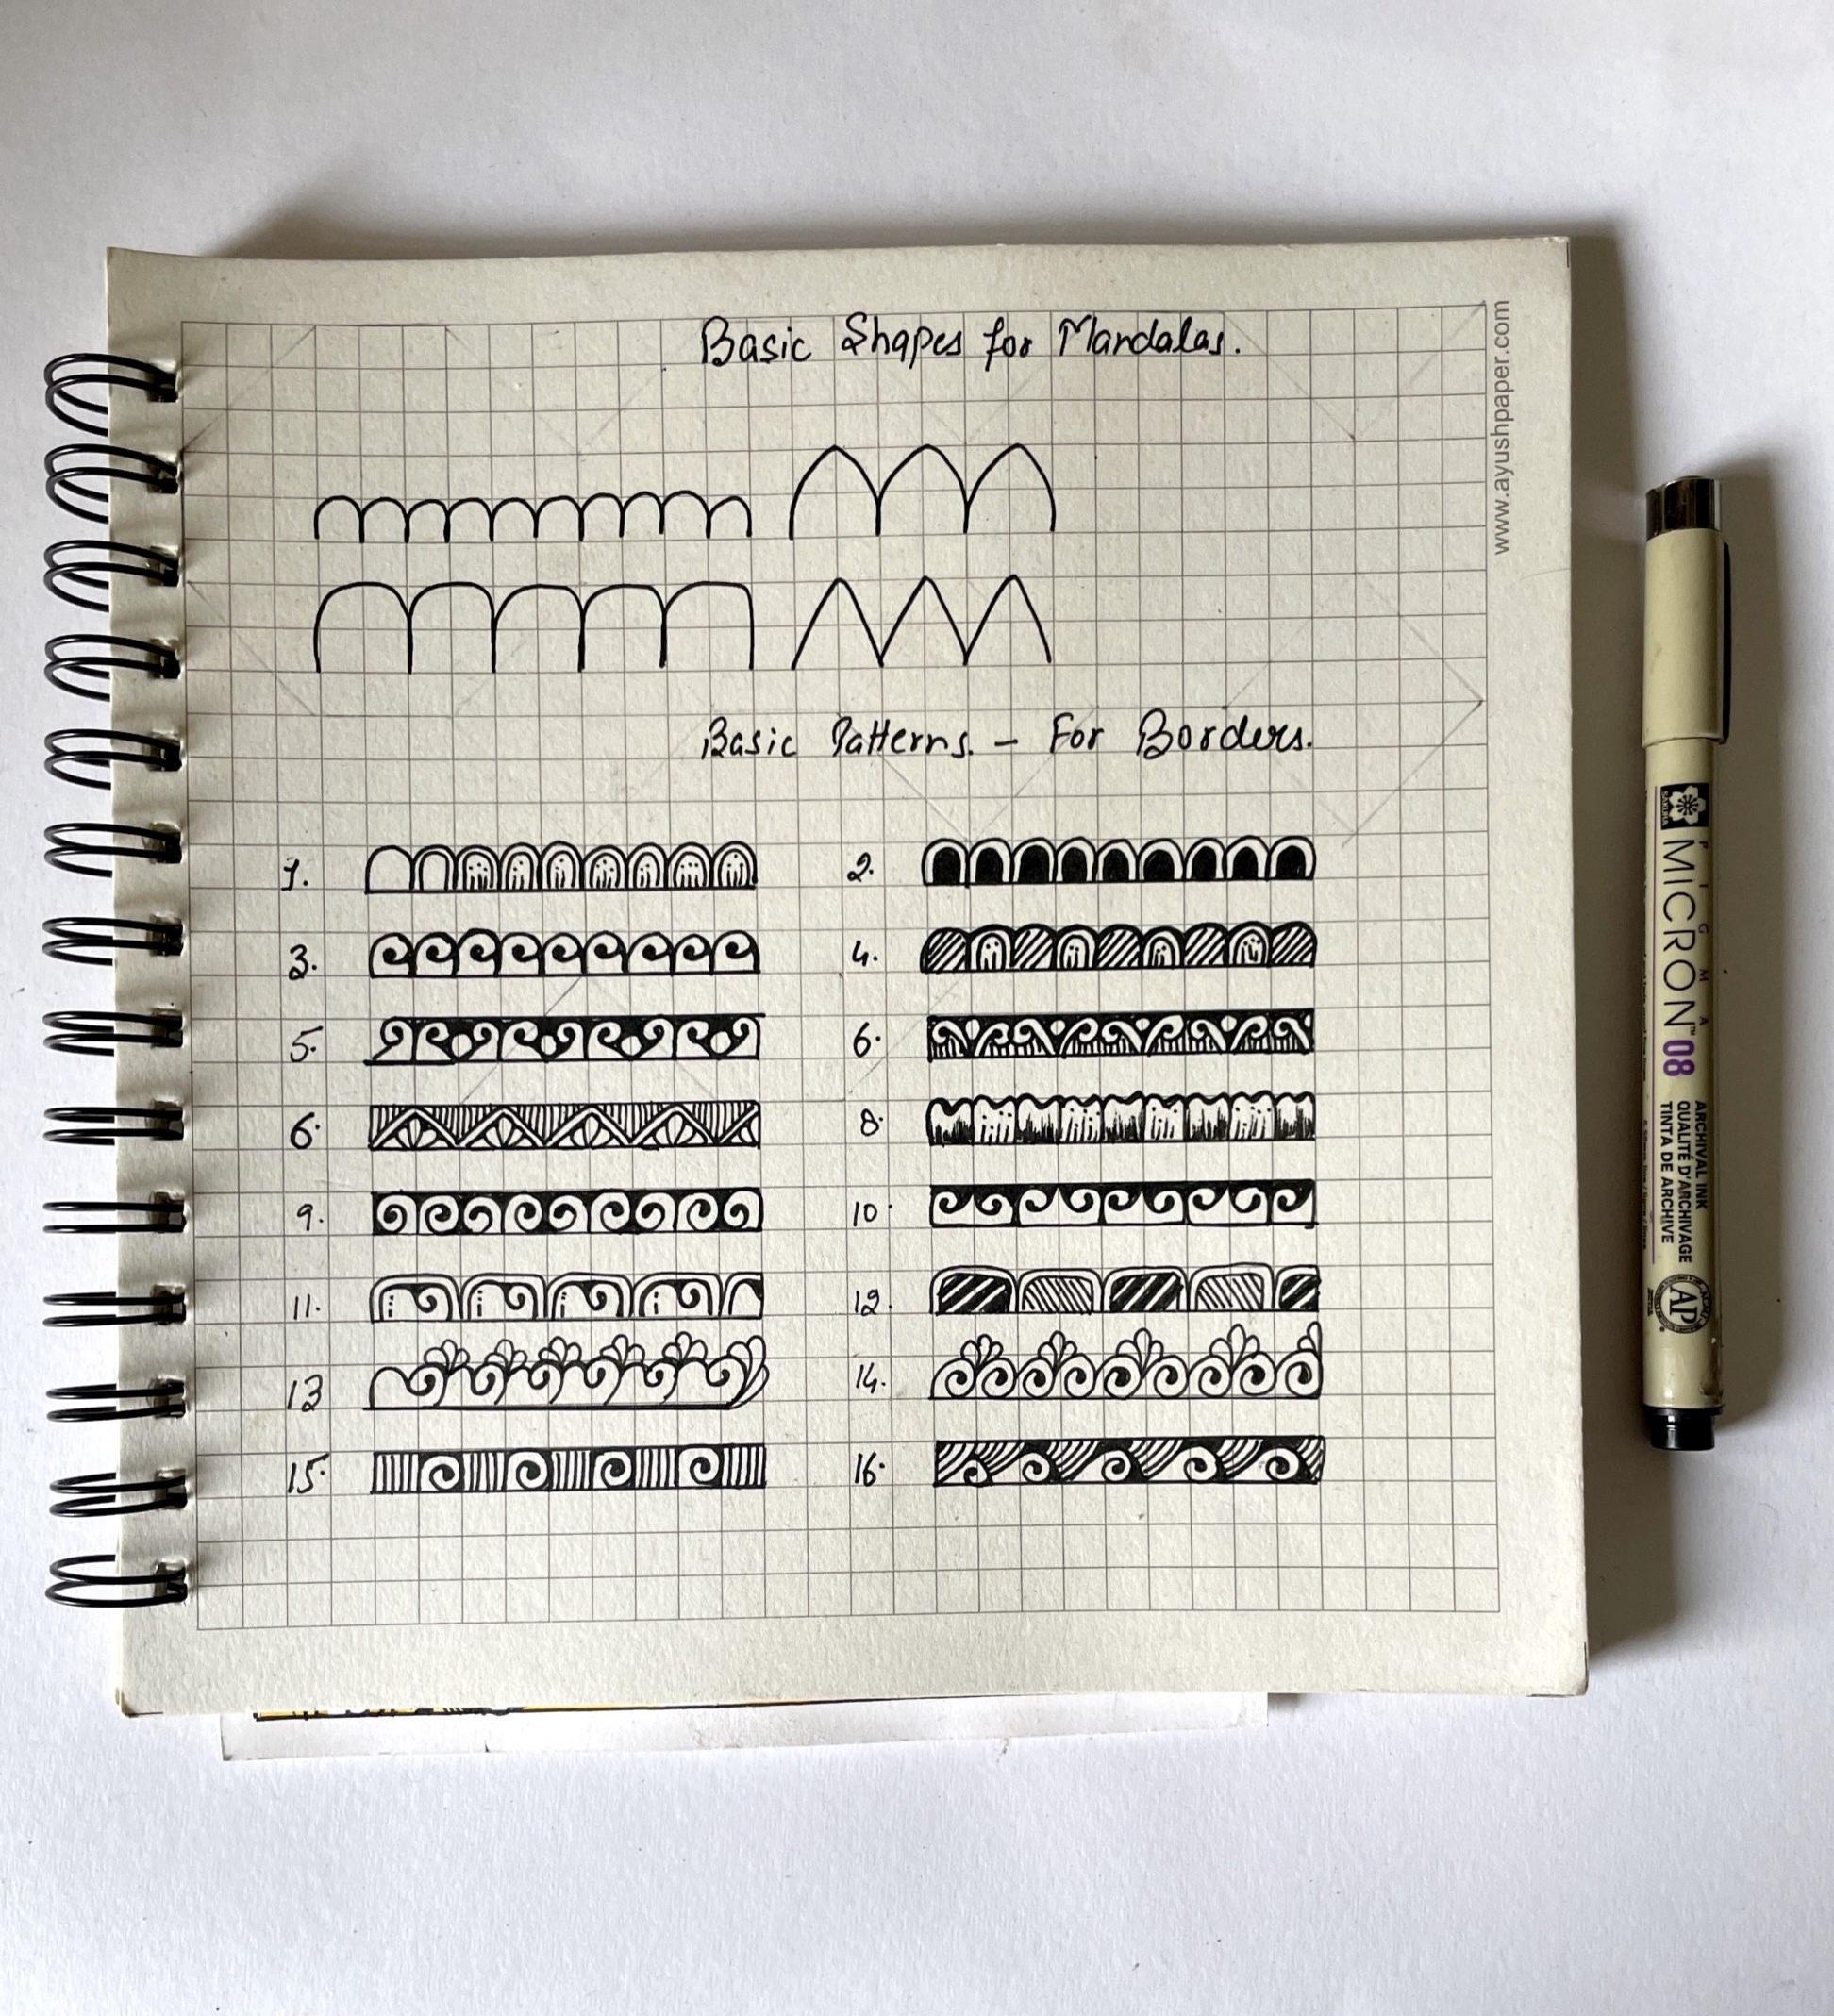
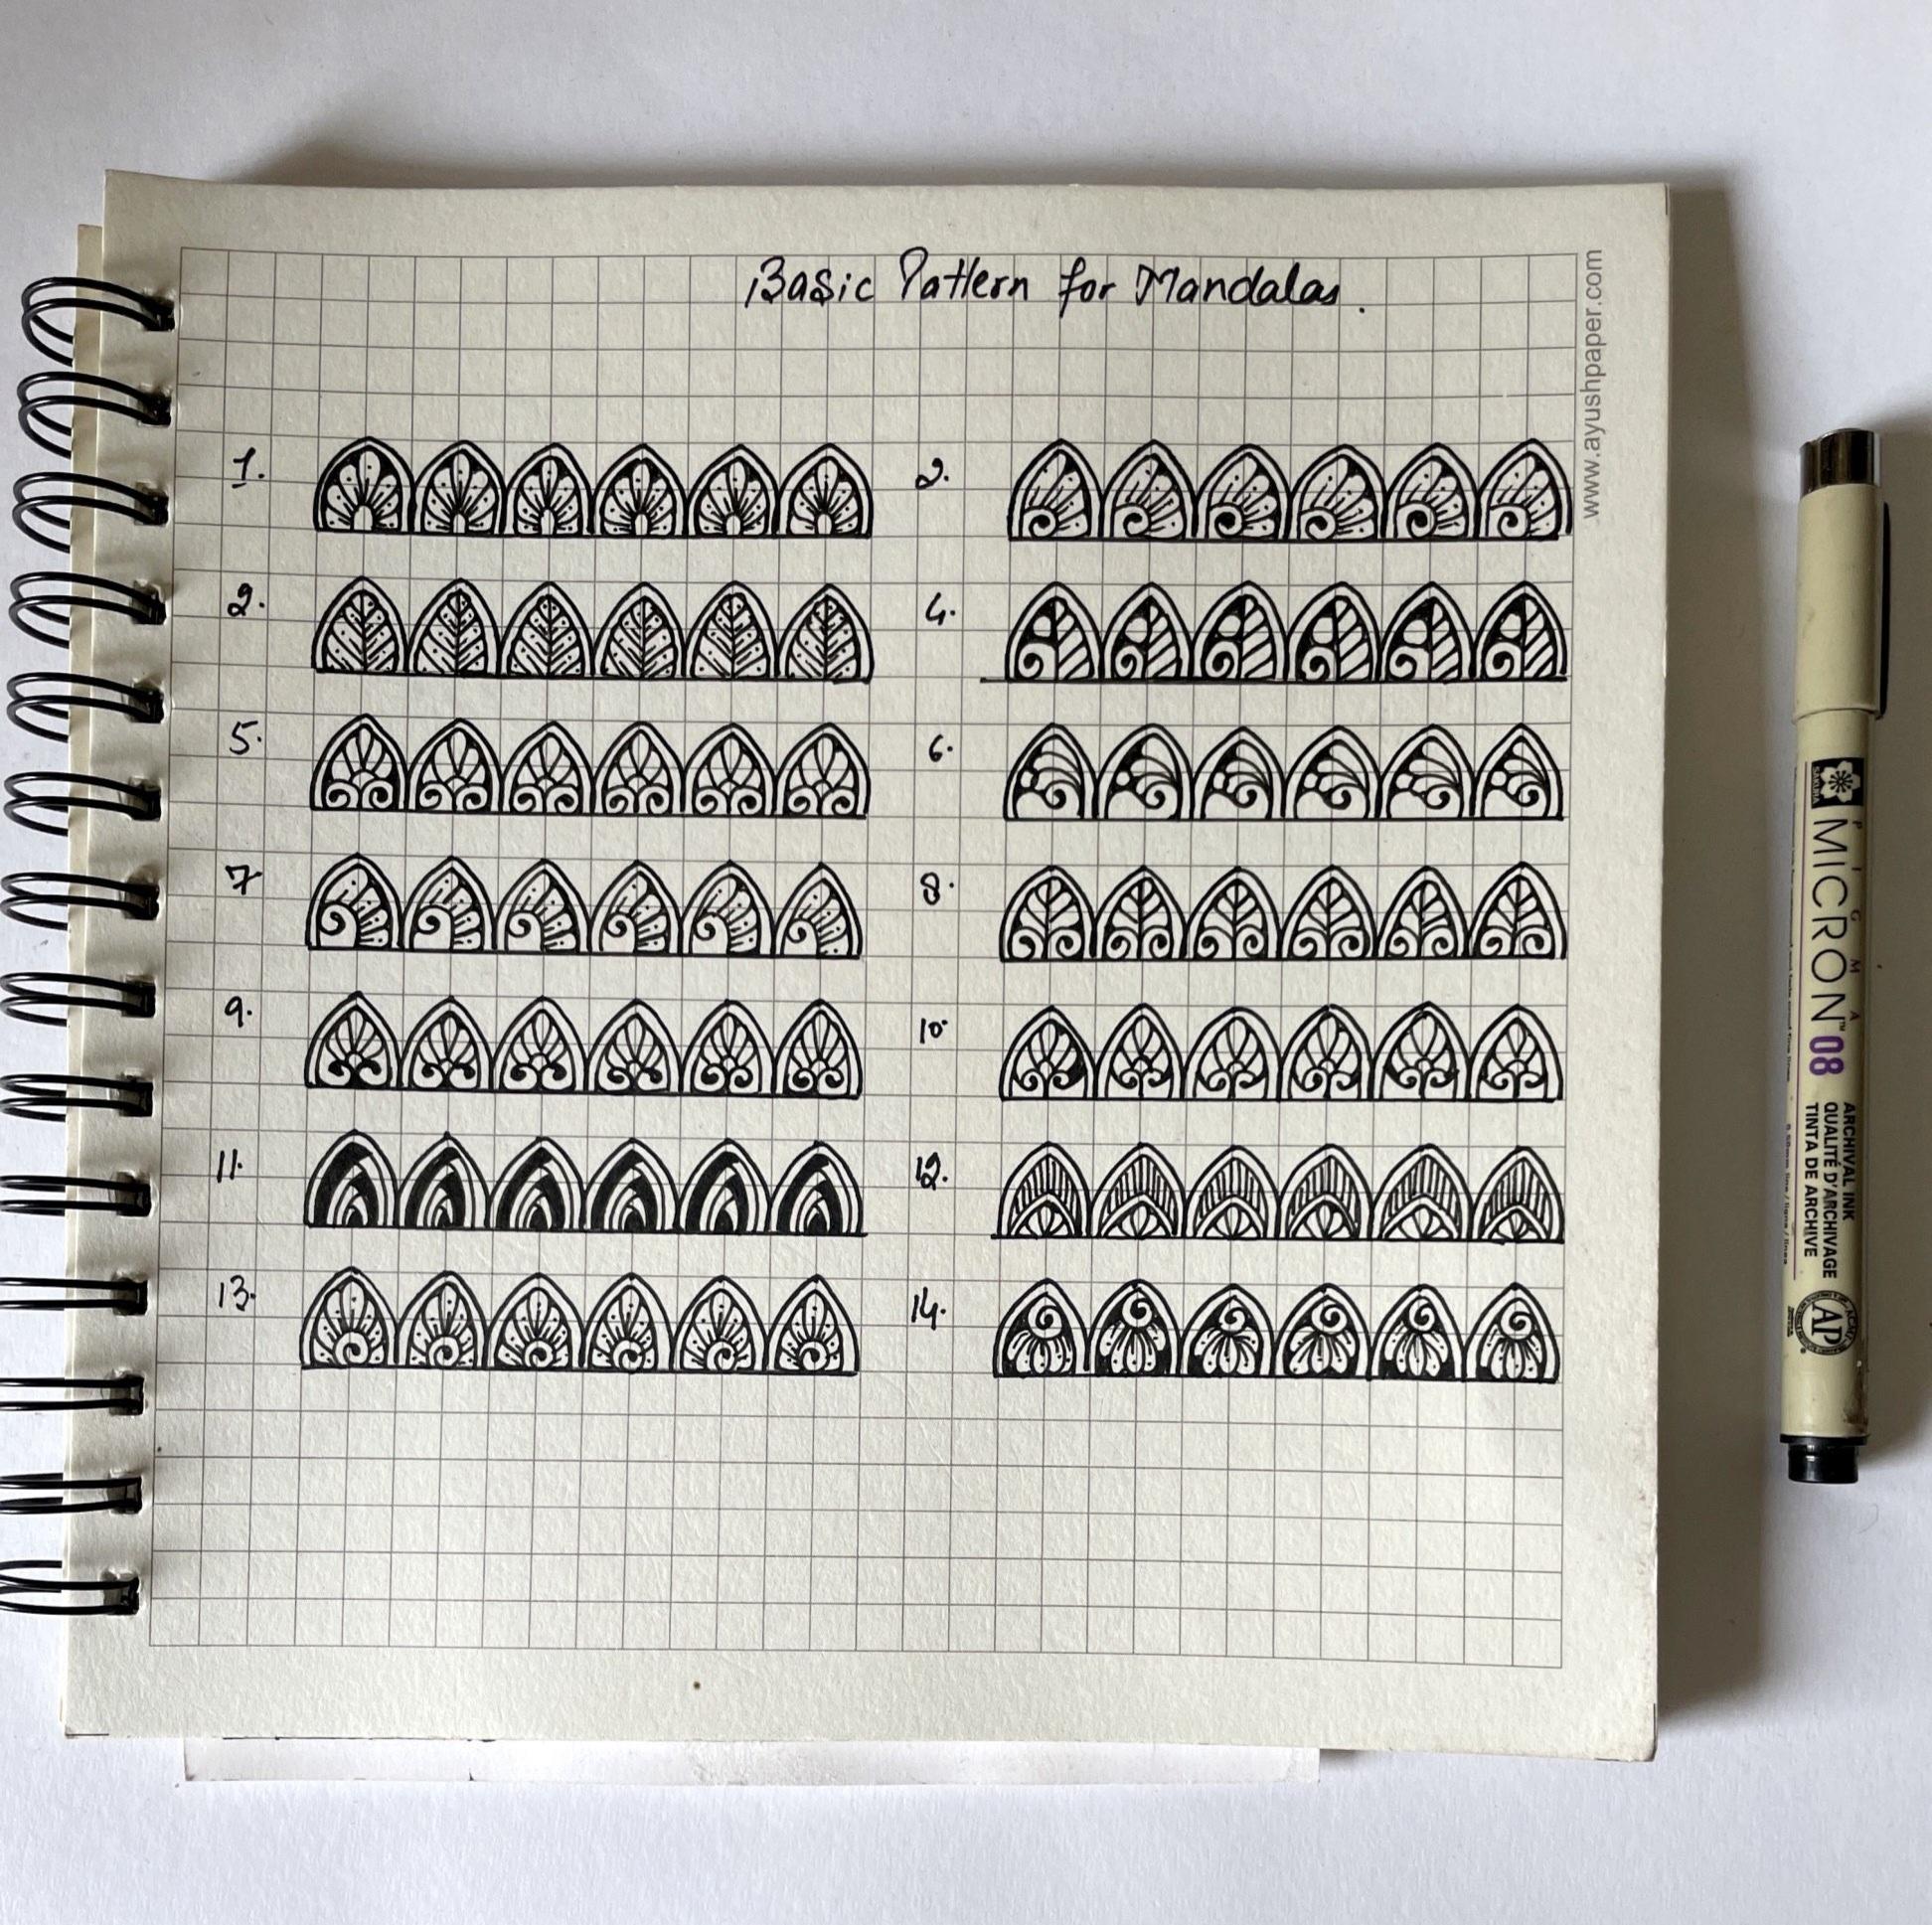
2. Art Supplies for YinYang Mandala: Hello everyone. So let's note the supplies
that we need for our class. We need a thin tip marker and fine liners 01 and
fine liners 03. Okay, and a ruler pencil. Any dark and the light
shade of pencil will do a campus that can
hold a pen and pencil, both a ruler, it is predictor. So you can use any
protectors that you have. It's not mandatory to have
to use this product or only. And we need a paper,
watercolor paper, 300 GSM, or to wifi
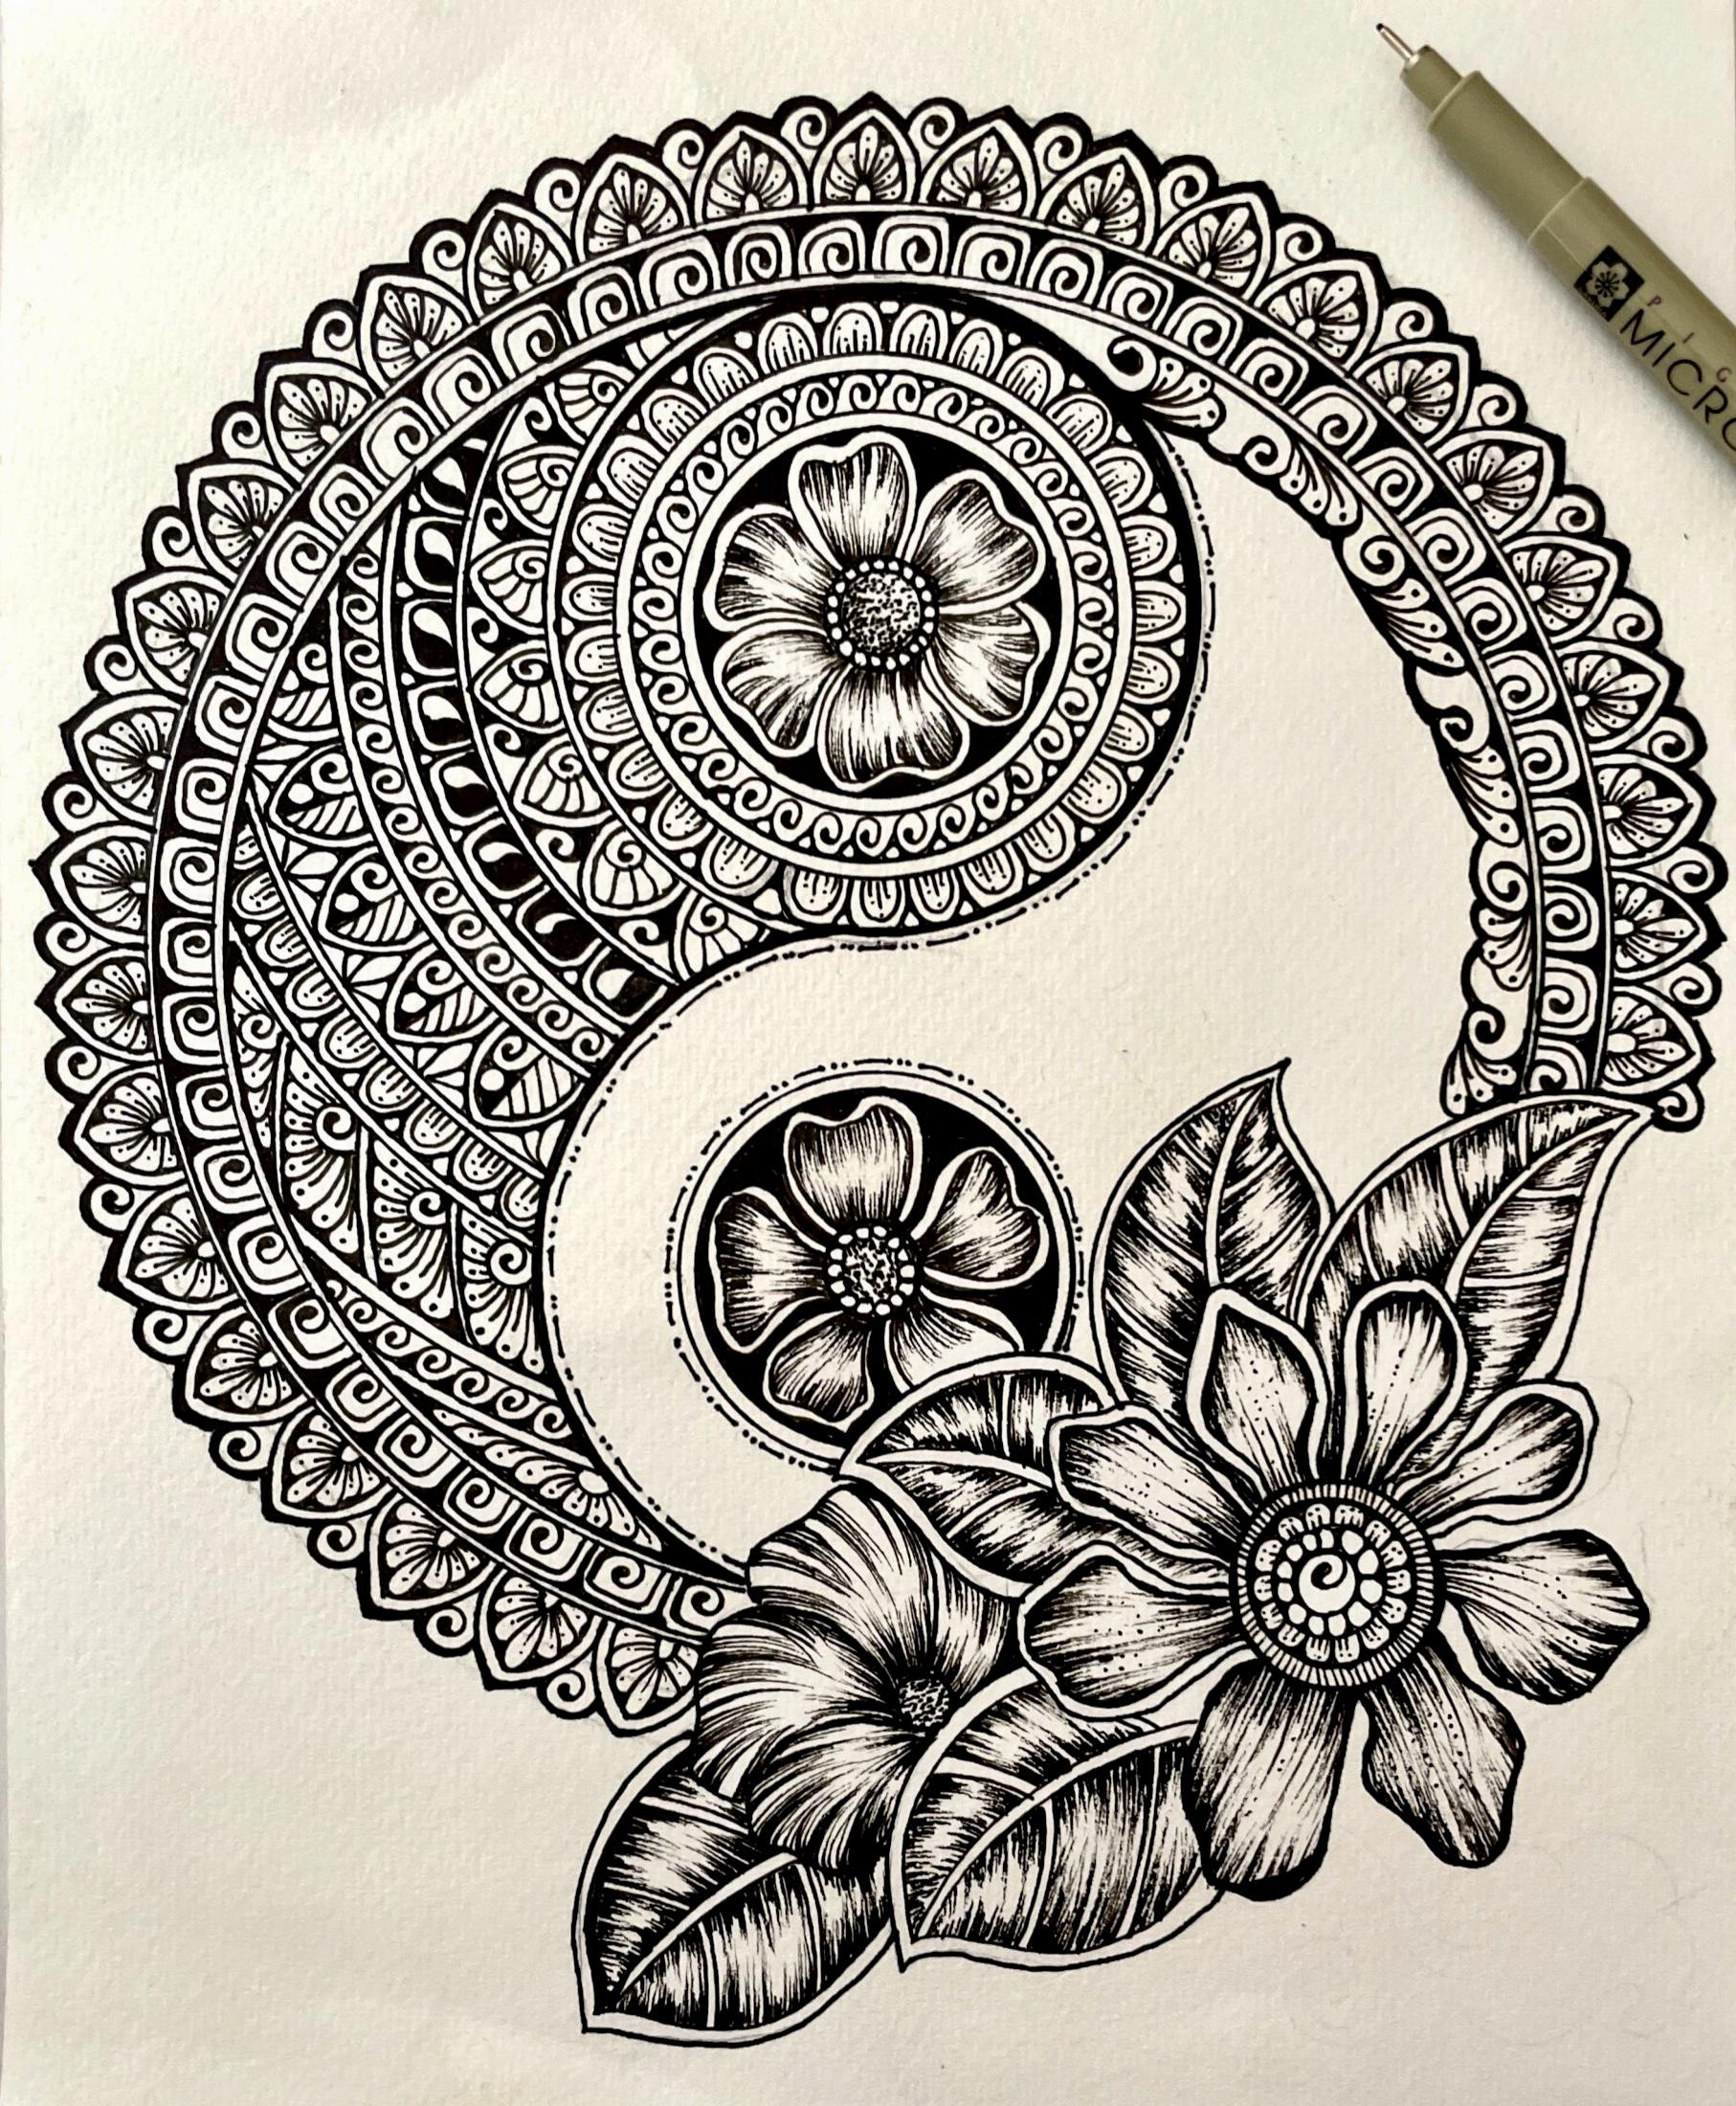
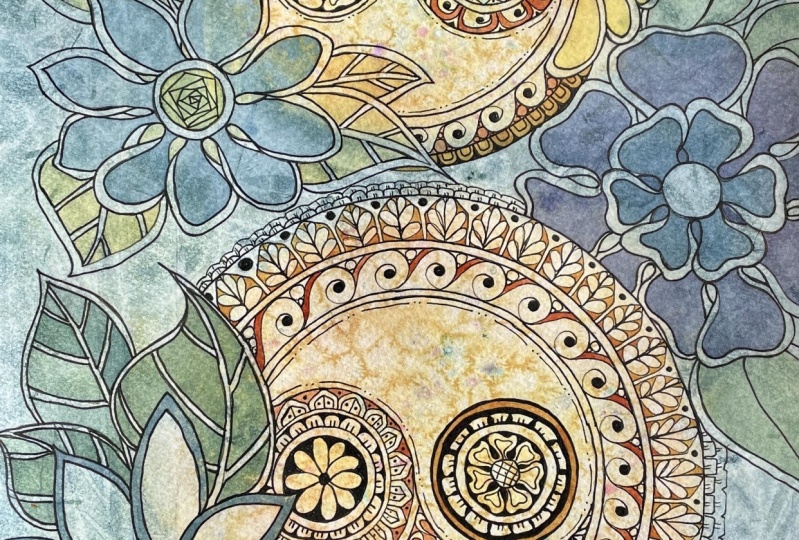
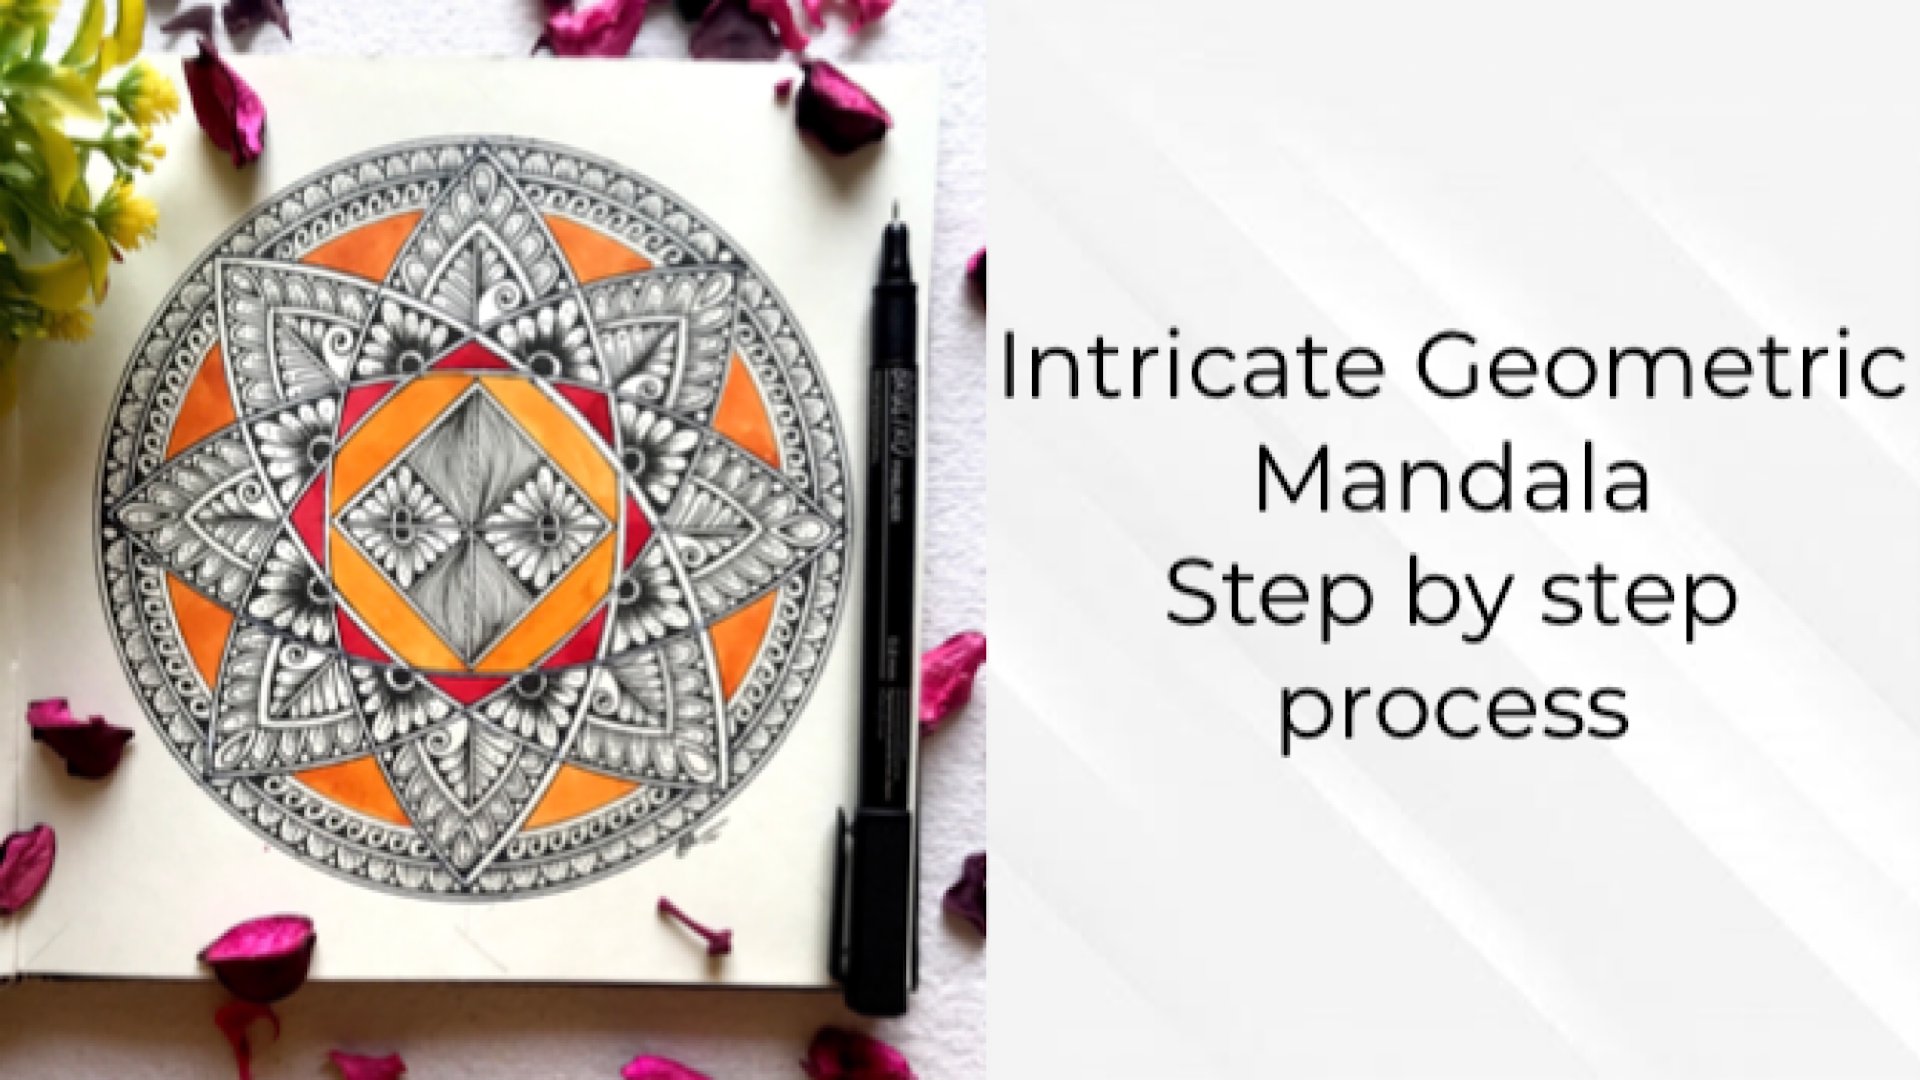
GSM, A4 size, right? So let's look, let's look at the project that
we will be creating. This is a Yin and Yang Mandela that we will be
creating in our class. So without any delay,
let's get started.
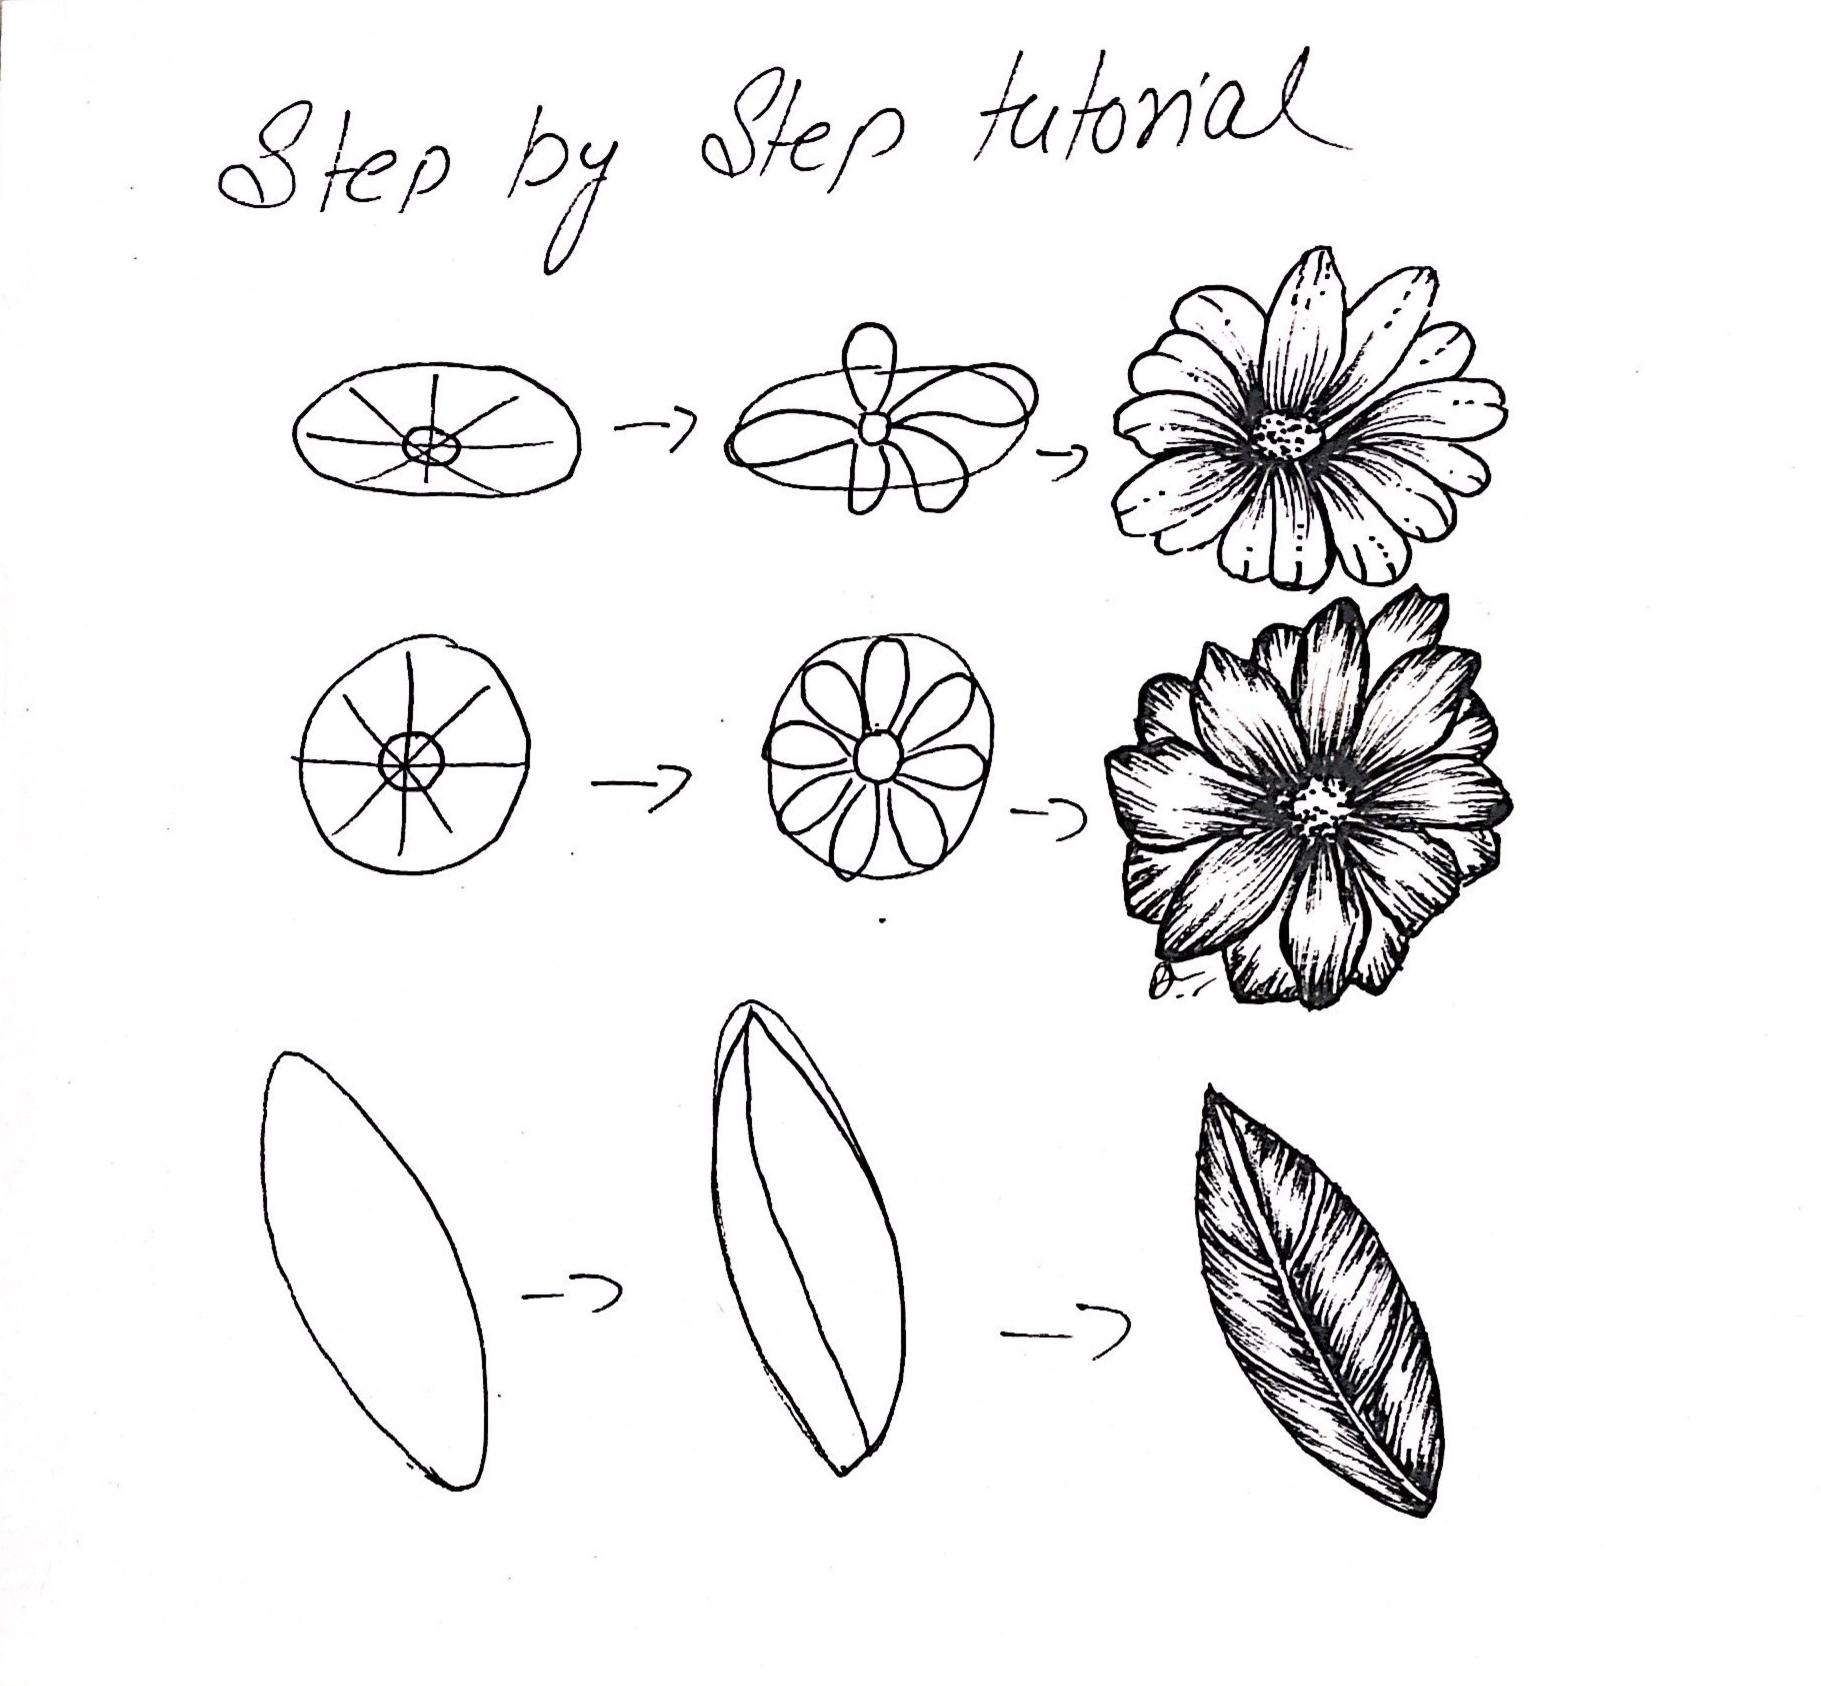
3. Freehand Doodle: Hello everyone. So in this
chapter I'm going to show you how we are going to create
the random freehand doodles. I have started with this
sweater and then I draw leaves. And what I'm gonna do
is I'm going to do it vice a versa Like one from left side and
one from right side. So it will give you a
variation in the patterns. Okay? So once it is done, we will put a line and a dot on over it to give it
more complex look. And once it is done, I will show you
one more method to do the freehand doodles. So in this we're not gonna
do the left and right. We're going to just follow the same in the same direction. Okay? And once it is done, I do tell is ready. So this we will be doing
in the Yin and Yang part. And let me show you
how I do us stippling. So I have created a circle
and I'll start putting the dots on that edge and it all on the
circumference of the circle. So this is how I'll do my step.
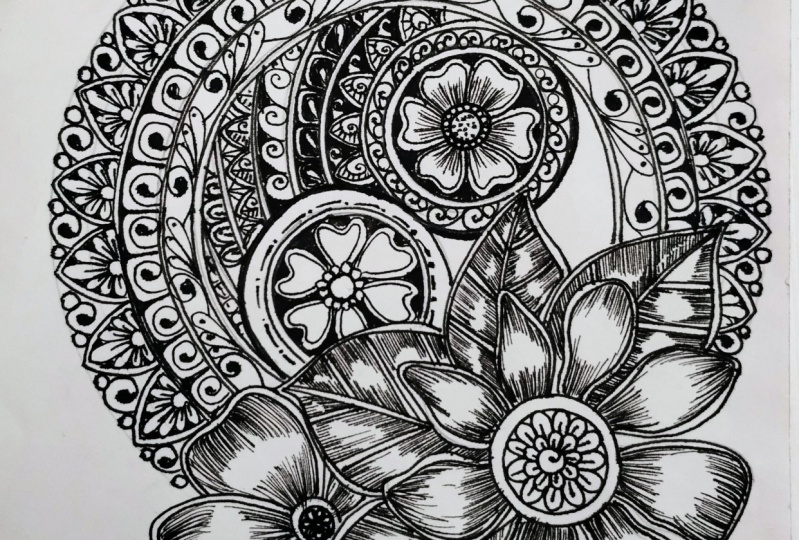
4. Yin Yang Floral Mandala Layout: Hello everyone and welcome back. And let's start by drawing this circle in the
center of a page. And the diameter of this circle
is six centimeter, right? And we're going to create
a Yin and Yang Mandela. So for that we have to take a diameter of three centimeters, just the half of the
circle that we have drawn. And now we're going to
create two more circles on the same edge on which we have draw the circles,
circle previous one. And this circle is just the
half of the six centimeter, that is three centimeters. Okay? So once we have draw
both of those circles, We're gonna erase
some lines to create the image of Yin and Yang. Okay? So our image opinion
Yang is complete. Now I'm going to draw
concentric circles with a gap of one
centimeter each. And I'm going to draw
two concentric circles with a gap of one centimeter. And after that,
I'm going to draw the third concentric circle with a gap of 0.5 centimeters. Okay? So if you can
see that I have left a bit of empty
space on the top, right, bottom of my page. So here we are going
to draw the fluids. Okay, So this is a
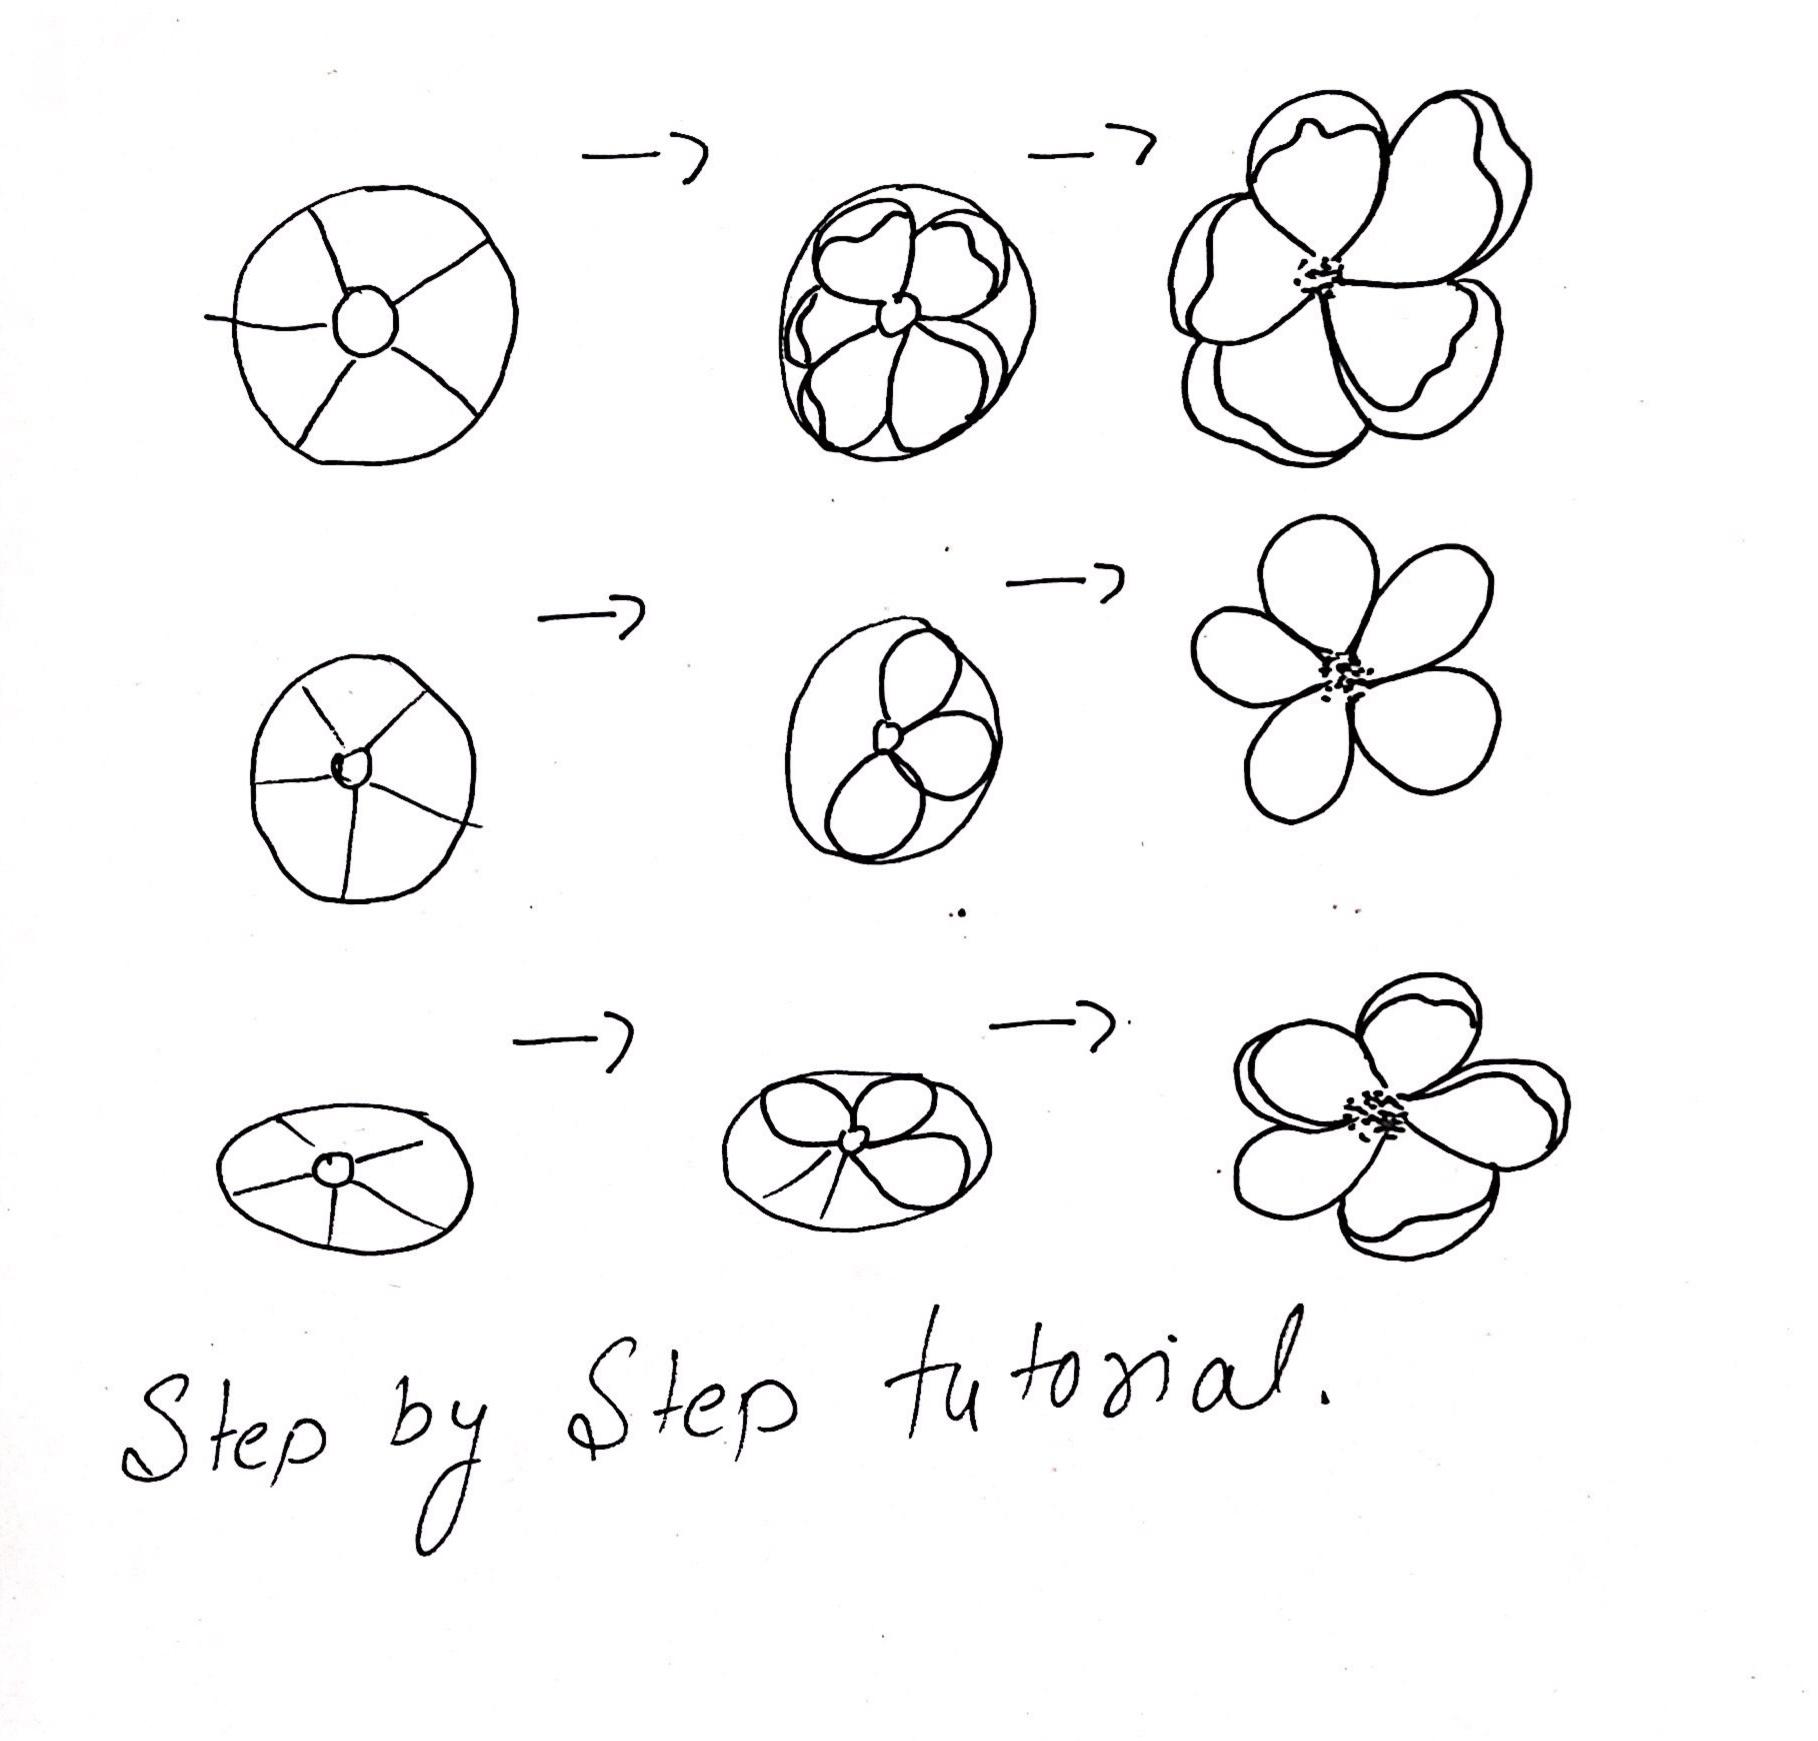
floral Yin and Yang $1. So here is this
piece where we will put our flowers for the
whole composition. Okay? So if you're not comfortable, what you can do is please do refer to the lesson
in which we're, I have shown you how to create the flow rules
and the easy way. Okay? So it is not mandatory
that you have to draw it in the same way because
nature is not perfect. And that's why the floss have different shapes
and variations. Right? Now, I'm going to
draw some random leaves. So make sure when you are drawing out the layout
of your flowers. Don't want to draw it
with a very dark, fancy, just a light one so you can
venule, erase this box. It won't be visible
after that. Okay. Layout of the flower is
complete and now I'm gonna take my predictor and I'm gonna draw some random
concentric circles. If you don't want to
have this predicted, that is fine, that's
completely okay. You can draw it freehand or you can take the help
of your campus also. Okay. So let's start
detailing in our flower. And I'm going to start with the first concentric
circles and I'm going to add some round
circles, many circus that. So it will add a
texture and our plot. And I'm also going to use
the stippling methods. So if you haven't gone
through the project section, please just do check it out
how to do this stippling. Now I'm going to draw the U-shaped pattern in the
second concentric circle. These other fillers that
we use in Mandela to create more depth and
more intricate look. Okay, so what you can do is if you are not
comfortable with this, you can also create any other pattern that you like that is totally up to you. But I'll suggest just stay
along with the course. And definitely you are
going to love it in the end because this Mandela is gonna be intricate with
so much of details And so much fun we are
going to have together. Okay? So in the outermost circle I'm going to draw this
random straight lines. Okay? So once it is done, we will move forward to the
shading part of our flower. Okay? Now let's start inking
our floral layout, right? And I'm gonna use
a pen tip marker. And it is easily available on any slashes store nearby you. Once we will complete the
outline of our Florida layout, then we will start
adding details like shading and lining and much more as we complete the inking
of fire Florida layout. Now let's erase the guidelines and see how our
layout is looking. So let's start inking
our Mandela layout, okay, so you can
use 0.2 fine liner. Do I'm using my thumb tip marker because I love bold
lines of the layout. So that's completely fine. If you don't have
pen tip marker, you can use 0 to all zeros, three fine liner for it. Okay. Once you have complete
tracing your layout, we will double outline
the whole layout. So when we will add patterns, it won't get messed up. And we will have precise uniform and
symmetrical patterns. Okay, So there are two
methods that once you have completed the whole
layout tracing, then you can double outline. Or what you can do is you can do the double outline along with
the tracing of the layout. Okay? So here I have created two small circles with a
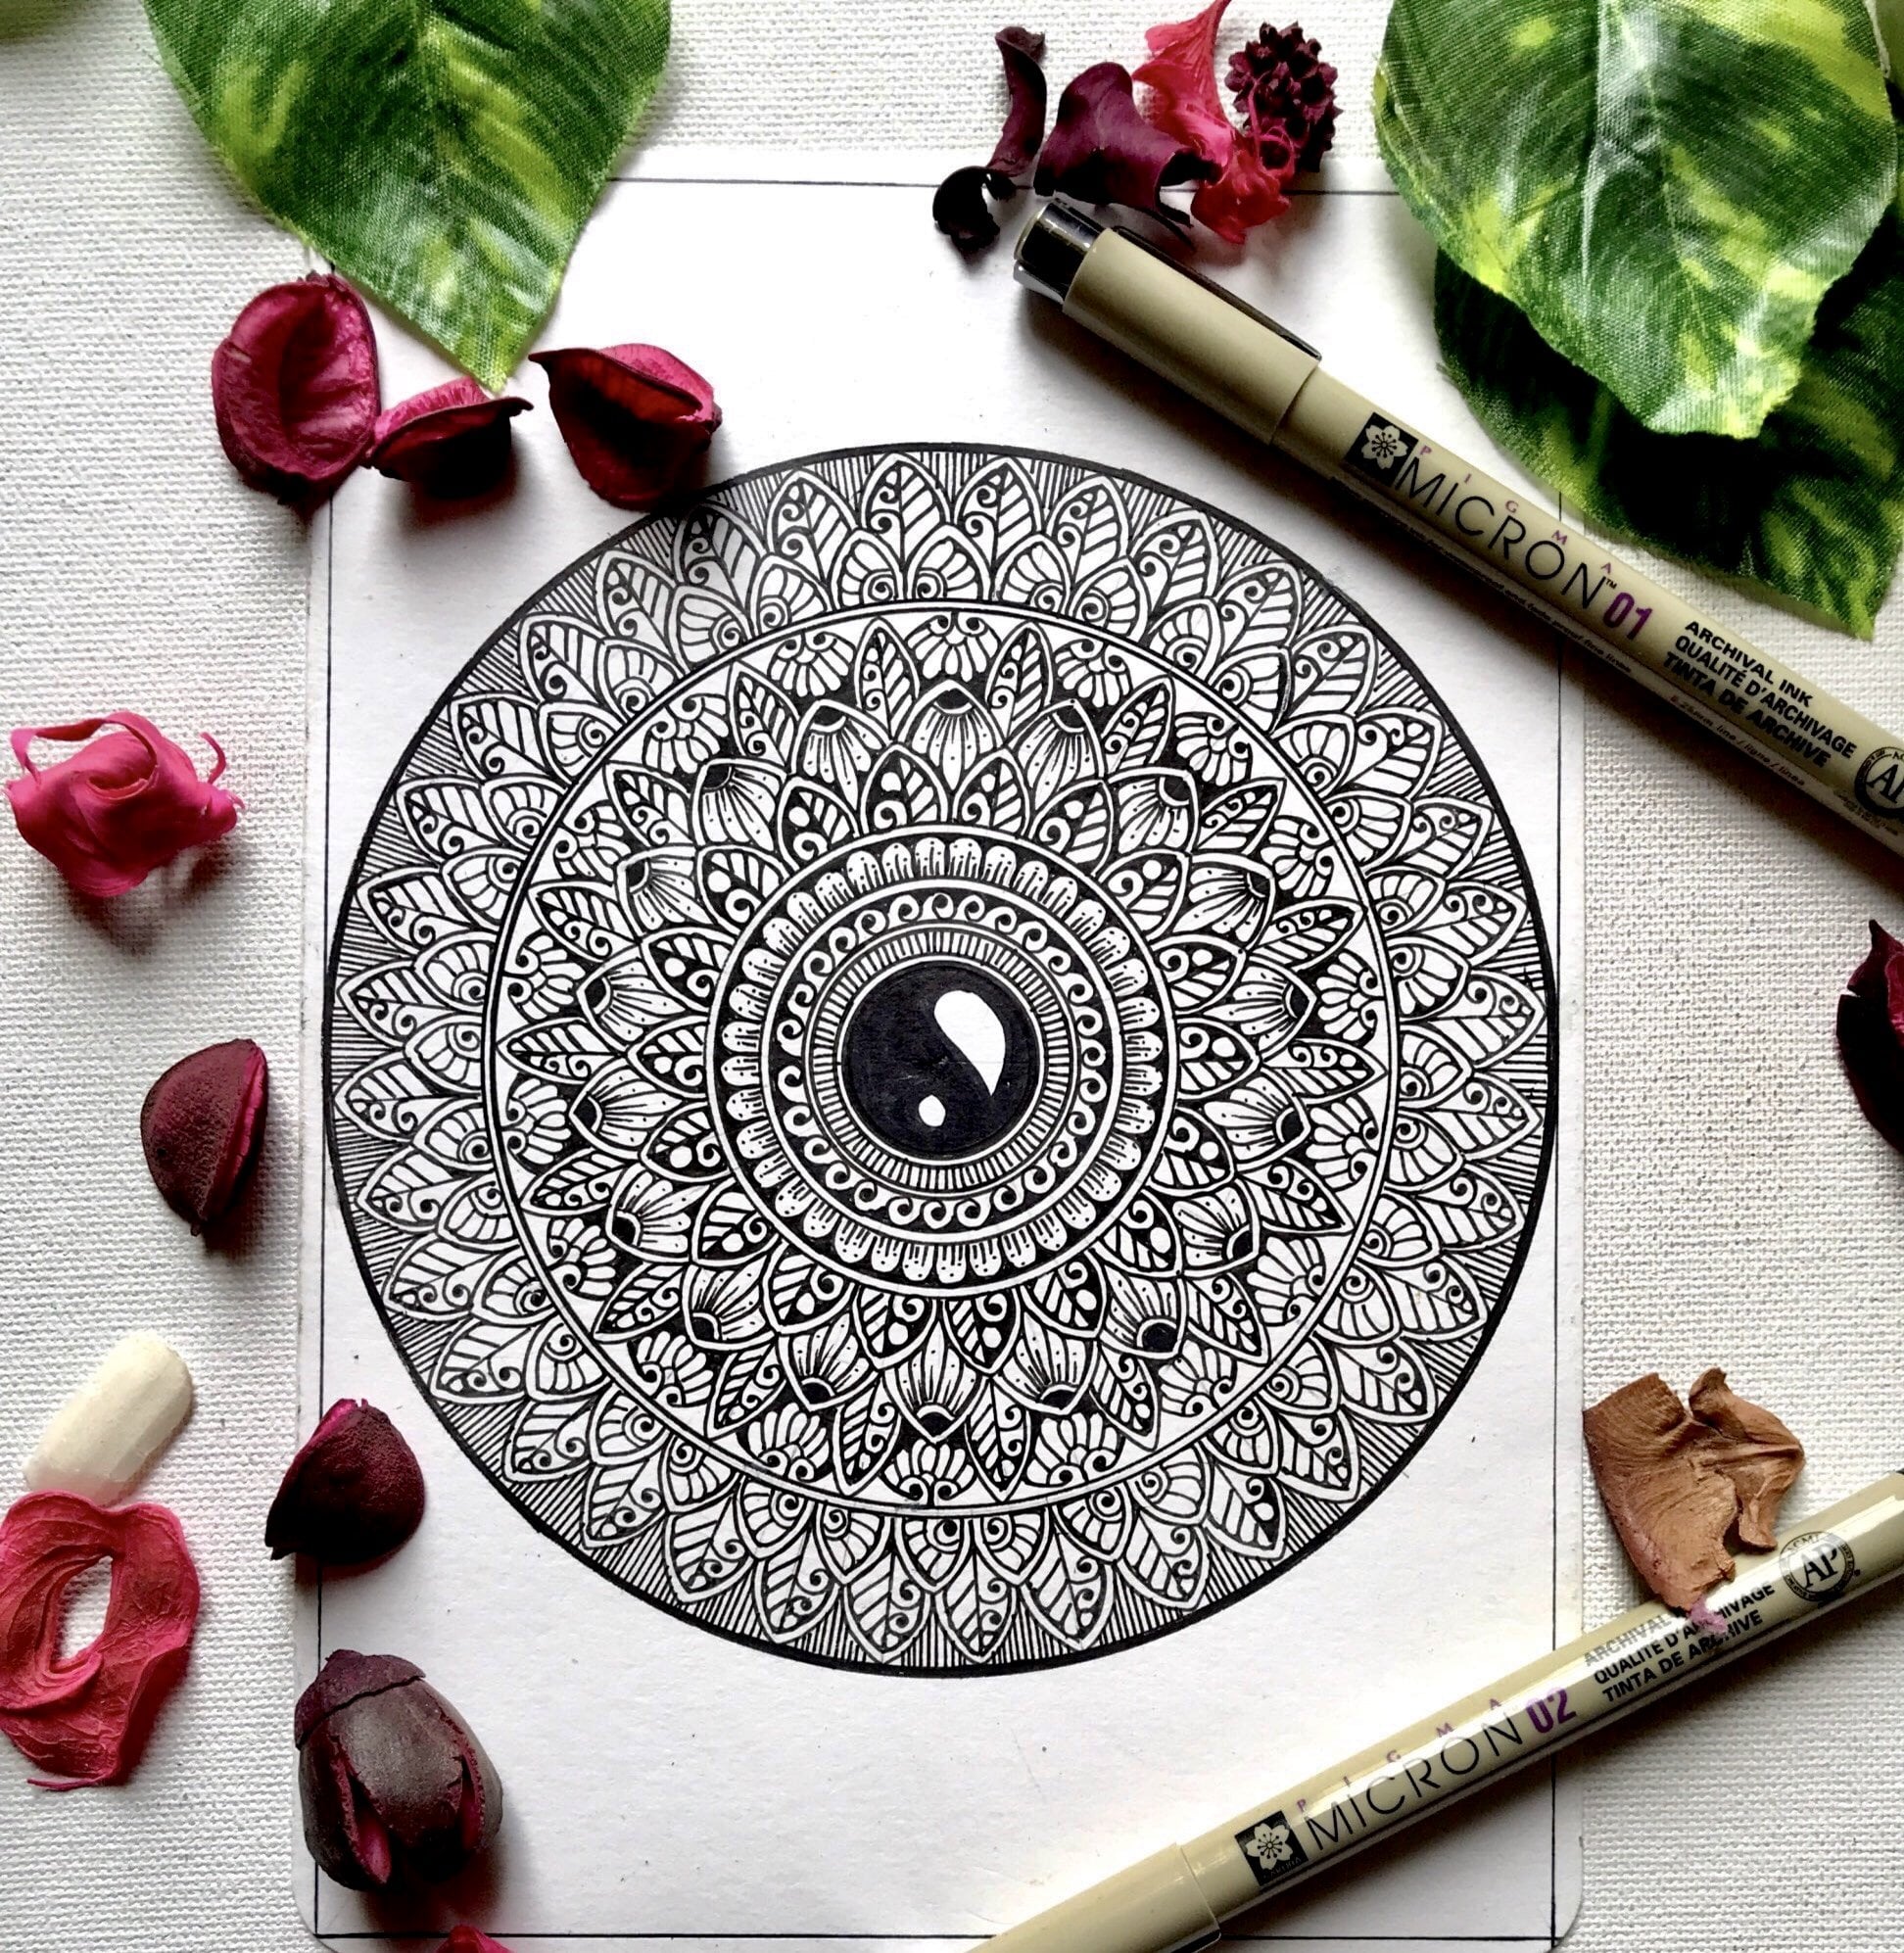
diameter of 2.5 centimeter. And this is a key part for
a Yin and Yang Mandela. So if you closely observe that it shows the
balance of life, the positivity and negativity
goes hand in hand. Okay? So Yin and Yang Mandela is basically to show
that how alive, how our life can be
balanced in a harmonic way. So on the one part
of Yin and Yang, I'm going to create a
complete Mandela, right? And I'm not going
to draw a grid like we used to draw in a
traditional Mandela as before, we put details on our medulla. So the first circle
that I have drawn is with a diameter
of 0.5 centimeter, with a gap of 0.5 centimeter. And the other one is also with the same one as the one
that I am drawing now, this is at a gap
of one centimeter. And again, the second one, then I'm going to draw
is 0.5 centimeters. So I have keep these
distances very random. So there is no guide, guide book that you have
to draw it like this. So you have to draw like that. It's totally up to
your comfort level, how you want your
whole composition. So what I have done that I
have taken one centimeter, then 0.5 centimeter, and
then 0.25 centimeter. This is the ratio that I
have kept in each offer, in the disturbance, in the
distance of each layer. Okay. So in these small circles that we have created
for Ichiban Yan, I'm going to draw two florals. And as this is a Florida
Yin and Yang modalities. So I have drawn small
circle in the center of that mini circle
that we have created. And I'm going to, I am adding small circles. And now after that, I'm going to use the
Planck to add some depth.
5. Adding Floral Details: Hello everyone and welcome back. So we will start
with the sibling, a stippling that I
was talking about. Okay, so what we're gonna
do that we're going to do a darker tone on the
edges of the circle. In the center of the circle, we are going to keep it light, so it will give us an effect
of a shadow kind of thing. Okay, So once it is done, we will start doing the
double outline of a Florida. This, the reason
is because when we start doing the shading part, so if you are not gonna do it, double line your flower. What happened that the
shading of the pedals will merge and shape of
the flower is not, will not be visible
very clearly. Okay, So let's start doing the shading and make sure when
you are doing the shading, you should leave some kind of some little white gaps
in between your shading. So this will give an impact that light is
reflecting on the patterns. Okay? So take it slow, don't rush because
this is the thing that takes time to complete. Once I shading is complete, we will start adding a border on the first concentric circle
just off to the flowers. And I'm going to add some
sweaters and this, right? So once it is completed, we will move on
to the next part. Venules were real
part is complete. There will be a small little
gap of white cup bite pod. And between both
of these videos. So what you have
to do is you have to either fill that part with small little circles or you
can color it black simply, these are the two options
that you can do, okay? And now we will start
doing the double outline of a flow layout that
we have created. And once a double
outline will be done, after that, we will start
adding the details, the shaded part
that we have just done in the floral section
of a Yin and Yang Mandela. Okay? So when you are doing the shading, but make sure you are
leaving a gap between both of the shading from left
to right and right to left. So it will give an effect that light is reflecting
on the pedal, on that part, and it will
give an illusion of a shadow. Okay? We have to repeat
the same process and all the leaves and flowers. So I am going to
fast-forward the video here as I leaves are done. So I'm gonna do the
double outline of the petals that are
connected with the leaves and these three petals that are on the bottom corner,
right bottom corner. I'm going to leave it like
that only because they are significantly on a
distance with each other. So we don't need to add
a double outline there, we just need to
add some shading. And in this shading, what I am doing is from
center to outwards area. What I'm doing is I am leaving a gap and I am using
lines with dots. In the top part of the petal. I'm doing the shading process, so it will give a different
kind of look to your florals. And we're gonna repeat this whole process
and this flower and the small one on the left
side of those big floor. Okay. As I'm going to repeat
the same process, so I'm going to
fast-forward it a bit. So once we are done
with the shading part, I'm gonna use my pen
tip marker to do the bold outline of the flower
petals and the leaves two. And this is just to add some highlights and
fluorine layout, right? So if you don't have
a thin tip marker, what you can do is
you can use 0.3 or 0.40.5 fine liner to
give it a bowl look. Okay. And a fluoro layout
is almost complete. So see you guys in
the next chapter and thank you so
much for joining me.
6. Adding Details in Mandala: Hello everyone and welcome back. So let's start adding the
details in our Mandela. And we're going to start
making the U-shape in the concentric circle next to the one in which we have
drawn them squareds. I have, I haven't drawn any grid because this is more
like free hand drawing. And if you are not comfortable, you can also draw the grid, but that's completely okay. Okay. So what you can do
is you can draw your shapes beforehand with the help of pencil and
then you can ink it. But for me, it's much comfortable when I'm
drawing straight with them.
7. Adding Details in Outer Layer: Hello everyone. So let's start the detailing in the
rest of our Mandela. So now I'm going to
do a dotted line on the boundary of the
empty Yin and Yang part. So it adds a different
kind of texture and it's really look
beautiful when you just want to maintain a balance and both
of the sides, right? So now I'm going
to start drawing U-shape in the outermost
circumference of our Mandela. And once it is done, we will start up the detailing. So if you want, you can use any other
shape or you can use wearables and
inspite of the U-shape, that's totally up to you. The moral of this lesson is how we combined patterns and an intricate way
for our Mandela. And as I told you earlier, I haven't drawn any grid. So it is a freehand Mandela. If you feel like you can also use pencil prior to your
fine liners, right? So here I am just
filling the gap between the two U-shapes that has been left to
the negative space. I have covered it
with the black. And now I will start double
lining this pattern. And once it is done, we will start the
detailing in it. Okay? So I have started drawing
this little shape in the EU pattern
that we have created. And we're going to create
this pattern all along the circumference where we
have created the U-shape. You can also use the
dotted line or you can fill up this negative space
where I am drawing this, where you can fill
up this space with any color or black color if
you want a monotone Mandela, or if you want to
add some colors. You can also add any color in this negative space where I am creating this
sweater patterns. Now, I'm gonna draw
the petal shape in the last concentric circle
of a Yin and Yang Mandela. And once it is done, we will start doing the double line and we will
start adding the details. Okay? So for me it is very convenient
when I'm rotating my paper and I'm
creating the first half and the petal and the first half of the double outline
because it keeps the flow going and your hand feels
more comfortable and more in control
in that position. Okay? So all you have to
do is draw first half, rotate the paper and
then when you are done, just start adding
the second half and start rotating the vapors so your hand won't be stuff when you are just
adding the details. Because what happens at times when you are
drawing Mandela your hand called
stiff just because of the pressure that we are
putting on our wrist. Okay, so now I have start
adding the details. And I am using the
basic paddle shape in the first half as
I'm going to follow the same procedure that I
was just telling you about. I will draw the first half
and once that is complete, I will move on to the other half and rotating the paper
while drawing it. First half is almost
about to complete. So once it is done, I will move on to
the second half. And the process is
the same that we, that we have been doing. So I'm going to fast
forward the process here a bit because it is
the same repeating process. If you want, you
can slow the video down or you can work
accordingly to your own pace. And our pattern design
is almost complete. So now it is the time to draw the details in the
leaves of the pattern. So the detail is
very much simple. You have to draw a small line
and then put a dot over it. Okay? And we have to repeat the same process and all
the leaf patterns that we have created on the outermost boundary of
a Yin and Yang Mandela. So now the details
are complete in the first layer and
I'm going to draw a small sweater in between the gap that is
available between the two patterns
to pet the leafs so the pattern will look fuller. Ok, it will look more complete and more beautiful in that way. There's almost
about to complete. The last step, step that we have to do is we have to
take a thin tip marker. We have to bold the outline of the outer pattern
that we have created, this little in-between the
two leaves and leaves. Okay, So what happened when you are doing a
bold outline that your design look more
finished and more perfect. I can say that,
but that's totally up to you if you don't
want and that's okay, but I prefer doing
it double outlined. It gives them another
aspect to your Mandela. The Mandela is almost
complete and I hope you guys enjoyed this session and don't forget to upload your projects
in the project section. I would love to share
them on my Instagram. Thank you so much guys
for joining me in, and I hope you have
learned something new out of this class. Thank you.
 Richa Saxena, mandala & watercolor artist