Transcripts
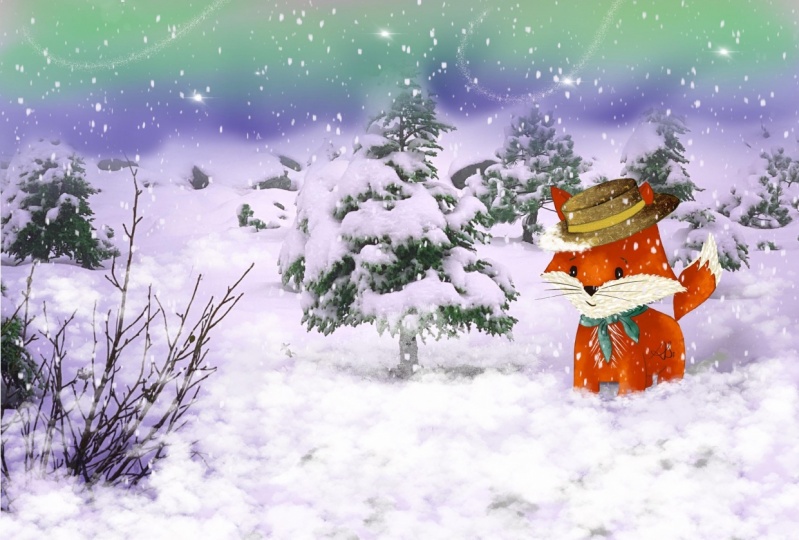
1. Intro: Distance. In that sense. Hello. Hi and welcome to my new class, fun with illustrations and
photos using Procreate. My name is Brenda Bakker and
I'm from the Netherlands. This is a class not
on drawing itself, but on how you can
create nice things from your hand-drawn
illustrations blended into a photo from real life. You now can create functions, are lovely stories,
just for fun. Show others. You can create from nature or
just from living your home. You only have to see
the possibilities. And now you can make
it happen yourself. You can choose to draw
realistically or just stylized, just to your own liking. You can incorporate your
child's favorite character and drove it into his own room. Or what about just during
a walk in the park, you suddenly bump into
your own brainstorming. Of course, in this course, I will give you some examples
and what to look for it, and how we can really blending your character into the picture. I will show you how I can create different scenes on just a
normal everyday picture. And so you can create an everyday object which is dull and gray into
a magical scene. So if you're interested in that, just helping and
I will show you, See you in class.
2. From Photo to Magical Background : So first we're going to start
with creating a new canvas. So I hit the plus sign and I'm going to hit
the plus here again. And I choose for
DSpace 9 to 11 inches. So I convert to inches first. Choose nine, choose 11. Set my DPI automatically to 300. So I have a good quality
and then I press Create. And now I've got a new canvas. Now, it's important to import
a picture of your choice. So I'm going to my wrench tool, go to Ed's, go to
Insert a photo. So it brings me to my library. And here is to photo
I want to import. And now we can see it's not
completely up to its size. So I'm just going to
make this a little bit smaller so I can see the
whole frame of the canvas. And I'm going to enlarge
its little bits. So it's completely
fitted into the screen. My Canvas, make sure I have the picture of the stem
in the right place, approximately,
something like here. I'll make it fit even more. Yes. Now I think I'm okay with that. So now I have to picture. And just for safety matters, maybe I'm going to use it
later on, maybe knots. I'm going to duplicate it once more and make it invisible. So it's just there
as a spare one. And now I have to change
the colors to my liking. Part is not hard, but
you have to decide what kind of atmosphere
you want for your picture. So I'm looking for a
dreamy atmosphere. So for this layer, I'm going to my use
saturation and brightness, which is on the magic wand. At the top. Use saturation
and brightness. There. I can play with you
a little bit so I can change the
color of the leaves. Make it a cold winter one, or a bit fairy
tale like in pink. And I can choose any
color to my liking. I can even using it as it was. Maybe that's also
part of your deal. But I'm catching up for
dreamy atmosphere like so. So I'm going to not
the pinkish this time, but maybe a little bit bluish, like it's a cold wintery
moonlight session, but you see the background
is still white, so I have to adapt that to maybe I can make it a little
bit more saturated, more blue or shall
I choose gray? I'm going to create more blue. And just play a little bit. What do I like?
Maybe a little bit. Blue purplish. I think this is fun. I can play with you. Sorry, I can play with
the brightness again, but I think this is
lovely as it was. So now I'm going to
leave it for this. So I'm going to create
a new layer on top. I said that part on multiply. And now I'm going
to the airbrush. And airbrush you can find
in your own library. I've got a love of brushes here. I have to sort them out, but I know where every
brush is approximately. So I go to our
airbrush and choosing the soft brush and
a bigger size. And I'm on a new layer. Yes, I'm on a new
layer on multiply, and I have to
choose a new color. I didn't choose new color. So I'm going for
a nice blue sky. Like so. And let me
see what that does. It already instantly is
a little bit darker. I'm going to leave a little
bit of light here so it don't so it doesn't
get totally dark. I can this is nuts. Almost full opacity, so I can darken it a little bit more. And I can play with that. Normally when I want to darken something and leave a
little bit of color behind, I sit them on overlay, but because my
background was white, it doesn't catch
overlay very well. So I think the multiply
is great for this one. Maybe a little bit
purplish, pinkish. We check. What does that do? Well, you can play with
that to your own liking. I think we're already getting lovely and dreamy color
of the background. We're going to do a little bit
about the moonlight later. For now, it's important
to do a drawing. And for that part, I'm
going to show you how I did that in the
drawing I did before. This lesson is not about
the drawing itself. What I'm going to give
you a walk-through of how I did this. So let's go to the next chapter
and to my other drawing.
3. Two ways of getting your drawing in to the picture: So in this chapter, I'm going to give
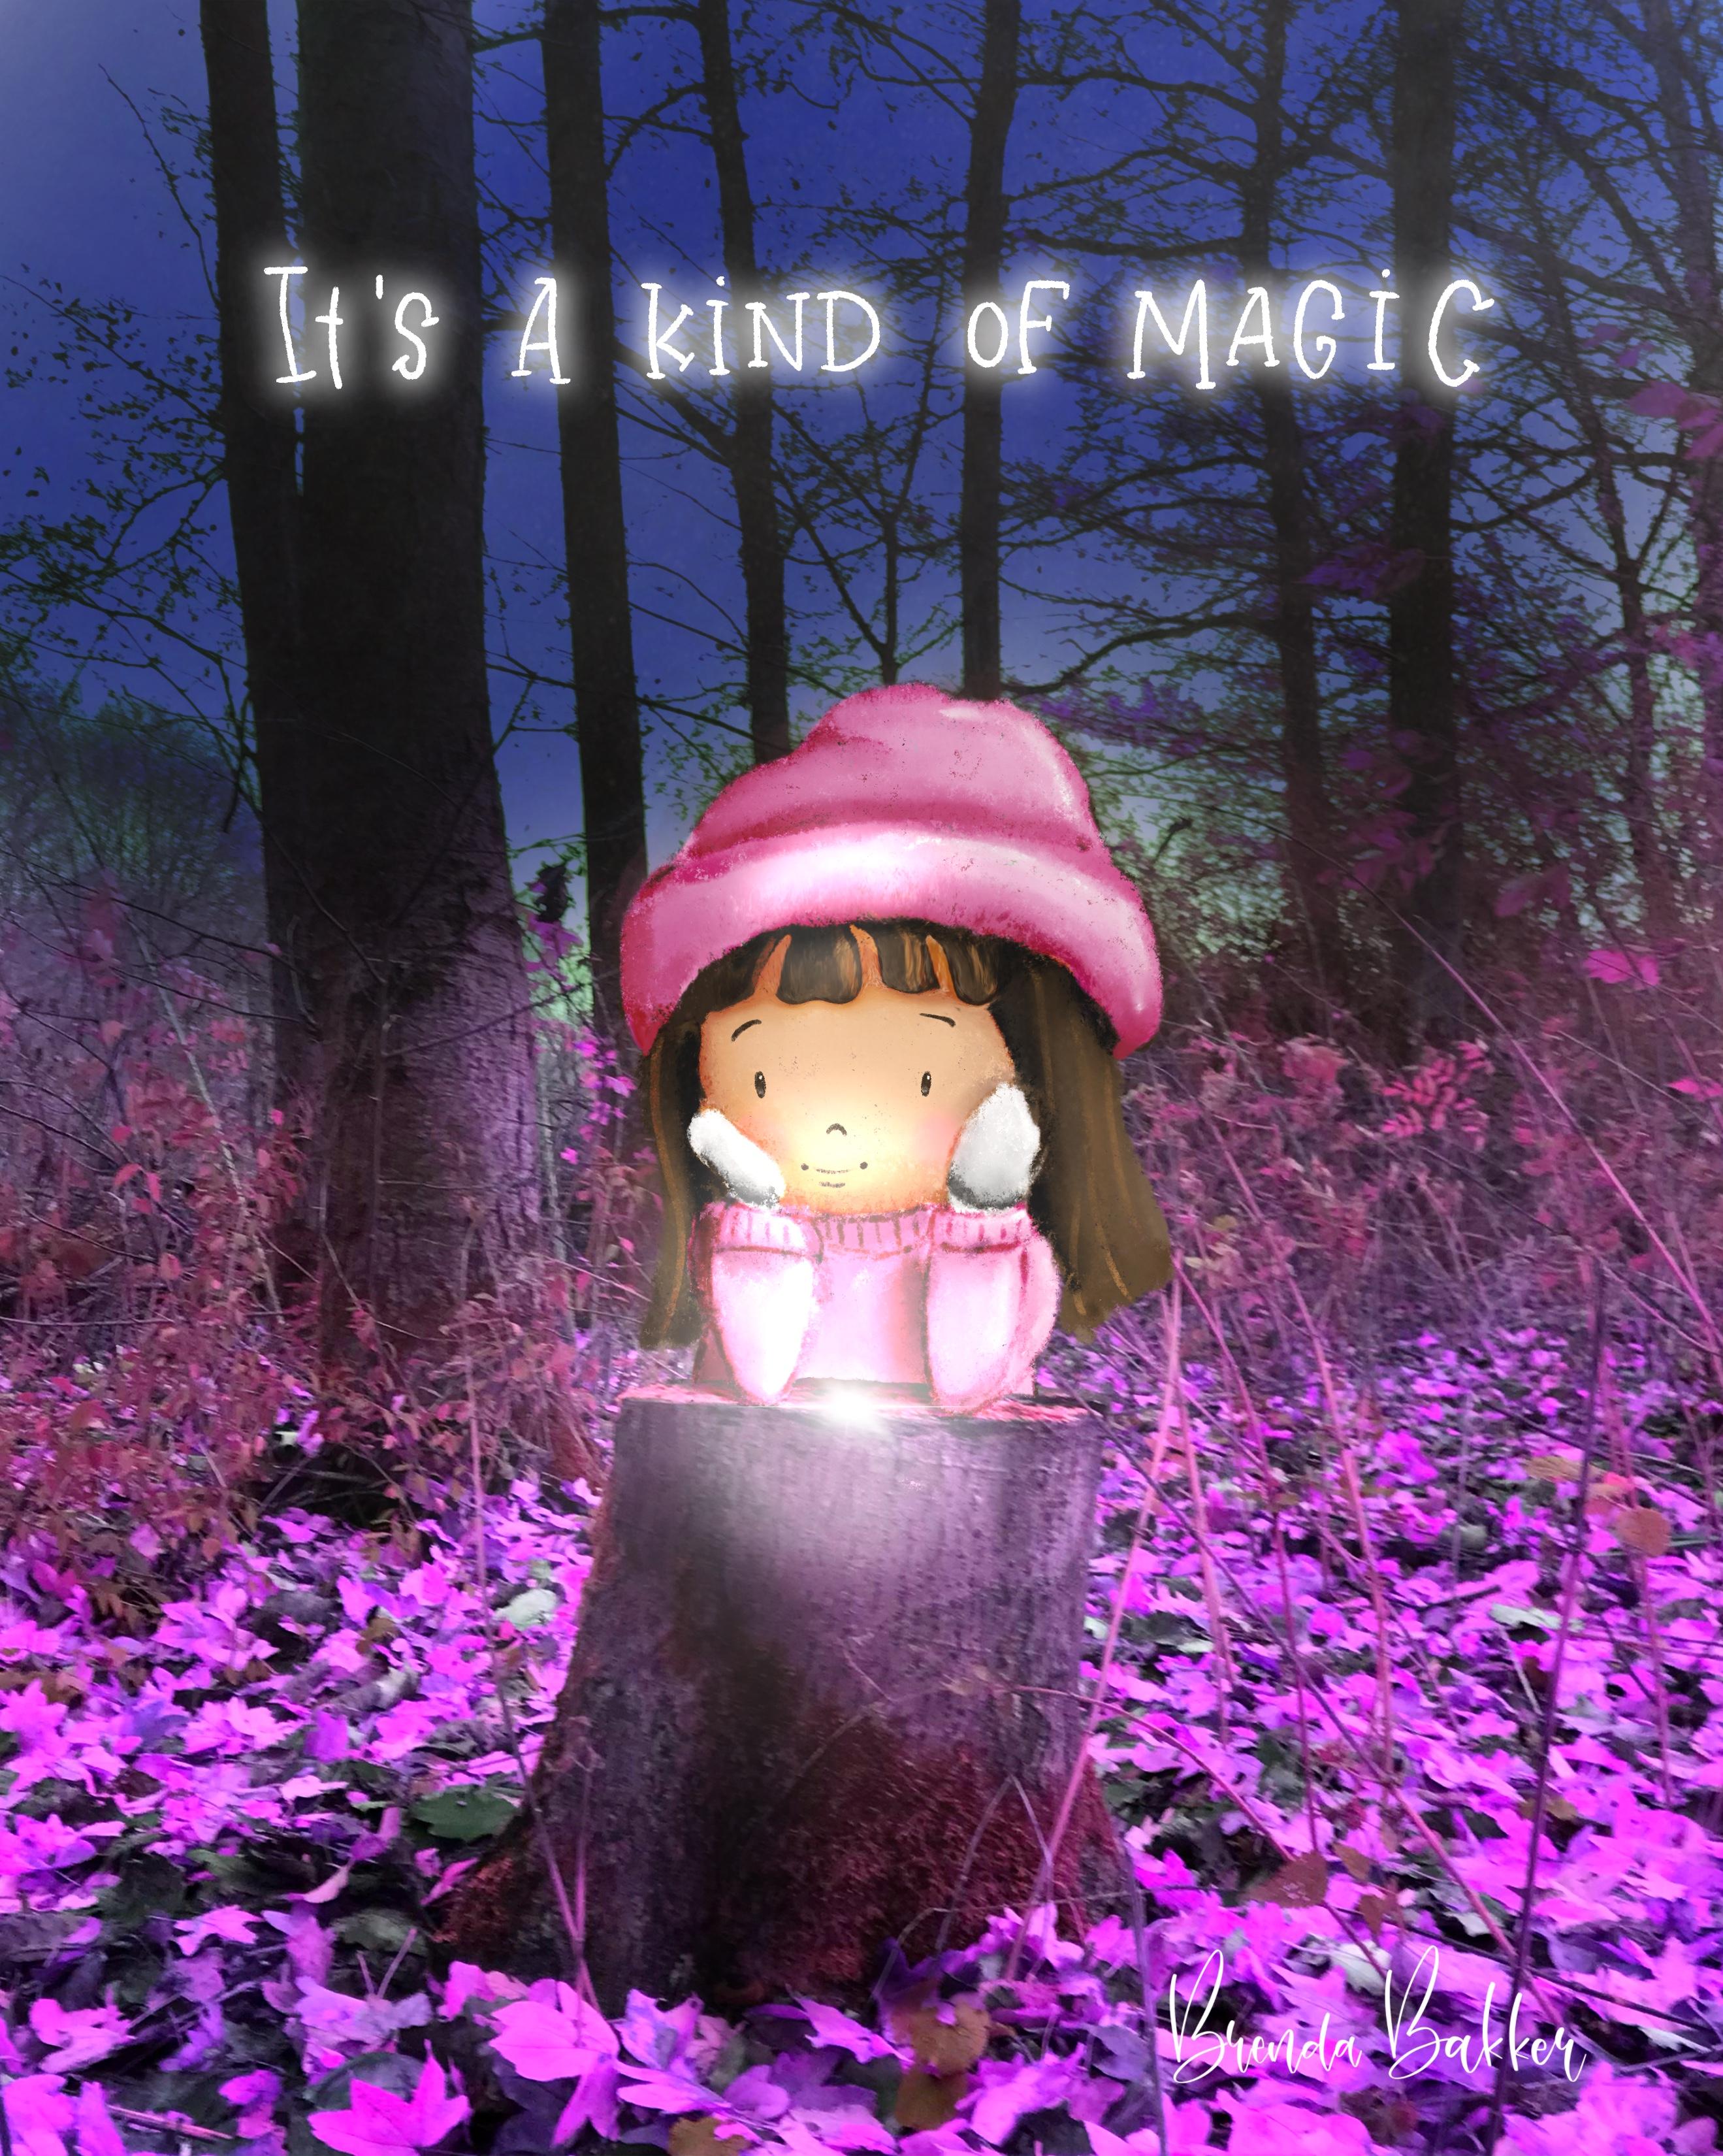
you a walk-through of how I did this drawing. Now you see the little girl is standing behind
the tree trunk. It's hard to draw because when I want to
make some changes or when I want to move
the girl a little bit to the side or make her
a little bit bigger. You have a problem because you can't see what's behind it. But I'm going to
show you how I did this one by going to the layers. Here you see this little girl, we're coming to that. First one I did was
create a little bit of line drawing on
top of the picture. And for debts, you
have to make them move the picture a little
bit less feasible. So what I did was
decrease the opacity. Now this one is still visible. So I decrease the
opacity of the drawing. And now you can see the outline. And that's what I did here. So let me go to the sketch. Just make this one feasible. How do I do that? Oh, there she is again. So this is the little
sketch I made. On top of the backgrounds. You see this is the photo. Here. You can see the
photo and I'm going to show you the sketch I made. It's not a hard sketch, not not very difficult, but for me it was an
indication of how I want my girl to be
approximately like that. So I hope you can see this. Oh, so I drew a
little outline of the tree trunk and I draw drew to go approximately
like I wanted. So I wanted to have her
elbows resting on this piece. And you can see here, I drew also everything. What's not, what's not feasible
behind the tree trunk. And I have a very
good reason for next. Well, let me show you a little bit of walk
through what I did. So we're going to give
her some trousers. Just a little bit
of color blocking. You see, I'm very messy
painter, but that's okay. The overall look is very nice. And then on top of that, I create a clipping mask. And I'm going to show you in later stadium how I
use it because we're going to do something more
later in this course. So with the clip them whilst
I added some shadows. And so I drew a normal girl. You see, I'm not completely
into the sketch anymore, but just to my liking. Here are her face, her jackets, just colored blocks on a clipping mask again. I did Her Shadows to give her some arms and I created
some mittens for her. And also she has to have hair. And the nice heads. And 0 rosy cheeks. Yes. Instantly. Lovely face. Was this the face
I used for her? I guess so maybe I
use another May 1. Do not always delete
all my layers. So here we have an overlay layer in which
I added some more shadows. So this is the complete girl. You can choose to
draw right on top of this with the picture
as a background. You can also import another drawing from
another painting. You might. The most important thing
what you have to do now is to isolate the girl, the complete girl, from the background with
no texture on top. So if you have a Canvas
used with taxes on top, you have to get rid of them. Mostly they are all the way on top and then you just
have to put them off. So now I'm going to put
off the background. I'm going to put off
the sketch layer. So now I've only got the girl, make sure your background
is off as well. Because when you
do it like it is not possible because well, I'm going to show you, so
make sure a see-through, Just like a PNG
file you will mate. So this is solely just a girl. What you're going to do now is make a three finger swipe down, three fingers swipe down, and then you hit Copy All. And you go to a new layer
all the way on top. Let me see here and then paste. And now I have to hold
girl in one layer. So not all these layers
together and just one layer. And that's the girl we're
going to work with. So if you want to work. Your picture, make sure you have the girl inner layer
on top somewhere. Like I did here. I move it on top because I
did it does drove an OpenID. And we're going to
move from there and make sure that everything
underneath is not feasible. So I did the whole girl in a group like this and then make the whole
group in feasible. So this is not showing anymore, you can make it even smaller. So this is now the whole thing. I worked about integral
and would just go into solely work
with the girl here. Either we can import
her to a new confess, which are made with the picture, or you can work from
here in your own Canvas. Let me show you how you want
to move her to your Canvas. You're already made. So for this one, it's easy. Just hate it's hit Copy. And now you complete
it and copied the whole layer of the whole
girl without any background. Go to your gallery. And remember, we started
with this picture. Well, just a simple three
fingers swipe down and paste. And voila, now your girl
instantly is in your forest. So this is a lovely already. But you see she is standing
solely on the leaves. And if you've got a brighter
color than it will be, just like you glued it on there and you
wanted to fit it in. So most importantly,
is always at a shadow. And we're going to do this. I'm going to do this. Well, let me start
just by doing it here. It's just very easy. We can do it different ways. I'm going to show
you all the ways. What we can do is create a
layer underneath the girl, but on top of the background, this part is also
now the background. So why don't we group this and call this
group background? I normally don't do that because well, I know
what I'm doing, mostly backgrounds, but for the sake of this
course, it will be lovely. Backgrounds. Here we go. I'm not doing anything
with that line now. So I'm going to create a
new layer underneath that. And mostly what I do is go to my darker color and
mostly going to overlay, but these colors are too light, so I think I'm going
to multiply layer. So I'm adding a darker color. And maybe I'm choosing a little bit from
the same color just by color picking everything and make it a little bit darker. And I think I'm going to use my airbrush
for this as well. Let me see what that does. It is darkening ants, but it's too bright. So create little
bit of even darker. And now we're already
getting there. But I think it's
still too bright. I'm going to use this
color and I'll go even darker and even smaller to hit it directly
under her feet. Maybe a little bit darker, even more more opaque. And now it's, I think it's
too dark, It's too obvious. So I'm going to
smudge that a little bit just by hitting
the same tool. And I think she already has little bit of
shadow on the nice. If she has a light coming
from the right upper corner, then you can move foreshadow
a little bit here. And you can also create a new
shadow for the tree trunk. It's all up to you. I haven't decided yet where
the moon is coming from. So this was one part. It's very crucial, always adding a shadow
when you do this. Otherwise, you have
a floating image of your listing your drawing. But how can we create the
girl behind the tree trunk? I will show you in
the next chapter.
4. The explaining of and working with Layer Mask: So if the girl is going to be standing behind the tree trunk, we have to move are,
and most importantly, we have to get rid
of this shadow. I'm not going to
delete it because maybe I want to use
it another place. So now I want to
make it invisible. And in order to get the girl at the right size behind
the tree trunk, let me play with her
a little bit more. So go to that layer and
go check the place. And now I can't see properly, but I think our ones
are approximately like so she's living with her
elbows on the tree trunk. But now I can't see
where her elbows are resting or is it floating? So let me see. Click the N and play
with the opacity a bit so we can a little
bit see-through hair. And I think it looks lovely. Now. I can I can see her albums
and I can see the tree trunk. I think she's a little too big when she wants to
be standing there. So I'm going to make
her a little bit smaller and still resting with her elbows on
the tree trunk here. Little bits like so. She's looking a
little bit downwards to this piece of
the tree trunks. A mover who little bit
more to the rights. Make sure she's
behind to treat drug. Or you can choose just to leave her jacket out and you can
play with that also as well. Let let's just just focus on
the top part of the girl. I think this is a perfect fit. Maybe a little bit smaller. Artists and creating rights. Maybe her elbow now is
a little bit too low, but I can play with
that later on. No worries. I think she
looks cute like this. Now, we can do two things. We could just simply erase everything we
don't want to see. But you've seen me changing the size and proportion already. So when I erase that, I've got a little gap and
maybe she could be floating away from the tree trunk if you only have an upper
part of her body. So in order to do that, I have to get rid of
division of the lower piece, but I still wanted to be there, like I would say, a
temporary erasure. So make things not visible, but they are still there. And that's where you're
laying mosques is coming in. You already know clipping mask. Maybe you work with that. So that part, it could be directly underneath
the layer below. That's not what
we're going to do. We're going to do a mosque. And something weird
is going to happen. If you use a mosque, instantly, you've
got a layer above. And in that layer
we're going to draw. And what do we go
into draw is black. You see, this
automatically turns to black or writes mostly black. Cause what we want to do is to make this part of
her body hiding. And I think no better place
in hiding then a dark place. That's how my mind works
to keep remembering it. So when you draw in black, it will be hidden. And when you draw a white, suddenly daylight is there. White is daylight for me. And then you can see
everything again. So let me just show you
what I'm going to do. I'm going for the sake
of this tutorial, I'm going to make her a
little bit more feasible. And if I go into
draw in this layer, and mostly I choose among or line or dry ink brush
or something like that. Let me do a mono line. Because then I have
all the pixels, I have no texture in debt. So I go to calligraphy, search for ammonia liner brush. Well, I made tons of them. Mono line. How big is it? So remember, we are on
this layer drawing. You can also select this layer, but we need to top
layer to be dark blue. And that layer is the layer
we're going to be drawing on. So I select monoline, I've cut my black. And now I can draw with black. And you see what it does. It makes her invisible. So I'm hiding are in the dark. I could go all the way here, but then you have a gap. So if I have erased it, Bart, I could never get this
Beck the same way, easy or otherwise done drawing the whole girl with a shadow
and overlay layers again, or I have to import her. So now when I'm gone
a little bit too far, well, remember what I
said, it's choosing white. You can suddenly see something. So the same brush, I'm going to draw white
on top of this again. And there she is. And so we can play
a little bit with what is feasible
and whatnot debts. One lady layer mask is for. So let's go back. And let's do this for real. Because I want her feasible. And I also want a lovely transition from the tree trunk to where
she stands behind it, but her elbows are
in front of it. So I'm going to make her a
little bit less visible again so I can exactly see where
the tree trunk is going. And with the mono
liner on black, choose black again, pure black. I'm going to trace everything. I don't want to see
and get rid of that. And just check every
once in a while. So I hope you can see it. When zoomed out, it's
better to see the lines, but it's harder for
you to see and we want a smooth
transition as possible. So two here, and then I have
to leave her elbow here. And directly where
the tree is going to make it not a straight line, just a little bit wiggly. And I think here I got four and here I got too
far, but I can read. We covered that as well. So now I'm going to make
it a little bit bigger. And I'm going to
mosque or temporary erase as I think it's a
better name to call it, and then I can remember it better and
explain it a lot better. So this will still be there, although it seems
like it's erased. And now I think the girl is standing pretty,
pretty behind her. But here I see some blue
from the leaves behind. And here I also see a
part that I don't like, but maybe it's something I
don't have to bother about. Maybe it's just
something into picture. But let me see
what it looks now. What she looks like when
I totally bombed her up. I think the girl is now
standing behind it. And now when I go into make her adjustments to the size or one to replace her,
You see what I meant? If you would have erased this, you can't get it back. But when I want her
to be as big as this, simply turn into
white up and draw. And we could get
pieces of her BEC. So that's how we have
a mask is working. So I hope that explains it well. So I'm going back to
the position I want it. And I have to do this a
little bit better than I did. So a little bit wobbly. And I think her elbow
need some shadow and I had that but I drew it
too small, I think. And otherwise I can add a little bit more
shadow on top of her. And I think I want this a
little bit more back so I can do this in some matters, but I may be choosing
liquefy, go to data, go to the magic ones, liquefy, push just a small size, and push your elbow a
little bit back again. So that's an easy
trick to do that. Easy-peasy. And you
see depart here, it's going up, it's
in the tree trunk, but I think it's bothering
me in a drawing. So I'm make sure
I have my whites and go back to my mono line
and my own layer mask, make sure it's dark room. And then I can play
a little bit myself. So you don't have to
always follow the shapes of what you already had is just a little bit
of manipulation. If you want, go to my black again to make it a bit higher. I think I like it like this. But now it's looking
very unnatural. And why is it? Because there is no shadow. There will be shadow of her. This is all the way
lightened in the picture, in the original, but now she's
standing in front of it. So it has to have a
little bit of shadow. Let's create that. And remember, we
have to create that underneath the girl,
underneath her elbows. So I'm going to
layer below that. And let me check
what I want to do. I think I'm going
well to darkish gray, choosing my airbrush again and set that layer to multiply. And let me see if
this isn't too dark, maybe it's too dark. Now it's already looking more natural. This is fun, right? Because she is
natural and it's all. Well. I could swear I seen her
in a forest somewhere. And I think this is a
little less to light now, so I'm going to erase that
with the same airbrush. My only airbrush, yes. And just the front of the tree. I want to have a little
bit lightened again. So little bits. So
it's easily feasible. And I think she could use a little bit darkness on
top on top of her shirt, like her belly and the
lower parts of the elbows. And in order to do that, we have to go on
top of the girl. So create a new layer on top. Adding to multiply. And also make it a
little bit darker, maybe like the
color we used here. Let me check. I
think it's too dark. Erase a little bits. But you can see what
this does to her. It makes it more real instantly because now she has
natural light and shadows. So now I think it's time to add some more and see
you in the next chapter.
5. Adding Moonlight, Highlights and Shadows : So now we have our
background created. We have our girl, including her shadows and
mosque TR, Bart's away. This is funny because now she can also
stand in front of it, but she has a weird shadow. Now you can actually
see what it's done. If you want her in
front of that, again, you can start letter stand like this and you have to
remove the shadow. And now she's looking at something that's
approximately here. So if you make one
drawing and masked it, you can do a lot of
more from there. But I want her behind the trunk again and have inner shadows. Now a fief looking gorgeous. Let's say we want to add
some lovely shine over moon. There is no moon, but hey, if you guys think of it, you can create it. So let's get started
with drawing the moon. And I'm going to create another
layer on top of this ONE. So everything on a new layer can be removed if
you're not liking it. So for the moon, I think we're going
to use a bit Polish, gray Now, bit Baylis
yellowish color. And I want to use my airbrush. Well, for the sake of this
tutorial, that's fine. It's easy. If you want
to moon in full site. You have to make sure
you're behind the trees, but that's hardly
possible because then you have to mask
out all the branches. So you can choose to draw
the moon far outside. So you only have the shimmer
of the moon coming through. That's feasible. You can you can chose a mile, a new layer I deleted. I saw it coming
appearing at the top. So always checking so
I can draw a moon from here and make it a
little bit of a glow. Maybe a little bit more pale by cause I think it's
just two yellowish. So I'm going to do this and maybe not too hard
so I can play with the opacity of bits
and nonce too soft. Maybe erasing it a little bit. With the same airbrush,
slightly, slightly. I think this will be nice. And now we have the
glow of the moon. Maybe you can add a little
bit of a harder moon. So it's a little bit
feasible still as a moon. And just the glow. Well, it's all in the color. You can do it to
your own liking. If you don't like it,
you can get rid of it. But for the sake
of this tutorial, let it be here. And I think it can use a little bit more pale
color again, like so. And maybe I can
blend a little bit. And we go into details here. So the glow would
be still there. And also when the
moon is shining, she has a new shadow
and lighting part. So make sure that's
all fitted perfectly. In this drawing. I made her with light
from the sides. For the sake of the tutorial, I'm going to show you
how I can reverse that. And that's by using
a clipping mask. You heard me speaking
of it before. And a clipping mask
always goes directly on top of the subject that you
want to be clipping on. In this case, it's the girl. And now you can see this
layer is actually two layers. In one, they can't be separated. So just make a new
layer on top of death one and create a clipping mask. And now it refers to
not only this one, but also this part. So if I'm going to
clip on her trousers, for instance, it
won't be feasible because that one was
blocked by the mosque. But I want some highlights
on her head on this side. And that's why you clipping
mask is very easy. I'm going to my coloring again, a little less yellow. I just wanted to have
a hinge of a shed. Highlights. Sorry, I want to have
a hint of a highlight. So with my airbrush and go into, pull it down so the Moon
is coming from here. I'm going to leave
it like there. And I'm just going
somewhere outside. And you can see my
brush car sharing when I do it very hard. You can see it hitting her. Heads. And that's where the glow
from, the moon comes from. I'm doing this very hard now, but it doesn't have
to be this hard, but I think it
would look lovely. You see what a highlight can do. And also you can do a low-light. Mostly. I forgot to mention. Mostly I do this in overlay. But for the whites, it will
be too much bright pink. So I don't think it's looking
good for the white part. So let's get back
to normal again. But the black one, I mostly do in overlay
for the shadow. So I'm going to create a new clipping mask
on top of debts. And you see also the arrow. So days refers to just
below and this below. So it's all going down
to this one girl, I'm choosing my black and indeed lay this
layer for black. I mostly choosing
overlay for my shadows. And I'm going to
create a little bit of darker shade right here. Because disbarred will be in a dark and this part
will be lighter. So I can choose to go back to the white again
or to why dish. And maybe her hair
could have some glow here and I won't
be in the camera. So I'm going to turn it again. Giving her hair a little
glow from this side. It makes sure the moon
glow is very feasible. You see it's very in there. But also to treat
drunk could have a little bit of a
highlight, sorry. But that we cannot clip on
because it's a whole picture. So there we have to be careful. Just go to the background. Create a layer above that. And also go with
your airbrush or dare you will see
it will do a lot of it's outside as well. And there you can easily erase. So it's just on the
tree trunk as well. You'll have to zoom in. I
think I already gone too far. Maybe I can move it a little
bit. I don't think so. Well, I'm not that
precise right now, but you can see how it works. So this is how we can
create extra lighting, an extra shadow also
within a picture. But then you have to erase. And for the girl, which is a different layer, you can use a clipping mask. So that's how I would do that. But I'm going to get
rid of the moon. I'm going to get rid
of her highlights. So get rid of the moon. Well, not just deleted, but make it not feasible. I don't want to see her
highlight it and her shadows, and I don't want to
see to highlight here. So we have absolutely
no lighting whatsoever except from
her original drawing. I want to make sure
she has a little bit of a firefly here where
she's looking at, let's see how I did this
in the next chapter.
6. Adding a glowing Firefly: So let's create the illusion of a firefly in front
of the little girl. So for debt, we need
something, right? So I'm going to create
a new layer on top of everything because it's
all the way in the front. It's coming towards you. So everything what's coming
towards you has to be in the front or the
most top layer. So let's get to the
original brushes and go to luminance and dare
you can find your flare. Flare is a brush which
is a tingling star. So I think that's perfectly
useful for a firefly to pure whites and just hits
a spot like this. So they're instantly
is a five-line. I think it can be a
little bit bigger. I think this is wonderful. She is approximately
look into it, maybe a little bit
more to the side. Like this. Yes. So this Firefly looks lovely, but now we have to create a low, a glow against her clothes
and the glow in her face. So let's see how are
we going to do that? And I already know
it because I've already done it and I
want to show you how. So I'm turning into a gray
car and grayish color. And then I'm going to set
that new layer I create. It's on top to add. And I'm going to
my airbrush again. And there I'm slightly, well, let me see greatness
of the thing. Instantly. We have a glow on her face and little bits
and a little bit like here, and make a smaller
one on her face. But I'm doing the
same thing because I want it to be highlighted
from the glow in her face. I loved that. Now it's looking like
a fairy tale already. And I'm going to
duplicate this layer. And I'm going to change that one with
another blend modes, Color Dodge because it will be more texture I
liked very bright. And I'm going to lower the
opacity of debt a bit. So I have a lovely, lovely glow. Maybe I can smudge
that a little bit. It's just a trial and error
and see what you like. Yes, play with it
to your liking. So I'm maybe I'm want to play
with little bit moonlight because she already has
her highlighting here. So I'm going to
create a new layer. Let me see what this does. Also in the add mode
with a gray color, Let's choose an air
brush again and go a little bit outside
of the painting. So I just have a change of color of
the moon, not too much. So on ads, I created this moonlight and maybe
blend it a little bits. Bring it more to earth. And I think I'm okay
with this undermined. It's now a little bit in front of the tree because it could come from front of the tree
also with a ray of light. So I think this is okay, but make sure
you're not going to blend away all of the trees. So I think we're finished with this one for today
and I hope you liked it and I will go and walk you through some
other things I did.
7. Getting rid of unwanted shadow using the clone tool: There are also several
problems that could occur. For instance, here you
can see my shadow. I was taking a picture
on a clear, bright day. And so you can also see shadows. And for instance,
for this picture, I wanted to keep the
name of the biker wrote in it and also take
a look at my shadow. I was standing approximately
right in front of here. And the shadows, we're going
to the right upper corner. Also, you can see this with
these leaves of the trees. So that's what you
have to keep in mind. First, we have to have to
get rid of this piece here. Now, I'm not a
photo shop expert, but Procreate has a fine tool for that and that's
called cloning. So you have to go on the layer and work
on the layer itself. Remember always to keep a copy. So if you're doing wrongly, you can go back to that. So duplicate it first, get rid of this one. And we have to work on the
exact layer. I will zoom in. And this will not get
it perfectly right, but it will get it
approximately right. So I go to the magic
ones to cloning, and it took me awhile to
discover how cloning works. Here you can see you can choose the brush you want for that. So make sure you've got a
brush that covers it all. And for me, I will
take the airbrush because that will
not be too obvious. The normal airbrush that we see here I've got
it's so soft brush. And I'm going to pick a place nearby because I wanted
to get rid of the shadow. But you can also see shadow
off the trees behind me. So when I take this here
and go over this bolts, you can see it instantly
brightens because it's copying and cloning the area over here so I don't want it. So I go to a nearby
piece and there, I just want to clone
that face approximately. And you can change
it again to pick a lighter piece or darker piece. But someone oh, no, I went into a too
much light part but it could be like a shadow, but I don't like it too much. So someone who doesn't
know the picture for real, now couldn't tell if I
were standing here or not, but I have to do it
also on the grass bars. So I go to the gross part and also going to clone that a bit. So always choose a nearby area. So we will take
approximately the same thing as the nearby area,
was already A14. So it doesn't have
to be precise. And an airbrush is the best way for me to figure this out. So now I think I'm cleared
out of this area as well. So that was the
part about cloning. Let me take you to
another chapter and deal with something else.
8. Dealing with complicated shadow using Warp Advanced Mesh: So remember I told you that we have seen the
shadow that's coming from the left down corner and
a little bit into Rights because the sun is coming from this angle a little
bit behind me. So we have to do this
with our monster. For this case, I drew a monster and we have
to do that as well. So we have to get a
shadow behind him. Let me get rid of this one so you can see the
total picture. I created, the monster, which I was inspired from
Abby nurse from every uproot. And I created this one
also a couple of years ago and now I went
back to it and recreated it and
make it funny walk. You can see here that the
shadow now it also coming from the Indus angle like
the trees and everything. So it's completely fade
it in and blended in. You also see, I've got a hard shadow under this
feat and a soft shadow underneath this one
because this is a little bit off the floor and I was
also looking like that. If I had a shared are directly under his feet and also
little bit harder, he would have been having
both pulse on the ground, but I wanted to keep it
slightly in the air. Well, how do I manage that? I'm going to show you. So this is the monster
without a shadow. I've built my monster from
a basic part like this one. So just a little egg shape. I added some layers on top of that because to give
him his fluffy look. But we only need to shadow, so that's not important. And you see, I've got his boss
also on a different layer, also with clipping mouse own
F4 light and shadow parts. But we don't meet
those clipping parts. We just need the basic shapes. So what I'm going to do is to duplicate the balls,
duplicate the body. And for these ones,
make sure to get the lowest one because the one
on top has a clipping mask. And if I take that, all
the clipping mask will be cut loose so
we don't want it. So take the one who was
at the bottom from those. And also this one. We make it into a group. And I think and a new group. I was checking, why are
my shadows this period, you can learn from
my mistakes and new group went on
top of his arms. So I can easily takes a new
group and put it below it. So now the original
part is still on top. I've got the ones just
the duplicated once here. I could blend them together. And for this one, because
it will be his shadow. I go select, choose
black, choose Fill layer. And our HIV got a
black one behind it. So now the background is all black and we can play
a little bit with it. I can show you what
is shadow does. It's like Peter Pan is
helping behind him. We have to get it at
the exact same angle. So if you want to move it is
still straight up shadow. We want to play with deaths
and for that we go to work. And because work is only
hitting on those corners spots, I want to go even further to play with the advanced meshes. Now every blue dots you
can pick and change, so you can say peekaboo, I hope you can see it. Now it's flipping from behind, but it's still got his hands and his feet at the same place. What I want now is
for this feat to stay on the floor so there
it must hold a shadow. But the risks, I can flip and it has to be
like something like this angle like
exactly from the trees we have behind and in front. So I want them approximately
at this angle. I want this one state here. So I'm going to play
a little bit with it. And for debts, I have to
do it mostly in part, but make sure we take everything with us
except for this food. So this I want to have
here and the other shadow, it can be a little bit up there. And I play with it in parts. It can be a little bit elongated
because it's very light, it's not straight up, it's coming from a little
bit of this angle. If I have a straight up angle, the shadow will be
even more here and maybe a little bit
floods, floods. And so I think my shadow now is in the
right place approximately. But it's way too hard. But you can still see this one is here underneath his foot. And I'm going to make some
adjustments to that later. We'll come to that.
And now because my shadow is extremely heart, I'm going to make it into
what's more soft blends. So I go to my Gaussian blur
by touching magic ones, go to Gaussian Blur. And then we have a
sliding bar here. And I'm going to tap
outside of the picture. And I'm going to make it
a little bit more fake, making sure I can still
see the parts here. And also where it
touches the ground, this one is off the floor now. You can see that clearly. And I think this is okay, but it's still a little bit too dark comparing to the shadows. Well, this tree is a lot further away than
the monster is, so I can keep the shadow
a little bit darker, but not as dark as it is now. So and going directly to the layer and change
the opacity a bit just according to my liking. And it must feel natural. For me, this feels natural, but you see a slider touch here. So where I think the shadow
will be darker because the leg is closer to the
ground then this surface. So I think this could
be a little bit darker. And that is what I'm
going to do it by creating a new layer
on top of deaths one. Go to my air brush again, make it very small and just play a little bit
underneath this one. So it shadow will be right
underneath its foot. Just a little bit. Maybe it's too hard now, but I can also change
the opacity of that. Well, maybe it's not perfect, but I guess you get the point. There is a shadow. It's approximately like it, how it will be in real time. So I think this is
lovely for as it is now. So I hope this is something you would like to incorporate
in your own work. And warping and cloning is
something we don't often do. But for these Bart's, It's very easy-to-use
to use them and to know how it's being used
and what to use it for. And I think the best
way to learn is to learn with some examples. I think this foot can be really a little
bit further away. So this one will be more
off of the asphalt. So I'm going to play
with this a little bit more by moving it. It's still warp because it's always remembering
the last thing you did. So what if I choose to get
this a little bit higher, but without moving
this one of course. And maybe I can even
get his fall too, lift more up, but then I have to take all these
layers with me. So that's a fun
thing to show you. Create this one as a new group. So I have it totally together. And now I'm going to
play with the group. And for that, I can also choose
to move it by warping it, but it affects mostly
the whole picture. Let me see what it does. Yes, it's going to affect
the whole picture. So I'm going to show
you something else. I'm going to the Liquify tool. And liquefy. I will push and I can
move the group around, just make it a
little bit bigger. Just going to take his
foot a little bit. And you can see, I can
totally shaped this a bit. And if I don't move it too much, I don't have to make
adjustments to the, to the backgrounds
of the shadow. So I think it's looking
lovely right now. Now you can see it's
really off the canvas because the shadow is
way off of his foot. And here his shadow is
right behind his foot. So so I hope this was helpful for you and
I hope you enjoyed it. And hopefully now you
will have more freedom to experiment with your
pictures and your drawings.
9. A quick and fun little bonus: Some fun things you see
people do on the Internet are some mesh ups where they create a normal picture and then
suddenly the eraser part, and then you can see
what they do with it. I think it's fun, but you have to like it and always let people know you
actually made this yourself. So it's not only issues and
you have another picture, so make sure you created
this one yourself. So let's go back to
the original picture. I always leaving that behind, so I create a new one and move it all the
way on top of everything. So this is my day in the
park at broad daylight. And then the fun part
is I can erase that. And mostly people are
going to film this. And they just do this like a giant Schorsch on
the correct layer and just having fun. And instantly, this is
how easy they do this. So go back on this
original layer. Just make sure you get your airbrush at
this size you like, or any other arranging
tool you want. And just erase away
the top layer. And this is easy
how they can create some funny pictures and little movies or gifts
for the Internet. So I hope you liked it. I've got a couple
of other pictures I want to quickly walk
through with you. So stay tuned.
10. A walk through with Prince Charming: So this is just a quick video on how I enjoy my walks in
the park with my doc. She's not in the
pictures though. So this is a very weird spots, is nothing fancy, but you can
turn into something fancy. Like, for instance, what if I would walk here early
in the evening? And I see my prince charming suddenly standing
on top of this one. Well, let me see what
I can do with that. You just have to imagine. And it's there. My prince charming standing
on top of these two poles. Well, what did I do? Let me check. We started out with this picture
we shown on the picture. And let me just get
to this picture. This picture, I want
a purplish glow. Purplish, pinkish. 40 evening. Well, not too much, but you see it's done its job. I don't want it to be too dark. I think this could be a little
bit more pink by the way, I did this with the airbrush
on the multiplied set. And I wanted more pink, but I wanted to see the
picture through it. So I did an overlay layer with airbrush as well, with pink. And I think, yes, I reduce the opacity. So there you can
play a little bit with how much you want
the glow to be in there. And after that, I was drawing
my sketch of the frog. You see its attitude and how we standing there with a
sense in his sights, like, Hey, I'm here. And on that part I went drawing just a color
block from everything. And I drew this with a
brush by Jennifer Nichols, lovely brushes, but they are
a little bit see-through. So I did the part of the arm and I did the part of
the body and the legs. And I do that on different
layers and the hat. And then I was seeing through, so I doubled it and make this to one whole
piece behind it. So now it's completely blocked. And then I have to
add my shadows. So I went to art part and creates my shadows
and highlights for debts. I created even
more darker shadow and a play on new layer
with some rim lights. And that I did for
all those layers, like gave him some color, choosing highlights
at the front end, some shadows on the back. And say, well, let's add
some other highlights. Just a quick see-through own
how I built everything here. And then I went onto his face and I wanted
to add, you see, I go outside my
sketches a little bit so I added some
highlights and some shadows and creating
even more rim lights. And I all do these
indifferent stage stages. So maybe I do the rim lights after I after I did
everything else. And of course, I want
to Tim to have a mouth. I created this
month first I see. And later decided to give
him this mouth and some ice. And I was messing around
with the eyes a little bit, so I have to check for my
eyes in order to be okay. Like I drew them up. This is shared a bar
does is a weird part, shared apart on
top of his heads, but you can see it needs a shadow because
he's wearing his crown. So I edit with a clipping mask also
highlights and low light and shadows and even
a little flare on it. And what did I do with that? I added some highlights
and an extra flair. And sometimes I miss
things up again, o and little bit of shadows
you see like there. And what did I do here? Oh, yes. I think it was at this point. I thought, let's get rid
of the sketch layer. It was a little bit too green, so I added a little bit
off or purple flare, also, pinkish purple flower with the Multiply
layer on this B. So it's in, so he also
has an evening glow. And now it's just, you know, when I mentioned
it's a stick on. It's glued on. And sure. This is not a realistic picture and I don't want
that because I want to do fun of a drawing in
a realistic photo setting. So, but now it
needs some shadow, and that's so important. So I'm going to add
the shadow right here. Poll, and now suddenly it's more incorporated into picture. So here you can see the importance of shadows,
like without shadow. And you can see
there's a highlight on top of it because
it was daylight. And with the shadow, it's more, more natural. As far as you can speak
from natural for Prufrock, prince charming in a park. So from a daylight
picture like this, it's not there anymore. Well, from this
daylight picture, we went to this is
wrong mouth also. So this was fun. I think. Let me see if I
have another one.
11. Adding Glow with Bloom and two more different settings : So this one was from our boring shopping
center during Christmas, but it was a gray day. It wasn't fun at all. And I wanted to
show you something. I did hear a couple of things. So this was the
original picture. It is not in its
original place because I edited because I did
something I want to show you, but I needed only
original photo, so it's not in the right place. Bear with me for debts. We go from this one to this one. And I'm going to quickly show
you some things I did here. So for instance, I may a
glow of this cross and I've added some darkness
to the light and some warm glow to the
buildings and the floor. So that's what I'm going
to explain to you. So what I did here is making sure the sky is a
little bit of dark blue. And what's, Yes, I
did it in normal. The easiest part to do
this is by selecting, but I don't want to
select everything and draw all the way
outside everything. So I went to selection
to choose automatic, touch the whites and swiped it. And because it is already
known what I did before, but otherwise you have to select and check how much you
want to have selected. So I have to find
that spot again. Here you can see it's not all the way correctly
selected everything. Now it's there. So this is the part
I want to draw on. But I take this selection
with me to a new layer. I selected it. This is blocked out and I can only
draw on that one, but make sure you create a new
layer on top of deaths and then go to my bluish
purplish color. Go to my soft brush again
and swipe the whole gout. All error. Well that's easy, right? Maybe not to purplish, maybe a little bit more blue, maybe play a little
bit with color, make it more magic. So that's the easy part. We blocked away all the day sky and we created a night scene, but this is now
still gray and dull. So let's play with that again. Go back to the photo. But in order to select
everything here, you know, the white sky was easy to
selects because it's one color, so it blocks away one color. This is so many colors when
I do a selection like this, choose automatic and they
go inside the building, well, it's remembering his
threshold from just now, but then you have a chance. It only would select
everything in that color, so only the ropes
of the building. But when I do now it's remembered
that that's not funny. What I normally do is just go and select this
part again of the sky. So ultimately select, select
the same thing again, and then choose Invert. And now it's selected
everything else, but this blue part. And I also go to a new
layer on top of that again. And then choose think Overlay. Let me see what I did. I yes, I did an
overlay in orange. Overlay. Little bit orangey look. Make it soft color. Accused opus T2 your liking. And instantly you have
warmer glow to your picture. And you can play along
with that as well. Once we make it less,
are less orangey. So and now we instantly already have a
very nice warm picture. And what I did here, I wanted to make these
more glossy fights and more sparkling. And for debt 1, I'm going to
the original picture again, and that's why I couldn't
show you and have to move into new picture. And a little bit of a
hard piece because I want to select the cross and
I want to select the bot, but I'm going to do it
as frequently and adjust tipping within the cross. Approximately two where
the cross will be. Make sure you're in the
cross and not outside because it would get aware
weird selection from deaths. And it can only hold
as much pieces. Let me see. Yes, now I've selected the whole cross and then
going to do something new. I'm going to my magic
ones, touch bloom. And then I can also
play with the slider. And an instantly,
you see it coming. It will be glowing. This will be fun. And it is approximately the
most I could get for now. So let me see, and let me check in the picture. It's already a lot brighter. But now I also want
to have the bot. So I'm going to do this again. And I'm going to select my
bot Now from here to here, to here, here, here. And let me see what it does. On blue. It's adding a little bit of glow
to that as well. And go into do
this on all parts. So select I can draw and select
all these parts as well. Long as you stay within and
not outside of the bow. We can also make these bloom. Make it shine. And let me see how
it looks like. So, yes, and I want to make
the cross even more gloomier, so I'm going to do the
cross one more time. Let me see. Just checking. I'm
going outside. That's not very good. I have to stay within the bow of the cross and bloom it a little bit more? Yes and no, I haven't a fairly lighting and
blooming background here. So that was a part of
manipulating the picture. And so if we get rid of
that original picture, I'm adding a flare here. It was different flare
from another brush sets. It's called the space brushes. I found on the
Internet somewhere. I can't remember where
it was in my early days when it started procreates
a couple of years ago. And I edit some star, some stars, a fleet with
nebula cloud behind it. And also I've created a little bit of airbrush and
Bloom does as well. And this is also an early
drawing I imported, just as I've shown you
with the girl before. And you see it's now
standing on the building. And I forgot to put
his shadow below. So it's really standing there. I think it's very important to have a
little bit of a shadow. So that was how I did this one. And I also, because, you know, it was Christmas time, I created this one also
with the blooming, a little bit of moonlight. I can show you the
original picture because these were
a little bit today. These didn't grab with you
saturation and brightness, but that was a lot
of fun for me. And let me show it on top. You see, the worse,
these were gray so I couldn't play with you
saturation and brightness. So that was a lot of fun. But I think in the new picture, it will be just as realistic
in-between a fairy tale. So that was the fun part for me, call me weird, but I like that. So lets hop over
what I did there. So it creates darker
sky, created a moon. I created some highlights and
little bit of rim lights I created with Bloom
also a glowing knows. I masked away a bit
out of his paws. You can see it. Here is the one I wasn't
using this to one I used. So originally this
has to be here. So let me show you. I created this 1 first
it was bigger and then I try it's too small it down. And first time I
created justice head, but I think that was weird. It was just a stick on as well. And you can see also
the shadow here. And that's what I thought
was necessary, but still, I thought it was too much
like glued on peace. So that's why I decided to move it and create this
one behind it. So That's how it worked. So I hope you liked this tutorial and I
hope you have fun. I hope you create your own. Please make your own pictures. There's nothing
fancy about that. Just shake your camera from your phone and create
some lovely pictures. You can use Internet
photos as well, but make sure they
are copyright free. But I challenge you to go
and create your own photos. As you can see in my
photos, is nothing hard. Just have to imagine
what it would be a fairy tale atmosphere
for a picture I like. And you can go from there.
12. Thank you for watching: Thank you for watching this
class all the way to the end. I hope I've given you enough
ideas to get started. I hope you all thumb in
creating lovely scenes for yourself or stories to
tell to your children, grandchildren,
nieces and nephews. It doesn't have to
be complicated. And you can even tell stories by just
drawing a statement. So choose your own style, choose your own photos, and let some things
magically happen. I hope you've learned
something extra S and I hope to have
tickled TO spark in creating some nice scenes and think of old imagine
you can create now. So please make sure you
post your projects in the projects and resources
section of this class to show me and also others
on what you've created. I would love to see them and
please do leave a review behind so people can see
if you enjoyed the class. Thanks for watching again and
see you in the next class. Bye.
 Brenda Bakker, Sharing my skills is sharing my joy