Transcripts
1. Introduction: If the thought of learning
DaVinci Resolve scares you because the screen has a
bazillion things going on, then you are not alone. I have been there, and I'll show you how to get up
and running fast. Hey, folks, I'm Lucy, and I've been using
DaVinci Resolve to edit videos for my YouTube
craft channel for years. Their free software is powerful enough to make
a Hollywood movie, but it's also perfect for
making YouTube videos or Tik Tok shorts if you know what features to use and which
ones you can ignore. People keep telling me they
love how I edit my videos, so I'm going to share
my basics with you. I'll show you how to
import your audio, your video, and graphics. You'll learn how to
change speeds and add music and text to create
a video like this one. We'll even do some
work with lip sync and video transitions,
just like that. It may sound complicated, but when I show you step
by step how to do it, you'll see how easy it can be, and you'll be cutting
and splicing in no time. I'll even give you some files to play around with to
help you get started. Let's create our
first video project.
2. Class Project: Your project for
this class is to create a short video
with DaVinci Resolve. That's right. I want
you to actually do a little editing on your
own and share it with us. It can be less than
a minute or two. Keep it short and play
around using some or even all of the skills you're about to
learn in this class. Then put a link to your video in the
class project section. I'll even give you a few
video and audio clips down in the class resources
section that you can download and edit yourself. Just film yourself
saying the intro piece and splice it together with the other clips I'm providing. Do something silly. It helps take the fear out of
this whole process. If you're not ready to share your video with the whole world, you can put it on
YouTube as unlisted. That lets you share the link to your project for this class, but it won't show up when people are searching or
browsing YouTube. I'm trying to remove all
the barriers for you. Don't be afraid of sharing your first video
editing experiments. The more videos you
make and share, the better you get at it, and the more comfortable you become with the whole process. We all have to start somewhere, and the safe environment of this class is a good
place to start. By the way, I'm using
the free version of DaVinci Resolve Version
19 for this class. I'll keep an eye on
future software versions just in case something changes and a lesson needs updating. Your screen should
look just like mine, or I'll point out if it's
going to look different.
3. Video Settings: I'm not going to show you how
to install DaVinci Resolve, because it's just like any
other software install, you just let the script
do all the work for you. Let's start by opening up a new installation
of DaVinci Resolve, and we'll go from
there to create a project and figure out some
settings for your video. When you open DaVinci Resolve, you're on the project
or home screen. You can either edit a
video project you've already started or
start a new one. Let's click down here in
the lower right corner for new project and give it a name. You need to know a
few things about your video before you get started and get those
in the settings. I'm going to go up here to file and go down to project settings. You could also do Shift nine. You'll need to know
what frame rate, and size are you wanting. I know that's confusing if you don't already know
about this stuff, but this is something
you'll need to figure out in order to
edit your videos. I'll give you a little cheat. If you're creating for YouTube, select the 1920 by 1080 size. You could also do four K if you already know
what you're doing, but I don't recommend starting
there unless you have a powerful computer
with an expensive GPU. If you have no idea
what I'm talking about, then just choose
the 1920 by 1080. But if you're creating a
vertical video for social media, you would want to check this box here for a vertical resolution, and it'll switch the dimensions
for you automatically. We're going to do YouTube,
so we don't want that yet. For the frame rate,
this is where you might get tripped up if you're
using multiple cameras. If you're not sure what
your camera settings were, go ahead and select 30 frames,
and we'll start with that. Actually, I'm going to stay
at 24 and show you what happens when I have
a 30 FPS video, and you'll get that in a minute. Because when you get to the next step and
you've guessed wrong, Da Vinci will tell you, and it'll ask if you want
to change the frame rate, and you can just say yes
and not worry about it. But write it down so that
you know what you're doing, and go ahead and in the future, set all of your cameras to
use the same frame rate. You can use clips that are
different frame rates, but DaVinci will need to adjust them and you
may lose some quality. So it's just good
practice to have all your cameras recording
the same frame rate and size. We're going to go with 1920
by 1080 for this class, which is also called
1080 P. We'll use 30 frames per
second, also called FPS. But for now, I'm
going to set it to 24 and show you something
in just a second. You can play with
higher quality settings in your future video projects. No problem. For everything
else on the settings page, you can just leave it alone
and accept the defaults. Then we'll click Save
down at the bottom. You've now seen how to
start a new project and select a couple of the
important settings in DaVinci Resolve. Don't let all the settings
and menu items freak you out. You are not gonna
need most of that. If you're not sure
what something is, just leave it alone. Let's learn to walk
before we run, right? Let's keep going. There's a
lot more fun stuff to see.
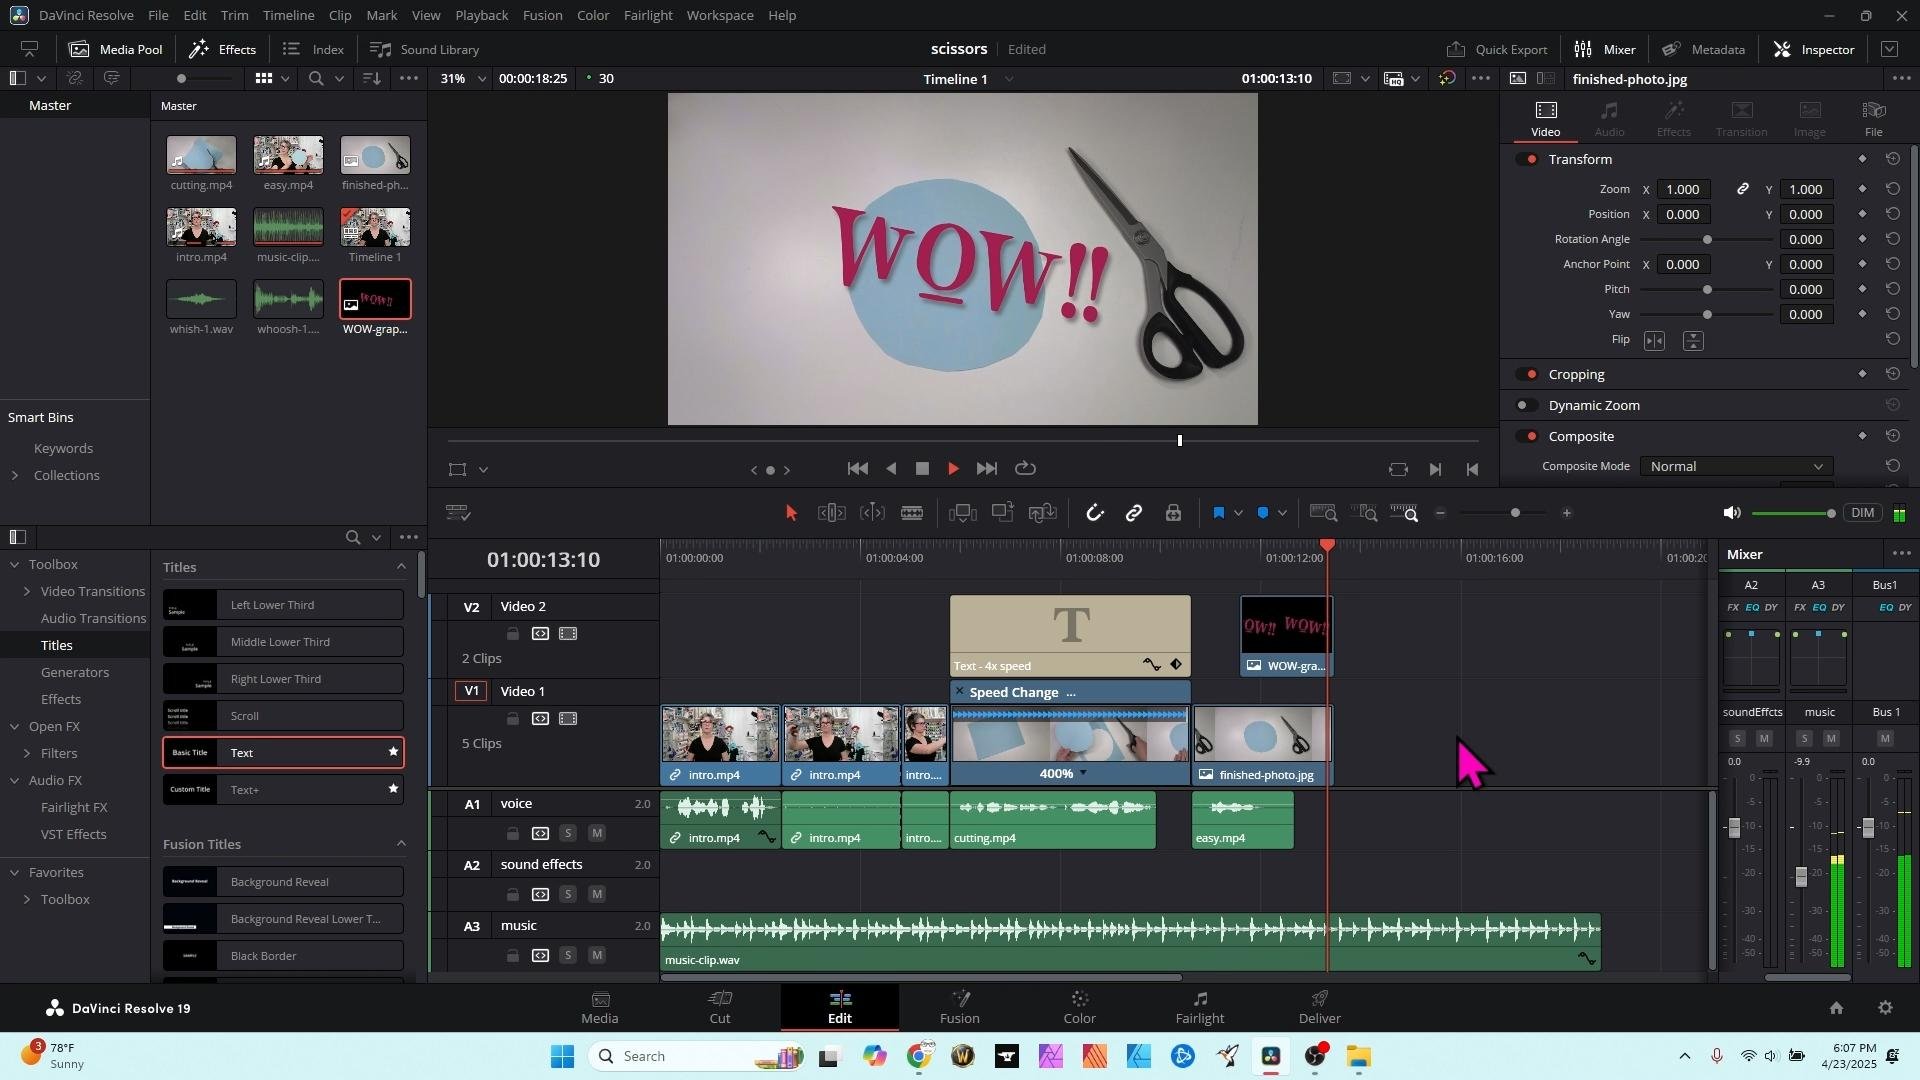
4. Pages & Imports: When you first open a
project in Resolve, you see a ton of stuff, and it feels overwhelming. I'm here to narrow down your focus so you only look
at the stuff you need, and you can safely ignore all the thousands of features
you don't need yet, right? Let's start at the very
bottom of the screen. These are little icons
across the bottom, and each of these is
like its own software, and these icons take you to different pages within
DaVinci Resolve. We're only going to use
two of these today, but I'm going to explain
the others very quickly. You have a media page for managing the clips you
bring into your project. The CUT page is
for speed editing. We're not going to use either
of those today because we can do everything
here from the Edit page. I'll come back to that
in just a few seconds. DaVinci also has very powerful motion graphics
on the fusion tab. You can do color grading. It has a full audio mixer for Fairlight.
That's your audio. And then the deliver page
is this little rocket, and we'll use that at the
very end to export our video. The home page over here is that page we just came from that had all
our projects on it, and the settings is
also the page we just filled out with our
frame rate and dimensions. So that's a very brief overview. Now let's click on the Edit page and we can start working. Is a very basic Edit page, and I want to turn
on a few more things that we're going
to use later on. Up on the top left, let's click on Effects. We're going to want
that in a little bit. And on the top right,
let's click on the inspector and the mixer. You'll learn more about
those later as well. I'm not going to explain all
of these areas to you yet. As we work through our project, I'll teach you about
them as we go. I think that will
help everything make more sense to you when
you see these in action. You can import all
your video, audio, and even your graphics
right here in the Edit page in the
upper left corner. Just right click on your mouse. And select Import Media. You could also do a control eye. And these are the
files that we're going to use for our project. I've got several video files, some audio files, and
a couple of graphics. I'm going to select my
intro first, say open. And that's the warning message
that I mentioned earlier. DaVinci is telling
me I have a mismatch because my actual
video is 30 FPS, but I had set it up as 24
when we did our setting. So it's asking me, Hey, do you want to change everything to 30? And I actually do, so
I'm going to say change. And then it puts it up here. I'm going to do that again. Import Media, you can select
multiple things at a time. So let's just select
everything and bring it in. And now I've got
all of my files in. To use those clips, you just drag them
down to your timeline. I'm not going to pull
everything down yet. I'm just going to select intro and pull that down
to my timeline. Just this clip with
the introduction. And now we're making a movie. Nice. Now you've seen how to
start a new video project, choose the settings for the
project and import files from your computer so you can edit them into a
whole new video.
5. Learning to Cut: One of the things that
makes DaVinci Resolve so powerful is all the
keyboard shortcuts it has. And you can even
map those shortcuts to devices and make
it even faster. But you don't need to worry
about all that just yet. There are a few keys on your keyboard you should
get familiar with. The letter A turns your
cursor into a selection tool. That's just the pointer
that you see here. Yours won't be this big
hot pink arrow like mine. I changed mine in the
operating system, so it's easier for you
to track what I'm doing. The letter B on your keyboard. Turns your cursor into this
little razor blade tool. That's for splicing and
dicing your footage. Get used to these two for now. Just remember, A is for
arrow and B is for blade. You'll also want to be aware of the backspace and delete
keys on your keyboard, and I'll show you
those in a minute. This big red bar is your
play bar or playhead, and you can drag it around
anywhere in your timeline. And anytime you want
the timeline to play, you can hit Spacebar or click the button up
here under your preview. That'll play and stop. Space Bar toggles the play and pause and become
friends with it. It will save you lots of time. You can also resize your preview window just by hovering over the borders
between these sections. Now let's learn how to
actually edit so we can keep the stuff we want and get rid
of the stuff we don't want. I've pressed B for Blade, and my cursor is that scary
little Razor blade again. There's some stuff in
this clip I don't want. See how the preview
window shows as I scan my blade over the timeline, and it shows what part of the
video that I'm looking at. I could also drag the
playhead to search or just play and pause until
you find the right spot. It all works the same way. The part I want to delete
starts right here. And when I click my
left mouse button, it slices the clip
into two pieces. Let's do the same
thing to find the end. It's right here before
I start talking. I cut again by clicking my left mouse button and see how that one clip
is now three clips. Now I hit A on my
keyboard again. Remember, A is for arrow, and I can just select the
garbage clip that's in the middle and hit Backspace
or Delete on your keyboard. The backspace will delete
the clip from your timeline, but it won't move anything. And by the way, if you mess up or want to play around
with these tools, Control Z will undo your last action just like any other program. So hack away. I just undid it and
put it back in there. The delete key when I
highlight that clip again, the delete key will remove the clip and delete
the empty space. Watch what happens. How it
pulled those two together. Pretty cool, huh? I'm going to control Z to undo that
again for another example. Again, select that clip. And if you hit the backspace, now you have that empty space and you're not
sure what to do, select that empty space
and hit delete again. And it pulls those
two clips together. No empty spaces. And
now you're editing. You've learned how to cut
clips into sections and remove the unwanted bits and also how to move things
around on your timeline. Remember the keyboard shortcuts, A for arrow and B for blade. You'll be using those a lot.
6. Speed Changes: When I'm making craft videos, I often want to speed through the boring bits so people can
still see what I'm doing, but not at a snail's pace. There are a few ways
to do this in DaVinci, and I'll show you my favorite. Let's come up here
to our media library again and find the clip where
I'm cutting with scissors. I'm gonna drag that down to my timeline here and
just join it together. I want to speed this up. There are different
ways to do that, but my favorite is to
select the video clip, click on it with your mouse. Right click for the
menu to come up, and I'm going to select
retime controls. You could also do Control
R on your keyboard. Pressing Control R on my keyboard would have
been even faster. When you find yourself using
certain menu items a lot, try to use the keyboard
shortcut instead. It will save you a
ton of time later on. Now my video clip has this little arrow
down at the bottom. And when I left click
my mouse on there, it pulls down a menu
with some speed options. I say, change speed, and it gives me these
different options. Let's go super fast and
select four x speed or 400%. And when we play that
back, I like that speed, but did you notice my
voice was sped up, too? That's easy to fix. I'm going to press Control Z on my keyboard to undo
our speed change. See how it got longer again. My clip is still selected, and I'm going to
right click my mouse, and down at the
bottom of the menu, I'm going to select link clips. Actually, what we're
doing is unlinking them. Now my audio and
video are treated as two separate parts
instead of one. You can always highlight
multiple clips and link them so that
they move together. But let's undo that because
we actually want to make sure that the audio and
video are separate here. Now I can go back to
my retime controls on the video portion and
change that speed to 400. And you see how the
video got very short, but the audio was still longer. If I press B on my keyboard to switch to the cutting tool, now I can cut my
audio where I stop talking and then switch
back to A for select, and I can delete the rest of that audio because it was
just the sound of scissors. Now I can click up here
and make the playhead move to the beginning of
that clip and play it again. You just open and close the scissors while
you're moving forward. If you want, you can even
go ahead and I'm going to press B again to get
my razor blade tool and cut off the beginning of this audio because I can see there was no talking
here at the beginning, so I'm going to press A again and just backspace
to remove that. You can just move this
around wherever you want. When you hover over the
beginning or end of a clip, you get this little handle, and you can make that longer if you wanted to, but I
don't really need it. I can just put it back
here where I stop talking. Now, let's see if we like
that by playing it back. We just open and close the scissors while
you're moving forward. Great. And that's
how you can speed up or slow down a video clip. You can even separate
the audio and video if you need to
do them separately. Some people will even
change the speed of all they're talking to pick up
the pace of their video. Use this speed change
in a way that suits.
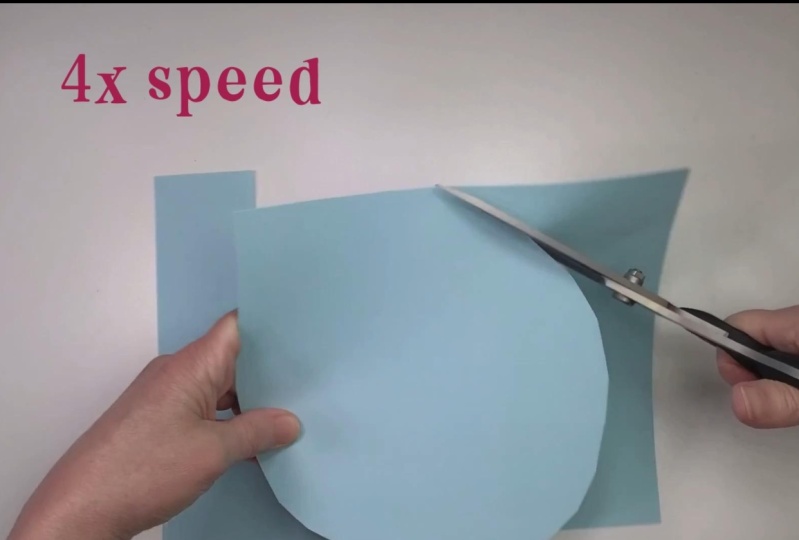
7. Text Titles: On that clip where
I sped things up, I'm going to add
some text to let people know I don't really
use scissors that fast. You can use titles to
help explain things or to emphasize certain words or even to add humor
to your editing. Da Vinci has a lot of different title effects available
on the lower left menu. When you have the effects
turned on up here at the left, you'll see them
down at the bottom. And over here, I'm
going to click on Titles in the far left, and this gives me a lot of
different options here. I'm going to keep it simple
and use just the basic text, which has a lot of options, so it's really not that basic. I just grab that text
and drag it onto my timeline and let it place
itself on top of my video. You'll notice
everything has been snapping to my
timeline, which I like. You can turn that on and off by this little magnet
horseshoe magnet right here. I like it on. Now I can hover over my
title at the end and get that little handle to make it shorter and make it the
same length as my video. You may need to zoom in to
make that handle appear. Control Plus and Control minus are your Zooming
keyboard shortcuts. Control minus to zoom out. You can use Control
Plus to zoom in. Times that makes it easier
to select certain things. When I select that title, let's look at the upper right of our screen where we
turned on the inspector, and that's where we
can fill in our title. Make sure video is
selected up here in the top and
click on the title, and we can just go ahead
and write our text in here. I'm just going to put four x speed because we did
400% speed change. Now I can choose my font, and all the fonts on my computer are in here in this list. If I type the letter of
one of them that I want, that can help me find it faster. You have a lot of other
options like color, size. Even down here, you
can add borders and drop shadows and backgrounds
and things like that. Feel free to play
around with those. You can either hit the reset. It's that circular arrow
on each of the features, or you can turn them
off if you want to. I'm going to go ahead and
change my color here, and you got a lot of
different color options, too. I don't like that text here
in the middle of my screen. So I'll click up here
in the inspector again and choose
the settings tab. Now I can zoom by
hovering over that box, I can use my let's see. I click my left mouse button, and as I move my mouse
around, it zooms in and out. So let's make that bigger. And now the position X and Y will help me move this
to where I want it. And let's put it up in
the top corner like that. And I'm not really
loving the color of this hot pink, so I'm
going to change that, go back to the title tab again, choose color, and I'll
select let's see, custom color that I have. Alright, I like that better. Over on the settings, I
should also point out that when you have these
boxes with numbers in them, you can either type in a number. You can drag the number around to change it
with your mouse. There are a lot of different
ways you can do that. And, of course, you can always
reset it if you want to. It's pretty cool. Now we've got our text on top
of our video clip, and you know how
to create titles. Let's keep going. I think you're gonna get the
hang of things now.
8. Lip Sync: Let's use what we just learned about linking and unlinking clips to fix a problem I
have with my intro clip. Lip sync can be a problem, especially if you're using a wireless microphone that is
separate from your camera. See how my words are not
in sync with my lips? Let me show you my old
fashioned trick to fix that. Before I record myself talking, I clap my hands. And like we did earlier, I'm going to select this clip and unlink the audio and video, right click and Link clips. Now it's not linked anymore. And now I can move
these separately. Here's another trick. I want everything off to
this side to be kind of out of the
way to give me a little space because I
need to move things around. So I'm going to put my playhead. You can drag it or you can just click up here on
this metered bar. I'm going to put my
timeline right there. Let me zoom out by
hitting Control minus so you can see all
of these clips together. And I've got my playhead right here at the
end of this clip, so it's going to select everything over here
to the right of it. I hit Alt Y on my keyboard. You see how everything off
to the right is now shifted, and I can just move it all. Give me a little bit of
breathing room there. That's a really great trick because there are going
to be a lot of times when you want to do something
earlier in the video and you need to kind of give yourself some breathing room, just use the Alt Y, and it selects everything to the
right of the playhead. Now I've got some room here. I'll put my playhead here where I see these
little claps in my audio and let's zoom in so we can get a
really good look at this. We want to see
about all three of them altogether. That's great. Now I'm going to move my playhead around because
I want to find where my hands first meet for that
first clap right there. So my hands are together, but this little
clap here down on the audio wave form,
it's way behind. So I'm going to
select my audio clip. And on my keyboard, I'm going to use the
period and the Kama keys, which have little arrows
or arrow brackets on them, and I'm going to nudge that clip forward by
one frame at a time. Until I can get it to
line up as best as I can. And this is not
gonna be perfect. You may be a frame
off with this. See how it's kind of
right in between. That's okay. I think
right there looks good. Let's play this
back and see what happens. That's much better. Let's zoom out again so we
can see what we're doing. And I'm going to select
both of these clips again, right click and say
ink clips again. Now when I move them around, they're going to move together. It's always a good idea to
relink your audio and video to prevent them from slipping around during your future edits. And since now I don't need all
this silly clapping stuff, I'm going to find the point
where I just start talking. Right before I open my mouth. There we go. Right
there's a good spot. I'm going to hit B to
get the razor tool cut, and I can delete
everything forward. And what are we going to
do with this part here? I'm just going to click in here. Just click here, hit Delete. And you see how a little bit of audio on the end just got, kind of stomped on top of, but that's okay because
I wasn't talking there. And now you know an
easy way to sync your audio with your
video just by clapping. There are other ways to sync
your voice to your video, but this method works every time with any audio and video source. Even if you don't have
issues with lip sync, you can still use this technique for other types of edits, too. Just move your audio
and video separately.
9. Music & Volume: You can do a lot more than just chop up video
clips with Davinci. Let's add some music and learn
to set the volume levels. You'll see down here
on our timeline. We have video up here
and audio down below. And for both of those,
you have multiple tracks. DaVinci will play everything in all the rows simultaneously. So if you stack lots of
videos on top of each other, you'll see only the
one on the very top. And if you stack
several audio clips, you'll hear all of
them at the same time. This is good because we can add music in the background.
And don't worry. Your timelines probably won't be this complicated for a while. It's baby steps, remember. We're back on our
little class project, and I'm going to come up here to my media library and
find my music clip. It's called Music clip, and I'm just going
to drag that down. And let's put it in
Track Audio two. Actually, I'm going
to do something here. I'm going to select Audio two. I'm just going to select down
here in this area and say, add a track, and I
want to stereo track. And this one I'm going to
click on and call music. That just helps me keep
things straight and then drag my music
down to music. Same thing for Audio two, let's call that sound effects. And for Audio one, that's
going to be my voice. This is just a way to help
you keep track of things. You don't have to
do it like this. Now we can play that
from any point. Okay, now I can
tell that music is way too loud, so let's fix that. There are different ways to
change the volume for a clip. If you move your mouse
around the middle, let's zoom in and we
can see this better. If you move your mouse around
the middle of the clip, you'll see how it turns into some little volume
slider up and down. You can raise or lower the
volume just for that clip. If you want to change the volume for everything in that track, you can do that over here on the right side in your mixer, and each track has its
own volume control. So let me just slide over
here. This is my music track. This is another
good reason to put the labels on because
they show over here, too. Each track has its
own volume control. But before I mess with that,
I'm going to make sure that my volume is a good range
on both of these clips, and then I'll soften the music so it doesn't drown
out in my voice. I'm going to hit Shift
Z on my keyboard, and that's going to show
me my entire timeline. Everything that I've
added will be showing. If you hit Shift Z
on your keyboard, I'm going to right click on
my audio clip to bring up its menu and I'm going to
choose normalize audio levels. And there are different
options here. I'm going to scroll down and find the one that says YouTube. You can choose
whichever one you like. And when I click normalize, you see how the audio wave form got bigger. Let me
show you again. Boom, much bigger. And
now it's much louder. So. Those jagged lines are
the waveform of my voice, and they get bigger when
the audio is louder. So let's do the same thing on the music clip. I'm
going to select it. Right click to get the
menu, normalize audio. YouTube is still
selected because it's picking the last thing I
put in there and normalize, and it makes it a
little bit louder. So now these two are
at a similar volume, which is actually not what we
want for background music. You don't want it to
drown out your voice. So my music is on
track three over here in the lower right
corner on my audio mixer. I'm going to reduce
the volume of track three anywhere 10-15, maybe as much as 20 decibels. Let's start at -15. See how this number here is changing as I slide this down. So I'm going to start
at -15 and check that. I'm going to show you how
to cut with scissors. Okay, that was too soft, so let's raise it
back up a little bit. How to cut With scissors. Okay, I think that our minus about minus ten is
gonna be good there. When your voice and music are at similar volumes like we did with the normalized volume step, your music should be at the
proper background volume when it's around ten to 15
decibels less than the voice. That's just a general rule. Feel free to play around with that until it sounds
right to your ears. You don't want your
music so faint that people can't understand
what that noise is, but you also want to make sure that people can
hear your voice. And that's all there
is to adding music and fixing minor issues with volume. Music and videos is great, but I've learned the hard
way that some people can't learn well when there's
background music playing. So if you're doing
teaching videos, it's best not to include music
during your explanations. It's just better for
your students that way.
10. Photos & Graphics: Y. We've done a lot already. You are on your way,
but let me show you a couple of other things
you might want to try. Obviously, you can add audio
on video to your timeline, but you can add still
photos and graphics, too. You can even combine them with audio from a different clip. I've got this video clip
that I was going to use at the very end called Easy, and I'm going to drag
that down to my timeline and stick it at the
end of my timeline. But I really only want
the audio from this. I don't want this video portion. So I'm going to right click
and choose link clips. Now that they're unlinked,
I'm going to select the video portion and hit my
delete key on the keyboard. Oops. That was the wrong time to do delete because delete
shifts everything over. But don't worry. I'm
just going to control Z to undo that get everything
back where I started. And now I'm going to
select that clip and hit Backspace instead.
That's what I wanted. And I just wanted to make that mistake to help you kind of cement in your mind that backspace and delete
do different things. So always check to see
what happened and undo it. Control Z undo it
if you need to. It can take some
time to get used to the delete versus backspace. So always check that you
didn't lose anything you wanted each time
you remove something. It's a common beginner
mistake that makes a lot of people give up on video
editing, but don't worry. You will get the hang of this. Let's come over here
to my clips library, and I have already imported a photograph of my cutout
shape that I'm so proud of. Just drag that down
to the timeline. This is a JPEG photo. And hovering over the end
of the clip down here at the end lets me drag that
handle and make it shorter. I think I want to bring
it all the way back to here, maybe a little longer. If the handlebar doesn't show
up for you, just zoom in. Remember, that's Control
plus on your keyboard. Put my playhead
at the beginning, and when we play that back,
see how you see that? We have voice over
the still photo. But wait, I want one
more thing in here. I have another graphic, and this one is a PNG file
with a transparent background. We're going to stack
that up on top. And let's make this come in a little later towards the end, and then I'll adjust the length. If you need to change
your window size around, you can do that just
by hovering around the little bars there and
make a little more room. So now I've got the
graphic over the top. N. See how that comes
in right there. Let's play that. See
how easy that was? That looks good. And
now you know how to mix audio with still
photos or graphics. This also works if you
want to mix the audio from one video clip with the
video from a different clip. You have a lot of creative
options with this. Let me show you something fun
before we export our video.
11. Transitions: Everything we've done
has been pretty basic, but also pretty powerful. You can do a lot with the
skills I've shown you already. Part of the fun with
video editing is the transitions and
special effects. Some people say you should
use transitions sparingly, and for movies and TV shows and commercials, I would
totally agree. But for social media videos, transitions are a
fun way to spice things up and let your
style come through. Choose a few transitions
you like and stick with those in all your videos to create a style that
is unique to you. Let's add a video
transition right here between these two
clips where we had a cut. I'm going to put my
playhead right there, and let's zoom in using Control plus so we can get a better look at what's
going on there. Go back to the lower left where all the cool Da vinci features
are because remember, we've turned on the
effects up here, so they're showing down here. I'm going to click on Video
Transitions on the far left, and it gives me a whole bunch of items down here.
Yes, there's a lot. And I've even got some
added ones that I paid for. So don't pay attention to those, but these are the basic ones that come with Davinci and
there's a lot of them. You can look around
at these and you can also move your cursor to see what they're
going to look like, to slowly move your cursor around to kind of audition it and see how
it's going to look. I like this push transition, so I'm just going to drag it
over and position it where those two clips meet
right there on the video. And you see how I've got this
little glass looking thing over my two clips there. Let's see what that looks like. Scissors. Okay. You might need
to zoom in or out with your Control plus on
your keyboard shortcut. But we can see there's
now a transition there, and up in the inspection window, if we click on that transition, we even see we have
some settings for it. So I'm going to make it
a little bit shorter. Let's do maybe 0.8 seconds. And for fun, I have another
clip up here in my library. This is a whooshing sound. Double click on the
clip in the library. You got this little preview
window shows just that. And if I hit Spacebar here,
I can hear what it is. I'm just going to drag
that down to my Track two. Have it set right
there in the middle. And now we get
something like this. With scissors. That's kind of fun.
Transitions don't have to go in between clips. You can actually add them
to other things too. Remember that graphic we
added in the last lesson? Let's add some motion to
it using a transition. I'm going to use the push
transition again and position it at the beginning
of the graphic clip, and when I click on it, and you see how it's highlighted in red, I'm going to make
it a little again, a little faster,
0.8 seconds there. Let's see how that looks. How easy that was? And again, for fun, I'm gonna
put another little noise down there and position it
right around that transition. Again, Track two is my sound
effects, so let's play that. See how easy that
was? And that's all there is to
adding transitions. Davenci has lots of video and audio transitions
you can experiment with. You can find more on paid
marketplaces or even learn to create your own in the Fusion
tab of DaVinci Resolve. And as you get more comfortable, you can play with
other special effects to change your audio
and video, too. But I don't want to throw
too much at you right now. Go and practice these
skills I've shown you and create your
own video project. The last thing we need to
do is export our video.
12. Exporting Videos: You would not be the first
person who couldn't figure out how to export a video
and DaVinci Resolve. I mean, you would think
that you would just go to the file menu
and choose Export. But no, there's no such thing. You have to get over
to the Deliver page. I just recently
learned that there's actually a little Quick
Export up here at the top. And if you click on
that and you say, Okay, I want a YouTube or
I want to Tik Tok, and then you just hit Export, it will let you save
the file that way, but I do want to show
you the deliver page, and that's the little
rocket down here on the bottom, this
little rocket. So click Deliver and we bring up a completely
different screen. You can't do editing when you're on the deliver
page, by the way. See how this looks
very different. You can't do your editing
in here or anything. Come over here to
the upper left, and I'm going to scroll over and I'm going to select
YouTube ten ADP. You could also have
other options here if you wanted to do a different
resolution for YouTube. So click on that and it automatically fills in like
it tells you your resolution. It knows our frame rate
is 30 frames per second. All we have to do is tell
it where we want to save, and I'm going to save it in
this folder on my computer. So it's a file called scissors. That's my file name, and this is the folder that I
want it to go into. If you need more options
than what you see here, you could always just scroll all you can scroll all the way
over and choose custom, and then you get a
lot more options. And sometimes when you
turn certain things on, you even get more options. But if you're doing
something for social media, choosing your social media
up here works just fine. So all of these
settings are already optimized for YouTube. I would suggest checking this button down here
for normalized audio. This is something
new in DaVinci 19. So if you don't see this, you might need to
upgrade to at least 19. And I would check optimize
instead of normalize. This is just something
that I like to do. What that does is if your
volume is too loud or too soft, it'll bring it up to the
proper level for YouTube. I'm not going to get too
advanced in audio processing. That's just a little quick
and dirty thing to make it sound a little bit more
of the right volume. And then down here
at the bottom left, we say add to render Q, and it pops up over in your u on the right
upper right side. So that's the video
that it's going to export and then just
click Render All. Video rendering is actually an intense process
for your computer. You may hear your
computer fans come on, and while your video
is processing, you won't be able to
continue editing. I would even caution
you against doing other graphic intensive things
like playing a video game, while this is processing because your computer is working
really hard on this. This project was a
very short video, so it processed quickly. But when you're doing 10
minutes or 30 minute videos, this takes several
minutes or more, depending on how
powerful your computer is and a lot of other factors
I won't bore you with. You might want to kick off a render and then
leave your computer. I often kick it off and
go have lunch or dinner. But, folks, we
just made a video. If I look over
here in my folder, my finished video is right
here, and I can play it. It's exactly like we wanted. I'm going to show you how
to cut with scissors. Now you can upload that
file and share it with the world or with just a few
people. It is your video. You do what you want with it. Now you know how to export your finished video using the DaVinci Resolve
Deliver page. That little bitty rocket.
13. Wrap-Up: I realized that was a very
brief tour compared to all of the other things that DaVinci Resolve can
do. But who cares? Because we made a video
from start to finish, and we didn't even need all those other gazillion features. You only need to know a
few things to get started. And those things you
learned today were how to set up your video
project and edit clips. Importing video,
audio and graphics. We talked about several keyboard shortcuts to save you time. Now you know how to
add music and change the speed and add
text to your videos. I showed you the clap trick to fix problems with lip sync. Just remember to clap at the beginning of
your recordings. It's easy to forget that piece. You also saw how to add
photos and graphics to your timeline and
add a transition between clips to
get a little fancy. That's all I'm doing with
this slide board here. It's just a graphic with a transition to
slide into my frame, and then I put titles on top.
It's pretty cool, right? And finally, you learned
how to export your video on the delivery page so you can
share your new masterpiece. I hope this all
made sense to you, and I would love
for you to share your short video in the
class project section. You can even use the clips
in the class resources to make something similar to
the sample from the class. I'm including all the clips
we used in my project, except the intro, because I want you to film a little
bit of your own intro. Doesn't need to be fancy. Just make a few of the
edits you learned here and get comfortable with
sharing your videos. And one last thing before I go, it would be awesome
if you could leave a review for this class and
let me know what you think. Was this helpful? Was
something missing? Do you want more classes on
text stuff like this one? Let me know. Now go out
and edit some videos, and I'll see you later, folks.
 Luci Ayyat, machine embroidery, dolls, puppets